
TP180REL - Water heater HAIER - Free user manual and instructions
Find the device manual for free TP180REL HAIER in PDF.


| Product Type | Water Heater |
| Brand | Haier |
| Model | TP180REL |
| Capacity (L) | 180 |
| Energy Type | Electric |
| Power (W) | 3000 |
| Voltage (V) | 240 |
| Dimensions (H x W x D mm) | 1600 x 600 x 600 |
| Weight (kg) | 60 |
| Temperature Range (°C) | 30 - 75 |
| Tank Material | Enameled Steel |
| Insulation | Polyurethane Foam |
| Safety Features | Overheat Protection, Pressure Relief Valve, Thermostat |
| Functions | Rapid Heating, Eco Mode |
| Maintenance | Annual Descaling, Anode Rod Check |
| Spare Parts | Anode Rod, Heating Element, Thermostat |
| Installation Type | Floor-Standing |
| Water Connection Size | 1/2 inch |
| Energy Efficiency Class | A |
| Warranty | 2 Years |
Frequently Asked Questions - TP180REL HAIER
User questions about TP180REL HAIER
0 question about this device. Answer the ones you know or ask your own.
Ask a new question about this device
Download the instructions for your Water heater in PDF format for free! Find your manual TP180REL - HAIER and take your electronic device back in hand. On this page are published all the documents necessary for the use of your device. TP180REL by HAIER.
USER MANUAL TP180REL HAIER
Manual for Installation and Operation

Direct System Models Indirect System Models
TP180REL TP180JEL
TP300REL TP300JEL
TP180REF TP180JEF
TP300REF TP300JEF
TP180RNL (*) TP180JNL (*)
TP300RNL (*) TP300JNL (*)
TP180RNF (*) TP180JNF(*)
TP300RNF (*) TP300JNF(*)
(*)without electric heater
WARNING: Use copper pipe ONLY. Plastic pipe MUST NOT be used.
It is a requirement of a solar water heater installation that all pipe work be in copper and not plastic, due to the effects of high water temperatures.
Content
Safety Consideration(Read it before use) 3
Product Features 4
Installation Introduction 4
Installation Consideration 4
Installation of Solar Collector 5
Installation of Water Storage Tank 6
Connection of Pipeline 7
Filling the Heat Exchange Jacket(For Indirect System)....7
Connection of Valves and Pipe Fittings 8
Water Injection into Water Tank 8
How to Drain Water Tank 8
Circuit Connections 9
Technical Parameters 10
Packing List 10
Exploded View 11
Troubleshooting 15
Cleaning and Servicing 15
Note

natural_image
Pure electrical circuit symbol for a battery, no text or labels presentCorrect Disposal of this product
This marking indicates that this product should not be disposed with other household wastes throughout the EU. To prevent possible harm to the environment or human health from uncontrolled waste disposal, recycle it responsibly to promote the sustainable reuse of material resources. To return your used device, please use the return and collection systems or contact the retailer where the product was purchased. They can take this product for environmental safe recycling.
Safety Consideration(Read it before use)
Symbol Explanation
 Prohibit Prohibit | Indicate the behavior to be prohibited. |
 Attention Attention | Indicate the events to be considered. |
 Alert Alert | Indicate the behavior shall be implemented. |
 | If this water heater is installed with electric heater, you need to read it carefully. |

Attention
- Do not drink hot water in the water heater directly or use it for similar purpose.

Prohibit
- Do not use the broken power cable.
- It is prohibited to switch on the water heater by the wet hands, for it is dangerous to be electric shocked.
- It is prohibited to install, disassemble, repair, maintain and reform the water heater by the non-professional personnel.
• The water may drip from the discharge pipe of the temperature & pressure valve, and the discharge pipe must be left open to the atmosphere.
* Children should be supervised to ensure that they do not play with the appliance.
- This appliance is not intended for use by persons(including children) with reduced physical, sensory or mental capabilities, or lack of experience and knowledge, unless they have been given supervision or instruction concerning use of the appliance by a person responsible for their safety.

Alert
• The water heater must be connected to a switch in the fixed wiring (eg. a CircuitBreaker fixed on the wall) that can provide the appliance all-pole disconnection from the supply mains. The switch shall be rated 250V/16A at least. Don't disconnect the grounding wire at any time.
• Make sure to switch off the power supply before the maintenance and servicing of the water heater.
• If any abnormality of the water heater is detected or it is burnt, please switch off the power supply immediately, and contact the installers.
• If the supply cord is damaged, it must be replaced by the qualified persons in order to avoid a hazard.
• Make sure all connection components of the pipeline are sealed without any leakage before use of the water heater.
• Make sure to test the water temperature before use.
• The temperature and pressure valve and discharge pipe are to be operated regularly to remove lime deposits and to verify that it is not blocked.
• If the system is not used for a period in excess of 1 week it is recommended the solar collectors be covered.
Product Features
1. Integral Installation
The installation of the collectors is integrated with that of the water storage tank and they both are well incorporated with the building, which can save indoor space as far as possible.
2. Selective Coating Absorber
The high-efficient flat collector absorber uses the state-of-the-art selectiveabsorbing coating, which features high absorptivity, low reflectivity, beautiful appearance and long duration.
3. Pressure-Bearing-Type System Water Heating Center
The pressure-bearing-type water heating system is multi-purposed with multi-channel water supply, which ensures strong and comfortable water flow with the easy thermo-regulator. In addition, the water heater uses the enamel tank with good corrosion resistance and long duration.
4. User-friendly Design
The system is furnished with the alternative electric heater, which can be used with safety and convenience to meet the need for hot water in various climates of different seasons.
Installation Consideration
- The roof of the water tank and collectors shall be solid and firm enough to sustain the weight two times that of the tank filled with water. In the case of a non-load-bearing roof, protective measures shall be taken such as installing additional mounts, using screws penetrating the wall and installing rear panels. If the roof angle is above 20^ , fixation equipment shall be added to fasten the water tank, such as the steel wire rope.
- Collectors shall be installed facing the south as far as possible. Once the installation is completed and before the system is full of water, it is IMPORTANT to check the following: depending upon the positioning of the frame on the roof and any minor fall the roof may have, ensure the collector rail is either horizontal or is higher on the hot outlet side of the solar collector(s). If in doubt use a spirit level.
- In the installation of the collector(s), The solar hot and solar cold pipes grade downwards with a continuous fall of not less than 10^ from the storage tank to the solar collector(s). If in doubt use a spirit level, and counter-slope is prohibited.
- The power cable terminals shall be embedded in the indoor wall. The company shall not be held liable for any accident caused by any cable terminal installed outdoors. The installation technician shall explain to the user to that effect before installation.
- The pressure of inflow water may be above 0.85MPa so that a pressure limiting valve shall be installed on the way of tap water to the heater.
- The desired system freeze protection. The system is not suitable for in stallation in areas subject to frost or freeze conditions. Freeze conditions occur below 6°C. The system has NO WARRANTY for freeze damage.
Installation Introduction
Installation of Solar Collector
The product uses high-efficient flat collectors fixed on the aluminum frame.
- Select a suitable position for the solar collectors.
- Determine the location of the collector rail, and hook the collector straps to the collector rail.
-
Remove the tiles from the place reserved for the collector on the roof, then fix the collector strap to the rafters, using self-drilling screws or stainless steel nails (or with embedded expansion bolts).
-
Position the solar collectors in the correct configuration with the lower ends seated in the collector rail.
-
For multiple solar collector installations, couple the solar collectors together using the collector unions.
-
Ensure the solar collectors are well seated in the collector rail.
Note:
Ensure the glass on your solar collectors is free of dust, salt spray or any other matter, which may reduce the effectiveness of the solar collectors. If the collector glass becomes dirty, hose down or if the solar collectors are accessible, wash the collector glass with water and a soft brush when the solar collectors are cool.
If your system is for flat roof, please refer to the Exploded View of System for flatroof on page 11 to 14.


Installation Introduction
Installation of Water Storage Tank
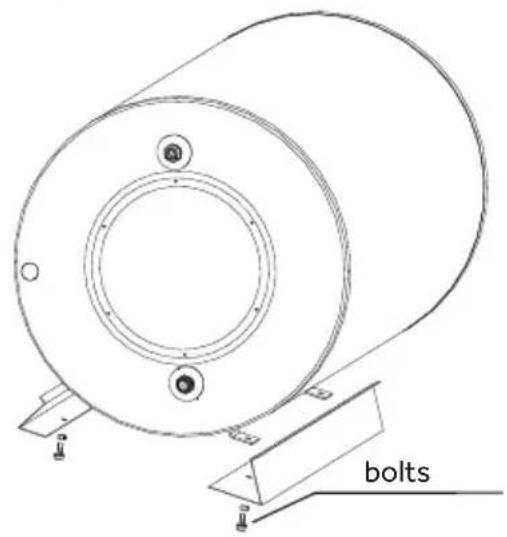
- Take the water storage tank out of the packing case, unfasten the nuts and washers fixed on the bolts on the both ends of the base of the tank.
- Determine the location of the water storage tank.
- The installers shall follow the instructions in the following assembly sketch map to fit the tank frame and the tank strap together.
- Remove the tiles from the place reserved for the water storage tank on the roof, then fix the tank strap to the rafters, using self-drilling screws or stainless steel nails (or with embedded expansion bolts).
- Position the water storage tank in the correct configuration and well seated in the tank frame.
Note:
To avoid any scratch, the plastic film covering the tank shall be removed only upon completion of the installation, and sharp tools such as a wallpaper cutter are prohibited from being used to remove the film.
If your system is for flat roof, please refer to the Exploded View of System for flat roof on page 11 to 14.
natural_image
Technical line drawing of a cylindrical mechanical component with mounting base and bolts, no text or symbols present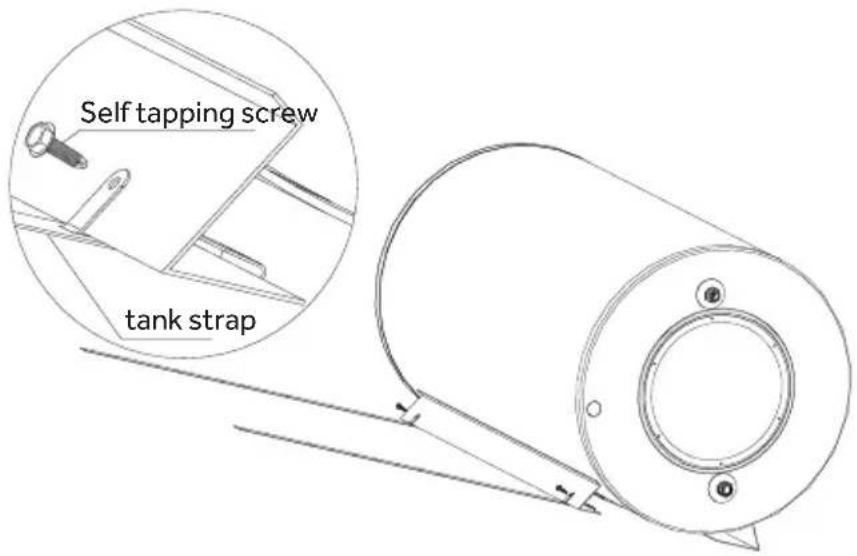
A: The roof angle less than 20^
B: The roof angle above 20^

Installation Introduction
Connection of Pipeline
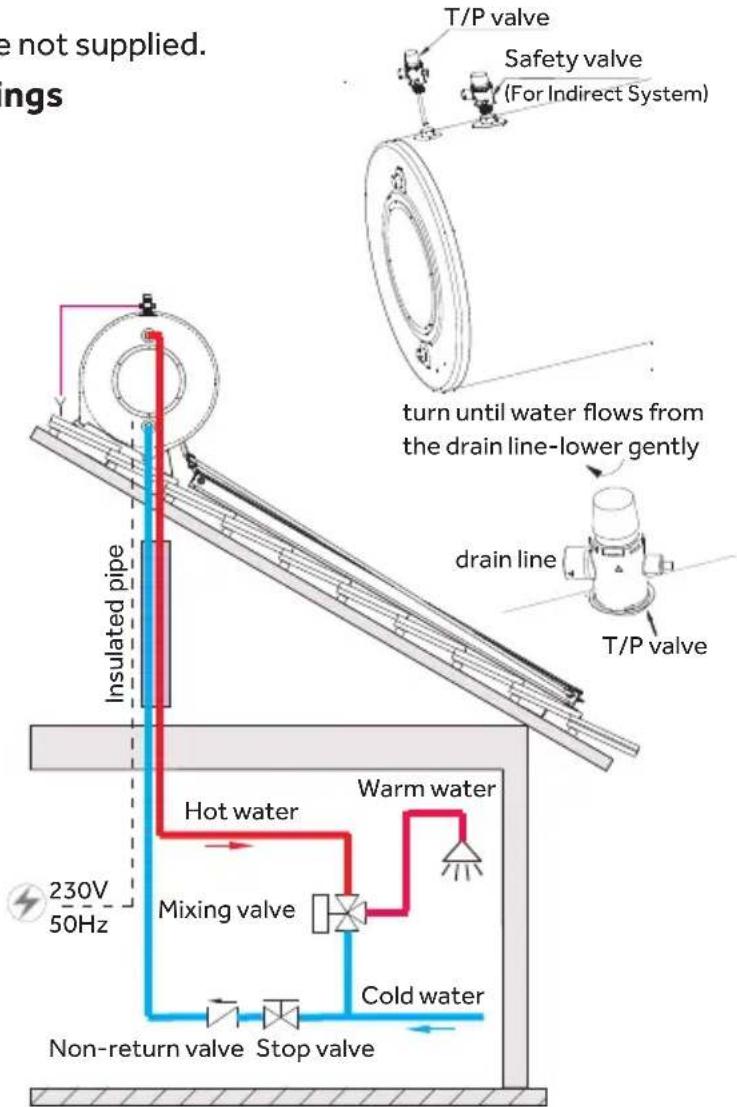
Please refer to the following system sketch map.
- Measure the distances from the collector circulation water inlet to the tank circulation water outlet, and from the collector circulation water outlet to the tank circulation water inlet.
- Prepare corresponding pipe fittings according to the measured dimension, and equipped with the thermal insulating layer.
- Connect the collector circulation water inlet and the tank circulation water outlet, as well as the collector circulation water outlet and the tank circulation water inlet by the prepared pipe fittings.
Note:
- Counter slope shall be avoided in the connection of the pipeline.
- The connection of the pipe fittings shall be correct and tight.
- The circulation pipe shall be installed in a nice and neat way.
- If insulation is required, the full length of the solar hot and solar cold pipes MUST BE insulated. The insulation must be weatherproof and UV resistant.


Filling the Heat Exchange Jacket(For Indirect System)
- Remove the 0.3MPa safety valve from the water tank. This is the fill level for the heat transfer fluid and will allow air to escape during filling.
- With the aid of a funnel and hose connected to the open service valve, pour water into the funnel until water flows from the vent of the 0.3MPa safety valve.
- Close the service valve tap and assembly the 0.3MPa safety valve.
- Check for leaks at all connections.
- If no leaks are evident, open the service valve tap, remove the 0.3MPa safety valve and add in the supplied heat transfer fluid through the funnel. Water will be displaced as the heat transfer fluid is added. Add a further 500ml of water to flush the heat transfer fluid through the hose and into the collector.
- Close the service valve tap, refit the 0.3MPa safety valve and ensure no leaks are present, then move the hose.
- The heat transfer fluid lever is to be checked every three(3) years by a competent technician.
Installation Introduction
Note:
- The heat transfer fluid is a food grade propylene glycol and is not toxic. However, care must be taken when handling not to spill or accidentally consume.
- It is normal that some heat transfer fluid may flow out from the safety valve as the heat transfer fluid is expanded due to the high solar energy collected.
- The safety valve should be left open to the atmosphere and its outlet should not be blocked. The solar storage tank be filled with water before charging the heat transfer fluid with the closed circuit fluid.
- The service valve, hose and the funnel are not supplied.
■ Connection of Valves and Pipe Fittings
Please refer to the following sketch map to connect the valves and pipe fittings.
- Install the temperature and pressure valve(T/P valve) to the T/P valve joint of the water tank.
Note:
A T/P valve shall be installed to the tank. It is normal that some water drops may flow out from the pressure relief hole as the water is expanded with heat while the water temperature in the heater gets higher.
Continuous leakage of water from the valve and its drain line may indicate a problem with the water heater. Failure to operate the T/P valve easing gear at least once every six months may result in the water heater exploding. The T/P valve should be replaced at intervals not exceeding 5 years, or more frequently in areas where there is a high incidence of water deposits.
- Install the cold water line, non-return valve and the stop valve to the cold water inlet of the tank.
flowchart
graph TD
    A["Insulated pipe"] --> B["Hot water"]
    B --> C["Mixing valve"]
    C --> D["Cold water"]
    D --> E["Non-return valve"]
    E --> F["Stop valve"]
    G["T/P valve"] --> H["Safety valve (For Indirect System)"]
    I["T/P valve"] --> J["drain line"]
    K["230V 50Hz"] --> B
    L["turn until water flows from the drain line-lower gently"] --> M["drain line"]
    style A fill:#f9f,stroke:#333
    style G fill:#ccf,stroke:#333
    style I fill:#cfc,stroke:#333
    style K fill:#fcc,stroke:#333
    style L fill:#cff,stroke:#333
Note: A non-return valve(not supplied) MUST BE installed on the cold water line to the water tank.
Water Injection into Water Tank
- Open the cold water inlet valve, and inject water into the water tank through the tap water outlet.
- When the air totally exhausts and the water flow is continuous, close the mixing valve and watch carefully to find out whether the tank is leaking water.
- Make sure that the cold water inlet is always open while using the water heater.
How to Drain Water Tank
- Cut off the power and cold water supply.
- Disconnect the T/P valve, let water flow out until empty.
Installation Introduction
Circuit Connections

Circuit Connections of water storage tank
Open the adapting plate on the left end of the tank, follow the instructions of the wiring terminals in the diagram below to correctly wire the cables.
- Determine the length of the electrical cable according to the distance between the electrical source and the water tank, and this is the power supply of the electrical heater of the water tank. A 3x1.5mm cable is needed which is offered by the installers. The cable shall be polychloroprene sheathed wire (eg: H07RN-F, H05RN-F).
- Connect respectively L line(red) and N line(blue) of the power cable to the L line and N line of the terminal block, and the earth wire (yellow and green) shall connect to the earth tag on the heating element.
- Make sure to use lug plate to fix the power supply wire. The wiring of PE and L/N lines please refer to below. The length of PE wire shall be longer than L/N wire, so that the L/N conductors become taut before the earthing conductor if the cord slips out of the cord anchorage.
For more information, please refer to the wiring diagram.

- Thermostat mount
- Thermostat
3.L line of electrical heater(red)
4.N line of electrical heater(blue)
5Heating Element
6.L line of power cable(red)
7.N line of power cable(blue) - Earthing line of power cable (yellow and green)
9.Fixing board
10.L line of thermostat(red)
11.N line of thermostat(blue) - Terminal block

Electrical Wiring Diagram
Electric Auxiliary Heating Solar Water Heater
L-Live wire(red)
N-Neutral wire(blue)
E-Earth wire(yellow and green)
TB-Terminal block
TS- Thermostat
HE- Heating Element

Technical Parameters • Packing List
Technical Parameters
| System Model | TP180REL/REF | TP180RNL/RNF | TP300REL/REF | TP300RNL/RNF |
| TP180JEL/JEF | TP180JNL/JNF | TP300JEL/JEF | TP300JNL/JNF | |
| Volume of water tank | 180L | 180L | 300L | 300L |
| Waterproof level of tank | IPX4 | IPX4 | IPX4 | IPX4 |
| Rated internal pressure | 0.85MPa | 0.85MPa | 0.85MPa | 0.85MPa |
| Dimension of water tank | 600 x 1156(mm) | 600 x 1776(mm) | ||
| Gross area of collectors | 2.0m2 | 2.0m2 | 4.0m2 | 4.0m2 |
| Max.Water Supply Pressure | 0.75MPa | 0.75MPa | 0.75MPa | 0.75MPa |
| Electric heater power | 1600W | / | 1600W | / |
| Rated voltage | 220-240V~220-240V~ | / | ||
| Frequency | 50Hz | / | 50Hz | / |
| Rated Temperature | 60°C | / | 60°C | / |
Packing List
| Packing method | Names of parts | Quantities | |||
| TP180REL TP300REL TP180RNL TP300RNL | TP180REF TP300REF TP180RNF TP300RNF | TP180JEL TP300JEL TP180JNL TP300JNL | TP180JEF TP300JEF TP180JNF TP300JNF | ||
| Packing box of water tank | Water tank 1 | 1 | 1 | 1 | |
| T/P valve | 1 | 1 | 1 | 1 | |
| Safety valve | 0 | 0 | 1 | 1 | |
| G3/4-3/4 hex nipple | 2 | 2 | 2 | 2 | |
| Collector connector | 3 | 2 | 3 | 3 | |
| Collector end plug | 2 | 2 | 1 | 1 | |
| Collector union(*) | 2 | 2 | 2 | 2 | |
| Manual | 1 | 1 | 1 | 1 | |
| Fiber gasket | 8 | 8 | 8 | 8 | |
| Screw(**) | 6 | 6 | 6 | 6 | |
| Packing box of water tank frame | Water tank frame | 1set | 0 | 1set | 0 |
| Packing box of Collector frame | Collector frame | 1set | 1set | 1set | 1set |
| Packing box of Solar pipes | Solar pipes | 1set | 1set | 1set | 1set |
| Packing box of solar collector | Solar collector | 1 1 | 1 1 | ||
| Packing box of cover | Plastic end cover(**) | 2 | 2 | 2 | 2 |
Note:(*) Only for the system of two solar collectors. (**) Optional
Exploded View
Exploded View of One Collector

Exploded View

Exploded View
Exploded View of One Collector
TP180JEL
TP180JNL

natural_image
Diagram of a pipe fitting with a bolt and nut, enclosed in a circle (no text or symbols)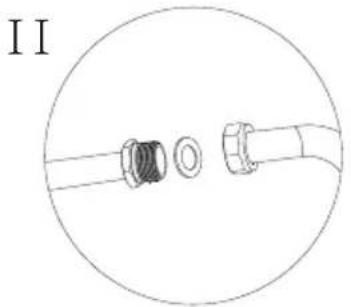
natural_image
Simple line drawing of a mechanical component with two parts, no text or symbols presentTP180JEF TP180JNF
How to fix the water tank


Exploded View

Troubleshooting · Cleaning and Servicing
- Water tank
2.G3/4-3/4 hex nipple
3.G3/4 fiber gasket - Solar hot pipe
- Collector connector
6.Solar collector - Collector end plug
- Solar cold pipe
- Temperature and pressure valve
10.Screw(optional) - Plastic end cover (optional)
- Safety valve
- Collector union(*** )
- Water tank strap(*)
- Collector clamp(*)
- Collector beam(*)
- Collector strap(*)
- Collector Frame(**)
(*):For inclined roof
(**):For flat roof
(**): For two collectors
Troubleshooting
It is prohibited to disassemble, repair, maintain and reform the water heater by the non-professional personnel. The improper method may cause serious injury or property damage. If any failure takes place, contact the installers.
| Problem | Possible causes | Solutions |
| No water | Whether the water use points is blocked or the water valve is opened? | Clean the block material and open the water valve |
| Cold water | Whether the water temperature is controlled properly? | Adjust it again |
| The temperature of the water tank do not rise | The sunlight is not enough | Use the electric heating method |
| The electrical heater is not "on" | ||
| The electrical heater is damaged | Contact the installers | |
| The heat transfer fluid is not enough | ||
| The electrical connection is damaged | ||
| A great deal of water flows out from the T/P valve | The pressure of the water tank is too high(higher than 0.85MPa) | Contact the installers |
Cleaning and Servicing
Switch off the power supply before cleaning the water tank. Wipe it by the wet cloth with some neutral detergent, and then wipe to dry it by the dry cloth, to maintain the drying of the water tank case.
To maintain the continuous high-efficient operation of the water heater, it is necessary to clean the electric heater and the liner every three years. Note that the protective layer shall not be damaged.
It is necessary to replace the magnesium anodes in the water tank according to the difference of local water quality.
If the water heater is not used for a long time, it is necessary to drain the water tank and cover the solar collector with a weatherproof opaque cover. Please refer to page 8 "How to Drain Water Tank".
Haier
0040503857
20150508
- Manual for Installation and Operation
- Content
- Safety Consideration(Read it before use) 3
- Product Features 4
- Installation Introduction 4
- Technical Parameters 10
- Packing List 10
- Exploded View 11
- Troubleshooting 15
- Cleaning and Servicing 15
- Note
- Correct Disposal of this product
- Safety Consideration(Read it before use)
- Attention
- Prohibit
- Alert
- Product Features
- Integral Installation
- Selective Coating Absorber
- Pressure-Bearing-Type System Water Heating Center
- User-friendly Design
- Installation Consideration
- Installation Introduction
- Installation of Solar Collector
- Note:
- Installation of Water Storage Tank
- Connection of Pipeline
- Filling the Heat Exchange Jacket(For Indirect System)
- ■ Connection of Valves and Pipe Fittings
- Water Injection into Water Tank
- How to Drain Water Tank
- Circuit Connections
- Circuit Connections of water storage tank
- Electrical Wiring Diagram
- Electric Auxiliary Heating Solar Water Heater
- Technical Parameters • Packing List
- Exploded View
- Troubleshooting · Cleaning and Servicing
- Troubleshooting
- Cleaning and Servicing
- Haier
Brand : HAIER
Model : TP180REL
Category : Water heater