
DM802 - Tumble dryer VOX - Free user manual and instructions
Find the device manual for free DM802 VOX in PDF.


| Product Type | Condenser Tumble Dryer |
| Brand | VOX |
| Model | DM802 |
| Capacity (max) | 8 kg |
| Dimensions (HxWxD) | 845-855 mm x 596 mm x 609 mm |
| Net Weight (plastic door) | 36.5 kg |
| Net Weight (glass door) | 38.8 kg |
| Power Supply | 220-240 V, 50 Hz |
| Power Consumption | 2700 W |
| Energy Efficiency Class | B |
| Annual Energy Consumption | 561 kWh |
| Programmes | Cotton Extra Dry, Cotton Cupboard Dry, Cotton Iron Dry, Synthetics Cupboard Dry, Synthetics Iron Dry, Delicate, Mix, Baby Care, Jeans, Time (10/30/60 min), Express 29', Shirts 12', Refresh |
| Drying Technology | Condenser with auto humidity control |
| Lint Filter | Removable, clean after each use |
| Water Tank | Removable, empty after each use (optional direct drain) |
| Condenser | Clean every 30 cycles or monthly |
| Humidity Sensor | Self-cleaning recommended 4 times a year |
| Additional Features | Child lock, delay start (3/6/9h), anti-crease, delicate drying, drying level adjustment, buzzer cancel |
| Installation Options | Freestanding or on washing machine (stacking kit required) |
| Noise Level | 65 dB(A) (standard cotton programme) |
| Safety Certifications | CE, WEEE compliant |
| Warranty | Standard manufacturer warranty (details in manual) |
Frequently Asked Questions - DM802 VOX
User questions about DM802 VOX
0 question about this device. Answer the ones you know or ask your own.
Ask a new question about this device
Download the instructions for your Tumble dryer in PDF format for free! Find your manual DM802 - VOX and take your electronic device back in hand. On this page are published all the documents necessary for the use of your device. DM802 by VOX.
USER MANUAL DM802 VOX
DM 802
OPERATING INSTRUCTIONS TUMBLE DRYER UPUTSTVO ZA UPOTREBU MAŠINA ZA SUŠENJE VEŠA УПАТСТВА ЗА РАКУВАЊЕ МАШИНА ЗА СУШЕЊЕ NAVODILA ZA UPORABO SUŠILNI STROJ UPUTE ZA UPORABU SUŠILICA MANUAL DO USUÁRIO MÁQUINA DE SECAR A ROUPA

natural_image
Abstract circular graphic with diagonal white stripes on gray background (no text or symbols)VOX
ELECTRONICS
GBRTumble Dryer
natural_image
Line drawing of a washing machine with front panel and buttons (no text or symbols)DM802
Thank you for choosing this product.
This User Manual contains important safety information and instructions on the operation and maintenance of your appliance. Please take the time to read this User Manual before using your appliance and keep this book for future reference.
| Icon Description | |
 | Read the instructions. |
 | Hot surface |
| Icon Caption Description | ||
 | WARNING Risk of serious injury or death | |
 | RISK OF ELECTRIC SHOCK Dangerous voltage | |
 | FIRE Risk of fire | |
 | ATTENTION Risk of injury or material damage | |
 | IMPORTANT/NOTE Information on correct operation of the system | |
CONTENTS
1. SAFETY INSTRUCTIONS .... 3
1.1. Electrical Safety....3
1.2. Children's Safety 4
1.3. Product Safety 5
1.4. Correct Use 6
1.5. Installing On Top Of a Washing Machine.... 7
2. INSTALLATION....9
2.1. Removing the Safety Assembly....9
2.2. Connection to Water Outlet (with optional drain hose) 9
2.2.1. Connecting the Water Discharge Hose 9
2.3. Adjusting the Feet.... 10
2.4. Electrical Connection....10
2.5. Under Counter Installation....10
3. OVERVIEW 10
4. PREPARING THE LAUNDRY....11
4.1. Sorting the Laundry to be Dried.... 11
4.2. Preparing the Laundry to be Dried 12
4.3. Load Capacity 12
5. USING THE TUMBLE DRYER .... 13
5.1. Control Panel....13
5.1.1. Programme Selection Knob.... 13
5.1.2. Electronic Indicator and Additional Functions.... 13
5.2. Programme Selection and Consumption Table 14
5.2.1. Auxiliary Functions.... 15
5.2.2. Starting the Programme .... 16
5.2.3. Programme Progress Indicator.... 17
6. CLEANING AND CARE....19
6.1. Cleaning the Lint Filter.... 19
6.2. Emptying the Water Tank.... 19
6.3. Cleaning the Condenser....20
6.4. Cleaning the Humidity Sensor 20
6.5. Cleaning the Inner Surface of the Loading Door 21
7. TECHNICAL SPECIFICATIONS....22
8. TROUBLESHOOTING....23
9. ENVIRONMENTAL PROTECTION AND PACKAGING INFORMATION ..... 25
9.1. Packaging Information....25
10. DESCRIBING THE ENERGY LABEL AND SAVING ENERGY .... 25
10.1. Energy Labelling....25
10.2. Energy Efficiency....26
PRIMARY CONSIDERATIONS
- This appliance can be used by children aged from 8 years and above and persons with reduced physical, sensory or mental capabilities or lack of experience and knowledge if they have been given supervision or instruction concerning use of the appliance in a safe way and understand the hazards involved. Children must not play with the appliance. Cleaning and user maintenance must not be made by children without supervision.
- This tumble dryer is intended only for household and indoor use. The warranty will be void in case of commercial use.
- Use this product only for laundry with a label that indicates it is suitable for drying.
• We will not accept responsibility for damages resulting from incorrect use or transport. - Do not allow floor coverings to obstruct the ventilation openings.
• Installation and repair of the machine should only be made by an authorised repair agent. The manufacturer cannot be held responsible for damages resulting from un-authorised repairs.
⚠ WARNING: Never spray or pour water onto the dryer to wash it! There is risk of electric shock!
- Leave at least 3 cm of space between the side and rear walls of the product and above if you plan on placing your appliance under a worktop.
-
Assembly / disassembly for under-counter installation if neccessary must be done by an authorised service agent.
-
Before installation, check the product for visible damage. Never install or operate a damaged product.
- Keep pets away from the dryer.
- Fabric softeners, or similar products, should be used in accordance with the manufacturers instructions.
- Remove all objects from pockets such as lighters and matches.
- The appliance must not be installed behind a lockable door, a sliding door or a door with a hinge on the opposite side to that of the tumble dryer, if it prevents the door from being fully opened.
1. SAFETY INSTRUCTIONS
This section contains safety instructions that will help protect you from risk of personal injury or property damage. Failure to follow these instructions will void any warranty.
1.1. Electrical Safety
- The appliance must not be supplied through an external switching device, such as a timer, or connected to a circuit that is regularly switched on and off by a utility.
- Do not touch the power plug with wet hands. Always pull the plug to unplug the product, otherwise, there will be risk of an electric shock.
- Connect the dryer to a grounded socket with fuse protection. Have the earth connection installed by a qualified electrician. Our company cannot be held responsible for damages/losses resulting from using the dryer without an earth connection as required by local regulations.
- The voltage and the allowable fuse protection are indicated on the type plate.(For the type plate, please see 3. Overview)
- Voltage and frequency values indicated on the type plate must be equal to the mains voltage and frequency value in your house.
- Unplug the dryer when it is not used for an extended period, and before installation, maintenance, cleaning and repair, otherwise, the dryer may get damaged.
- The plug socket must be freely accessible at all times after installation.
⚠️ A damaged power cord/plug can cause fire or give you an electric shock. When damaged it must be replaced, this should only be done by qualified personnel.
⚠️ To avoid the risk or fire or electric shock, do not use extension cords, multi sockets or adapters to connect the dryer to mains power.
1.2. Children's Safety
- This appliance is not intended for use by persons (including children) with reduced physical, sensory or mental capabilities, or lack of experience and knowledge, unless they have been given supervision or instruction concerning use of the appliance by a person responsible for their safety. - This appliance can be used by children aged from 8 years and above and persons with reduced physical, sensory or mental capabilities or lack of experience and knowledge if they have been given supervision or instruction concerning use of the appliance in a safe way and understand the hazards involved. Children must not play with the appliance. Cleaning and user maintenance must not be made by children without supervision.
- Do not leave children unattended near the machine.
- Children might lock themselves in the machine resulting in risk of death.
- Do not allow children to touch the glass door during operation. The surface becomes extremely hot and may cause skin damage.
- Keep packaging material away from children.
-
Poisoning and irritation may occur if detergent and cleaning materials are consumed or come into contact with the skin and eyes.
-
Keep cleaning materials out of the reach of children Electrical products are dangerous for children.
- Keep children away from the product while it is running.
- To prevent children from interrupting the dryer cycle, you can use the child lock to avoid any changes in the running programme.
- Do not allow children to sit/climb on or climb inside the product.
1.3. Product Safety
Due to risk of fire, the following laundry items and products should NEVER be dried in the dryer:
- Do not dry unwashed items in the tumble dryer.
- Items that have been soiled with substances such as cooking oil, acetone, alcohol, petrol, kerosene, spot removers, turpentine, waxes and wax removers should be washed in hot water with an extra amount of detergent before being dried in the tumble dryer.
- Cleaning cloths and mats that have residues of flammable cleaning agents or acetone, gas, patrol, stain remover, turpentine, candle, wax, wax remover or chemicals.
- Laundry that has residues of hair sprays, nail polish remover and similar substances.
- Laundry on which industrial chemicals have been used for cleaning (such as chemical cleaning).
- Laundry that has any kind of foam, sponge, rubber or rubber-like parts or accessories. These include latex foam sponge, shower caps, waterproof fabrics, fitted clothes and foam pillows.
- Items with filling and damaged items (pillows or jackets). Foam protruding from these items might catch fire during the drying process.
- Operating the dryer in environments that contain flour or coal dust may cause explosion.
⚠️ ATTENTION: Underwear that contains metal reinforcements should not be put in the dryer. The dryer may be damaged if metal reinforcements come loose and break off during drying.
1.4. Correct Use
⚠️ ATTENTION: Never stop a tumble dryer before the end of the drying cycle unless all items are quickly removed and spread out so that the heat is dissipated.
⚠️ ATTENTION: Make sure that pets do not enter the dryer. Check the inside of the dryer before using it.
⚠️ ATTENTION: Superheating of clothes inside of the dryer can occur if you cancel the programme or in the event of a power failure whilst the dryer is running. This concentration of heat can cause self-combustion so always activate the Refresh programme to cool down or quickly remove all laundry from the dryer in order to hang them up and dissipate the heat.
- Use the dryer only for household drying and to dry fabrics with a label that indicates they are suitable for drying. All other uses are out of the scope of intended use and are prohibited.
- The warranty will be void in case of any commercial use.
-
This appliance is designed to be used inside domestic residences only, and should be placed on a straight and stable surface.
-
Do not lean against or sit on the door of the dryer. The dryer may tip over.
- To maintain a temperature that will not harm the laundry (e.g. to prevent the laundry from catching fire), a cooling process starts after the heating process. After this, the programme ends. At the end of the programme, always remove the laundry promptly.
⚠️ ATTENTION: Never use the dryer without a lint filter or with a damaged lint filter.
- Lint filters must be cleaned after each use as indicated in 6.1. Cleaning the Lint Filter.
- Lint filters must be dried after wet cleaning. Wet filters might cause malfunction during the drying process.
- Lint accumulation must not to be allowed around the tumble dryer (not applicable for appliances intended to be vented to the exterior of the building)
IMPORTANT: The clearance between the dryer and the floor should not be reduced with objects such as carpets, wood or panel, otherwise, sufficient air intake cannot be ensured for the machine.
- The maximum load capacity is 8 kilograms (dry laundry).
- Do not install the dryer in rooms where there is risk of freezing. Freezing temperatures negatively affect the dryers performance. Condensation that freezes in the pump and hose may cause damage.
1.5. Installing On Top Of a Washing Machine
⚠️ ATTENTION: A washing machine cannot be placed on the dryer. Pay attention to the warnings below when installing the dryer on a washing machine.
⚠️ ATTENTION: The dryer can only be placed on washing machines that have same capacity and above.
- To use the dryer on the washing machine, a fixing part must be used between the two products. The fixing part must be attached by an Authorised Service Provider.
- When the dryer is placed on the washing machine, the total weight of these products may reach almost 150 kilograms (when loaded). Place the products on a solid floor that has a load bearing capacity!
| Appropriate Installation Table for Washing Machine and Tumble Dryer | ||||||
| Tumble Dryer (Depth) | Washing Machine | |||||
| 37 cm 42 cm | 53 cm 56 cm | 59 cm 85 cm | ||||
| 56 cm X X | √ | √ | √ | √ | ||
| 61 cm X X X | √ | √ | √ | |||
(For the depth information, please see 7. Technical Specifications)
In order to put the washing machine onto the dryer machine, a special stacking kit is required as an optional extra. Please contact customer service to acquire. The assembly instruction will be served together with the stacking kit
CE Declaration of conformity
We declare that our products meet the applicable European Directives, Decisions and Regulations and the requirements listed in the standards referenced.
Disposing the Old Product
natural_image
Simple line drawing of a trash bin with diagonal lines crossing it, no text or symbols present.This product complies with EU WEEE Directive (2013/19/EU). This product bears a classification symbol for waste electrical and electronic equipment (WEEE).
This symbol, which is found on the product or information label, indicates that this product must not be disposed together with other household waste at the end of its service life. To prevent the potential harms of uncontrolled waste disposal on the environment and human health, please keep this product separate from other types of waste, and to prevent sustainable reuse of material resources, make sure that it is recycled responsibly.
Contact your dealer or local authorities to get information on how and where you can take the product for environmentally-safe recycling. This product cannot be mixed with other commercial wastes for recycling.
2. INSTALLATION
- Before contacting the local Authorised Service Provider for the installation of the dryer, check the information in the user manual to make sure that the electrical installation and water outlet is suitable. If they are not, call a qualified electrician and a plumber to have the necessary adjustments made.
- It is the customer's responsibility to prepare the dryer's installation place, as well as the electricity and waste water installation. Before installation, check the dryer for damage. If damaged, do not have it installed. Damaged products may endanger your health.
• Install the dryer on a stable and flat surface. - Run the dryer in a dust-free environment where the air ventilation is good.
- The clearance between the dryer and the floor should not be reduced with objects such as carpets, wood or tape.
- Do not block the ventilation grills found on the plinth of the tumble dryer.
- The appliance must not be installed behind a lockable door, a sliding door or a door with a hinge on the opposite side of the tumble dryer, in such a way that blocks the full opening of the tumble dryer door.
- Once the dryer has been installed, the connections must remain stable. When installing the dryer, make sure that the rear surface is not leaning on anything (e.g. tap, socket).
- The operating temperature of the dryer is +5°C to +35°C. If operated out of this temperature range, the performance of the dryer will be affected negatively and the product will be damaged.
- Be careful when carrying the product since it is heavy. Always wear safety gloves.
• Always install the product should be placed against a wall. - The rear surface of the product should be placed against the wall.
- When the product is placed on a stable surface, use a water level to check if it is fully stable. If not, adjust the feet until it becomes steady. Repeat this process every time you relocate the product.
- Do not place the dryer onto the power cable.
2.1. Removing the Safety Assembly
- Open the loading door.
- Hold the nylon that contains the Styrofoam part and is found in the drum.
- Pull the nylon towards you and remove the transport safety assembly.
- Make sure that there is no part of the transport safety assembly left in the drum.
2.2. Connection to Water Outlet (with optional drain hose)
In products with a condenser unit, water accumulates in the water tank during the drying process. You must empty the accumulated water after each drying process. Instead of periodically emptying the water tank, you can also use the water drain hose provided with the product to directly drain the water outside.
2.2.1. Connecting the Water Discharge Hose
- Pull and take out the end of the hose at the back of the dryer. Do not use any tools to take out the hose.
- Fit one end of the water discharge hose, which is provided with the product, to the slot from which you have removed the hose.
- Fix the other end of the water discharge hose directly to the water outlet or sink.
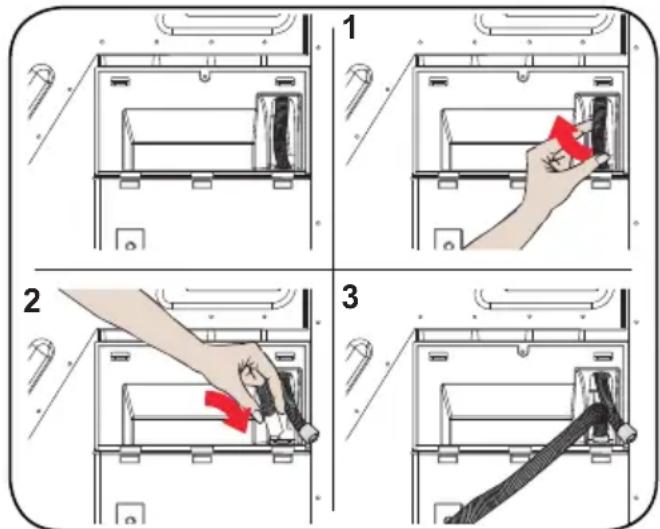
ATTENTION: The hose must be connected in a manner that it cannot be displaced. If the hose comes out during water discharge, there might be flooding in your house.
IMPORTANT: The water discharge house must be installed at a height of 80 cm maximum.
IMPORTANT: The water discharge hose must not be bent between the outlet and the product, folded or stepped over.
2.3. Adjusting the Feet
- For the dryer to work with less noise and vibration, it must be stable and balanced on its feet. Adjust the feed to ensure that the product is balanced.
- Rotate the feet to the right and to the left until the dryer is even and stable.
IMPORTANT: Never remove the adjustable feet.
2.4. Electrical Connection
ATTENTION: There is risk of fire and electric shock.
- Your dryer is set to 220-240 V and 50 Hz.
- The mains cable of the dryer is equipped with a special plug. This plug must be connected to an earthed socket protected by a fuse of 16 Amperes as indicated on the type plate. The fuse current rating of the power line where the outlet is connected must also be 16 amperes. Consult a qualified electrician if you do not have such an outlet or fuse.
• Our company cannot be held responsible for damages resulting from usage without earthing.
IMPORTANT: Operating your machine at low voltage values will shorten the service life and decrease the performance of your machine.
2.5. Under Counter Installation
- Leave at least 3 cm of space between the side and rear walls of the product and the underside of the worktop when installing your product under a counter.
- Assembly / disassembly under the counter if necessary must be done by authorized service.
3. OVERVIEW
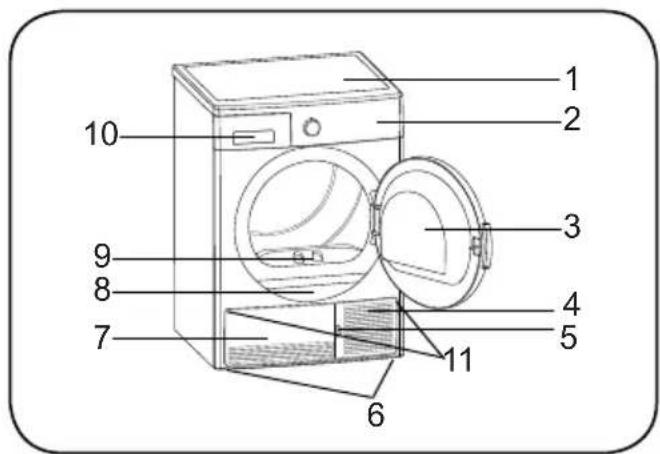
- Upper tray
- Control panel
- Loading door
- Plinth opening slot
- Plinth
- Adjustable feet
- Plinth cover
- Type plate
- Lint filter
- Drawer Cover
- Ventilation grills
4. PREPARING THE LAUNDRY
4.1. Sorting the Laundry to be Dried
Follow the instructions on the labels of the laundry to be dried. Only dry items that have a statement/symbol that indicates "they can be dried in a dryer".
- Do not operate the product with load amounts and laundry types other than those given in 4.3. Load Capacity.
 Suitable for drying in a dryer Suitable for drying in a dryer |  Does not need ironing Does not need ironing |  Sensitive/Delicate drying Sensitive/Delicate drying |  Not suitable for drying in a dryer Not suitable for drying in a dryer |
| KKD4]No drying |  Do not dry-clean Do not dry-clean |  At any temperature At any temperature |  At high temperatures At high temperatures |
 At medium temperatures At low temperatures Heatless At medium temperatures At low temperatures Heatless |  |  Hang to dry Hang to dry |  |
 Spread to dry Hang wet to dry Spread in shadow to dry Suitable for dry cleaning Spread to dry Hang wet to dry Spread in shadow to dry Suitable for dry cleaning |  |  |
Do not dry thin, multi-layer or thick-layer fabrics together as they dry at different levels. For this reason, dry clothes together that have the same structure and fabric type. This way, you can get an even drying result. If you think that the laundry is still wet, you can select a time programme for additional drying.
Please dry your big (like duvets) and small sizes of laundries separately in order to not to have a damp laundries.
IMPORTANT: Delicate fabrics, embroided fabrics, woolen/silk fabrics, clothes made of delicate and expensive fabrics, airtight clothes and tulle curtains are not suitable for drying in the dryer.
4.2. Preparing the Laundry to be Dried

Risk of explosion and fire!
Remove all objects from pockets such as lighters and matches.

ATTENTION: The drum of the dryer and fabrics may get damaged.
- The clothes may have become entangled during the washing process. Separate them from each other before placing them in the dryer.
- Remove all objects in the pockets of the clothes and apply the following:
- Tie fabric belts, apron laces etc. to each other or use a laundry bag.
- Lock the zips, clasps and fasteners, do up the buttons of covers.
• To get the best drying result, sort the laundry according to the textile type and drying programme. - Remove clips and similar metal parts from the clothes.
- Woven goods such as t-shirts and knit clothes generally shrink in the first drying. Use a protective programme.
- Do not over-dry synthetics. This will cause creases.
- When washing the laundry to be dried, adjust the amount of softener according to the data from the manufacturer of the washing machine.
4.3. Load Capacity
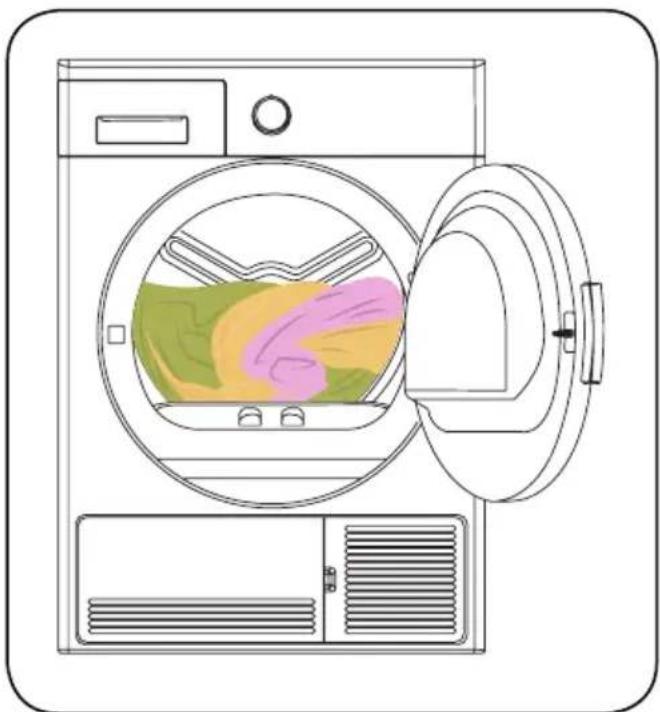
Follow the instructions in the "Programme selection and consumption table". (See: 5.2 Programme selection and consumption table). Do not load the product with more laundry than the capacity values specified in the table.
natural_image
Line drawing of a washing machine with an open door and internal air filter (no text or symbols)
IMPORTANT: It is not recommended to load the dryer with more laundry than the amount shown in the figure. When overloaded, the drying performance of the dryer will decrease and the dryer and laundry might be damaged.
| Laundry Dry load weight (gr) | |
| Bedsheet (double) 725 | |
| Pillowcase 240 | |
| Bath Towel 700 | |
| Hand Towel 225 | |
| Shirt 190 | |
| Cotton Shirt 200 | |
| Jean 650 | |
| Fabric - Gabardine Trousers 400 | |
| T-shirt 120 | |
5. USING THE TUMBLE DRYER
5.1. Control Panel
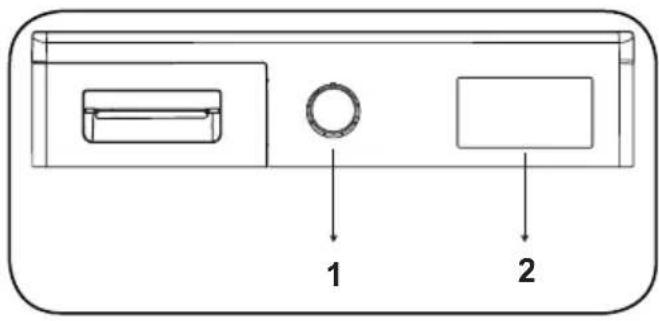
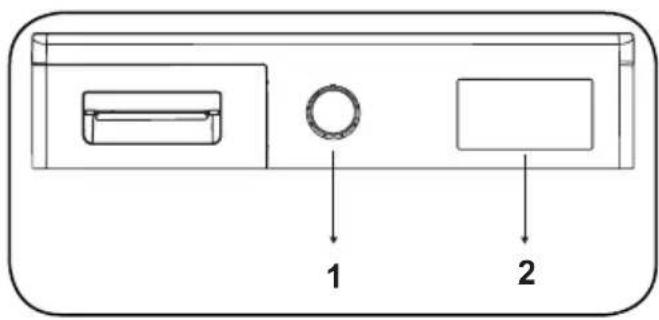
- Programme Selection Knob
- Electronic indicator and additional functions
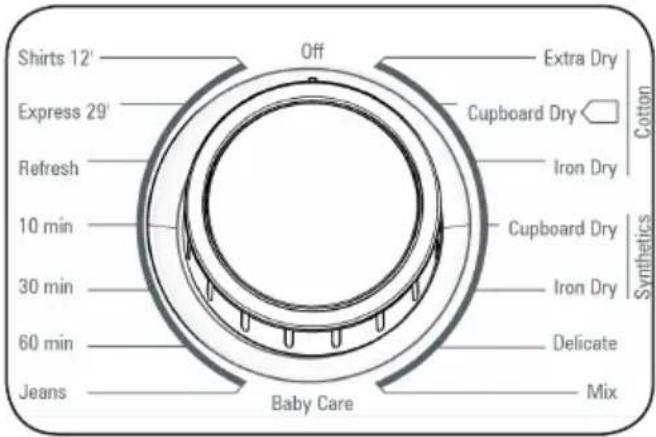
5.1.1. Programme Selection Knob
Use the programme selection knob to select the desired drying programme
5.1.2. Electronic Indicator and Additional Functions
Display symbols:
| Water tank warning indicator |  |
| Lint filter cleaning warning indicator |  |
| Condenser cleaning warning indicator |  |
Drying stages indicator:
| Drying |  |
| Cooling |  |
| End | [ITY4] |
- The electronic indicators show the progress of a running programme. At the beginning of each programme step, the relevant indicator LED comes on and the LED of the completed step goes off.
5.2. Programme Selection and Consumption Table
Press the Start/Pause button to start the programme. The Start/Pause LED that indicates that the programme has started and the Drying LED will come on.
| Programme Load (kg) | Washing machine spin speed | Approximate amount of remaining humidity | Duration (minutes) | |
| Cotton Extra Dry 8 1000 60% 132 | ||||
| Cotton Cabinet Ready | 8 1000 60% | 129 | ||
| Cotton Iron Ready | 8 1000 60% | 107 | ||
| Synthetics Cabinet Ready | 4 800 40% 51 | |||
| Synthetics Iron Dry 4 800 40% 38 | ||||
| Gentle Dry | 2 600 50% 39 | |||
| Baby Care 3 1000 60% 60 | ||||
| Jeans | 4 1200 60% | 85 | ||
| Mix | 4 1000 60% | 75 | ||
| Refresh | - | - | - | - |
| Rapid 29' | 2 | 1200 | 50% | 29 |
| Shirts 12' | 0.5 | 1200 50% 12 | ||
| Energy consumption values | ||||
| Programme Load (kg) | Washing machine spin speed | Approximate amount of remaining humidity | Energy consumption values (kWh) | |
| Cotton Cabinet Ready | 8 | 1000 | 60% | 4,68 |
| Cotton Iron Ready | 8 | 1000 | 60% | 4,1 |
| Synthetics Cabinet Ready | 4 | 800 | 40% | 1.58 |
| Power consumption in the "off mode" P_o (W) | 0.5 | |||
| Power consumption in the "on mode" P_L (W) | 1.0 | |||
The Cotton Cupboard Dry programme is the standard drying programme that can be run with a full or half load and for which the information is given on the label and product receipt. This programme is the most energy efficient programme to dry normal wet cotton clothes.
*Energy labelling standard programme (EN 61121:2013)
All values in the table were determined in accordance with the EN 61121:2013 standard. Consumption values may vary from the values in the table depending on the fabric type, spin speed, environment conditions and voltage values.
5.2.1. Auxiliary Functions
The table that summarises the options that can be selected in programmes is given below.
| Option Description | |
| Delicate Drying Delicate | fabrics are dried for a longer time at a low temperature |
| Drying Level | The humidity level obtained after drying can be increased by 3 levels. This way, level of required dryness can be selected. The levels that can be selected other than the standard setting: 1, 2, 3. After selection, the LED of the relevant drying level will turn on. |
| Anti-Crease | If you select the "Anti-Crease" option and do not open the door of the dryer at the end of the programme, the 1-hour anti-crease phase will extend to 2 hours. After selecting the Anti Crease option, you will hear an audible warning. You can press the same button again to cancel the option. If you open the door or press the Start/Pause key while the z-crease step is in progress, the said step will be cancelled. |
| Delay Start | You can delay the start time of the programme by selecting the 3-hour, 6-hour or 9-hour option. You can activate the desired delay time by pressing the Start/Pause button. When the time is up, the selected programme will start automatically. During the delay time, options compatible with the programme can be activated/deactivated. |
| Buzzer Cancel | The dryer gives an audible warning when program selection knob is turned, buttons are pressed and at the end of programme. To cancel these warnings, press and hold the "Delicate Drying Option" button for 3 seconds. When you press the button, you will hear an audible warning that the option has been cancelled. |
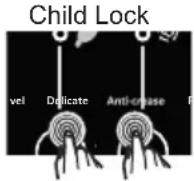 | There is a child lock option to avoid changes in the programme flow when keys are pressed during the programme. To activate the child lock, press and hold the "Anti-Crease" and "Delicate Drying" keys simultaneously for 3 seconds. When the child lock is active, all keys will be deactivated. Child lock will be deactivated automatically at the end of the programme. When activating/deactivating the child lock, the LEDs of the "Anti-Crease" and "Delicate Drying" options will flash and an audible warning will be heard. Warning: when the product is running or the child lock is active, if you turn the programme selection knob, you will hear an audible warning. Even if you set the programme knob to another programme, the previous programme will continue running. To select a new programme, you need to deactivate the child lock and then set the programme selection knob to "Off" position. Then, you can select and start the desired programme. |
5.2.2. Starting the Programme
The Start/Pause LED will flash during programme selection. Press the Start/Pause button to start the programme. The Start/Pause LED that indicates that the programme has started and the drying LED will come on.
| Programme Description | |
| Cotton Extra Dry | This programme dries thick and multi-layer fabrics, such as cotton towels, bedsheets, pillowcases, bathrobes, at a high temperature to allow you to place them in a closet. |
| Cotton Cupboard Dry | This programme dries cotton pyjamas, underwear, tablecloths etc. to allow you to place them in a closet. |
| Cotton Iron Dry | This programme dries cotton laundry to prepare it for ironing. Laundry removed from the machine will be damp. |
| Synthetics Cupboard Dry | This programme dries synthetics, such as shirts, t-shirts, blouses, at a lower temperature compared to the cottons programme to allow you to place them in a closet. |
| Synthetics Iron Dry | This programme dries synthetics, such as shirts, t-shirts, blouses, at a lower temperature compared to the cottons programme to prepare them for ironing. Laundry removed from the machine will be damp. |
| Delicate | This programme dries thin clothes like shirts, blouses and silk garments at a low temperature to make them ready to wear. |
| Mix | This programme dries cotton-synthetic mixed garments that do not discolour to make them ready to wear. |
| Baby Care | This programme dries delicate infant clothes at a low temperature to make them ready to wear. |
| Jeans This programme is used to dry jeans. | |
| Time Programmes | To reach the required drying level at a low temperature, you can use the timed programmes of 10 min., 30 min., and 60 min. Regardless of the drying level, the programme stops at the desired time. |
| Refresh | This programme provides ventilation for 10 minutes without applying heat to help freshen up your garments. |
| Express 29' | 2 kg of cotton shirts spun at a high speed 1200 rpm in the washing machine are dried in 29 minutes. |
| Shirts 12' 2 to 3 shirts are ready for to be ironed in 12 minutes. | |
IMPORTANT: Do not open the loading door while the programme is running. If you have to open the door, do not keep it open for a long time.
5.2.3. Programme Progress Indicator
The programme follow-up indicator shows the progress of the programme running. At the beginning of each programme step, the relevant indicator LED comes on and the LED of the completed step goes off.
Drying:
- It remains on during the whole drying process until the drying level reaches "Cooling".
Cooling:
- It lights up when the drying level reaches "Cooling" and remains on until the next step.
End:
- It lights up at the end of the programme.
During the Programme
If you open the door when the programme is running, the product will switch to standby mode. Once the door has been closed, press the Start/Pause key to resume the programme.
Do not open the loading door when the programme is running. If you have to open the door, do not keep it open for a long time.
Programme End
Once the programme is over, the warning LEDs for Start/Pause, water tank level, filter cleaning and condenser cleaning will turn on. Additionally, an audible warning will be given at the end of the programme. You can remove the laundry to make the machine ready for a new load.
IMPORTANT: Clean the lint filter after every programme. Empty the water tank after every programme.
IMPORTANT: f you do not take out the laundry after the programme has ended, the 1-hour Anti Crease phase will automatically be activated. This programme rotates the drum at regular intervals to prevent creases..
| PROGRAMMES | OPTIONS | |||||
| Anti-Crease | Time Delay | Cancelling the Audible Warning | Child Lock | Delicate Drying | Drying Level | |
| Cotton Extra Dry | ✓ | ✓ | ✓ | ✓ | ✓ | ✓ |
| Cotton Cupboard Dry | ✓ | ✓ | ✓ | ✓ | ✓ | ✓ |
| Cotton Iron Dry | ✓ | ✓ | ✓ | ✓ | ✓ | ✓ |
| Synthetics Cupboard Dry | ✓ | ✓ | ✓ | ✓ | ✓ | ✓ |
| Synthetics Iron Dry | ✓ | ✓ | ✓ | ✓ | ✓ | ✓ |
| Delicate | ✓ | ✓ | ✓ | ✓ | ✓ (automatic) | X |
| Mix | ✓ | ✓ | ✓ | ✓ | ✓ | ✓ |
| Baby Care | ✓ | ✓ | ✓ | ✓ | ✓ | ✓ |
| Refresh X X | ✓ | ✓ | ✓ | ✓ | ||
| Jeans | ✓ | ✓ | ✓ | ✓ | ✓ | ✓ |
| 60 min X X | ✓ | ✓ | ✓ | ✓ | ||
| 30 min X X | ✓ | ✓ | ✓ | ✓ | ||
| 10 min X X | ✓ | ✓ | ✓ | ✓ | ||
| Express 29' X X | ✓ | ✓ | ✓ | ✓ | ||
| Shirts 12' X X | ✓ | ✓ | ✓ | ✓ | ||
| X Not selectable | ||||||
| ✓ | Selectable | |||||
ATTENTION: "Delicate" and "Drying Level" options cannot be selected at the same time in any programme.
6. CLEANING AND CARE
IMPORTANT: Do not use industrial chemicals to clean your dryer. Do not use a dryer that has been cleaned with industrial chemicals.
6.1. Cleaning the Lint Filter
IMPORTANT: DO NOT FORGET TO CLEAN THE LINT FILTER AFTER EACH USE.
To clean the lint filter:
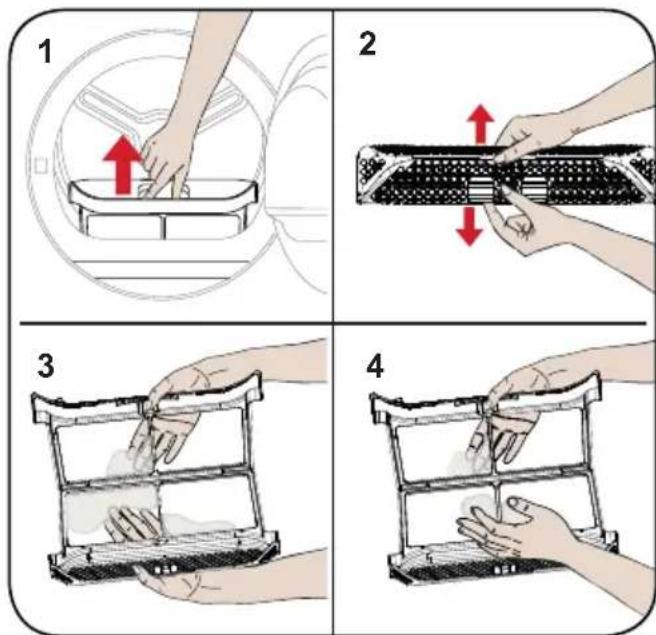
- Open the loading door.
- Pull up the lint filter to remove it.
- Use your hands or a soft cloth to clean the lint.
- Close and refit the lint filter.
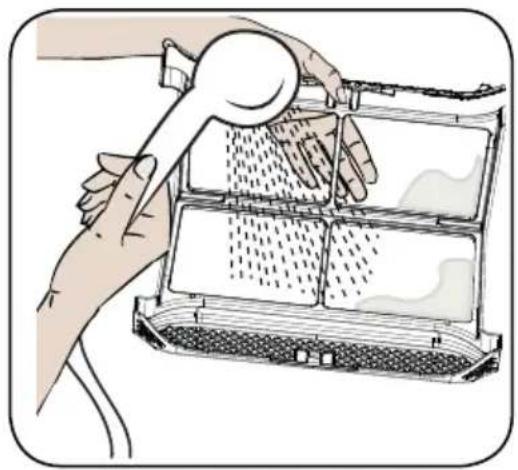
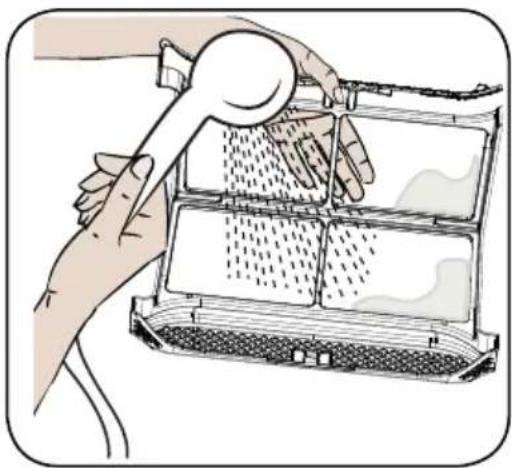
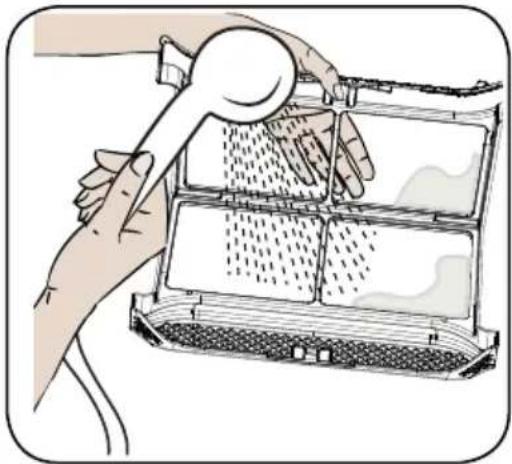
After the dryer has been used for a certain period of time, if you encounter a layer that will cause obstruction on the filter surface, wash the filter with warm water to clean the layer. Dry the filter thoroughly before reinstalling it again.
natural_image
Illustration of a hand using a tool to clean or store food items in a container (no text or symbols visible)6.2. Emptying the Water Tank
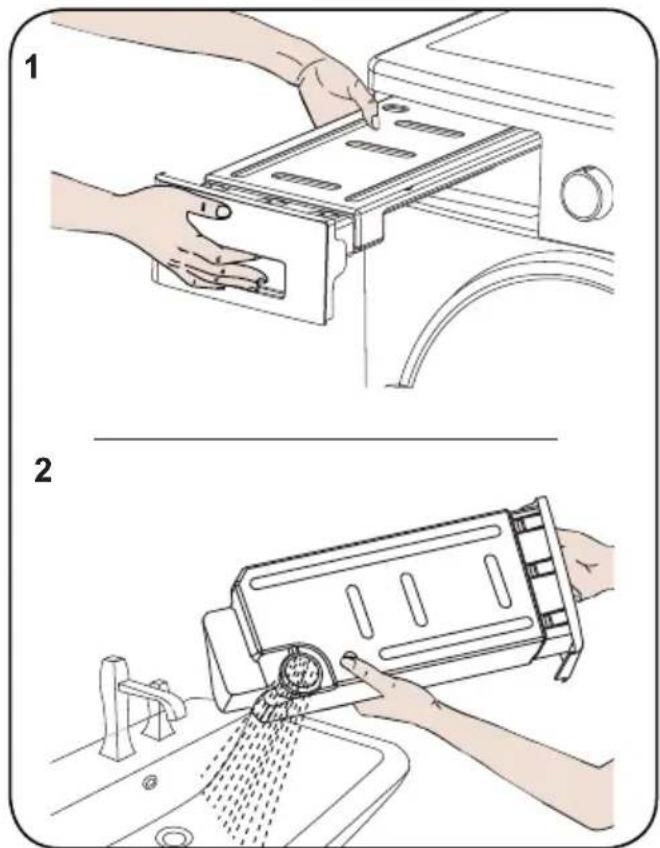
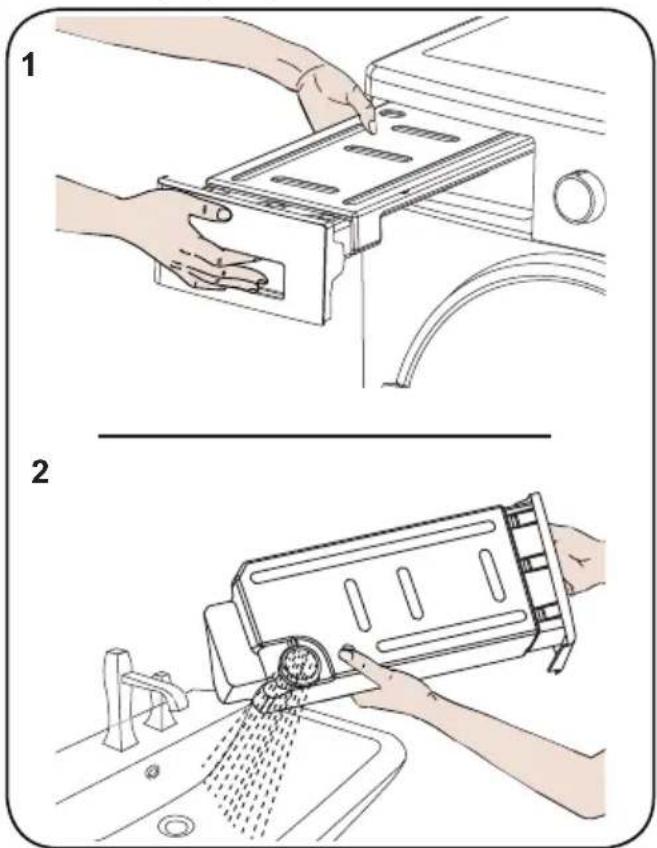
- Pull the drawer cover and carefully take out the tank.
- Empty the water in the tank.
- If there is lint accumulated on the discharge cap in the tank, clean it with water.
- Refit the water tank.
IMPORTANT: Never remove the water tank when the programme is running. The water condensed in the water tank is not suitable for human consumption.
IMPORTANT: DO NOT FORGET TO EMPTY THE WATER TANK AFTER EACH USE.
6.3. Cleaning the Condenser
IMPORTANT: Clean the condenser when you see the warning "Condenser Cleaning".
IMPORTANT: EVEN IF THE "CONDENSER CLEANING WARNING LED" IS NOT ON: CLEAN THE CONDENSER AFTER EVERY 30 DRYING PROCESSES OR ONCE A MONTH.
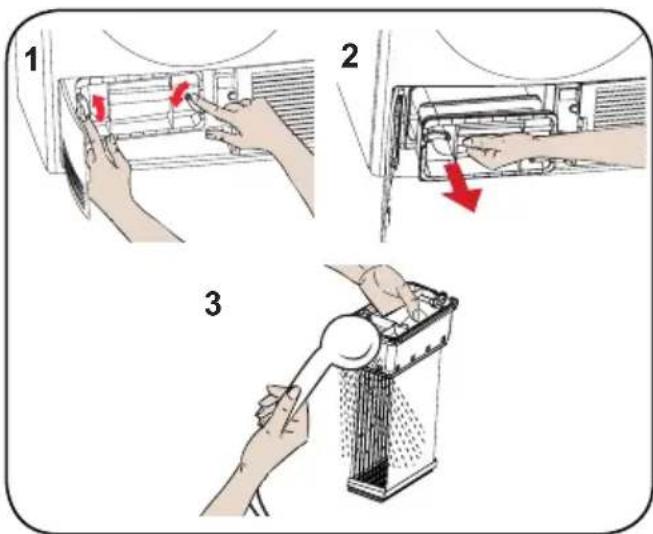
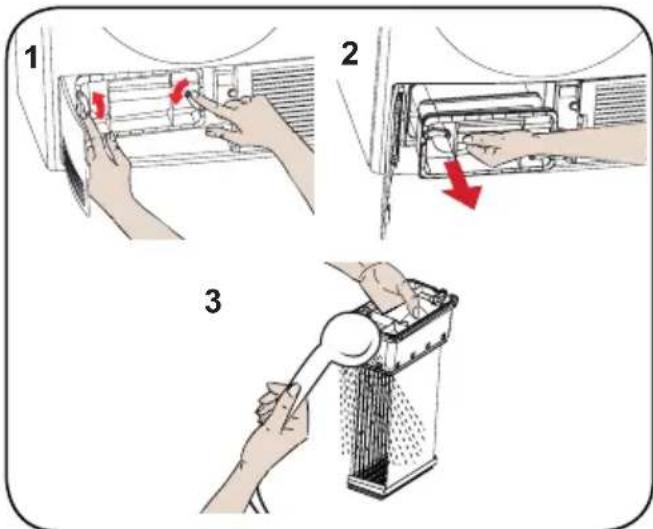
If the drying process is completed, open the loading door and wait for it to cool down.
- Open the plinth and release the 2 cover locks of the condenser.
- Hold the condenser by the plastic part and pull it out.
- Clean it with a showerhead and wait for the water to drain off.
- Fully insert the condenser into its seat and lock the 2 locks.
- Close the plinth cover
6.4. Cleaning the Humidity Sensor
natural_image
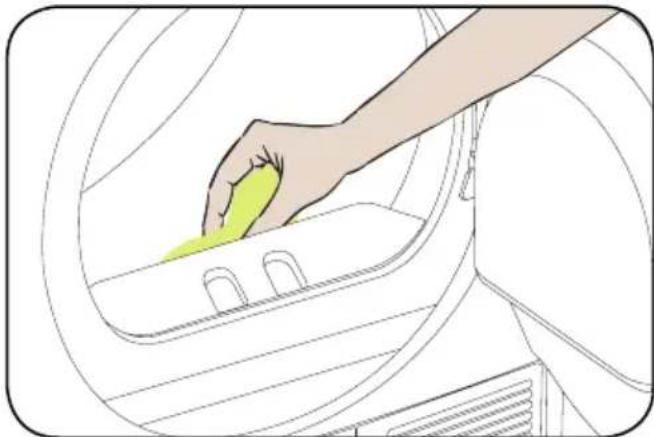
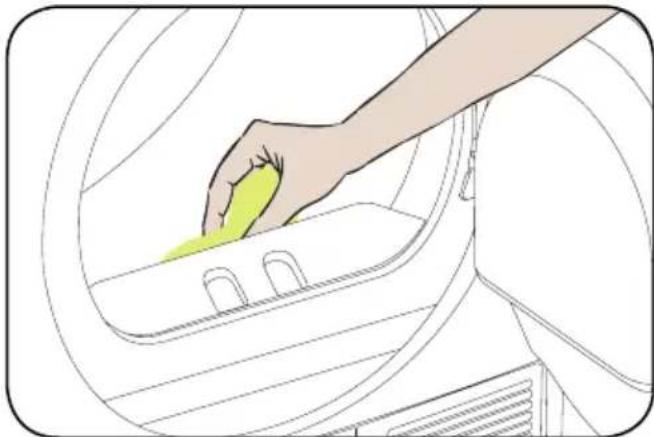
Illustration of a hand placing a yellow substance into a white container (no text or symbols)Inside the machine, there are humidity sensors that detect whether the laundry is dry or not.
To clean the sensors:
- Open the loading door of the machine.
- If the machine is still hot due to the drying process, wait for it to cool down.
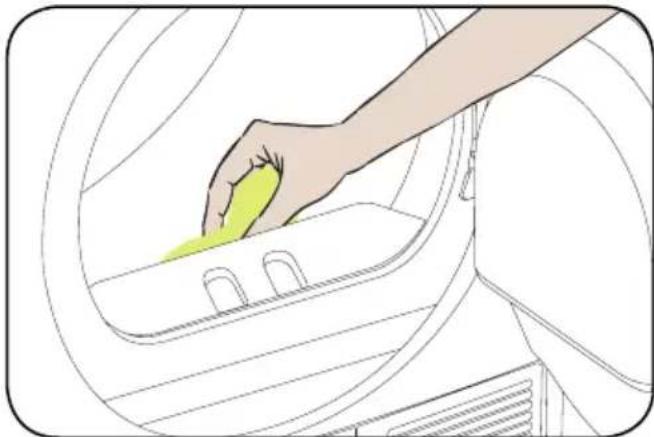
- Using a soft cloth soaked in vinegar, wipe the metal surfaces of the sensor and dry them.
IMPORTANT: CLEAN THE METAL SURFACES OF THE SENSOR 4 TIMES A YEAR.
IMPORTANT: Do not use metal tools to clean the metal surfaces of the sensor.
⚠ WARNING: Due to the risk or fire and explosion, do not use solution agents, cleaning agents or similar products when cleaning the sensors.
6.5. Cleaning the Inner Surface of the Loading Door
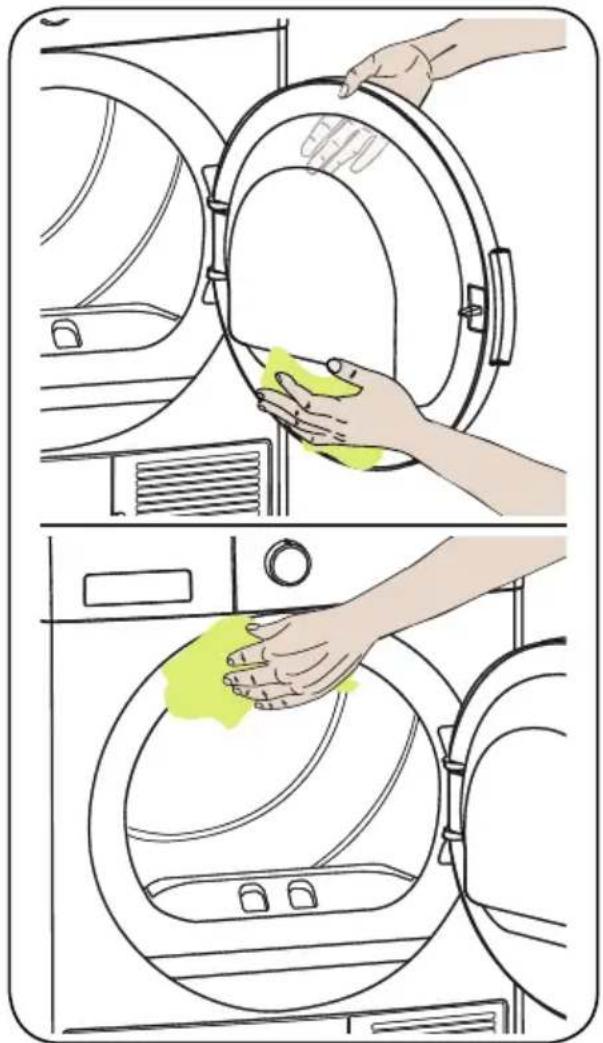
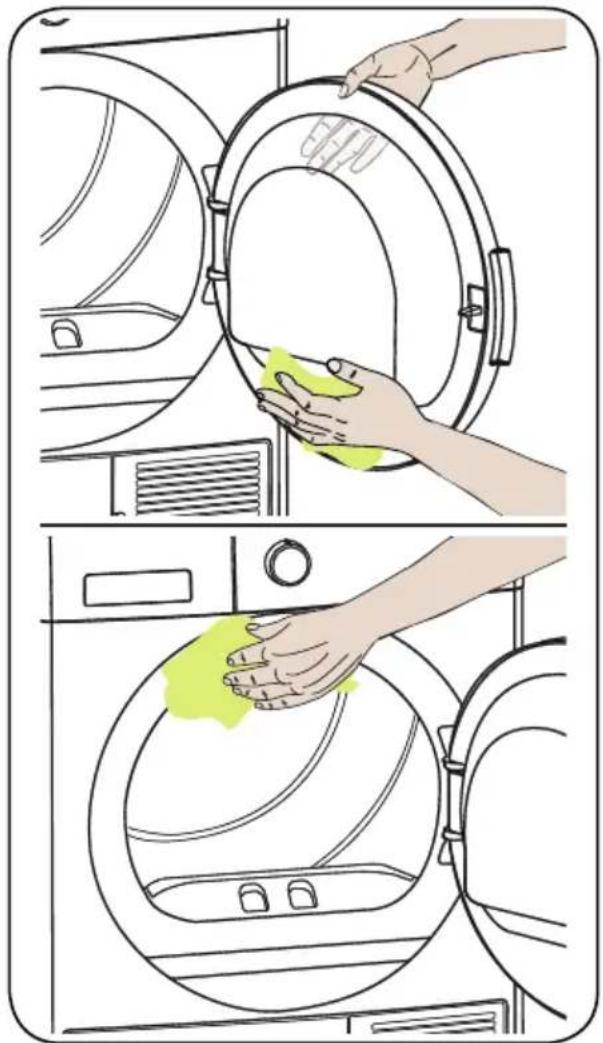
IMPORTANT: DO NOT FORGET TO CLEAN THE INNER SURFACE OF THE LOADING DOOR AFTER EACH DRYING PROCESS.
Open the loading door of the dryer and clean all of the inner surfaces and the gasket with a soft, damp cloth.
natural_image
Illustration showing hands cleaning a washing machine with a cloth, no text or symbols present7. TECHNICAL SPECIFICATIONS
| Brand VOX | |
| Model name DM802 | |
| Height Min: 845 mm / Max: 855 mm* | |
| Width 596 mm | |
| Depth 609mm | |
| Capacity (max.) 8 kg** | |
| Net weight (with plastic door) 36,5 kg | |
| Net weight (with glass door) 38,8 kg | |
| Voltage | 220-240 V |
| Power | 2700 W |
*Min. height: Height with the adjustable feet not used. Max. height: Height with the adjustable feet extended to the maximum.
**Dry laundry weight before washing.
IMPORTANT: To improve the quality of the dryer, technical specifications are subject to change without prior notice.
IMPORTANT: The values declared have been obtained in a laboratory environment according to the relevant standards. These values may change depending on the environmental conditions and use of the dryer.
8. TROUBLESHOOTING
Your dryer is fitted with systems that continuously perform checks during the drying process to take the necessary measures and warn you in case of any malfunction.
⚠ WARNING: If the problem persists even if you have applied the steps in this section, please contact the your dealer or an Authorised Service Provider. Never try to repair a nonfunctional product.
| PROBLEM REASON SOLUTION | ||
| The drying process takes a long time. | The surface of the lint filter might be clogged. | Wash the filter with lukewarm water. |
| The condenser might be clogged. Wash the condenser. | ||
| The ventilation grills in front of the machine might be closed. | Open the doors/windows to prevent the room temperature from rising too much. | |
| There might be a layer of limescale on the humidity sensor. | Clean the humidity sensor. | |
| The dryer might be overloaded with laundry. | Do not overload the dryer. | |
| The laundry might be insufficiently spun. | Select a higher spin speed on your washing machine. | |
| Laundry comes out damp at the end of the drying process. | ⚠ The laundry that comes out hot at the end of the drying process generally feels more humid. | |
| The programme used might not be suitable for the type of laundry. | Check the care labels on the laundry items, select a suitable programme for the type of laundry and additionally, use the time programmes. | |
| The surface of the lint filter might be clogged. | Wash the filter with lukewarm water. | |
| The condenser might be clogged. Wash the condenser. | ||
| The dryer might be overloaded with laundry. | Do not overload the dryer. | |
| The laundry might be insufficiently spun. | Select a higher spin speed on your washing machine. | |
| The dryer cannot be opened or the programme cannot be started. The dryer does not get activated when adjusted. | The dryer might not be plugged in. Make sure that the plug is fitted in the socket. | |
| The loading door might be open. Make sure that the loading door is properly closed. | ||
| You might not have set a programme or pressed the Start/Pause key. | Make sure that the programme has been set and the dryer is not in the Standby (Pause) mode. | |
| Child lock might be active. Deactivate the child lock. | ||
| The programme has been interrupted for no reason. | The loading door might not be closed properly. | Make sure that the loading door is properly closed. |
| There might have been a power failure. | Press the Start/Pause key to start the programme. | |
| The water tank might be full. Empty the water tank. | ||
| Clothes have shrunk, felted or deteriorated. | The programme used might not be suitable for the type of laundry. | Check the care labels on the laundry items, select a suitable programme for the type of laundry. |
| Water leaking from the loading door. | There might be lint accumulated on the inner surfaces of the loading door and on the surfaces of the gasket of the loading door. | Clean the inner surfaces of the loading door and the surfaces of the gasket of the loading door. |
| The loading door opens on its own. | The loading door might not be closed properly. | Push the loading door until you hear the closing sound. |
| The water tank warning symbol is on/flashing. | The water tank might be full. Empty the water tank. | |
| The water discharge hose might be bent. | If the product is connected directly to the water outlet, check the water discharge hose. | |
| The filter cleaning warning symbol is on. | The lint filter might be unclean. Clean the filter. | |
| The filter cleaning warning symbol is flashing. | The filter seat might be clogged by lint. | Clean the filter seat. |
| There might be a layer that causes obstruction on the surface of the lint filter. | Wash the filter with lukewarm water. | |
| The condenser might be clogged. Wash the condenser. | ||
9. ENVIRONMENTAL PROTECTION AND PACKAGING INFORMATION
9.1. Packaging Information
The packaging of this product is made of recyclable materials. Do not dispose of the packaging, waste together with household or other waste. Instead, take it to a packaging collection point defined by your local authority.
10. DESCRIBING THE ENERGY LABEL AND SAVING ENERGY
10.1. Energy Labelling
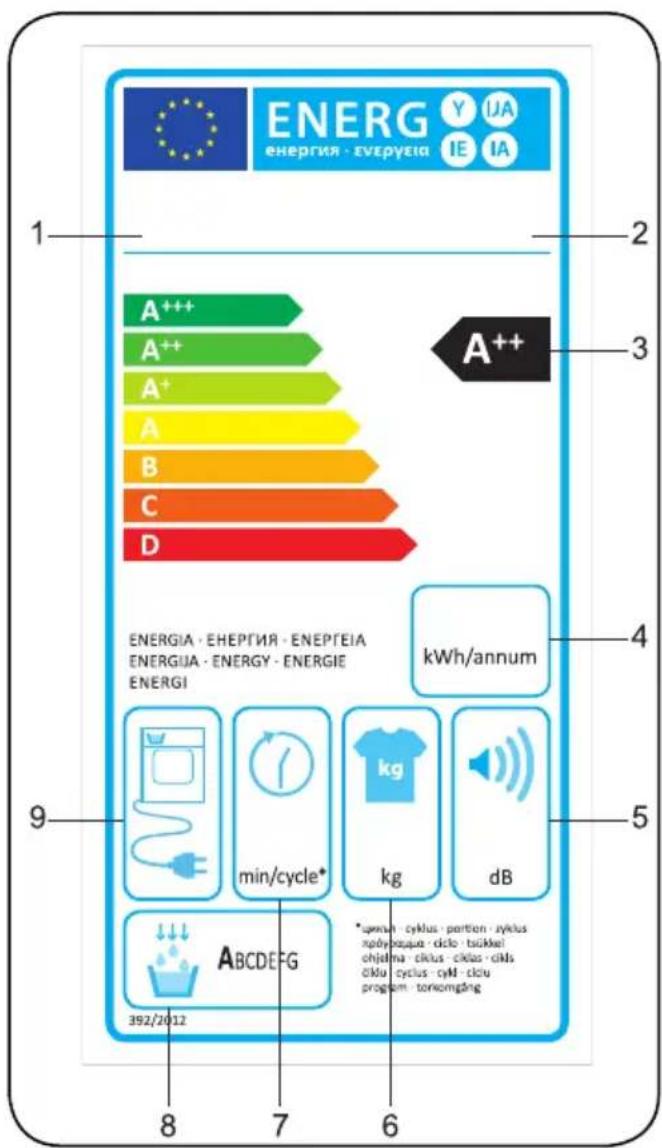
- Trademark
- Model
- Energy Class
- Annual Power Consumption
- Noise During Drying
- Dry Laundry Capacity
- Cotton Cupboard Dry Cycle Time
- Condensing Efficiency Class
- Machine Technology
10.2. Energy Efficiency
- You should operate the dryer to full capacity, but make sure that it is not overloaded.
- When the laundry is being washed, the spin speed should be at the highest level possible. This will shorten the drying time and reduce energy consumption.
• Make sure that the same kinds of laundry are dried together. - Please follow the recommendations in the user manual for programme selection.
- For air circulation, leave an appropriate clearance on the front and back sides of the Dryer. Do not cover the grills on the front side of the machine.
- Unless necessary, do not open the door of the machine when drying. If you have to open it, do not keep it open for a long time.
- Do not add new (wet) laundry during the drying process.
- Hairs and lint that detach from the laundry and merge in the air are collected by the "Lint Filters". Please make sure that the filters are cleaned before and after each use.
- For models with a condenser, make sure that the condenser is cleaned at least once a month or after each 15 uses.
- During the drying process, the environment where the dryer is installed must be well ventilated.
| PRODUCT FICHE | |
| Complying Commission Delegated Regulation (EU) No 392/2013 | |
| Supplier name or trademark VOX | |
| Model name DM802 | |
| Rated capacity (kg) 8 | |
| Type of Tumble Dryer Condenser | |
| Energy efficiency class (1) | B |
| Annual Energy Consumption (kWh) (2) | 561 |
| Automatic of Non-automatic Automatic | |
| Energy Consumption of the standard cotton programme at full load (kWh) 4,68 | |
| Energy Consumption of the standard cotton programme at partial load (kWh) 2,56 | |
| Power consumption of the off-mode for the standard cotton programme at full load P_o (W) | 0,5 |
| Power consumption of the left-on mode for the standard cotton programme at full load P_L (W) | 1,0 |
| The duration of the left mode on (min) n/a | |
| Standard cotton programme (3) | |
| Programme time of the standard cotton programme at full load , T_dry (dak.) 129 | |
| Programme time of the standard cotton programme at partial load , T_dry1/2 (dak.) 76 | |
| Weighted programme time of the standard cotton programme at full and partial load(T) | 99 |
| Condensation efficiency class (4) | B |
| Average condensation efficiency of the standard cotton programme at full load C_dry | %81 |
| Average condensation efficiency of the standard cotton programme at partial load C_dry1/2 | %81 |
| Weighted condensation efficiency of the standard cotton programme at full load andpartial load C_t | %81 |
| Sound power level for the standard cotton programme at full load (5) | 65 |
| Built-in No | |
(1) Scale from A+++ (most efficient) to D (least efficient)
(2)Energyconsumption based on 160 drying cycles of the standard cotton programme at full and partial load, and the consumption of the low-power modes. Actual energy consumption per cycle will depend on how the appliance is used.
(3) “Cotton cupboard dry programme” used at full and partial load is the standard drying programme to which the information in the label and the fiche relates, that this programme is suitable for drying normal wet cotton laundry and that it is the most efficient programme in terms of energy consumption for cotton
(4) Scale from G (least efficient) to A (most efficient)
(5) Weighted average value - L wA expressed in dB(A) re 1 pW

52246206

natural_image
Abstract circular graphic with diagonal white stripes on gray background (no text or symbols)VOX
ELECTRONICS
SRB
Mašina za sušenje veša
natural_image
Line drawing of a washing machine with front panel and side door (no text or symbols)DM802
Zahvaljujemo vam što ste izabrali ovaj proizvod.
Ovaj Korisnički priručnik sadrži veoma važne informacije i uputstva koji se tiču korišćenja i održavanja vašeg uređaja. Odvojite vreme da pročitate ovaj Korisnički priručnik pre korišćenja uređaja i čuvajte ga za buduću upotrebu.
natural_image
Symbol of a trash bin crossed out by diagonal lines, with no text or labels present.Ovaj proizvod je usaglašen sa EU WEEE direktivom (2013/19/EU). Ovaj proizvod nosi simbol klasifikacije za otpad za električnu i elektronsku opremu (WEEE).
Ovaj simbol koji se nalazi na proizvodu ili oznaci sa informacijama naznačava da ovaj proizvod ne sme da se odlaže u otpad zajedno sa drugim kućnim otpadom na kraju radnog veka. Da bi se sprečile potencijalne opasnosti od nekontrolisanog odlaganja otpada po životnu sredinu i ljudsko zdravlje, držite ovaj proizvod odvojeno od drugih vrsta otpada, a da bi se omogućila održiva ponovna upotreba materijalnih resursa, postarajte se
da se reciklira odgovorno. Obratite se svom prodavcu ili lokalnim nadležnim organima da dobijete informacije o tome kako i gde možete da odnesete proizvod zbog ekološki bezbedne reciklaže. Ovaj proizvod ne sme da se meša sa drugim vrstama komercijalnog otpada za reciklažu.
2. POSTAVLJANJE
- Pre nego što se obratite lokalnom ovlašćenom pružaocu servisnih usluga zbog postavljanja mašine za sušenje veša, proverite informacije iz korisničkog priručnika da proverite da su električna instalacija i izlaz za vodu odgovarajući. Ako nisu, pozovite kvalifikovanog električara i vodoinstalatera da obave neophodna podešavanja.
- Dužnost je kupca da pripremi mesto za postavljanje mašine za sušenej veša, kao i instalacije za električno napajanje i otpadnu vodu. Pre postavljanja proverite mašinu za sušenje veša zbog oštećenja. Ako je oštećena, nemojte da je postavljate. Oštećeni proizvodi mogu da ugroze vaše zdravlje.
- Postavite mašinu za sušenje veša na stabilnu i ravnu površinu.
- Pokrenite mašinu za sušenje veša u okruženju bez prašine sa dobrom ventilacijom.
- Rastojanje između mašine za sušenje i poda ne treba da se smanji usled predmeta kao što su tepisi, drvo ili traka.
- Nemojte da blokirate ventilacione rešetke koje se nalaze na osnovi mašine za sušenje veša.
- Ovaj uređaj se ne sme postaviti iza vrata koja se zaključavaju, klizećih vrata ili vrata sa šarkama na suprotnoj strani od one na kojoj je mašina za sušenje tako da je potpuno otvaranje vrata mašine za sušenje blokirano.
- Kada se postavi mašina za sušenje veša, povezivanja moraju da ostanu stabilna. Prilikom postavljanja mašine za sušenje veša, postarajte se da se zadnja površina ne oslanja na neki predmet (npr. slavina, utičnica).
- Radna temperatura mašine za sušenje veša je od +5°C do +35°C. Ako se mašina koristi van ovog opsega temperature, to će imati negativan uticaj na učinak mašine za sušenje veša i proizvod će biti oštećen.
- Budite oprezni prilikom prenošenja proizvoda jer je težak. Uvek nosite zaštitne rukavice.
- Uvek postavljajte proizvod tako da bude pored zida.
- Zadnja površina proizvoda treba da bude pored zida.
- Kada se proizvod postavi na stabilnu površinu, koristite nivo vode da proverite
da li je proizvod potpuno stabilan. Ako nije, podesite stope dok ne postane stabilan. Ponovite ovaj postupak svaki put kada premeštate proizvod.
- Gornja ploča
- Kontrolna tabla
- Vrata za punjenje
- Ležište otvora osnove
- Osnova
- Podesive stope
- Poklopac osnove
- Tipska pločica
- Filter za dlačice
- Poklopac fioke
- Ventilacione rešetke
4. PRIPREMA VEŠA
natural_image
Line drawing of a washing machine with an open door and internal air filter (no text or symbols)VAŽNO: Ne preporučuje se u mašinu za sušenje staviti više veša od količine prikazane u tabeli. Kada je pretrpana, performanse sušenja se smanjuju i može doći do oštećenja mašine za sušenje i veša.
| Veš Težina suvog veša(g) | |
| Čaršav (dvostruki) 725 | |
| Jastučnica 240 | |
| Peškir za kupanje 700 | |
| Peškir za ruke 225 | |
| Košulja 190 | |
| Pamučna košulja 200 | |
| Farmerke 650 | |
| Tkanina – pantalone od gabardena | 400 |
| Majica 120 | |
5. KORIŠĆENJE MAŠINE ZA SUŠENJE VEŠA
5.1. Kontrolna tabla
- Dugme za izbor programa
- Elektronski indikator i dodatne funkcije
5.1.2. Elektronski indikator i dodatne funkcije
Simboli na ekranu:
| Indikator upozorenja za rezervoar za vodu |  |
| Indikator upozorenja za čišćenje filtera za dlačice |  |
| Indikator upozorenja za čišćenje kondenzatora |  |
Indikator faza sušenja:
- Otvorite vrata za punjenje.
- Podignite filter za dlačice da biste ga izvadili.
- Dlačice očistite rukama ili mekom krpom.
- Zatvorite filter i vratite ga na mesto.
Nakon što se mašina za sušenje veša neko vreme koristila, ako se pojavi sloj koji stvara smetnje na površini filtera, isperite ga toplom vodom i tako očistite. Temeljno očistite filter pre nego što ga ponovno postavite.
natural_image
Illustration of hands using a tool to clean or store food items in a container (no text or symbols visible)- Povucite poklopac fioke i pažljivo izvucite rezervoar.
- Ispraznite vodu iz rezervoara.
- Ako su se u poklopcu odvoda nakupile dlačice, očistite ih vodom.
- Ponovno namestite rezervoar za vodu na mesto.
VAŽNO: Rezervoar za vodu nemojte da vadite dok je program pokrenut. Voda kondenzovana u rezervoaru za vodu nije za ljudsku upotrebu.
VAŽNO: NAKON SVAKOG KORIŠĆENJA OBAVEZNO ISPRAZNITE REZERVOAR ZA VODU.
6.3. Čišćenje kondenzatora
VAŽNO: Kada vidite upozorenje „Čišćenje kondenzatora“, očistite kondenzator.
VAŽNO: ČAK I AKO LED INDIKATOR „LED UPOZORENJE ZA ČIŠĆENJE KONDENZATORA” NIJE UKLJUČEN: OČISTITE KONDENZATOR NAKON SVAKIH 30 POSTUPAKA SUŠENJA ILI JEDNOM MESEČNO.
Ako je postupak sušenja dovršen, otvorite vrata za punjenje i sačekajte da se ohladi.
- Otvorite osnovu i otpustite dva zavrtnja poklopca kondenzatora.
- Uhvatite kondenzator za plastični deo i izvucite ga.
- Očistite ga tušem i sačekajte da se voda ocedi.
- Potpuno ugurajte kondenzator u njegovo ležište i zatvorite 2 zavrtnja.
- Zatvorite poklopac osnove
6.4. Čišćenje senzora za vlagu
natural_image
Illustration of a hand placing a yellow substance into a white container (no text or symbols)Unutar uređeja nalaze se senzori za vlagu koji otkrivaju je li veš suv ili nije.
Da biste očistili senzore:
- Otvorite vrata za stavljanje veša na mašini.
- Ako je uređaj još vreo zbog postupka sušenja, sačekajte da se ohladi.
- Koristeći krpu natopljenu sirćetom, obrišite metalne površine senzora i osušite ih.
VAŽNO: METALNE POVRŠINE SENZORA OČISTITE 4 PUTA GODIŠNJE.
VAŽNO: Nemojte da koristite metalne alate da biste očistili metalne površine senzora.
⚠ UPOZORENJE: Zbog opasnosti od požara i eksplozije, za čišćenje senzora nemojte da koristite razređivače, sredstva za čišćenje ili slične proizvode.
6.5. Čišćenje unutrašnje površine vrata za ubacivanje
! VAŽNO: NEMOJTE DA ZABORAVITE DA OČISTITE UNUTRAŠNJU POVRŠINU VRATA ZA UTOVAR NAKON SVAKOG POSTUPKA SUŠENJA.
Otvorite vrata za ubacivanje mašine za sušenje veša pa mekom, vlažnom krpom očistite sve unutrašnje površine i zaptivku.
natural_image
Illustration showing hands cleaning a washing machine with a cloth, no text or symbols present7. TEHNIČKE SPECIFIKACIJE
| Marka VOX | |
| Naziv modela DM802 | |
| Visina Min: 845 mm / Maks.: 855 mm* | |
| Širina 596 mm | |
| Dubina 609mm | |
| Kapacitet (maks.) 8 kg** | |
| Neto težina (s plastičnim vratima) 36,5 kg | |
| Neto masa (sa staklenim vratima) 38,8 kg | |
| Napon | 220-240 V |
| Snaga | 2700 W |
*Min. visina: Visina ako se ne koriste podesive stope. Miks. visina: Visina ako su podesive stope maksimalno podignute.
**Težina suvog veša pre pranja.
VAŽNO: Radi poboljšanja kvaliteta mašine za sušenje veša, tehničke specifikacije podležu promenama bez prethodne najave.
natural_image
Abstract geometric pattern with diagonal white lines inside a gray circle (no text or symbols)VOX
ELECTRONICS
MKD
Машина за сушење
natural_image
Line drawing of a washing machine with front panel and side door (no text or symbols)DM802
natural_image
Simple line drawing of a trash bin with crossed lines indicating no waste or discharge (no text or symbols)natural_image
Technical line drawing of a mechanical or electrical enclosure with internal components and mounting brackets (no text or symbols)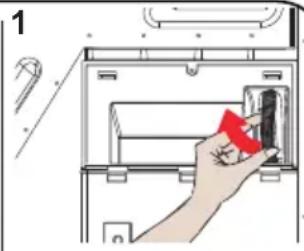
natural_image
Hand inserting a red object into a device casing (no text or symbols visible)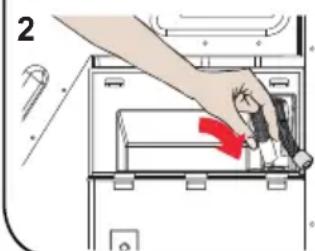
natural_image
Illustration of a hand inserting a component into a device (no text or symbols visible)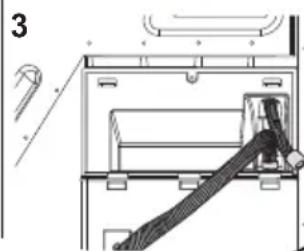
natural_image
Technical line drawing of a mechanical device with a clamping cable (no text or symbols)natural_image
Line drawing of a washing machine with an open door and internal air vent (no text or symbols)
5.1.2. Електронски индикатор и дополнителни функции
Символи на приказот:
natural_image
Illustration of a hand using a tool to clean or store food items in a container (no text or symbols visible)natural_image
Illustration of a hand placing a yellow substance into a white container (no text or symbols)natural_image
Illustration showing hands cleaning a washing machine with a cloth, no text or symbols presentnatural_image
Abstract geometric pattern with diagonal stripes inside a circle (no text or symbols)VOX
ELECTRONICS
SVNSušilni stroj
natural_image
Line drawing of a washing machine with no text or symbolsDM802
Hvala, ker ste izbrali ta izdelek.
natural_image
Symbol of a trash bin crossed out by two diagonal lines, with no text or labels present.Ta izdelek je skladen z Direktivo OEEO EU
natural_image
Technical line drawing of a mechanical or electrical component with no visible text or symbols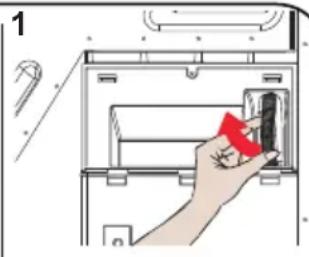
natural_image
Hand inserting a red plastic into a device casing (no text or symbols visible)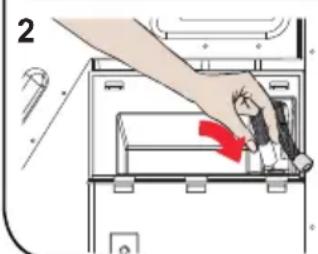
natural_image
Illustration of a hand inserting a device into a machine, showing a red arrow indicating direction (no text or symbols present)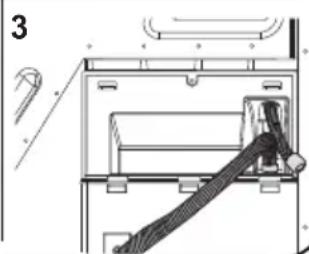
natural_image
Technical line drawing of a mechanical device with a coiled cable or strap (no text or symbols)natural_image
Line drawing of a washing machine with an open door and internal air filter (no text or symbols)
5.1.2. Elektronski indikator in dodatne funkcije
Simboli na zaslonu:
natural_image
Illustration of hands using a tool to clean or store food items in a container (no text or symbols visible)natural_image
Illustration of a hand placing a yellow substance into a white container with three side outlets (no text or symbols)natural_image
Illustration showing hands cleaning a washing machine with a cloth, no text or symbols present7. TEHNIČNE SPECIFIKACIJE
natural_image
Abstract geometric pattern with diagonal stripes inside a circle (no text or symbols)VOX
ELECTRONICS
HRV
Sušilica
natural_image
Line drawing of a washing machine with front panel and buttons (no text or symbols)DM802
Hvala vam što ste odabrali ovaj proizvod.
Ovaj korisnički priručnik sadrži važne informacije o sigurnosti te upute o radu i održavanju vašeg uređaja. Prije korištenja uređaja odvojite vrijeme da biste pročitali ovaj priručnik i sačuvajte ga za buduće korištenje.
| Ikona Opis | |
 | Pročitajte upute. |
 | Vruća površina |
| Ikona Opis ispod slike Opis | ||
 | UPOZORENJE Opasnost od opasne ozljede ili smrti | |
 | OPASNOST OD STRUJNOG UDARA Opasni napon | |
 | POŽAR Opasnost od požara | |
 | POZOR Opasnost od ozljede ili materijalne štete | |
 | VAŽNO/NAPOMENA Informacije o ispravnom korištenju sustava | |
SADRŽAJ
1. UPUTE O SIGURNOSTI 3
1.1. Sigurnost vezana uz struju 3
1.2. Sigurnost djece....4
1.3. Sigurnost proizvoda....5
1.4. Ispravno korištenje 6
1.5. Instalacija uređaja na stroju za pranje rublja 7
2. INSTALACIJA....9
2.1. Uklanjanje sigurnosnog sklopa....9
2.2. Povezivanje s odvodom vode (uz dodatno crijevo za odvod) 9
2.2.1. Povezivanje crijeva za odvod vode 9
2.3. Prilagodba postolja....10
2.4. Strujni priključak 10
2.5. Instalacija unutar elemenata....10
3. PREGLED 10
4. PRIPREMA RUBLJA 11
4.1. Razvrstavanje rublja koje će se sušiti.... 11
4.2. Priprema rublja koje će se sušiti 12
4.3. Kapacitet sušilice 12
5. KORIŠTENJE SUŠILICE....13
5.1. Upravljačka ploča 13
5.1.1. Ručica za odabir programa 13
5.1.2. Elektronički indikator i dodatne funkcije.... 13
5.2. Tablica odabira programa i potrošnje 14
5.2.1. Pomoćne funkcije 15
5.2.2. Pokretanje programa....16
5.2.3. Indikator napretka programa 17
6. ČIŠĆENJE I ODRŽAVANJE 19
6.1. Čišćenje filtra mucica.... 19
6.2. Pražnjenje spremnika za vodu 19
6.3. Čišćenje kondenzatora 20
6.4. Čišćenje senzora za vlagu.... 20
6.5. Čišćenje unutarnje površine vratašaca za utovar 20
7. TEHNIČKE SPECIFIKACIJE 22
8. OTKLANJANJE POTEŠKOĆA 23
- INFORMACIJE O ZAŠTITI OKOLIŠA I PAKIRANJU 25
9.1. Informacije o pakiranju 25 - OPIS ENERGETSKE OZNAKE I UŠTEDA ENERGIJE 25
10.1. Energetska oznaka 25
10.2. Energetska učinkovitost.... 26
NAJVAŽNIJA UPOZORENJA
natural_image
Simple line drawing of a trash bin with diagonal lines crossing it, no text or symbols present.Ovaj je proizvod usklađen s EU WEEE Direktivom (2013/19/EU). To znači da proizvod nosi klasifikacijski simbol za otpadnu električnu i elektroničku opremu (WEEE).
Ovaj simbol moguće je pronaći na proizvodu ili na informacijskoj oznaci, a označava da ovaj proizvod na kraju njegova radnog vijeka nije moguće odlagati zajedno s drugim kućanskim otpadom. Da biste spriječili potencijalne štete nekontroliranog odlaganja otpada po okoliš i ljudsko zdravlje, molimo vas da ovaj proizvod odvojite od drugih vrsta otpada. Kako biste osigurali održivo ponovno korištenje materijalnih resursa, osigurajte
natural_image
Technical line drawing of a mechanical device interior (no text or symbols)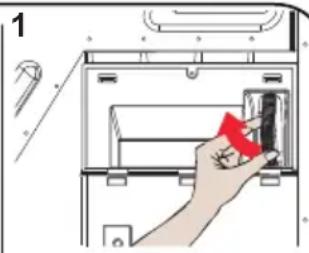
natural_image
Hand inserting a red object into a device casing (no text or symbols visible)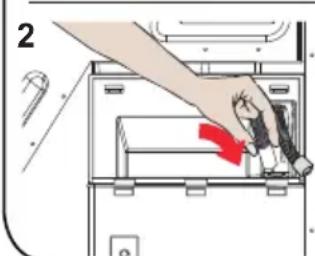
natural_image
Illustration of a hand inserting a device into a machine (no text or symbols visible)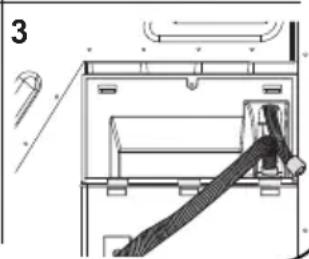
natural_image
Technical line drawing of a mechanical device with a coiled cable and handle (no text or symbols)natural_image
Line drawing of a washing machine with an open door and internal compartments (no text or symbols)VAŽNO: Ne preporučuje se u sušilicu staviti više rublja od količine prikazane u tablici. Kada je pretrpana, performanse sušenja se smanjuju te može doći do oštećenja sušilice i rublja.
| Rublje Težina suhog rublja (g) | |
| Plahta za krevet (dvostruki) 725 | |
| Jastučnica 240 | |
| Ručnik 700 | |
| Ručnik za ruke 225 | |
| Košulja 190 | |
| Pamučna košulja 200 | |
| Traper 650 | |
| Tkanina - hlače od gabardena | 400 |
| Majica 120 | |
5. KORIŠTENJE SUŠILICE
5.1.2. Elektronički indikator i dodatne funkcije
Simboli na zaslonu:
| Indikator upozorenja spremnika za vodu |  |
| Indikator upozorenja filtra mucica |  |
| Indikator upozorenja čišćenja kondenzatora |  |
- Otvorite vratašca za utovar.
- Podignite filtar mucica da biste ga izvadili.
- Mucice očistite rukama ili mekom tkaninom.
- Zatvorite filtar i vratite ga na mjesto.
Nakon što se sušilica neko vrijeme koristila, ako se pojavi sloj koji stvara smetnje na površini filtra, isperite ga toplom vodom i tako očistite. Temeljito očistite filtar prije nego ga ponovno postavite.
natural_image
Illustration of hands using a tool to clean or store food items in a container (no text or symbols visible)6.2. Pražnjenje spremnika za vodu
Ako je postupak sušenja dovršen, otvorite vratašca za utovar i sačekajte da se ohladi.
- Otvorite podnožje i otpustite dva zavrtnja poklopca kondenzatora.
- Uhvatite kondenzator za plastični dio i izvucite ga.
- Očistite ga tušem i sačekajte da se voda ocijedi.
- Potpuno ugurajte kondenzator u njegovo ležište i zatvorite 2 zavrtnja.
- Zatvorite pokrov podnožja.
6.4. Čišćenje senzora za vlagu
natural_image
Illustration of a hand placing a yellow substance into a white container (no text or symbols)natural_image
Illustration showing hands cleaning a washing machine with a cloth, no text or symbols present7. TEHNIČKE SPECIFIKACIJE
| Robna marka VOX | |
| Naziv modela DM802 | |
| Visina Min: 845 mm / Maks.: 855 mm* | |
| Širina 596 mm | |
| Dubina 609mm | |
| Kapacitet (maks.) 8 kg** | |
| Neto masa (s plastičnim vratašcima) 36,5 kg | |
| Neto masa (sa staklenim vratašcima) 38,8 kg | |
| Napon | 220-240 V |
| Snaga | 2700 W |
natural_image
Abstract geometric pattern with diagonal stripes inside a circle (no text or symbols)VOX
ELECTRONICS
PRT
Máquina de secar a roupa
natural_image
Line drawing of a washing machine with front panel and side buttons (no text or symbols)DM802
natural_image
Simple line drawing of a trash bin with crossed lines indicating no waste or discharge (no text or symbols)natural_image
Line drawing of a washing machine with an open door and internal air filter (no text or symbols)
natural_image
Illustration of hands using a tool to clean or store food items in a container (no text or symbols visible)natural_image
Illustration of a hand placing a yellow substance into a white container (no text or symbols)natural_image
Illustration showing two steps of cleaning a washing machine, with hand cleaning the rim and cleaning the interior (no text or symbols present)7. ESPECIFICAÇÕES TÉCNICAS
- DM 802
- VOX
- ELECTRONICS
- Thank you for choosing this product.
- CONTENTS
- SAFETY INSTRUCTIONS .... 3
- INSTALLATION....9
- OVERVIEW 10
- PREPARING THE LAUNDRY....11
- USING THE TUMBLE DRYER .... 13
- CLEANING AND CARE....19
- TECHNICAL SPECIFICATIONS....22
- TROUBLESHOOTING....23
- ENVIRONMENTAL PROTECTION AND PACKAGING INFORMATION ..... 25
- DESCRIBING THE ENERGY LABEL AND SAVING ENERGY .... 25
- PRIMARY CONSIDERATIONS
- SAFETY INSTRUCTIONS
- Electrical Safety
- Children's Safety
- Product Safety
- Due to risk of fire, the following laundry items and products should NEVER be dried in the dryer:
- Correct Use
- Installing On Top Of a Washing Machine
- CE Declaration of conformity
- Disposing the Old Product
- INSTALLATION
- Removing the Safety Assembly
- Connection to Water Outlet (with optional drain hose)
- Connecting the Water Discharge Hose
- Adjusting the Feet
- Electrical Connection
- Under Counter Installation
- OVERVIEW
- PREPARING THE LAUNDRY
- Sorting the Laundry to be Dried
- Preparing the Laundry to be Dried
- Risk of explosion and fire!
- Load Capacity
- USING THE TUMBLE DRYER
- Control Panel
- Programme Selection Knob
- Electronic Indicator and Additional Functions
- Programme Selection and Consumption Table
- Auxiliary Functions
- Starting the Programme
- Programme Progress Indicator
- Drying:
- Cooling:
- End:
- During the Programme
- Programme End
- CLEANING AND CARE
- Cleaning the Lint Filter
- Cleaning the Condenser
- Cleaning the Humidity Sensor
- Cleaning the Inner Surface of the Loading Door
- TECHNICAL SPECIFICATIONS
- TROUBLESHOOTING
- ENVIRONMENTAL PROTECTION AND PACKAGING INFORMATION
- Packaging Information
- DESCRIBING THE ENERGY LABEL AND SAVING ENERGY
- Energy Efficiency
- Zahvaljujemo vam što ste izabrali ovaj proizvod.
- POSTAVLJANJE
- PRIPREMA VEŠA
- KORIŠĆENJE MAŠINE ZA SUŠENJE VEŠA
- Kontrolna tabla
- Elektronski indikator i dodatne funkcije
- Simboli na ekranu:
- Indikator faza sušenja:
- Čišćenje kondenzatora
- Čišćenje senzora za vlagu
- Čišćenje unutrašnje površine vrata za ubacivanje
- TEHNIČKE SPECIFIKACIJE
- Електронски индикатор и дополнителни функции
- Hvala, ker ste izbrali ta izdelek.
- Elektronski indikator in dodatne funkcije
- Simboli na zaslonu:
- TEHNIČNE SPECIFIKACIJE
- Hvala vam što ste odabrali ovaj proizvod.
- SADRŽAJ
- UPUTE O SIGURNOSTI 3
- INSTALACIJA....9
- PREGLED 10
- PRIPREMA RUBLJA 11
- KORIŠTENJE SUŠILICE....13
- ČIŠĆENJE I ODRŽAVANJE 19
- TEHNIČKE SPECIFIKACIJE 22
- OTKLANJANJE POTEŠKOĆA 23
- NAJVAŽNIJA UPOZORENJA
- KORIŠTENJE SUŠILICE
- Elektronički indikator i dodatne funkcije
- ESPECIFICAÇÕES TÉCNICAS
Brand : VOX
Model : DM802
Category : Tumble dryer