
ThunderForm F-150EX-09A - Subwoofer MTX Audio - Free user manual and instructions
Find the device manual for free ThunderForm F-150EX-09A MTX Audio in PDF.


| Product Type | Vehicle-Specific Amplified Subwoofer Enclosure |
| Brand | MTX Audio |
| Model | ThunderForm F-150EX-09A |
| Compatible Vehicles | Ford Mustang 2005-2013 (except convertible) |
| Subwoofer Size | 12 inches |
| Subwoofer Type | MTX Terminator |
| RMS Power Handling | 200 Watts |
| Peak Power Handling | 400 Watts |
| Frequency Response | 10 Hz - 78 Hz |
| Impedance | 4 Ohms |
| Signal-to-Noise Ratio | >75 dB (1 Watt) |
| Amplifier | Integrated, 200W RMS |
| Enclosure Design | Rotationally molded, finished in black |
| Mounting Location | Trunk, passenger side |
| Included Accessories | Wiring harness, Electronic Bass Control (EBC), fuse holder, ring terminal, speaker grill, mounting hardware, owner's manual |
| Power Wire Gauge | 10 AWG (red for power, black for ground) |
| Fuse Rating | 20 Amp |
| Warranty | 2-year limited warranty |
| Safety Notes | Disconnect battery before installation; use fused power connection; avoid short circuits; protect from moving/hot parts |
| Installation Tools Required | Powered screwdriver, Phillips head bit, 6" bit extension, wire cutters, 10mm wrench, 5/16" wrench, trim panel removal tool |
Frequently Asked Questions - ThunderForm F-150EX-09A MTX Audio
User questions about ThunderForm F-150EX-09A MTX Audio
0 question about this device. Answer the ones you know or ask your own.
Ask a new question about this device
Download the instructions for your Subwoofer in PDF format for free! Find your manual ThunderForm F-150EX-09A - MTX Audio and take your electronic device back in hand. On this page are published all the documents necessary for the use of your device. ThunderForm F-150EX-09A by MTX Audio.
USER MANUAL ThunderForm F-150EX-09A MTX Audio
FMUST05BK12A-TN
FORD MUSTANG
VEHICLE SPECIFIC SUBWOOFER ENCLOSURE
OWNER'S MANUAL

THANK YOU
Thank you for making the AWESOME decision to purchase our MTX Audio vehicle specific subwoofer enclosure designed for the Ford Mustang. Our sub enclosure, with its 12" Terminator subwoofer, will belt out the bass and deliver ground pounding audio making you the party vehicle! With a few basic hand tools in your trusty toolbox, you can have this installed in no time. So, what are you waiting for? It's time to get the rumble in your ride! Oh, and congratulations on your purchase, thanks for your support and most importantly, enjoy the ultimate audio experience with MTX!
WE'RE HERE TO HELP
We're here to help with any installation or technical support. Visit mtx.com to chat, call 1-800-225-5689 to speak with an MTX Technical Support representative, or visit youtube.com/user/MTXAudioUSA to view product videos.
DON'T FORGET TO REGISTER YOUR PRODUCT
Don't forget to register your new MTX Audio product. Visit mtx.com/productregistration or scan the QR code to the right.
Model #
Serial # ____
Dealer's Name
Date of Purchase

IMPORTANT NOTICE
Whenever working on the vehicle, it is recommended to disconnect the battery prior to starting work. Failure to do so may lead to a risk of electric shock or equipment damage.
When connecting power and ground wires ensure that the red power wire is fused at the point where it is connected to the vehicle's battery. Failure to do so can result in damage to the vehicle if a short circuit develops between the vehicle connection point and the product.

FEATURES
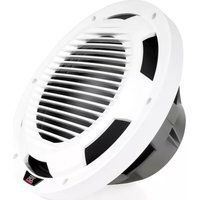
- Includes One MTX 12" Terminator Subwoofer
- Integrated Amplifier Easily Connects to Existing Systems
- Rotationally Molded Design, Finished in Black
- Mounts in Trunk on Passenger Side
• EBC and Wiring Harness Included
SPECIFICATIONS
- Single 12" Amplified Subwoofer Enclosure
• RMS Power Handling: 200-Watts
• Peak Power Handling: 400-Watts
• Signal-to-Noise Ratio (1 Watt): >75dB
• Frequency Response: 10Hz - 78Hz - Impedance: 4Ω
FIT GUIDE
Mustang....2005 - 2013
FIT GUIDE NOTES
Does not fit convertible.
REQUIRED TOOLS
- Powered Screwdriver
-
2 Phillips Head Bit
- 6" Bit Holder Extension
- Wire Cutters
- 10mm Wrench
- 5/16" Wrench
- Trim Panel Removal Tool
IN THE BOX
• FMUST05BK12A-TN Amplified Subwoofer Enclosure
• EBC
- Wiring Harness
INSTALLATION
Step 1 - Place enclosure in passenger side of cargo area.

Step 2 - Make note of the terminal / pre-amp location and then move enclosure aside to route wires to that location.
Step 3 - If externally amplified, connect speaker wires from amplifier to enclosure, positive to red terminal and negative to black terminal.
Step 4 - If you are using an external amplifier, skip to step 20.
Amplified ThunderForm
Note: When routing power wire we recommend a connection directly to the battery.
Step 5 - Remove the rear seat bottom by pressing the cushion toward the rear of the car and lifting up. It helps to do one side at a time. Starting at the rear of the vehicle, remove the plastic trim on driver side.
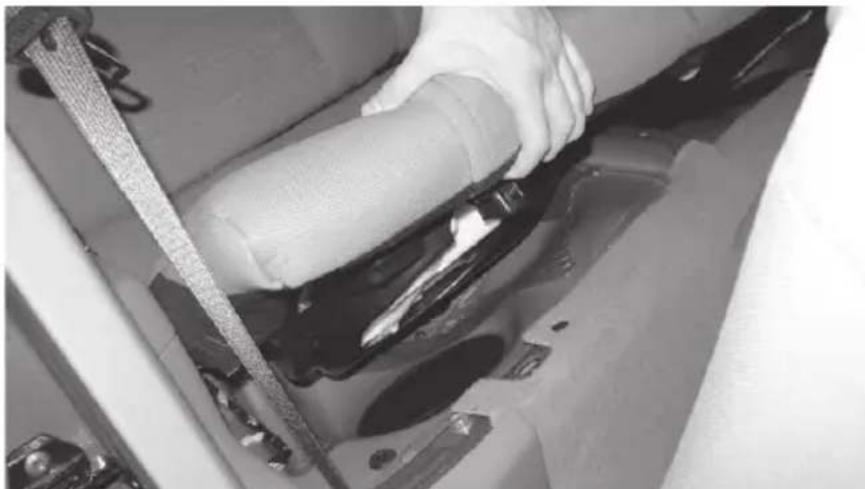

Step 6 - Using furnished wiring harness route 10ga red power wire starting at pre-amp location. Route wire under rear seat on driver side, over to threshold and under carpet to the front of vehicle.
Step 7 - Open hood.
Step 8 - Drill a hole through the firewall. Locate a spot low on the firewall on the passenger side. You should always look to find a clear path. Drill a hole from inside of the vehicle into engine compartment and insert grommet. You may also find a pre-existing, unused rubber grommet in this location that you can pass the wire through. Note: To avoid any damage to parts inside engine compartment, drill from inside of vehicle using a short bit.

Step 9 - Route 10ga red power wire through grommet into the engine compartment.
Step 10 - Route 10ga red power wire through engine compartment safely away from any moving or hot parts that could damage the wire.
Step 11 - Cut 10ga red power wire to length, connect the supplied fuse holder from the wire kit to the end of the wire.
Step 12 - Remove 20 amp fuse from MTX fuse holder. Connect furnished ring terminal to positive side of battery. Remove 5/16 nut from factory battery terminal. Place ring terminal on battery post and retighten nut. Note: Always turn the ignition OFF when connecting or disconnecting battery cables. Failing to do so may damage electronic components.
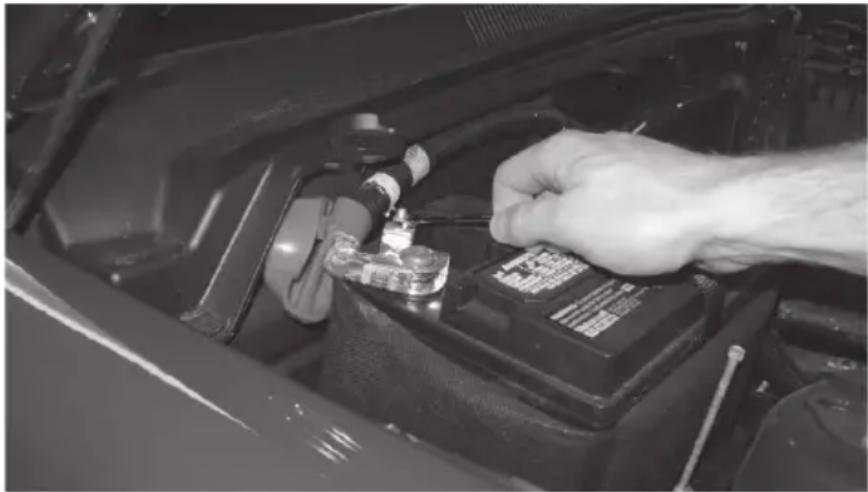
Step 13 - Ground amplifier to chassis of vehicle; connect the terminal provided to the 10ga black wire from furnished wiring harness. A good ground is as important as the power connection. The ground should be as short as possible and the contact point should be free of paint and debris.
Step 14 - Connect remote (Blue) wire to 12-volt switched accessory. To turn on the amplifier unit, a switched 12-volt signal is required. Locate a 12-volt wire that is active when the vehicle key is on and connect the blue remote wire to it. This may be found in the fuse panel, key-switch or radio harness.
Speaker Wires
Step 15 - Once the rear seat is pulled out, you will see the two main wire harnesses wrapped in black tape (as shown bellow). Speaker wires are located on their respective sides and are twisted together in these harnesses. Wire colors for the left rear speakers are; tan / yellow (positive) and gray / light blue (negative). The right rear speaker wire colors are; orange / red (positive) and brown / pink (negative). Tap into wires and route into the trunk, behind trunk liner and to pre-amp of enclosure. Connect to the supplied High Level input harness wires and plug into the matching port on the pre-amp.
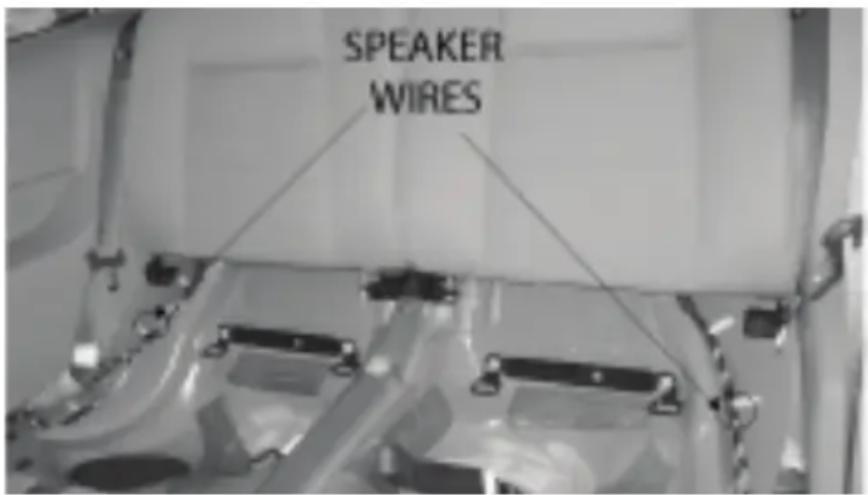
Although, MTX has made every effort to assure proper wiring colors, MTX is not responsible for any changes made by the vehicle manufacturer which sometime occur. If wiring colors do not match then physical verification is required.
Connection to Enclosure
Conventional Wiring of Factory Radio
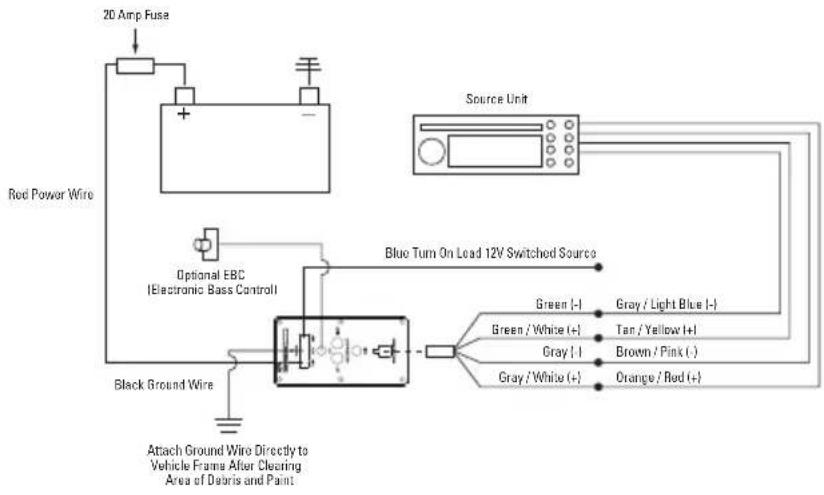
Conventional Wiring of Aftermarket Radio

Step 16 - Plug power wire harness into amplifier pre-amp.

Step 17 - Replace 20 amp fuse under hood.
Step 18 - When amp turns on, LED will display red during diagnostic mode, and then green, signaling amp is on and functioning. Amp will only turn on when radio is on.
Step 19 - Adjust gain.
Setting Gain
Turn gain knob on ThunderForm pre-amp to minimum, counter clockwise. Play a favorite song that contains consistent music and bass. Turn the source unit to maximum listening level. You should know that some source units will produce distortion or "clip" before the unit reaches maximum volume. Reduce volume to the loudest listening level before distortion. Turn the gain knob on the ThunderForm pre-amp clockwise until the speaker starts to distort and reduce gain to loudest listening level before distortion.
Optional - The EBC, or Electronic Bass Control, allows a remote bass control to be adjusted from the driver's seat.
Troubleshooting Tips if Amp Does Not Turn On
- Check all connections at battery and that fuse is installed
- Check speaker wire connections
- Check ground
- Check fuse on pre-amp
Step 20 - Carefully un-install the woofer from the enclosure by removing the 8 screws holding it in the enclosure and continue to next step.
Step 21 - Fold the corner of the floor mat back under itself, as shown below.

Step 22 - Place enclosure into corner of trunk with its front edge over the folded section of the floor mat. Make sure the enclosure is pressed firmly against the side walls of the truck liner and tail light.
Step 23 - With supplied hardware, secure the enclosure to the floor.

Step 24 - Carefully reinstall woofer into enclosure.
Step 25 - Using the supplied screws, attach the included speaker grill to prevent damage from cargo.
These instructions are guidelines only and in no way are intended to replace a professional installation. As always before screwing or drilling check to make sure you will not damage any wires or hoses or cause damage to the vehicle.
Warning: Batteries normally produce explosive gases which can cause personal injury. Therefore, do not allow flames, sparks or lighted substances to come near the battery. When charging or working near a battery, always shield your face and protect your eyes. Always provide ventilation.
NOTES
WARRANTY PERIOD
At MTX Audio we engineer products that will stand up to the test of time. We also realize that from time to time a problem may occur. That's why our products carry a 2-year limited warranty that begins at the time of sale to the end user.
Of course, we're here to help. If you experience an issue with any of our products within the warranty period, please contact our customer service technical line at 1-800-CALL-MTX to help troubleshoot your issue. If, after speaking with our technical experts it is determined that a problem lies with the product, the technician will provide you with a Return Authorization number and all relevant details you'll need to get the product taken care of.
MITEK WARRANTY
MiTek Mobile products (including, but not limited to: MTX, Coustic, Streetwires, Xtant, BassSlammer, and Thunder Marine) purchased in the USA from an AUTHORIZED MITEK DEALER are guaranteed against defects in material and workmanship for the period of time specified. The warranty period begins the day the product is purchased by the end user, and this warranty is limited to the original retail purchaser of product. Products found to be defective during the warranty period will be repaired or replaced with equivalent product by MiTek at no charge. This warranty is void if it is determined that unauthorized parties have attempted repairs or alterations of any nature, and the warranty does not extend to cosmetics or finish. MiTek disclaims any liability for other incurred or consequential damages resulting from product defects. MiTek's total liability will not exceed the purchase price of the product.

Let's Get Social
mtx.com

Like, Follow, & Subscribe
© 2021 MiTek Corporation. All rights reserved. MTX is a trademark of MiTek Corporation. All other trademarks are property of their respective owners. Designed and Engineered in the U.S.A.
Due to continual product development, all specifications are subject to change without notice.
MTX Audio, 4545 East Baseline Rd. Phoenix, AZ 85042 U.S.A. 1-800-225-5689
MTX006401 RevA 2/21 • 1-10532

- THANK YOU
- WE'RE HERE TO HELP
- DON'T FORGET TO REGISTER YOUR PRODUCT
- IMPORTANT NOTICE
- FEATURES
- SPECIFICATIONS
- FIT GUIDE
- FIT GUIDE NOTES
- REQUIRED TOOLS
- 2 PHILLIPS HEAD BIT
- IN THE BOX
- INSTALLATION
- AMPLIFIED THUNDERFORM
- SPEAKER WIRES
- CONNECTION TO ENCLOSURE
- SETTING GAIN
- TROUBLESHOOTING TIPS IF AMP DOES NOT TURN ON
- NOTES
- WARRANTY PERIOD
- MITEK WARRANTY
- LET'S GET SOCIAL
- MTX.COM
Brand : MTX Audio
Model : ThunderForm F-150EX-09A
Category : Subwoofer