
50BT - Humidifier Winix - Free user manual and instructions
Find the device manual for free 50BT Winix in PDF.


| Product Type | Dehumidifier |
| Model | 50BT |
| Moisture Removal Capacity | 50 Pints (at 80°F, 60% RH) |
| Bucket Capacity | 19.2 Pints |
| Power Supply | 115V / 60Hz |
| Power Consumption | 490W |
| Refrigerant | R410A, 10.22 oz |
| Humidity Control Range | 35% – 70% relative humidity (in 5% increments) |
| Fan Speeds | Auto, Low, High |
| Timer Features | Cycle Timer (3, 5, or 12 hours on/off); Delay Start |
| Operating Temperature Range | 30°F – 90°F (1°C – 32°C) |
| Dimensions (W x D x H) | 14.1 x 12.1 x 22.3 inches |
| Weight | 39.3 lbs |
| Filter Type | Washable pre-filter (behind front grill) |
| Filter Cleaning | Every 2 weeks; wash with water, air dry 24 hours |
| Drain Options | Bucket (manual empty) or Gravity Drain (hose not included) |
| Safety Features | Auto shut-off when bucket full/bucket not in place; defrost operation |
| Warranty | 1 year limited warranty (parts) |
| Recommended Placement | Level floor, 12–18 inches from electronics, away from direct sunlight |
| Special Note | Not for whole-house dehumidification; use in enclosed area |
Frequently Asked Questions - 50BT Winix
User questions about 50BT Winix
0 question about this device. Answer the ones you know or ask your own.
Ask a new question about this device
Download the instructions for your Humidifier in PDF format for free! Find your manual 50BT - Winix and take your electronic device back in hand. On this page are published all the documents necessary for the use of your device. 50BT by Winix.
USER MANUAL 50BT Winix
natural_image
Line drawing of a BYINX industrial air purifier with ventilation slots and wheels (no text or symbols on the device itself)
50BT, 70BT
FOR THE HOME

natural_image
Simple line drawing of a house and cloud with no text or symbolsFOR THE FAMILY

natural_image
Simple line drawing of a family holding an adult's hand (no text or symbols)CONTENTS
Set Up
Controls 5
0
Where to use?
Safety Instructions
Safety and Cautions 5
Operation
Bucket 9
Gravity Drain 10
Care and Maintenance
Grill and Filter 11
exterior 12
Bucket 13
Troubleshooting
Tecuently Askc Questions 4
and Specifications 16
Product Warranty 18
CONTROLS
(A) Power: Turns the unit on or off.
(B) Settings: Cycles through available settings; Auto, Humidity; Cycle Timer; Delay Start, and Auto.
( C ) Fan Speed: Allows manual control of fan speeds.
(D/E) Manual Humidity Level: Use the arrows to manually adjust the humidity level in the environment. Down (D) decreases and Up (F) increases humidity percentage.
(F) Fan Speed Indicator: Displays the current fan speed. When AUTO is selected, the unit adjusts the fan speed accordingly depending on the humidity level.
(G) Bucket Full Indicator: When the collection bucket is full this indicator will turn on. The unit will not run until the bucket is emptied.
(H) Display Window: Shows humidity level of environment between 35% to 70%, in increments of 5%. Shows information when setting Cycle Timer or Delay Start.
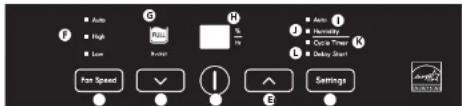
(1) Auto: When the unit is initially powered on, it will run in AUTO mode. The unit will automatically set the Relative Humidity (RH) level to 50%, for normalized operation.
(J) Humidity: Manually set the RH by pressing the Down or Up arrows when in this setting, allowing the user to manually set their RH level, ranging from 35% to 70% in increments of 5%.
(K) Cycle Timer: Timer feature which allows the unit to run for 3, 5, or 12 hours then power down for 3, 6, or 12 hours. Manually set the duration by pressing the Down or Up arrows when in this setting.
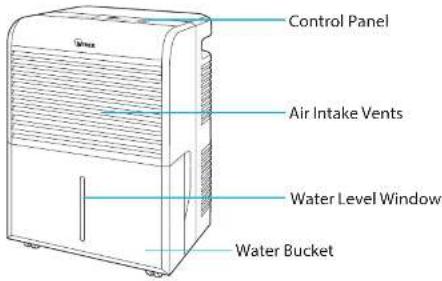
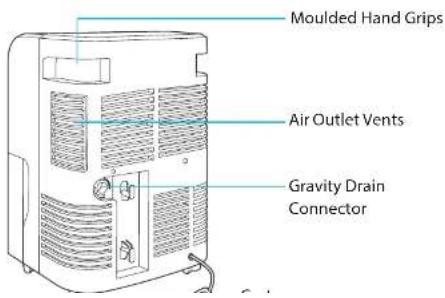
UNIT
× Always keep unit in upright position. Do not allow to tip over.
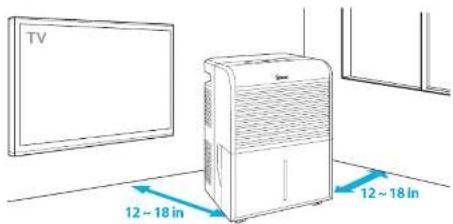
WHERE TO USE
Allow 12 \~ 18 in. of space between TVs, radios, and other electronic products
electron signed: interference from certain electronics may cause product, HVAC, or
Place in a location where the temperature will not fall below 65°F
property management company will lead to maximum effectiveness.
Place indoors away from direct sun light
direct exercise may cause product malfunction or failure.
Do not leave doors or windows open where unit is being used
the unit was not will be increased and may cause railinc. or failures.

WARNING
Follow these instructions to reduce the risk of serious injury or death and to reduce risk of damaging the unit.

Do not use around mist or fumes from
industrial oil or around large quantities
metallic dust
Do not install in any sort of motor or

Do not place around heating elements
1. 2017年 ,公司及子公司对外担保情况
Do not place in an area with excessive

The quick brown fox jumps over the lazy dog.

公司预计2023年实现的经营目标
SAFETY AND CAUTIONS
Before operating this equipment, carefully read and follow these safety cautions
Be sure foreign objects are NOT inserted into the vents on the unit
objects can include pins, mids, and coins.
Do not touch any part of the interior of the unit with wet hands
The high voltage may cause electric shock
Ensure unit intake and outlet vents do not become blocked
blockage may lead to increased internal temperatures causing product failure and deformation
Do not use the unit as a step stool or place heavy objects on it
personal injury may occur or product, failure and deformation.

WARNING
Follow these instructions to reduce the risk of serious
injury or death and to reduce risk of damaging the unit.

Do not pull on the power cord when
unplugging the unit

If the unit becomes submerged in water,

Do not tie or knot power cord when unit
is in operation

Do not unplug or move the unit while in
OPERATION
There are two options to operate the unit, bucket or Gravity Drain Hose.
1. Bucket
Using this method requires the bucket to be emoted manually when full.
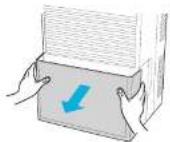
① Slide the bucket out of the unit by grasping the side handles.
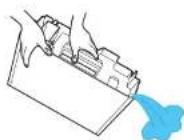
② Emoty the bucket in a basin with a drain, ideally a sink.
(3) After the bucket is emptied, the bucket will need to be replaced by sliding the bucket back into the unit.
2. Gravity Drain Hose
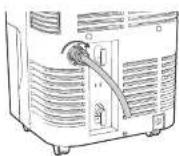
This method will allow a nose to be connected to the rear of the unit, allowing for continuous flow and disposal of any water collected from the air (hose not provided).
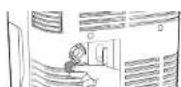
① Remove the Gravity Drain cap.
OPERATION
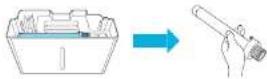
② Remove the bucket from the unit. Remove the DRAIN CONNECTOR from the buckets
(3) Install the DRAIN CONNECTOR to the oehum cliter by inserting fully into the gravity drain in the rear of the unit, and turning clockwise.
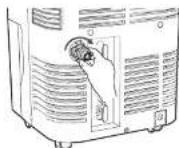
④ Screw a standard drain hose to the drain connector by turning it clockwise.
Defrost Operation
- The dehumidifier has a built-in pelrost control that senses frost buildup on the evaporator coils.
- During defrosting, the compressor will automatically turn off; the fan will continue running to defrost, the coils.
Automatic Shut off
- When the bucket is full, or when the bucket is not in the proper position.
CARE AND MAINTENANCE
1. Cleaning Front Grill and Air Filter
Using this method requires the bucket to be emoted manually when full.
① Remove the bucket from the unit; the air filter is located behind the front grill.
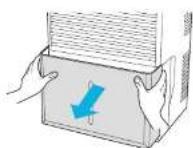
② Pull the filter down and away from the unit, until it is all the way out.
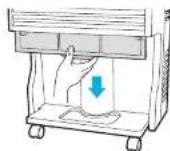
③ Wash the filter with water, rinse thoroughly. Air dry away from direct sunlight for at least 24 hours.
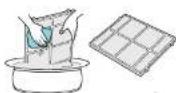
④ After cleaning and drying, replace the air filter behind the front grill and replace the bucket
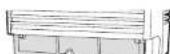
CARE AND MAINTENANCE
2. Cleaning the Exterior
① Clean the exterior using a soft brush or dry towel. But do not spray water directly on the unit.
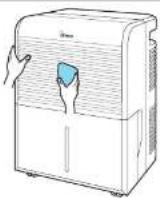
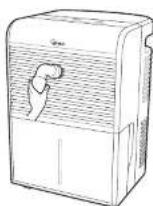
② The Front Grill can be cleaned using a vacuum cleaner or a soft brush to remove dust.
CARE AND MAINTENANCE
3. Cleaning the Bucket
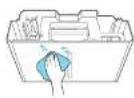
① After removing the bucket from the unit, lift off the cover. Clean the inside and outside of the bucket as needed.
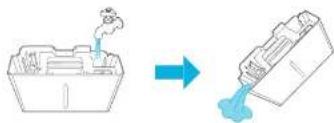
② Rinse the bucket and drain.
flowchart
graph LR
    A["Factory with smoke"] --> B["Container with liquid"]
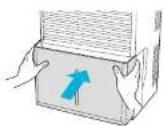
③ Replace the bucket. Ensure float switch is not obstructed. Proper position of the bucket and float switch is required for the dehumidifier to run.
FREQUENTLY ASKED QUESTIONS
| Problem Check / | Actions to take |
| Dehumidifier does not work when pressing the POWER button. | Is the power cord plugged into a grounded 3-prong outlet?- Plug the power cord securely into a grounded 3-prong outlet.Does Bucket Full light appear after emptying the water bucket?- Empty the water bucket and re-insert. |
| Dehumidifier is operating, but the unit is not drawing any water. | - Is the compressor running as well as the fan?- The unit may be in the defrost mode.This is noted by the fan running but not the compressor. If this is the case, regular operation will begin to run automatically.- If both the compressor and fan are running, but the air being returned from the outlet vent is not at least 65°F or above for room temperature, then there may be a sealed system failure. Please contact customer service. |
| Loud noise and/or vibration occurs during | - Is the unit on a level surface?- If not, place the unit on a level and hard |
FREQUENTLY ASKED QUESTIONS
| Problem Check / | Actions to take |
| Odd sounds seem to be coming from the unit. | • Sounds like flowing water during and after operation.- This is a normal sound of the refrigerant flowing through the coils.• The unit is making a pinging sound.- This is a normal sound of expansion and contraction caused by the change in temperatures. |
| Dehumidifier is not running efficiently. | • Are the grill and filter dirty?- Clean the Front Grill and Air Filter, see p. 12• Is the indoor temperature under 68°F?- If you, frost can develop easily which will inhibit the units efficiency. |
| Unit is discharging warm air. | - Normal; the compress and electric motor discharge a small amount of heat which will warm the air. |
| • Is the Drain Connector installed correctly?- Re-install the drain hose, see p. 9 |
UNIT SPECIFICATIONS
| Model 50BT 70BT | ||
| Moisture Removal | 50 Pint. 70 Pint | |
| Bucket Capacity | 19.2 Pints | |
| Power Supply 115V / 60Hz | ||
| Watts 490W 710W | ||
| Refrigerant | R 410s10.22 oz | T 410s11.99 oz |
| Relative Humidity Settings | 35 - 70% | |
| Cycle Timer | 3.6.12 Hours | |
| Operating Temperatures | 30H - 90H | |
| Unit Dimensions | 14.1 in (W) x 12.1 in (D) x 22.3 in (H) | |
| Unit Weight | 39.3 lbs 42.5 lbs | |
The exterior, design, and product specifications may be changed to improve product performance without prior notice.
Warning: Change or modifications to this unit not expressly approved by the party responsible for compliance could void the user's authority to operate the equipment.
Note: This equipment has been tested and found to comply with the limits for a Class 4 digital device, pursuant to Part 15 of the FCC Rules. These limits are designed to provide reasonable protection against harmful interference in a residential installation. This equipment generates, uses and can radiate radio frequency energy and, if not installed and used in accordance with the instructions, and may cause harmful interference to radio communications. However, there is no guarantee that interference will not occur in a particular installation. If the equipment does cause harmful interference to radio or television reception, which can be characterized by turning the equipment off and on, the user is encouraged to try to correct the interference by one or more of the following measures.
- Increase the separation between the equipment and receiver.
- Connect the instrument into an outlier on a line in different form that to which the network connected
Thank you for purchasing a Winix dehumidifier. This product is for household use only.
IMPORTANT CAUTIONS FOR USING YOUR DEHUMIDIFIER
WARNING: Follow the instructions in this manual to reduce the risk of electric shock, short circuit, and/or fire.
• Do not place the power cord near a
hearer
- Do not use an electrical outlet near flammable or combustible materials such as gasoline, propane, paint thinners, etc.
* Do not disassemble or modify the dehumidifier parts or components. I may cause electric shock and failure.
- Plug in the power cord properly.
- Do not turn the unit on and off by
inserting or pulling out the power plug.
* Do not damage the power cord or use an
unspecified power cord.
- Do not modify power cord length.
• Do not share the outlet with another
appliance
- A ways plug into a grounded outlet. Not grounding unit may cause electrical shock
- Unp. ug the unit: if it emits strange sounds, adors, or smoke.
- Do not use an electrical outlet if this loose or damaged.
- Do not operate or plug in unit with wet hands or in a wet environment.
- Ventilate area before operating dehumicifier. Check for the presence of natural gas or the buildup of other combustible vapors.
- Do not clear the dhumidifier with water. Water may enter the unit and degrade the insulation resulting in an electrical shock.
- If water enters the product, turn off the dehumidiner's power switch, then unplug the unit. Do not plug in unit until it has been inspected by an authorized repair service.
- Because the fan rotates at high speed during operation, always unplug dehumidifier before attempting any recommended maintenance or cleaning.
* When not in use, turning the unit off will save energy. Unplug the dehumidifier when not in use, turning the unit off will save energy.
- When removing the filter, be aware that some metal parts may have sharp edges and may cause injury.
- Do not use the water collected in the bucket for drinking purposes. It is not sanitary and could cause illness.
• Do not allow children to play with this product.
TIPS
• Auto is the suggested setting for typical everyday use.
• Make sure the dehumidifier is the correct size for the area you want to dehumidify. It is not designed to dehumidify the entire house.
- For proper operation, the dehumidifier should only be placed on a level floor. - Close all doors, windows and other openings to the room. The dehumidifier must operate in an enclosed area to be effective.
- To clean, use a soft cloth; do not use wax, thinners, or strong detergents as they may change the color of the unit or cause surface damage.
* Be sure to replace the bucket properly after complying to prevent water from collecting on the floor causing damage to some brees of flooring.
- Do not put a pet or house plant, where it will be exposed to direct air flow. This could injure the pet or plant.
• Operation without filter will cause unit failure. Insert the filter securely. Clean it every two weeks.

WARNING
WINIX DEHUMIDIFIERS LIMITED WARRANTY
Limited Warranty: Winix warrants the parts of the machine to be free of defects in material and workmanship and provides service and support for one (1) year from the date of purchase by the original consumer for models 50BT and 70BT.
If any part is found to be defective during the warranty period, your sole and exclusive remedy will be repair or replacement, at Winix's option and expense, of the defective part.
This warranty does not apply in cases of abuse, mishandling, failure to comply with product usage standards, operation using an improper power supply (other than listed on the label), or unauthorized repair.
Winix reserves the right to charge the consumers for any additional costs incurred by Winix to provide parts or services outside of the country where the air purifier is initially sold by an authorized reseller. This warranty does not include the air cleaner's replaceable filters, which are expendable parts that wear out from normal use.
ANY IMPLIED WARRANTY, INCLUDING THAT OF MERCHANTABILITY OR FITNESS FOR A PARTICULAR PURPOSE, IS HEREBY LIMITED IN DURATION TO THE APPROPRIATE WARRANTY PERIOD SET FORTH ABOVE.
In no event shall Winix be liable for any consequential or incidental damages attributable to this product.
This warranty gives you specific legal rights. The duration, terms and conditions of this warranty are valid worldwide, except where different limitations, restrictions, or conditions may be required by local law.
For more details or to obtain service under this warranty, please contact your local dealer.




Independently Tested
Consumer Trusted.
151216 Rev.2.1.1
To expedite service, please specify the model name and number, the nature of the problem, your contact information, and your address.
- CONTENTS
- Set Up
- Safety Instructions
- Operation
- Care and Maintenance
- Troubleshooting
- CONTROLS
- UNIT
- WHERE TO USE
- WARNING
- SAFETY AND CAUTIONS
- Bucket
- Gravity Drain Hose
- Defrost Operation
- Automatic Shut off
- Cleaning Front Grill and Air Filter
- Cleaning the Exterior
- Cleaning the Bucket
- IMPORTANT CAUTIONS FOR USING YOUR DEHUMIDIFIER
- TIPS
- WINIX DEHUMIDIFIERS LIMITED WARRANTY
Brand : Winix
Model : 50BT
Category : Humidifier