
R30 - Dash cam Kaiser Baas - Free user manual and instructions
Find the device manual for free R30 Kaiser Baas in PDF.


| Product Type | Dash Cam |
| Brand | Kaiser Baas |
| Model | R30 |
| Video Resolution | Full HD (1920x1080p) at 30fps |
| Field of View | 120° wide angle |
| Display | 2.0 inch LCD screen |
| Storage Media | MicroSD card up to 32GB (Class 10) |
| Power Source | Built-in rechargeable battery, 12V car adapter |
| Battery Capacity | 200mAh Li-ion |
| Dimensions (WxHxD) | 65 x 55 x 40 mm |
| Weight | 60 g |
| Mounting | Suction cup or adhesive mount |
| Loop Recording | Yes, adjustable segment length |
| G-sensor | Built-in impact detection, auto-locks footage |
| Night Vision | Low light enhancement with LED |
| Parking Mode | Motion detection when parked (requires hardwire kit) |
| Audio Recording | Built-in microphone, can be toggled |
| Operating Temperature | -10°C to 50°C |
| Maintenance | Clean lens with soft cloth; format SD card monthly |
| Safety Certifications | CE, RoHS |
| Spare Parts Availability | Mounts, cables, and batteries available from manufacturer |
| Warranty | 1 year limited |
Frequently Asked Questions - R30 Kaiser Baas
User questions about R30 Kaiser Baas
0 question about this device. Answer the ones you know or ask your own.
Ask a new question about this device
Download the instructions for your Dash cam in PDF format for free! Find your manual R30 - Kaiser Baas and take your electronic device back in hand. On this page are published all the documents necessary for the use of your device. R30 by Kaiser Baas.
USER MANUAL R30 Kaiser Baas
R30 CAR DVR Capture your journey
KAISER BAAS
Languages
English

Community


/kaiserbaas
Register this product for 12 month warranty:
www.kaiserbaas.com/register
Get product updates:
www.kaiserbaas.com/updates
Tech support
e: helodesk@kaiserbaas.com
w: www.kaiserbaas.com/support
p: Australia 1300 302 306
p: New Zealand 0800 302 306
(ousiness hours, AEST)

Contents
Safety Precautions 6
What's in the Box 7
Product Diagram B
Setting up the 250 Car DVR
In Car Operation 10
Computer Connection II
Wifi Set Up (for Android and iPhone) 12
Software 15
Apr: 18
LED Indication 23
specifications 24
Frequently Asked Questions 25
Carney, 16


Safety Precautions
Before using your R30 Car DVR, please ensure you have
read and understand all of the safety approaches below
- Only use the provided power cables to charge the device
• Do not expose the 730 Car DVR to water, dust, oil and temperatures over 60 °C. - Avoid leaving your R30 Car DVR in direct sunlight; for prolonged periods of time.
- Please do not attempt to adjust the camera settings while you are operating your vehicle.
PLEASE USE YOUR CAMERA WITHIN YOUR COUNTRIES ROAD LAXS. PLEASE CHECK YOUR LOCAL ROAD LEGISLATION BEFORE USE
Warning Changes or modifications to this will not expressly approved by the party responsible for compliance could void the user's authority to operate the equipment.
NOTE This equipment has been tested and found to comply with the trials for a Class R digital new cc, pursuant to Part 1's of the I CC Rules. These limits are designed to provide reasonable protection against harmful interference in a residential installation. This equipment generates uses and can radiate ramp frequency energy and, if not installed and used in accordance with the instructions, may cause harmful interference to reduce communications.
However, there is no guarantee that interference will not occur in a particular installation. If this equipment cross cause harmful interference to radio or televis on reception, which can be determined by turning the equipment off and on, the user is encouraged to try to correct the interference by one or more of the following measures:
• Reorient or relocate the receiving antenna.
- Increase the separation between the equipment and water vent.
- Connect the equipment into an outlet, on a circuit, different from that to which the receiver is connected.
- Consult the dealer or an experienced radio/TV technician for help.
This device complies with Part 15 of the FCC Ru os. Operation is subject to the following two conditions:
- (1) this device may not cause harmful interference, and - (2) this device must accept any interference received, not using interference that may cause undesired operation.


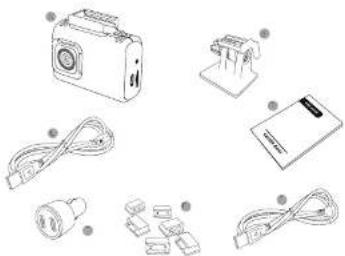
What's in the Box
Please ensure the product package has all the following contents.
R50 Car DVR
JSP Car Charger
Moun.
5 x Cable Management Clips
Micro USB Cable
⑦ JSE DC power cable
b. User Guide
natural_image
Illustration of various electronic components including a camera, plug, capacitor, and connector (no text or symbols)
Product Diagram
Wide Angle Lens
Mounting Socket
Micro USB Port
DC Power Port
Micro SD Sol
GPS LED Indicator
Status LLD Indicator
Wi LED indicator
Capture Photo Button
Event Recording Button
1 WiFi Button
Reset Button


Setting up the R30 Car DVR
General:
- Insert Micro SD card in the Micro SD card slot on the side of the R30 Car DVR.
- Camera will power up and start recording as soon as t receives power from the DC power carrier line (eg. when you start your car).

Car set up:
- Clean the area on your windscreen making sure desired placement is not blocking the driver's view.
- Attach the R50 to the mount by sliding the camera connection from right to left along the mount connection until each
- Remove the protective skin from the 3M adhesive or the mount.
- Stick the adhesive to the inside of the front windscreen in the desired position, and gross for 30 seconds to ensure that the camera is secure.
- Adjust the nut to ensure that the camera is correctly angled
- Tinely connect the R30 to power using the 2C power cable and the USB car charge adapter.


In Car Operation
- Once the RSD Car JV-R is set up and connected to DC power, the comers will automatically power on and start recording when the car is started
- The R30 requires a class 6 or above Micro SD card (not used) with at least 80% of free space.
- The internal G sensor will register any bumps that could be accidents and registers them as an "Ever". These events will not be recorded over by regular footage, these files need to be manually deleted from your SD card using either the App or the provided software.
- Ever recording can be manually triggered using the "1" button.
• Still photos can be taken using the camera button

11

Computer Connection
- Download and install the supplied Motor software to your PC or Mac. The software can be found at:
www.kaiserbaas.com/software/r30
• Follow the on screen setup guide
- Connect your R50 Car DVR to your computer using the supplied micro US3 cable
- Open the Motor+ software
- Select if you want to review media on the camera (left con), or your computer (right icon).
Note. For more information on software functions please see section markers "Software".

Wifi Set Up (for Android and iPhone)
• Download the Motor Plus app by going to:
www.kaiserbaas.com/apps/r30
For a link to the Drive- App in the App Store.
- Power on your camera by contacting the DC power to a USB outlet. From here the WHI LLD should turn on indicating that it is broadcasting a signal.
• In your phones Settings menu, go to your WiFi connection and connect to the camera's wireless connection "MOIONPLUS"
(if you cannot find the WiFi signal, turn the WiFi off using the physical button on the device covered "WiFi" and then run back on by adding the same button until the WiFi light gives grace and the device will say "WiFi start up")
• Please enter the generic password '123-156/69'
- Once connected, open the Motor-app. You should now be able to use your phone as a viewinger for the camera as well as reviewing and managing footage.
For more updates on App functions please see the section labeled "App".


Software
Opening Screen

natural_image
Two identical circular icons on a plain gray background, no text or symbols present.Opening Screen Screen
Camera men
Media Store on Computer

Media Manager

Media Manager Screen
Photo
Media
Video
- Camera Settings
Event Video
General Selines
Meta Street on Computer


Media Player

Media Player Screen
Speec
Share to Social Media
Compass
Copy Video from
Player Controls
Camera
GPS position
General Settings
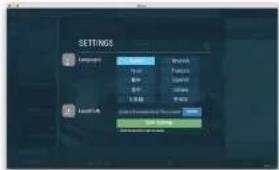
General Settings Screen
Language Selection
DirectoratoSave
Videos to Computer

17

Camera Settings

Camera Settings Screen
1 Mute/Volume
■ Voice Guidance Settings
Event Recording Sensitivity
Video Duration Settings
5 Video Resolution Settings

App
Streaming Screen

natural_image
Street scene with a road and trees, showing a camera icon overlay (no readable text or symbols)Streaming Screen
GPS / Power / WTI
Indicators
Menu
Resolution Settings
Capacity indicators
Streamico Video
Heed
Photo Shutter Button


Menu Screen

Menu Screen
Live Feed
Video S.cred art
2 Video Screen on Camera
Phone
Settings

App Settings

And Sellings Screen
Sign in to Social Mume
Rename Saved Files

21
Car DV Settings

Car DV Sellings Screen
Mute Video Resolution
volume Settings
Event Recording Sensitivity
Reclustering Deviation Settings
Voice Guidance Settings
General Settings

General Settings Screen
1 Set Date / Time
| "RED" Status LED ON R30 | is under Normal Looping Recording. |
| "RED" Status LED Flarec continuously | Counting down and the 720's go- ng to car off out to the power source is random |
| "DOUBLE" Status LLD ON R30 | 30 is under Event Protoclon Recording. |
| "BLUE" Status LED ON R30 | is connecting to PC through US$ rattle. |
| Sub & Red atop LED a emitting fan | 1. No memory card is notation 2. Memory card is less than 800 3. Card error |
| "OZA VAF" GPS LED ON R30 | GPS signal is readout |
| "ORANGE" GPS LED Claver | No GPS signal or GPS signal is weak |
| "GREEN" WITH LED ON W- | is missing. |
| "GREEN" WITH LLD Flarec rapidly | With a ready for connection or approved. |
| "GREEN" WITH LLD Claver rapidly | Data is transforming in With mode. |
Specifications
| Lone 125" Wise Apog Lo#s | |
| Sul Image Resolution or Recording | SPF or 120bp 2MP or 1080p SPF or 720p |
| Video Resolution 12065 | 304x1294 P30 1000P 1920X1090 130 720P 1350x730 P30 |
| Video Format MRES4 (H204) MOV File | |
| Photo frame, 2.0G | |
| SPS Sensor Yes | |
| O Sensor Yes | |
| Work Yes | |
| UFA Port Micro UFR | |
| Power JC In | |
| Microphone Yes | |
| Spacker Yes | |
| Language English | |
| Voice Language English | Mendam |
| Authery | 180mA/s |
| Operator Temperature | -20 to 30 oegred |
| Storage temperature | -10 to 60 degree |
| Orientation (x W x H) | 63 x 43 x 21 cm |
| Weight | 60.3g |

25

Frequently Asked Questions
Q. The image is blurry
A. Try repositioning the 230. For best results, try to earn the camera through a section of the windshield that is not overly curved or angled as this can cause a blurring effect with footage
Q. I can't connect to the cameras WiFi.
A. Try recalling the WiFi by turning it off using the WiFi button and then turning it back on by holding the WiFi button until the camera until the WiFi LED indicator shows green and the camera says "WiFi start up". The connection should now be available in your phone's Will settings.
Q. I can't find the App in the App store
A. Co to www.kaiserbaas.com/R30 using your mobile phone for a direct link to the apo store in your country.
Q. My device will not record
A. Please ensure that you have power connected to the camera using the supplied DC power cable and that you have a SD cord inserted that is Cat 6 or above.

Contact Us
Having trouble setting your Rs0 Ca/2VH up?
Please contact us. No question too big or small and we are more than happy to help.
Please visit
www.kaiserbaas.com/support
Or en
nelodesk@kaiserbaas.com
For further information please visit:
www.kaiserbaas.com
Tech support:
c helipicsikovaisen-Emis.com
www.kaiserpass.com/supcort
1: New Zealand 0800 302 306
(business hours, AL51)


2


English
English
English
English
English
[Non-Text]
[Non-Text]
[Non-Text]
[Non-Text]
[Non-Text]
[Non-Text]
[Non-Text]
[Non-Text]
[Non-Text]
[Non-Text]
[Non-Text]
[Non-Text]
[Non-Text]
[Non-Text]

KAISER
BAAS



- Community
- /kaiserbaas
- Contents
- Safety Precautions
- What's in the Box
- Product Diagram
- Setting up the R30 Car DVR
- General:
- Car set up:
- In Car Operation
- Computer Connection
- www.kaiserbaas.com/software/r30
- Wifi Set Up (for Android and iPhone)
- www.kaiserbaas.com/apps/r30
- Software
- App
- Frequently Asked Questions
- The image is blurry
- I can't connect to the cameras WiFi.
- I can't find the App in the App store
- My device will not record
- Contact Us
Brand : Kaiser Baas
Model : R30
Category : Dash cam