
Playon! Live - Media player AC Ryan - Free user manual and instructions
Find the device manual for free Playon! Live AC Ryan in PDF.


| Product Type | Media Player with DVB-T2 Recorder |
| Model | ACR-PV78100 |
| Brand | AC Ryan |
| Power Supply | DC 5V via included AC adapter |
| Video Outputs | HDMI, Composite (CVBS) |
| Audio Outputs | HDMI, S/PDIF Coaxial, RCA (L/R) |
| Supported Resolutions | 480p, 576p, 720p, 1080i, 1080p |
| Aspect Ratio | 16:9 Widescreen, 4:3 Letterbox, 4:3 Pan Scan, Auto |
| Digital TV Standard | DVB-T2 (EN 302 755) |
| USB Port | 1 x Hi-Speed USB 2.0 (supports up to 3TB HDD) |
| Supported File Systems | FAT, FAT32, NTFS |
| Media File Formats | MKV, TS, TRP, VOB, M2TS, AVI, MOV, MP4, DAT, MP3 |
| Video Codecs | MPEG-1/2/4, H.264/AVC, VC-1 (up to 80 Mbps MPEG2) |
| Audio Codecs | AAC LC, HE AAC v1/v2, AC3, E-AC3 |
| Surround Sound | Dolby Digital 5.1 passthrough/downmix |
| Recording Features | Schedule recording, timeshift, One Touch Recording (OTR) |
| Antenna Connections | RF In, RF Out (passthrough) |
| Remote Control | Full function with numeric keys, EPG, recording buttons |
| Front Panel | USB 2.0 Host port |
| Back Panel | HDMI, Composite Video, Audio L/R, Coaxial, DC In, RF In/Out |
| Warranty | 1 year limited (player, remote control, power adapter) |
Frequently Asked Questions - Playon! Live AC Ryan
User questions about Playon! Live AC Ryan
0 question about this device. Answer the ones you know or ask your own.
Ask a new question about this device
Download the instructions for your Media player in PDF format for free! Find your manual Playon! Live - AC Ryan and take your electronic device back in hand. On this page are published all the documents necessary for the use of your device. Playon! Live by AC Ryan.
USER MANUAL Playon! Live AC Ryan
natural_image
Black electronic device labeled 'A.C.Ryman' with visible ports and ventilation grille (no readable text beyond branding)PLAYON! LIVE
ACR-PV78100
USER MANUAL
A.C.Ryan
TABLE OF CONTENTS
1 User Information 2
1.1 Caption
1.1.1 Usage Cuations .... 2
1.1.2 Radio Interference/Compatibility.... 2
1.1.3 Repair .... 2
1.1.4 Disposing of the player.... 2
1.1.5 Hard Drive Cuations.... 2
1.1.6 Others.... 2
1.1.7 Warranty.... 3
2 Product Information....3
2.1 Product Overview
2.1.1 AV Essentials....3
2.1.2 DVR-T2 Specification....4
2.1.3 USB Connectivity....5
2.1.4 Media Formats & Codes....4
2.2 Player physical appearance....4
2.2.1 Front Panel....4
2.2.2 Back Panel (Left to Right)....4
2.2.3 Passive Control....5
2.3 Initial Setup 7
3 Menu Functions 9
3.1.1 A#F Menu
4 Digital TV Function 24
4.1 DPG 15
4.1.1 LPG Schedule Recording 15
4.2 Timer Schedule Recording 15
A.C.Ryan
1 USER INFORMATION
1.1 CGAURON
This player is designed and manufactured with safety in mind. In order to safely and effectively use this player, please read the following before usage:
1.1.1 Usage Cautions
The player's power voltage: DC 5V. Please use the original supplied AC adapter with this player. Never connect the AC adapter to the player in a humid or dusty area. Do not replace or modify the wiring or the connector of the AC adapter.
1.1.2 Radiointerference/Compatibility
Almost all electronic devices will get radio interference if it is not properly shielded. Under some conditions, your player might get interference. The design of this player complies with CF standards and achieves in the following rules:
This player may not cause harmful interference.
This player may receive some interference, which may cause undesired operation.
1.1.3
If the player has a problem, you should take it to an appointed repair center and let the authorized specialists do the repair. Never repair the player yourself as you might damage the player or endanger yourself.
1.1.4 Disposing of the players
When you dispose the player, be sure to dispose of it appropriately. Some countries may regulate disposal of electrical devices, please consult with your local authority.
1.1.5 Hard-Dater/Coolers
The player uses an external USB hard drive for data storage including recording.
Physical impact may create bad sector in your hard drive. You can use CHKDSK (on Windows OS) to check and fix the problem. All data stored in your hard drive may be lost due to physical impact, electrical shock, power lost, HDD format etc.
It is recommended that you perform defragment after a long period of usage. Regularly backup the data in your hard drive so that it can be recovered in an event of data corruption or loss. AC Ryan takes no responsibility for loss of data stored on the hard drive.
1.1.6 Coloess
When using the player, please do not let the player come in contact with water or other liquid, if water is accidentally spilled on the player, please use a dry cloth to absorb the spillage.
Electronic products are vulnerable, when using please avoid the following:
Do not let the player come into contact with water or other liquid.
A.C.Ryan
- Do not disassemble the player, repair the player or change the design of the player, any damage done will not be included in the repair policy.
- avoid hitting the player with hard object, avoid shaking the player and stay away from magnetic fields.
During electrostatic discharge or when exposed to a strong electromagnetic field, the product will malfunction. If this happens, then unplug the power cable and the product will return to normal performance next time when it is powered on.
1.1.7 Warranty
Your PlayfullNE is covered with 1 year limited warranty from the date of purchase including its supplied remote control and power adaptor.
What your warranty does not cover:
- Acts of nature, such as fire, static discharge
- Damages from unauthorized repair, alternation or accident.
- Damages from misuse or neglects.
A unit that has been modified or incorporated into other products or is used for institutional or other
commercial purposes. - Loss of customer's software, n
2 PRODUCT INFORMATION
2.1 PRODUCT OVERVIEW
Thank you for purchasing an AC Ryan Player/LNL (V43-T2 Recorder, model: ACR-PV78100. View Tree-to-Nr TV programs through Digital Video Broadcasting via Terrestrial 2 [DVB-T2]. Record and playback your favorite TV shows.
2.1.1 AV Essentials
Resolution: 480/p, 576l/p, 720p, 1090l/p
Aspect Rate: 10:5 Widescreen, 4:3 Letterbox, 4:3 Pan Scan, Auto Aspect Ratio
Video: HDMI, RCA (CVBS)
Audio: LPCM, HDMI Passthrough, S/PDIF Coastal
Surround Sound: Up to Dolby Digital 5.1
Digital TV Antenna In
Digital TV Antenna Passthrough
* for digital 19 (nm+2) to built range
It for signal porthrough to another OVI-T2 tuner or to OVI-T2 ready Television unit. The player must be powered on in order to amplify the signal porthrough.
A.C.Ryan
2.1.2 DNA/SPredification
DVB-T2 Standard: EN 302 755 v1.3.1
Frequency Range: 177.5MHz - 226.5MHz / 474MHz - 858MHz
Modulation: QPSK 15 / 64 / 256 QAM
FFT Size: Up to 32K
Guard Intervals: Up to 1/128
FIC: 1/2, 3/3, 2/3, 3/4, 4/5, 5/9
Physical Layer Pipes (FLP): Both Single & Multiple
2.1.3 USB Connectivity
1 x HI Speed USB2.0 Port
The player supports up to 3TB external USB hard drive. The player will recognize FAT/FAT32/NTF5 file system for external USB hard drives. Other file systems such as Mac OSX Extended (HFS) or Third Extended (FKT3) are not supported.
2.1.4 Multi-Formates-Codes
The player supports the following media file format: MKV, TS, TRP, VOB, M2TS, AVI, MOV, MP4, DAT and MP3
2.1.4.1 Vialos Coiñoz
MPEG-1/2/4, H.264/AVC, VC-1 (Max. 80Mbit/s @ MPEG2, Max. 60Mbit/s @ H.264/AVC
2.1.4.2 Auclid Ochleros
AAC LC, HE AAC v1/v2, AC3, E-AC3
The player supports Dolby Digital AC3 5.1 and Dolby Digital Plus E AC3 passthrough and downmix to stereo. To bit stream Dolby Digital Plus E-AC3, HDMI enabled Audio & Video Receiver (AVR) must use via HDMI connection. SPDIF connection is not capable to bit stream Dolby Digital Plus E AC3 due to the bandwidth limitation on SPDIF.
2.2 PROFESSIONAL PERFORMANCE
2.2.1 FruitPilamel
1) III-Speed USB2.0 Host Port
2.2.2 Cause of change
2) RF Inlet
3) RF Outlet | signal paththrough to another OVM-T2 tuner or to OVM-T3 ready Television unit. The player must be powered
an In order to amplify the signal porthrough.
4) Constrain Out
A.C.Ryan
5) HCMICut
6) Composite Video
7) Composite Audio (Right & Left)
8) DC Inlet
2.2.3 Release Control
| 1. Power | 17. Numeric Buttons |
| 2. Info | 18. TV/RADIO |
| 3. M/P | 19. RECALL |
| 4. Mutc | 20. AVOC |
| 5. FRWS | 21. SUB-T |
| 6. FWD | 22. IJK |
| 7. Pg Up | 25. PPG |
| 8. Pg On | 26. PLAY |
| 9. PRFV | 26. FALSE |
| 10. NLXT | 26. STOP |
| 11. Mini | 27. RRC |
| 12. EXT | 28. SSD |
| 13. Navigation Buttons | 29. GREEN |
| 14. UK | 30. YELLOW |
| 15. SWAP | 31. BLUE |
| 16. FAY |

Note: Some buttons have multiple functors in different modes of the players.
A.C.Ryan
| No. | Button | Function |
| 1 | POWER | Press to enter standby mode or wake-up. |
| 2 | INFO | Press to display TV current status, signal strength. Press during playback, an open screen displays appears showing the track number and time elapsed/remaining. |
| 3 | MIP | |
| 4 | NOTE | Press to make audio output. Press again to volume. |
| 5 | FWD | Press to fast rowing the current playback. Press repeatedly to select speeds (2x / 4x / 8x / 16x / 24x) |
| 6 | FWD | Press to fast forward the current playback. Press repeatedly to select speeds (2x / 4x / 8x / 16x / 24x) |
| 7 | PG UP | Press in quick sides to the first channel on the TV channel listing. |
| 8 | PG DN | Press to quick switch to the last channel on the TV channel listing. |
| 9 | PILV | Press to view the previous file. |
| 10 | NEXT | Press to view the next file. |
| 11 | MENU | Press to enter Menu. |
| 12 | EXI | Press to test system prompt. |
| 13 | NAVIGATION BUTTONS | Press left Arrow to decrease VolumePress right Arrow to increase VolumePress up arrow and down arrow in change TV channel. |
| 14 | OK | Press OK Button to confirm. |
| 15 | SWAP | Press to quick swap categories. |
| 16 | RIV | Press to move a route between. |
| 17 | NUMERIC BUTTONS | Press to enter numeric input when changing settings. |
| 18 | W/S/ADO | Press to switch over radio channel. |
| 19 | RFCAL | Press to switch close to the last broadcast TV channel. |
| 20 | AUDIO | Press to set suite options. Press repeatedly to select audio tracks. |
| 21 | SUB-I | Press to set subtile options. Press repeatedly to select subtile tracks. |
| 22 | TX | Press to access Toxtoost. |
| 23 | FPG | Press in order Electronic Programs guide. |
| 24 | PLAY | Press to begin playback. |
| 25 | PRASE | Press to press playback. |
| 26 | STOP | Press to stop playback. |
| 27 | REC | Press to record. Press again to set OTR one time recording. |
| 28 | RED | Press to enable AD audio octagonal. Press again to disable. Press in reverse in media chapter mode. |
| 29 | GREEN | Press to switch display language in EPG. Press to |
| 30 | YELLOW | Press to access additional menu option under File Manager. |
| 31 | BLUE | Press to change aspect ratio. Press repeatedly to select aspect ratio. |
A.C.Ryan
2.3 INITIAL SETUP
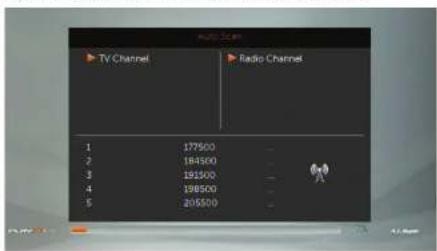
When you first set up the player, you will be greeted with the initial setup window of the player.

You can set the region, language of the player, you can also set the display output mode of the player. The player will automatically perform a channel scan to use you to complete the initial setup.
A.C.Ryan

The player will scan through the broadcasted frequencies and will store the channel listings into the player's memory.
Note: Depending on the region you're using the player in, the channels listing may vary.

www.acryan.com
A.C.Ryan
3 MERNALFUNCTIONS
3.1.1 Main/Res
The main menu of the player consist of 5 sub-categories. They are File Manager, Channel List, Scan, System Setup and Miscellaneous. To access Main Menu press 'Menu' button on your remote control and use 'Up/Down' Arrow to navigate Press 'Right' or 'OK' button to access the options.
3.1.1.1 Full-Manager

Use this menu to playback media contents stored on your external hard drive. You may access your recordings, video files, music and pictures through this menu.
A.C.Ryan
3.1.1.2 Cashflow
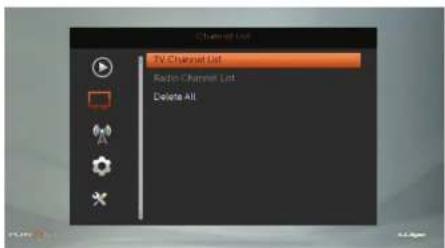
Use this menu to access the TV Channel listing as well as Radio Channel listing. You may also delete all channels from the player through this menu.
Note: You will need to perform channel scan again after deleting all channels from the player.
3.1.2.3 5.6mm

Use this menu to perform channel scan. This menu consist of 3 options - Manual Scan, Auto Scan and LCN.
A.C.Ryan
Manual Scan
• Conduct channel scan using a specific frequency or by a specific channel number.
Auto Scan
• Conduct full range of channel scan.
- You will be able to modify and change country
- FTA Only - To only display Free to Air TV programs.
- 12 Signal Only - To only display DNA 12 signal
n - T3-Lite Support - To also scan for I/V8-72 ure signal.
ICN
- ICH is known as Lagi: Channel/Numbering which is a method to copy program number as used in DVD transmission. We recommend to turn on this option.
1.1.14 3.05mm

Use this menu to perform and make changes to the general settings of the player.
Language
• To change system default language and other language options.
TV System
• To change video resolution output by the plaver, aspect ratio and Digital Audio Out settings.
Display System
A.C.Ryan
• To change display brightness, contrast, saturation, hue and sharpness.
Local Time Setting
• To change date/time settings.
Timer Setting
- To create schedule viewing or schedule recording on a particular TV channel at an user specified date/time.
Note: For schedule recording, please make sure that the hard drive is connected to the player's USB best part on the front panel of the player at all times to prevent any failure in recording.
Parental Lock
- To enable 4-pin numeric code on the player to lock the menu. The default pin is '0000' (Four zeros). User will be able to modify and change the default pin to their desired pin code.
OSO Setting
• To set OSD timeout in an increment of 1 second, up to 10 seconds. To set OSD transparency.
Favorite
• To set and rename Favorite Group. User can customise up to 5 Favorite group.
PVR Storage Information
- To show the total capacity of the attached USB Mass Storage device. User will also be able to configure their hard drive for 'REC & TMS', 'Timeshift' or 'Record' only. User will also be able to use the device to format their external hard drive.
Note: REC stands for Recording. TMS stands for Timeshift.
PVR Setting
• To set Timeshift related options.
Other
• To set Antenna related options.
A.C.Ryan
3.1.2.5 (Anelementus
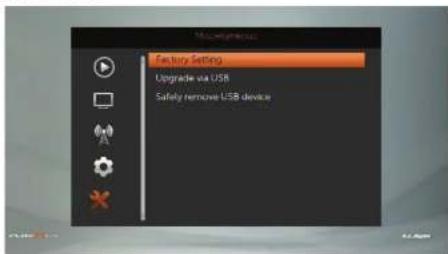
Use this menu to restore default factory setting, firmware upgrade and safely removed of USB devices.
Factory Settings
• To resum battery default settings
Upgrade via USB
• To upgrade fromware version on the player
Safely remove US\$ device
• To safely remove attached USB mass storage device.
A.C.Ryan
4 DIGITAL TV FUNCTION
After you have completed the Initial setup, you should have Digital TV channels listing. The system will automatically show Digital TV immediately after it powers on from standby mode. In this menu, you can watch and record Digital Terrestrial TV programs, or activate the time shift function.
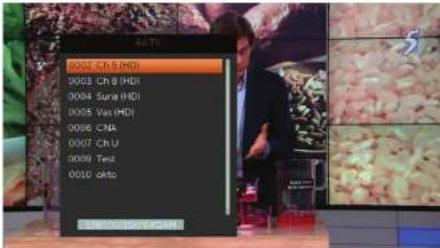
The following are some functional buttons on the remote control, available when watching:
| Name | Function |
| Okay | Press to view the program list menu. |
| Up / Down | Press to switch channels. [Channels that are currently in recording will be locked] |
| Numeric buttons | Press to input channel number. Then press 'Clay' to confirm |
| RRC | Press to start recording the current. In program, Press again to activate during recording. Press Numeric buttons to set the duration on. Press again to set the desired duration. |
| Press | Press to activate Timeshift ^1 |
| Play | Press to Play the Timeshift ^2 |
| Stop | Press to exit Timeshift ^3 |
| Subtitle | Press to activate the substitute list menu if available. |
| EPG | Press to activate the EPG menu if available. |
| LTX | Press to activate the selected menu if available. |
| Audio | Press to enable the audio list menu if available. |
| RED | Press to enable AD audio description if available. |
| BLUE | Press to change Audio Ratio |
| INFO | Press to check current show. Press again to Channel Status |
Note. *Timeshift options must be enabled before you can activate Timeshift. To enable Timeshift, go to 'Menu' > 'System Setup' > 'PVB Settings' > enable 'Timeshift'.
A.C.Ryan
4.1 396
To access Electronic Program Guide, press 'EPS' on your remote control during Digital TV. This allows you to access the Electronic Program Guide to show all the program listing.
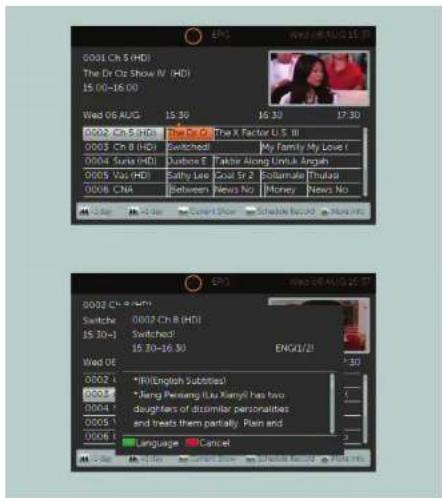
The following are some functional buttons on the remote control, available when accessing EPG:
| Name | Function |
| Navigation | Press to navigate around the listing |
| PRAY | Press to display the listing for the previous day |
A.C.Ryan
| NEXT | Press to display the listing for the following day |
| PS UP | Press to return to current listing |
| PS DV | Press to set schedule recording on the current listing |
| Day | Press to see program description |
| GREEN | Press to switch language on program description |
| RED | Press to wait program description |
4.1.1 FEROSchroderieRecording
To set up a schedule recording through Electronic Program Guide, you need to first access EPG during Digital TV. Navigate to the channel and the program listing that you wish to record, then press 'PG DN' on your remote. A schedule record window will appear which you can make changes to set repeat recording on Weekly Daily basis.
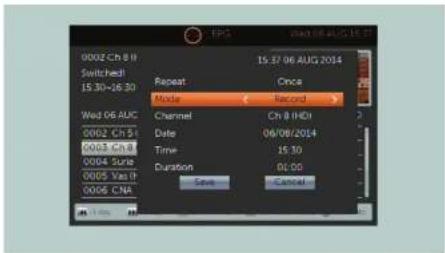
Note: An external USB Mass storage is required for recording. The USB Mass vintage must be connected to the player at all times during the recording.
4.2 TIMER SCHEDULE RECORDING
To set up timer recording, you need to first access 'Menu' during Digital TV. Press 'Menu' on your remote control, then navigate to System Setup and select 'Timer setting'. You will see & timer schedule slots. Select the availability not using the navigation buttons.
A.C.Ryan

Note: An external USB Mass storage is required for recording. The USB Mass storage must be connected to the player at all times during the recording.

- Set 'Once / Weekly / Daily' under Repeat mode
- Set "Record" as mode for recording, if you wish to view
- Set the channel that you wish to record under Channel
- Set the Recording Date under 'Date'
- Set the Start Time under Time
A.C.Ryan
- Set the duration under 'Duration'. To set the duration, you need to use the numeric buttons on the remote control
- Select 'Save' to store your schedule into the system
To remove the pre-set schedule recording. Under Timer setting, choose the schedule slot that you wish to remove.
-
Set 'Off' under Repeat Mode
-
Select 'Save' to remove the selected schedule from Timer setting.
Note: Once you have set your scheduled recordings, you may power off the device to standby mode. The front LED will display in 'Red' in colour to represent 'standby'. The player will automatically power on 1 minute before the actual schedule time. It will prepare itself to start recording once the timer reach the actual time. Once the recording is done, the system will automatically power of 'Itself' back to standby mode.

- A.C.Ryan
- TABLE OF CONTENTS
- USER INFORMATION
- CGAURON
- Usage Cautions
- Radiointerference/Compatibility
- 1.1.3
- Disposing of the players
- Hard-Dater/Coolers
- Coloess
- Warranty
- PRODUCT INFORMATION
- PRODUCT OVERVIEW
- AV Essentials
- DNA/SPredification
- USB Connectivity
- Multi-Formates-Codes
- Vialos Coiñoz
- Auclid Ochleros
- PROFESSIONAL PERFORMANCE
- Cause of change
- INITIAL SETUP
- MERNALFUNCTIONS
- Main/Res
- Full-Manager
- Manual Scan
- Auto Scan
- ICN
- 3.05mm
- Language
- TV System
- Display System
- DIGITAL TV FUNCTION
- 396
- FEROSchroderieRecording
- TIMER SCHEDULE RECORDING
Brand : AC Ryan
Model : Playon! Live
Category : Media player