001-199 - Drill Meec Tools - Free user manual and instructions
Find the device manual for free 001-199 Meec Tools in PDF.


| Product Type | Drill |
| Brand | Meec Tools |
| Model | 001-199 |
| Power Supply | Corded, 230V AC |
| Power Consumption | 600 W |
| No-Load Speed | 0 - 2800 rpm (variable) |
| Chuck Type | Keyless, 13 mm capacity |
| Drilling Capacity (Steel) | 13 mm |
| Drilling Capacity (Wood) | 30 mm |
| Weight | 1.8 kg |
| Cable Length | 2 m |
| Dimensions (L x W x H) | 280 x 200 x 80 mm |
| Main Features | Variable speed trigger, forward/reverse, lock-on button, auxillary handle |
| Maintenance | Clean vents regularly, check carbon brushes, lubricate chuck |
| Safety | Double insulated, always disconnect before maintenance, use safety goggles |
| Spare Parts | Carbon brushes, chuck key, auxillary handle |
| Repairability | User-replaceable carbon brushes, serviceable by qualified technician |
| Accessories Included | Auxillary handle, depth stop, belt clip |
| General Information | Designed for DIY and professional use; ergonomic grip, compact design |
Frequently Asked Questions - 001-199 Meec Tools
User questions about 001-199 Meec Tools
0 question about this device. Answer the ones you know or ask your own.
Ask a new question about this device
Download the instructions for your Drill in PDF format for free! Find your manual 001-199 - Meec Tools and take your electronic device back in hand. On this page are published all the documents necessary for the use of your device. 001-199 by Meec Tools.
USER MANUAL 001-199 Meec Tools
natural_image
Close-up of a gray and yellow handheld drill bit with no visible text or symbols

BORRHAMMARE
Care for the environment!
Must be discarded with household waste. This
product contains electrical or electronic components that should be recycled. Leave the product for recycling at the designated station e.g. the local authority's recycling station.
Jula reserves the right to make changes. In the event of problems, please contact our service department. www.jula.com

Tilverkare/ Produsert/ Produzendi/ Manufacturer
Julia AB, Box 163, 512-24 SKARA
Distribuior/ Distribuior/ Oysirpludan/ Distribuir
Jula Pelanc Sp. 2010, u
Walborska 41, 08-28: Warsawa, Polska
Jula Marge 75, so hemserien 6–8.
147112K-RSKDJ.
SÄKERHETSANVISNINGAR
WARNING!
Alpha cluster - Amplified alpha cluster 20
Vibration 19,200m/s², K=1.5m/s²
SIKKERHET PÅ ARBEIDSOMRÅDET
BRUK OG VEDLIKEHOLD AV ELEKTROVERKT∅Y
BEZPIECZEŃSTWO W MIEJSCU PRACY
Read all safety warnings and all instructions. Failure to follow the warnings and instructions may result in electric shock, fire and/or serious injury. Save all warnings and instructions for future reference. The term "power tool" in the warnings refers to your mains-operated (corded) power tool or battery-operated (cordless) power tool.
WORK AREA SAFETY
- Keep work area clean and well lit Cluttered or dark areas invite accidents.
- Do not operate power tools in explosive atmospheres, such as in the presence of flammable liquids, gases or dust. Power tools create sparks which may ignite the dust or fumes.
- Keep children and bystanders away while operating a power tool.
• Distractions can cause you to lose control.
ELECTRICAL SAFETY
- Power tool plugs must match the outlet. Never modify the plug in any way. Do not use any adapter plugs with earthed (grounded) power tools. Unmodified plugs and matching outlets will reduce risk of electric shock.
- Avoid body contact with earthed or grounded surfaces, such as pipes, radiators, ranges and refrigerators. There is an increased risk of electric shock if your body is earthed or grounded.
- Do not expose power tools to rain or wet conditions. Water entering a power tool will increase the risk of electric shock.
-
Do not abuse the cord. Never use the cord for carrying, pulling or unplugging the
-
When operating a power tool outdoors, use an extension cord suitable for outdoor use. Use of a cord suitable for outdoor use reduces the risk of electric shock.
- If operating a power tool in a damp location is unavoidable, use a residual current device (RCD) protected supply. Use of an RCD reduces the risk of electric shock.
PERSONAL SAFETY
- Stay alert, watch what you are doing and use common sense when operating a power tool. Do not use a power tool while you are tired or under the influence of drugs, alcohol or medication. A moment of inattention while operating power tools may result in serious personal injury.
• Use personal protective equipment. Always wear eye protection. - Protective equipment such as dust mask, non-skinie safety shoes, hard hat, or hearing protection used for appropriate conditions will reduce personal injuries.
- Prevent unintentional starting. Ensure the switch is in the off position before connecting to power source and/or battery pack, picking up or carrying the tool. Carrying power tools with your finger on the switch or energising power tools that have the switch on invites accidents.
- Remove any adjusting key or wrench before turning the power tool on
- A wrench or a key left attached to a rotating part of the power tool may result in personal injury.
- Do not overreach. Keep proper footing and balance at all times. This enables better control of the power tool in unexpected situations.
- Dress properly. Do not wear loose clothing
- If devices are provided for the connection of dust extraction and collection facilities, ensure these are connected and properly used. Use of dust collection can reduce dust-related hazards.
POWER TOOL USE AND CARE
- Do not force the power tool. Use the correct power tool for your application. The correct power tool will do the job better and safer at the rate for which it was designed.
- Do not use the power tool if the switch does not turn it on and off. Any power tool that cannot be controlled with the switch is dangerous and must be repaired.
- Disconnect the plug from the power source and/or the battery pack from the power tool before making any adjustments, changing accessories, or storing power tools. Such preventive safety measures reduce the risk of starting the power tool accidentally.
- Store idle power tools not of the reach of children and do not allow persons unfamiliar with the power tool or these instructions to operate the power tool. Power tools are dangerous in the hands of untrained users.
- Maintain power tools. Check for misalignment or binding of moving parts, breakage of parts and any other condition that may affect the power tool's operation. If damaged, have the power tool repaired before use. Many accidents are caused by poorly maintained power tools.
- Keep cutting tools sharp and clean. Properly maintained cutting tools with sharp cutting edges are less likely to bind and are easier to control.
• Use the power tool, accessories and tool
operations different from those intended could result in a hazardous situation.
SERVICE
Have your power tools serviced by a qualified repair person using only identical replacement parts. This will ensure that safety of the power tool is maintained.
DRILL SAFETY WARNINGS
- Wear ear protectors when impact drilling. Exposure to noise can cause hearing loss.
- Use auxiliary handle(s), if supplied with the tool. Loss of control can cause personal injury.
- Hold power tool by insulated gripping surfaces, when performing an operation where the cutting accessory may contact hidden wiring or its own cord. Cutting accessory contacting a "live" wire may make exposed metal parts of the power tool "live" and could give the operator an electric shock.
SYMBOLS

Double insulation
TECHNICAL DATA
Chuck type SDS-
Capacity in steel 13 mm
Capacity in wood 40 mm
Speed 900/min
Weight 3.6 kg
Capacity in concrete 25 mm
Percussion force 4J
Voltage 230 V
Output 800 W
Stroke 3900 s/min
Ford length 7 m
The declared vibration and noise value, which has been measured by a standardised test method, can be used to compare different tools with each other and for a preliminary assessment of exposure. The measurement values have been determined in accordance with Fx 60745-2-5:2010.
WARNING!
The actual vibration and noise level when using power tools may differ from the specified maximum value, depending on how the tool is used and what kind of workpiece is processed. It is therefore necessary to determine which safety precautions are required to protect the user, based on an estimate of exposure in actual operating conditions (taking into account all stages of the work cycle, e.g. the time when the tool is switched off and when it is idling, in addition to the start-up time).
DESCRIPTION
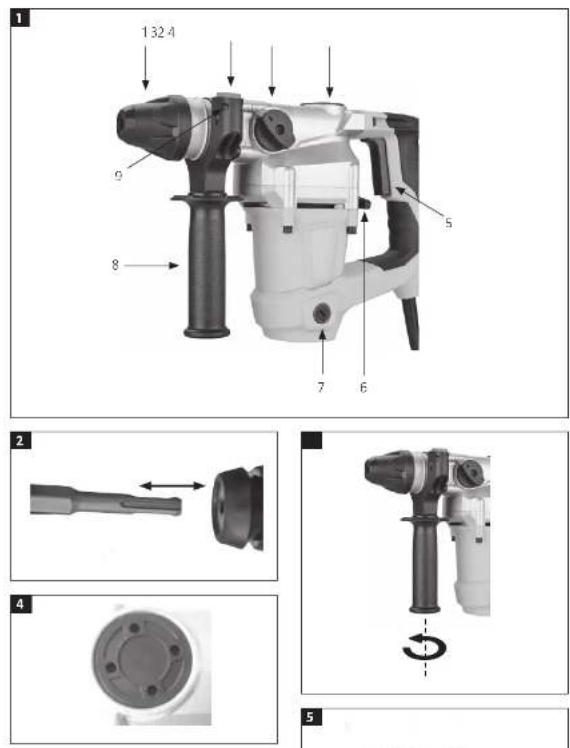
- SDS chuck
- Lock button depth stop
- Mode selector drilling/chiselling
- Oil cap
- Powerswitch
- Mode selector percussion
- Cap for carbon brushes
- Support handle
- Mount hole depth stop
FIG. 1
Accessories included: Depth stop
USE
INTENDED USE
• The hammer drill is intended for
- The hammer drill must only be used together with approved accessories.
• The hammer drill is intended for private use. - Do not modify the hammer drill in any way.
ASSEMBLY
Accessories
NOTE:
Accessories fitted to the machine should be clean and lubricated with a thin layer of grease.
- Pull back the chuck and hold it in this position. Now twist in the accessory until it automatically snaps in place.
FIG. 2
- Check that the accessory is properly inserted by pulling it.
- Remove the accessory by pulling back the chuck and pulling it out.
Support handle
NOTE:
• Always check before use that the handle is correctly and securely fitted.
- For safety reasons, always use the hammer drill with the support handle.
-
Fasten the support handle in place by turning the handle clockwise.
-
Fasten the support handle in place by turning the handle clockwise.
FIG. 3
- Remove the support handle by turning it anticlockwise.
Depth stop
- Press down the lock button on the support handle and insert the depth stop in mount hold on the handle. Adjust the depth stop to the required position.
EN
STARTING/STOPPING
WARNING!
Wait until all moving parts have completely stopped before putting the hammer drill away, adjusting it, or carrying out maintenance.
- Hold the hammer drill with both hands and gently press the power switch to start it.
- Release the power switch to switch off the hammer drill.
MODE SELECTOR
DRILLING/CHISELLING
Chiselling
Turn off the drilling mode by turning the mode selector to the hammer symbol ☐.
- Place the tip of the chisel against the surface where you want to chisel.
-
In some situations the tip of the chisel needs to be pressed hard against the surface to activate the percussion function. This is not a malfunction; it is caused by the safety mechanism to prevent striking when there is no load.
-
Hold the hammer drill firmly in both hands and use the weight of the tool to counteract the recoil.
— Do not press the hammer drill too hard, this will have the adverse effect.
Drilling
To enable the percussion on drilling mode, turn the mode selector to the hammer drill symbol
MODE SELECTOR PERCUSSION
Drilling without percussion
Turn the mode selector to the drill symbol
Drilling with percussion
Turn the mode selector to the hammer symbol.
MAINTENANCE
Maintenance interval every 30 working hours, or when necessary.
Check
lubricating grease
Open the grease cap and top up with grease if necessary.
FIG. 4
Use lubricating grease med good lubricity and a high melting point. Do not overfill; it should be possible to see the connecting rod.
Carbon brushes
The motor's carbon brushes are replacement parts. Check the carbon brushes regularly and replace them when they are worn out. Always keep the carbon brushes clean and check that they move freely in the brush holders.
- Remove the carbon brush cover and the rubber seal.
- Check/replace the carbon brushes.
FIG. 5
- Refit in the reverse order.
Accessories
Always replace, or resharpen blunt accessories. Blunt bits overload the motor and are less effortive.
EN
Screw unions
Regularly check that all screw unions on the hammer drill are properly tightened. Tighten any loose screw unions immediately to prevent serious personal injury.
Motor
Protected the motor from damage, oil and water.

EC DECLARATION OF CONFORMITY
EG FÖRSÄKRAN OM ÖVERENSSTÄMMELSE
EF SAMSVARSERKLÆRING
DEKLARACJA ZGODNOŚCI WE

Jula AB, Box 363, SE-532 24 SKARA, SWEDEN
certify that the design and manufacturing of this product
Machinery Directive 2006/42/EC
EN 60745-1:2009+A11, EN 60745-2-6:2010
Electromagnetic Compatibility Directive 2014/30/EU
EN 55014-1:2006+A1+A2, EN 55014-2:2015
- BORRHAMMARE
- SÄKERHETSANVISNINGAR
- WARNING!
- SIKKERHET PÅ ARBEIDSOMRÅDET
- BRUK OG VEDLIKEHOLD AV ELEKTROVERKT∅Y
- BEZPIECZEŃSTWO W MIEJSCU PRACY
- WORK AREA SAFETY
- ELECTRICAL SAFETY
- PERSONAL SAFETY
- POWER TOOL USE AND CARE
- SERVICE
- DRILL SAFETY WARNINGS
- SYMBOLS
- TECHNICAL DATA
- DESCRIPTION
- 1
- USE
- INTENDED USE
- ASSEMBLY
- Accessories
- NOTE:
- 2
- Support handle
- 3
- Depth stop
- EN
- STARTING/STOPPING
- MODE SELECTOR
- DRILLING/CHISELLING
- Chiselling
- Drilling
- MODE SELECTOR PERCUSSION
- Drilling without percussion
- Drilling with percussion
- MAINTENANCE
- Check
- lubricating grease
- 4
- Carbon brushes
- 5
- Screw unions
- Motor
Brand : Meec Tools
Model : 001-199
Category : Drill