TBFF37 - Refrigerator Tricity Bendix - Free user manual and instructions
Find the device manual for free TBFF37 Tricity Bendix in PDF.


| Product Type | Fridge-Freezer |
| Brand | Tricity Bendix |
| Model | TBFF37 |
| Total Gross Capacity | 214 L (fridge) + 76 L (freezer) = 290 L |
| Net Capacity - Fridge | 210 L |
| Net Capacity - Freezer | 70 L |
| Star Rating | 4-star (★★★★) |
| Power Supply | 220-240 V / 50 Hz |
| Total Power Absorbed | 120 W |
| Average Daily Energy Consumption | 1.101 kWh |
| Climate Class | SN, N, ST, T (+10°C to +43°C) |
| Refrigerant | Hydrocarbons (isobutane R600a) |
| Defrost Type - Fridge | Automatic |
| Defrost Type - Freezer | Manual |
| Temperature Control | Single thermostat, 6 positions + OFF |
| Door Reversal | Yes (right to left) |
| Installation | Freestanding or built-in |
| Recess Dimensions (H x D x W) | 1780 x 550 x 560 mm |
| Freezing Capacity | Up to 4 kg per 24 hours |
| Interior Light | Yes, replaceable bulb |
| Adjustable Shelves | Yes, movable glass shelves |
| Door Shelves | Height-adjustable |
| Dual Purpose Meat Box | Reversible lid for meat or salad |
Frequently Asked Questions - TBFF37 Tricity Bendix
User questions about TBFF37 Tricity Bendix
0 question about this device. Answer the ones you know or ask your own.
Ask a new question about this device
Download the instructions for your Refrigerator in PDF format for free! Find your manual TBFF37 - Tricity Bendix and take your electronic device back in hand. On this page are published all the documents necessary for the use of your device. TBFF37 by Tricity Bendix.
USER MANUAL TBFF37 Tricity Bendix
⚠️ IMPORTANT SAFETY INFORMATION
It is most important that this instruction book should be retained with the appliance for future reference. Should the appliance be sold or transferred to another owner, or should you move house and leave the appliance, always ensure that the book is left with the appliance in order that the new owner can get to know the functioning of the appliance and the relevant safety information.
This information has been provided in the interest of safety. You MUST read it carefully before installing or using the appliance.
Installation
• This appliance is heavy. Care should be taken when moving it.
- It is dangerous to alter the specifications or attempt to modify this product in any way.
- Care must be taken to ensure that the appliance does not stand on the electrical supply cable. Important: If the supply cable is damaged, it must be replaced by a special cable available from your local Service Force Centre.
- Any electrical work required to install this appliance should be carried out by a qualified electrician or competent person.
- Parts which heat up should not be exposed. The back of the appliance should be close to a solid wall but leaving the required distance for ventilation as stated in the installation instructions.
• The appliance should be left for 2 hours after installation before it is turned on, in order to allow the refrigerant to settle.
Child Safety
- This appliance is not intended for use by persons (including children) with reduced physical, sensory or mental capabilities, or lack of experience and knowledge, unless they have been given supervision or instruction concerning use of the appliance by a person responsible for their safety. Children should be supervised to ensure that they do not play with the appliance.
- Keep all packaging well away from children.
General Safety
- This appliance contains hydrocarbons in its cooling unit; maintenance and recharging must therefore only be carried out by authorised technicians.
• Take utmost care when handling your appliance so as not to cause any damages to the cooling unit with consequent possible fluid leakages.
• The appliance must not be located close to
During Use
• This appliance is designed for domestic use only, specifically for the storage of edible foodstuffs.
- Frozen food must NOT be re-frozen once it has thawed out.
- Do not place carbonated or fizzy drinks in the freezer.
- Do not remove items from the freezer if your hands are damp/wet, as this could cause skin abrasions or frost/freezer burns.
- Ice lollies can cause 'frost/freezer burns' if consumed straight from the freezer.
- Manufacturers' storage recommendations should be strictly adhered to. Refer to relevant instructions.
- The cooling plate or refrigerated freezer shelves in this appliance contain channels through which the refrigerant passes. If these are punctured this will cause substantial damage to the appliance and result in food loss. DO NOT USE SHARP INSTRUMENTS to scrape off frost or ice. Under NO circumstances should solid ice be forced off the lining or shelves. Solid ice should be allowed to thaw, when defrosting the appliance. See Defrost Instructions.
Maintenance and Cleaning
- Switch off and unplug the appliance before carrying out any cleaning or maintenance work.
Servicing
- This product should be serviced by an authorised engineer and only genuine spare parts should be used.
• Under no circumstances should you attempt to repair the machine yourself. Repairs carried out by inexperienced persons may cause injury or serious malfunctioning. Refer to your local
At the end of the Appliance Life
- When disposing of your appliance, use an authorised disposal site.
- Remove the plug and ensure that any locks or catches are removed, to prevent young children being trapped inside.
Disposal of old Appliances
The symbol on the product or on its packaging indicates that this product may not be treated as household waste. Instead it shall be handed over to the applicable collection point for the recycling of electrical and electronic equipment. By ensuring this product is disposed of correctly, you will help prevent potential negative consequences for the environment and human health, which could otherwise be caused by inappropriate waste handling of this product. For more detailed information about recycling of this product, please contact your local city office, your household waste disposal service or the shop where you purchased the product.
CONTENTS
Instructions for the User
| Important Safety Information | 2 |
| Operation | 4 |
| Before use: 4 | |
| Setting the temperature 4 | |
| The freezer compartment 4 | |
| Freezing fresh food 4 | |
| Frozen food storage 4 | |
| Thawling 5 | |
| Making ice cubes 5 | |
| Fresh food refrigeration 5 | |
| Normal operating sounds 5 | |
| Dual purpose meat box 6 | |
| Movable shelves 6 | |
| Positioning the door shelves 6 | |
| Hints and Tips | 7 |
| Maintenance and Cleaning | 8 |
| Internal cleaning 8 | |
| External cleaning 8 | |
| When the appliance is not in use | 8 |
| Changing the light bulb | 8 |
| Defrosting | 8 |
Instructions for the Installer
| Technical Specification | 13 |
| Installation | 14 |
| Positioning | 14 |
| Electrical Connection | 15 |
| Door Reversal | 16 |
OPERATION
Before using
Remove all securing tapes. Wash inside the appliance with lukewarm water and bicarbonate of soda (5 ml to 0.5 litre of water).
Do not use soap or detergent as the smell may linger. Dry thoroughly.
Setting the temperature
The temperature inside the refrigerator and the freezer is regulated by a single thermostat with 6 temperature positions and an "OFF" (O) position.
Position 1 = minimum coldness
Position 6 = maximum coldness
Turn the thermostat dial to the required position.
The intermediate position is usually the most suitable (3-4).
The thermostat setting can vary as the temperature inside the refrigeration compartment depends on the following factors:
- room temperature
- how often the door is opened
- how much food is stored
- position of the appliance

Important
During prolonged periods of abnormally hot weather, if the thermostat is set on too high a number, the cooling system may operate continuously and the fridge cooling plate may not defrost. Turning the knob to a lower number will cause the automatic defrosting to resume.
The freezer compartment
The four-star freezer compartment is suitable for storage of commercially frozen food and for freezing fresh foods.
Freezing fresh food
It is not necessary to adjust the thermostat setting when freezing fresh food.
In any 24 hours you can freeze up to 4 kn. of fresh
Pay careful attention not to exceed load limit stated on the side of the upper section (where applicable).
Caution
In the event of a power cut do not open the door. The food in the freezer will not be affected if the power cut is short and if the freezer is full. Should the food begin to thaw, it must be consumed quickly and must not be re-frozen.
DEFROSTED COOKED FOOD MUST NOT BE REFROZEN.
Frozen food storage
When first starting-up or after a period of use, before putting the products in the freezer compartment let the appliance run for at least two hours on the coldest setting, then turn the thermostat knob to the normal operation position.
Do not exceed the storage period indicated by the manufacturer.
Finally, do not open the door frequently or leave it open longer than is absolutely necessary.

Important
Do not put carbonated liquids, (fizzy drinks etc.), in the freezer compartment.
Ice lollies, if consumed immediately after removal from the freezer, can cause low temperature skin burns.
Do not remove items from the freezer if your hands are damp/wet, as this could cause skin abrasions or "frost/freezer burns".
Thawling
Frozen food, prior to being used, can be thawed in the fridge or at room temperature depending on the time available. Small food items may even be cooked from frozen; in this case cooking will take longer.
Any frozen food which is allowed to thaw accidentally should either be eaten as soon as possible or thrown away. Alternatively, if the food is uncooked and has not been completely defrosted it can be cooked and then refrozen.
Meat, fish and fruit should be thawed in the refrigerator compartment and small pieces of meat can even be cooked while still frozen, but you must ensure that it is thoroughly cooked through.
Vegetables should be directly immersed in boiling water, ready-cooked dishes can be placed directly in the oven in their aluminium wrapping.
A microwave oven is particularly suitable for thawing any type of frozen or deep-frozen food: follow the oven instructions, particularly regarding the placement of aluminium wrapping or containers in the oven.
Defrosted cooked food must never be refrozen.
Making ice cubes
The appliance is provided with one or more trays for ice-cubes trays.
Fill the tray(s) 3/4 full to give the ice space to expand and place them in the freezer compartment.
To release the ice cubes simply give the tray a slight twist.
Do not use sharp or metallic instruments to remove the trays from the freezer.
Dual purpose meat box
The meat box can also be used as a salad crisper. The lid is reversible and when storing meat the 10 mm gap allows the meat to breathe.
By reversing the lid the box becomes airtight and can be used as a salad crisper.
Fresh food refrigeration
To obtain the best performance, do not store warm food or evaporating liquids in the refrigerator; do cover or wrap the food, particularly if it has a strong flavour.
Do not cover the shelves with any protective material, such as paper, cardboard or plastic, which can obstruct the air circulation through them.
To help you use your refrigerator correctly, here are some more useful hints:
Raw meat (beef, pork, lamb & poultry or chicken): wrap in polythene bags and place on top of the salad crispers.
Meat can only be stored safely in this way for one or two days at the most.
Fruit & vegetables: these should be thoroughly cleaned and placed in the bottom salad crispers.
Butter & cheese: these should be placed in special airtight containers or wrapped in aluminium foil or polythene bags to exclude as much air as possible.
Milk bottles: these should have a cap and should be stored in the bottle rack on the door.
Normal Operating Sounds
- You may hear faint gurgling or bubbling sounds when the refrigerant is pumped through the coils or tubing at the rear, to the cooling
praterevaporation of to the fixed freezer shelves.
- When the compressor is on, the refrigerator is being pumped round, and you will hear a whirring sound or pulsating noise from the compressor.
• A thermostat controls the compressor, and you will hear a faint 'click' when the thermostat cuts in and out.
Movable shelves
The walls of the refrigerator have runners so that the shelves can be positioned as desired.

Positioning the door shelves
To permit storage of food packages of various sizes, the door shelves can be adjusted in height. To make these adjustments proceed as follows:
Gradually pull the shelf in the direction of the arrows until it comes off, then reposition as required.

HINTS AND TIPS
Food Storage
• To obtain the best results from your appliance, neither hot foods nor liquids which may evaporate, should be placed in the larger compartment.
- Keep the time between buying chilled food and placing it in your fridge as short as possible.
- Do not push food together too much, try to allow air to circulate around each item.
• Do not store uncovered.food.
- Remove suspect food from your refrigerator and clean, refer to 'Maintenance and Cleaning'.
- Ensure that food placed in the freezer is dated and labelled and used in date order to ensure that food is consumed at its best.
- Avoid buying frozen food if you cannot store it straight away. The use of an insulated container is advisable. When you arrive home place the frozen food in the freezer immediately.
• The symbols on the drawers show different types of frozen goods. The numbers indicate storage times in months for the appropriate types of frozen goods. Whether the upper or lower value of the indicated storage time is valid depends on the quality of the foods and pre-treating before freezing.
Energy Saving Advice
- Do not install the cabinet close to sources of heat, i.e. boiler or radiator.
- Locate the appliance in a cool well ventilated room and make sure that the air openings of the cabinet are not obstructed.
- Avoid unnecessary frosting in the cabinet by packing all foodstuffs into airlight packages before placing them in the freezer.
• Always leave warm food to cool down to room temperature before placing in the fridge or freezer. -
Food which is to be frozen (when cool) should be placed in the fridge before being transferred to the freezer.
• Thaw frozen food in the fridge. This will ensure eater drinking of foods and reduce the whole of -
Try to avoid keeping the door open for long periods, or opening the door too frequently as warm air will enter the cabinet, and cause the compressor to switch on unnecessarily often.
- Ensure there are no obstructions preventing the door from closing properly.
In the Event of a Power Failure
If there is a power failure during the storage of frozen foods, keep the door closed. If the temperature within your freezer should rise do not retreeze the food without checking it's condition.
The following guidelines should assist you.
Ice Cream:
Once thawed should be discarded.
Fruit and Vegetables:
If soft should be cooked and used up.
Bread and Cakes:
Can be refrozen without danger.
Shellfish
Should be refrigerated and used up quickly.
Cooked Dishes:
i.e. casseroles, should be refrigerated and used up
Large Pieces of Meat:
[Non-Text]
[Non-Text]
[Non-Text]
Can be re-frozen providing there are ice crystals remaining within them.
Small Joints
Should be cooked and then re-frozen as cooked dishes.
Chicken:
Should be cooked and re-frozen as a fresh dish.
[Non-Text]
[Non-Text]
MAINTENANCE AND CLEANING
Before any maintenance or cleaning work is carried out, DISCONNECT the appliance from the ELECTRICITY supply.
Internal cleaning
Clean the inside and accessories with warm water and bicarbonate of soda (5ml to 0.5 litre of water). Rinse and dry thoroughly.
NEVER USE DETERGENTS, ABRASIVE POWDERS, HIGHLY PERFUMED CLEANING PRODUCTS OR WAX POLISHES, TO CLEAN THE INTERIOR AS THESE WILL DAMAGE THE SURFACE AND LEAVE A STRONG ODOUR.
When the appliance is not in use
When the appliance is not in use for long periods, disconnect from the electricity supply, empty all foods and clean the appliance, leaving the doors ajar to prevent unpleasant smells.
External cleaning
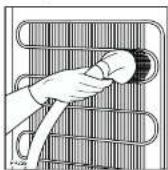
Once or twice a year dust the condenser (black grill) and the compressor at the back of the appliance, with a brush or vacuum cleaner, see figure, as an accumulation of dust will affect the performance of the appliance and cause excessive electricity consumption.
Changing the light bulb
Should the interior light fall to work, first switch off the appliance and disconnect from the electricity supply, then replace the bulb as follows:

Unscrew the light cover and then pull it outward by pressing as shown in the figure. Unscrew the bulb and replace it with one of the same power (the maximum power is shown on the light diffuser) available from your nearest Service Force Centre. Replace the light cover by sliding it into its original position and replacing the screw.
Defrosting
Refrigerator
The refrigerator automatically defrosts every time the compressor stops. The water is discharged, via the pipe, into a tray located at the back of the appliance above the compressor, where it evaporates.

⚠️ Important
Remember to wash the detrost cleaner in hot soapy water at regular intervals. Dry thoroughly before replacing.
Freezer
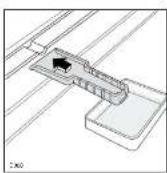
When the frost has reached a thickness of up to 4mm it can be removed using the ice scraper provided with the appliances. During this operation it is not necessary to disconnect the appliance from the mains and remove the food. Never use metal tools for this operation.
For complete defrostling (once or twice a year) proceed as follows.
- turn the thermostat control knob to the «OFF» position (O) or disconnect the appliance from the mains.
- Remove any food from inside the freezer and fridge, wrap it in several sheets of newspaper and store in a cool/dry place.
- Leave the door open and insert the ice scraper under the channel in the centre of the lower part of the appliance; place a low-sided container beneath the scraper to collect the water.
- Clean and dry thoroughly.
- Replace the scraper in one of the drawers.
- Reconnect the appliance to the mains or reset the thermostat control knob to a functioning position.
- After letting the appliance run for a least half an hour, replace the previously removed food into the compartment.

Important
When defrosting the freezer, the fridge is also controlled by the thermostat and will not be operational during this period. A temperature rise of the frozen food packs, during defrosting, may shorten their safe storage life.
SOMETHING NOT WORKING
Important: If you call out an engineer to a fault listed below, or to repair a fault caused by incorrect use or installation a charge will be made, even if the appliance is under guarantee.
Before contacting your local Service Force Centre, check the following points:
| Symptom | Solution |
| No power to the appliance | Check there is power at the socket. |
| Check there is not a power cut by checking the household lights. | |
| Check the fuse has not blown. | |
| The light does not come on | Ensure that the bulb is correctly fitted. |
| Replace the bulb if it has blown. | |
| Check the door light switch is not jammed. | |
| The temperature in the fridge or freezer section is too high | Check the thermostat control knob in the fridge is turned to the correct setting relative to ambient conditions. |
| Check the ambient temperature is within the appliance's operating limits, please refer to the installation section in this instruction book. Relocate the appliance if necessary. | |
| The freezer door will not open | Has the door just been opened? If so leave for a few minutes to allow the air pressure to equalise. |
| The compressor runs continuously | Adjust the thermostat control knob to give correct temperature control. See "Setting the temperature". |
| Check that the doors are closed. | |
| Large quantities of food have recently been placed in the cabinet and/or door is frequently opened. | |
| Check that air ventilation is not obstructed. | |
| Excessive frost and ice has built up | Ensure the doors are not left open. |
| Check that nothing is preventing the doors from closing. | |
| Is the door gasket intact and clean. | |
| Noise | Refer to normal operating sounds. |
| Water under the salad bin | Check the drain hole is not blocked. (see Maintenance and Cleaning). |
SERVICE AND SPARE PARTS SERVICEFORCE
In the event of your appliance requiring service, or if you wish to purchase spare parts, please contact your local Tricity Bendix Service Force Centre by telephoning:-
0870 5 929929
Your telephone call will be automatically routed to the Service Force Centre covering your post code area.
For the address of your local Service Force Centre and further information about Service Force, please visit the website at www.serviceforce.co.uk
Before calling out an engineer, please ensure you have read the details under the heading "Something Not Working?
When you contact the Service Force Centre you will need to give the following details:
-
Your name, address and post code
-
Your telephone number
-
Clear and concise details of the fault
-
The model and serial number of the appliance (found on the rating plate)
-
The purchase date
For service in the Republic of Ireland contact
Tricity Bendix
Long Mile Road
Dublin 12
Telephone: 01 4090752
Please note that a valid purchase receipt or guarantee documentation is required for in-guarantee service calls.
CUSTOMER CARE DEPARTMENT
For general enquiries concerning your Tricity Bendix appliance or for further information on Tricity Bendix products, please contact our Customer Care Department by letter or telephone as follows:-
Customer Care Department
Tricity Bendix Major Appliances
Addington Way
Lutor
Bedfordshire
LU4 9QQ
08705 950 950
* calls to this number may be recorded for training purposes.
GUARANTEE CONDITIONS
Standard guarantee conditions
We, Tricity Bendix, undertake that if within 12 months of the date of the purchase this Tricity Bendix appliance or any part thereof is proved to be defective by reason only of faulty workmanship or materials, we will, at our option repair or replace the same FREE OF CHARGE for labour, materials or carriage on condition that:
The appliance has been correctly installed and used only on the electricity supply stated on the rating plate.
The appliance has been used for normal domestic purposes only, and in accordance with the manufacturer's instructions.
The appliance has not been serviced, maintained, repaired, taken apart or tampered with by any person not authorised by us.
All service work under this guarantee must be undertaken by a Tricity Bendix Service Force Centre. Any appliance or defective part replaced shall become the Company's property.
This guarantee is in addition to your statutory and other legal rights.
Home visits are made between 8.30am and 5.30pm Monday to Friday. Visits may be available outside these hours in which case a premium will be charged.
Exclusions
This guarantee does not cover:
Damage or calls resulting from transportation, improper use or neglect, the replacement of any light bulbs or removable parts of glass or plastic.
Costs incurred for calls to put right an appliance which is improperly installed or calls to appliances outside the European Community (EC) or European Free Trade Area.
Appliances found to be in use within a commercial environment, plus those which are subject to rental agreements.
Products of Tricity Bendix manufacture which are not marketed by Tricity Bendix.
European Guarantee
The standard one year guarantee is for the same period and the same extent for labour and parts as exists in the new country of use for this brand or range of products.
Customer Care Centre:
Ireland Dublin
353-1-4090752
If you should move to another country within Europe then your guarantee moves with you to your new home subject to the following qualifications:
The guarantee starts from the date you first purchased your product.
The guarantee is for the same period and to the same extent for labour and parts as exists in the new country of use for this brand or range of products.
This guarantee relates to you and cannot be transferred to another user.
Your new home is within the European Community (EC) or European Free Trade Area.
The product is installed and used in accordance with our instructions and is only used domestically, i.e. a normal household.
The product is installed taking into account regulations in your new country.
Before you move please contact your nearest Customer Care centre, listed below, to give them details of your new home. They will then ensure that the local Service Organisation is aware of your move and able to look
TECHNICAL SPECIFICATIONS
POWER SUPPLY VOLTAGE AND FREQUENCY 220-240 V / 50 Hz
TOTAL POWER ABSORBED 120 W
AVERAGE DAILY UNITS ELECTRICITY * 1.101 kWh
GROSS CAPACITY
| Fridge | 214 | I | |
| Freezer 76 I | |||
| NET CAPACITY | |||
| Fridge | 210 | I | |
| Freezer 70 I | |||
| STAR RATING | ★★★☆ | ||
* This figure is based on standard test results in accordance with European Standard EN 153.
Actual consumption will depend on how the appliance is used and where it is located.
INSTALLATION
Warning
IF YOU ARE DISCARDING AN OLD APPLIANCE THAT HAS A LOCK OR CATCH ON THE DOOR, YOU MUST ENSURE THAT IT IS MADE UNUSABLE TO PREVENT YOUNG CHILDREN BEING TRAPPED INSIDE.
Depending upon the position which you choose for your appliance, you may wish to reverse the way in which the door opens. To do this, refer to instructions under "Door reversal".
Important
It must be possible to disconnect the appliance from the mains power supply; the plug must therefore be easily accessible after installation.
Positioning
This appliance should only be installed at a location where the ambient temperature corresponds to the climate classification indicated on the rating plate, which is located at the left on the inside of the appliance.
The following table shows which ambient temperature is correct for each climate classification:
SN +10°C to +32°C
N +16°C to +32°C
ST +18°C to +38°C
T +18°C to +43°C
The appliance should be located in a dry atmosphere, out of direct sunlight and away from continuous heat and extreme temperature, e.g. not next to a boiler or radiator, or in a very cold room e.g. an outhouse. If these temperatures are exceeded i.e. warmer or colder, then the appliance may not operate correctly.
For building-in and door reversal instructions please refer to the relevant instructions on the following pages.

Electrical connections
Any electrical work required to install this appliance should be carried out by a qualified electrician or competent person.
WARNING: THIS APPLIANCE MUST BE EARTHED.
The manufacturer declines any liability should this safety measure not be observed.
If the plug that is fitted to your appliance is not suitable for your socket outlet, it must be cut off and the appropriate plug fitted.
Remove the fuse from the cut off plug.
The cut off plug should then be disposed of to prevent the hazard of shocks in case it should be plugged into a 13amp socket in another part of your home.

Important
The wires in the mains lead are coloured in accordance with the following code:
Green and Yellow
- Earth
Blue
- Neutral
Brown
If you fit your own plug, the colours of the wires in the mains lead of your appliance may not correspond with the markings identifying the terminals in your plug, proceed as follows:

Connect the Green and Yellow (earth) wire to the terminal in the plug which is marked with the letter «E» or the earth symbol or coloured green and yellow.
Connect the blue (neutral) wire to the terminal in the plug which is marked with the letter «N» or coloured
For replacement, use a 13amp BSI362 fuse. Only ASTA or BSI approved fuses should be used.
The plug must not be used if the fuse cover/carrier is lost. The cover/carrier is indicated by the coloured insert at the base of the plug.
A replacement covercarrier must be obtained from your local Service Force Centre.
This appliance complies with the E.E.C. Directive No. 87/308 of 2.6.87 relative to radio interference suppression.
CE This appliance complies with the following E.E.C. Directives:
- 73/23 EEC of 19.2.73 (Low Voltage Directive) and subsequent modifications;
- 89/336 EEC of 3.5.89 (Electromagnetic Compatibility Directive) and subsequent modifications.
Please ensure that when the appliance is installed it is easily accessible for the engineer in the event of a breakdown.

Instructions for totally built-in appliances
Door reversal

The appliance is supplied with the right ft door opening. To change the opening action of the door proceed as in the wing instructions before installing it.
- Unscrew the upper pin and remove the spacer.
- Remove the upper pin and the upper door
- Unscrew the middle hinge.
- Remove the lower door
- Unscrew the lower pin and refit it on the opposite side
- Refit the lower door.
- Rescrew the middle hinge and the covers on the opposite side.
- Rent the upper door and rescrew the hinge pin and the spacer on the opposite side.


Recess dimensions
Height (1) 1780 mm
Depth (2) 550 mm
Width (3) 560 mm
To ensure adequate ventilation, allow the clearances shown in figure.
Furthermore, it is necessary that the cabinet has a
ventilation recess with the following dimensions:
depth 50 mm
0417:14.5 m/m


Make sure that a distance of 44 mm is maintained in the lower part between the kitchen furniture and the border of the appliance.
The lower hinge cover inserted in the accessories bag, is useful to guarantee the exact position of the kitchen furniture and the appliance.
Also make sure that the appliance does not clamp the mains cable
Fasten the appliance with 4 screws provided in the kit included with the appliance. (I = short) (P = long)
Apply the sealing strip pushing it between the refrigerator and the adjacent cabinet.
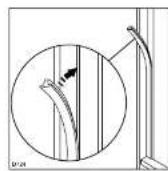
From the plastic cover (E), which is used to cover the hinges with the pivot pin, you must take away the part as indicated in the drawing.
This operation is made easier since there is, in the internal part of the cover hinge lid a groove that facilitates the removal of this component.
"Remove the part marked with DX, if the pivot pin is inserted in the right hinge, SX in opposite case."
Apply covers (C-D) on joint cover lugs and into hinge holes. Snap vent grille (B) and hinge covers (E) into




Separate parts Ha, Hb, Hc, Hd as shown in the figure.
Ha Hb
Hc
Hd
FUM
Place guide (Ha) on the inside part of the furniture door, up and down as shown in the figure and mark the position of external holes. After having drilled holes, fix the guide with the screws supplied.
ca. 50 mm
[Unreadable]
2i inat
(2)
13.50mm
2i m01
Fix cover (Hc) on guide (Ha) until it clips into place
Ha
Hc
Open the appliance door and the furniture door at 90°. Insert the small square (Hb) into guide (Ha). Put together the appliance door and the furniture door and mark the holes as indicated in the figure.
Green
Ha
(1)
Hb
Remove the brackets and mark a distance of 8 mm from the outer edge of the door where the nail must be fitted (K).
Jmm
Place the small square on the guide again and fix it with the screws supplied.
Should the lining up of the furniture door be necessary, use the clearance of slots.
At the end of operations, it is necessary to check if the door of the furniture closes properly.
Fix cover (Hd) on guide (Hb) until it clips into place.
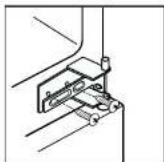
If the appliance is to be fitted laterally to the kitchen unit, it will be sufficient to loosen the screws of the little plates (D), move them as shown in Fig. and then fasten them up again. Fit the cover (E).
After completion of the door reversing operation, check that the door gasket adheres to the cabinet. In the ambient temperature is cold (i.e. in Winter), the gasket may not fit perfectly to the cabinet. In that case, wait for the natural fitting of the gasket or accelerate this process by heating up the part involved with a normal hairdryer on a low setting.


TRICITY BENDIX
Tricity Bendix, Addington Way Luton, Bedfordshire LU4 90Q
Consumer care telephone number.....08705 950950
- ⚠️ IMPORTANT SAFETY INFORMATION
- Installation
- Child Safety
- General Safety
- During Use
- Maintenance and Cleaning
- Servicing
- At the end of the Appliance Life
- Disposal of old Appliances
- CONTENTS
- OPERATION
- Before using
- Setting the temperature
- Important
- The freezer compartment
- Freezing fresh food
- Caution
- Frozen food storage
- Thawling
- Making ice cubes
- Dual purpose meat box
- Fresh food refrigeration
- Meat can only be stored safely in this way for one or two days at the most.
- Normal Operating Sounds
- Movable shelves
- Positioning the door shelves
- HINTS AND TIPS
- Food Storage
- Energy Saving Advice
- In the Event of a Power Failure
- Ice Cream:
- Fruit and Vegetables:
- Large Pieces of Meat:
- Internal cleaning
- When the appliance is not in use
- External cleaning
- Changing the light bulb
- Defrosting
- Refrigerator
- Freezer
- SOMETHING NOT WORKING
- SERVICE AND SPARE PARTS SERVICEFORCE
- CUSTOMER CARE DEPARTMENT
- GUARANTEE CONDITIONS
- Standard guarantee conditions
- Exclusions
- This guarantee does not cover:
- European Guarantee
- Customer Care Centre:
- Ireland Dublin
- 353-1-4090752
- TECHNICAL SPECIFICATIONS
- Warning
- Positioning
- Electrical connections
- WARNING: THIS APPLIANCE MUST BE EARTHED.
- Recess dimensions
- TRICITY BENDIX
Brand : Tricity Bendix
Model : TBFF37
Category : Refrigerator