
MCM1110W - Microwaves Magic Chef - Free user manual and instructions
Find the device manual for free MCM1110W Magic Chef in PDF.


| Product Type | Countertop Microwave |
| Brand | Magic Chef |
| Model | MCM1110W |
| Color | White |
| Capacity | 1.1 cu. ft. |
| Power Output | 1000 Watts |
| Dimensions (W x D x H) | 20.5 x 17.4 x 12.5 inches |
| Weight | 30 lbs |
| Power Source | 120V ~ 60Hz |
| Power Consumption | 1500 Watts (cooking) / 5 Watts (standby) |
| Control Type | Electronic Touchpad |
| Display | LED Digital Display |
| Turntable Diameter | 12.5 inches |
| Interior Material | Stainless Steel |
| Door Type | Push-Button Release |
| Child Lock | Yes |
| Auto Cook Menus | 10 pre-programmed settings |
| Defrost | Weight and Time Defrost |
| Timer | Up to 99 minutes 99 seconds |
| Clock | 12/24 hour display |
| Interior Light | Yes |
| Cleaning | Wipe with damp cloth; avoid abrasive cleaners |
| Safety Features | Interlock system, child lock, overheat protection |
| Spare Parts | Glass turntable, roller ring, fuse, magnetron available |
| Repairability | Serviceable by authorized technician; user replaceable fuse |
Frequently Asked Questions - MCM1110W Magic Chef
User questions about MCM1110W Magic Chef
0 question about this device. Answer the ones you know or ask your own.
Ask a new question about this device
Download the instructions for your Microwaves in PDF format for free! Find your manual MCM1110W - Magic Chef and take your electronic device back in hand. On this page are published all the documents necessary for the use of your device. MCM1110W by Magic Chef.
USER MANUAL MCM1110W Magic Chef
(a) Do not attempt to operate this oven with the door open since open-door operation can result in harmful exposure to microwave energy. It is important not to defeat or tamper with the safety Interlocks.
(b) Do not place any object between the oven front face and the door or allow soil or cleaner residue to accumulate on sealing surfaces.
(c) Do not operate the oven if it is damaged. It is particularly important that the oven door close properly and that there is no damage to the: (1) door (bent), (2) hinges and latches (broken or loosened), (3) door seals and sealing surfaces.
(d) The oven should not be adjusted or repaired by anyone except properly qualified service personnel.
TABLE OF CONTENTS
- PRECAUTIONS TO AVOID POSSIBLE EXPOSURE TO EXCESSIVE MICROWAVE ENERGY....1
- IMPORTANT SAFETY INSTRUCTIONS....3
- FEDERAL COMMUNICATIONS COMMISSION RADIO FREQUENCY INTERFERENCE STATEMENT....4
- GROUNDING INSTRUCTIONS....4
- INSTALLATION....5
- SPECIFICATIONS....6
- PARTS AND FEATURES ....7 TURNTABLE ....7
DEFROSTING BY WT FUNCTION....9
TIME DEFROST FUNCTION....9
POPCORN....9
POTATO....10
PIZZA....10
BEVERAGE....10
SOUP 10
DINNER PLATE....10
FRESH VEGETABLE....10
FROZEN VEGETABLE....11
PRE-SET FUNCTION....11
IMPORTANT SAFETY INSTRUCTIONS
When using electrical appliances, basic safety precautions should be followed, including the following:
WARNING-To reduce the risk of burns, electric shock, fire, injury to persons or exposure to excessive microwave energy:
- Read all instructions before using the appliance.
- Read and follow the specific "PRECAUTIONS TO AVOID POSSIBLE EXPOSURE TO EXCESSIVE MICROWAVE ENERGY" found on page 1.
- This appliance must be grounded. Connect only to properly grounded outlet. See "GROUNDING INSTRUCTIONS" found on page 4.
- Install or locate this appliance only in accordance with the provided installation instructions.
- Some products such as whole eggs and sealed containers - for example, closed glass jars are able to explode and should not be heated in this oven.
- Use this appliance only for its intended use as described in this manual. Do not use corrosive chemicals or vapors in this appliance. This type of oven is specifically designed to heat, cook, or dry food. It is not designed for industrial or laboratory use.
- As with any appliance, close supervision is necessary when used by children.
- Do not operate this appliance if it has a damaged cord or plug, if it is not working properly, or if it has been damaged or dropped.
- This appliance should be serviced only by qualified service personnel. Contact nearest authorized service facility for examination, repair or adjustment.
- Do not cover or block any openings on the appliance.
- Do not store this appliance outdoors. Do not use this
c) If materials inside the oven ignite, keep oven door closed, turn oven off, and disconnect the power cord, or shut off power at the fuse or circuit breaker panel.
d) Do not use the cavity for storage purposes. Do not leave paper products, cooking utensils, or food in the cavity when not in use.
- Liquids, such as water, coffee, or tea are able to be overheated beyond the boiling point without appearing to be boiling due to surface tension of the liquid. Visible bubbling or boiling when the container is removed from the microwave oven is not always present. THIS COULD RESULT IN VERY HOT LIQUIDS SUDDENLY BOILING OVER WHEN A SPOON OR OTHER UTENSIL IS INSERTED INTO THE LIQUID.
To reduce the risk of injury to persons:
a) Do not overheat the liquid.
b) Stir the liquid both before and halfway through heating it.
c) Do not use straight-sided containers with narrow necks.
d) After heating, allow the container to stand in the microwave oven for a short time before removing the container.
e) Use extreme care when inserting a spoon or other utensil into the container.
- Do not use this microwave oven to heat corrosive chemicals (for example, sulfides and chlorides). Vapors from such corrosive chemicals may interact
FEDERAL COMMUNICATIONS COMMISSION RADIO FREQUENCY INTERFERENCE STATEMENT
WARNING:
This equipment generates and uses ISM frequency energy and if not installed and used properly, that is in strict accordance with the manufacturer's Instructions, may cause interference to radio and television reception.
It has been type-tested and found to comply with limits for an ISM Equipment pursuant to part 18 of FCC Rules, which are designed to provide reasonable protection against such interference in a residential installation.
However, there is no guarantee that interference will not occur in a particular installation. If this equipment does cause interference to radio or television reception, which can be determined by turning the equipment off and on, the user is encouraged to try to correct the interference by one or more of the followings.
• Reorient the receiving antenna of radio or television.
- Relocate the Microwave oven with respect to the receiver.
- Move the microwave oven away from the receiver.
- Plug the microwave oven into a different outlet so that microwave oven and receiver are on different branch circuits.
THE MANUFACTURER is not responsible for any radio or TV interference caused by UNAUTHORIZED MODIFICATION to this microwave oven. It is the responsibility of the user to correct such interference.
GROUNDING INSTRUCTIONS
This appliance must be grounded. In the event of an electrical short circuit, the grounding plug reduces the risk of electric shock by providing an escape wire for electric current. This appliance is equipped with a cord having a
INSTALLATION
- Examine the oven after unpacking.
Check for damage such as a misaligned door, broken door or dent in the cavity.
If any damage is visible, DO NOT INSTALL, and notify your dealer immediately.
- Level, flat location.
Install the microwave oven on a level, flat surface.
- Ventilation.
Do not block air vents. If they are blocked during operation, the oven may overheat and eventually cause a failure.
For proper ventilation, allow 4 inches (10.16 cm) of space between oven top, sides, rear and adjacent surfaces.
- Away from radio and TV sets.
Poor television reception and radio interference may result if the oven is located close to a TV, radio, antenna.
feeder, etc.
Place the oven as far from them as possible.
- Away from heating appliances and water taps.
Keep the oven away from heat, steam or splashing liquids. These things can adversely affect oven wiring and
contacts.
- Power supply.
- Check your local power source.
This microwave oven requires a current of approximately 12 amperes, 120Volts, 60Hz grounded outlet.
-
A short power-supply cord is provided to reduce the risks resulting from becoming entangled in or tripping over a longer cord.
-
Longer cord sets or extension cords are available and may be used if care is exercised in their use.
-
If a long cord or extension cord is used:
- The marked electrical rating of the cord set or extension cord should be at least as great as the electrical rating of the appliance.
- The extension cord must be a grounding type 3-wire cord.
- The longer cord should be arranged so that it will not drape over the counter top or tabletop where it can be pulled on by children or tripped over unintentionally.
- The minimum height of free space necessary above the top surface of the oven is about 4 inches (10.16 cm).
When use 3-pronged plug
When use grounding adaptor, make sure the receptacle box is fully grounded.
SPECIFICATIONS
| POWER SUPPLY | 120V AC, 60Hz SINGLE PHASE WITH GROUNDING | |
| MICROWAVE | INPUT POWER | 1500 W |
| ENERGY OUTPUT | 1000W | |
| FREQUENCY 2,450MHz | ||
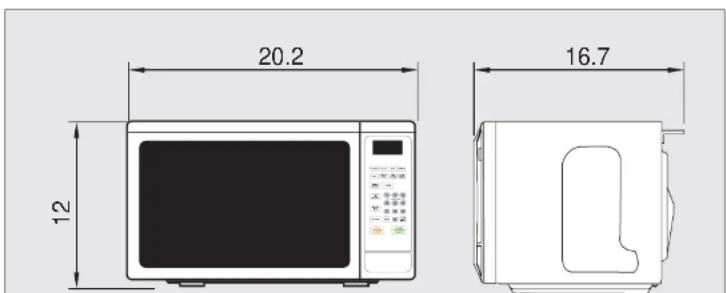
| OUTSIDE DIMENSIONS (W H ×D) | 513x305x425 mm (20.2x12x16.7 in) | |
| CAVITY DIMENSIONS (W xH xD) | 328x226x368 mm (12.9x8.9x14.5 in) | |
| CAVITY VOLUME | 1.1 cu.ft | |
| NET WEIGHT | APPROX. 31.8 lbs. | |
| TIMER 99 min. 99 sec. | ||
| POWER LEVELS 10 Levels | ||
* Specifications are subject to change without notice.
PARTS AND FEATURES
This manual may cover several different models. The model you have purchased may have some or all of the features shown here. The appearance of your particular model may differ slightly from the illustrations in this manual.
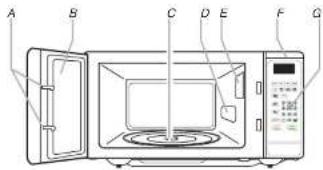
A. Door lock system
B.Metal shielded window
C.Glass turntable
D. Microwave inlet cover
E. Microwave oven light
F.Display
G.Control panel
Turntable
Ten power levels are available.
LEVEL POWERSPLAY
| 10 | PL10 | 100% |
| 9 | PL9 | 90% |
| 8 | PL8 | 80% |
| 7 | PL7 | 70% |
| 6 | PL6 | 60% |
| 5 | PL5 | 50% |
| 4 | PL4 | 40% |
| 3 | PL3 | 30% |
| 2 | PL2 | 20% |
| 1 | PL1 | 10% |
Remarks:
when a power between level 10-8 is chosen, the high level indicator is lighted and it will flash when in operation.
When a power between level 7-1 is chosen, the low level indicator is lighted and it will flash when in operation.
Clock Setting
When the microwave oven is plugged into a outlet, the oven will display "0:00".
(1) Press "CLOCK/PRE-SET", LED will display 00:00, clock indicator will be lighted. The hour figures will flash; ":" and "0" will be lighted.
(2) Press the number keys and enter the correct time. For example, time is 10:12 now, please press "1,0,1,2" in turn.
(2) Drop "AM/DM" to choose AM or DM, AM or DM
Kitchen Timer
(1) Press * KITCHEN TIMER *, LED will display 00:00, clock indicator will be lighted.
The first "0" will flash; ":" and the other "0" will be lighted.
(2) Press the number keys and enter the correct time.(the maximum cooking time is 99 minutes and 99 seconds).
(3) Press "START/+30SEC." to confirm setting, clock indicator will be lighted.
(4) When the kitchen time is reached, clock indicator will go out. The buzzer will ring 5 times.
If the clock be set(12-hour system), LED will display the current time.
Note: The kitchen Time is differ from 12-hour system, Kitchen Timer is a timer.
Microwave cook
(1) Keep on pressing "POWER" to choose microwave power. "and" or "will be lighted.
(2) Press number keys to input the cooking time; the maximum cooking time is 99 minutes and 99 seconds.
(3) Press " START/+30SEC." to start cooking, and the remained cooking time will be displayed.":", " ", " " or " " indicators will be flashing.
Note: In the process of cooking, if the "STOP/CLEAR
Note: Each press on "START/+30SEC" can increase the cooking by 30 seconds for the microwave and Auto menu cooking. However, the operation will not work under "Weight Defrost" operation.
Defrosting By WT Function
(1) Press "WEIGHT DEFROST", LED will display "dEF1"; when at the same time " ", " **" indicators will be lighted.
(2) Press numerical pads to input weight to be defrosted. "Oz" indicator will be lighted. Input the weight ranged between 4\~100 OZ
(3) If the weight input is not within 4\~100, the input will be invalid. No "beep" will be sound and the microwave will not work until valid numbers are input.
(4) Press "START/+30SEC." to start defrosting and the remained cooking time will be displayed. "", " ☐ and " 📋" indicators will be flashing and the "Oz" indicator will go out.
Time Defrost Function
(1) Press * TIME DEFROST *, LED will display "dEF2". At the same time, "", " indicators will be lighted.
(2) Press number pads to input defrosting time. The effective time range is 00:01-99:99.
(3) If the time input is not within 00:01\~99:99, no "beep" will be sound and the microwave will not
2) Press "START/+30SEC." to start cooking, the buzzer will ring once, "Oz" will go out. " ", " will flash.
3) When the cooking is over, the buzzer will ring 5 times, LED will display "0:00". If the clock be setted(12-hour system), LED will display the currently time.
b) Cooking-time adjustable mode
1) Press 'POPCORN' to select popcorn mode, "☐", "☐" and "Oz" are light. "1.75", "3.0", "3.5" appears in the display.
2) Press "MEMORY", LED will display the cooking time of the weight, the minute figure is flashing.
3) Press the number keys and enter the time.
4) Press "MEMORY" to save the setting. If straight press "START/+30 SEC.", the oven will to cook with the amended cooking time. "☐", "☐" will flash.
Users can change the cooking time e.g.: Users set "POPCORN" time for 3 minutes and 15 seconds.
1) Press" POPCORN " button once or twice when the oven is on call ( the screen will display "1.75" for once press and "3.0" for twice), then press "MEMORY" button, LED screen will display the default cooking time of current food weight ( which is not 0:00 ), for example 1'30". on the screen the first number 1 glints, press member button to input 3; the second number 3 glints, press number button to input 1; the third number 0 glints, press
POTATO
| PAD TOUCH DISPLAY SERVING SIZE | |||
| POTATO | Once | 1 | 1set |
| Twice | 2 | 2set | |
| Thrice | 3 | 3set | |
(a) Press "POTATO" repeatedly until the number you wish appears in the display,
" ", " light.
"1"SET: 1 potato (approximate 230 gram)
"2"SET: 2 potatoes (approximate 460 gram)
"3"SET: 3 potatoes (approximate 690 gram)
For example, press "POTATO" once : "1" displays.
(b) Press " START/+30 SEC." to cook, "",
"☐" are flashing, time counts down.
PIZZA
| PAD TOUCH DISPLAY SERVING SIZE | |||
| PIZZA | Once | 1 | 1(about 3.0 Oz) |
| Twice | 2 | 2(about 6.0 Oz) | |
| Thrice | 3 | 3(about 9.0 Oz) | |
a) Press "PIZZA" repeatedly until the number you wish appears in the display, "☐", "☐" light. You can reheat 1\~3 slices of Pizza each time. For example, press' PIZZA" twice, "2" appears in the LED.
b) Press " START/+30 SEC." to cook, " ", " " are flashing, time counts down.
SOUP
| PAD TOUCH DISPLAY SERVING SIZE | |||
| SOUP 4.0 | Once | 4.0 Oz | |
| Twice | 8.0 | 8.0 Oz | |
| Thrice | 12.0 | 12.0 Oz | |
| 4 times | 16.0 | 16.0 Oz | |
a) Press * SOUP * repeatedly until the number you
wish appears in the display, " ", " "
,"Oz" light
For example, press "SOUP" twice, "8.0" appears
b) in the display.
Press * START/+30 SEC." to cook, "",
" ☐ " light, time counts down.
DINNER PLATE
| PAD TOUCH DISPLAY SERVING SIZE | |||
| DINNER | Once | 9.0 | 9.0 Oz |
| PLATE | Twice | 12.0 | 12.0 Oz |
| Thrice | 18.0 | 18.0 Oz | |
a) Press "DINNER PLATE" repeatedly until the
number you wish appears in the display,
" ", " and "Oz" light.
For example, press" DINNER PLATE " twice,
b) "12.0" appears in the display.
b) Press " START/+30 SEC. " to cook, "
" " are flashing, time counts down.
FROZEN VEGETABLE
| PAD TOUCH DISPLAY SERVING SIZE | |||
| FROZEN | Once | 4.0 | 4.0 Oz |
| VEGETABLE | Twice | 8.0 | 8.0 Oz |
| Thrice | 16.0 | 16.0 Oz | |
a) Press "FROZEN VEGETABLE" repeatedly until the number you wish appears in the display,
" ", " and "Oz" light.
For example, press "FROZEN VEGETABLE"
twice, "8.0" appears in the display.
b) Press "START/+30 SEC." to cook, "Oz"
disappears, " ", " are flashing, time
counts down
PRE-SET FUNCTION
(1) Set the clock first. (Consult the instruction of clock setting.)
(2) Set a certain cooking procedure(one or two blocks), the setting method and display are same as relevant cooking procedure. (Defrosting is beyond pre-set cooking).
Example: If you want to cook the food with 100% microwave power for 10 minutes.
Do it as following:
a. Press "POWER" once to choose 100% microwave power;
b. Press number keys "1", "0", "0", "0" In order to adjust the cooking time;
MEMORY FUNCTION
(1) Press "MEMORY" to choose memory 1-5 procedure. The LED will display 1,2,3...5.
(2) If the procedure has been set, press "START/+30 SEC." to use it. If not, continue to set the procedure. Only one or two stages can be set.
(3) After finishing the setting, press "MEMORY" to save the procedure and turn back to the waiting states. If press "START/+30 SEC.", it can save and operate the setting.
a. In waiting states, press "MEMORY" twice, stop pressing until the screen displays "2".
b. Press "POWER" three times until "PL8" displays.
c. Press number keys "3", "2", "0" In order to input the cooking time.
d. Press 'MEMORY' to save the setting. Buzzer sounds once then turn back to waiting states. If you press "START/+30SEC." after the above step, the procedure will be saved as the memory 2 and operated.
e. If the electricity is not cut off, the procedure will be saved all the time. If it is, the procedure need to reset.
f. If you want to run the saved procedure, in
Example: to set the following procedure as the second memory, that is memory 2. to cook the food with 80% microwave power for 3 minutes and 20 seconds.
The steps are as follow:
(1) Press "POWER" for times to choose 80% microwave, now "PL8" is displayed;
(2) Press number keys "5", "0", "0" to set the cooking time;
(3) Press "POWER" for times to choose 60% microwave power, "PL6" is displayed;
(4) Press number keys "1", "0", "0", "0" to set the cooking time;
(5) Press "START/+30SEC." to start cooking.
INQUIRING FUNCTION
(1) In cooking state, press "CLOCK/PRE-SET", the LED will display clock for three seconds.
(2) In the microwave cooking state, press "POWER" to inquire microwave power level, and the current microwave power will be displayed. After three seconds, the oven will turn back to the previous state. In multi-stage state, the inquiring way can be done by the same way as above.
LOCK FUNCTION FOR CHILDREN
Lock: In waiting state, press "STOP/CLEAR" for 3 seconds, there will be a long "beep" denoting the entering into the children-lock state; meanwhile, LED will display "[---]".
Lock quitting: In locked state, press "STOP/CLEAR" for 3 seconds, there will be a long "beep" denoting that lock is released.
COOKING END REMINDING FUNCTION
When the cooking is over, the buzzer will sound 5 "beep" to alert user the cooking is finished.
OTHER SPECIFICATIONS
(1) In standby state, if the set clock digital tube displays current time, the icon " : " would flash; otherwise, it shows "0:00".
(2) In setting function state, LED displays corresponding setting.
(3) In working or pause state, LED displays surplus cooking time.
The oven should be cleaned regularly and any food deposits removed. Failure to maintain the oven in a clean condition could lead to deterioration of the surface that could adversely affect the life of the appliance and possibly result in a hazardous situation.
1 Unplug the power cord before cleaning any part of this oven.
2 Keep the inside of the oven clean. When food spatters or spilled liquids adhere to oven walls, wipe with a damp cloth. Mild detergent may be used if the oven gets very dirty.
The use of harsh detergent or abrasives is not recommended.
3 The outside oven surface should be cleaned with soap and water, rinsed and dried with a soft cloth. To prevent damage to the operating parts inside the oven, water should not be allowed to seep into the ventilation openings.
4 If the Control Panel becomes wet, clean with a soft, dry cloth. Do not use harsh detergents or abrasives on Control Panel.
5 If steam accumulates inside or around the outside of the oven door, wipe with a soft cloth. This may occur when the microwave oven is operated under high humidity conditions and in
no way indicates malfunction of the unit.
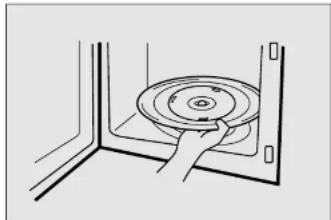
6 It is occasionally necessary to remove the glass tray for cleaning. Wash the tray in warm sudsy water or in a dishwasher.
7 The roller guide and oven cavity floor should be cleaned regularly to avoid excessive noise. Simply wipe the bottom surface of the oven with mild detergent water or window cleaner and dry.
natural_image
Line drawing of a hand holding a circular component mounted inside a corner (no text or symbols)ROLLER GUIDE
1 The ROUER GUIDE and oven floor should be
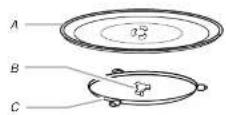
Glass Tray
Roller Guide
BEFORE YOU CALL FOR SERVICE
Refer to following checklist, you may prevent an unnecessary service call.
\* The oven doesn't work :
- Check that the power cord is securely plugged in.
- Check that the door is firmly closed.
- Check that the cooking time is set.
- Check for a blown circuit fuse or tripped main circuit breaker in your house.
\* Sparking In the cavity;
- Check utensils. Metal containers or dishes with metal trim should not be used.
- Check that metal skewers or foil does not touch the interior walls.
If there is still a problem, contact the service station.
A list of these stations is included in the oven.
CARE AND CLEANING
Although your oven is provided with safety features, it is important to observe the following:
- It is important not to defeat or tamper with safety interlocks.
- Do not place any object between the oven front face and the door or allow residue to accumulate on sealing surfaces. Wipe the sealing area frequently with a mild detergent, rinse and dry. Never use abrasive powders or pads.
- When opened, the door must not be subjected to strain, for example, a child hanging on an opened door or any load could cause the oven to fall forward to cause injury and also damage to the door. Do not operate the oven if it is damaged, until it has been repaired by a competent service technician. It is particularly important that the oven closes properly and that there is no damage to the:
i) Door(bent)
ii) Hinges and Hookes(broken or loosened)
iii) Door seals and sealing surfaces.
-
The oven should not be adjusted or repaired by anyone except a properly competent service technician.
-
The oven should be cleaned regularly and any food deposits removed;
-
Failure to maintain the oven in a clean condition could lead to deterioration of the surface that could adversely affect the life of the appliance and possibly result in a hazardous situation.
QUESTIONS AND ANSWERS
* Q : Can the oven be used with the glass tray or roller guide removed?
A: No. Both the glass tray and roller guide must always be used in the oven before cooking.
* Q : Can I open the door when the oven is operating?
A: The door can be opened anytime during the cooking operation. Then microwave energy will be instantly switched off and the time setting will maintain until the door is closed.
* Q : Why do I have moisture in my microwave oven after cooking?
A: The moisture on the side of your microwave oven is normal. It is caused by steam from cooking food hitting the cool oven surface.
* Q : Does microwave energy pass through the viewing screen in the door?
A: No. The metal screen bounces back the energy to the oven cavity. The holes are made to allow light to pass through. They do not let microwave energy pass through.
* Q : Why do eggs sometimes pop?
A: When baking or poaching eggs, the yolk may pop due to steam build-up inside the yolk membrane. To prevent this, simply pierce the yolk with a toothpick before cooking. Never cook eggs without piercing their shells.
* O. Why this standing time recommended after
* Q : What does "standing time" mean?
A: "Standing time" means that food should be removed from the oven and covered for additional time to allow it to finish cooking. This frees the oven for other cooking.
* Q : Why does my oven not always cook as fast as the microwave cooking guide says?
A: Check your cooking guide again, to make sure you've followed directions exactly; and to see what might cause variations in cooking time. Cooking guide times and heat settings are suggestions, to help prevent over-cooking... the most common problem in getting used to a microwave oven. Variations in the size, shape and weights and dimensions could require longer cooking time. Use your own judgement along with the cooking guide suggestions to check whether the food has been properly cooked just as you would do with a conventional cooker.
* Q : Will the microwave oven be damaged If It operates while empty?
A : Yes. Never run it empty.
* Q : Can I operate my microwave oven without the turntable or turn the turntable over to hold a large dish?
A: No. If you remove or turn over the turntable, you will get poor cooking results. Dishes used in your oven must fit on the turntable.
Do not attempt to defeat or tamper with safety interlocks.
Do not place any object between the oven front frame and the door or allow residue to build up on sealing surfaces. Wipe with a mild detergent, rinse and dry. Never use abrasive powders or pads.
Do not subject the oven door to strain or weight such as a child hanging on an open door.
This could cause the oven to fall forward resulting in injury to you and damage to the oven.
Do not operate the oven if door seals or sealing surfaces are damaged; or if door is bent; or if hinges are loose or broken.
Do not operate the oven empty. This will damage the oven.
Do not attempt to dry clothes, newspapers or other materials in the oven. They may catch on fire.
Do not use recycled paper products as they may contain impurities which may cause sparks or fires. Do not hit or strike the control panel with hard objects.
This can damage the oven.
Food
Never use your microwave oven for home canning. The oven is not designed for proper home canning. Improperly canned food may spoil and be dangerous to consume.
Always use the minimum recipe cooking time. It is better to undercook rather than overcook foods. Undercooked foods can be returned to the oven for more cooking. If food is overcooked, nothing can be done.
Heat small quantities of food or foods with low moisture carefully. These can quickly dry out, burn or catch on fire.
Do not heat eggs in the shell. Pressure may build up and eggs can explode.
Potatoes, apples, egg yolks and sausages are examples of food with non-porous skins.
These must be pierced before cooking to prevent bursting.
Do not attempt to deep fat fry in your microwave oven.
temperature to even out, stir during heating, if
necessary, and ALWAYS stir after heating. To prevent eruptive boiling and possible scalding, you should put a spoon or glass stick into the beverages and stir before, during and after heating.
Do not leave the oven unattended while popping corn. Do not pop corn in a paper bag unless it is the
commercially prepared Microwave Popcorn product. The kernels can overheat and ignite a brown paper bag.
Do not put packaged Microwave Popcorn bags directly on the oven tray. Place the package on a microwave safe glass or ceramic plate to avoid overheating and cracking the oven tray.
Do not exceed the Microwave Popcorn manufacturers suggested popping time.
Longer popping does not yield more popcorn but it can result in burling the popcorn or risk of fire. Remember, the Popcorn bag and tray can be too hot to handle.

Magic Chef™
SORIGHTATHOME.™
Microwave Oven Warranty
MC Appliance corp. warrants each new Microwave Oven to be free from defects in material and workmanship and agrees to remedy any such defect or to furnish a new part(s) (at the company's option) for any part(s) of the unit that has failed during the warranty period. Parts and labor expenses are covered on this unit for a period of one year after the date of purchase. In addition, MC Appliance corp. warrants the Magnetron (parts only) to be free from defects in material and workmanship for a period of 8 years. The consumer is responsible for all labor and transportation expenses related to the diagnosis and replacement of the Magnetron after the initial one-year warranty expires. If in the event the unit requires replacement or refund under the terms of this warranty the consumer is responsible for all transportation expenses to return the unit to our factory prior to receiving a replacement unit or refund. A copy of the dated sales receipt / Invoice is required to receive warranty service, replacement or refund.
This warranty covers appliances in use within the continental United States, Puerto Rico and Hawaii. The warranty does not cover the following:
- Damages due to shipping damage or improper installation.
• Damages due to misuse or abuse. - Content losses due to failure of the unit.
• Repairs performed by unauthorized service agents. - Service calls that do not involve defects in material and workmanship such as instruction on proper use of the product or improper installation.

Magic Chef™
SO RIGHT AT HOME.™
natural_image
Simple line drawing of a mechanical component with a circular base and central shaft (no text or symbols)- TABLE OF CONTENTS
- IMPORTANT SAFETY INSTRUCTIONS
- To reduce the risk of injury to persons:
- FEDERAL COMMUNICATIONS COMMISSION RADIO FREQUENCY INTERFERENCE STATEMENT
- WARNING:
- GROUNDING INSTRUCTIONS
- INSTALLATION
- PARTS AND FEATURES
- Clock Setting
- Kitchen Timer
- Microwave cook
- Defrosting By WT Function
- Time Defrost Function
- b) Cooking-time adjustable mode
- PRE-SET FUNCTION
- MEMORY FUNCTION
- INQUIRING FUNCTION
- LOCK FUNCTION FOR CHILDREN
- COOKING END REMINDING FUNCTION
- OTHER SPECIFICATIONS
- ROLLER GUIDE
- BEFORE YOU CALL FOR SERVICE
- \* The oven doesn't work :
- \* Sparking In the cavity;
- CARE AND CLEANING
- QUESTIONS AND ANSWERS
- Food
- Magic Chef™
- Microwave Oven Warranty
Brand : Magic Chef
Model : MCM1110W
Category : Microwaves