
KX-TCD510BXM - Phone Accessories PANASONIC - Free user manual and instructions
Find the device manual for free KX-TCD510BXM PANASONIC in PDF.


| Product Type | Digital Cordless Answering System |
| Model | KX-TCD510BXM |
| Brand | Panasonic |
| Standard | DECT (Digital Enhanced Cordless Telecommunications) / GAP |
| Number of Channels | 120 Duplex Channels |
| Frequency Range | 1.88 GHz to 1.9 GHz |
| Power Source | AC Adaptor 220-240 V, 50 Hz |
| Power Consumption (Base Unit) | Standby: Approx. 3.5 W, Maximum: Approx. 9.2 W |
| Base Unit Dimensions (H x W x D) | Approx. 58 mm x 128 mm x 105 mm |
| Base Unit Weight | Approx. 200 g |
| Handset Dimensions (H x W x D) | Approx. 143 mm x 48 mm x 32 mm |
| Handset Weight | Approx. 125 g |
| Battery Type | Ni-MH (AAA size, 700 mAh typical) or Ni-Cd (AAA size, 250 mAh typical) |
| Battery Talk Time (Ni-MH) | Approx. 10 hours |
| Battery Standby Time (Ni-MH) | Approx. 120 hours |
| Answering System Recording Capacity | Up to 30 minutes or 64 messages |
| Phonebook Capacity | Handset: 200 stations, Base Unit: 20 stations |
| Caller ID Memory | Up to 50 callers |
| Ringtones | 32-polyphonic: 9 preset melodies + 6 bell patterns |
| Key Features | Hands-free speakerphone, illuminated keypad, headset jack, intercom, walkie-talkie mode, call bar, direct call, voice date/time stamp |
| Operating Conditions | 5 - 40 °C, 20 - 80 % relative air humidity (dry) |
| Safety & Maintenance | Only use specified rechargeable batteries; clean charge contacts monthly; do not expose to water or excessive smoke/dust; use only included AC adaptor (PQLV19CE) |
Frequently Asked Questions - KX-TCD510BXM PANASONIC
User questions about KX-TCD510BXM PANASONIC
0 question about this device. Answer the ones you know or ask your own.
Ask a new question about this device
Download the instructions for your Phone Accessories in PDF format for free! Find your manual KX-TCD510BXM - PANASONIC and take your electronic device back in hand. On this page are published all the documents necessary for the use of your device. KX-TCD510BXM by PANASONIC.
USER MANUAL KX-TCD510BXM PANASONIC
510DX e.book Page 1 Thursday, June 5, 2003 9:43 PM
Panasonic
Digital Cordless Answering System
Operating Instructions
Model No. KX-TCD510BX
Contents
Preparation
Before Initial Use....2
Important Information....5
Location of Controls....6
Meanings of Icons above
SOFT KEYS....7
Meanings of Symbols
and Operations of Keys 8
Display 9
Setting up....10
Cordless Telephone
Using the Telephone....14
Caller ID 19
List Menu 20
Using the Phonebook....23
Settings Menu Chart....32
Handset Settings....34
Base Unit Settings 44
Preparation
Cordless Telephone
Answering


510DX e-book Page 2 Thursday, June 5, 2003 9:43 PM


Before Initial Use

Features

Digital Answering System
Up to 30 minutes recording time or up to 64 messages, with time/day stamp that records when messages were received and counts the total number.

32-Polyphonic Ring Tones
A variety of high-quality sounds can be reproduced for your ring tones. You can choose from 9 pre-set melodies and 6 ring tones.

Hands-Free Speakerphone
You can talk without holding the handset. Convenient for talking while doing something else.

Headset Jack
Plug in the optional headset and the hands-free facility provides total ease and freedom of use.

Illuminated Keypad
Lights up when there is an incoming call or you touch any key for easier operation even in the dark.

200+20-Station Phonebook
Stores 200 station names and numbers with the built-in telephone directory of the handset to be recalled easily and stores 20 station names


510DX e.book Page 3 Thursday, June 5, 2003 9:43 PM
Before Initial Use
Thank you for purchasing your new Panasonic digital cordless telephone.
Dear purchaser,
You have acquired a KX-TCD510BX, which is a product made in accordance with the Digital Enhanced Cordless Telecommunications (DECT). DECT technology is characterized by high-security protection against interceptions as well as high-quality digital transmission. This telephone was designed for a wide range of applications. For example, this telephone can be used within a network of base units and handsets, constituting a telephone system which
•operates up to 6 handsets at one base unit.
- allows an intercom between 2 handsets
- allows the operation of a handset at up to 4 base units, expanding the communication radio area.
Caller ID Service, where available, is a telephone company service. After subscribing to Caller ID, this phone will display the caller's phone number.
Preparation


510DX e.book Page 4 Thursday, June 5, 2003 9:43 PM


Before Initial Use
Accessories (specific to product type)
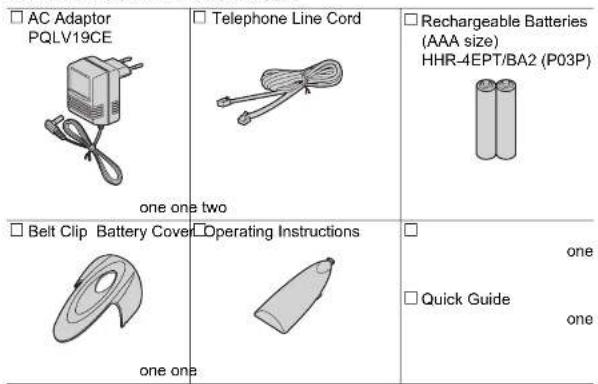
Additional accessories are available for purchase. Contact your Panasonic Service Centre for further details.


510DX e.book Page 5 Thursday, June 5, 2003 9:43 PM
Important Information
Only use the power supply included with the product.
Do not connect the AC adaptor to any AC outlet other than the standard AC220-240 V.
The apparatus is approved for use with PQLV19CE power supply.
This apparatus is unable to make calls under the following conditions: • The portable handset batteries need recharging, or have failed.
- During a mains power failure. - When the Key Lock is set to ON. - When the unit is in Direct Call mode (only the Direct Call Number can be made).
Do not open the base unit or handset (other than to change the batteries). This apparatus should not be used near emergency/intensive care medical equipment and should not be used by people with pacemakers.
Care should be taken that objects do not fall onto, and liquids are not spilled into the unit. Do not subject this unit to excessive smoke, dust, mechanical vibration or shock.
Environment Do not use this unit near water.
Battery Caution
- Use only the specified batteries.
- Only use rechargeable batteries.
- Do not mix old and new batteries.
-
Do not dispose of batteries in a fire, as they may explode. Check local waste management codes for special disposal instructions.
-
Do not open or mutilate the batteries. Released electrolyte from the batteries is corrosive and may cause burns or injury to the eyes or skin.
The electrolyte may be toxic if swallowed.
-
Exercise care in handling the batteries in order not to short circuit the batteries with conductive materials such as rings, bracelets and keys. The batteries and/or conductor may overgeal and cause burns.
-
Charge the batteries in accordance with the information provided in this operating guide.
Location
- For maximum distance and noise-free operation, place your base unit:
- Away from electrical appliances such as TVs, radios, personal computers or other phones.
- In a convenient, high, and central location.


510DX e.book Page 6 Thursday, June 5, 2003 9:43 PM
Location of Controls

Handset
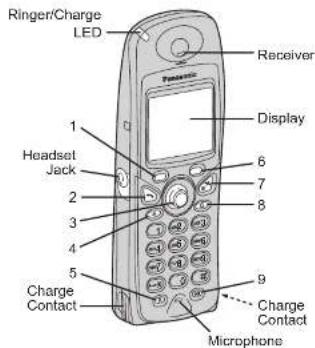
1 - LEFT SOFT KEY
2 - TALK Button
3 - JOYSTICK
4 - SPEAKERPHONE Button
5 - RECALL Button
6 - RIGHT SOFT KEY
7 - POWER/TALK OFF Button
8 - CLEAR Button
9 - INTERCOM Button
How to Use the Handset Soft Keys
3 soft keys are used to select functions displayed directly
above the keys.
Functions displayed above the keys will change depending
on the state of use.
For example, on the standby mode display,


S10DX e.book Page 7 Thursday, June 5, 2003 9:43 PM


Location of Controls

Base Unit
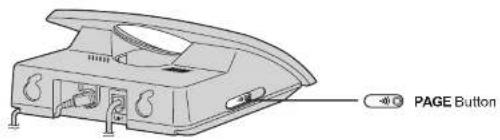
Preparation
Meanings of Icons above SOFT KEYS
| Icon Function Icon Function | |||
| Go Back Alphabet | ABC | ||
| Menu Numeric | 0-9 | ||
| Sub-Menu Extended | 1 AAA | ||
| OK | OK Extended 2 | SSS | |
| Redial Greek | ABΓ | ||
| Phonebook Russian | A5B | ||
| New Phonebook Select | √ | ||
| Search Pause | P | ||
| Key Lock Mute | 81 | ||


510DX e.book Page 8 Thursday, June 5, 2003 9:43 PM
Meanings of Symbols and Operations of Keys
| Symbol Meaning | ||
 | Move  up, down, left or right.e.g., menu. up, down, left or right.e.g., menu. |  |
| e.g., OK[8xCT] | e.g., Display of menu items 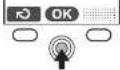 | Press JOYSTICKdirectly in the centre.In this example, the desired item is selected.  |
| e.g., Redial[3562] | e.g., Standby Mode Display  | Press RIGHT SOFT KEY.In this example, the telephone number last dialled is displayed. |
e.g., Go Back | e.g., Display of menu items 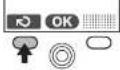 | Press LEFT SOFT KEY.In this example, the display returns to the previous menu. has the same function. |
| [0336] | Press POWER/TALK OFF Button.Press this button for one or two times, then the display returns to the standby mode any time. | |


510DX e.book Page 9 Thursday, June 5, 2003 9:43 PM
Display

Display Icons
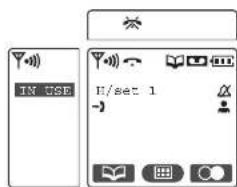

Within range of a base unit
Out of range/No registration/
No power on base unit

Paging/Intercom/
While connecting with base unit

Making or answering calls

Call Bar ON

Phonebook Mode

Answering System ON

Battery strength

Direct Call ON
Ringer Volume OFF
H/set 1
Handset Name (e.g., Handset 1)

New call (Caller ID only)

The line is being used by another
handset (for additional handset
users)
Preparation

Main Menu Display


510NX e-book Page 10 Thursday, June 5, 2003 9:43 PM
Setting up

Connection
Plug in the AC adaptor and the telephone line cord in order 1, 2, 3, 4.
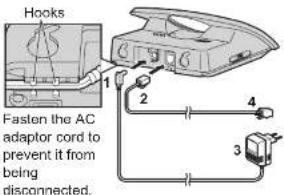
•The AC adaptor must remain connected at all times. (It is normal for the adaptor to feel warm during use.)
- Never install telephone wiring during a lightning storm.
•USE ONLY WITH Panasonic AC ADAPTOR POLV19CE.

Battery Installation
Please ensure the batteries are inserted as shown. Part should be inserted first. Close the cover as indicated by the arrow
- When you replace the batteries, part

Battery Charge
At the time of shipment, the batteries are not charged. To charge, place the handset on the base unit. Please charge the batteries for about 7 hours before initial use.
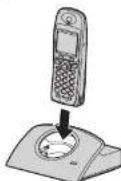
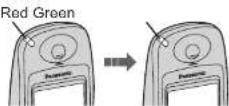
During charging, the charge LED will light as shown below.
During charging Fully charged
Display icon Battery strength


510NX e-book Page 11 Thursday, June 5, 2003 9:43 PM
Setting up

Battery Information
After your Panasonic battery is fully charged:
Ni-MH Batteries (typical 700 mAh)
| Operation Operating Time | |
| While in use (TALK) | 10 hrs approx. |
| While not in use(Standby) | 120 hrs approx. |
Ni-Cd Batteries (typical 250 mAh)
| Operation Operating Time | |
| While in use (TALK) | 4 hrs approx. |
| While not in use(Standby) | 40 hrs approx. |
• Times indicated are for peak performance.
•The battery operating time may be shortened depending on usage conditions and ambient temperature.
- Clean the charge contacts of the handset and the base unit with a soft, dry cloth once a month. Clean more often if the unit is subject to

Replacing the Batteries
If the icon flashes after a few telephone calls even when the handset batteries have been fully charged, both batteries must be replaced.
- Charge new batteries for approximately 7 hours before initial use. (The telephone line cord must not be connected to the telephone socket at this time.)
- When replacing the batteries, be sure to set up the battery type even if you install the same type of batteries to initialise battery remaining memory of your handset. (See Setting the Battery Type on page 42.)
- Do not use non-rechargeable batteries. If non-rechargeable batteries are fitted and start charging, it may cause the leakage of the battery electrolyte.
- Press the notch on the cover firmly and slide it as indicated by the arrow. Replace both batteries (p.10) and close the cover then charge the handset for about 7 hours.
Preparation


510NX e-book Page 12 Thursday, June 5, 2003 9:43 PM


Setting up

Power ON/OFF
Power ON Power OFF
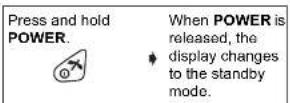

Press and hold
POWER

The display goes blank.

Selecting the Display Language
You can select one of 19 languages. The factory preset is English.
To exit the operation, press at any time.
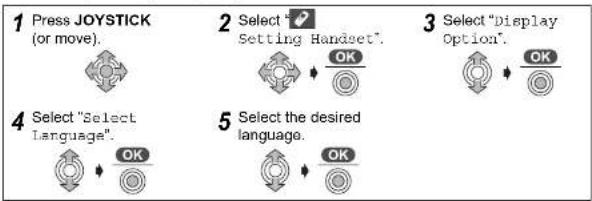
flowchart
graph TD
    A["1 Press JOYSTICK (or move)."] --> B["2 Select "Setting Handset"."]
    B --> C["3 Select "Display Option"."]
    C --> D["5 Select the desired language."]
    D --> E["4 Select "Select Language"."]
- If you set a language you cannot read, reset the handset to its initial settings.


510NX e-book Page 13 Thursday, June 5, 2003 9:43 PM
Setting up

Setting the Date and Time
After a mains power failure, the clock needs to be adjusted. Ensure that the Ycon is not flashing.
To exit the operation, press at any time.
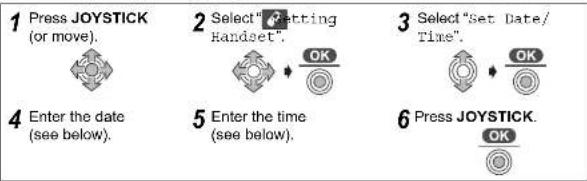
flowchart
graph TD
    A["1 Press JOYSTICK (or move)."] --> B["2 Select "Setting Handset"."]
    B --> C["3 Select "Set Date/Time"."]
    C --> D["6 Press JOYSTICK."]
    E["4 Enter the date (see below)."] --> F["5 Enter the time (see below)."]
Example: To set 16 February, 2003, 7:15 pm.

To Select 12/24 Hour Clock

Preparation


510NX e-book Page 14 Thursday, June 5, 2003 9:43 PM


Using the Telephone

Making a Call
◆ Pre-Dialling Post-Dialling
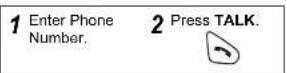

1 Press TALK.
2 Enter Phone
Number.
- When using Pre-Dialling:
If you need to make a correction while entering the phone number, press the digit is cleared to the left, then you can enter numbers. All digits are cleared if you press and hold ©
- You can also press to make a call.

Answering a Call
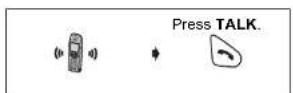
- Terminating a Call
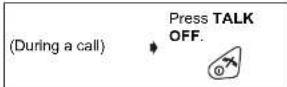
- You can also answer a call by pressing ① to ②, ③, ④, ⑤ or ⑥ (Any Key Talk).
Auto Talk
If you set Auto Talk to ON, you can answer a call by lifting the handset off the base unit. (See Setting Auto Talk ON/OFF on page 42.)


510NX e-book Page 15 Thursday, June 5, 2003 9:43 PM
Using the Telephone
◆ Receiver (or Headset Receiver)/Speaker Volume
The choices for the receiver (or headset receiver) volume are 3 levels, and 6 levels for the speakerphone volume.

Have a Hands-Free Phone Conversation (using Digital Speakerphone)
Speakerphone allows you to talk to your caller without holding the handset and allows other persons in the room to listen to the conversation.
To Return to Receiver
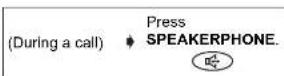

•For best performance, please note the following:
- Talk alternately with the caller in a quiet environment.
- If either party has difficulty hearing, move the JOYSTICK up or down to change the volume accordingly. The choices for the speakerphone volume are 6 levels.
◆◆ Muting Your Conversation
During a call, you can mute your phone so the other party cannot listen to you. When muting your conversation, you can hear the other party.
To Note To Return to the Communication



510NX e-book Page 16 Thursday, June 5, 2003 9:43 PM


Using the Telephone

Key Lock
You can lock the handset dialling buttons. Only incoming calls are accepted while the key lock is ON. When the key lock is ON, the menu icon switches to . When the key lock is ON, emergency calls cannot be made until key lock is cancelled.
Key Lock ON Key Lock OFF
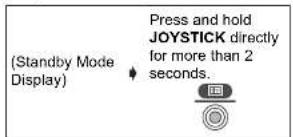

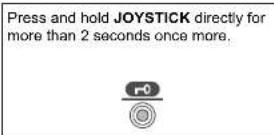

You can locate a misplaced handset by paging it.
♦ Paging

To Stop Paging


510NX e-book Page 17 Thursday, June 5, 2003 9:43 PM
Using the Telephone

Redialling
The last 10 numbers dialled are automatically stored in the redial list.
◆ Dialling with the Redial List

- If there are no items stored in the redial list when pressing, the display shows "Memory Empty".
- If the items are scrolled at the end when you search for the desired dialled item, an end tone sounds.
- You can also press make a call.
- To save the numbers from the redial list into the handset phonebook, or to edit or delete from memory, see pages 21 and 22.
◆ Dialling the Last Number Dialled
1 Press TALK. 2 Press RIGHT SOFT KEY.


Cordless Telephone
Auto Redial
If you press then to redial and the dialled number is engaged, the unit will automatically call back every 40 seconds, up to 12 times. When using Auto Redial, press again after pressing in the mute has not been cancelled.


510NX e-book Page 18 Thursday, June 5, 2003 9:43 PM


Using the Telephone
◆ Dialling Pause (for PBX line/long distance service users)
A dialling pause is used when a pause in the dialling of a phone number is necessary
using a PBX or accessing a long distance service.
For example, when 0 (line access number) is dialled followed by a pause to access an outside line through a PBX:
1 Press 0.
2 Press RIGHT SOFT KEY.
3 Enter Phone Number.
4 Press TALK.


- Entering a pause prevents misdialling when you redial or dial a stored number.
- Pressing RIGHT SOFT KEY (Pause) more than once increases the length of the
pause between numbers.
• To change the pause time, see Selecting the Pause Time on page 45.
Call Waiting
Call Waiting is a service of your Telephone company and will only operate if you have subscribed to this service. You can answer the second call, keeping the first call on hold.
(Call waiting tone sounds during a call)
Press RECALL. The first call is put on hold and R you can answer the second call.
To Return to the First Caller
Press RECALL once more


510NX e-book Page 19 Thursday, June 5, 2003 9:43 PM
Caller ID
Caller ID Service
Caller ID is a service of your Telephone company and will only operate if you have subscribed to this service.
After subscribing to Caller ID, this phone will display the caller information.
If your unit is connected to a PBX or a telephone line that does not support this service, you will not be able to use it.
Standby Mode Display
| K/ect 1→10 Calls |
| 17.8 14:59 |
When new calls have been received, the display shows the number of calls.
In the example on the left, 10 new calls have been received.
Making a Call from the Caller ID List
The last 50 callers' phone numbers are stored in the order the calls were received. When the 51st call is received, the oldest caller information is cleared. If the caller's name has been stored with the number in the phonebook (see Storing Caller Information on page 24), the caller's name will also be displayed.
To exit the operation, press at any time.
1 Press JOYSTICK (or move).

2 Select "→Caller ID"

3 The newest caller information is displayed.
4 Search for the desired item.
5 Press TALK.



510NX e-book Page 20 Thursday, June 5, 2003 9:43 PM
List Menu
Caller ID List Menu
You can save the numbers from the Caller ID list into the handset phonebook, and you can edit (for calling) or delete item(s) in the Caller ID List.
To exit the operation, press at any time.
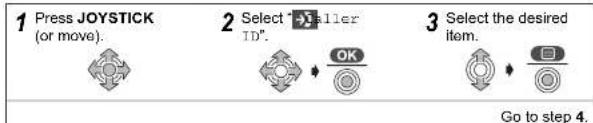
flowchart
graph TD
    A["1 Press JOYSTICK (or move)."] --> B["2 Select "older ID"."]
    B --> C["3 Select the desired item."]
- If the items are scrolled at the end when you search for the desired item, an end tone sounds.
- If there are no items stored in the caller list when "Caller ID" is selected, the display shows "Memory Empty".
- Editing the Received Number for Calling
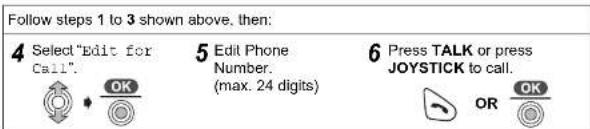
•You can also press to make a call.
• To add a digit at the beginning of a phone number, press too or ad the desired item on step 3, or to delete a digit at the beginning of a phone number, press


510NX e-book Page 21 Thursday, June 5, 2003 9:43 PM
List Menu
◆ Deleting One/All Caller ID Item(s)
Follow steps 1 to 3 on the previous page, then:
4 Select "Delete" or "Delete All".
5 Select "Yes", then "Deleted" is displayed.


◆ Redial List Menu
You can save the numbers from the redial list into the handset phonebook, and you can edit (for calling) or delete item(s) in the redial list.
To exit the operation, press at any time.
1 Press RIGHT SOFT KEY.

2 Select the desired item.

Go to step 3
- If there are no items stored in the redial list when pressing, the display shows "Memory Empty".
Storing the Number in the Handset Phonebook
Follow steps 1 and 2 shown above, then:
3 Select "Save Phonebook"
4 Enter Name (p.26). (max 16 characters)
5 Press JOYSTICK twice


510NX e-book Page 22 Thursday, June 5, 2003 9:43 PM
List Menu
Editing the Dialled Number for Calling
Follow steps 1 and 2 on the previous page, then:
3 Select "Edit for Call".

4 Edit Phone Number. (max. 24 digits)
5 Press TALK or press JOYSTICK to call.

- You can also press to make a call.
◆ Deleting One/All Redial Item(s)
Follow steps 1 and 2 on the previous page, then:
3 Select "Delete" or "Delete All".
4 Select "Yes", then "Deleted" is displayed.


510DX e.book Page 23 Thursday, June 5, 2003 9:43 PM
Using the Phonebook
You can store up to 200 caller information in the handset phonebook and up to 20 caller information in the base unit phonebook. If you subscribed to Caller ID and you received a call from the same phone number you stored with name in the phonebook, the display will show the caller's name.
Private Category Feature
You can categorise caller information in the handset phonebook. There are 9 categories available. For example, category 1 can be used to save friends' numbers. For each category, you can change the category name (max. 10 digits; see Changing the Private Category Name on page 39), and you can select one of 3 Ringer LED colours (see Setting the Private Colour on page 39) and one of 15 ringer types (see Selecting the Ringer Pattern for Private Ring on page 37).
This feature is only available after subscribing to Caller ID Service. Please contact your Telephone company for further information.
Example
| PrivateCategory No. | Ringer LED ColourGreen Orange Red | PrivateRinger Type | CategoryName |
1 3 Friends
3 2 Customers
* The factory preset LED colour is green.
- The unit will indicate an incoming call using the factory preset LED colour (green) and the ringer pattern assigned to external calls (p.37) momentarily until Caller ID information is received from the network provider.
Audible Caller ID Feature
To use this feature, you need to subscribe to Caller ID service. For further information,
510NX e-book Page 24 Thursday, June 5, 2003 9:43 PM
Using the Phonebook

Storing Caller Information
To exit the operation, press at any time.
◆ Handset Phonebook
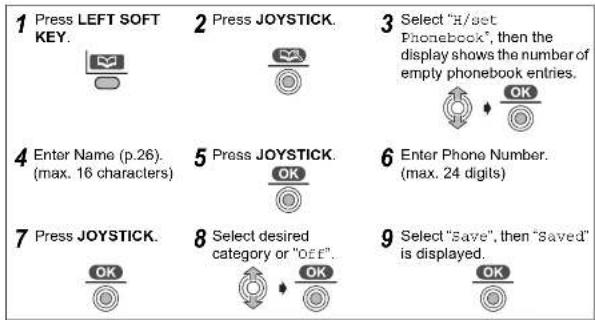
- If "Memory Full" is displayed at step 3, the phonebook is full. To store, delete other stored items in the phonebook.
• To continue storing other caller information, repeat from step 4.


510NX e 03.fm Page 25 Thursday, June 5, 2003 11:27 PM
Using the Phonebook
Base Unit Phonebook
To use an Audible Caller ID feature (p.23), you must store caller information into the base unit phonebook.
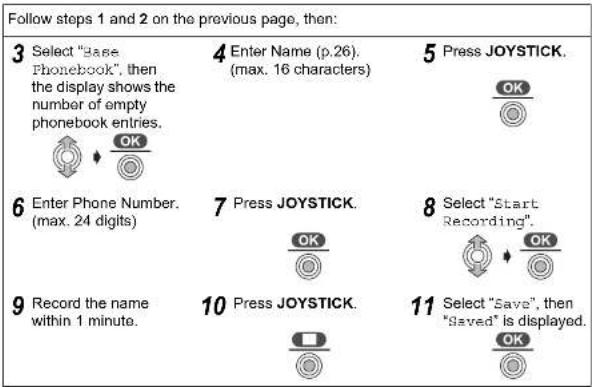
- If "Memory Full" is displayed at step 3, the phonebook is full. To store, delete other stored items in the phonebook.
- If "Memory full" is heard at step 8, the remaining recording time is 0. To store, delete



510NX e-book Page 26 Thursday, June 5, 2003 9:43 PM
Using the Phonebook

Entering Names/Characters
| Keys Operations | |
 | Move the JOYSTICK up, down, left or right to move the cursor (a flashing digit). |
| 0 to w## | Press to enter letters/numbers. (Items are added to the left of the cursor. If the cursor is at the beginning of a line, the item is added at the beginning.) |
| C | Press to delete characters. (Character on the cursor is deleted. To dolete all characters, press and hold.) |
| A→* | Press to change between upper and lower case. |
| 0 | Press to insert a blank space (except when in Numeric Input mode). |
| 1 | Press to insert a symbol (*#, /, etc.) (except when in Numeric input mode). |
- Selecting the Input Mode
You can select one of 6 input modes by pressing RIGHT SOFT KEY while entering a name. The function icon above the key displays the current input mode. The factory preset is "Alphabet Mode".
For the full character map, see Phonebook Character Table (p.75).
To switch the input mode while editing the name in the phonebook, press RIGHT SOFT KEY.


510NX e-book Page 27 Thursday, June 5, 2003 9:43 PM


Using the Phonebook

Finding Items in the Phonebook
All phonebook items are stored in the following order: Alphabet letter/Symbol/Number/Telephone Number (when a name is not stored).
To exit the operation, press at any time.

Press LEFT SOFT KEY.
To select the base unit phonebook, press LEFT SOFT KEY again.

2 Move the JOYSTICK up or down to search for the desired item.

- Searching for a Name by Initial
Example: To find "Felix"

Press LEFT SOFT KEY.
To select the base unit phonebook,
press LEFT SOFT KEY again.

2 Press 3 repeatedly
until the first item under "F" is displayed.

3 Move the JOYSTICK
down until "Felix" is displayed.

Searching by Private Category (For Handset Phonebook only)

Press LEFT SOFT
KEY.

2 Press RIGHT SOFT
KEY.

3 Select "Category".


510NX e-book Page 28 Thursday, June 5, 2003 9:43 PM
Using the Phonebook
◆ Searching by Index Search Mode
Example: To find "ΣΟΦΙΑ" (SOPHIA).
1 Press LEFT SOFT KEY. To select the base unit phonebook, press LEFT SOFT KEY again.

2 Press RIGHT SOFT KEY. When searching from the base unit phonebook, go to step 4.

3 Select "Index Search".

4 Press RIGHT SOFT KEY repeatedly until the desired input mode (Greek) appears.

5 Select the desired initial character "Σ".

6 Move the JOYSTICK down until "ΣΟΦΙΑ" is displayed.

◆Dialling from the Phonebook
1 Press LEFT SOFT KEY. To select the base unit phonebook, press LEFT SOFT KEY again.
2 Select the desired item (see above and previous page).
3 Press TALK or SPEAKERPHONE.



510NX e-book Page 29 Thursday, June 5, 2003 9:43 PM
Using the Phonebook

Editing Caller Information
To exit the operation, press

any time.
◆ Handset Phonebook
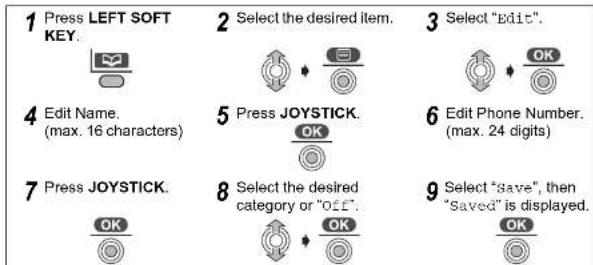
- To continue editing other caller information, repeat from step 2.
Cordless Telephone


510NX e-book Page 30 Thursday, June 5, 2003 9:43 PM
Using the Phonebook
Base Unit Phonebook
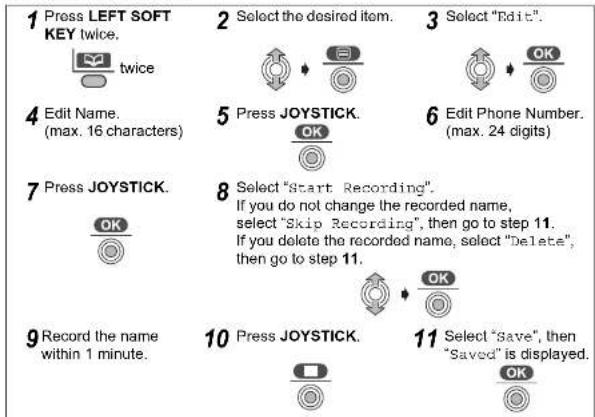
• To continue editing other caller information, repeat from step 2.
- If you confirm the recorded name, select "Audible Call", then press in step 3.
◆ Deleting Caller Information


510NX e-book Page 31 Thursday, June 5, 2003 9:43 PM
Using the Phonebook

Hot Keys
You can assign the dialling buttons through as-hot keys. You can choose 9 phone numbers from the handset phonebook.
To exit the operation, press at any time.
◆ Registering a Phone Number as a Hot Key
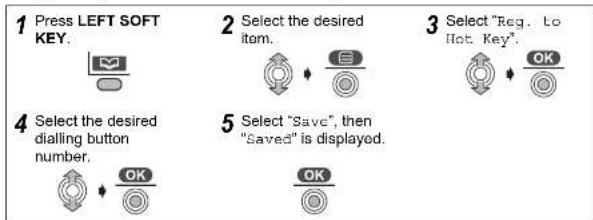
flowchart
graph TD
    A["1 Press LEFT SOFT KEY."] --> B["2 Select the desired item."]
    B --> C["3 Select "Req. to Hot Key"."]
    C --> D["4 Select the desired dialling button number."]
    D --> E["5 Select "Save", then "Saved" is displayed."]
- If there are no items stored in the phonebook when searching for the desired item, the display shows "Memory Empty".
- If an item is already assigned to a hot key, "√" will be displayed on the left of the key number. If a hot key number with "√" is selected, press OK to select "Overwrite".
◆ Dialling with a Hot Key
1 Press and hold the dialling button registered as a hot key until a phone number is displayed.
2 Press TALK or SPEAKERPHONE.

OR


510NX e-book Page 32 Thursday, June 5, 2003 9:43 PM


Settings Menu Chart

Handset Settings Menu Chart
| 1st Menu 2nd Menu 3rd Menu | ||
| Setting Handset Set Date/Time | ||
| Memo Alarm | ||
| Ringer Option Ringer | Volume | |
| EXT Ringer Type | ||
| INT Ringer Type | ||
| Paging Tone | ||
| Private Ring | ||
| Tone Option Key Tore | ||
| Display Option Standby Display | ||
| Call Option Call Bar | ||
| Direct Call No. | ||
| Direct On/Off | ||
| Registration Register | H/set | |
| Cancel Base | ||
| Select Base Auto | ||
| Base 1: | ||


510NX e-book Page 33 Thursday, June 5, 2003 9:43 PM
Settings Menu Chart

Base Unit Settings Menu Chart
| 1st Menu 2nd Menu 3rd Menu | ||
| Setting Base Ringer Option Ringer Volume | ||
| Call Option Dial Mode | ||
| Cancel Handset | ||
| Other Option Change Base PIN | ||
Cordless Telephone


510NX e-book Page 34 Thursday, June 5, 2003 9:43 PM


Handset Settings

Memo Alarm
Set the date and time before setting the memo alarm (p.13).
To exit the operation, press at any time.
1 Press JOYSTICK (or move).

2 Select "Betting Handset".

3 Select "Memo Alarm".

4 Select the desired alarm number (1-3).

Go to step 5.
Setting the Alarm Mode "Once" or "Daily"
Follow steps 1 to 4 shown above, then:
5 Select "Once" or "Daily".

6 "Once": Enter the date and time. "Daily": Enter the time.
7 Press JOYSTICK.

8 Enter a memo message (max. 32 characters, n 26) then
9 Select the desired ringer pattern.
10 Select "Save", then "Saved" is displayed.


510NX e-book Page 35 Thursday, June 5, 2003 9:43 PM
Handset Settings
Setting the Alarm "Off"
Follow steps 1 to 4 on the previous page, then:
5 Select "011".


6 Select "Save", then "Saved" is displayed.

• The factory preset is "OFF".
- To delete the displayed memo alarm, press 📄 then select "Yes" on step 4 on the previous page.
To Stop the Alarm
(The Alarm sounds: Max. 3 minutes) Press

•You can also stop the alarm by pressing


- If "Once" is selected, the setting is turned off. When in talk or intercom mode, the alarm will not sound until the call is ended.


510NX e-book Page 36 Thursday, June 5, 2003 9:43 PM


Handset Settings

Ringer Options
There are 15 ringer patterns available on each ringer. "Ringer 1" to "Ringer €" are the bell ringer patterns. "Ringer 7" to "Ringer 15" are the preset melody patterns as shown below. The music data in this product belongs to M-ZoNE Co., Ltd.
To exit the operation, press at any time.
| Ringer No. Ringer Pattern or Name | |
| 1 ~ 6 Bell Patterns | |
| Ringer Pattern 7 to 15: Preset Melody Patterns | |
| 7 Symphony No.5 in C minor | |
| 8 Air on G String | |
| 9 Wholelemperiere Clavier 1 Teil No 1 Fuga Das | |
| 10 Fantaisie Impromptu | |
| 11 Allegro Spring/The Four Seasons | |
| 12 Also Sprach Zarathustra | |
| 13 Liebestraum | |
| 14 Polovetsian Dance | |
| 15 24 Caprices | |
* © 2003 M-ZoNE Co., Ltd.
- If you select one of the melody ringer patterns, the phone will ring for 10 seconds even if a caller has hung up. Therefore, you may hear a dial tone or no one on the line after you answer a call.


510NX e-book Page 37 Thursday, June 5, 2003 9:43 PM
Handset Settings
Setting the Ringer Volume
The choices are 6 levels and off. If you set the volume to OFF, "Is displayed,
however, still the volume of a paging and intercom call are level 1.
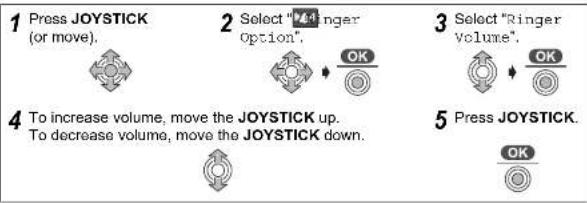
flowchart
graph TD
    A["1 Press JOYSTICK (or move)."] --> B["2 Select "Ringer Option"."]
    B --> C["3 Select "Ringer volume"."]
    C --> D["5 Press JOYSTICK."]
    A --> E["4 To increase volume, move the JOYSTICK up. To decrease volume, move the JOYSTICK down."]
•The factory preset is 6.
Selecting the Ringer Pattern for External Call/Internal Call/Paging
Follow steps 1 to 2 shown above, then:
3 Select "EXT Ringer Type", "INT Ringer Type" or "Paging Tone". 4 Select the desired ringer pattern.


•The factory preset is 1.
Selecting the Ringer Pattern for Private Ring
Cordless Telephone


510NX e-book Page 38 Thursday, June 5, 2003 9:43 PM


Handset Settings

Setting the Handset Key Tone ON/OFF
You can turn the key tone ON/OFF.
To exit the operation, press at any time.
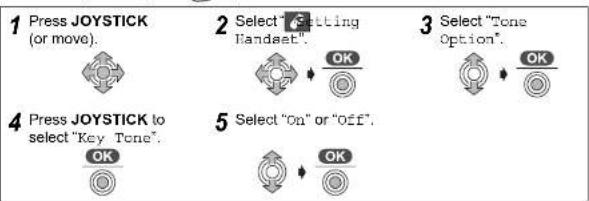
flowchart
graph TD
    A["1 Press JOYSTICK (or move)."] --> B["2 Select Setting Handset."]
    B --> C["3 Select "Tone Option"."]
    C --> D["4 Press JOYSTICK to select "Key Tone"."]
    D --> E["5 Select "On" or "Off"."]
•The factory preset is "On".

Display Options
To exit the operation, press at any time.
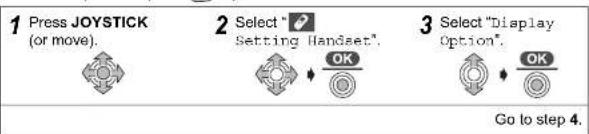
flowchart
graph TD
    A["1 Press JOYSTICK (or move)."] --> B["2 Select Setting Handset."]
    B --> C["3 Select Display Option."]
Selecting the Standby Mode Display


510NX e-book Page 39 Thursday, June 5, 2003 9:43 PM
Handset Settings
- Selecting the Talk Mode Display
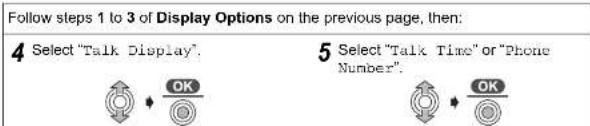
- Even if you select "Phone Number", the length of the call will appear on your display when you receive calls.
- The factory preset is "Talk Time".
Setting the Private Colour
Follow steps 1 to 3 of Display Options on the previous page, then:
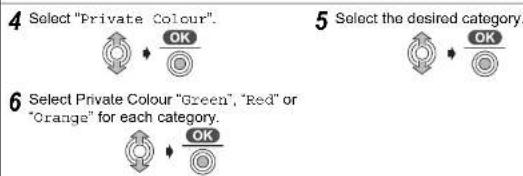
• The factory preset is "Green".
- When you select the private colour on step 6, the Ringer LED will flash at the selected colour.
Cordless Telephone


510NX e-book Page 40 Thursday, June 5, 2003 9:43 PM


Handset Settings

Call Options
To exit the operation, press at any time.
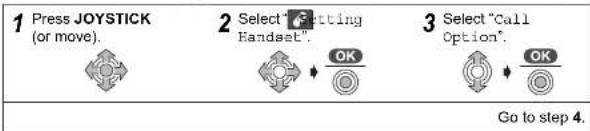
flowchart
graph LR
    A["1 Press JOYSTICK (or move)."] --> B["2 Select "Getting Handset"."]
    B --> C["3 Select "Call Option"."]
    C --> D["Go to step 4."]
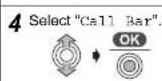
Call Bar ON/OFF
When this feature is set to ON, outgoing calls cannot be made. Intercom calls and calls to numbers assigned as emergency numbers can be made (see Setting the Emergency Calls on page 46).
Follow steps 1 to 3 shown above, then:
5 Enter 4-digit Handset PIN. (Factory Preset 0000)
- While the Call Bar mode is turned on, " " displayed.
Setting the Direct Call Number
After a direct call number has been set and the feature has been turned on, you can dial only the direct call number by pressing ☑. When this feature is ON, emergency calls cannot be made. However, incoming calls can be answered.


510NX e-book Page 41 Thursday, June 5, 2003 9:43 PM
Handset Settings
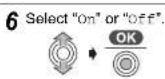
Setting the Direct Call ON/OFF
Follow steps 1 to 3 on the previous page, then:

Select "Direct
On/Off.


Select "On" or "Off".


- If the direct call mode is turned off, * * will disappear.
- If you did not set the Direct Call Number and select "On" in step 5, "Enter Phone No" will be displayed. Enter the number, then press twice.
Other Options
To exit the operation, press at any time.

Press JOYSTICK (or move).


Select "Setting Handset".


Select "Other Option".


Go to step 4.
Changing the Handset PIN (Personal Identification Number)
The factory preset is 0000.
Once you have programmed the handset PIN, you cannot confirm it. We recommend you write down the handset PIN. If you forget it, please consult your nearest Panasonic Service Centre.


510NX e-book Page 42 Thursday, June 5, 2003 9:43 PM


Handset Settings
Changing the Handset Name
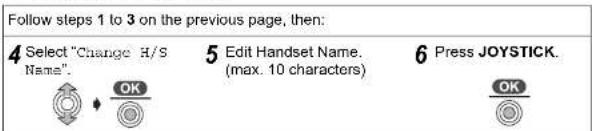
Setting Auto Talk ON/OFF

• The factory preset is "O11".
Setting the Battery Type

• The factory preset is "Ni MH".


510NX e-book Page 43 Thursday, June 5, 2003 9:43 PM
Handset Settings
Handset Initial Settings
| Functions Initial Settings | |
| Memo Alarm Mode OFF | |
| Alarm Time Delete | |
| Handset Ringer Volume 6 | |
| Handset External Ringer Pattern 1 | |
| Handset Internal Ringer Pattern 1 | |
| Handset Paging Tone Pattern 1 | |
| Handset Private Ringer Pattern 1 | |
| Handset Alarm Tone Pattern 1 | |
| Key Tone ON | |
| Standby Mode Display Handset Name | |
| Talk Mode Display Talk Time | |
| Display Language English | |
| Call Bar Mode OFF | |
| Direct Call Mode OFF | |
| Direct Call Number Delete | |
| 4-Digit Handset PIN | 0000 |
| Auto Talk | OFF |
| Select Base | Automatic Base Unit Selection |
Cordless Telephone


510NX e-book Page 44 Thursday, June 5, 2003 9:43 PM
Base Unit Settings

Setting the Base Unit Ringer Volume
To exit the operation, press at any time.
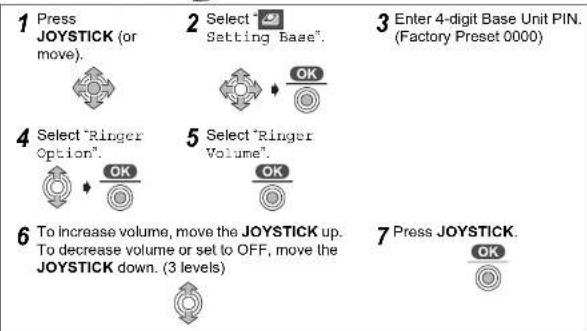
flowchart
graph TD
    A["1 Press JOYSTICK (or move)."] --> B["2 Select Setting Base"."]
    B --> C["3 Enter 4-digit Base Unit PIN. (Factory Preset 0000)"]
    C --> D["4 Select "Ringer Option"."]
    D --> E["5 Select "Ringer Volume"."]
    E --> F["6 To increase volume, move the JOYSTICK up. To decrease volume or set to OFF, move the JOYSTICK down. (3 levels)"]
    F --> G["7 Press JOYSTICK."]
•The factory preset is medium.

Call Options
To exit the operation, press at any time.
1 Press JOYSTICK (or move).
2 Select "Getting Base".
3 Enter 4-digit Base Unit PIN. (Factory Preset 0000)


510NX e-book Page 45 Thursday, June 5, 2003 9:43 PM
Base Unit Settings
Selecting the Dialling Mode (Tone/Pulse)
You can change the dialling mode to tone or pulse depending upon your network service. If you have a touch tone service, select "Tone". If you have rotary or pulse service, select "Pulse".
| Follow steps 1 to 4 of Call Options on the previous page, then: | |
| 5 Select "Dial Mode". | 6 Select "Tone" or "Pulse". |
• The factory preset is "Tone".
Selecting the Flash/Earth Mode
An earth relay can be installed as an option depending on your PBX requirements. Please consult your nearest Panasonic Service Centre for installation. On installation, you can select the flash or earth mode to suit your PBX or Telephone company.
| Follow steps 1 to 4 of Call Options on the previous page, then: | |
| 5 Select "Recall". | 6 Select "Flash" or "Earth". |
When "Flash" was selected;
7 Select the desired flash type (see below).

Cordless Telephone


510NX e-book Page 46 Thursday, June 5, 2003 9:43 PM


Base Unit Settings
Setting the Emergency Calls
Even if handset is in Call Bar Mode, you can make an emergency call.
Follow steps 1 to 4 of Call Options on page 44, then:
5 Select "Emergency Call".

6 Select "Emergency Call1" to

7 Enter Emergency Call Number.
8 Press JOYSTICK.

Call Restriction
You can restrict selected handset(s) from dialling selected phone numbers. You can assign up to 6 call restriction numbers (up to 8 digits). If you dial a restricted number, the call does not connect and the restricted number flashes.
Follow steps 1 to 4 of Call Options on page 44, then:
5 Select "Call Restricted".
6 Search and press RIGHT SOFT KEY to attach (or cancel) "V" to the desired Handset(s) to restrict.
7 Press JOYSTICK.




510NX e-book Page 47 Thursday, June 5, 2003 9:43 PM
Base Unit Settings

Other Options
To exit the operation, press at any time.
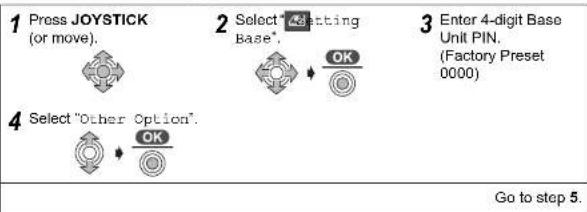
flowchart
graph TD
    A["1 Press JOYSTICK (or move)."] --> B["2 Select Setting Base*"]
    B --> C["3 Enter 4-digit Base Unit PIN. (Factory Preset 0000)"]
    D["4 Select "Other Option""] --> E["OK"]
Changing the Base Unit PIN (Personal Identification Number) The factory preset is 0000.
Once you have programmed the base unit PIN, you cannot confirm it. We recommend you write down the base unit PIN. If you forget it, please consult your nearest Panasonic Service Centre.
Follow steps 1 to 4 shown above, then:
5 Select "Change Base PIN".

2 Select* Letting Base*.

3 Enter 4-digit Base Unit PIN. (Factory Preset 0000)
Go to step 5
7 Enter new PIN again to verify.
Cordless Telephone


510NX e-book Page 48 Thursday, June 5, 2003 9:43 PM


Base Unit Settings
Base Unit Initial Settings
| Functions Initial Settings | |
| Dial Mode Tone | |
| Recall Flash/Type 2 (600 ms) | |
| Pause Time Short (3 seconds) | |
| Emergency Call Number(s) Delete All | |
| Call Restricted Handset(s) Delete All | |
| Call Restriction Number(s) Delete All | |
| 4-Digit Base Unit PIN 0000 | |
| Base Unit Ringer Volume Medium | |
| Caller ID List Delete All | |
| Date/Time 31-12-03/00:00 | |
| Answering System ON | |
| Your Own Greeting Message Remain | |
| Caller's Recording Time No Limit | |
| Number of Rings | 4 Rings |
| Greeting Monitor | ON |
| Remote Code | Delete (OFF) |
| Incoming/Memo Message(s) | Remain |


510NX e-book Page 49 Thursday, June 5, 2003 9:43 PM
Multi-Unit User Operations
◆ Operating Additional Handsets
Additional KX-TCA151EX handsets are available for purchase separately. Up to 6 handsets can be registered to a single base unit. Using additional handsets allows you to have an intercom call while simultaneously conducting a call to an outside line.
◆ Operating Additional Base Units
You can register and operate your handset with up to 4 base units. Each base unit forms 1 radio cell. If the individual bases are linked to the same telephone line then you can extend the operating range of the system by positioning the bases so that the two radio cells overlap. If the handset is set to auto base selection, then in standby mode the handset will automatically swap to the second base if the range on the first base is exceeded. It is not possible to transfer calls between bases (only between handsets linked to the same base unit).
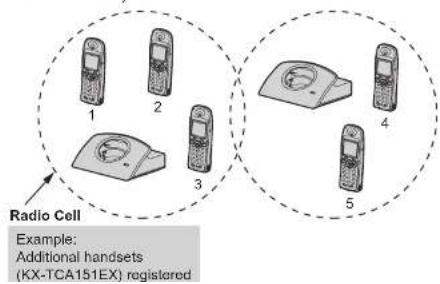


510NX e-book Page 50 Thursday, June 5, 2003 9:43 PM
Multi-Unit User Operations

Handset Registration to a Base Unit
The handset supplied with the base unit is already registered. If an optional handset is purchased, it must be registered as follows.
Charge the optional handset batteries for 7 hours before initial use.
Handset registration must be completed within 1 minute after pressing over 1 minute, press then start over again.
To exit the operation, press at any time.
1 Press JOYSTICK (or move).

4 Select "Register H/set".

6 Select the desired base unit.

2 Select Setting Handset.

5 Press and hold on the Base Unit (for about 3 seconds) until the tone sounds.
If all registered handset(s) start ringing (paging), press to stop paging then start over again.
7 Enter 4-digit Base Unit PIN.
(Factory Preset 0000)
3 Select "Registration".

8 Press JOYSTICK.

When a handset is registered successfully, a confirmation tone sounds and the *icon is displayed.
- If you enter the incorrect Base Unit PIN, the error tone sounds and repeat from step 1.


510NX e-book Page 51 Thursday, June 5, 2003 9:43 PM
Multi-Unit User Operations
◆ Cancelling a Handset
Each handset can cancel itself or another handset. This feature is usually used to cancel a link between Handset and Base Unit.
To exit the operation, press any time.
1 Press JOYSTICK (or move).

2 Select "Setting Base".

3 Enter 4-digit Base Unit PIN. (Factory Preset 0000)
4 Select "Cancel Handset".

5 Search and press RIGHT SOFT KEY to attach *∇ to the handset(s) to cancel.
6 Press JOYSTICK.


- Cancelling a Base Unit
If another handset is out of range and/or power is OFF when Cancelling a Handset, the previous base unit number will still remain in the base unit registered in the cancelled handset. Therefore, you need to cancel the base unit registered in the cancelled handset.
To exit the operation, press at any time.
Follow steps 1 to 3 on the previous page, then:


510NX e-book Page 52 Thursday, June 5, 2003 9:43 PM
Multi-Unit User Operations

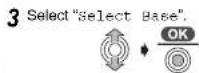
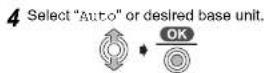
Base Unit Selection
When "Auto" (Automatic Base Unit Selection) is selected, the handset automatically searches for other registered base units if you move outside of the radio range of the current base unit.
When a specified base unit is selected, the handset will access that base unit only. Calls (both incoming and outgoing) can be conducted only via the selected base unit, even if the radio cells overlap with neighbouring base units.
To exit the operation, press at any time.

Intercom Between Handsets
You can use your handsets as a 2-way intercom. Intercom calls can be conducted within the radio cell of the current base unit, but not with units in neighbouring radio cells.
To exit the operation, press at any time.
For example, when Handset 1 calls Handset 2:


510NX e-book Page 53 Thursday, June 5, 2003 9:43 PM
Multi-Unit User Operations
◆ Transferring a Call to Another Handset
The intercom can be used during a call to transfer an external call between handsets that are registered to the same base unit.
To exit the operation, press at any time.
For example, when Handset 1 transfers a call to Handset 2:
| 1 | (During a call)Press INTERCOM (Ifen press the desired handset number ⚫2) | |
| 2 | Press TALK ⚫. | |
| 3 | (Conversation between handset 1 and 2)Press TALK OFF ⚫. | (Conversation between outside line and Handset 2) |
- You can also answer a call by pressing , (No) , (Or instead of # pressing (Any Key Talk).
- If you press after pressing the desired handset number, a call can be transferred to another handset without speaking to another handset. If the transferred call is not answered within 60 seconds, Handset 1 will ring again.
Cordless Telephone


510NX e-book Page 54 Thursday, June 5, 2003 9:43 PM


Multi-Unit User Operations

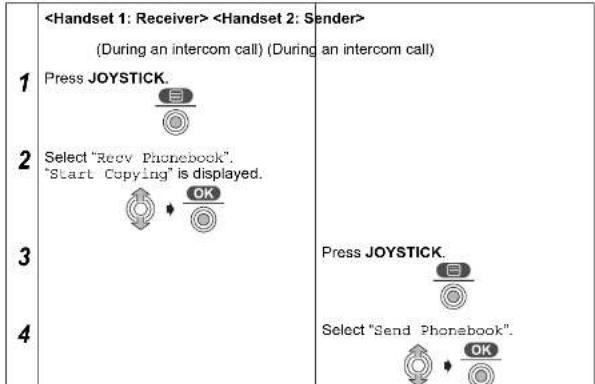
Phonebook Copy
You can copy information in the handset phonebook between handsets registered to the same base unit. The phonebook copy must be performed while in intercom mode (see Intercom Between Handsets on page 52).
To exit the operation, press at any time.
◆ Copying an Item


510NX e-book Page 55 Thursday, June 5, 2003 9:43 PM
Multi-Unit User Operations
◆ Copying All Items
To exit the operation, press at any time.
| Follow steps 1 to 4 on the previous page, then: | ||
| 56 | Press JOYSTICK.OKSelect "Copy All Items".OK | |
- When copying is completed, a beep sounds and "Copy Complete" is displayed. After a few seconds, the display will return to the intercom call. "Copy Incomplete" will be displayed if the receiver handset memory is full. If "Copy Failure" is displayed on the sender handset, the receiver and/or sender did not prepare for copying within 60 seconds.
- If you move the JOYSTICK up or down before pressing JOYSTICK at step 5, all items will not be copied. The items, from the item indicated now to the last item, are copied


510NX e-book Page 56 Thursday, June 5, 2003 9:43 PM


Walkie-Talkie
The Walkie-Talkie feature allows handsets to communicate with each other outside the range of the base unit. When the handsets are in Walkie-Talkie mode, external calls cannot be received. Only KX-TCA151EX with Walkie-Talkie feature can communicate with one another.
Talk time in this mode is approximately 6 hours. Standby time in this mode is approximately max.15 hours. (It changes by the use conditions.) When using the handset in Walkie-Talkie mode, we recommend keeping the handset turned off, turning it on only when talking in Walkie-Talkie mode. Turning the handset off immediately after use will improve battery operating time.
Range:
The maximum range between two handsets while in Walkie-Talkie mode is up to 300 metres outdoors.
Setting the Walkie-Talkie Mode
You can set the Walkie-Talkie mode. There are two types: Common Base Station mode and Group mode. The factory preset is Group mode.
- In Common Base Station mode, communication is possible between handsets registered to a common base unit. If the handsets are registered to more than one base unit, the same base unit must be selected.
Please note, the feature will not operate if AUTO is set in the base unit selection.
If Common Base Station mode is selected and the handset is not registered to a base unit, an error tone sounds.
- In Group mode, communication is possible between handsets that are both set to this mode and whose Group IDs are common.
This allows handsets to communicate in Walkle-Talkie mode regardless of which base unit they are registered to.


510NX e-book Page 57 Thursday, June 5, 2003 9:43 PM
Walkie-Talkie
To exit the operation, press at any time.
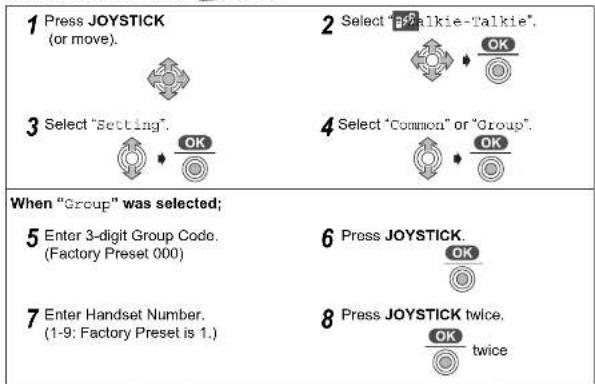
- If you select "Group", enter Group Code (this can be 3 digits of your choice - the factory preset is 000). Make note of your code.
•The factory preset of Handset Number is 1.
IMPORTANT: Each handset should have its own unique number.


510NX e-book Page 58 Thursday, June 5, 2003 9:43 PM


Walkie-Talkie
Turning the Walkie-Talkie Mode On/Off
To use the Walkie-Talkie feature, all handsets in conversation must be in Walkie-Talkie mode.
To exit the operation, press at any time.
To Turn the Walkie-Talkie Mode On
1 Press JOYSTICK (or move).
2 Select "Talkie-Talkie".
3 Select "On".



- When the Walkie-Talkie mode is ON, the handset number is displayed after "Walkie-Talkie" appears on the display.
To Turn the Walkie-Talkie Mode Off
1 Press JOYSTICK.
2 Select "Off".


•This feature is also turned off if you turn power off then on.
◆ Talking in Walkie-Talkie Mode
Before proceeding with this function, please ensure Walkie-Talkie mode is turned on, and the appropriate Walkie-Talkie mode has been selected. For example, Handset 1 is calling Handset 2.
To exit the operation, press at any time.


510NX e-book Page 59 Thursday, June 5, 2003 9:43 PM
Answering System
If you set the current date and time (p.13) and set the answering system ON, a synthesized voice announces the date and time an/a incoming/memo message was recorded after playback-Voice Date/Time Stamp.
The total recording capacity is approximately 30 minutes or 64 messages. Any recorded noise may shorten the recording time up to 3 minutes. The greeting recording time is limited to 2 minutes and 30 seconds. We recommend you to record a brief greeting message in order to leave more time for recording new incoming/memo messages. All messages (greeting, incoming and memo) are stored indefinitely on a "Flash memory" IC chip-even if a power failure occurs. All of the messages are saved until you erase them-Flash Memory Message Backup.

Answering System ON/OFF
When you set the answering system ON, a caller can leave his/her messages.
To Set ON
1 Press JOYSTICK (or move).

2 Select "AM Operation".

3 Select "Answer On", then is displayed.

To Set OFF
1 Press JOYSTICK (or move).

2 Select "AM Operation".

3 Select "Answer Off", then disappears

Answering


510NX e-book Page 60 Thursday, June 5, 2003 9:43 PM


Answering System

Greeting Message
Recording Your Own Greeting Message
1 Press JOYSTICK (or move).

4 Select "Record OGM".

2 Select "ETAM Operation".

5 Record Greeting Message. 20 cm away from the Mic.
3 Select "Record".

6 Press JOYSTICK to finish recording, then the recorded message is played back.

- Selecting the Caller's Recording Time
Follow steps 1 to 2 shown above, then:
3 Select "Setting TAM".

4 Select "Msg Rec Time".

5 Select "1 Minute" or "No Limit" (up to 30 minutes) or "Greeting Only" (no incoming messages will be recorded).



510RX e-book Page 61 Thursday, June 5, 2003 9:43 PM
Answering System
Playing back Pre-Recorded/Your Own Greeting Message
If you do not record your own greeting message, one of two pre-recorded messages will be played. A pre-recorded greeting message depends on the selection of caller's recording time.
When the recording time is set to "1 Minute" or "No Limit" (30 minutes).
- "Hello, we are not available now. Please leave your name and phone number after the beep. We will return your call."
When the recording time is set to "Greeting Only".
- "Hello, we are not available now. Please call again. Thank you for your call."
1 Press JOYSTICK
(or move).

2 Select "AM
2 Select "Play OGM".

◆ Deleting Your Own Greeting Message
1 Press JOYSTICK (or move).

2 Select "AM
3 Select "Delete
Message.

4 Select "Delete
CGM".

5 Select "Yes", then "Deleted" is displayed.

Answering


510NX e-book Page 62 Thursday, June 5, 2003 9:43 PM
Answering System

Selecting the Number of Rings
You can select the number of times the unit rings before the answering system answers a call, from 2 to 7 or Auto (for Toll Saver; as shown below).
♦ Toll Saver (When set to "Auto")
When you call the unit from a touch tone telephone:
If the unit answers on the 2nd ring, there is at least one new message.
If the unit answers on the 5th ring, there are no new messages.
Hang up when you hear the 4th ring. This will save you the toll charge for the call.
1 Press JOYSTICK (or move).

2 Select "at AM
Operation

3 Select "Setting TAM".


Select "Number of Rings".


Select "Auto" or "2 Rings" to "7 Rings" to select the number of rings.

• The factory preset is "4 Rings".


510NX e 05.fm Page 63 Thursday, June 5, 2003 11:48 PM
Answering System

Incoming/Memo Messages
Incoming messages and memo messages are stored in chronological order. New messages cannot be recorded when "Memory full" is heard. We recommend you erase unnecessary messages after each playback to leave more time for recording new message(s).
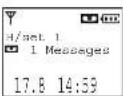
If new message(s) is (are) recorded, L50 n and the number of messages will be displayed.
Playing New Incoming/Memo Message(s)

Press JOYSTICK (or move).


Select "am Operation"


Select "Play New Mag."

- Messages are heard from the speaker. To switch to the receiver, press .to switch back to the speaker, press
- Playing All Incoming/Memo Messages

Press JOYSTICK (or move).


Select "AM Operation"


Select "Play All Mag."

- Repeating a Message During Playback
Answering


510NX e-book Page 64 Thursday, June 5, 2003 9:43 PM


Answering System
Selecting the Receiver Volume During Playback

◆ Deleting One Incoming/Memo Message
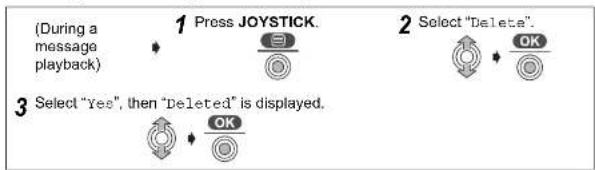
flowchart
graph TD
    A["(During a message playback)"] --> B["1 Press JOYSTICK"]
    B --> C["2 Select "Delete""]
    C --> D["3 Select "Yes", then "Deleted" is displayed."]
    D --> E["OK"]
    E --> F["Feedback Loop"]
    F --> G["OK"]
- You can also delete the message by pressing 📄 then selecting "Yes" during playback (p.63).
◆ Deleting All Incoming/Memo Messages

flowchart
graph LR
    A["1 Press JOYSTICK"] --> B["2 Select "OK" Operation"]
    B --> C["3 Select "Delete Message""]


510NX e-book Page 65 Thursday, June 5, 2003 9:43 PM
Answering System
Editing a Number for Calling
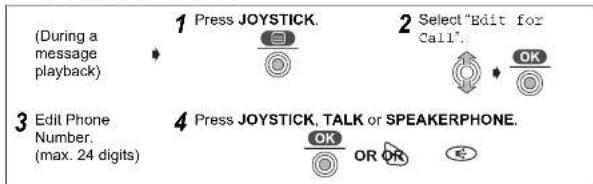
flowchart
graph TD
    A["(During a message playback)"] --> B["1 Press JOYSTICK."]
    B --> C["2 Select 'Edit for Call'"]
    C --> D["3 Edit Phone Number. (max. 24 digits)"]
    D --> E["4 Press JOYSTICK, TALK or SPEAKERPHONE."]
◆ Monitor Function ON/OFF
When your greeting message is being played to the caller and the caller's message is being recorded, you can listen to it through the handset.
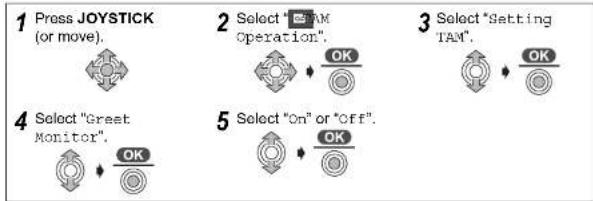
flowchart
graph TD
    A["1 Press JOYSTICK (or move)."] --> B["2 Select TAM Operation."]
    B --> C["3 Select "Setting TAM"."]
    C --> D["4 Select "Great Monitor"."]
    D --> E["5 Select "On" or "Off"."]
•The factory preset is "on".
Answering


510NX e-book Page 66 Thursday, June 5, 2003 9:43 PM


Answering System
Answering System Direct Command
You can operate the answering system by pressing dialling buttons as direct command.
1 Press JOYSTICK (or move).
2 Select "TAM Operation".
3 Select "Play New Msg." or "Play All Mag."



Follow steps 1 to 3 shown above, then:
Press To1epeat a message.
Press (A) Ship a message
Press Top a message playback.
Press A-Tx deleteone incoming/memo message. *1
Press A-T* delete all incoming/memo messages.
Follow steps 1 to 2 shown above, then:
Press To Enter the answering system setting menu.
Press 📂 playback new incoming/memo message(s).
Dress To Einkock all incoming/memo messages


510NX e-book Page 67 Thursday, June 5, 2003 9:43 PM
Answering System

Remote Operation from a Touch Tone Phone
You can operate the answering system from any touch tone phone.
Firstly you must store your remote code using the handset near the base unit. The 3-digit remote code prevents unauthorised use of your answering system for listening to recorded messages.
Setting the Remote Code ON
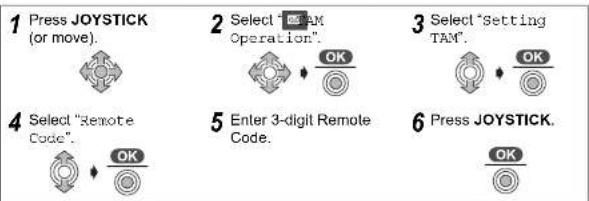
flowchart
graph TD
    A["1 Press JOYSTICK (or move)."] --> B["2 Select "TAM Operation"."]
    B --> C["3 Select "Setting TAM"."]
    C --> D["4 Select "Remote Code"."]
    D --> E["5 Enter 3-digit Remote Code."]
    E --> F["6 Press JOYSTICK."]

tting the Remote Code OFF
Follow steps 1 to 5 shown above, then:

Press *


Press JOYSTICK.


•The factory preset is Remote Code OFF.
Answering


510NX e-book Page 68 Thursday, June 5, 2003 9:43 PM


Answering System
◆ Summary of Remote Operation
You can operate the answering system from any touch tone phone.
| 1 Call from a touch tone phone. | 2 Greeting message playback. | 3 Enter Remote Code. |
| 4 The number of new message(s) is played. | 5 Voice menu starts after 3 seconds.♦ Follow the guidance (see next page).OREnter your desired direct remote command (see below). | |
- To skip the greeting message, press ✝ during the greeting on step 2.
Direct Remote Commands
After entering the remote code, you can operate your answering system using direct commands as shown below, instead of following the voice menu. To end the remote operation, hang up anytime.
| Command Function | |
| 1 | Repeat message (during playback) |
| 2 | Skip message (during playback) |
| 4 | New message playback |
| 5 | All message playback |


510RX e-book Page 69 Thursday, June 5, 2003 9:43 PM
Answering System
Voice Menu
The words in * mean a voice guidance.
| Press 1 → | ||
| "Press 1 to playback all messages. Press 2 for other functions." | "All message playback." At the end of the last message, "End of final message" is announced.When the remaining recording time becomes less than 5 minutes, the remaining recording time is announced. | |
| "Press 1 to playback new messages. Press 2 for other functions." | "New message playback." | |
| "Press 1 to record your message. Press 2 for other functions." | "Please leave your message." Talk after you hear this message.Hang up to finish recording. | |
| "Press 1 to erase all messages. Press 2 for other functions." | "No message." | |
| "Press 1 to record your greeting. Press 2 for other functions" | "Press 7 to record your greeting. Press 9 to end recording."Press p start recording. | |
Answering


510NX e-book Page 70 Thursday, June 5, 2003 9:43 PM
Answering System

Recording a Memo Message
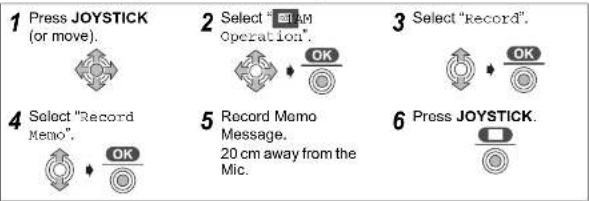
flowchart
graph TD
    A["1 Press JOYSTICK (or move)."] --> B["2 Select "Record" operation."]
    B --> C["3 Select "record"."]
    C --> D["4 Select "Record Memo"."]
    D --> E["5 Record Memo Message. 20 cm away from the Mic."]
    E --> F["6 Press JOYSTICK."]

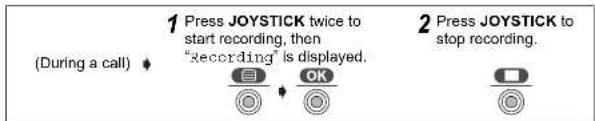
Recording Your Telephone Conversation
When you record your 2-way telephone conversation, you should inform the other party that the conversation is being recorded.


510NX e-book Page 71 Thursday, June 5, 2003 9:43 PM
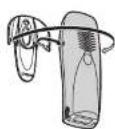
Using the Belt Clip
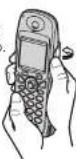
To remove the belt clip
You can hang the handset on your belt or pocket using the belt clip.
Optional Headset
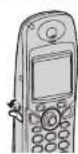
Plugging an optional headset into the handset allows hands-free phone conversations. Please use only the Panasonic KX-TCA89EX headset. While using the headset, speakerphone is not available. To switch to speakerphone, disconnect the headset.

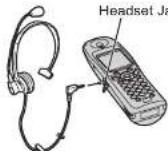
Connecting the Optional Headset to the Handset
Open the headset jack cover, and connect the optional headset to the headset jack as shown.
Wall Mounting


510NX e-book Page 72 Thursday, June 5, 2003 9:43 PM

Before Requesting Help
If you experience any problems with the normal use of your apparatus, you should unplug it from the telephone outlet and connect a known working telephone in its place. If the known working telephone still has problems, then please contact the customer service department of your Telephone company.
If it operates correctly, then the problem is likely to be a fault in your apparatus. In this case, contact your supplier for advice. Your Telephone company may charge you if they attend a service call that is not due to an apparatus supplied by them. Turn the power OFF then ON (Handset)/Disconnect then connect the AC adaptor (Base Unit).
| Problem Possible cause Solution Page | |||
| The unit does not work. | Batteries not installed properly.AC adaptor of base unit not connected properly. | Re-install batteries properly.Disconnect and then connect AC adaptor. | p.10 |
| Display is blank. | Handset not turned on. | Turn on power. p.12 | |
| Display is blank even if the unit is charged. | Battery low. | Recharge batteries more than about 15 minutes. | p.10 |
| Handset will not turn on. | Batteries not inserted.Batteries not charged. | Insert the 2 rechargeable batteries supplied.Place handset on base and connect AC adaptor to base and AC outlet (full charge period 7 hrs). | p.10 |
| Battery charge icon not counting up. | Dirty charge contacts. | Clean charge/battery contacts and retry charge. | p.11 |


510NX e 06./m Page 73 Thursday, June 5, 2003 11:54 PM
Before Requesting Help
| Problem Possible cause Solution Page | |||
| Cannot dial out. | • Dialling mode setting may be incorrect.• Call Bar mode ON.• Particular dialled number is restricted.• Key lock mode ON. | • Check whether the dialling mode setting is correct.• Turn feature off.• Remove number from call restricted list.• Turn key lock OFF. | p.45p.40p.46p.16 |
| Handset will not ring. | • Ringer switched off. | • Set ringer to one of 6 volume levels. | p.37 |
| Last number redial does not work. | • Number exceeded 24 digits. | • Redial manually. p.17 | |
| No Caller ID number displayed. | • Service not supplied.• Caller has withheld info. | • Caller ID service must be arranged with Telephone company. | p.19 |
| icon flashes. | • Battery low. | • Recharge batteries. p.10 | |
| Cannot register handset to base. | • Max. number of bases already registered to handset.• Max. number of handsets already registered to base unit.• Wrong PIN number entered (Default 0000).• Electrical noise in local | • Delete unused base registrations from handset.• Delete unused handset registrations from base.• If PIN number is lost, contact the Panasonic Service Centre.• Move base/handset | p.51p.51p.47p.5 |


510NX e-book Page 74 Thursday, June 5, 2003 9:43 PM


Before Requesting Help
Answering System
| Problem Possible cause Solution Page | |||
| The answering system is on, but incoming messages are not recorded. | The recording time is set to "Greeting only".Memory is full (30 minutes or 64 messages). | Select"1 Minute"or"No limic".Erase some or all of the messages. | p.60p.64 |
| Cannot operate the answering system from a touch tone phone. | Incorrect remote code entered.Tones are too short to activate the unit.The answering system is off. | Enter the correct remote code.Press each button firmly.Turn on the answering system. | p.68p.59, 67 |
| Cannot operate the answering system with the handset. | Someone is operating the answering system.You are too far from the base unit. | Retry when other user has finished operation.Move closer to the base unit. | |
| While recording a greeting message, the unit starts to ring and stops recording. | A call is being received. | To answer the call, press TALK. The recording stops halfway. Start from the beginning after hanging up. | |
| During playback, the unit starts to ring and stops playback. | A call is being received. | To answer the call, press TALK. | |


510NX e-book Page 75 Thursday, June 5, 2003 9:43 PM
Character Table
Table
Greek, Russian (Cyrillic), Polish, Czech and Slovakian are not available.
Small. Small > Capital.
1. 2. 3. 4. 5. 6. 7. 8. 9. 10. 11. 12. 13. 14. 15. 16. 17. 18. 19. 20. 21. 22. 23. 24. 25. 26. 27. 28. 29. 30. 31. 32. 33. 34. 35. 36. 37. 38. 39. 40. 41. 42. 43. 44. 45. 46. 47. 48. 49. 50. 51. 52. 53. 54. 55. 56. 57. 58. 59. 60. 61. 62. 63. 64. 65. 66. 67. 68. 69. 70. 71. 72. 73. 74. 75. 76. 77. 78. 79. 80. 81. 82. 83. 84. 85. 86. 87. 88. 89. 90.


510NX e-book Page 76 Thursday, June 5, 2003 9:43 PM


Index
AC Adaptor 4.10
Accessories....4
Answering a Call 14 Answering System 59
Answering System 59 Any Key Talk 14
Audible Caller ID 23
Auto Talk.... 14, 42
Base Unit
Initial Settings.... 48
PIN 47
Reset 47
Ringer Volume 44
Battery
Caution 5
Charge 10
Information 11
Belt Clin 71
Call Bar 40
Call Restriction 46
Call Waiting 18
ifier ID List Deleting 21
Dialling 19
Editing 20
Storing.... 20
Cancelling a Base Unit 51
Cancelling a Handset.... 51
Conference Call 5.3
Handset
Display....9
Initial Settings 43
Location/Paging.... 16 PIN.... 41
41 Registration 50
Reset 42
Ringer Pattern.... 37
Ringer Volume 37
Hands-Free Phone 15
Headset, optional....71
Intercom....52
Key
Lock 16
Tone 38
Making a Call 14
Memo Alarm 34
Mute.... 15
Pause Time.... 45
Phonebook
Copy 54
Dialling.... 28
510NX e-book Page 77 Thursday, June 5, 2003 9:43 PM
Technical Information
Specifications
Standard:
DECT=(Digital Enhanced Cordless
Telecommunications)
GAP=(Generic Access Profile)
Number of channels: 120 Duplex Channels
Frequency range: 1.88 GHz to 1.9 GHz
Duplex procedure: TDMA (Time Division Multiple Access)
Channel spacing: 1728 kHz
Bit rate: 1152 kbit/s
Modulation: GFSK
RF Transmission power: Approx. 250 mW
Voice coding: ADPCM 32 kbit/s
Power source: AC Adaptor 220 - 240 V, 50 Hz
Power consumption, base unit: Standby: Approx. 3.5 W
Maximum: Approx. 9.2 W
Operating conditions:
5 - 40 °C, 20 - 80 % relative air humidity (dry)
Dimensions and mass (weight):
Base Unit:
About (58 mm x 128 mm x 105 mm) x 200 g
Handset
About (143 mm x 48 mm x 32 mm) x 125 g
•Specifications are subject to change.
- The illustrations used in this manual may differ slightly from the original device.
Connections:
The unit will not work during a power failure. We recommend you connect a standard telephone on the same line for power protection.


natural_image
Two identical crosshair targets with centerlines, no text or symbols present


natural_image
Two identical crosshair targets with centerlines, no text or symbols present

510FX e.book Page 80 Thursday, June 5, 2003 9:43 PM


Hereby, Panasonic Communications Co., Ltd., declares that this Dect Cordless Telephone is in compliance with the essential requirements and other relevant provisions of Directive 1999/5/EC.
A copy of the manufacturer's declaration of conformity to the essential requirements of the R&TTE Directive is available at the following web address: http://doc.panasonic-tc.de
For your future reference
Serial No. Date of purchase
(found on the bottom of the base unit)
Name and address of dealer

C€0436
1999/5/EC
- Panasonic
- Contents
- Preparation
- Cordless Telephone
- Before Initial Use
- Features
- Digital Answering System
- 32-Polyphonic Ring Tones
- Hands-Free Speakerphone
- Headset Jack
- Illuminated Keypad
- 200+20-Station Phonebook
- Important Information
- Battery Caution
- Location
- Location of Controls
- How to Use the Handset Soft Keys
- Meanings of Symbols and Operations of Keys
- Display
- Display Icons
- Setting up
- Connection
- Battery Installation
- Battery Charge
- Battery Information
- Replacing the Batteries
- Power ON/OFF
- Selecting the Display Language
- Setting the Date and Time
- Using the Telephone
- Making a Call
- Answering a Call
- Auto Talk
- ◆ Receiver (or Headset Receiver)/Speaker Volume
- Have a Hands-Free Phone Conversation (using Digital Speakerphone)
- To Return to Receiver
- ◆◆ Muting Your Conversation
- Key Lock
- Redialling
- ◆ Dialling Pause (for PBX line/long distance service users)
- Call Waiting
- To Return to the First Caller
- Caller ID
- Caller ID Service
- Standby Mode Display
- Making a Call from the Caller ID List
- List Menu
- Caller ID List Menu
- - Editing the Received Number for Calling
- ◆ Deleting One/All Caller ID Item(s)
- ◆ Redial List Menu
- Storing the Number in the Handset Phonebook
- Using the Phonebook
- Private Category Feature
- Audible Caller ID Feature
- Storing Caller Information
- Base Unit Phonebook
- Entering Names/Characters
- - Selecting the Input Mode
- Finding Items in the Phonebook
- ◆Dialling from the Phonebook
- Editing Caller Information
- Hot Keys
- Settings Menu Chart
- Handset Settings
- Memo Alarm
- Ringer Options
- Setting the Handset Key Tone ON/OFF
- Display Options
- - Selecting the Talk Mode Display
- Setting the Private Colour
- Follow steps 1 to 3 of Display Options on the previous page, then:
- Call Options
- Base Unit Settings
- Setting the Base Unit Ringer Volume
- Other Options
- Multi-Unit User Operations
- ◆ Operating Additional Handsets
- ◆ Operating Additional Base Units
- Handset Registration to a Base Unit
- Base Unit Selection
- Intercom Between Handsets
- ◆ Transferring a Call to Another Handset
- Phonebook Copy
- ◆ Copying an Item
- Walkie-Talkie
- Range:
- Setting the Walkie-Talkie Mode
- Answering System
- Answering System ON/OFF
- To Set ON
- To Set OFF
- Greeting Message
- Selecting the Number of Rings
- Incoming/Memo Messages
- Playing New Incoming/Memo Message(s)
- - Playing All Incoming/Memo Messages
- Answering System Direct Command
- Remote Operation from a Touch Tone Phone
- Setting the Remote Code ON
- tting the Remote Code OFF
- Recording a Memo Message
- Recording Your Telephone Conversation
- Using the Belt Clip
- Optional Headset
- Wall Mounting
- Before Requesting Help
- Index
- Technical Information
- Specifications
- For your future reference
Brand : PANASONIC
Model : KX-TCD510BXM
Category : Phone Accessories