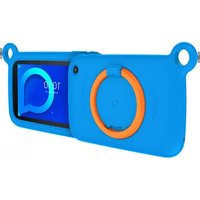
1T7 Family - Tablet ALCATEL - Free user manual and instructions
Find the device manual for free 1T7 Family ALCATEL in PDF.


| Type de produit | Tablet |
| Dimensions (H x L x P) | 191 x 102 x 9 mm |
| Weight | 250 g |
| Display size | 7 inches |
| Display resolution | 1024 x 600 pixels |
| Processor | Quad-core 1.3 GHz |
| RAM | 1 GB |
| Internal storage | 16 GB (expandable via microSD up to 128 GB) |
| Operating system | Android 9 (Go edition) |
| Rear camera | 2 MP |
| Front camera | 0.3 MP |
| Battery capacity | 2580 mAh |
| Power supply | 5V/1A micro USB charger |
| Connectivity | Wi-Fi 802.11 b/g/n, Bluetooth 4.0, micro USB 2.0, 3.5 mm headphone jack |
| Sensors | Accelerometer, proximity sensor |
| Maintenance and cleaning | Wipe with a soft, dry cloth. Do not use harsh chemicals or water. |
| Safety | Keep away from water and extreme temperatures. Use only original accessories. |
| Spare parts and repairability | Battery not user-replaceable. Contact authorized service center for repairs. |
| General information | Suitable for basic tasks like browsing, video streaming, and e-reading. |
Frequently Asked Questions - 1T7 Family ALCATEL
User questions about 1T7 Family ALCATEL
0 question about this device. Answer the ones you know or ask your own.
Ask a new question about this device
Download the instructions for your Tablet in PDF format for free! Find your manual 1T7 Family - ALCATEL and take your electronic device back in hand. On this page are published all the documents necessary for the use of your device. 1T7 Family by ALCATEL.
USER MANUAL 1T7 Family ALCATEL
For more information, we have to join the talent, please go to www.ubstendable.com and download the complete use manual. Moreover, at the website, you can also find answers to frequently what questions, upgrade the software as Mobile upgrade, and so much more...
alcatel 1T 7
Wi-Fi Tablet
Table of Contents
Safety and use 4
Radio Waves....7
I Your device....13
1.1 Keys and connectors....13
1.2 Getting started 16
1.3 Home screen 17
2 Text input 24
2.1 Using the Onscreen Keyboard 24
- Contacts & Gmail 25
3.1 Contacts....25
3.2 Gmail 27
4 Calendar & Clock & Calculator....33
4.1 Calendar 33
4.2 Click 34 4.3 Calculates 36
5 Getting connected 38
5.1 Connecting to the Internet 38
5.2 Chrome 39
5.3 Connecting to Bluetooth devices....43 5.4 Connection to a connectivity....44
5.4 Connecting to a computer 44 5.5 Sharing your device's Wi-Fi connection 44
5.6 Connecting to virtual private networks 45
6 Multimedia applications....46
6.1 Camera/Camcorder 46
6.2 Photos 49
7 Others 50
7.1 File Manager....50
7.2 Other applications....50
8 Google applications 51
8.1 Gmail 51
8.2 Maps Go 51
8.3 YouTube 51 9.4 Play Stars 50
8.4 Play Store 52 8.5 Play Music 50
9 Settings....53
9.1 Network & Internet 53
9.2 Connected devices 53
9.3 Apps & notifications 54
7.4 Battery 54 9.5 Display 54
9.6 Sound 55
9.7 Storage 55
9.8 Security & Location 56
9.9 User & accounts 59
9.10 Accessibility 59
9.12 System 40
10 Upgrade 64
10.1 Mobile Upgrade 64
10.2 FOTA Upgrade 64
11 Accessories....65
12 Warranty 66
13 Troubleshooting 68
14 Specifications 71

www.sar-tick.com
This product meets applicable national SAR limits of 1/6 W/kg. The specific maximum SAR values can be found on Radio waves section.
When carrying the product or using it while worn on your body, either use an approved accessory such as a holster or otherwise maintain a distance of 0 mm from the body to ensure compliance with RF exposure requirements.


PROTECT YOUR HEARING
To prevent possible hearing damage, do not listen at high volume levels for long periods. Exercise caution when holding your device near your car while the loudspeaker is in use.
Safety and use
We recommend that you read this chapter carefully before using your device. The manufacturer disclaims any liability for damage, which may result as a consequence of improper use or use contrary to the instructions contained herein.
TRAFFIC SAFETY:
Given that studies show that using a device while driving a vehicle constitutes a real risk, drivers are requested to refrain from using their device when the vehicle is not parked. Check the laws and regulations on the use of wireless devices and their accessories in the areas where you drive. Always obey them. The use of these devices may be prohibited or restricted in certain areas.
CONDITIONS OF USE:
- You are advised to switch off the device from time to time to optimize its performance;
• Remember to abide by local authority rules of mobile device use on aircrafts; - If your device is a unibody device, where the back cover and battery are not removable, dissembling the device will void your warranty. Disassembling the device can cause bodily injury if the battery is punctured;
• Always handle your device with care and keep it in a clean and dust-free place. - Do not allow your device to be exposed to adverse weather or environmental conditions, such as moisture, humidity, rain, infiltration of liquids, dust, sea air, etc. The manufacturer's recommended operating temperature range is -10°C (24°F) to -55°C (131°F). At over 55°C (131°F), the logibility of the device's display may be impaired, though this is temporary and not serious:
• Do not open, dismantle, or attempt to repair your device yourself;
Do not drop, throw, or hand your device - Use only batteries, battery chargers, and accessories which are recommended by TCL Communication Ltd. and its affiliates and are compatible with your device model. TCL Communication Ltd. and its affiliates disclaim any liability for damage caused by the use of other chargers or batteries.
- Your device should not be disposed of in a municipal waste. Please check local regulations for disposal of electronic products;
- Remember to make backup copies or keep a written record of all important information stored on your device;
- Some people may suffer epileptic seizures or blackouts when exposed to flashing lights, or when playing video games. These seizures or blackouts may occur even if a person never had a previous seizure or blackout. If you have experienced seizures or blackouts, or if you have a family history of such occurrences, please consult your doctor before playing video games on your device or enabling a flashing-lights feature on your device; - Parents should monitor their children's use of video games or other features that incorporate flashing lights on the devices. All persons should discontinue use and consult a doctor if any of the following symptoms occur: convulsion, eye or muscle twitching, loss of awareness, orientation, or movements.
PRIVACY:
Here note that you may receive the own any regulations in terms of your exclusion or other jurisdiction where you will use your device regarding, acting as photographs and recording sounds with your device. Potential to such events and regulations, it may be an angry mechanism to take strategies and/or to record the services or other people or any of their personal activities, and reproduce or communicate times, as this may be considered to be an investor of privacy. It is the user's sole responsibility to ensure that prior authorization has been obtained. If necessary, in order to record private or confidential conversations or take a photograph of another person, the main disaster, the seller or vendor or your service (including the same) document any liability which may result from improper use of the device.
BATTERY:
For a non-unibody device:
Observe the following precautions:
• Do not attempt to open the battery (due to the risk of toxic fumes and burns).
• Do not puncture, disassemble, or cause a short circuit in a battery;
- Do not burn or dispose of a used battery in household rubbish or store it at temperatures above 60°C (147°F).
Batteries must be disposed of in accordance with locally applicable environmental regulations. Only use the battery for the purpose for which it was designed. Never use damaged batteries or those not recommended by TCL Communication Ltd. and/or its affiliates.
For a non-unibody device with a non-removable battery:
Observe the following precautions
• Do not attempt to eject, replace or open the battery;
Do not puncture, disassemble, or cause a short circuit in the battery;
- Do not burn or dispose of your device in household rubbish or store it at temperature above 60°C (140°F). Device and battery must be disposed of in accordance with locally applicable environmental regulations.
For a unibody device:
Observe the following precautions:
- Do not attempt to open the back cover;
Do not attempt to eject, replace, or open battery;
Do not puncture the back cover of your device;
- Do not burn or dispose of your device in household rubbish or store it at temperature above 60°C (140°F);
Device and battery as a unibody device must be disposed of in accordance with locally applicable environmental regulations.
This symbol on your device, the battery, and the accessories means that
- Municipal waste disposal centers with specific bins for these items of equipment;
• Collection bins at points of sale.
They will then be recycled, preventing substances being disposed of in the
environment, so that their components can be reused.
In European Union countries:
These collection points are accessible free of charge.
All products with this sign must be brought to these collection points.
In non-European Union jurisdictions:
Items of equipment with this symbol are not to be thrown into ordinary bins if your jurisdiction or your region has suitable recycling and collection facilities; instead they are to be taken to collection points for them to be recycled. In the United States you may learn more about CTIA's Recycling Program at http://www.gowirelessgogreen.org/
CAUTION: RISK OF EXPLOSION IF BATTERY IS REPLACED BY AN INCORRECT TYPE. DISPOSE OF USED BATTERIES ACCORDING TO THE INSTRUCTIONS.
WARNING: This product contains chemicals known to the State of California to cause cancer and birth defects or other reproductive harm.
CHARGERS:
Home A.C./Travel chargers will operate within the temperature range of: 0°C (32°F) to 40°C (104°F).
The chargers designed for your device meet the standard for safety of information technology equipment and office equipment use. Due to different applicable electrical specifications, a charger you purchased in one jurisdiction may not work in another jurisdiction. They should be used for this purpose only. Characteristics of power supply (depending on the country):
Travel charger: Input: 100-240 V, 50/60 Hz, 0.2A
Output: 5V, 1A
Battery:Lithium 2580 mAh
Radio Waves
THIS Device MEETS THE GOVERNMENT'S REQUIREMENTS FOR EXPOSURE TO RADIO WAVES.
Your device is a radio transmitter and receiver. It is designed and manufactured not to exceed the emission limits for exposure to radio-frequency (RF) energy. These limits are part of comprehensive guidelines and establish permitted levels of RF energy for the general population. The guidelines are based on standards that were developed by independent scientific organizations through periodic and thorough evaluation of scientific studies. These guidelines include a substantial safety margin designed to ensure the safety of all persons, regardless of age and health.
The exposure standard for devices employs a unit of measurement known as the Specific Absorption Rate, or SAR. The SAR limit set by public authorities such as the Federal Communications Commission of the US Government (FCC) is 1.6 W/kg averaged over 1 gram of body tissue. Tests for SAR are conducted using standard operating positions with the device transmitting at its highest certified power level in all tested frequency bands.
This device is complied with SAR for general population /uncontrolled exposure limits in ANSI/IEEE C95.1-1992 and had been tested in accordance with the measurement methods and procedures specified in IEEE1528.
The FCC has granted an Equipment Authorization for this model device with all reported SAR levels evaluated as in compliance with the FCC RF exposure guidelines. SAR information on this model device is on file with the FCC and can be found under the Display Grant section of www.fcc.gov/oet/ea/fccid after searching on FCC ID: 2ACCJBT12
Although the SAR is determined at the highest certified power level, the actual SAR level of the device while operating can be well below the maximum value. This is because the device is designed to operate at multiple power levels so as to use only the power required to reach the network. In general, the closer you are to a wireless base station antenna, the lower the power output of the device. Before a device model is available for sale to the public, compliance with national regulations and standards must be shown.
The highest SAR value for this model device when tested is 1.19 W/Kg for use close to the body.
While there may be differences between the SAR levels of various devices and at various positions, they all meet the government requirement for RF exposure.
For body-worn operation, the device meets FCC RF exposure guidelines provided that it is used with a non-metallic accessory with the handset at least 0 mm from the body. Use of other accessories may not ensure compliance with FCC RF exposure guidelines.
Additional information on SAR can be found on the Cellular Telecommunications & Internet Association (CTIA) Web site: http://www.ctia.org/
Note: This equipment has been tested and found to comply with the limits for a Class B digital device pursuant to part 15 of the FCC Rules. These limits are designed to provide reasonable protection against harmful interference in a residential installation. This equipment generates, uses and can radiate radio frequency energy and, if not installed and used in accordance with the instructions, may cause harmful interference to radio communications. However, there is no guarantee that interference to radio or television reception, which can be determined by turning the equipment off and on, the user is encouraged to try to correct the interference by one or more of the following measures:
• Reorient or relocate the receiving antenna;
• Increase the separation between the equipment and receiver:
- Connect the equipment into an outlet on a circuit different from that to which the receiver is connected;
- Consult the dealer or an experienced radio/ TV technician for help.
Changes or modifications not expressly approved by the party responsible for compliance could void the user's authority to operate the equipment.
For the receiver devices associated with the operation of a licensed radio service (e.g. FM broadcast), they bear the following statement:
This device complies with Part 15 of the FCC Rules.
Operation is subject to the following two conditions:
- This device may not cause harmful interference; - This device must accept any interference received, including interference that may cause undesired operation.
Your device is equipped with a built-in antenna. For optimal operation, you should avoid touching it or degrading it.
As mobile devices offer a range of functions, they can be used in positions other than against your ear. In such circumstances the device will be compliant with the guidelines when used with a headset or USB data cable.
If you are using another accessory ensure that whatever product is used is free of any metal and that it positions the device at least 15 mm away from the body.
Please note by using the device some of your personal data may be shared with the main device. It is under your own responsibility to protect your own personal data, not to share with it with any unauthorized devices or third party devices connected to yours. For products with Wi-Fi features, only connect to trusted Wi-Fi networks. Also when using your product as a hotspot (where available), use network security. These precautions will help prevent unauthorized access to your device. Your product can store personal information in various locations including a SIM card, memory card, and built-in memory. Be sure to remove or clear all personal information before you recycle, return, or give away your product. Choose your apps and updates carefully, and install from trusted sources only. Some apps can impact your product's performance and/or have access to private information including account details, call data, location details and network resources. Note that any data shared with TCL Communication Ltd. is stored in accordance with applicable data protection legislation. For these purposes TCL Communication Ltd. implements and maintains appropriate technical and organizational measures to protect all personal data, for example against unauthorized or unlawful processing and accidental loss or destruction of or damage to such personal data whereby the measures shall provide a level of security that is appropriate having regard to
• The technical possibilities available;
• The costs for implementing the measures:
• The risks involved with the processing of the personal data, and:
• The sensitivity of the personal data processed.
You can access, review and edit your personal information at any time by logging into your user account, visiting your user profile or by contacting us directly. Should you require us to edit or delete your personal data, we may ask you to provide us with evidence of your identity before we can act on your request.
Licenses.
micro
microSD logo is a trademark.

The Bluetooth word mark and logos are owned by the Bluetooth SIG, Inc. and any use of such marks by TCL Communication Ltd. and its affiliates is under licence. Other trademarks and trade names are those of their respective owners. Alcatel 8067/ 8068 Bluetooth Declaration ID D030187

The Wi-Fi Logo is a certification mark of the Wi-Fi Alliance. Google, the Google logo, Android, the Android logo, Google Search™, Google Maps™, Gmail™ YouTube, Google Play Store, Google Latitude™, and Hangouts™ are trademarks of Google Inc.
The Android robot is reproduced or modified from work created and shared by Google and used according to terms described in the Creative Commons 3.0 Attribution License (the text will show when you touch Google legal in Settings > System >About tablet > Legal information) [1] .
You have purchased a product which uses the open source (http://opensource.org/) programs mtd, msdosfs, netfilter/iptables and initrd in object code and other open source programs licensed under the GNU General Public Licence and Apache Licence.
We will provide you with a complete copy of the corresponding source codes upon request within a period of three years from the distribution of the product by TCL Communication Ltd.
You may download the source codes from http://sourceforge.net/projects/alcatel/files/. The provision of the source code is free of charge from the internet.
41 May not be available in all countries.
General information
Website (USA): https://us.alcatelmobile.com
Website (Canada): https://ca.akcatelmobile.com
• Facebook (USA): https://www.facebook.com/alcatelmobileus
• Facebook (Canada): https://www.facebook.com/alcatelmobileca
• Twitter (USA): https://twitter.com/alsatelmobileus
• Twitter (Canada): https://twitter.com/alcatelotcanada
• Instagram (USA): https://www.instagram.com/alcateimobileus
• Instagram (Canada): https://www.instagram.com/alcatelmobileca
• Hotline: In the United States, call 855-36B-0829 for technical support.
• Manufacturer: TCL Communication Ltd.
- Address: 5/F, Building 22E, 22 Science Park East Avenue, Hong Kong Science Park,
Shah, N1, Hong Kong
Electronic labeling path: Touch Settings >System >Regulatory & Safety, you can find more information about labeling), such as PCC IP.
On our website, you will find our FAQ (Frequently Asked Questions) section.
You can also contact us by email to ask any questions you may have.
Disclaimer
There may be certain differences between the user manual description and the device's operation, depending on the software release of your device or specific carrier services.
TCL Communication Ltd. shall not be held legally responsible for such differences, if any, nor for their potential consequences, which responsibility shall be borne by the carrier exclusively.
Warranty
For information on warranty of your device, visit USA website at https://us.alcatelmobile.com/warranty/ and https://ca.alcatelmobile.com/warranty/
Electronic Recycling
For more information on Electronic Recycling, please Visit Alcatel Electronic Recycling Program website at (USA) https://us.alcatelmobile.com/accessibility-compliance/electronic-recycling-program/ and (Canada) https://ca.alcatelmobile.com/accessibility-compliance/electronic-recycling-program/
6) It depends on countries.
Battery Recycling
Alcatel partners with Call2Recycle ® to offer a safe and convenient battery recycling program.
For more information on our Battery Recycling Program, please visit the USA and Canada at https://us.alcatelmobile.com/accessibility-compliance/battery-recycling/ and https://ca.alcatelmobile.com/accessibility-compliance/battery-recycling/
[Non-Text]
[Non-Text]
[Non-Text]
[Non-Text]
[Non-Text]
[Non-Text]
[Non-Text]
[Non-Text]
[Non-Text]
[Non-Text]
[Non-Text]
[Non-Text]
[Non-Text]
[Non-Text]
[Non-Text]
[Non-Text]
[Non-Text]
[Non-Text]
[Non-Text]
[Non-Text]
Your device
1.1 Keys and connectors


Recents key
- Touch to switch between individual app activities and documents.

Home key
• From any application or screen, touch to return to the Home screen.

Back key
- Touch to go back to the previous screen, or close a dialog box, options menu, the notification panel, etc.

Power key
• Press: Lock the screen/light up the screen.
- Press and hold: Show the popup menu to select from Power off/Restart.
- Press and hold the Power key and Volume down key to make a screenshot.
- Press and hold the Power key for at least 10 seconds to force reboot.
Volume Keys
• In Music/Video/Streaming mode, adjusts the media volume.
• In general mode, adjusts the ringtone volume.
- In camera preview mode, press Volume up or down key to take a photo or press and hold to make burst shoot.
1.2 Getting started
1.2.1 Set up
Inserting or removing the SIM
Your device only supports SD cards. Do not attract to insert SIM types like micro SIM and standard cards; otherwise this may cause damage to your device.

Charging the battery
You are advised to fully charge the battery (Charging status is indicated by a percentage displayed on screen while the device is powered off. The percentage increases as the device is charged.

To reduce power consumption and energy waste when the battery is fully charged, disconnect your charger from the plug; switch off Wi-Fi, GPS, Bluetooth or background-running applications when not in use; reduce the backlight time, etc.

1.2.2 Power on your device
Hold down the Power key until the device powers an unlock your device (Swipe, PIN, Password, Pattern) if necessary and confirm. The Home screen is displayed.
If you do not know your PIN code or forget it, contact your network carrier. Be sure to keep your PIN code well.
1.2.3 Power off your device
Hold down the Power key until options appear, select Power off.
1.3 Home screen
You can bring all the items (applications, shortcuts, folders and widgets) you love an use most frequently to your Home screen for quick access. Touch the Home key to switch to the Home screen.

-Status bar
• Status/Notification indicators
- Touch and drag down to open the notification panel
Search bar
- Touch Ⓞ to enter text search screen.
• Touch ② to enter voice search screen.
_Touch an icon to open an application, folder, etc.
-Touch to enter the applications list.
Favorite tray applications
- Touch to enter the application.
- Long press to move or remove applications.
The Home screen is provided in an extended format to allow more space for adding applications, shortcuts etc. Slide the Home screen horizontally left and right to get a complete view.
1.3.1 Using the touchscreen


1.3.2 Status bar
From the status bar, you can view both device status (on the right side) and notification information (on the left side);
Drag down the status bar to view notifications and drag again to enter the quick settings panel.
Touch and drag up to close is. When there are notifications, you can touch them to access notifications.
Notification panel
When there are notifications, touch and drag down the Status bar to open the Notification panel to read more detailed information.
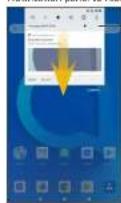
-Touch to access device settings, where you can make changes to more functions.
Touch to clear all event-based notifications (other ongoing notifications will remain).

Touch to access Settings, where you can set more items.
- Touch to enter user screen to edit and save owner's name, device number, and other information.
1.3.3 Search bar
The device provides a Search function which can be used to locate information within applications, the device or the web.

Quick settings panel
Touch and drag down the Notification panel or touch the down-sided arrow to open the Quick settings panel. You can enable or disable functions or change modes by touching the icons. Touch the EDIT button to customize your Quick settings panel.
Search by text
- Touch the Search bar from the Home screen.
• Enter the text/phrase you want to search for. - Touch the icon on the keyboard if you want to search on the web.
Search by voice
• Touch from the Search bar to display a dialog screen.
- Speak the word/phrase you want to search for. A list of search results will display for you to select from.
1.3.4 Lock/Unlock your screen
To protect your device and privacy, you can lock the device screen by choosing slide or creating a pattern. PIN or password, etc.
To create a screen unlock pattern
- From the Home screen, touch to open the applications list, then touch Settings>Security & Location >Screen lock>Pattern
• Draw your own pattern.
To lock device screen
Press the Power key once to lock the screen.
To unlock the device screen
Press the Power key once to light up the screen, slide to draw the unlock pattern you have created or enter your PIN or password, etc. to unlock the screen.
If you have chosen Swipe as the screen lock, you can press the Power key to light up the screen, then swipe up to unlock the screen, double touch the camera icon to enter Camera or double touch the Voice search icon to enter Voice search.

1.3.5 Personalize your Home screen
Ald
You can long press a folder, an application or a widget to activate the Move mode, and drag the item to your preferred Home screen.
Reposition
Long press the item to be repositioned to activate the Move mode, drag the item to the desired position and then release. You can move items both on the Home screen and the Favorite tray. Hold the icon on the left or right edge of the screen to drag the item to another Home screen.
Remove
Long press the item than touch the "Ion, and enter into App Info, then disable/ FORCE STOP this function.
Create folders
To improve the organization of items (shortcuts or applications) on the Home screen and the Favorite tray, you can add them to a folder by stacking one item on top of another. To rename a folder, open it and touch the folder's title bar to inout the new name.
Wallpaper customisation
Long press the empty area in the Home screen, then touch WALLPAPERS to customize wallpaper.
1.3.6 Widgets and recently-used applications
Consult widgets
Long press the empty area in the Home screen, then touch WIDGETS to display all widgets.
Touch the selected widget and slide it to move to your preferred screen.
Consult recently-used applications
To consult recently-used applications, touch the Overview key. Touch a thumbnail in the window to open the application.
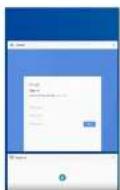
Touch one thumbnail and slide it right/left or touch to close the application.
Touch clear icon at the middle bottom of the screen to close all the running applications.
1.3.7 Volume adjustment
Using the volume key
Press the Volume key to adjust the volume. To activate the vibrate mode, press the Volume down key until the device vibrates.
Using the settings menu
From the Home screen, touch Settings>Sound to set the volume of media, ringtone, alarm, etc. to your preference.
2 Text input
2.1 Using the Onscreen Keyboard
Onscreen Keyboard settings
Touch Settings>System>Language & Input, touch the keyboard you want to set up and a series of settings will become available.
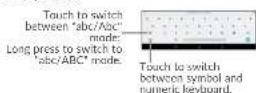
2.1.1 Virtual keyboard
2.2 Text editing
You can edit the texts you entered.
- Lang press or double touch within the texts you want to edit.
- Drag the tabs to change the checked texts.
• The following options will show: CUT, COPY and SHARE.

You can also insert new texts if preferred
- Touch where you want to type, or long press the blanc, the cursor will blinc and the tab will show. Drag the tab to move the cursor.
- If you have cut or copied any text, touch the tab to show the PASTE icon which allows you to complete pasting immediately.

Contacts & Gmail
3.1 Contacts
Contacts enables quick and easy access to the contact you want to reach.
You can view and create contacts on your device and synchronize these with your Gmail contacts or other applications on the web or on your device.
3.1.1 Consult your Contacts
To see your contacts, touch Contacts icon in the homescreen.

Delete a contact
To delete a contact, long press the contact you want to delete, then touch
The contact you have deleted will also be removed from other applications on the device or web the next time you synchronize your device.
Touch to display the contacts list option menu, following actions are enabled:
- Select Touch to select one contact that you want
- Select all Touch to select all contacts
- Customize view Touch to set the contact display, like All contacts or Customise which you can set for different groups.
3.1.2 Adding a contact
Touch the contact list to create a new contact.
You are required to enter the contact's name and other contact information. By scrolling up and down the screen, you can move from one field to another.
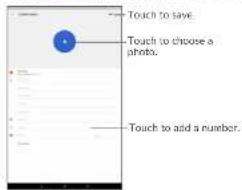
3.1.3 Editing your contacts
To edit contact information, touch on the contact details screen to edit
When finished, touch SAVE to save.
3.1.4 Importing, exporting and sharing contacts
This device enables you to import or export contacts between your device, SIM card and device storage.
From the Contacts screen, touch 📄 to open the options menu, touch Settings Import/Export.
To share a contact, long press the contact you want to share, then touch <You can share a single contact or contacts with others by sending the contact's vCard to them via Bluetooth, Gmail, etc.
3.1.5 Accounts
Contacts, data or other information can be synchronized from multiple accounts, depending on the applications installed on your device.
To add an account, touch Afrom the home screen, then Settings\Users & accounts\Add account.
You are required to select the kind of account you are adding, like Google, Corporate, etc.
As with other account setup, you need to enter detailed information. Use username, password, etc.
You can remove an account to delete it and all associated information from the device. Touch the account you want to delete, touch REMOVE ACCOUNTS, then confirm.
Turn on/off the auto-sync
In the Accounts screen, mark the Automatically-sync data checkbox. When activated, all changes to information on the device or online will be automatically synchronized with each other.
3.2 Gmail
As Google's web based email service, Gmail is configured when you first set up your device. Gmail on your device can be automatically synchronized with your Gmail account on the web.
3.2.1 To access Gmail
From the Home screen, touch Gmail.
3.2.2 To create and send emails
- Touch the icon from the inbox screen.
- Enter recipient(s) s email address in To field, and if necessary, touch the downward arrow to add a copy [Cr] or a blind copy [Brc] to the message.
- Enter the subject and the content of the message.
- Touch to add an attachment.
• Finally, touch the icon to send - If you do not want to send the mail out right away, you can touch and Save draft or touch the Back key to save a copy. To view the draft, touch the Icon when select Drafts.
• If you do not want to send or save the mail, you can touch and then touch Discard.
To add a signature to emails, touch; and Settings from inbox screen, choose an account, then touch Signature.
3.2.3 To receive and read your emails
When a new email arrives, you will be notified by a ring-one or vibration, and an icon will appear on the Status bar.
Touch and drag down the Status bar to display the Notification panel and touch the new email to view it. You can also access the Gmail Inbox label and touch the new mail to read it.
You can search for an email by sender, subject, label, etc.
- Touch the icon from Inbox screen.
- Enter the keyword you want to search for in the search box and touch
3.21 To
3.2.4 To reply or forward emails
- Reply When viewing an email, touch also reply to the sender of this mail.
- Reply all Touch: and select "Reply all" to send the message to all people in a mail loop.
- Forward Touch: and select "Forward" to forward the received mail to other people.
- Add star Touch and select "Add star" to add a star for the mail.
- Print Touch and select "Print" to print the mail.
3.2.5 Managing Gmails by Labels
To conveniently manage conversations and messages, you can organize them using a Label.
To label a conversation when reading a conversation's messages, touch * and then choose Move to.
To view conversations by labels when viewing your inbox or another conversation list, touch the icon 📂en touch a label to view a list of conversations with that label.
Long press an email to activate batch mode and produce the following options.
Touch to archive the email message. To display the archived messages, you can touch in inbox screen then touch All mail.
Touch to delete the email message.
Touch to make an email message as read or unread.
Touch to access the following options
- Move to Touch to move the mail to other labels.
- Change labels Touch to change the label of the email message or conversation.
- Add star Touch to remark in star for the mail
• Mark as important To Mark the email as important or not important. - Mute Touch to hide the mail and the mail could be found by touching All mail.
• Report spam To report the email message/conversation as spam.
3.2.6 Gmail settings
To access Gmail settings, touch the icon and select Settings.
General settings
- Gmail default actionTouch to set the default action: archive or delete.
- Manage Touch to set the notifications' action
Notifications
- Conversation view Mark the checkbox to group emails in the same conversation (for IMAT, POPS and Exchange accounts
- Swine actions. Mark the checkbox to enable a Swine to archive messages
within the conversation list.
- Sender image Mark the checkbox to show the sender's image beside their
name in the conversation list.
- Default reply action Touch to choose your default reply action for Reply/Reply all
- Auto-fit messages Mark the checkbox to shrink messages to fit the screen and allow zooming.
- Open web links in: Mark the checkbox to turn on for faster browsing.
Gmail
- Confirm before Mark the checkbox to receive a request to confirm your
Banking action before defecting emails.
- Confirm before archiving Mark the checkbox to receive a request to confirm your action before archiving emails.
- Confirm before sending Mark the checkbox to receive a request to confirm your action before sending emails.
Touch an account to view the following settings:
- Inbox type To set this inbox as the default or priority Inbox.
- Inbox categories Mark the checkbox to enable the folder to appear under
the Inbox folder. - Notifications Mark the checkbox to activate a notification when a new
Email arrives. - Manage notifications touch to set the notifications' action
- Default reply action Touch to set the default reply action: Reply or Reply to all.
- Mobile signature To add a signature text to the end of each mail you send.
- Smart Reply Mark the checkbox to show suggested replies when
available
• Out of Office Touch to set the AutoReply when out of office
Autokopy
- Sync Gmail Mark the checkbox to turn dry/off Gmail sync.
• Days of mail to syncTouch to set the duration of days for mail sync.
- Download Mark the checkbox to auto download attachments to
attachments recent messages via Wi-Fi.
- Images Touch to set whether images are always shown or if you will
4 Calendar & Clock & Calculator
4.1 Calendar
Use the Calendar to keep track of important meetings, appointments, etc.
To view the calendar and create events, touch Calendar from the Home screen.
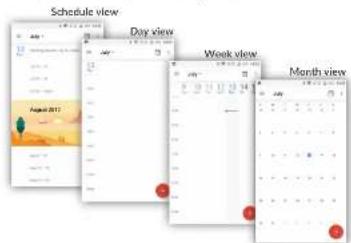
4.1.1 Multimode view
You can display the Calendar by Schedule. Day, Week, or Month.
4.1.2 To create new events
You can add new events from any Calendar view.
• Touch to access a new event edit screen.
- Fill in all required information for this new event. If it is a whole-day event, you can select All-day.
- Invite guests to the event. Enter the email addresses of the guests you want to invite with commas to separate. The guests will receive an invitation from Calendar and Email.
- When finished, touch SAVE from the top of the screen.
To quickly create an event from the Week view screens, touch an empty spot to select a target area which will then turn and touch the icon to create the new event.
4.1.3 To delete or edit an event
To delete or edit an event, touch the event to enter its details screen, touch the key to edit the event and touch Delete to create.
4.1.4 Event reminder
If a reminder is set for an event, the upcoming event icon will appear on the Status bar as a notification when the reminder time arrives.
Touch and drag down the status bar to open the notification panel, touch an event name to view the Calendar notification list.
Touch the Back key to keep the reminders pending in the status bar and the notification panel.
4.2 Clock
Your device has a built-in clock.
To view the current time, touch A from the Home screen, then touch Clock.
4.2.1 World clock
To view the world clock, touching the Time screen.
Touch the icon to add a time zone.
4.2.2 Alarm
From the Time screen, touch 📋 enter the Alarm screen.
Touch the switch to enable the alarm.
Touch + add a new alarm, the following options will appear:
• Time Touch to set the alarm time.
- Repeat Touch to select the days when you want the alarm to work.
- Ringtone Touch to select a ringtone for the alarm.
- Label Touch to set a name for the alarm.
- Delete Touch to delete the alarm
Touch a currently existing alarm to enter the alarm editing screen.
Touch then touch to delete the selected alarm.
4.2.3 Countdown
From the Time screen, touch X enter the Countdown screen.
- Enter the time. The time should be typed in second, minute and hour number
sequence.
• Touchdown to activate Countdown. - Touch ADD TIMER to set the countdown time in panel.
• Tour III on to deactivate Countdown. - Touch DELETE to delete current countdown label.
4.2.4 Timer
From the Time screen, touch 📋 enter the Timer screen.
• Touch to activate the timer.
- Touch LAP to show a list of records according to the updated time.
- Touch 📄 to halt the total and lap times. These will only restart after ▶ is touched.
- Touch RESET to reset the record.
4.2.5 Adjust Clock settings
Touch the icon and then Settings, the following options can now be adjusted:
• Style Touch to set the clock style to Analogue or Digital.
- Automatic home clockMark the checkbox to enable the function when travelling in an area where the time is different, add a clock for home.
• Home time zone Touch to set Home time zone.
• Silence after Touch to set a temporary turn off time for an alarm.
- Snooze length Touch to set the duration of alarms.
• Alarm volume Touch to set alarm volume.
• Gradually increase Touch to choose the time to gradually increase volume volume
• Volume buttons Touch to set side Volume up/down key behaviors when alarm sounds, soars. Dismiss or Do nothing
Figure 1. The following table provides the information in English:
- Take a week off - Touch to choose which day as the one to start week on
4.3 Calculator
With the Calculator, you can solve many mathematical problems.
To use the calculator, touch from the Home screen, then touch Calculator.
There are two panels available: Basic panel and Advanced panel.
To switch between panels, turn the device to the landscape mode from the basic panel or swipe left to open the Advanced panel.
If Settings\Display\When device is rotated\Rotate the contents of the screen is enabled, this item will display.

Enter a number and the arithmetic operation to be performed, order the second number, then touch 1-2 to display the result. Touch DEL to delete digits one by one long press DEL to delete all at one time.
5 Getting connected
To connect to the internet with this device, you can use Wi-Fi.
5.1 Connecting to the Internet
5.1.1 Wi-Fi
Using Wi-Fi, you can connect to the Internet when your device is within range of a wireless network.
To turn Wi-Fi on and connect to a wireless network
• Touch Settings> Network & Internet>Wi-Fi.
- Touch the switch return on/off Wi-Fi.
- Once Wi-Fi is on, the detailed information of detected Wi-Fi networks is displayed.
- Touch a Wi-Fi network to connect to it. If the network you selected is secured, you are required to enter a password or other credentials (you may contact the network carrier for details). When finished, touch Connect:
To activate notification when a new network is detected
When Wi-Fi is on and the network notification is activated, the Wi-Fi icon will appear on the status bar whenever the device detects an available wireless network within range. The following steps activate the notification function when Wi-Fi is on:
- Touch Settings
- Touch Wi-Fi, scroll to the bottom. Then touch Wi-Fi preferences.
- Switch the toggle Open network notification to activate/deactivate this function.
To add a Wi-Fi network
When Wi-Fi is on, you may add new Wi-Fi networks according to your preference.
- Touch Settings
- Touch Wi-Fi, scroll to the bottom and touch Add network.
- Enter the name of the network and any required network information.
- Touch SAVE.
To forget a Wi-Fi network
The following steps prevent automatic connections to networks which you no longer wish to use.
• Turn on Wi-Fi, if it's not already on.
- In the WI-EI screen, touch the name of the saved network.
• Touch FORGET in the dialog that opens.
5.2 Chrome
Using Chrome, you can enjoy surfing the Web.
To surf the web, touch from Chrome the Home screen
To go to a web page
On the Chrome screen, touch the URL bar at the top, enter the address of the web page, then confirm.

To set a homepage
- Touch the icon from Chrome screen to display option menu, touch Settings\ Homepage.
- Touch the switch on to set this website as your homepage.
Viewing web pages
When opening a website, you can navigate on web pages by sliding your finger on the screen in any direction to locate the information you want to view.
To find text on a web page
- Touch the icon from Chrome screen to display option menu, and touch Find in page.
• Enter the text or phrase you want to find.
- Words with matching characters will be highlighted on the screen.
- Touch the up or down arrow to switch to the previous or next matching items.
- When finished, you can touch the Back key to close the search bar.
Further operations for the text on a web page
You can copy, share or search the text from a web page.
- Long press the text to highlight the text.
• Move two tabs to select the text.
• Touch the Icon to show further actions, including search on the web.
- When finished, touch the Back key to deactivate the mode.
To open new window/switch between windows
• Touch to open a one-window.
• Joura Icon and New Incognito tab to open a window without any trace
• To your a synapse, touch on the window you want to place or size it sideways.
Other options:
To add the current website page as a bookmark.
.① To see details about the current website.
Touch to download the current website.
To refresh the current page.
- New tab Touch to open a new web
- New incognito tab Touch to open the incognito web
• Bookmarks To see the bookmarks.
- Recent tabs To see the tabs you have recently closed.
• History To view your browsing history.
• Downloads To check the downloaded web
- Share... To share via Gmail, Messaging, Bluetooth...
• Find In page To enter the information locking, then find in the website
- Add to Home screenTouch to add the web page opened to homescreen.
- Desktop site To set the web screen to desktop mode.
- Settings To access detailed Chrome settings.
• Help & feedback To get help tips and send feedback about Chrome.
5.2.1 Manage links, history, downloads
To manage a link, device number or address displayed on a web page
- Link Touch the link to open the web page. Long press the link to open options for further operation, like open in new window, download link, share link, copy link address, copy link text, etc.
• Device number Touch to call the device number.
- Address Touch to open Google Maps and locate the address.
To download a web application/view your downloads
To download an item, touch the item or the link you want to download. To cancel a download, touch the downloaded item from the Notification panel, select the item to be canceled, and touch "to confirm.
5.2.2 Manage bookmarks
To bookmark a web page
- Open the web page you want to bookmark,
- Touch the icon in the web page.
To open a bookmark
• Touch the • Loan and Bookmarks
• Touch the bookmark you want to open.
To edit a bookmark
- Touch the : icon and Bookmarks.
• Long press the bookmark you want to edit
• Touch and enter your changes.
• Touch to move the bookmark to a folder.
- Touch to delete a bookmark.
5.3 Connecting to Bluetooth devices [4]
Bluetooth is a short-range wireless communication technology that you can use to exchange data, or connect to other Bluetooth devices for various uses.
To exchange data, touch Settings>Connected devices >Bluetooth, your device and other available ones will show on the screen.
To turn on Bluetooth
- Touch Settings>Connected devices >Bluetooth.
- Touch to activate/deactivate this function.
To make your device more recognisable, you can change your device's name which is visible to others.
• Touch Settings*Connected devices >Bluetooth.
- Touch Device name, enter a name, then touch RENAME to confirm
To pair/connect your device with a Bluetooth device.
To exchange data with another device, you need to turn Bluetooth on and pair your device with the Bluetooth device with which you want to exchange data.
- Touch Settings>Connected devices >Bluetooth.
• Touch Pair new device.
• Touch a Bluetooth device you want to be paired with in the list.
• A dialog will pop up, touch PAIR to confirm.
• If the pairing is successful, your device connects to the device;
To disconnect/unpair from a Bluetooth device
- Touch the Settings icon beside the device you want, to unpair.
+ Touch FORGET to confirm.
You are recommended to use Acstel Bluetooth headers, which have been tested and proved compatible with your device. You can go to www.scstelmbics.com for more information about the acstel Bluetooth headset.
5.4 Connecting to a computer
With the USB cable, you can transfer media files and other files between your internal storage and a computer.
To connect your device to the computer
Use the USB cable that came with your device to connect the device to a USB port on your computer. You will receive a notification that the USB is connected.
Open the Notification panel and choose for three different modes below:
-Charge this device
-Transfer flies
Transfer photos(PTP)
-Use device as MIDI
5.5 Sharing your device's Wi-Fi connection
You can share your device's Wi-Fi connection with a single computer via a USB cable [USB tethering] or with up to eight devices at once by turning your device into a portable Wi-Fi hotspot.
To share your device's data connection via USB
Use the USB cable that came with your device to connect the device to a USD port on your computer.
- Touch Settings\Network & Internet\Tethering.
- Touch the switch beside USB tethering to activate/deactivate this function.
To share your device's data connection via Bluetooth
Use the bluetooth that came with your device to connect the device to a bluetooth port on your computer.
- Touch Settings\Network & Internet\Tethering.
- Touch the switch beside Bluetooth tethering to activate/deactivate this function.
,
5.6 Connecting to virtual private networks
Virtual private networks (VPNs) allow you to connect to the resources inside a secured local network from outside that network. VPNs are commonly deployed by corporations, schools, and other institutions so that their users can access local network resources when not inside that network, or when connected to a wireless network.
To add a VPN
- Touch Settings>Network & Internet >VPN and then touch +
- In the screen that opens, follow the instructions from your network administrator to configure each component of the VPN settings.
- Touch SAVE
The VPN is added to the list on the VPN settings screen.
Before adding a VPN, you should set a PIN code or password for your device.
To connect/disconnect VPN
To connect to a VPN:
- Touch Settings>Network & Internet>VPN
- VPNs you have added are listed; touch the VPN you want to connect with.
• In the dialog that opens, enter any requested credentials and touch CONNECT.
To disconnect
- Open the Notification panel and touch the notification for the VPN disconnection.
To edit/delete a VPN
To edit a V/Dtiv
- Touch Settings>Network & Internet>VPN
- VPNs you have added are listed; touch the ⚙ icon beside the VPN you want to edit.
• After editing, touch SAVE.
To delete:
- Touch the 🎨 icon beside the VPN you want to delete, then touch FORGET.
6 Multimedia applications
6.1 Camera/Camcorder
Your device is fitted with a Camera and a Camcorder for taking photos and shooting videos.
Before using the Camera or Camcorder, be sure to remove the protective lens cover to avoid it affecting your picture quality.
To take a photo or video, touch Camera from the Home screen.

Touch to take a picture
To take a picture
The screen acts as the viewfinder. First, position the object or landscape in the viewfinder, touch the screen to focus if necessary and touch the icon to take the picture which will be automatically saved.
To shoot a video
Switch to the video made by touching VIDEO icon besides, position the object or
landscape in the viewfinder and touch the look to start recording. Touch the
icon to stop recording. The video will be automatically saved.
Further operations when viewing a picture/video you have taken
- Touch the circle in the lower left part to view the photos or videos you have taken.
- Touch the icon then Gmail, Bluetooth, etc to share the photo or video.
• Touch the △ back iron to return to Camera
6.1.1 Modes and settings
Back camera shooting mode


Settings
Touch 📄 to choose different mouse for Auto, Fars, Social, and enter for setting to set order options.
• Picture size Touch to select picture size.
• Video quality Set the the quality of the video captured.
- Grid Set the grid mode when take picture
• Volume function buttoise this function to enable the volume buttons to capture a photo, zoom in or out, or adjust the volume.
• Storage Set the storage location in your device or SD card.
- Save location switch the tagge to activate/deactivate the function of information tagging photos and videos with your location.
- Shutter sound Switch the toggle to enable/disable shutter sound when taking a photo.
- One hand mode Switch the toggle to enable/disable the function to use one hand when take a photo.
- Reset settings Touch and confirm to reset the camera settings.
6.2 Photos
Photos act as a media player for you to view photos and play videos. In addition, a set of further operations to pictures and videos are available for your choice.
To view the photos you have taken, touch Photo icon in the home screen.
Working with pictures
Touch a picture you want to work on, touch the icon to delete a selected one. Touch share selected ones.
Touch the icon>Use as to set them as contact photo or wallpaper, etc.
Batch operation
The Photos provide a multi-select function, so that you can work with pictures/videos in batches.
Open the Photos window, long press one picture, touch the ☐con to delete photos, move the selected flies to trash. Touch ☐to share selected flies, touch ☐to Delete from device, Back up now, or Archive.
7 Others
7.1 File Manager
To manage the files in your device, touch from the Home screen, then touch Files Go.
Files Go work with both external SD card and internal storage.
Files Go display all data stored on the device, including applications, media files downloaded from Google Play Store, YouTube or other locations; videos, pictures or audios you have captured; other data transferred via Bluetooth, USB cable, etc.
When you download an application from PC to device, you can locate the application using Files, then touch it to install it in your device.
Files Go allow you to perform and is really efficient with the following common operations: create (sun) folder, open folder/file, view, rename, move, copy, delete, play, share, etc.
7.2 Other applications [5]
The previous applications in this section are preinstalled on your device. To read a brief introduction of the preinstalled 3rd party applications, refer to the least provided with the device. You can also download thousands of 3rd party applications by going to Google Play Store on your device.
8
Google applications
Google apps are preinstalled on your device to improve work efficiency and help you enjoy life.
This manual briefly introduces the apps. For detailed features and user guides, refer to related websites or the introduction provided in the apps.
You are recommended to register with a Google account to enjoy all the functions.
8.1 Gmail
As the Google's web-based email service, Gmail is configured when you first set up your device. With this application, you can receive and send mails, manage mails by labels, and archive mails, etc. Mails can be automatically synchronized with your Gmail account.
8.2 Maps Go
Google Maps offers satellite imagery, street maps, 360° panoramic views of streets, real-time traffic conditions, and route planning for traveling by foot, car, or public transportation. By using this application, you can get your own location, search for a place, and get suggested route planning for your trips.
8.3 YouTube
YouTube is an online video-sharing application where users can upload, view, and share videos. Available content includes video clips, TV clips, music videos, and other content such as video blogging, short original videos, and educational videos. It supports a streaming function that allows you to start watching videos almost as soon as they begin downloading from the Internet.
8.4 Play Store
Serves as the official app store for the Android operating system, allowing users to browse and download applications and games. Applications are either free of charge or at a cost.
In Play Store, search for the app you need, download it and then follow the installation guide to install the app. You can also uninstall, update an app, and manage your downloads.
8.5 Play Music
A music streaming service and online music locker operated by Google.
You can upload and listen to a large number of songs for free. In addition to offering music streaming for Internet-connected devices, the Google Play Music app allows music to be stored and listened to offline. Songs purchased through the Play Music are automatically added to the user's account.

Settings
To go to Settings, touch ▲ from the Home screen, then touch Settings.
9.1 Network & Internet
9.1.1 Wi-Fi
Using Wi-Fi you can now surf the Internet without using your SIM card whenever you are in range of a wireless network. The only thing you have to do is to enter the Wi-Fi screen and configure an access point to connect your device to the wireless network.
For detailed instructions on using Wi-Fi, refer to "5.1.1 Wi-Fi".
9.1.2 Tethering
This function allows you to share your device's Wi-Fi connection Via USB or as a portable Wi-Fi access point (refer to '5.5 Sharing your device's Wi-Fi connection').
9.1.3 VPN
A mobile virtual private network (imobile VPN or mVPN) provides devices with access to network resources and software applications on their home network, when they connect via other wireless or wind networks. Mobiles VPNs are used in environments where workers need to keep application sessions open at all times. Throughout the working day, at the user contacts via various wireless networks, encounters gaps in coverage, or suspends-and-resumes their devices to preserve battery life. A conventional VPN can't survive such events because the network tunnel is disrupted, causing applications to disconnect, time out, fail, or even the computing device itself to crash.
For more information on VPN, refer to "5.6 Connecting to virtual private networks"
9.2 Connected devices
This function allows you to use Bluetooth to connect your device to other devices. (refer to "5.3 connecting to Bluetooth devices")
9.3 Apps & notifications
Touch to view details about the applications installed on your device, to manage their data usage and force them to stop.
In the App permissions menu of an application, you can grant permissions for the app, such as allowing the app to access your Camera, Contacts, Location, etc.
9.4 Battery
Touch any category in the battery management screen to view its power consumption. You can adjust power use via the screen brightness or screen timeout settings in the Display screen.
9.5 Display
In this menu, you can adjust your screen brightness level, wallpaper, font size, etc.
MiraVision TM
A Set of engines to enhance display picture quality
Brightness level
Touch to set the brightness of the screen or enable the automatic brightness mode.
Eye care
Touch to activate/disactivate eye care automatically.
Wallpaper
You choose the wallpaper of your screen from Gallery, Photos, or Wallpapers.
Sleep
Set your device to enter the sleep made after a specified period of time, such as 1 minute or 30 seconds.
Auto-rotate screen
Set your device to rotate the screen contents or stay in portrait view when the device is rotated.
Font size
Touch to set the size of the fonts displayed on your screen.
Display size
This function makes the items on your screen smaller or larger. Some apps may change position.
Double tap screen
Touch to enable/disable it. If enabled, double tap to light up when screen is off.
9.6 Sound
• Sound Set volume for media, ringtone, notifications, and alarms.
- Do not disturb preferences
Touch to allow alarms, reminders, calls, etc. when Do not disturb mode is enabled.
- Default notification Touch to set the default sound for notifications.
- Default alarm sound Touch to set the default sound for alarms.
- Power on ringtone Touch to disable the Power on ringtone.
- Other sounds Touch to set dial pad tones, screen locking sounds, touch sounds, power on & off ringtone.
9.7 Storage
Use these settings to monitor the total and available space on your device and touch to view the total memory and the memory used by applications.
9.8 Security & Location
Security status
-Google Play Protect
Touch to enable/disable Google Play Protect which can regularly checks your apps and device for harmful behavior when turns on.
- Find My Device
Check this function to remotely locate this device, or allow remote lock and erase.
-Security update
Check if your system is up to date, if not, touch Check for update to upgrade.
You can specify a maximum of five app shortcuts displayed on the lock screen.
5screen lock
Touch to set your screen unlock method. For example, you can unlock your device by sliding the screen, entering a password, or drawing a pattern, etc.
Lock screen preferences
Touch set the status show on the lock screen & Lock screen message, or add users from lock screen.
Smart Lock
Touch to set your device to automatically unlocked as long as it's in motion, like when you're holding or carrying your device. Your device will lock when it detects that it's been set down.
Location
On
Touch the search to enable the use of information from Wi-Fi and mobile networks to determine your approximate location, for use in Google Maps, when you search, and so on. When you select this option, you're asked whether you consent to share your location anonymously with Google's location service.
-Mode
Touch to select High accuracy, Battery saving or Device only mode.
• High accuracy: Use GPS, Wi-Fi and mobile network to determine location.
• Battery saving: Use Wi-Fi to determine location.
• Device only: Use GPS to determine location.
-Recent location requests
This list shows the recent location requests.
Show passwords
Switch the toggle to show passwords as you type
Device admin apps
Touch to view or deactivate device administrators.
Encrypt & credentials
-Encryption
Requires a numeric PIN, pattern, or password to decrypt your device each time you power it on.
- Credential storage
• Storage type: Touch to check the hardware-backed
- Trusted credentials: Touch to display trusted CA certificates
- User credentials: Touch to view and modify stored credentials
• Install from SD card:Touch to install encrypted portificates from internal storage
(三) 本报告书
View or reactivate trust agents
Screen pinning
When this function is enabled, you can always keep a window in view by touching the
Overview Button and then the pin icon. In this case, the user cannot go to any other window or open any other app.
To stop pinning a window in view, long press both the Back and Overview keys
tagather, then enlching your screen unlock password or drawing your brick pattern.
Apps with usage access
Touch to display the apps which can track what apps you are using, and the using frequency. You can switch the toggle to turn on/off the permission.
9.9 User & accounts
This feature allows you to add another user account. When a friend need to use your device, switch to the guest account so that information in the main account cannot be accessed.
9.10 Accessibility
Use the Accessibility settings to configure any accessibility plug-ins you have installed on your device.
Volume key shortcut
Touch to enable/disable quick activating for accessibility features.
Text-to-speech output
Touch to update the settings for text-to-speech output, such as the speech rate.
Font size
Touch to set the size of the fonts displayed on your screen.
Display size
This function makes the items on your screen smaller or larger. Some apps may change position.
Magnification
Touch to turn on/off to activate/deactivate zoom in/out function by triple-lapping the screen.
Color correction
Touch to turn on/off color correction.
Color inversion
Touch the switch to turn on/off color inversion.
Large mouse cursor
Touch the switch to activate large mouse cursor.
Click after cursor stops moving
Touch to activate/deactivate this function.
Auto-rotate screen
Touch the switch to activate auto-rotate screen. Content on the screen or the
Keystream Will Del Min
Polish or hold betty
Touch to adjust the duration of touch and hold delay. This function enables your device to differ touch and touch & hold, which may avoid incorrect operations.
Mono audio
Touch to activate/deactivate combining channels when playing audio.
Captions
Touch to activate/deactivate captions for device screen.
High contrast text
Touch the switch to activate high contrast text.
9.11 Google
Touch to check Google services & preferences.
9.12 System
9.12.1 Language & input
Use the Language & Input settings to select the language for the text on your device and for configuring the onscreen keyboard. You can also configure voice input settings and the pointer speed.
Language
Touch to select the language and the region you want.
Virtual keyboard
Touch to manage virtual keyboard.
Physical keyboard
Touch to set the physical keyboard.
Spell checker
Switch the toggle to enable the system to show suggested words.
Auto-fill service
Touch to set Anto-fill service for None or Auto-fill with Google
Personal dictionary
Touch to open a list of the words you've added to the dictionary. Touch a word to edit or delete it. Touch the add button (+) to add a word.
Pointer speed
Touch to open a dialog where you can change the pointer speed, touch OK to confirm.
Text-to-speech output
- Preferred engine: Touch to choose a Preferred text to speech engine, touch the settings icon 📂 show more choices for each engine.
• Language: Touch to choose language preferred.
- Speech rate: Touch to open a dialog where you can select how quickly you want the synthesizer to speak.
- Pitch: Touch to set the pitch you want the synthesizer to speak.
9.12.2 Date & time
Use Date & time settings to customize your preferences for how date and time are displayed.
Automatic date & time
Touch the switch to use the network-provided date and time.
Set date
Touch to open a dialog where you can manually set the device's date.
Set time
Touch to open a dialog where you can manually set the device's time.
Select time zone
Touch to open a dialog where you can set the device's time zone.
Use 24-hour format
Touch the switch to display the time using the 24-hour clock format.
9.12.3 Backup
Touch the switch to back up your device's settings and other application data to Google servers. If you realize your device, the settings and data you've backed up will be restored only the new device for the first line you sign in with your Google account. If you mark this option: a wide variety of settings and data are backed up, including your Wi-Fi passwords, bookmarks, a list of the applications you've installed. The words you've added to the dictionary used by the omscreen keyboard, and most of the settings that you configure in the Settings application. If you unmark this option, you stop backing up your settings, and any existing backups are deleted from Google servers.
Backup account
Touch to set your backup account.
9.12.4 Reset options
Touch to reset your device.
DRM reset
Touch to delete all DRM licenses.
Reset Wi-Fi, Bluetooth
Touch to reset all network settings.
Reset app preferences
Touch to reset all preference for:
-Disabled apps
-Disabled app notifications
-Default applications for actions
-Background data restrictions for apps
-Any permission restrictions
Erase all data(factory reset)
Erase all of your personal data from internal device storage, including information about your Google account, any other accounts, your system and application settings, and any downloaded applications. Resetting the device does not erase any system software updates you've downloaded.
If you reset the device in this way, you're prompted to re-enter the same kind of information as when you first started Android.
When you are unable to power on your device, there is another way to perform a factory data reset by using hardware keys. Press the Volume up key and the Power key at same time until the screen lights up.
9.12.5 Regulatory & safety
Touch to view product information like Product model, Manufacture name/address, IMEI, Bluetooth Declaration ID, and some certification logo or text.
9.12.6 About tablet
This contains information ranging from Legal information, Model number, Firmware version, Baseband version, Kernel version, Build number to those listed below:
Status
This contains the status of the Battery status. Battery level, IP address, Wi-Fi MAC address, Bluetooth address, SN etc.
10 Upgrade
You can use the Mobile Upgrade tool or FOTA Upgrade tool to update your device's software.
10.1 Mobile Upgrade
Download Mobile Upgrade from aicatel website (www.alcatelmobile.com) and install it on your PC. Launch the tool and update your device by following the step by step instructions (refer to the User Guide provided together with the tool). Your device's software will now have the latest software.
All personal information will be permanently last following the update process. We recommend you back up your personal data using Smart Suite before upgrading.
10.2 FOTA Upgrade
Use the FOTA (Firmware Over The Air) Upgrade tool to update your device's software. To access Updates, touch the Application tab from the Home screen, then select Updates or touch Settings>System>System updates.
Touch and the device will search for the latest software. If you want to update the system, touch the button, and when that's finished, touch to complete the upgrade. Now your device will have the latest version of the software. You should turn on data connection or Wi-Fi before searching for updates. Settings for auto-check frequency are also available once you restart the device. If you have chosen auto-check, when the system discovers the new version, a dialog will pop up to choose download or ignore, the notification will also appear in status bar.
During FOTA downloading or updating, to avoid errors in locating the correct update packages, do not change your default storage location.
11 Accessories
The latest generation of sicalat mobile devices offers a built-in handsfree feature that allows you to use the teledevice from a distance, placed on a table for example. For those who prefer to keep their conversations confidential, an earplace is also available known as the headset.
-
Charger
-
USB cable

Only use the Alcatel chargers and accessories included along with your device.
12 Warranty
Your device is warranted against any defect or malfunctioning which may occur in conditions of normal use during the warranty period of twelve (12) months from the date of purchase as shown on your original invoice.
Batteries and accessories sold with your device are also warranted against any defect which may occur during the first six (6) months(1) from the date of purchase as shown on your original invoice.
In case of any defect of your device which prevents you from normal use thereof, you must immediately inform your vendor and present your device with your proof of purchase.
If the defect is confirmed, your device or part thereof will be either replaced or repaired, as appropriate. Repaired device and accessories are entitled to a one (%) month warranty for the same defect. Repair or replacement may be carried out using reconditioned components offering equivalent functionality.
This warranty covers the cost of parts and labor but excludes any other costs.
This warranty shall not apply to defects to your device and/or accessory due to (without any limitation):
- Non-compliance with the instructions for use or installation, or with technical and safety standards applicable in the geographical area where your device is used;
- Connection to any equipment not supplied or not recommended by TCL Communication Ltd.;
Modification or repair performed by individuals not authorized by TCL Communication Ltd. or its affiliates or your vendor;
- Modification, adjustment or alteration of software or hardware performed by individuals not authorized by TCL Communication Ltd.;
- Indement: weather, lightning, fire, humidity, infiltration of liquids or foods, chemical products, download of files, crash, high voltage, corrosion, oxidation...
Your device will not be repaired in case labels or serial numbers [IMH] have been removed or altered.
There are no express warranties, whether written, oral or implied, other than this
printed limited warranty or the mandatory warranty provided by your country or jurisdiction.
In no event shall TCL Communication Ltd. or any of its affiliates be liable for indirect, incidental or consequential damages of any nature whatsoever, including but not limited to commercial or financial loss or damage, loss of data or loss of image to the full extent those damages can be disclaimed by law.
Some countries/states do not allow the exclusion or limitation of indirect, incidental or consequential damages, or limitation of the duration of implied warranties, so the preceding limitations or exclusions may not apply to you.
13 Troubleshooting
Before contacting the service center, here are some instructions to help you troubleshoot your device.
• To have optimal operation, fully charge the battery.
• To improve the device's performance, remove unnecessary files or apps on your device.
- To update your system software, use the System Updates command in your device's settings.
- To set your device to factory default, use the Backup & Reset in the device's settings. All your device data will be lost permanently. It is strongly advised to fully back up your device before resetting.
My device can't be switched on
- When the device can't be switched on, charge for at least 20 minutes to ensure the minimum battery power needed. Then switch it on again.
My device has not responded for several minutes
- If your device doesn't respond, turn off your device by pressing and holding the Power key until it turns off and then restart it again.
- If your device has a removable battery, remove the battery and reinsert it, then restart the device.
My device turns off by itself
- When your device turns off by itself, make sure that the Power key is not accidentally pressed.
• Check the battery charge level.
- Check your device's settings for turning off the device at a certain time.
- If it still doesn't work, Factory reset the device via the Backup & reset in the device's Settings. Make sure you have backed up your data.
My device can't charge properly
• Make sure that you are using the proper charger that comes with the device.
- If your device has a removable battery, make sure that your battery is inserted properly and the battery terminal makes a good contact with the device. It must be inserted before plugging in the charger.
- Make sure that your battery is not completely discharged; if the battery power has been discharged for a long time, it may take around 20 minutes to display the battery charging indicator on the screen.
• Make sure that charging is carried out under normal conditions (0°C (32°F) to 40°C (104°F)).
+ When abroad, check that the voltage input is compatible.
- Check that the charging port is secured or it's not damaged.
My device can't connect to a network or "No service" is displayed
• Try connecting to the network by moving to another physical location.
• Make sure your device's setting is not in airplane mode.
- If you are away from your carrier's network, you may need to enable roaming in the device's settings to connect to other networks. Roaming charges may apply.
My device can't connect to the Internet
• Make sure that Cellular Data internet service is available in your wireless service plan.
- Check your device's settings. Make sure Cellular Data is enabled or WI-FI connected.
• Make sure that you are in a place with network coverage for cellular data or Wi-Fi Internet connection.
• Try connecting at a later time or another location.
I can't use the features described in the manual
+ Check with your carrier to make sure that your subscription includes this service.
• Make sure that this feature doesn't require any additional accessory.
I can't connect my device to my computer
• Install Smart Suite.
- Check that your USB driver is installed properly.
- Open the Notification panel to check if the Smart Suite Agent has been activated.
- Check that you have marked the USB debugging checkbox
- Check that your computer meets the requirements for Smart Suite installation.
• Make sure that you're using the right cable from the box.
I can't download new files
• Make sure that there is sufficient device storage space for your download.
- Select the microSD card as the location to store downloaded files.
• Check your subscription status with your carrier.
The device can't be detected by others via Bluetooth
• Make sure that Bluetooth is turned on and your device is visible to other users.
• Make sure that the two devices are within Bluetooth's detection range.
The battery drains too fast
• Make sure that you follow the complete charge time (minimum 135 minutes).
• After a partial charge, the battery level indicator may not be exact. Wait for at least
20 minutes after removing the charger to obtain an exact indication.
- Adjust the brightness of screen as appropriate.
- Extend the email auto-check interval for as long as possible.
- Update news and weather information on manual demand, or increase their auto-check interval.
- Exit background-running applications if they are not being used for extended periods of time.
- Deactivate Bluetooth. Wi-Fi, or GPS when not in use.
After Factory data reset is performed, I can't use my device without entering Google
account credentials
• After reset is performed, you must enter the original Google account credentials
that were used on this device.
• If you don't remember your Google account credentials, complete Google account
recovery procedures.
- If you still cannot access your device, apply to the authorized repair center, but remember that it will not be regarded as warranty case.
I forget some passwords/codes/keys on device
• Perform Factory data reset.
• If you still cannot access your device, apply to the authorized repair center, but remember that it will not be regarded as warranty case.
14 Specifications
| Processor | MT8321A/D Quad Core 1.3GHz |
| Platform | Android 8.1(GO Edition) |
| Memory | 1GB ROM + 8 GB RAM |
| Dimensions (LxWxT) | 109.5x 111 x 9.15mm |
| Weight | 245 g |
| Display | 7" 1024 X 600 TN (landazaz) |
| Network | Wi-Fi |
| Connectivity | Bluetooth V4.2Wi-Fi 2.4GHz3.5 mm audio jackmicro-USB 2.0 |
| Camera | 0.3 M15M |
| Audio supported formats | AAC LC, HE AACv1 (AAC=), HE AACv2 (enhance AAC+),AAC ELD (enhanced low delay AAC), AMR-NB, AMR-W8, FLAC, MP3, MIDI, Vorbis, PCM/WAVE |
| Video supported formats | H.263, H.264 AVC, H.265 HEVC, MPEG-4 SP, VPB, VP9 |
| Battery 3) | • Rechargeable Lithium-Ion battery• Capacity: 2580 mAh (Typical) |
| Expansion Slot | microSDTM memory card, support up to 128GB microSD card [Availability of microSD card depends on market] |
| Special Features | • G-sensor• Parental Center |
Note: Specifications are subject to change without prior notice.
y
14 The original battery has undergone rigorous safety inspections to meet qualification standards, the use of non-original batteries may be dangerous.

- TABLE OF CONTENTS
- PROTECT YOUR HEARING
- SAFETY AND USE
- TRAFFIC SAFETY
- CONDITIONS OF USE
- PRIVACY
- BATTERY
- FOR A NON-UNIBODY DEVICE
- FOR A NON-UNIBODY DEVICE WITH A NON-REMOVABLE BATTERY
- FOR A UNIBODY DEVICE
- CHARGERS
- BATTERY:LITHIUM 2580 MAH
- RADIO WAVES
- LICENSES
- MICRO
- GENERAL INFORMATION
- DISCLAIMER
- WARRANTY
- ELECTRONIC RECYCLING
- BATTERY RECYCLING
- [NON-TEXT]
- YOUR DEVICE
- RECENTS KEY
- HOME KEY
- BACK KEY
- POWER KEY
- VOLUME KEYS
- 1.2 GETTING STARTED
- 1.2.1 SET UP
- CHARGING THE BATTERY
- 1.2.2 POWER ON YOUR DEVICE
- 1.2.3 POWER OFF YOUR DEVICE
- 1.3 HOME SCREEN
- STATUS BAR
- FAVORITE TRAY APPLICATIONS
- 1.3.1 USING THE TOUCHSCREEN
- 1.3.2 STATUS BAR
- NOTIFICATION PANEL
- 1.3.3 SEARCH BAR
- QUICK SETTINGS PANEL
- SEARCH BY TEXT
- SEARCH BY VOICE
- 1.3.4 LOCK/UNLOCK YOUR SCREEN
- 1.3.5 PERSONALIZE YOUR HOME SCREEN
- ALD
- REPOSITION
- REMOVE
- CREATE FOLDERS
- WALLPAPER CUSTOMISATION
- 1.3.6 WIDGETS AND RECENTLY-USED APPLICATIONS
- CONSULT WIDGETS
- CONSULT RECENTLY-USED APPLICATIONS
- 1.3.7 VOLUME ADJUSTMENT
- USING THE VOLUME KEY
- USING THE SETTINGS MENU
- 2 TEXT INPUT
- 2.1 USING THE ONSCREEN KEYBOARD
- 2.1.1 VIRTUAL KEYBOARD
- 2.2 TEXT EDITING
- YOU CAN ALSO INSERT NEW TEXTS IF PREFERRED
- CONTACTS & GMAIL
- 3.1 CONTACTS
- 3.1.1 CONSULT YOUR CONTACTS
- 3.1.2 ADDING A CONTACT
- 3.1.3 EDITING YOUR CONTACTS
- 3.1.4 IMPORTING, EXPORTING AND SHARING CONTACTS
- 3.1.5 ACCOUNTS
- TURN ON/OFF THE AUTO-SYNC
- 3.2 GMAIL
- 3.2.1 TO ACCESS GMAIL
- 3.2.2 TO CREATE AND SEND EMAILS
- 3.2.3 TO RECEIVE AND READ YOUR EMAILS
- 3.21 TO
- 3.2.4 TO REPLY OR FORWARD EMAILS
- 3.2.5 MANAGING GMAILS BY LABELS
- 3.2.6 GMAIL SETTINGS
- 4 CALENDAR & CLOCK & CALCULATOR
- 4.1 CALENDAR
- 4.1.1 MULTIMODE VIEW
- 4.1.2 TO CREATE NEW EVENTS
- 4.1.3 TO DELETE OR EDIT AN EVENT
- 4.1.4 EVENT REMINDER
- 4.2 CLOCK
- 4.2.1 WORLD CLOCK
- 4.2.2 ALARM
- 4.2.3 COUNTDOWN
- 4.2.4 TIMER
- 4.2.5 ADJUST CLOCK SETTINGS
- 4.3 CALCULATOR
- 5 GETTING CONNECTED
- 5.1 CONNECTING TO THE INTERNET
- 5.1.1 WI-FI
- TO FORGET A WI-FI NETWORK
- 5.2 CHROME
- TO GO TO A WEB PAGE
- TO SET A HOMEPAGE
- VIEWING WEB PAGES
- TO FIND TEXT ON A WEB PAGE
- FURTHER OPERATIONS FOR THE TEXT ON A WEB PAGE
- OTHER OPTIONS
- 5.2.1 MANAGE LINKS, HISTORY, DOWNLOADS
- 5.3 CONNECTING TO BLUETOOTH DEVICES [4]
- TO TURN ON BLUETOOTH
- TO PAIR/CONNECT YOUR DEVICE WITH A BLUETOOTH DEVICE
- TO DISCONNECT/UNPAIR FROM A BLUETOOTH DEVICE
- 5.4 CONNECTING TO A COMPUTER
- TO CONNECT YOUR DEVICE TO THE COMPUTER
- 5.5 SHARING YOUR DEVICE'S WI-FI CONNECTION
- TO SHARE YOUR DEVICE'S DATA CONNECTION VIA BLUETOOTH
- 5.6 CONNECTING TO VIRTUAL PRIVATE NETWORKS
- TO ADD A VPN
- 6 MULTIMEDIA APPLICATIONS
- 6.1 CAMERA/CAMCORDER
- TO TAKE A PICTURE
- TO SHOOT A VIDEO
- 6.1.1 MODES AND SETTINGS
- SETTINGS
- 6.2 PHOTOS
- WORKING WITH PICTURES
- BATCH OPERATION
- 7 OTHERS
- 7.1 FILE MANAGER
- 7.2 OTHER APPLICATIONS [5]
- 8
- GOOGLE APPLICATIONS
- 8.1 GMAIL
- 8.2 MAPS GO
- 8.3 YOUTUBE
- 8.4 PLAY STORE
- 8.5 PLAY MUSIC
- 9.1 NETWORK & INTERNET
- 9.1.1 WI-FI
- 9.1.2 TETHERING
- 9.1.3 VPN
- 9.2 CONNECTED DEVICES
- 9.3 APPS & NOTIFICATIONS
- 9.4 BATTERY
- 9.5 DISPLAY
- MIRAVISION TM
- BRIGHTNESS LEVEL
- EYE CARE
- WALLPAPER
- SLEEP
- AUTO-ROTATE SCREEN
- FONT SIZE
- DISPLAY SIZE
- DOUBLE TAP SCREEN
- 9.6 SOUND
- 9.7 STORAGE
- 9.8 SECURITY & LOCATION
- SECURITY STATUS
- FIND MY DEVICE
- SECURITY UPDATE
- 5SCREEN LOCK
- LOCK SCREEN PREFERENCES
- SMART LOCK
- LOCATION
- ON
- MODE
- ENCRYPT & CREDENTIALS
- 9.9 USER & ACCOUNTS
- 9.10 ACCESSIBILITY
- 9.11 GOOGLE
- 9.12 SYSTEM
- PHYSICAL KEYBOARD
- SPELL CHECKER
- AUTO-FILL SERVICE
- PERSONAL DICTIONARY
- POINTER SPEED
- TEXT-TO-SPEECH OUTPUT
- 9.12.2 DATE & TIME
- AUTOMATIC DATE & TIME
- SET DATE
- SET TIME
- SELECT TIME ZONE
- USE 24-HOUR FORMAT
- 9.12.3 BACKUP
- BACKUP ACCOUNT
- 9.12.4 RESET OPTIONS
- DRM RESET
- RESET WI-FI, BLUETOOTH
- RESET APP PREFERENCES
- 9.12.5 REGULATORY & SAFETY
- 9.12.6 ABOUT TABLET
- 10 UPGRADE
- 10.1 MOBILE UPGRADE
- 10.2 FOTA UPGRADE
- 11 ACCESSORIES
- 12 WARRANTY
- 13 TROUBLESHOOTING
- MY DEVICE CAN'T CONNECT TO A NETWORK OR "NO SERVICE" IS DISPLAYED
- MY DEVICE CAN'T CONNECT TO THE INTERNET
- I CAN'T USE THE FEATURES DESCRIBED IN THE MANUAL
- I CAN'T CONNECT MY DEVICE TO MY COMPUTER
- I CAN'T DOWNLOAD NEW FILES
- THE DEVICE CAN'T BE DETECTED BY OTHERS VIA BLUETOOTH
- THE BATTERY DRAINS TOO FAST
- AFTER FACTORY DATA RESET IS PERFORMED, I CAN'T USE MY DEVICE WITHOUT ENTERING GOOGLE
- ACCOUNT CREDENTIALS
- I FORGET SOME PASSWORDS/CODES/KEYS ON DEVICE
- 14 SPECIFICATIONS
Brand : ALCATEL
Model : 1T7 Family
Category : Tablet