TDW12X - Dishwasher Tisira - Free user manual and instructions
Find the device manual for free TDW12X Tisira in PDF.


| Product Type | Freestanding Dishwasher |
| Brand | Tisira |
| Model | TDW12X |
| Place Settings | 12 |
| Dimensions (W x H x D) | 60 cm x 85 cm x 60 cm |
| Weight | 45 kg |
| Power Supply | 220-240 V, 50 Hz, 10 A |
| Power Consumption | 1900 W |
| Energy Efficiency Class | A |
| Noise Level | 44 dB |
| Wash Programs | Eco, Intensive, Normal, Quick, Glass, Pre-Wash |
| Delay Start | Up to 24 hours |
| Water Consumption | 12 L per cycle (Eco program) |
| Drying System | Condensation drying |
| Control Panel | Electronic push buttons with LED display |
| Interior Material | Stainless steel |
| Cutlery Basket | Yes, removable |
| Rinse Aid Dispenser | Yes, adjustable |
| Salt Dispenser | Yes, for water softener |
| Safety Features | Child lock, anti-flood system, leak protection |
| Maintenance | Clean filter regularly, check spray arms, clean door seals |
| Spare Parts Availability | Yes, through authorized service centers |
| Repair Index | 7.5 / 10 (estimated) |
| User Manual Languages | English, French, Dutch, German, Italian, Spanish |
Frequently Asked Questions - TDW12X Tisira
User questions about TDW12X Tisira
0 question about this device. Answer the ones you know or ask your own.
Ask a new question about this device
Download the instructions for your Dishwasher in PDF format for free! Find your manual TDW12X - Tisira and take your electronic device back in hand. On this page are published all the documents necessary for the use of your device. TDW12X by Tisira.
USER MANUAL TDW12X Tisira
IMPORTANT // Please ensure that you read through this user manual prior to installation and use. This manual contains important information to ensure optimal performance and keep you safe. Please retain your proof of purchase, as this will be required in the event that you require warranty service. Remember to retain this manual for future reference.
HELLO
CONGRATULATIONS ON THE SELECTION OF THIS TISIRA APPLIANCE. TISIRA APPLIANCES HAVE BEEN SPECIFICALLY DESIGNED FOR AUSTRALIAN AND NEW ZEALAND KITCHENS.
Please read through this user manual carefully as it contains information that will ensure that your appliance is installed correctly, important operating & care instructions and also some advice of what you need to do if this appliance is not performing as intended.
CONTENTS
HELLO 2
CONTENTS 3
WARNINGS 4
PRODUCT OVERVIEW 5-6
OPERATING INSTRUCTIONS 7-15
MAINTENANCE 16-17
INSTALLATION 18-19
TROUBLESHOOTING 20-21
PRODUCT SPECIFICATIONS 22
NOTES 23
CONTACT DETAILS 67
WARNINGS
IMPORTANT // To get the best performance from your dishwasher, read all operating instructions before using it for the first time.
SAFETY INFORMATION
WARNING // HYDROGEN GAS IS EXPLOSIVE Under certain conditions, Hydrogen gas may be produced in a hot water system that has not been used for two weeks or more. If the hot water system has not been used for such a period, before using the dishwasher turn on all hot water faucets and let the water flow from each for several minutes. This will release any accumulated hydrogen gas. As the gas is flammable, do not smoke or use an open flame during this time.
DO NOT USE OR STORE FLAMMABLE MATERIALS IN THE APPLIANCE STORAGE DRAWER OR NEAR THIS APPLIANCE
●DO NOT SPRAY AEROSOLS IN THE VICINITY OF THIS APPLIANCE WHILE IT IS IN OPERATION
●Young children should be supervised to ensure that they do not play with the appliance.
●The door should not be left in the open position since this could present a tripping hazard.
This appliance is not intended for use by persons (including children) with reduced physical, sensory or mental capabilities, or lack of experience and knowledge, unless they have been given supervision or instruction concerning use of the appliance by a person responsible for their safety.
- If the supply cord is damaged, it must be replaced by the manufacturer or its service agent or a similarly qualified person in order to avoid a hazard.
PRODUCT OVERVIEW
CONTROL PANEL
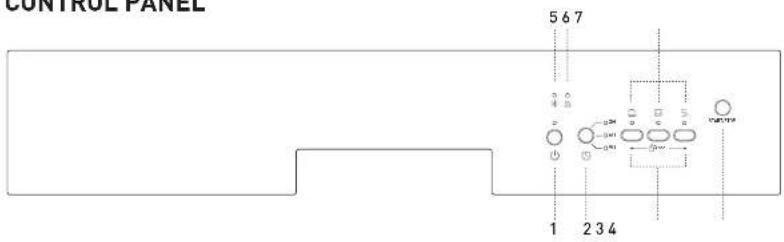
- Power switch: To turn on/off the power supply.
- Delay button: The delay start can be set for 3 different periods: 3, 6 or 9 hours.
-
Child Lock & Unlock: To lock and unlock the dishwasher controls, press and
-
Start/Pause Button: Press this button to start or pause washing cycle
- Rinse aid refill indicator: The indicator lights up when dispenser needs to be refilled.
- Drying indicator: the light comes on
PRODUCT OVERVIEW
DISHWASHER FEATURES

OPERATING INSTRUCTIONS
ATTENTION // Before using your dishwasher for the first time, please make sure that you read the following sections:
A. Fill the rinse aid dispenser B. Fill the detergent dispenser
A. FILL THE RINSE AID DISPENSER
FUNCTION OF RINSE AID
The rinse aid is automatically released during the last rinse in order to prevent water from forming droplets on your dishes that can leave spots and streaks.
ATTENTION // Only use branded rinse aid in the dishwasher.
Never fill the rinse aid dispenser with any other substances (e.g. dishwasher cleaning agent, liquid detergent). This would damage the appliance.
The rinse aid dispenser is located inside the door next to the detergent dispenser.
To fill the dispenser, open the cap and pour the rinse aid into the dispenser until the level indicator turns completely black. The volume of the rinse aid container is about 140ml.
Be careful not to overfill the dispenser, because this could cause over sudsing. Wipe away any
OPERATING INSTRUCTIONS
WHEN TO REFILL THE RINSE AID DISPENSER
You can judge the amount of rinse-aid by the colour of the optical level indicator "D" located next to the cap. When the rinse-aid container is full, the whole indicator will be dark. As the rinse aid diminishes, the size of the dark dot decreases.

IMPORTANT // You should never let the
If spots and poor drying are problems, increase the amount of rinse aid dispensed by removing the dispenser lid and rotating the dial to "5". If the dishes still are not drying properly or are spotted, adjust the dial to the next higher number until your dishes are spot-free. The dose is factory set in position 5.
NOTE // Increase the dose if there are drops of water or lime spots on the dishes after washing. Reduce it if there are sticky whitish streaks on the dishes or a bluish film on glassware or knife blades.
B. FILL THE DETERGENT DISPENSER
Detergents with its chemical ingredients are necessary to remove dirt, crush dirt and
OPERATING INSTRUCTIONS
achieve the same results that can otherwise only be achieved using "intensive" programme.
DETERGENT TABLETS
Detergent tablets of different brands dissolve at different speeds. For this reason some detergent cannot dissolve and develop their full cleaning power during short programmes. Therefore please use long programmes when using detergent tablets, to ensure the complete removal of detergent residuals.
DETERGENT DISPENSER
The dispenser must be refilled before the start of each washing cycle following the instructions provided in the "Washing Cycle Table". Your dishwashers use less detergent and rinse aid than conventional dishwashers. Generally, only one tablespoon of detergent
starting the dishwasher, otherwise the tablet can get damp and it will not dissolve properly.
- If the lid is closed: press release button. The lid springs open.
- Always add the detergent just before starting each washing cycle. Only use branded detergent aid for dishwasher.
WARNING//Dishwasher detergent is corrosive! Take care to keep it out of reach of children. Use only detergent specifically made for use in dishwashers. Keep your detergent fresh and dry. Do not put powder detergent into the dispenser until you're ready to wash the dishes.
FILL IN THE DETERGENT
1 2
OPERATING INSTRUCTIONS
If the dishes are heavily soiled, place an additional detergent dose in the pre-wash detergent chamber. This detergent will take effect during the pre-wash phase.
NOTICE // Information about the amount of detergent to be used for each type of programme can be found on the Washing Cycle Table in the "Starting a washing programme" section.
Please be aware that according to the level of soiling and the specific hardness of water, differences are possible. Please observe the manufacturer's recommendations on the detergent packaging.
DETERGENTS
There are 3 sorts of detergents:
- With phosphate and with chlorine
USE OF "3 IN 1" DETERGENT TABLETS
GENERAL ADVICE
- Before using these type of detergents, you should first read the manufacturer instructions to check if their tablets are compatible to the water hardness of your water supply.
- These products should be strictly used according to the detergent manufacturers instructions.
- If you encounter problems when using "3 in 1" products for the first time then please contact the detergent manufacturers care line (the telephone number is given on the product packaging). These products are

OPERATING INSTRUCTIONS
LOADING THE DISHWASHER BASKETS
NOTE// Features and appearances of baskets and cutlery tray may vary from your model.
ATTENTION // Before or after loading the dishwasher baskets, scrape off any large amounts of leftover food.
Place objects in the dishwasher in the following way:
- Items such as cups, glasses, pots/pans, etc. are placed upside down.
●Curve items, or those with recesses, should be at a slant so that water can run off.
●They are stacked securely and can not tip over
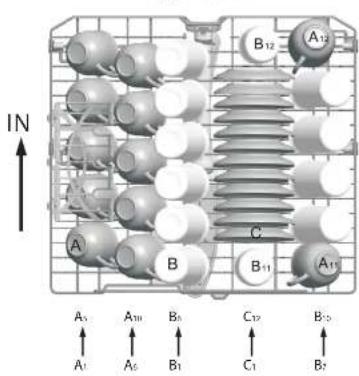
| UPPER BASKET |
| Type Item |
OPERATING INSTRUCTIONS
LOADING THE LOWER BASKET
We recommend that you place large items which are most difficult to clean in to the lower basket: pots, pans, lids, serving dishes and bowls, as shown in the figure below.
It is preferable to place serving dishes and lids on the side of the baskets in order to avoid blocking the rotation of the top spray arm. Pots, serving bowls, etc. must always be placed top down.
Deep pots should be slanted to allow water to flow out.
The bottom basket features fold down tine rows so that larger or more pots and pans can be loaded.
CUTLERY BASKET
Arrange the cutlery in the tray as shown.
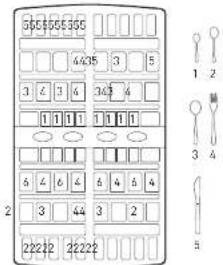
| CUTLERY BASKET | |
| Type Item | |
| 17 |
OPERATING INSTRUCTIONS
LOADING CUTLERY & DISHES
Before loading the dishes you should remove large left-over food scraps and soften remnants of burnt food in pans.
The following items are not suitable for washing in the dishwasher:
● Cutlery with wooden or mother-of-pearl handles
- Plastic items that are not heat resistant
●Older cutlery with glued parts that is not temperature resistant
Bonded cutlery items or dishes
Pewter or copper items
Lead crystal glass
Steel items subject to rusting
standard dishes. This is important for good results and for reasonable energy consumption.
AT THE END OF THE WASH
When the working cycle has finished, the buzzer of dishwasher will ring 6 times, then stop. Turn off the appliance using the "Power" button and open the door of the dishwasher. Wait a few minutes before unloading the dishwasher to avoid handling the dishes and utensils while they are still hot and more susceptible to breakage. They will also dry better.
REMOVING THE DISHES
OPERATING INSTRUCTIONS
SELECT A PROGRAMME
Choose your programme according to the type of load and how dirty it is.
The different programmes and their uses are described in the "washing cycle table" (see page 15). Use the programme selector to select the expected programme.
CHANGE THE PROGRAMME.
A cycle that is underway can only be modified if it has only been running for a short time.
Otherwise, the detergent may have already been released, and the appliance may have already drained the wash water. If this is the case, the detergent dispenser must be refilled (see the section entitled "Filling the Detergent").
NOTE // If all the lights begin to glimmer, that indicates the machine is out of order, please turn off the main power and water supply before calling a service.
FORGET TO ADD A DISH
A forgotten dish can be added any time before the detergent cup opens.
- Open the door a little to stop the washing.
- After the spray arms stop working, you can open the door completely.
- Add forgotten dishes.
- Close the door, the dishwasher will work after ten seconds.
WARNING // It is dangerous to open the door when washing, because the hot water
OPERATING INSTRUCTIONS
WASHING CYCLE TABLE
| Program Cycle Selection Information Description of Cycle | Detergent Pre/Main | Running Time (min) | Energy (kWh) | Water (L) | ||
 Intensive Intensive | For the heaviest soiled loads, such as pots, pans, casserole dishes and dishes that have been sitting with dried food on them for a while. | Pre-wash(40°C)Main wash(55°C)Rinse 1Rinse 2Hot rinse(65°C)Drying | 5/25g 145 | 1.20 15.5 | ||
 Normal Normal | For normally soiled loads, such as pots, plates, glasses and lightly soiled pans. standard daily cycle. | Main wash(45°C)RinseHot rinse(50°C)Drying | 5/25g 112 | 0.73 11.8 | ||
 | A shorter wash for lightly | Main wash(40°C) | ||||
MAINTENANCE
FILTERING SYSTEM
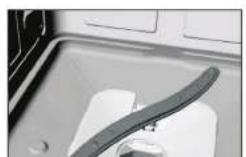
The filter is used to avoid the big remnants and other sundries getting inside the pump. Sometimes, an extra deposit of residues can obstruct the water flow.
The filter system consists of a coarse filter, a flat (Main filter) and a micro filter (fine filter).

- Flat filter - Food and debris will be
STEP 1 // Rotate the coarse filter anticlockwise, filter, and then lift it up;

STEP 2 // lift the flat filter up
MAINTENANCE
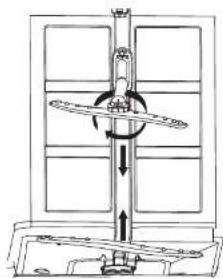
CLEANING THE SPRAY ARMS
It is necessary to clean the spray arms regularly to ensure efficient operation of the spray arm jets and bearings.
To remove the spray arms, screw off the nut clockwise to take out the washer on top of the spray arm and remove the arm. Wash the arms in warm soapy water and
REMOVE THE PLUG
Before cleaning or performing maintenance, always remove the plug from the socket.
WHEN YOU GO ON HOLIDAY
When you go on holiday, it is recommended that you run a wash cycle with the dishwasher empty and then remove the plug from the socket, turn off the water supply and leave the door of the appliance slightly ajar. This will help the seals last longer and prevent odours from forming in the appliance.
TO REMOVE SPOTS FROM GLASSWARE:
- Take out all metal utensils out of the dishwasher.
- Do not add detergent.
- Choose the longest cycle.
- Start the dishwasher and allow it to run for about 18 to 22 minutes, then it will be
INSTALLATION
WARNING // Disconnect electrical power before installing the dishwasher. Failure to do so can result in death or electrical shock.
POSITIONING AND LEVELLING
- Remove the appliance from all packaging and check that it has not been damaged during transportation. If it has been damaged, contact the retailer and do not proceed any further with the installation process.
- Check the dishwasher by placing it so that its sides or back panel are in contact with the adjacent cabinets or even with the wall. This appliance can also be recessed under a single work top.
- Position the dishwasher on a level and sturdy floor. If the floor is uneven, the front feet of the appliance may be adjusted until it reaches a horizontal position. If the appliance is levelled correctly, it will be more stable and much
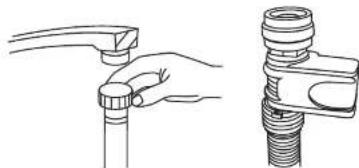
CONNECTING THE WATER INLET HOSE*
Connect the cold water supply hose to a threaded 3/4 inch connector and make sure that it is fastened tightly in place.
If the water pipes are new or have not been used for an extended period of time, let the water run to make sure that the water is clear and free of impurities. If this precaution is not taken, there is a risk that the water inlet can get blocked and the appliance could be damaged.
INSTALLATION
ELECTRICAL CONNECTION
NOTICE // During installation, the power supply must not be excessively or dangerously bent or flattened.
Before inserting the plug into the electrical socket, make sure that:
the socket is earthed and complies with current regulations;
●the socket can withstand the maximum load of the appliance, which is indicated on the data plate located on the inside of the door(see description of the appliance);
●the power supply voltage falls within the values indicated on the data plate on the inside of the door;
the socket is compatible with the plug of the appliance. If this is not the case, ask an authorised technician to replace the plug (seek assistance); do not use extension cables or multiple sockets.
Once the appliance has been installed

SYPHON CONNECTION
The waste connection must be at a height of between 50cm (minimum) and 100cm (maximum) from the bottom of the dish. The water drain hose should be fixed by a hose clip.
STARTING YOUR DISHWASHER
The followings should be checked before starting the dishwasher:
- Whether the dishwasher is level and fixed
TROUBLESHOOTING
ERROR CODES
When some malfunctions happen, the appliance will display error codes to warn you.
| CODES MEANINGS POSSIBLE CAUSES | ||
| LED1 LED2 flashing | Door open The door is opened when the dishwasher is operating | |
| LED1 LED5 flashing | Water inlet Water inlet malfunction | |
| LED1 LED4 flashing | Water drainage Water drainage malfunction | |
| LED2 LED3 flashing | Temperature sensor Temperature sensor malfunction | |
| LED2 LED4 flashing | Overflow/leakage Overflow occurs/Water leakage occurs | |
| LED3 LED4 flashing | Water leakage Water leakage occurs | |
| LED3 LED5 flashing | Heating element Abnormal heating | |
BEFORE CALLING CUSTOMER SERVICE
Reviewing the charts on the following pages to help you resolve the problem without having to call for service.

TROUBLESHOOTING
| PROBLEM POSSIBLE CAUSES WHAT TO DO | ||
| Suds in the tub | Improper detergent Use only the special dishwasher detergent to avoid suds. If this occurs, open the dishwasher and let suds evaporate.Add 1 gallon of cold water to the tub. Close and latch the dishwasher, then start the "soak" wash cycle to drain out the water... Repeat if necessary. | |
| Spilled rinse agent Always wipe up rinse agent spills immediately. | ||
| Dishes and flatware not clean | Improper programImproper basket loading | Select a stronger programmeMake sure that the action of the detergent dispenser and spray arms are not blocked by large dishware. |
| Cloudiness on glassware | Combination of soft water and too much detergent | Use less detergent if you have soft water and select a shortest cycle to wash the glassware and to get them clean. |
| Yellow or brown film on inside surfaces | Tea or coffee stains Using a solution of 1/2 cup of bleach and 3 cups of warm water to remove the stains by hand.WARNING // You have to wait for 20 minutes after a cycle to let the heating elements cool down before cleaning interior; otherwise, burns will happen. | |
| Iron deposits in water can cause an overall film | You have to call a water softener company for a special filter. | |
White Glue on inside | Hard motor minerals To along the interior was a down source with
PRODUCT SPECIFICATIONS
| W x D x H | 600mm x 600mm x 845mm |
| Voltage connected load: | 220 - 240V- 50Hz |
| Water pressure: | 0.04-1.0MPa |
| Power supply: | 1850W |
| Capacity: | 12 Place settings |
| Hot water connection: | Max 60°C |
PROOF OF PURCHASE
ATTACH YOUR PROOF OF PURCHASE FOR FUTURE REFERENCE
CONTACT DETAILS
AUSTRALIA
ARISIT PTY LIMITED
40-44 Mark Anthony Drive, Dandenong South, VIC 3175 Australia
P // 1300 762 219
F//03 9768 0838
consumer.care@arisit.com
NEW ZEALAND
ARISIT PTY LIMITED
PD Box 68-140
Newton, Auckland 1145, New Zealand
P // 09 306 1020
F//093020077
sales@aristonappliances.co.nz
TSRA IS COMMITTED TO ONSINO RESEARCH AND DEVELOPMENT, EVERY EFFORT HAS BEEN MADE TO ENGLIRE ALL INFORMATION IN THIS USER MANUAL IS CORRECT AT TIME OF GOINS TO PRINT. DIMENSIONS SHOULD BE USED AS A REFERENCE ONLY AND ACTUAL DIMENSIONS SHOULD BE TAKEN FROM THE PHYSICAL PRODUCT ONLY.
MANUFACTURER RESERVES THE RIGHT TO CHANGE SPECIFICATIONS WITHOUT NOTICE.
- HELLO
- CONTENTS
- WARNINGS
- SAFETY INFORMATION
- PRODUCT OVERVIEW
- OPERATING INSTRUCTIONS
- WHEN TO REFILL THE RINSE AID DISPENSER
- FILL THE DETERGENT DISPENSER
- DETERGENT TABLETS
- DETERGENT DISPENSER
- DETERGENTS
- USE OF "3 IN 1" DETERGENT TABLETS
- GENERAL ADVICE
- LOADING THE DISHWASHER BASKETS
- LOADING THE LOWER BASKET
- CUTLERY BASKET
- LOADING CUTLERY & DISHES
- AT THE END OF THE WASH
- REMOVING THE DISHES
- SELECT A PROGRAMME
- CHANGE THE PROGRAMME
- FORGET TO ADD A DISH
- MAINTENANCE
- FILTERING SYSTEM
- CLEANING THE SPRAY ARMS
- REMOVE THE PLUG
- WHEN YOU GO ON HOLIDAY
- TO REMOVE SPOTS FROM GLASSWARE
- INSTALLATION
- POSITIONING AND LEVELLING
- CONNECTING THE WATER INLET HOSE
- ELECTRICAL CONNECTION
- SYPHON CONNECTION
- STARTING YOUR DISHWASHER
- TROUBLESHOOTING
- ERROR CODES
- BEFORE CALLING CUSTOMER SERVICE
- PRODUCT SPECIFICATIONS
- PROOF OF PURCHASE
- CONTACT DETAILS
- ARISIT PTY LIMITED
Brand : Tisira
Model : TDW12X
Category : Dishwasher