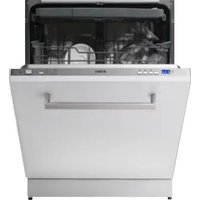
TDW9AX - Dishwasher Tisira - Free user manual and instructions
Find the device manual for free TDW9AX Tisira in PDF.


| Type | Dishwasher |
| Brand | Tisira |
| Model | TDW9AX |
| Place Settings | 9 |
| Dimensions (H x W x D) | 845 x 448 x 600 mm (approx.) |
| Weight | Approx. 35 kg |
| Power Supply | 220-240 V, 50 Hz, 10 A |
| Energy Consumption (ECO) | 0.71 kWh/cycle |
| Water Consumption (ECO) | 11.2 L/cycle |
| Number of Programs | 5 |
| Programs | Intensive, ECO, 90min, Rapid, Soak |
| Extra Dry Function | Yes |
| Rinse Aid Dispenser Capacity | 110 mL |
| Filter System | 3-part self-cleaning filter |
| Control Type | Electronic push buttons |
| Installation Type | Built-in or freestanding |
| Safety Features | Grounding, child lock, overflow protection |
Frequently Asked Questions - TDW9AX Tisira
User questions about TDW9AX Tisira
0 question about this device. Answer the ones you know or ask your own.
Ask a new question about this device
Download the instructions for your Dishwasher in PDF format for free! Find your manual TDW9AX - Tisira and take your electronic device back in hand. On this page are published all the documents necessary for the use of your device. TDW9AX by Tisira.
USER MANUAL TDW9AX Tisira
IMPORTANT // Please ensure that you read through this user manual prior to installation and use. This manual contains important information to ensure optimal performance and keep you safe. Please retain your proof of purchase, as this will be required in the event that you require warranty service. Remember to keep this manual for future reference
Hello
CONGRATULATIONS ON THE SELECTION OF THIS TISIRA APPLIANCE. TISIRA APPLIANCES HAVE BEEN SPECIFICALLY DESIGNED FOR AUSTRALIAN AND NEW ZEALAND KITCHENS.
Please read through this user manual carefully as it contains information that will ensure that your appliance is installed correctly, important operating & care instructions and also some advice of what you need to do if this appliance is not performing as intended.
Contents
Hello
2
Contents 3
Warning & Safety Instructions 4-5
Product Overview 6
Operating Instructions 7-18
Maintenance and Cleaning 19-21
Installation 22-24
Troubleshooting 25-28
Notes 29
Contact Details 32
Warning & Safety Instructions
IMPORTANT // To ensure best performance, avoid risk of damage or accidents. Please read the operating instructions prior to first time use.
Grounding Instructions
- This appliance must be grounded. In the event of a malfunction or breakdown, grounding will reduce the risk of an electric shock by providing a path of least resistance of electric current. This appliance is equipped with a cord having an equipment grounding conductor and a grounding plug.
IMPORTANT // Check with a qualified electrician or service representative if you are in doubt whether the appliance is properly grounded.
- The plug must be plugged into an appropriate outlet that is installed and grounded in accordance with all local codes and ordinances.
- DO NOT modify the plug provided with the appliance: If it does not fit the outlet, have
- This appliance is not suitable for outdoor use.
- Open the door very carefully if the dishwasher is running to avoid the risk of water leaking.
- Do not stand or place heavy objects on the door when open as this will cause the dishwasher to tip forward.
- Do not touch the heating element during or immediately after use.
- Dishes can be very hot immediately upon completion of a cycle.
- Only use detergent and rinse aid specifically designed for an automatic dishwasher. Never use soap, laundry detergent or hand soap in your dishwasher.
Warning & Safety Instructions
Safety with Children
- Young Children should not use this appliance.
• Children should be supervised to avoid the risk of locking themselves in the dishwasher. - Dishwasher detergents are strongly alkaline. They can be extremely dangerous if swallowed. Avoid contact with the skin and eyes, and keep children away from the dishwasher when the door is open. Check that the detergent receptacle is empty after completion of the wash cycle.
- Consult a doctor immediately if your child has swallowed or inhaled detergent.
Technical Safety Instructions
- Before installation, check for visible signs of damage. Under no circumstance should you use a damaged dishwasher.
- There must be no electrical socket behind the dishwasher as this can cause danger of overheating and fire risk if the dishwasher were to be pushed against a plug.
- The dishwasher must not be installed underneath a cooktop or next to an oven. High temperatures can cause damage to the Dishwasher.
- Unauthorised repairs could result in unforeseen danger for the user, repairs should only be undertaken by approved service technicians.
• In areas, which may be subject to infestation by cockroaches or other vermin, pay particular attention to keeping the surroundings clean. Any damage caused by vermin will not be covered by warranty.
Product Overview
Control Panel
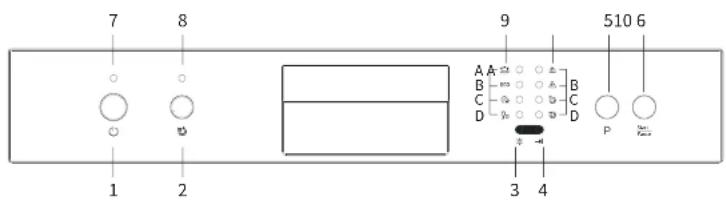
- Power button: To turn the power supply on/off
- Extra Dry Function Button: To activate the extra dry function
- Rinse Aid re-fill indicator: To indicate when the rinse aid dispenser needs to be refilled.
- Cycle Finish – To indicate the end of a cycle
- Program button: To select a wash program
-
Start/Pause Button: To start the selected washing program or pause a washing
-
Power Indicator: To indicate the on/off status of the dishwasher
- Extra Dry Indicator: To indicate whether the extra dry function is in use
- Program Indicator: To indicate which wash program is in use
A. Intensive C. 90mins
B. ECO D. Rapid
- Washing Step Indicator: To indicate which step the washing program is currently functioning
A. Pre-wash C. Rinse
D. W. L. D. Dwing
Operating Instructions
IMPORTANT // Before using your dishwasher for the first time, please read through these instructions as they contain important information on how to operate your appliance correctly.
Dishwasher check
Before operating the dishwasher, the following should be checked:
- The dishwasher is level and fixed properly
• The inlet valve is open - There is a leakage at the connections of the conducts
- The wires are tightly connected
• The power is switched on
• The inlet and drain hoses are knotted - All packing materials and printings should be taken out from the dishwasher
NOTE // Very small items should not be washed in the dishwasher as they can easily fall out of the baskets.
- Items such as cups, glasses, pots, pans, etc. should be placed upside down.
- Curved items, or those with recesses, should be at a slant so that water can run off.
• Make sure items are securely positioned and cannot tip over. - Make sure items will not block the rotation of the spray arms.
- To avoid damage to glasses, ensure they are not touching other items in the dishwasher.
Loading the Dishwasher Baskets
Operating Instructions
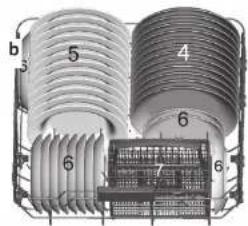
Upper Basket - 12 place model
The upper basket is designed to hold more delicate and lighter dishware, such as glasses, teacups, saucers, as well as plates, small bowls and shallow pans.

The height of the upper basket can be adjusted in order to create more space for larger utensils, both for the upper and lower baskets. The height can be adjusted by re-
Long items such as serving cutlery, salad serves and knives should be placed on the cup shelf so that they do not obstruct the rotation of the spray arms.
Lower Basket - 12 place model
The lower basket is designed to hold larger items, which are most difficult to clean, such as pots, pans, lids, serving dishes and bowls.
Operating Instructions
Folding Racks and Cup shelves 12 place model
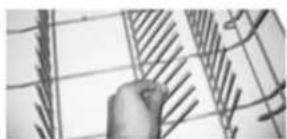
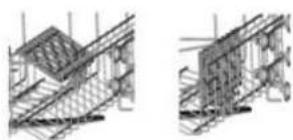
The folding racks (spike rows) of the lower basket (a) and the cup shelves (b) can be folded
natural_image
Hand holding a grid of metal rods or wires against a white background (no text or symbols visible)in to allow more room for larger items.
(a) Folding Racks
natural_image
Architectural line drawings of two structural steel beams (no text or symbols)(b) Folding sun cholvoc
The previous image provides suggestions of how to arrange the cutlery on the basket.
| Type Item | |
| 1 Forks | |
| 2 Soup spoons | |
| 3 Dessert spoons | |
| 4 Teaspoons | |
| 5 Knives |
- Cutlery such as forks and spoons should be placed in the cutlery basket with the handles facing downwards
- Long utensils should be placed in the horizontal position at the front of the upper basket, as shown in the image.
WARNING // Always load sharp utensils such
Operating Instructions
Upper Basket - 9 place model
The upper basket is designed to hold more delicate and lighter dishware, such as glasses, teacups, saucers, as well as plates, small bowls and shallow pans.
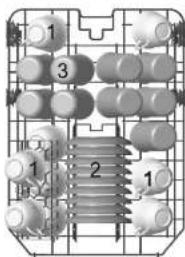
The height of the upper basket can be adjusted in order to create more space for larger utensils, both for the upper and lower baskets. The height can be adjusted by re-
cup shelf so that they do not obstruct the rotation of the spray arms.
Lower Basket - 9 place model
The lower basket is designed to hold larger items, which are most difficult to clean, such as pots, pans, lids, serving dishes and bowls.
It is preferable to place serving dishes and lids on the side of the racks in order to avoid
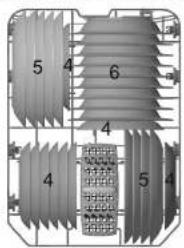
Operating Instructions
Folding Racks and Cup shelves 9 place model
The folding racks (spike rows) of the lower basket (a) and the cup shelves (b) can be folded
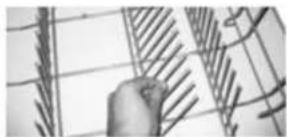
natural_image
Hand holding a grid with diagonal lines and shaded cells, no visible text or symbolsin to allow more room for larger items, (a) Folding Racks

natural_image
Two technical line drawings of structural steel beams and columns, no text or symbols present(b) Folding cup shelves
The previous image provides suggestions of how to arrange the cutlery on the basket.
| Type Item | |
| 1 Soup spoons | |
| 2 Forks | |
| 3 Knives | |
| 4 Teaspoons | |
| 5 Dessert spoons | |
- Cutlery such as forks and spoons should be placed in the cutlery basket with the handles facing downwards
- Long utensils should be placed in the horizontal position at the front of the upper basket, as shown in the image.
WARNING // Always load sharp utensils such as knives with the handle facing upwards.
Operating Instructions
Filling the Detergent Dispenser
Detergents are necessary to ensure clean crockery and cutlery as they work to remove dirt. Most of the available dishwasher detergents will fulfil this purpose.
The washing programs of your dishwasher were specially designed to work in conjunction with concentrated detergents or detergents tablets. Using these types of detergent will allow you to achieve excellent results by simply using the "ECO" (standard) washing program.
NOTE // Detergent tablets of different brands dissolve at different rates, for that reason some detergents cannot dissolve and develop their full cleaning power during short programs. Therefore, please use long programs when using detergent tablets to ensure the complete removal of residuals.
Detergents
Detergents without chlorine don't have a full bleaching capacity. Strong and coloured stains will not be removed completely. In this case, please choose a program with a higher temperature setting.
Concentrated detergent
Based on their chemical composition, detergents can be split in two basic types:
- Conventional, alkaline detergents with caustic components
- Low alkaline concentrated detergents with natural enzymes
The use of normal washing programs in combination with concentrated detergents reduces pollution and is good for your dishes; these wash programs are specifically matched to the dirt-dissolving properties of the enzymes on the concentrated detergent. For this reason normal wash programs in which concentrated detergents are used can
Operating Instructions
Detergent Dispenser
The dispenser must be refilled before the start of each washing cycle. The “Washing Cycle Table” on page 14 provides the amount of detergent required for each washing program.
NOTE // Your dishwasher uses less detergent and rinse aid than conventional dishwashers. Generally, only one tablespoon of detergent is needed for a normal wash load.
NOTE // Always fill the detergent dispenser just before starting a washing cycle to avoid the tablet from getting damp and may impede it from dissolving properly.
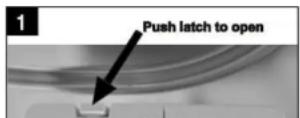
- If the lid is closed: push the latch to open the lid.
- Fill the detergent dispenser according to the detergent amount suggested on the "Washing Cycle Table" on page 14 just before starting each washing cycle.
NOTE // Please observe the manufacturers dosing and storage recommendations as stated on the detergent packaging.
Operating Instructions
Filling the Rinse Aid Dispenser
Function of the rinse aid
The rinse aid is automatically released during the last rinse in order to prevent water from forming droplets on your dishes that can leave spots and streaks.
NOTE // Only use branded rinse aid in the dishwasher. Never fill the rinse aid dispenser with any other substances (e.g. dishwasher cleaning agent, liquid detergent) as this will damage the appliance.
The rinse aid dispenser is located inside the door next to the detergent dispenser.
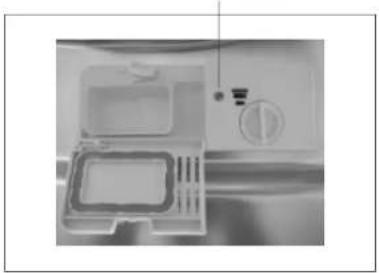
To fill the dispenser, open the cap and pour the rinse aid into the dispenser until the level indicator turns completely black. The volume of the rinse aid container is about 110mL . Be careful not to overfill the dispenser, because this could cause over-sudsing.

natural_image
Close-up of a person using a handheld device near a wall-mounted device (no visible text or symbols)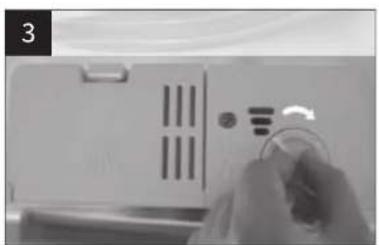
natural_image
Close-up of a hand holding a small electronic device with ports and buttons (no visible text or symbols)- To open the dispenser, turn the cap to the "open" (left) arrow and lift it out
Operating Instructions
IMPORTANT // Avoid running your dishwasher with the rinse aid level below 14 of the full capacity.
As the level of rinse aid decreases, the size of the dark dot reduces as illustrated below:
Full
• 1/4 Full - Should refill to
3/4 Full
eliminate spotting
● 12 Full
○ Empty

C - Rinse Aid Indicator
consecutive number until your dishes are spot-free. The factory setting is "4".
NOTE // Reduce the rinse aid dosage to a lower level if crockery is found with sticky white streaks or a bluish film on glassware or knife blades at the end of the cycle.
natural_image
Interior view of a kitchen appliance showing a tray with a handle and control knob (no text or symbols visible)Operating Instructions
Starting the washing program
Washing Cycle Table
| Program Cycle Selection Information | Description of cycle | Detergent pre/main | Running time (min) | Energy (kWh) | Water (L) | Rinse-aid | ||
| Intensive F | For the heaviest soiled loads, such as pots, pans, casserole dishes and dishes that have been sitting with dried food on them for a while. | Pre-wash (50°C)Wash (50°C)RinseRinseRinse (65°C)Drying | 12 Place | 5/27.5g (Or all in 1) | 170 1.6 18.5 | |||
| 9 Place | 5/21.5g 165 1.4 16.5 | |||||||
| ECO The ECO | standard program that is suitable to clean normally soiled tableware.It's the most efficient program in terms of its combined energy and | Pre-washWash (45°C)Rinse (65°C)Drying | 12 PL | 5/25g (Or all in 1) | 170 0.69 10.2 | |||
| 9 PL | 5/21.5g 175 0.71 11.2 | |||||||
Operating Instructions
To start a cycle wash:
- Draw out the lower and upper basket, load the dishes, and push the baskets back in.
- Pour in the detergent as instructed
- Partially close the door and press the power button. Press the program button, and the program will proceed in the following order:
- Once a program has been selected, the corresponding program indicator light will display. Press the Start/Pause button and the dishwasher will commence washing.
ECO 90min Rapid Soak
Have you forgotten to place a dish in the dishwasher?
- Press the Start/Pause button to pause the washing program.
button. The dishwasher will resume functioning after 10 seconds.
Changing a running program
A cycle that is underway can only be changed to a different program if it has only been running for a short period of time. Otherwise, the detergent may have already been released and the appliance may have already drained the washing water.
If this is the case, the detergent dispenser must be refilled (See Section "Filling the detergent dispenser"-Page 14)
To change a running program:
- Press the Start/Pause button, and the dishwasher will enter into standby mode.
- Press the program button for a few seconds to cancel the current program in use.
- Change the program to your desired
Operating Instructions
IMPORTANT // Slightly opening the door of the dishwasher at the end of the program and leaving it ajar for a few minutes before unstacking the dishwasher will assist the drying process to achieve better results. It will also allow the utensils to cool down before removing them from the dishwasher (hot dishware is more susceptible to breakage).
TIP // To prevent water from dripping from the upper basket onto dishes on the lower basket, empty the lower basket first and then work your way up to the upper basket and cutlery drawer.
TIP // When not in use, leave the door of the dishwasher ajar so that moisture and bad odours are not held inside the appliance.
Maintenance and Cleaning
WARNING // Before cleaning or servicing your dishwasher, always remove the plug from the power point.
A. Filtering system
The filtering system is used to avoid big remnants and other sundries getting inside the pump. Sometimes, deposits of residue can obstruct the water flow in the internal pipes and spray arms.
The filtering system consists of 3 parts:
NOTE // The entire filter assembly should be cleaned at least once a week.
B. Cleaning the filter

natural_image
Close-up of a handheld electronic device with a black lever and 'Open' label (no readable text or symbols beyond the label)

natural_image
Close-up of a mechanical component with a black arrow pointing to a feature (no visible text or symbols)Maintenance and Cleaning
NOTE // Improper installation of the filters may reduce the performance level of the appliance and damage your dishware.
WARNING // Never run the dishwasher without the filters in place.
Cleaning the spray arms

The spray arms should be cleaned regularly to ensure efficient operation of the spray jets and bearings. To do so, remove the spray
Cleaning the dishwasher
It is not recommended to use solvents or abrasive cleaning products to clean the exterior and rubber parts of the dishwasher. Only use a cloth and warm soapy water.
To remove darker spots or stains from the surface of the interior cavity, use a cloth dampened with water and a small amount of white vinegar. Cleaning products made specifically for dishwashers are also indicated.
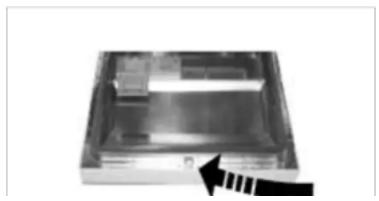
Cleaning the door seals
natural_image
Exterior view of a modern office building (no signage)Maintenance and Cleaning
Protection against freezing
Take frost protection measures by following these instructions after every wash cycle during winter:
- Remove the power plug from the power supply
- Turn off the water supply and disconnect the water inlet pipe from the water valve.
- Drain the water from the inlet pipe and water valve into a container
- Reconnect the water inlet pipe to the water valve.
- Remove the filter at the bottom of the tub and use a sponge to soak up water in the sump.
Transporting the appliance
If the appliance must be moved, try to keep it in the vertical position. If absolutely necessary, it is recommended to position the dishwasher on its back instead of any of the other lateral or front sides.
Are you going on holiday?
When you go on holiday and the dishwasher
Installation
ATTENTION // Connection to the water and electrical supplies should only be performed by a qualified technician.
WARNING // Switch off the electrical power before installing the appliance. Failure to do so can result in electrical shock or death.
Product dimensions

- Position the dishwasher in a way so that its sides and back panels are not in contact with the adjacent cabinets or with the wall. This appliance can also be recessed under a bench top.
- Position the dishwasher on a level and sturdy floor. If the floor is uneven, the three leveling legs of the appliance can be individually adjusted until it reaches a horizontal position. If the appliance is leveled correctly, it will be more stable and much less likely to move or cause vibrations and noise while in operation.
Water supply connections
The dishwasher should not stand on top of the water hoses or electric supply cable. The appliance must be connected to the water supply network using new piping.
Connecting the safety supply hose
The safety supply hose system blocks the flow of water in the case of the supply hose breaking, or when the air space between the
Installation
- Turn the water supply fully on before starting the dishwasher.
Disconnecting the safety supply hose
The safety supply hose system blocks the flow of water in the case of the supply hose breaking, or when the air space between the supply house and the outer corrugated hose is full of water.
- Turn the water supply completely off
- Unscrew the safety supply hose from the faucet.
WARNING // A hose that attached to a sink spray can burst if it is installed on the same water line as the dishwasher. If your sink has one, it is recommended that the hose be disconnected and the hole plugged.
Connecting the water inlet hose
Connect the cold water supply hose to a threaded 34 ” connector and make sure that it is fastened tightly in place.
taken, there is a risk of the water inlet getting blocked, which could damage the appliance.
Connecting the water outlet
Insert the hose into a drainage hose with diameter greater than 40mm or into a sink, in both cases, make sure that the outlet pipe is straight and not higher than 1m from the floor.
Secure your hose firmly to the drainage pipe to avoid it coming off during the washing process.
If the length of the hose is not sufficient, a hose extension can be ordered from an authorised service agent.
NOTE // The hose length, including the extension, should not exceed 4 meters.
ATTENTION // If the end of the outlet hose is positioned at a height above 1m from the floor, the excess water in hoses cannot be drained.
Connecting the drain hose
The drain hose with a minimum diameter of
Installation
Electrical connection
NOTE // During installation, the power supply must not be excessively or dangerously bent or flattened.
Before plugging the power plug into the electrical power point, make sure that:
- The power point is earthed and complies with local current regulations.
- The power point can withstand the maximum load of the appliance, which is specified on the rating label of the product
- The power supply voltage falls within the values specified on the rating label of the product.
-
The power point is compatible with the plug of the appliance. If this is not the case, ask an authorised technician to replace the plug;
-
Do not use extension cables or multiple sockets.
- Once the appliance has been installed, the power supply cable and the electrical power point should be easily accessible.
- The cable should not be bent or compressed.
- If the power supply cable is damaged, a qualified technician must replace it in order to prevent potential hazards.
Troubleshooting
Before calling a service agent, please review the table below to identify and solve your dishwasher problem.
Troubleshooting Table
| PROBLEM POSSIBLE CAUSES WHAT TO DO | ||
| Dishwasher doesn't start | The fuse has blown, or the circuit breaker has tripped | Replace the fuse or reset circuit breaker.Remove any other appliances sharing the same circuit with the dishwasher |
| The power supply is not turned on | Make sure the dishwasher is turned on and the door is securely closed.Make sure the power cord is properly plugged into the wall socket. | |
| The water pressure is too low | Check that the water supply is connected properly and the water is turned on. | |
| The dishwasher door is not closed properly | Make sure the door is closed securely. | |
| Some audible sounds are normal | Sound from detergent cup opening. | |
| Utensils are not secure in the baskets or something small has dropped into the basket. | Ensure everything is secured in the dishwasher. | |
Troubleshooting
| PROBLEM POSSIBLE CAUSES WHAT TO DO | ||
| Dishes and flatware not clean | Improper program | Refer to the “Loading the dishwasher baskets” section for instructions on how to correctly load the dishes (Page 7) |
| Improper basket loading | Select a more intensive program. Refer to the “Wash cycle table” to identify a suitable program. (Page 14) | |
| Inadequate amount of detergent is being dispensed | Use more detergent, or change your detergent. Rearrange the items so that the spray arms can freely rotate | |
| Spray arm blockage Sound | from detergent cup opening. | |
| Improper filter installation or dirty filters - this may cause a blockage to the spray arm jets. | Clean and/or fit the filters correctly.Clean the spray arm jets – Refer to the “Cleaning the spray arm” section (Page 18) | |
| Cloudiness on glassware | Combination of soft water and too much detergent | Use less detergent if you have soft water and select the shortest cycle to wash the glassware and to get them clean. |
| Yellow or brown | Tea or coffee stains | Using a solution of 1/2 cup of bleach and 3 cups of warm water to remove the stains by hand.WARNING.//You have to wait for 30 minutes |
Troubleshooting
| PROBLEM POSSIBLE CAUSES WHAT TO DO | ||
| Detergent left in dispenser cups | Dishes block detergent cups | Re-loading the dishes properly. |
| Black or gray marks on dishes | Aluminium utensils have rubbed against dishes | Use a mild abrasive cleaner to eliminate those marks. |
| Dishwasher leaks | Overfilled dispenser or rinse aid spills | Be careful not to overfill the rinse aid dispenser.Spilled rinse aid could cause over sudsing and lead to overflowing.Wipe away any spills with a damp cloth. |
| Dishwasher isn't level Make sure the dishwasher is level. | ||
| Stained tub interior | Detergent with colorant was used | Make sure that the detergent is the one without colorant. |
| The dishes are | Improper loading | Load the dishwasher as suggested in the instructions |
| There is not enough rinse-aid | Increase the amount of rinse-aid/refill the rinse-aid dispenser | |
| The dishes have been unloaded too soon | Do not empty the dishwasher immediately after washing. Open the door slightly so that the steam can escape.Unload the dishwasher as instructed only. | |
Troubleshooting
B. Error Codes
When a malfunction occurs, the appliance displays error codes to alert you.
| Codes Description Possible causes | ||
| Rapid Water malfunction | The faucets are not openedThe water intake is restrictedThe water pressure is too low | |
| 90 mins+ Rapid | The required temperature is not being reached | Temperature sensor malfunctionHeating element malfunction |
| ECO | An overflow has occurred | Leakage in the dishwasher element |
WARNING // If overflow occurs, turn off the main water supply before calling for service. If there is water in the base pan because of an overfill or small leak, the water should be removed before restarting the dishwasher.
Notes
Notes
Notes
Notes
CONTACT DETAILS
AUSTRALIA
ARISIT PTY LIMITED
40-44 Mark Anthony Drive,
Dandenong South, VIC 3175,
Australia
P//1300762219
F//0397680838
consumer.care@arisit.com
NEW ZEALAND
ARISIT PTY LIMITED
PO Box 68-140
Newton, Auckland 1145,
New Zealand
P//093061020
Γ//093020077
sa.es@arlstonappliances.co.nz
Tis re is committed to ongoing research and
development. Every effort has been made
to ensure an information in this service manual is correct at time of going to next
Dimensions should be used as a reference
- Hello
- Contents
- Warning & Safety Instructions
- Grounding Instructions
- Safety with Children
- Technical Safety Instructions
- Product Overview
- Operating Instructions
- Dishwasher check
- Upper Basket - 12 place model
- Lower Basket - 12 place model
- Folding Racks and Cup shelves 12 place model
- Upper Basket - 9 place model
- Lower Basket - 9 place model
- Folding Racks and Cup shelves 9 place model
- Filling the Detergent Dispenser
- Detergents
- Concentrated detergent
- Detergent Dispenser
- Function of the rinse aid
- To start a cycle wash:
- ECO 90min Rapid Soak
- Have you forgotten to place a dish in the dishwasher?
- Changing a running program
- To change a running program:
- Maintenance and Cleaning
- Filtering system
- Cleaning the filter
- Cleaning the dishwasher
- Protection against freezing
- Transporting the appliance
- Are you going on holiday?
- Installation
- Water supply connections
- Connecting the safety supply hose
- Disconnecting the safety supply hose
- Connecting the water inlet hose
- Connecting the water outlet
- Connecting the drain hose
- Electrical connection
- Troubleshooting
- Error Codes
- Notes
- CONTACT DETAILS
- ARISIT PTY LIMITED
Brand : Tisira
Model : TDW9AX
Category : Dishwasher