TDW6SS - Dishwasher Tisira - Free user manual and instructions
Find the device manual for free TDW6SS Tisira in PDF.


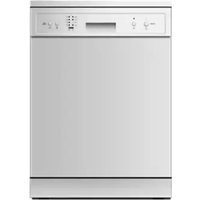
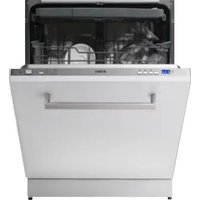
| Product Type | Built-in Dishwasher (can be installed under counter with decorative panel) |
| Brand | Tisira |
| Model | TDW6SS |
| Capacity | 6 Place Settings |
| Dimensions (H x W x D) | Approximately 850 x 450 x 550 mm (refer to manual for exact) |
| Power Supply | 220-240 V ~ 50 Hz, 10 A |
| Energy Consumption | 0.5 kWh per cycle (Normal program) |
| Water Consumption | 8.7 L per cycle (Normal program) |
| Wash Programs | 7 programs: Intensive, Heavy, Normal, Rinse, Glass, Rapid, Soak |
| Control Type | Electronic with push buttons and indicator lights |
| Display | Program indicator lights, Delay Time display, Rinse Aid warning light |
| Delay Start | Up to 24 hours (adjustable in 1-hour increments) |
| Rinse Aid Dispenser | Capacity 110 ml, adjustable setting (1-6, factory set at 6) |
| Detergent Dispenser | Dual compartment for pre-wash and main wash |
| Filter System | Three-stage: coarse filter, fine filter (microfilter), main filter |
| Spray Arms | Two rotating arms, removable for cleaning |
| Maximum Dish Size | 260 mm diameter (plates up to 270 mm when racks folded) |
| Water Pressure | 0.04 - 1.0 MPa (min 0.04, max 1.0) |
| Water Connection | Cold water only, 3/4 inch threaded connector |
| Drain Hose | Extension up to 4 meters allowed; hose must not be kinked |
| Included Accessories | Cutlery basket, cup shelf, inlet hose, drain hose, plastic hose support |
| Warranty | 2 years parts and labor (Australia/New Zealand) |
| Safety Features | Grounding instructions, automatic pause when door opened, child lock not specified |
Frequently Asked Questions - TDW6SS Tisira
User questions about TDW6SS Tisira
0 question about this device. Answer the ones you know or ask your own.
Ask a new question about this device
Download the instructions for your Dishwasher in PDF format for free! Find your manual TDW6SS - Tisira and take your electronic device back in hand. On this page are published all the documents necessary for the use of your device. TDW6SS by Tisira.
USER MANUAL TDW6SS Tisira
6 PLACE DISHWASHER TDW6SS
IMPORTANT // Please ensure that you read through this user manual prior to installation and use. This manual contains important information to ensure optimal performance and keep you safe. Please retain your proof of purchase, as this will be required in the event that you require warranty service. Remember to retain this manual for future reference.
tisira
www.tisira.com
HELLO
CONGRATULATIONS ON THE SELECTION OF THIS TISIRA APPLIANCE.
Please read through this user manual carefully as it contains information that will ensure that your appliance is installed correctly, important operating and care instructions and also some advice of what you need to do if this appliance is not performing as intended.

Read this Manual
DearCustomer,
Pleasecarefullyreadingitbeforeusingthedishwasher will helpyoutouse and maintain the dishwasher properly.
- Keepittorefertoatalaterdate.
■ Passitontoanysubsequentowneroftheappliance.
This manual contains sections of Safety Instructions, Operating Instructions, Installation Instructions and Troubleshooting Tips, etc.

Before Calling for Service
- ToreviewthesectiononTroubleshootingTips will helpyoutsolvesomecommonproblems byyourself.
If you cannot resolvethetroubles by yourself, please ask for the help of professional technicians.

NOTE:
Themanufacturer, following a policy of constant development and updating of the product, may make modifications without giving prior notice.
1) Safety Information....1
2) Operating Instructions....2
Control Panel....2
Dishwasher Features....2
3) Prior using for the first time....3
AFilltheRinseAidDispenser....3,
B、Function of Detergent....4,5
4) Loading the Dishwasher Basket....6
AttentionbeforeorafterloadingtheDishwasher Baskets....6
Loading the Basket....7
Cutlery Basket....8
When load bigger Dinner Plates....9
5) Starting a washing programme....10
Wash Cycle Table....10
Turning on the Appliance....10
Change the Programme....11
At the End of the Wash Cycle....11
6) Maintenance and cleaning....12
Filtering System....12
Caring for the Dishwasher....13
7) Installation instruction....14
Positioning the Appliance....15
About Power Connection....15
Water Connection....15
Connection of Drain Hoses....16
Start of dishwasher....17
8) Troubleshooting Tips....18
Before calling for service....18
Error codes....19
9) Technical information.... 20
10) Installation instruction....21
11) Notes....26
11) Proof Of Purchase....27
12) Warranty Terms & Conditions......28
1. IMPORTANT SAFETY INFORMATION READ ALL INSTRUCTIONS BEFORE USING

WARNING!
When using your dishwasher, follow the precautions listed below:

GROUNDING INSTRUCTIONS
Thisappliancemustbegrounded. Intheeventofamalfunctionorbreakdown, groundingwillreducetheriskofelectricshockbyprovidingapathofleastresistanceofelectriccurrent. Thisapplianceisequippedwithacordhavinganequipment-groundingconductorandagroundingplug.
■ Theplugmustbepluggedintoanappropriateoutlet thatisinstalledandgroundedinaccordancewith alllocalcodesandordinances.
▲WARNING!
■ Improperconnectionoftheequipment-grounding conductorcanresultinariskofelectricshock.
■ Checkwithaqualifiedelectricianorservice representativeifyouareindoubtwhetherthe applianceisproperlygrounded.Donotmodifythe plug provided with the appliance; If it is not fit for theoutlet.Haveaproperoutlet installedbya qualified electrician.

WARNING! PROPER USE
■ Donotabuse, siton, or standard the door or dish rack of the dish washer.
■ Donotplaceanyheavyobjectsofstandonthe doorwhenitisopen. The appliance could tip forward.
■ Whenloadingitemstobewashed:
1) Locatesharpitemssothattheyarenotlikely todamagethedoorseal;
2) Warning:Knivesandotherutensilswith sharppointsmustbeloadedinthebasket withtheirpointsdownorplacedina horizontalposition.
■ When using your dishwasher, you should prevent plastic items from coming into contact with heating element. (This instruction is only applicable to machines with visual heating element.)
■ Check that the detergent-receptible is empty after completion of the wash cycle.
■ Donotwashplasticitemsunlesstheyaremarked dishwashersafeortheequivalent. Forplasticitems notsomarked, checkthemanufacturer's recommendations.
■ Useonlydetergentandrinseadditives designedforanautomaticdishwasher.
■ Neverusesoap, laundry detergent, or hand washing detergent in your dish washer. Keep these products out of there each of children.
- Keepchildrenawayfromdetergentandrinseaid,keep childawayfromtheopendoorofthedishwasher,therecouldstillbesomedetergentleftinside.
This appliance is not intended for use by persons (including children with reduced physical, sensory or mental capabilities, or lack of experience and knowledge, unless they have been given supervision or instruction concerning use of the appliance by a person responsible for their safety.
■ Childrenshouldbesupervisedtoensurethattheydo notplaywiththeappliance.
■ Dishwasherdetergentsarestronglyalkaline,they canbeextremelydangerousifswallowed.Avoid contactwithskinandeyesandkeepchildrenaway fromthedishwasherwhenthedoorisopen.
■ Thedoorshouldnotbeleftintheopenposition sincethiscouldpresentatrippinghazards.
■ If the supply cord is damaged, it must bere placed by the manufacturer or its service agent or a similarly qualified person in order to avoid a hazard.
■ Pleasedisposeofpackingmaterialsproperly.
■ Usethedishwasheronlyforitsintendedfunction.
■ During installation, the powersupply must not be excessively ordered dangerously bentor flattened. Donottamperwith controls.
■ The appliance is to be connected to the water mains using new whose sets and that old hose-sets should not be reused.
■ Themaximumsizeofthedishesis260mm.
■ Themaximumpermissibleinletwaterpressureis 1Mpa.
■ Theminimumpermissibleinletwaterpressureis 0.04Mpa.
READ AND FOLLOW THIS SAFETY INFORMATION CAREFULLY SAVE THESE INSTRUCTIONS
2. Operation Instruction
IMPORTANT Togetthebestperformancefromyourdishwasher,readalloperatinginstructions beforeusingitforthefirsttime.
Control Panel

1 Power on light: To come on when Power ON/OFF button is pressed down.
2 ON/OFF Button: To turn on/off the power supply.
3 Delay time: To display booking time.
4 Delayed Start Button: Press this button to set the delayed hours for washing. You can delay the start of washing up to 24 hours. One press on this button delays the start of washing by one hour.
5 Rinse Aid Warning Light: To be on when the rinse aid dispenser needs to be refilled.
6 Program indicator light: when you select washing program, the correspond light will display.
7 Program button :To select washing program when press the button.
Dishwasher Features
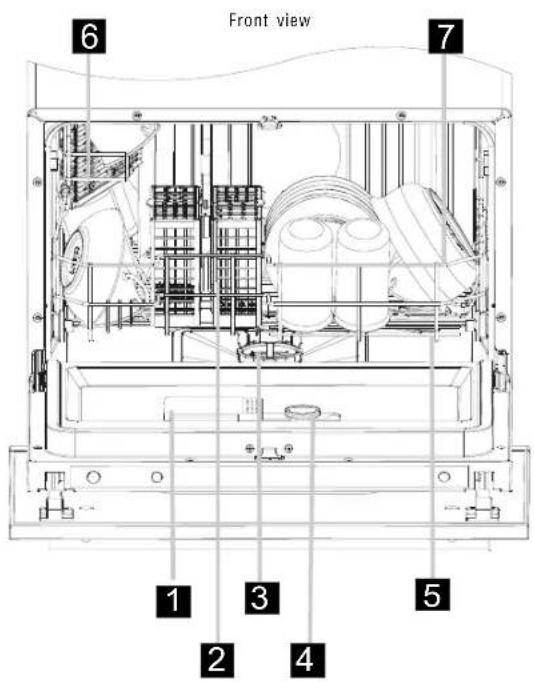
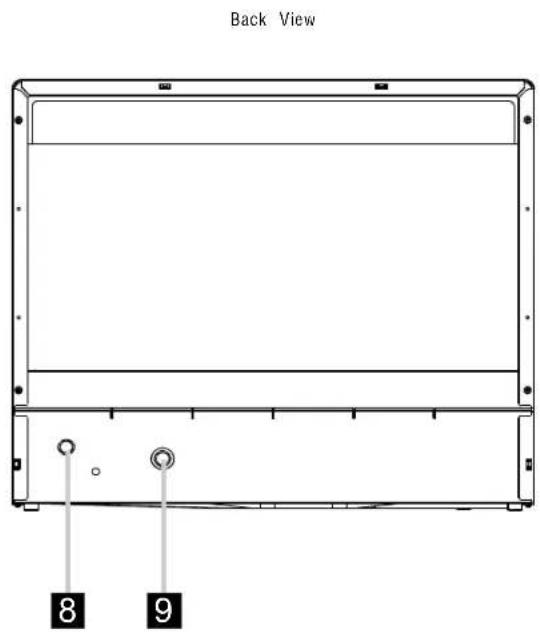
1 DetergentDispenser
2 CutleryBasket
3 Filterassembly
4 RinseAidDispenser
5 SprayArms
6 CupShelf
7 Basket
8 Drainpipeconnector
q Inletpipeconnector
3.Prior using for the first time
A. Fill the Rinse Aid Dispenser
RinseAidDispenser
The rinse aid is released during the final rinse to prevent water from forming droplets on your dishes. That can leave spots and streaks. It also improves drying by allowing water to sheet off the dishes. Your dishwasher is designed to useliquidrinseaids. Therinseaiddispenserislocatedinsidethedoornexttothedetergentdispenser. Tofillthe dispenser, open the cap and pour the rinse aid into the dispenser until the level indicator turns completely black. Thevolumeoftherinseaaidcontainerisabout110ml.
FunctionofRinseAid
Rinse aid is automatically added during the last rinse, ensuring thorough rinsing, and spot and streak free drying.
Attention!
Only use branded rinse aid for dishwasher. Never fill the rinse aid dispenser with any other substances (e.g. Dishwashercleaningagent, liquiddetergent). This would damage the appliance.
WhentoRefilltheRinseAidDispenser
If there is no rinse-aid warning light in the control panel, you can judge the amount of rinse-aid by the color of the optical level indicator located next to the cap. When the rinse-aid container is full, the whole indicator will be dark. As the rinse-aid diminishes, the size of the dark dot decreases. You should never let theirinseadget below 1/4 full.
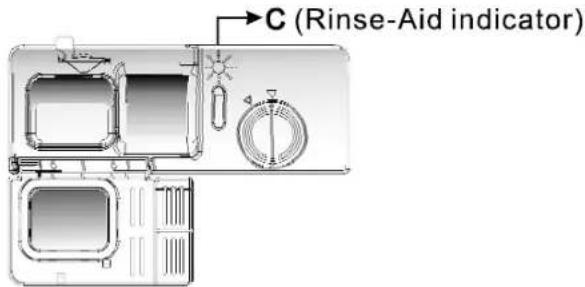
Astherinseaiddiminishes, thesizeoftheblackdot ontherinseaidlevelindicatorchanges, asillustratedbelow.
Full
3/4full
1/2full
- 1 / 4 full - Should refill to eliminate spotting
Empty


natural_image
Illustration of a bottle with a lid and a coin, no text or symbols present
1 Toopenthedispenser,turnthecaptothe"open"(left)arrowandliftitout.
2 Pourtherinseaidintothedispenser,beingcarefulnottooverfill.
3 Replace the cap by inserting it aligned with "open" arrow and turning it to the closed (right) arrow.
NOTE: Clean up any rinse aid split during filling with an absorbent cloth to avoid excessive foaming duringthenextwash. Don'tforgettoreplacethecapbeforeyouclosedishwasherdoor.
AdjustingRinseAidDispenser

Therinseaiddispenserhassixorfoursettings.Alwaysstartwiththedispenser set on "4". If spots and poor drying are problems, increase the amount of rinse aid dispensed by removing the dispenser lid and rotating the dial to "5". If the dishes still are not drying properly or are spotted, adjust the dial to the next higher number until your dishes are spot-free. The recommended setting is "4". (Factoryvalueis"6".)
NOTE:
Increasethedoseif therearedropsof wat erorlimespotsonthedishesafterwashing. Reduce it if there are sticky whitish stains on your dishes or a bluish film on glassware or knifeblades.
B. Function of Detergent
Detergents with its chemical ingredients are necessary to remove dirt, crush dirt and transport it out of the dishwasher. Most of commercial quality detergents are suitable for this purpose.
Detergents
Thereare3sortsofdetergents
- With phosphate and with chlorine
- With phosphate and without chlorine
- Without phosphate and without chloride
Normally new pulverised detergent is without phosphate. The water softener function of phosphate is not given. In this case we recommend to fill salt in the salt container even when the hardness of water is only 6 °dH. If detergents without phosphate were used in case of hard water often white spots appear at dishes and glasses. In this case please add more detergent to reach better results. Detergents without chlorine do only bleach a little. Strong and coloured spots will not removed completely. In this case please choose a programme with higher Temperature.
Concentrated Detergent
Based on their chemical composition, dishwasher can be split in two basic types:
■ conventional, alkalinedetergentswithcausticcomponents
■ low alkaline concentrated detergents with natural enzymes
The use of “normal washing programmes in conjunction with concentrated detergents reduces pollution and is good for your dishes; these wash programmes are specially matched to the dirt-dissolving properties of the enzymes of the concentrated detergent. For this reason “normal wash programmes in which concentrated detergents are used can achieve the same results that can otherwise only be achieved using “intensive programmes.
Detergent Tablets
Detergent tablets of different brands dissolve at different speeds. For this reason some detergent tablets cannot dissolve and develop their full cleaning power during short programmes. Therefore please use long programmes when using detergent tablets, to ensure the completeremoval of de tergentresiduals.
DetergentDispenser
Thedispensermustberefilledbeforethestartofeachwashcyclefollowingtheinstructions providedintheWashCycleTable.Yourdishwasheruseslessdetergentandrinseaidthen conventionaldishwasher.Generally,onlyonetablespoonofdetergentisneededfor anormalwashload.Also,moreheavilysoileditemsneedmoredetergent.Alwaysaddthe detergentjustbeforestartingthedishwasher,otherwiseitcouldgetdampandwillnot dissolveproperly.
AmountofDetergenttoUse


NOTE:
■ Ifthelidisclosed:pressreleasebutton. Thelidspringsopen.
■ Alwaysaddthedetergentjustbeforestartingeachwashcycle.
■ Onlyusebrandeddetergentaidfordishwasher.

WARNING!
Dishwasher detergent is corrosive! Take care to keep it out of reach of children.
ProperUseofDetergent
Use only detergent specifically made for use in dishwashers. Keep your detergent fresh and dry. Don't put powder detergent into the dispensers until you're ready to wash dishes.
Fillindetergent
Fillthedetergentdispenserwithdetergent. Themarkingindicatethedosinglevels,as illustratedonright:
A Theplaceofmainwashcycledetergentplaced.
B Theplaceofpre-washcycledetergentplaced.
Pleaseobservethemanufacturersdosingandstorage Recommendationsasstatedonthedetergentpackaging.
Closethelidandpressuntillocksinplace.

If the dishes are heavily soiled, place an additional detergent dose in the pre-wash detergent chamber. This detergent will take effect during the pre-wash phase.

NOTE:
■ Youfindinformationabouttheamountofdetergentforthesingleprogrammeonthelastpage.
■ Pleaseaware, that according to the level soiling and the specific hardness of water differences are possible.
■ Pleaseobservethemanufacturer'srecommendationsonthedetergentpackaging.
4. Loading the Dishwasher Baskets
Recommendation
■ Considerbuyingutensilswhichareidentifiedasdishwasher-proof.
■ Useamilddetergentthatisdescribedas'kindofdishes'.Ifnecessary,seekfurther informationfromdetergentmanufacturers.
■ Forparticularitems,selectaprogrammewithaslowatemperature.
■ Topreventdamage, donottakeglass and cutlery out of the dish washer immediately after the programme has ended.
For washing in the dishwasher the following cutlery/dishes
Arenotsuitable
■ Cutlerywithwooden,hornchinaor mother-of-pearlhandles
■ Plasticitemsthatarenot heatresistant
■ Oldercutlerywithgluedpartsthatisnot temperatureresistant
■ Bondedcutleryitemsordishes
■ Pewterorcooperitems
■ crystalglass
■ Steelitemssubjecttorusting
■ Woodenplatters
■ Itemsmadefromsyntheticfibres
Areoflimited suitability
■ Sometypesofglassescanbecome dullafteralargenumberofwashes
■ Silverandaluminiumpartshavea tendencytodiscolourduringwashing
■ Glazedpatternsmayfadeifmachine washedfrequently
Attention before or after loading the Dishwasher Baskets
(Forbestperformanceofthedishwasher, followtheseloadingguidelines. Featuresandappearanceofbasketsandcutlerybasketsmayvaryfromyourmodel.)
Scrapeoffanylargeamountsofleftoverfood.Softenremnantsofburntfoodinpans Itisnotnecessarytorinsethedishesunderrunningwater.
Placeobjectsinthedishwasherinfollowingway:
1.Itemssuchascups, glasses, pots/pans, etc.arefacedown.
-
Curved items, or those with recesses, should be loaded at a slant so that water can run off.
-
Allutensilsarestackedsecurelyandcannottipover.
-
Allutensils are placed in the way that the spray arms can be rotated freely during washing.

NOTE: Verysmallitemsshouldnotbewashedinthedishwasherastheycouldeasilyfalloutofthebasket.
- Loadhollowitemssuchascups, glasses, pansetc. With the opening downwards so that water cannot collect in the container or a deep base.
■ Dishesanditemsofcutlerymustnotlieinsideoneanother,orcovereachother.
■ Toavoiddamagetoglasses,theymustnottouch.
■ Loadlargeitemswhicharemostdifficulttocleanintothebasket.
■ Longbladedknivesstoredinanuprightpositionareapotentialhazard!
■ Long and/or sharp items of cutlery such as carving knives must be positioned horizontally in the basket.
■ Pleasedonotoverloadyourdishwasher.
Loading the Basket
Position the dishes and cookware so that they will not get moved by the spray of water.


natural_image
Diagram of a mechanical device with internal components and directional arrows indicating motion (no text or symbols)Plate racks of Basket
The basket is fitted with plate racks which can be stowed horizontal if required.
Cutlery Basket
Cutleryshouldbeplacedinthecutlerybasketwithhandlesatthebottom.Iftherackhassidebaskets,thespoon shouldbeloadedindividuallyintotheappropriateslots,especiallylongutensilsshouldbeplacedinthehorizontal positionatthefrontoftheupperbasketasshown.

1 Soupspoons

2 Forks

3 Knives

4 Dessertspoons

5 Teaspoons


▲ WARNING!
■ Donotletanyitemextendthroughbottom.
Alwaysloadsharputensilswiththesharppointdown!
For personal safety and a top quality clean, place the silverware in the basket:
■ They do not nest together.
■ Place silverware with handles-down.
■ But place knives and other potentially dangerous utensils handles-up.
When load bigger Dinner Plates

natural_image
Technical line drawing of a mechanical assembly with gears and housing (no text or symbols)Plate racks of Basket
When load bigger Dinner plates, please fold the rack to left picture showed location.
The maximum plate can be loaded is 270mm(10 inches) diameter.
Loading the Basket
Position the dishes and cookware so that they will not get moved by the spray of water.


Cups

Large serving bowl

Glasses

Saucers

Dish

Dessert dishes

Dinner plates

Soup plates
Cutlery basket
5. Starting a washing programme
Wash Cycle Table

NOTE:
AS/NZS2007.1
■ (★) Means: need to fill rinse into the Rinse-Aid Dispenser.
AS/NZS2007.1*: This program is the test cycle, the rinse-aid dispenser setting is recommended to Position 6.
| Program | Cycle Selection Information | Description of Cycle | Detergent pre/main | Running time(min) | Energy (Kwh) | Water (l) | Rinse Aid |
| [C2C0]Intensive | For the heaviest soiled loads, such as pots, pans, casserole dishes and dishes that have been sitting with dried food on them for a while. | Pre-wash (50°C)Wash (70°C)RinseRinseRinse (70°C)Drying | 4/18.5g | 140 | 0.94 | 9.7 | |
| [03K4]Heavy | For heavily soiled loads, such as pots, plates, glasses and lightly soiled pans. standard daily cycle. | Pre-washWash (60°C)RinseRinse (70°C)Drying | 4/18.5g | 120 | 0.70 | 7.7 | |
 Normal*AS/NZS2007.1 Normal*AS/NZS2007.1 | For normally soiled loads,such as plates, glasses, bowls and lightly soiled pans. | Wash (55°C)RinseRinseWas (55°C)Drying | 4/18.5g | 105 | 0.5 | 8.7 | |
 Rinse Rinse | For dishes that need to be rinsed and dried only. | Wash (40°C)RinseRinse (70°C)Drying | / | 80 0.48 | 4.0 | ||
 Glass Glass | For lightly soiled loads, such as glasses, crystal and fine china. | Wash (45°C)RinseRinse (60°C)Drying | 15g. | 70 0.48 | 5.8 | ||
| [2220]Rapid | A shorter wash for lightly soiled loads that do not need drying. | Wash (40°C)RinseRinse | 15 g. | 30 0.30 5.8 | |||
| [H2AT]Soak | To rinse dishes that you plan to wash later that day. | Pre-wash | / | 14 | 0.01 | 2.1 |
Turning On the Appliance
Starting a wash cycle...
- Draw out the basket (see the section entitled "Loading the Dishwasher").
- Pour in the detergent (see the section entitled "Detergent and Rinse Aid").
- Insert the plugin to the socket. The power supply is 220-240 VAC 50 HZ, the specification of the socket is 10 A 250 VAC.
- Make sure that the water supply is turned on to full pressure.
- Turn on the power button, press the program button, to select a program, the response light will light. Then close the door, the dish washer begins to start.

NOTE:
When you open the door to pause during washing, the program light will stop blinking and the dishwasher will beep every minute unless you close the door.
Change the Programme...
Premise: You can modify the washing program, Whentledishwasher just runs for a short time. Otherwise, the detergent may have already been released, and the appliance may have already drained the wash water. If this is the case, the detergent dispenser must be filled (seethesection entitled "Loading the Detergent").
Openthedoortopause during washing, press ProgramButton more than three second sthem machine will be instand by state, then you can change the program to the desired cycles setting (seethesection entitled "Startingawashcycle...").
NOTE: If you opened the doorduring washing, them machine will pause. When you close the door, the machine will keep on working after 10 seconds.
Theprogramlightsshowthestateofthedishwasher: a) Allprogramlightsoff----standby b) Oneoftheprogramlightson----pause c) Oneoftheprogramlightsblinking----run

NOTE: If you opened the door when washing, them machine will pause. When you closed the door, them machine will keep on working after 10 seconds.
Forget to Add a Dish?
Aforgottendishcanbeaddedanytimebeforethedetergentcupopens.
1 Openthedooralittletostopthewashing.
3 Addforgottendishes.
2 Afterthesprayarmsstopworking, you can open the door completely.
4 Closethedoor
At the End of the Wash Cycle
Whentheworkingcyclehasfinished,thebuzzerofdishwasherwillsound8seconds,thenstop.Turnoff theapplianceusingtheON/OFFbutton,shutoffthewatersupplyandopenthedoorofthedishwasher. Wait a few minutes before unloading the dishwasher to avoid handling the dishes and utensils while they arestillhotandmoresusceptibletobreakage.Theywillalsodrybetter.
■ SwitchOfftheDishwasher
In the digital display appears 0 (remaining programme time), only in this case the programme has ended. 1. Switch off the dishwasher by pressing the ON/OFF button. 2. Turnoffthewatertap!
■ Openthedoorcarefully.
Hotdishesaresensitivetoknocks. Thedishesshouldthereforebeallowedtocooldownaround15minutes beforeremovingfromtheappliance. Openthedishwasher'sdoor,leaveitajarandwaitafewminutesbeforeremovingthedishes.Inthiswaythey willbecoolerandthedryingwillbeimproved.
■ Unloadingthedishwasher
Itisnormalthatthedishwasheriswetinside.

WARNING!
It is dangerous to open the door when washing, because the hot water may scald you.
6. Maintenance and Cleaning
Filtering System
The filter prevent larger remnants of food or other objects from getting insidethepump.
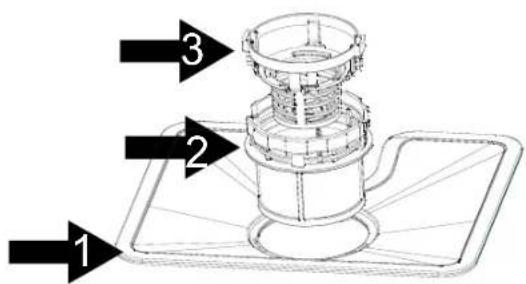
Thefiltersystemconsistsofacoarsefilter,aflat(Mainfilter) andamicrofilter(finefilter).
Mainfilter 1
Food and soil particle strapped by this filter are pulverized by a special jet on the spray armand washed downtodrain.
Finefilter 2
Thisfilterholdssoilandfoodresidueinthesumpareaand preventsitfrombeingredepositonthedishesduringwashcycle.
Coarsefilter 3
Larger items, such as pieces of bone or glass, that could block thedrainaretrappedinthecoarsefilter. Toremovetheitems caughtbythefilter, gentlysqueezethetaponthetopofthis filterandliftout.
Filter assembly
The filter efficiently removes food particles from the wash water, allowing it to be required during the cycle. For best performance and results, the filter assembly must be regularly. For this reason, it is a good idea to remove the larger food particles trapping in the filter after each wash cycle by rinsing the filter and cup under running water. Toremovethe filter assembly, pull on the cup handle in the upward direction.

WARNING!
■ Never run the dishwasher without the filters in place.
■ The dishwasher must never be used without the filters.
■ Improper replacement of the filter may reduce the performance level of the appliance and damage dishes and utensils.

Step 1 : contrarotate the Fine filter,
Step2: lift it up;

Step3 : lift the Main filter up

NOTE: If do it from step1 to step 3, the filter system will be removed; while if do it from Step 3 to Step 1, the filter system will be installed.
Remarks:
-Inspectthefiltersforblockingeverytimethedishwasherhasbeenused.
-Byunscrewingthecoarsefilter.youcanremovethefiltersystem.Removeanyfoodremnantsandcleanthefiltersunderrunningwater.

NOTE: Theentirefilterassemblyshouldbecleanedonceaweek.
CleaningTheFilter
To clean the coarse filter and the fine filter, use a cleaning brush. Reassemble the filter parts as shown in the figures inthelastpageandreinserttheentireassemblyinthedishwasher,positioninginitsseatandpressingdownward.

WARNING!
Whencleaningthefilters, don'tknockonthem. Otherwise, thefilterscouldbe contortedandtheperformanceofdishwashercouldbedebased.
Caring for the Dishwasher
The control panel can be cleaned by using a lightly dampened cloth and dry thoroughly.
The exterior use a good appliance polish wax.
Neverusesharpobjects, scouringpadsorharshcleanersonanypartofthedishwasher.
CleaningTheDoor

natural_image
Technical line drawing of a mechanical assembly with no visible text or symbolsTocleantheedgearoundthedoor, glideanddecorativepanels, youshoulduseonlyasoftwarm, dampcloth.
To avoid penetration of water into the door lock and electrical components, donot use as spray cleaner of any kind.
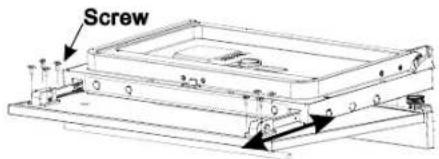
If you want to clean the innersurface of decorative panels, 1) removetheslide 8 screws between these at and decorative panels; 2) then you can clean the surface, please use adamp and soft cloth; 3) then open the doors and siding to the graph state, pull out the slide, aligns crew wholes into the eights screws removed, pleasenotethate effort to light the onesrewscannot betoolarge, soas not to be refailure.

WARNING!
■ Neveruseaspraycleanertocleanthedoorpanelasitmaydamagethedoorlock andelectricalcomponents.
■ Abrasiveagentorsomepapertowelshouldnotbeusedbecauseoftheriskof scratchingorleavingspotsonthestainlesssteelsurface.
ProtectAgainstFreezing
pleasetakefrostprotectionmeasuresondishwasherinwinter.Efterwashingbyoles, pleaseoperateasfollows:
- Cutoffelectricalpowertothedishwasher.
- Turnoffthewatersupplyanddisconnectthewaterinletpipefromthewatervalve.
- Drainwater from the inlet pipe and water valve. (Use a separate catch the water)
- Reconnectthewaterinletpipetothewatervalve.
- Removethefilteratthebottomofthetubanduseaspongetouseupwaterinsump.

NOTE: Ifyourdishwashercannotworkbecauseoftheice,pleasecontactprofessionalservicepersons.
CleaningtheSprayArms
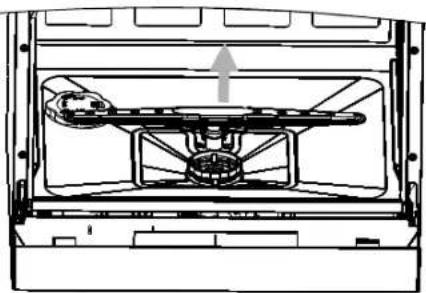
The spray arms can be easily removed for periodic cleaning of the nozzles, to prevent possible clogging. Wash them under running water and carefully replace them in their seats, checking that their rotary movement is in no way impeded.
Grasp the middle of the spray arm, pull it upwards to remove it. Wash the arms under a jet of running water and return them carefully to their seat. After reassembly, check that the spray arms turn freely. Otherwise, check that they have been installed correctly.
natural_image
Technical line drawing of a mechanical assembly with no visible text or symbolsHow to Keep Your Dishwasher in Shape
■ AfterEveryWash
After every wash, turn off the water supply to the appliance and leave the door slightly open so that moisture and odors are not trapped inside.
■ Remove the Plug
Before cleaning or performing maintenance, always remove the plug from the socket.
■ NoSolventorAbrasiveCleaning
To clean the exterior and rubber parts of the dishwasher, do not use solvents or abrasive cleaning products. Only use a cloth with warm soapy water. To remove spots or stains from the surface of the interior, use a cloth dampened with water with a little vinegar, or a cleaning product made specifically for dishwashers.
■ Whenitisnotinneedforalongtime Itisrecommendthatyourunawashcyclewiththe dishwasheremptyandthenremovetheplugfromthe socket,turnoffthewatersupplyandleavethedoorof theapplianceslightlyopen.Thiswillhelpthedoor sealstoastlongerandpreventodoursfromforming withintheappliance.
■ MovingtheAppliance
If the appliance must be removed, try to keep it in the vertical position. If absolutely necessary, it can be positioned on its back.
Seals
Oneofthefactorsthatcauseodorstoforminthe dishwasherisfoodthatremainstrappedintheseals. Periodiccleaningwithadampspongewillpreventthis fromoccurring.
7. Installation instruction
▲Attention:
The installation of the pipes and electrical equipments should be done by professionals.
! Warning

Electrical Shock Hazard Disconnect electrical power before installing dishwasher.
Failure to do so can result in death or electrical shock.
Installation preparation
The installation position of dishwasher should be near the existing inlet and drain hoses and power cord.
One side of the cabinet sink should be chosen to facilitate the connection of drain hoses of the dishwasher.
Positioning the Appliance
Positiontheapplianceinthedesiredlocation. Thebackshouldrestagainstthewallbehindit, andthesides, alongtheadjacentcabinetsorwall. Thedishwasherisequippedwithwatersupply anddrainhosesthatcanbepositionedtotherightorthelefttofacilitateproperinstallation.
About Power Connection

WARNING!
Forpersonal safety:
■ DONOTUSEANEXTENSIONCORDORANADAPTERPLUGWITHTHISAPPLIANCE.
■ DONOT, UNDERANYCIRCUMSTANCES, CUTORREMOVETHEEARTHING CONNECTIONFROMTHEPOWERCORD.
Electrical Requirements
Please look at the rating label to know the rating voltage and connect the dishwasher to the appropriate power supply. Use the required fuse 10 amp, time delay fuse or circuit breaker recommended and provide separate circuit serving only this appliance.

Insure proper ground exists before use
Electrical Connection
Ensure the voltage and frequency of the power being correspond to those on the rating plate. Only insert the plug into an electrical socket which is earthed properly. If the electrical sockettow which the appliance must be connected, is not appropriate for the plug, replace the socket, rather than using a adaptorsorthelike as they could cause overheating and burns.

GROUNDING INSTRUCTIONS
This appliance must be earthed. In the event of a malfunction or breakdown, earthing will reduce the risk of electric shock by providing a path of least resistance for the electric current. This appliance is equipped with acordhavinganequipment-earthingconductorandanearthingplug.Theplugmustbepluggedintoan appropriate outlet that is installed and earthed in accordance with all local standards and requirements.

WARNING!
■ Improperconnectionoftheequipmentearthingconductorcanresultintheriskofan electricshock.
Checkwithaqualifiedelectricianorservicerepresentativeifyouareindoubtwhetherthe applianceisproperlyearthed.
■ Donotmodifytheplugprovidedwiththeappliance.Iftheplugdoesnotfitproperlytothe outlet,pleasehaveaqualifiedelectriciantoinstallaproperoutlet.
Water Connection
Cold Water Connection
natural_image
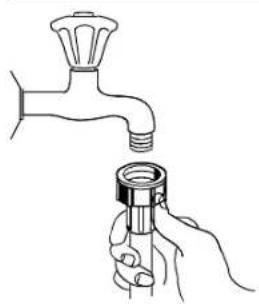
Line drawing of a hand holding a pipe fitting above a faucet (no text or symbols)Connectthecoldwatersupplyhosetoathreaded3/4(inch)connectorandmakesure thatitisfastenedtightlyinplace. Ifthewaterpipesareneworhavenotbeenused for anextendedperiodoftime, letthewaterruntomakesurethatthewaterisclear and freeofimpurities. Ifthisprecautionisnottaken, thereisariskthatthewaterinletcan getblockedanddamagetheappliance.

WARNING!
Pleaseclosethehydrantafterusing.
Connection of drain hoses
Insertthedrainhoseintoadrainpipewithaminimumdiameterof4cm,orletit runintothesink,makingsuretoavoidbendingorcrimpingit.Usethespe ial c plasticsupportthatcomeswiththeappliance.Thefreeendofthehosemustbe at a height lower than 75cm and must not be immersed in water to avoid the back flowofit.

Attention:
Thespecialplastichosesupportmustbesolidlyfastenedtothewallto preventthedrainhosefrommovingandallowingwatertospilloutside thedrain.

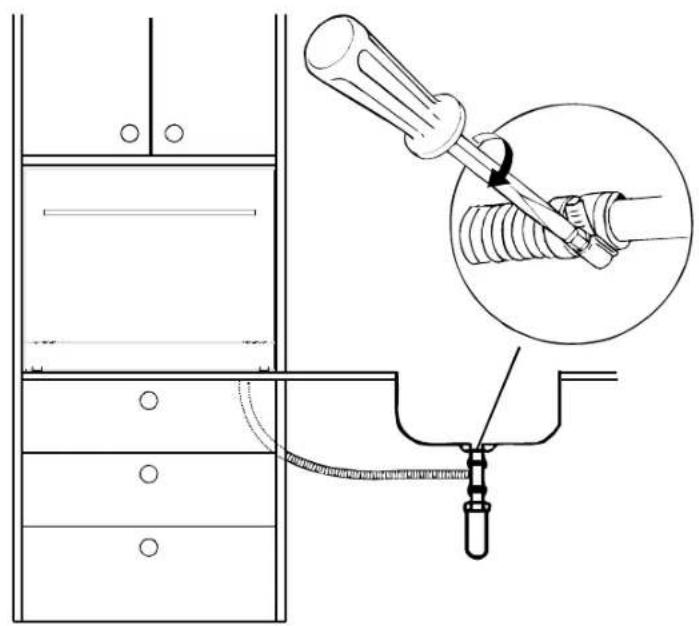
HowtoDrainExcessWaterFromHoses
Ifthesinkis 1000 higher from the floor, the excess water inhosescannot bedrained directly into the sink. It will be necessary to drain excess water from hoses into abowlors suitable container that is held outside and lower than the sink.
WaterOutlet
Connectthewaterdrainhose. Thedrainhose must be correctly fitted to avoid water leaks. Ensure that the water drainhose is not linked or squashed.
ExtensionHose
If you need a drain hose extension, observetouse as similar drain hose.
It must be no longer than 4 metres; otherwise the cleaning effect of the dishwasher could be reduced.
Start of dishwasher
The following things should be checked before starting the dishwasher.
1 Thedishwasherislevelandfixedproperly
2 Theinletvalveisopen
3 Thereisaleakageattheconnectionsoftheconducts
4 Thewiresaretightlyconnected
b Thepowerisswitchedon
6 Theinletanddrainhosesareknotted
7 Allpackingmaterialsandprintingsshouldbetakenoutfromthedishwasher
A Attention: Afterinstallation, pleasemakesuretokeepthismanual.
Thecontentofthismanualisveryhelpfultotheusers.
8. Troubleshooting Tips
Before Calling for Service
Review the charts on the following pages may save you from calling for service.

| Problem | Possible Causes | What To Do | |
| Technical problems | Dishwasher doesn't start | Fuseblown,orthe circuitbreakertripped. | Replacefuseorresetcircuitbreaker.Removeanyother appliancessharingthesamecircuitwiththedishwasher |
| Powersupplyisnot turnedon. | Makesurethedishwasheristurnedonandthedooris closedsecurely.Makesurethepowercordisproperlypluggedintothe wallsocket. | ||
| Doorofdishwasher notproperlyclosed. | Closeddishwashermakingsurethatdoorlatches. | ||
| Water not pumped form dishwasher | Kinkindrainhose | Checkdrainhose. | |
| Filterclogged. | Checkcoarsethefilter.(see section titled " Cleaning The Filter ") | ||
| Kitchensinkclogged. | Checkkitchensinktomakesureitisdrainingwell.Ifproblemiskitchensinknotdraining,youmayneed aplumberratherthanaservicemanfordishwasher. | ||
| General problems | Suds in the tub | Improperdetergent | Useonlythespecialdishwasherdetergenttoavoid suds.Ifthisoccurs,openthedishwasherandletsuds evaporate.Add1gallonofcoldwatertothetub.Close andlatchthedishwasher,thenStartthe"soak"wash cyclelodrainoutthewater.Repeatifnecessary. |
| Spilledrinse-aid | Alwayswipeuprinse-aidspillsimmediately. | ||
| Stained tub interior | Detergentwith colourantwasused. | Makesurethatthedetergentistheonewithout colourant. | |
| White film on inside surface | Hardwaterminerals | Tocleantheinterior,useadampspongewith dishwasherdetergentandwearrubbergloves.Neveruseanyothercleanerthandishwasher detergentfortheriskoffoamingorsuds. | |
| There are rust stains on cutlery | Theaffecteditemsare notcorrosionresistant. | ||
| Aprogrammewasnot runafterdishwasher saltwasadded.Tracesofsalthave gotintothewashcycle.c | AlwaysruntheQuickwashprogramme.withoutanycrockeryinthedishwasherand withoutselectingtheTurbofunction(ifpresent),afteraddingdishwashersalt. | ||
| Thelidofsofter isloose. | Checkthelip.Ensurethefixisfine. | ||
| Noise | Knocking noise in the wash cabinet | Thespayarmis knockingagainst aniteminabasket. | Interrupttheprogramme,andrearrangetheitems whichareobstructingthespayarm.r |
| Rattling noise in the wash cabinet | Itemofcrockery areinsecure inthewashcabinet. | Interrupttheprogramme,andrearrangetheitemsofcrockery. | |
| Knocking noise in the water pipes | Thismaybecaused byon-siteinstallation orthecross-sectionof thepiping. | Thishasnoinfluenceondishwasherfunction.ifindoubt,contactasuitablyqualifiedplumber. |

| Problem | Possible Causes | What To Do | |
| The dishes are not clean | Thedisheswerenot loadedcorrectly. | Seenotesin"LoadingtheDishwasherBaskets". | |
| Theprogrammewas notpowerfulenough. | Selectamoreintensiveprogramme.See"WashCycleTable." | ||
| Notenoughdetergent wasdispensed. | Usemoredetergent,orchangeyourdetergent. | ||
| Itemareblocking thepathofspayarms.r | Rearrangetheitemssothatthespaycanrotatefreely.r | ||
| Unsatis -factory washing result | Thefiltercombination inthebaseofwash cabinetisnotcleanor isnotcorrectlyfitted. Thismaycause thespayarmjets togetblocked. | Cleanand/orfitthefiltercombinationcorrectly.Cleanthespayarmjets.See"CleaningtheSpray Arms". | |
| Cloudiness on glassware | Combinationofsoft waterandtoomuch detergent. | Uselessdetergentifyouhavesoftwaterandselect ashortestcycletowashtheglasswareandtoget themclean. | |
| Black or gray marks on dishes | Aluminumutensils haverubbedagainst dishes. | Useamildabrasivecleanertoeliminatethosemarks. | |
| Detergent left in dispenser cups | Dishesblock detergentcups. | Re-loadingthedishesproperly. | |
| Unsatis -factory drying result | The dishes are not drying | Improperloading | Loadthedishwasherassuggestedinthedirections. |
| Toolittlerinse-aid | Increasetheamountofrinse-aid/Refilltherinse-aid dispenser. | ||
| Dishesareremoved toosoon. | Donotemptyyourdishwasherimmediatelyafter washing.Openthedoorslightlysothatthesteamcan escape.Beginunloadingthedishwasheronlyoncet hedishesarebarelywarmtothetouch.Emptythelow basketfirst.Thispreventswaterformdroppingoff dishesintheupperbasket. | ||
| Wrongprogramme selection | In short programmes the washing temperature is lower.Thisalslowerscleaningperformance.Choosea programmewithalongwashingtime. | ||
| Usingcutlerywith alow-qualitycoating | Waterdrainageismoredifficultwiththeseitems.Cutleryordishesofthistypearenotsuitablefor washinginthedishwasher. |
Error Codes
When some malfunctions come on, the appliance will display error codes to warn you:
| Codes | Meanings | Possible Causes |
| E1 | Longerinlettime. | Faucets is not opened, or water intake is restricted, orwaterpressureistoolow. |
| E4 | Overflow. | Someelementofdishwasherleaks. |
WARNING!
■ Ifoverflowoccurs,turnoffthemainwatersupplybeforecallingaservice.
■ Ifthereiswaterinthebasepanbecauseof anoverfillorsmallleak, thewatershouldberemovedbeforererestartingthedishwasher.
- Technical Information

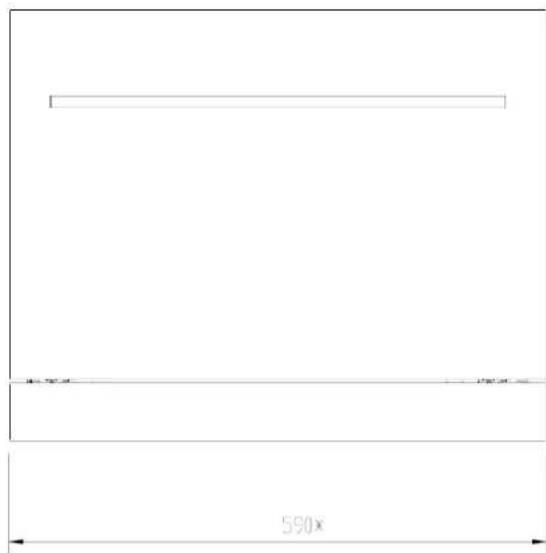
Thedimensionswith * "variable accordingtoactualsituation

| Water pressure: | 0.04-1.0MPa |
| Powersupply: | Seeratinglabel |
| Capacity: | 6placesettings |
10. Installation instruction

Step1a:
Ifonlythebodyintocabinets, pleasemakethismapthesizeofthecabinethole.
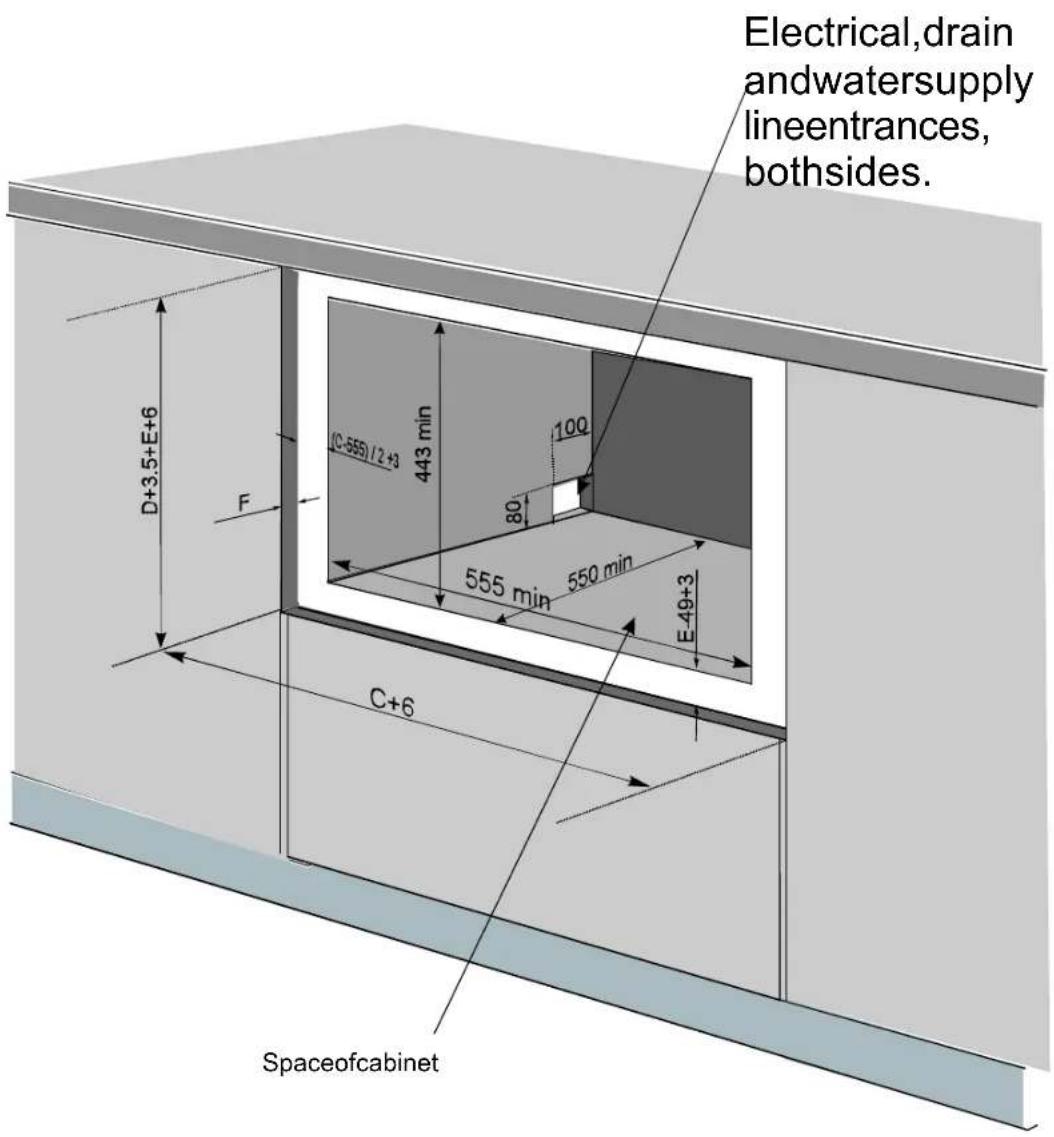
Step1b :
Iftheentiredecorativepanelintothecabinetalso, thesizeofashouldbeequaltoD+3.5+E+6;sizebshouldbeequaltoC+6; Meanwhile,thecabinetaroundtheinwardbooster: thebottomoftheentireplanefortheE-49+3; bothsidesofthe(C-555)/2+3; C,D,EandFastesecondstepwithintherelevantsizedecorativepanels

Step2 :
Weightofthedecorativepanel(up)shouldbe
min3Kg-max4Kg.
Dim.A and B could be alterable by handle,
Dim.C,D,EandFcouldbealterablebyfact,
If you want to make the decorated panels sizesameas
the front of the machine, please usetheminimumsizeinbrackets;
Dim.Fshouldbeinrange16\~22mm,
besidestheapplianceassembling decorativepanels
Note:
Ifthem achinewithadecorativeplate, nothisstep.

Step3:
Assemblethe.decorativepanels
Note:
Ifthem achinewithadecorativeplate, nothisstep.
Step4:
Assemble the display of the door on the
asfigure.Firstinstallsidepiecescrewbetween
baseboardand(dobovor),aniale4;panel
thenpullglidefromoutdoorgroove, case8-screw
between arecolativepanels
Note:
If themachinewithadecorativeplate, nothisstep
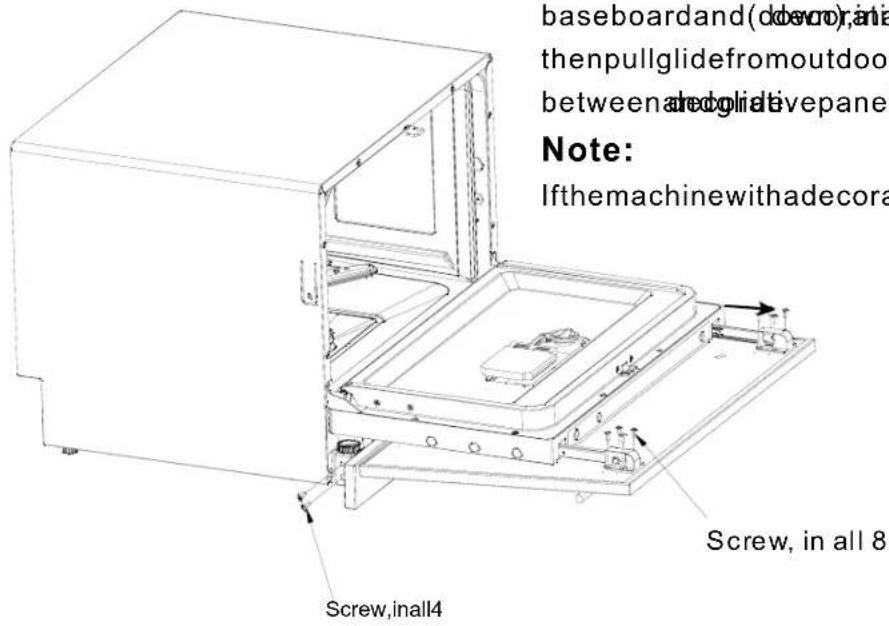

Step 5: Installthedishwasherinaperture, butnotfull,asfigure,adjustscrew, letitsbottomalignsbaperture' thenpushdishwasherfull.

Step: 6 Takeoutcap, a hole, using eyealing screwdriver installs screw, both sides. Then recover the cap in hole.
NOTES

PROOF OF PURCHASE
ATTACH YOUR PROOF OF PURCHASE FOR FUTURE REFERENCE
WARRANTY TERMS & CONDITIONS
These Terms and Conditions apply only to Tisira products distributed in Australia and New Zealand by Arisit Pty Limited.
- This warranty applies for a period of 2 years parts and labour, Australia and New Zealand, commencing from date of purchase.
- Evidence of the date of purchase must be shown to the technician, when he calls, to obtain benefit under this warranty.
-
This warranty applies only to the original purchaser/hire purchaser of this appliance and cannot be assigned or transferred. Failure to produce documentary proof of the date of original acquisition by the original purchaser will result in a charge being levied for work done, labour and parts supplied.
-
This warranty does not apply to:
a) Serviceable items such as filters, fuses, light bulbs, door seals, drive belts, external hoses, etc.
b) Damage to body work, paint work, glass, trivets and plastic items (such as, but not limited to windows, covers, baskets, trays, worktops, door handles, control and kick panels.)
c) Corrosion & rust damage.
d) Damages/blockages caused by laundry or foreign objects.
A fee for service will be charged following warranty claims where no fault is found with the appliance.
- This warranty will not apply where:
a) The fault is caused by accident, misuse, oversuds, an infestation of vermin, fire, flood or the use of products not approved by Arisit Pty. Limited.
b) There has been a failure to comply, with the manufacturer's operating and installation instructions.
c) Service, modification or repair has been carried out by anybody other than an approved Tisira Service Technician.
d) The appliance has been used/installed anywhere other than a private dwelling, or where it has been used other than for domestic use.
e) The appliance is subject to a rental agreement.
-
Any defective part that has been replaced becomes the property of Arisit Pty Limited.
-
This warranty applies only to Tisira appliances purchased and installed in Australia and New Zealand.
-
Loss of use of the appliance or consequential loss of any nature is not covered.
-
A charge may be levied at the discretion of Arisit Pty Limited if the call is deemed unnecessary or if the cause of failure is traced to external sources such as, but not limited to: blown fuses, power failure, faulty installation, etc.
-
Where the appliance, the subject of a warranty claim or repair, is used or installed more than TWENTY (20) kilometres from the nearest
Arisit Service Division or Authorised Service Agent, the cost of delivery to the nearest Service Division or travel costs for a technician or Authorised Service Agent shall be for the account of the Purchaser. Where a built-in appliance is located or installed outside the Arisit Authorised Service Agent's normal service area, additional travel and labour costs shall be the account of the Purchaser
-
Arisit Pty Limited shall not under any circumstances be responsible in terms of this warranty for the replacement or repair of any part of the equipment which may have been damaged in transit, during and after installation or imperfections after installation.
-
Losses caused by act of God, failure to obtain spare parts, strikes or lockouts are not covered.
-
Service is offered during normal working hours only, also appliances to a have clear access in a serviceable area.
-
This warranty does not effect your statutory rights.
-
Our goods come with guarantees that cannot be excluded under the Australian Consumer Law. You are entitled to a replacement or refund for a major failure and for compensation for any other reasonably foreseeable loss or damage. You are also entitled to have the goods repaired or replaced if the goods fail to be of acceptable quality and the failure does not amount to a major failure.
We reserve the right to amend any of the above without prior notice.
Registration Form
To register for your warranty please complete and return this form to Arisit Pty Limited within 30 days of purchase.
t tisira
Where did you first hear about Tisira?
□ Advertising
In Store Display
☐ Other (please specify).
□ Tradesman's Recommendation
□ Recommendation by Friend/Relative
Would you like any further information on other Tisira appliances? Please specify
□ Cooking
□ Dishwashers
□ Laundry
□ All
Please print in block letters
Date of Purchase / /
Name of Retailer
Address
Model Number
Serial Number
□ Mr □ Mrs □ Ms
Initials
Surname
Address
State.
Postcode.
Telephone
CONTACT DETAILS
AUSTRALIA
ARISIT PTY LIMITED
40-44 Mark Anthony Drive, Dandenong South, VIC 3175, Australia
P // 1300 762 219
F // 03 9768 0838
consumer.care@arisit.com
NEW ZEALAND
ARISIT PTY LIMITED
PO Box 68-140
Newton, Auckland 1145,
New Zealand
P // 09 306 1020
F // 09 302 0077
sales@aristonappliances.co.nz
TISIRA IS COMMITTED TO ONGOING RESEARCH AND DEVELOPMENT. EVERY EFFORT HAS BEEN MADE TO ENSURE ALL INFORMATION IN THIS USER MANUAL IS CORRECT AT TIME OF GOING TO PRINT. DIMENSIONS SHOULD BE USED AS A REFERENCE ONLY AND ACTUAL DIMENSIONS SHOULD BE TAKEN FROM THE PHYSICAL PRODUCT ONLY.
MANUFACTURER RESERVES THE RIGHT TO CHANGE SPECIFICATIONS WITHOUT NOTICE.
t tisira
VERSION 2.0
www.tisira.com
- PLACE DISHWASHER TDW6SS
- HELLO
- CONGRATULATIONS ON THE SELECTION OF THIS TISIRA APPLIANCE.
- Read this Manual
- DearCustomer,
- Before Calling for Service
- NOTE:
- IMPORTANT SAFETY INFORMATION READ ALL INSTRUCTIONS BEFORE USING
- GROUNDING INSTRUCTIONS
- ▲WARNING!
- WARNING! PROPER USE
- Operation Instruction
- Control Panel
- Dishwasher Features
- 3.Prior using for the first time
- Fill the Rinse Aid Dispenser
- RinseAidDispenser
- FunctionofRinseAid
- Attention!
- WhentoRefilltheRinseAidDispenser
- AdjustingRinseAidDispenser
- Function of Detergent
- Detergents
- Concentrated Detergent
- Detergent Tablets
- DetergentDispenser
- AmountofDetergenttoUse
- WARNING!
- Fillindetergent
- Loading the Dishwasher Baskets
- Recommendation
- For washing in the dishwasher the following cutlery/dishes
- Arenotsuitable
- Areoflimited suitability
- Attention before or after loading the Dishwasher Baskets
- Loading the Basket
- Plate racks of Basket
- Cutlery Basket
- ▲ WARNING!
- When load bigger Dinner Plates
- Starting a washing programme
- Wash Cycle Table
- Turning On the Appliance
- Change the Programme...
- Forget to Add a Dish?
- At the End of the Wash Cycle
- ■ SwitchOfftheDishwasher
- ■ Openthedoorcarefully.
- ■ Unloadingthedishwasher
- Maintenance and Cleaning
- Filtering System
- Mainfilter 1
- Finefilter 2
- Coarsefilter 3
- Filter assembly
- Remarks:
- CleaningTheFilter
- Caring for the Dishwasher
- CleaningTheDoor
- ProtectAgainstFreezing
- CleaningtheSprayArms
- How to Keep Your Dishwasher in Shape
- ■ AfterEveryWash
- ■ Remove the Plug
- ■ NoSolventorAbrasiveCleaning
- ■ MovingtheAppliance
- Seals
- Installation instruction
- ▲Attention:
- ! Warning
- Installation preparation
- Positioning the Appliance
- About Power Connection
- Electrical Requirements
- Electrical Connection
- Water Connection
- Cold Water Connection
- Connection of drain hoses
- Attention:
- HowtoDrainExcessWaterFromHoses
- WaterOutlet
- ExtensionHose
- Start of dishwasher
- Troubleshooting Tips
- Error Codes
- Installation instruction
- Step1b :
- Step2 :
- NOTES
- PROOF OF PURCHASE
- WARRANTY TERMS & CONDITIONS
- These Terms and Conditions apply only to Tisira products distributed in Australia and New Zealand by Arisit Pty Limited.
- Registration Form
- t tisira
- CONTACT DETAILS
- ARISIT PTY LIMITED
Brand : Tisira
Model : TDW6SS
Category : Dishwasher