
RB-72S - Cooker Rinnai - Free user manual and instructions
Find the device manual for free RB-72S Rinnai in PDF.


| Product Type | Built-In Gas Hob |
| Model | RB-72S |
| Brand | Rinnai |
| Installation | Built-in (worktop cut-out) |
| Product Dimensions (W x D x H) | 760 x 460 x 147 mm |
| Cut-out Dimensions (W x D) | 650–730 x 350–410 mm, corner radius R120 |
| Top Plate Material | Stainless Steel |
| Burner Configuration | 2 Big Burners (Left and Right) |
| Burner Ratings (LPG) | Left: 5.5 kW, Right: 5.5 kW |
| Burner Ratings (Natural Gas) | Left: 5.3 kW, Right: 5.3 kW |
| Pan Support Material | Cast Iron |
| Control Knob Type | Cylindrical |
| Flame Safety Device | Yes (thermocouple) |
| Ignition | DC 1.5V battery (D size) |
| Gas Connection | 1/2" BSP fixed connection |
| Suitable Gas Types | LPG (Liquefied Petroleum Gas) and Natural Gas (NG) |
| Gas Conversion | Convertible between LPG and NG (requires qualified technician) |
| Safety Features | Flame failure safety device |
| Maintenance | Clean with warm water and mild detergent; dry thoroughly |
| Included Accessories | Pan supports, burner caps, burner heads, user manual |
Frequently Asked Questions - RB-72S Rinnai
User questions about RB-72S Rinnai
0 question about this device. Answer the ones you know or ask your own.
Ask a new question about this device
Download the instructions for your Cooker in PDF format for free! Find your manual RB-72S - Rinnai and take your electronic device back in hand. On this page are published all the documents necessary for the use of your device. RB-72S by Rinnai.
USER MANUAL RB-72S Rinnai
natural_image
Hand holding a mechanical component with a tool, labeled 'Pic 1' (no other text or symbols visible)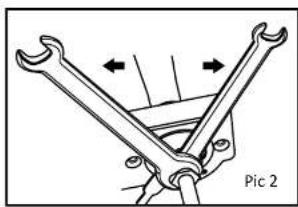
natural_image
Technical line drawing of a mechanical clamp or bracket assembly (no text or symbols)Rinnai
Operation / Installation Manual
Built-In Hob
(LPG / NG)
RB-72S
RB-72G
RB-73TS
RB-73TG
RB-92G
RB-93TS
Content
Guide to Appliances RB-72S / RB-72G / RB-73TS / RB-73TG / RB-92G / RB-93TS 1
Guide to Appliances RB-93TG / RB-93US / RB-93UG 2
Guide to the Appliances 3
Specification 4
Safety Instructions 6
Using for the first time 8
Installation Guide 9
Operation 1
Suitable Pans 1
Cleaning and Care 1
Trouble Shooting Guide 1
Rinnai Customer Care Centers 2
Conversion from NG to LPG & LPG to NG 2
Caution For the Tempered Glass 2
Rinnai
| China | 中国 | |
| Guangzhou Rinnai Gas & Electric Room 2805, No.31 Jianghe Building,Tianshou Road, Guangzhou, China广州林内燃具电器有限公司中国广州天河区大寿路31号江河大厦2805室Tel电话:(86)2038217976Email邮箱:grrjdq@gzrinnai.com.cnURL网址:www.gzrinnai.com.cn | PhilippinesMitsui Indu10 BuenaveHighway, DPhilippinesTel:(63)2Fax:(63)2 |
| Indonesia | Rinnai Holdi |
| Customer Care of PT. Rinnai Indonesia | #02-20 & 21 |
| JL. Raya Pejuangan No.21, | Singapore 4 |
| Komp. Ruko Sastra Graha No.11 -13 | Tel: (65) 674 |
| Jakarta 11530 | Email : servi |
Tel : (62) 0804 1 889 889 (Customer care) / 0815 112 99999
(SMS Center)
Email: customercare_bit@yahoo.com
URL: www.rinnai.co.id
Thailand |
| Macau | 濾門 | 61/1 Soi Ki |
| Rinnai Appliance Service CenterEdificio Industrial, 3 andar F.A da Zona Macau 林內熾具服務中心澳門青洲 跨境工業大廈 3 璞 F 座 | Racha Then Thailand |
| Phone 電話:+853 2852-7799Fax 傳真:+853 2827-0572URL 网址:www.rinnai.com.hk/mo | u#d#n#w#l#d |
| Malaysia | du#m#t#e lo# |
| Rinnai (M) Sdn Bhd D2-3-G & D2-3-1, BlockD2, Pusat Perdagangan Dana 1, Jalan PJU 1A/46, 47301 Petaling Jaya, Selangr#d#p#g, Malaysia | Tel : (66) 2 Email : luck URL : www |
常见问题与解决方法
Guide to the Appliances
RB-93TG
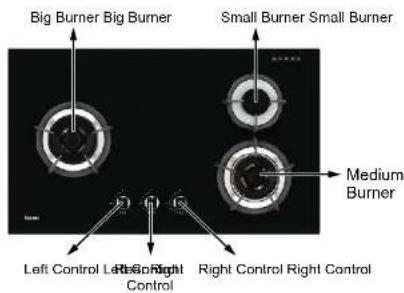
RB-93US
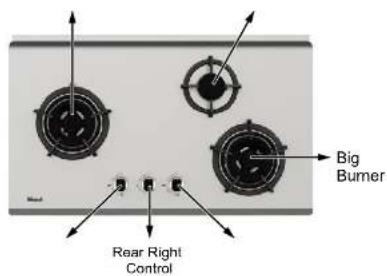
RB-93UG
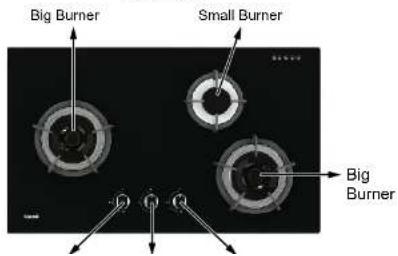
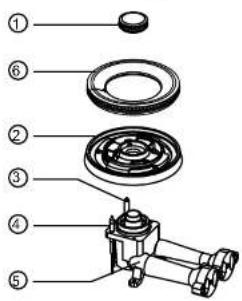
大炉头分解图
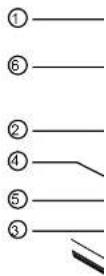
②—
③—
④—
⑤—
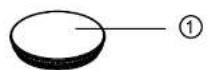
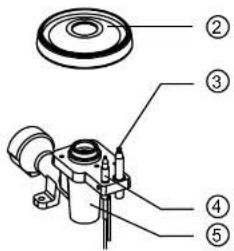
1 Burner Head
2 Burner Body
3 Electrode
4 Thermocouple
5 Ventury
1 Simme
2 Burner
3 Electro
4 Thermo
5 Ventur
6 Burner
Specification
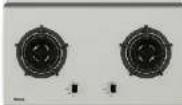 | 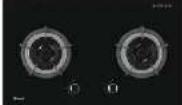 | 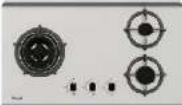 | ||
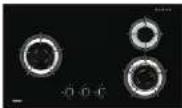
| Rinnai Model No. | RB-72S | RB-72G | RB-73TS | |
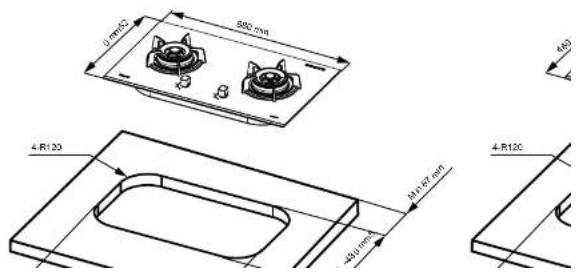
| Cut-out Size(mm) | 650~730 x 350~410 R120 | 650~730 x 350~410 R120 | 650~730 x 350~410 R120 | |
| Product Size(mm) | 760 x 460 x 147 | 770 x 460 x 147 | 760 x 460 x 147 | |
| Rating (kW) | LPG | Left: 5.5 | Left: 5.5 | Left: 5.5 |
| Right: 5.5 | Right: 5.5 | Rear Right: 1.5 | ||
| NIL | NIL | Front Right: 2.0 | ||
| NG | Left: 5.3 Left: 5.3 | Left: 5.3 | ||
| Right: 5.3 Right: 5.3 | Rear Right: 1.45 | |||
| NIL NIL | Front Right: 1.9 | |||
| Top Plate | Stainless | Glass | Stainless | |
| Burners | Left: (B) | Left: (B) | Left: (B) | |
| Right: (B) | Right: (B) | Rear Right: (ES) | ||
| NIL | NIL | Front Right: (S) | ||
| Pan Support | Cast Iron | Cast Iron | Cast Iron | |
| Knob | Cylindrical | Cylindrical | Cylindrical | |
| Flame Safety Device | Yes | Yes | Yes | |
| Ignition | (DC 1.5V) Battery D size | (DC 1.5V) Battery D size | (DC 1.5V) Battery D size | |
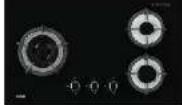 | 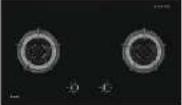 | 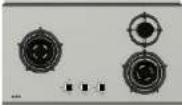 | |
| Rinnai Model No. | RB-73TG | RB-92G | RB-93TS |
清洁和护理清洁和护理
 |  | ||
| Rinnai Model No. | RB-93TG | RB-930 | |
| Cut-out Size(mm) | |||
| Product Size(mm) | |||
| Rating (kW) | LPG | Left: 5.5 | Left: 5 |
| Rear Right: 2.0 | Rear Right | ||
| Front Right: 4.5 | Front Right | ||
| NG | Left: 5.3 | Left: 5 | |
| Rear Right: 1.9 | Rear Right | ||
| Front Right: 4.4 | Front Right | ||
| Top Plate | Glass GlassStainless | ||
| Burners | Left: (B) Left: (B) Left: (B) | ||
| Rear Right: (S) Rear Right: (S) Rear Right | |||
| Front Right: (M) | Front Right | ||
| Pan Support | Cast Iron Cast Iron | ||
| Knob | Cylindrical Cylindrica | ||
| Flame Safety Device | Yes Yes | ||
| Ignition | (DC 1.5V) Battery D size (DC 1.5V) Battery D | ||
Note: The manufacturer reserves the right to effect any technolo-modification without prior notice
Safety Instructions
To avoid the risk of accidents and damage to the appliance, please read these instructions carefully before installation and using it for the first time. They contain important notes on installation, safety, operation and care.
Keep this manual in a safe place and ensure that new users are familiar with the instructions. Pass them on to any future owner.
Safety Precautions
All operations including installations, repairs, maintenance, gas and electrical connection or conversion to other types of gas must be carried out by a suitably qualified and competent person as set out by the local gas and electricity providers. You are to contact your local Rinnai Customer Care Centres if there is a need to convert to another type of gas.
○ Using the gas hob will cause a build-up of heat and moisture in the room in which it is installed. Ensure that the room has sufficient natural or mechanical means of ventilation, e.g. an extractor.
If the hob is used for very long periods of time additional ventilation of the room may be necessary, e.g. by opening windows or doors, or running the extractor on the highest setting.
This gas hob is not designed for commercial or professional use. It is only intended for use in domestic households. Any other usage of the appliance other than the purpose in which it is designed for could void the warranty. The manufacturer is exempt from all responsibilities resulting from incorrect or improper use or operation.
This appliance is not intended for use by people with reduced physical, sensory or mental capabilities, or lack of experience and knowledge, unless they are supervised whilst using it, or have been shown how to use it by a person responsible for their safety.
调节火焰调节火焰
natural_image
Two identical illustrations: a pot on a tripod and a windmill on a flat surface, both without any text or symbols.燃烧器可以在最高和
If a cooker hood is installed above the gas hob, ensure that covered with a pan when in use. Otherwise flames could which could then be damaged or set on fire.
Do not store flammable material under a cooker hood. The cooker hood on fire.
Do not use the appliance as a resting place for anything to catch fire if residual heat is still present or if the appliance
Do not cover the appliance, e.g. with a cloth, kitchen foil, if residual heat is still present or the appliance is switched
Do not uses plastic or aluminium foil containers. These m could catch fire
Do not heat up unopened tins of food on the hob as press causing it to explode. This could result in injury and scald
○ Make sure all the components of the gas burners have be switching on.
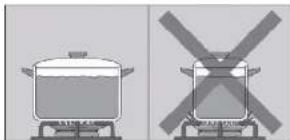
Pans must be the correct size for the burner they are use pan which is too small will be unstable on the pan support large, flames can spread out to the sides and damage or claddings or surrounding units and also parts of the hob.
o Connection to the gas supply must be carried out by a sup person in strict accordance with current local safety regul
- For safety reasons, this appliance may only be used whe
o Installation, maintenance and repairs may only be carried competent person in strict accordance with current local s
- During installation, maintenance and repair work, the ann
Using for the first time
- Remove any protective foil and adhesive labels.
- Clean all removable parts of the burners with a solution of warm water and a little washing-up liquid applied with a soft sponge. Dry all parts thoroughly after cleaning and then reassemble the burners (see "Cleaning and care").
- Clean the stainless steel trough with a damp cloth, and then wipe dry.
The metal components have a protective coating which may give off a slight smell when heated up for the first time.
The smell and any vapours will dissipate after a short time, and do not indicate a faulty connection or appliance.
接电接电
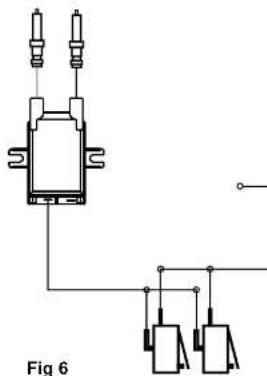
Fig 6 & Fig7
RB-72S / RB-72G / RB-92G
natural_image
Pure electrical circuit lines without any symbolsRB-73TS / RB-73TG / RB-93TS / RB-93TG / RB-93US / RB
A A A
安装指引
电气连接电气连接
All operations relating to installation, regulation and con must be carried out by an authorised installation person regulations, standards and the specifications of the gas. Before you begin, turn off the appliance's electricity and You are recommended to contact your local Rinnai Cust to another type of gas.
The units next to the appliance must be made of non-flamma covering and glue for adhering it must be heat resistant.
This appliance cannot be installed above fridges, washing ma similar.
An oven must have a power cooling fan to install a hob above dimensions in its installation manual.
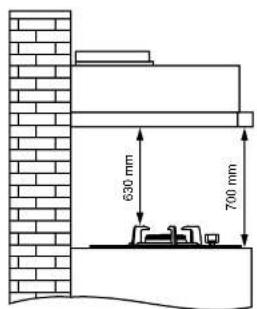
If a cooker hood is installed, you must follow the installation r keeping a minimum distance of 550 mm to the hob.
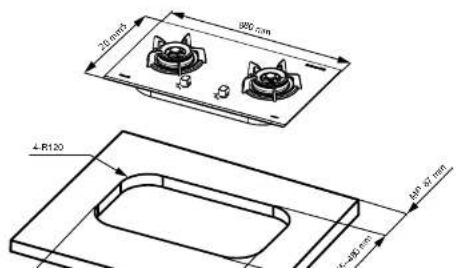
Preparing the Bench Top (Fig 2 & Fig 3)
Make an appropriate size cut in the work surface. It is recommendable to place a non-flammable separator (e.g. from the bottom of the hob. This will prevent access to the be On wood work surfaces, varnish the cutting surfaces with a s from moisture which could collect under the work surface.
Installation of Appliance
The adhesive seal (underside of the hob) are factory-fitted; d remove them. The seal ensures that the entire work surface w water seepage.
In order to fit the appliance into the kitchen unit, first place the
Installation Guide
Fig 2 & Fig 3
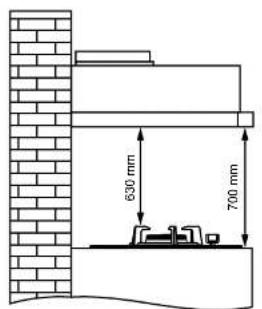
Fig 2 & Fig 3
RB-9 Series RB-7 Series
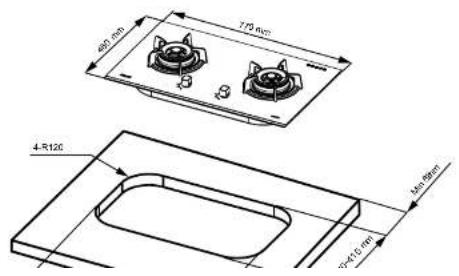
RB-9 Series RB-7 Series
安装指引
安装安装
Electrical installation
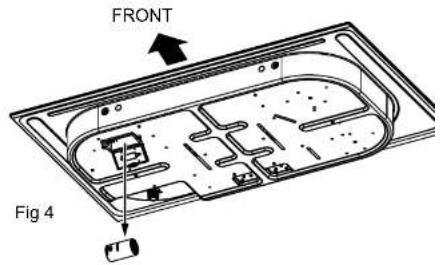
Please install a DC 1.5v battery into the battery casing at the Hob. (Fig 4)
When the battery is exhausted; or the spark become weak, a replaced. The battery compartment is located as shown in the correct polarity as shown.
Warning: Please take out the battery if the hob is not use for
Gas Connection (Fig. 5)
The end of the inlet connection point of the gas hob has a 1/2 Fixed connection.
- Connection using a flexible hose (For LPG only). In this c accessory and the O-Ring as shown in Fig. 5. In this case
Installation Guide
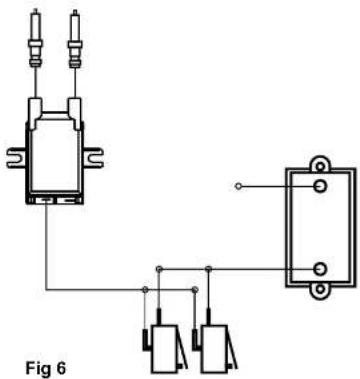
Electrical Connection
Fig 6 & Fig7
RB-72S / RB-72G / RB-92G
natural_image
Pure electrical circuit lines without any symbolsRB-73TS / RB-73TG / RB-93TS / RB-93TG / RB-93US / RB-93UG
A A A
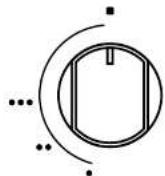
- The control knob is used to ignite the burner and to regulate
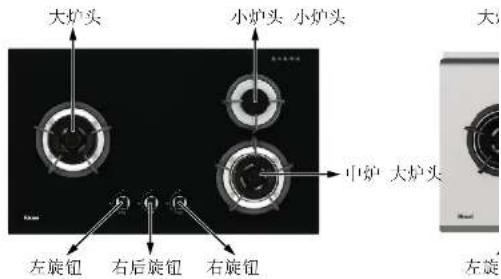
Big Burner & Medium Burner Small Burner & Extra Sn
■ The gas supply is turned off
High Flame
Max Simmer
- Min Simmer
The burners can only be in operation mode by press appropriate control and turning it anti-clockwise, and turning the control clockwise.
The following will cause damage to the appliance: Operating the burner without pressing the control. Operating the burner on by turning the control cl
The manufacturer will not accept liability for any dan incorrect operation.
Operation
Regulating the Flame
natural_image
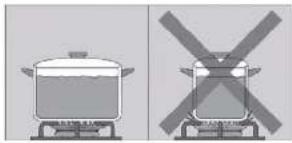
Two identical illustrations of a cooking pot and a windmill, both without any text or symbols.The burners can be regulated at any level between the highest and lowest flame.
Control the flame so that it does not spread out beyond the sides of the pan. As the outer part of the flame is much hotter than the centre, the tips of the flames should stay beneath the pan base. Flame tips which extend beyond the sides of the pan merely warm up the air in the room and can also damage pan handles and increase the danger of injury
Switching OFF
Turn the control clockwise to position "o"
This stops the flow of gas and the flame goes out
Warnings
- It is normal to hear a slight whistling noise while the burner is operating.
When it is first used for the first time, it is normal for the burner to give off odours; this does not pose any risk and does not indicate a malfunction; the smell will be gone over the time.
A few seconds after the burner is switched off, a sound (thud) will be produced. This is not a fault - this means that the safety device is no longer operating. - Keep the burner as clean as possible. If the ignitor are dirty they will not light properly. Clean them periodically using a small non-wire brush. Rear in mind that the ignitor must
Extra small Burner ∅ 10
Refer to the chart above and ensure that the pan diameter maximum diameters given for the burner you are using. A unstable on the pan support. If the pan base diameter is t to the sides and damage or burn the worktop, wall claddir also parts of the hob. The manufacturer cannot be held lia
- Select pans which are suitable for the burner they are to be larger diameter pans on the large burners, and smaller diameter burners
o Pans with thick bases are preferable as these distribute h bases, there is a danger of food overheating in places. St
- Any heat-resistant pans can be used on a gas burner.
When placing pans on the pan support(s) make sure y they cannot tip up. Please note that it is not possible to wobbling very slightly.
Always place pans on the pan support(s) supplied. Pair directly on the burner.
Cleaning and Care
Cleaning and Care
The appliance should be cleaned after each use. Allow the appliance to cool down to a safe temperature before cleaning.
To avoid water marks and lime scale deposits, use a soft cloth to dry surfaces that have been cleaned with water.
- Stubborn soiling should be soaked first.
- Food which boils over onto the hot hob can cause the burner components and the stainless steel surface of the hob to discolour. Remove any soiling immediately.
The surfaces of the burner components will become more matt with time. This is quite normal and will not affect the operation of the hob.
To avoid damaging the surface of your appliance, do not use:
- cleaning agents containing descaling agents, soda, alkaline, ammonia, acids or chlorides
- stain or rust removers
- abrasive cleaning agents, e.g. powder cleaners and cream cleaners
- solvent-based cleaning agents
- dishwasher cleaner
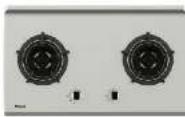 | 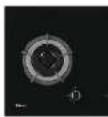 | ||
| 型号 | RB-72S | RB-72 | |
| 开孔尺寸(mm) | 650~730 x 350~410 R120 | 650~730 x 350 | |
| 产品尺寸(mm) | 760 x 460 x 147 | 770 x 460 | |
| 功率(kW) | LPG | 左:5.5 左:5.5 | |
| 右:5.5 右:5.5 | |||
| NIL NIL | |||
| NG | 左:5.3 左:5.3 | ||
| 右:5.3 右:5.3 | |||
| NIL NIL | |||
| 面板 | Stainless Glass | ||
| 炉头 | 左:(B) 左:(B) | ||
| 右:(B) 右:(B) | |||
| NIL NIL | |||
| 锅架 | 铸铁 铸铁 | ||
| 旋钮 | 圆柱形 | 圆柱形 | |
| 安全装置 | YES YES | ||
| 点火 | (DC 1.5V) 十电池 D size | (DC 1.5V) 十电 | |
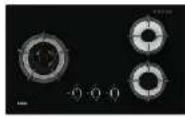 |  | |
| 型号 | RB-73TG | RB-92 |
产品指引
炉头分解
小 & 超小炉头 中 & 大炉头
1 燃烧头
Simmer燃烧器头
| Cleaning | Instructions | |
| Stainless Steel & Glass Surface | Clean stainless steel & glass surfaces with a solution of warm water and a little washing-up liquid applied with a soft sponge.If necessary, you could use the scouring pad on the reverse of a washing-up sponge. Apply with an even pressure following the direction of the “grain”. | Printed sur (Flame sym Remove ar printed flam particularly damage if I Do not use printed flam |
| Pan supports | Remove the pan supports. Clean the pan supports using a solution of warm water and a little washing-up liquid applied with a soft sponge.If necessary, you could use the scouring pad on the reverse of a washing-up sponge | Stubborn su supports ar |
| Controls | Clean the controls with a solution of warm water and a little washing-up liquid applied with a soft sponge. | The control |
| Burner Head Burner Body and Simmer | Clean the burner head with a solution of warm water and a little washing-up liquid applied with a soft sponge. | The burner Make sure |
Cleaning and Care
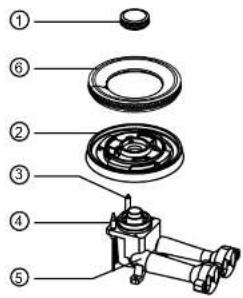
To Assemble the Big Burner
To Assemble the Medium Burner
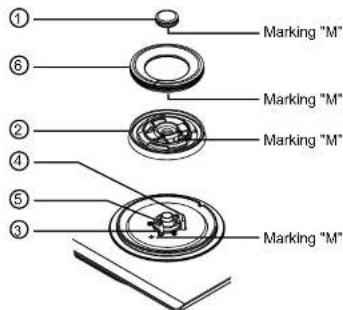
Place burner body②onto ventury ⑤. Ensure the burner body sit nicely on the ventury with the thermocouple ④ and the electrode ③ extend through their respective holes in the burner body.
■ Position the burner head Ⓔ onto the burner body Ⓩ.
■ Position the simmer burner head ① onto the center of the burner body ②.
■ To assemble Medium Burner, ensure that simmer burner head, burner head, burner body and drip pan / top plate have marking "M" ( RB-93TS & RB-93TG ).
To Assemble the Small Burner & Extra Small Burner
RB-93TG
| Fault Possible cause Solution | |
| No ignition (DC) | The battery have been used (drained) up.Electrode gap excessiveIgnitor connections loose |
| The automatic ignition function does not work | Cleaning products stuck between the ignitor and the burners.The burners are wet.The burner covers are not correctly positioned. |
| The burner flame is not uniform. | The burner components are not correctly positioned.The grooves on the burner head & body are dirty. |
| The flow of gas does not appear normal or no gas comes out. | The gas supply is blocked via intermediary valves.If the gas is supplied from a gas cylinder, check that this is not empty. |
| The kitchen smells of gas. | A gas tap has been left on. There may be a leak in the gas cylinder coupling. |
| The safety valves on one of the burners are not working. | The control knob was not held down for long enough.The grooves on the burner head & body are dirty. |

Warning!
Only a qualified person can convert this appliance.
. Remove pan support, burners and knobs from the hob body.
. Remove the stainless steel top plate by using a cross screwdriver. Be careful not to damage the electrode and the thermocouple when removing the steel top plate.
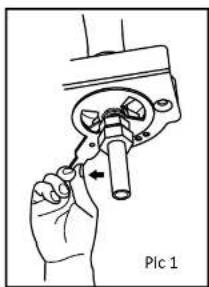
. Use the key included to loose the holder at the ventury as shown in picture 1.
. Use type #12 & #14 fixed wrench to remove the nuts on the copper pipe and the nozzles at the ventury as shown in picture 2.
. Remove all the nozzles from the ventury and place the correct nozzles back. Make sure the damper plates and the damper springs are properly installed.
. Tighten back the nuts and nozzles onto the copper pipe.
. Use a spanner to remove the LPG adaptor if using Natural gas or Install If using LPG. Do make sure that it is tight.
. Do a leak test on all joint to ensure there is not leakage found.
natural_image
Hand holding a mechanical component with a lever, labeled 'Plc 1' (no other text or symbols)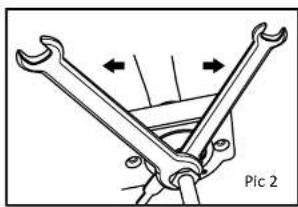
natural_image
Technical line drawing of a mechanical clamp or bracket assembly (no text or symbols)Replace back all the parts back onto the hob.
目录
器具指引RB-72S / RB-72G / RB-73TS / RB-73TG / RB-92G / RB
器具指引 RB-93TG / RB-93US / RB-93UG
器具指引
产品说明
安全指引
初次使用
安装指引
使用说明
适用盘子
清洁与保养
常见问题与解决
林内容服中心
气种置换NG换LPG & LPG换NG
警示强化玻璃
- Rinnai
- Operation / Installation Manual
- Content
- Guide to the Appliances
- Safety Instructions
- Safety Precautions
- 调节火焰调节火焰
- Using for the first time
- 安装指引
- Preparing the Bench Top (Fig 2 & Fig 3)
- Installation of Appliance
- Electrical installation
- Gas Connection (Fig. 5)
- Installation Guide
- Electrical Connection
- Operation
- Regulating the Flame
- Switching OFF
- Warnings
- Cleaning and Care
- To avoid damaging the surface of your appliance, do not use:
- 产品指引
- Warning!
- 目录
Brand : Rinnai
Model : RB-72S
Category : Cooker