VX-1002-TX - AV Extender Black Box - Free user manual and instructions
Find the device manual for free VX-1002-TX Black Box in PDF.


| Product Type | AV Extender (Transmitter) |
| Brand | Black Box |
| Model | VX-1002-TX |
| Video Input | 1x HDMI (Type A) |
| Video Output | 1x RJ45 (Cat5e/6) |
| Maximum Resolution | 1080p @ 60 Hz |
| Transmission Range | Up to 100 m (328 ft) over Cat5e/6 |
| IR Support | Yes (IR pass-through, 20-60 kHz) |
| Power Supply | 5V DC, 1A (via micro USB or screw terminal) |
| Power Consumption | < 2.5 W |
| Dimensions (W x D x H) | 120 x 80 x 25 mm (4.7 x 3.1 x 1.0 in) |
| Weight | 200 g (7.0 oz) |
| Operating Temperature | 0 °C to 50 °C (32 °F to 122 °F) |
| Storage Temperature | -20 °C to 60 °C (-4 °F to 140 °F) |
| Humidity | 10% to 90% RH (non-condensing) |
| Housing Material | Metal (steel/aluminum) |
| Mounting | Desktop or wall-mountable (brackets included) |
| LED Indicators | Power, Link, Data |
| Compliance | CE, FCC, RoHS |
| Warranty | 2 years |
| Maintenance | Wipe with a dry cloth; no liquid cleaners |
| Cleaning | Use soft, lint-free cloth; disconnect power before cleaning |
| Safety | Do not expose to water or excessive heat; use only included power adapter |
| Spare Parts Availability | Contact Black Box support for replacement adapters or cables |
| Repairability | Not user-repairable; no internal serviceable parts |
Frequently Asked Questions - VX-1002-TX Black Box
User questions about VX-1002-TX Black Box
0 question about this device. Answer the ones you know or ask your own.
Ask a new question about this device
Download the instructions for your AV Extender in PDF format for free! Find your manual VX-1002-TX - Black Box and take your electronic device back in hand. On this page are published all the documents necessary for the use of your device. VX-1002-TX by Black Box.
USER MANUAL VX-1002-TX Black Box
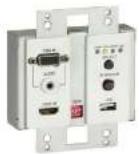

FCC and IC RFI Statements/NOM Statement
FEDERAL COMMUNICATIONS COMMISSION AND INDUSTRY CANADA RADIO FREQUENCY INTERFERENCE STATEMENTS
This equipment generates, uses, and can radiate radio-frequency energy, and if not installed and used properly, that is, in strict accordance with the manufacturer's instructions, may cause interference to radio communication. It has been tested and found to comply with the limits for a Class A computing device in accordance with the specifications in Subject 3 of Part 15 of PCC rules, which are designed to provide reasonable protection against such interference when the equipment is operated in a commercial environment. Operation of this equipment in a residential area is likely to cause interference, in which case the user at his own expense will be required to take whatever measures may be necessary to correct the interference.
Trademarks/Safety Instructions
TRADEMARKS USED IN THIS MANUAL
Black Box and the Double Diamond logo are registered trademarks of
BB Technologies, Inc.
Blu-ray" is a trademark of Blu-ray Disc Association.
Any other trademarks mentioned in this manual are acknowledged to be
the property of the trademark owners.
Important Safety Instructions
- Do not expose this apparatus to rain, moisture, dripping or splashing water
and do not place objects filled with liquids, such as vases, on the apparatus.
- Do not install or place this unit in a bookcase, built-in
confined space. Make sure the unit is well ventilated.
- To prevent risk of electric shock or fire hazard caused by overheating, do not
abstract the unit's ventilation openings with newspapers, tablecloths,
curtains, and similar items.
- Do not install near any host sources such as radiators, heat registers, stoves,
or other apparatus (including amplifiers) that produce heat
-
Do no place sources of flames, such as lighted candles, on the unit.
-
Clean this apparatus only with a dry cloth.
-
Unbelug this apparatus during lightning storms or when unused for jnoa
periods of time.
- Protect the power card from being walked on or climbed particularly at
(1) Targeted list: (Subs. 2003; 2004; 2005; 2006; 2007; 2008; 2009; 2010; 2011; 2012; 2013; 2014; 2015; 2016; 2017; 2018; 2019; 2020).
-
Oakure vitrheinertivierungskreis specified by the manufacture
-
Only the all-invested reserves specified by the funds and li
-
Refer all servicing to qualified service personnel.
Disclaimer
Black Box Network Services shall not be liable for damages of any kind, includ-
ing, but not limited to, punitive, consequential or cost of cover damages, result-
ing from any errors in the product information or specifications set forth in this
document and Black Box Network Services may reuse this document at any
time without notice.
Table of Contents
Table of Contents
- Specifications....7
- Overview 10
2.1 Introduction....10 2.2 [1]
2.2 Features 10
2.3 What's Included 11
2.4 Hardware Description 12 - Automatic Input Detection 14
- EDID Presets 16
- Hardware installation....17
- Troubleshooting 18
Chapter 1: Specifications
1. Specifications
Wallplate Transmitter (VX-1102-TX)
| Video | |
| Input (1) HDMI IN, (1) VEA IN, (1) Audio IN | |
| Input Signal Type HDMI 1.4 xHDCP | |
| Resolution Support | VSA: 1920 x 1200, 1952 x 1082, 1680 x 1050, 1600 x 1200, 1900 x 900, 1420 x 1050, 1440 x 950, 1560 x 768, 1280 x 1024, 1280 x 600, 1280 x 768, 1280 x 720, 1024 x 768, 800 x 520, 540 x 480 MBO Hz HDMI: Up to 3640 x 2 (60) |
| Input Video Level 05-12 vpp | |
| Maximum Power Clock | 297 MHz |
| Output (1) HDBest Out | |
| Output Signal Type | HDBest |
| Video Impedance 100 ohms | |
Chapter 1: Specifications
| Wallplate Transmitter (continued) | |
| Audio | |
| Input (1): 3.5-inr min sec, stereo audio binding with VGA input | |
| Supported Audio Format | HDMI Stereo, LPCM a.t. LPCM A.T. Dolby True HD, DT-HD Master Audio, VGA Stereo |
| General | |
| Environment | |
| Operating Temperature | 32 to 13°F (0 to 45°C) |
| Storage Temperature | -4 to -158°F (-20 to +70°C) |
| Humidity 10 to 90%, noncondensing | |
| FSD Protection Human-body model ±8 kV (air-gas discharge)/4 kV (contact discharge) | |
| Power | |
| Power Supply 12 VDC, 1.5 APcH | |
| Power Consumption Maximization | 3.36 W, powered by HDBaseT recaver with PCH |
| Mechanical | |
| Dimensions: 4.15" x 3.58"W x 1.16"D (10.56 x 9.1 x 2.94 cm) | |
| Wegar 0.46 lb (0.2 kg) | |
| Approvals CF, FCC, RCHS, PCH | |
Chapter 1: Specifications
Cable Specifications
| Cable Type Range Supported Video | |
| CAT5e/6 328 L (100 m) Up to 1080p @ 60 Hz, 36-bit | |
| 230 Tc (70 m) 3840 x 2160 @ 30 Hz, 4.4 A bit | |
| CAT6o/7 328 F (100 m) 1280p @ 60 Hz, 48 bit;1080p @ 60 Hz, 3D;3840 x 2160 @ 60 Hz, 42.0 bit |
NOTE: We recommend using straight-through Category cables wired to 15529 standard.
Chapter 2: Overview
- Overview
2.1 Introduction
The VX1000 Series Walplate transmitter - HDMI, VGA (VX-1002-IX) is a 2-to-1 walplate HDBaseT transmitter with one HDMI input, one VGA input, and one HDBaseT output. It enables transmission of an HDMI signal over a single CA/Se6 cable up to 328 feet (100 meters) for 1082p HD video and HD Audio distribution, or 230 feet (70 meters) for 3840 x 2160 @60 4.2.0 8-bit HD video and HD Audio distribution.
This waliplate HDBaseT transmitter simplifies installation and also creates a clean seamless lock with the decor.
VGA and HDMI inputs are automatically selected and switches when the unit detects a signal. A smart detection feature prioritizes inputs. You can also switch the inputs manually—just press the switch button on the front panel of the transmitter.
The VX-1002-TX also supports a-directional IR and Ethernet passthrough. It offers an excellent solution to any commercial or residential environment where switching between VEA with audio and HDMI over distance is required.
NOTES
-
Must be used with a compatible receiver (VX-1003-RX or VX-1007-RX).
-
With 48-V PolI integrated inside, the extender pair needs just one power supply connected to the RX unit to power both units.
2.2 Features
- Provides Z:1 switching between VGA and HDMI inputs to HDBaseT output
- Robust HDBaseT technology distributes lossless 3840 x 2160 @ 30 Hz HD video and audio.
- Transmits an HDMI signal over a single CAT5e6 cable under recommended conditions.*
*NOTES
- 250 feet (70 meters): 3840 x 2160 @ 60 4:2:0 8-bit / 24-bit True Color with Chroma subsampling color palette: 4K @ 60 4:2:0
- 320 feet (100 meters): 1920 x 1080p HD video © 60 Hz / 36bit Deep Color
• Installed in a 2-gang US Decora wall plate.
• EDID management for VGA input.
• Automatic input detection.
• HDMI V1.4 compliant
Chapter 2: Overview
- 4K compatible—60 Hz, 4:2:0.
• HDCP compliant.
• Bi-directional IR supported.
• Supports Ethernet passthrough.
- Supports one-way Poll (Power over HDBaseT, can be powered by the HDBaseT
receivers with PSE (Power Sourcing Equipment).
- Compact size for convenient and unobtrusive installation.
2.3 What's Included
Your package should include the following items. If anything is missing
or damaged, contact Black Box Technical Support at 077-677-2269
OF (HCPAD) 求出及认购
- VX1000 Series Walplate Transmitter - HDMI, VGA (VX-1002-TX)
• (1) 3.81-mm Phoenix male connector (5-pin)
• (1) cover with four screws
• This user manual
Additional items you will need:
• (1) VX1000 Series Receiver (VX-1001-RX or VX-1003-RX) or
(1) Presentation Switcher (AVSC-0602H).
Chapter 2: Overview
2.4 Hardware Description
Figures 2-1 and 2-2 illustrate the frame and back panels of the transmission Table 2-1 describes its components.
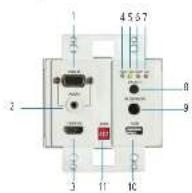
Figure 2-1. Transmitter front panel,
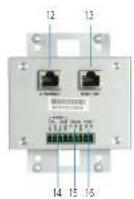
Figure 2-2. Transmitter back panel
Chapter 2: Overview
Table 2-1. Transmitter components.
| Number Component Description | |
| 1 VGA IN Connects to VGA source device | |
| 2 Audio Audio input (for use with VGA source) | |
| 3 HDMI IN Connects to HDMI source device | |
| 4 HDMI LED ON HDMI signal transmitted OFF: No HDMI signal transmitted or unstable | |
| 5 VGA LED ON VGA signal transmitted OFF: No VGA signal transmitted or unstable | |
| 6 HDCP LED ON HDMI video being transmitted. Binding, Non-HDCP video is being taken used. OFF: No video is being transmitted | |
| 7 LINK LED ON HDMI link is normal. Binding/CRP No HDMI link or unstable | |
| 8 Select button Press this button to set the input source. | |
| 9 IR sensor IR in built-in IR receiver (30 to 95 kHz) | |
| 10 USE Table A port Connect to USB bus device. | |
| 11 | EDIO-DIP switch Used to select EDIO packets |
| 12 | 113 R1-4s port Connects to Ethernet device |
| 13 | 113 R=43 HDMI OUT port Connects to HDMI set IN port, of the receiver (RX-1001-RX) |
| 14 | Power IN Connects to 12 V power source. OUT Maximum power output is 12 V, 400 mA |
| 15 RS-232 transthrough. | |
| 16 IR OUT Connect to IR end-user tube. | |
Chapter 3: Automatic Input Detection
- Automatic Input Detection
- If the current signal is VGA input, the transmitter will not automatically switch to HDMI input
- The button switch will recognize the VGA and HDMI input signals only if they are both valid. For example, it no HDMI input signal is present, the transmitter cannot switch to HDMI input even using the button.
After power on, the input signal is automatically selected according to the following tables.
Table 3-1. Power on to detect the input signal
| HDMI IN VGA IN Input Select | |
| Yes No / Yes HDMI IN | |
| No No HDMI IN | |
| No Yes VGA IN | |
Table 3-2. After power or, press button to switch input.
| Current Input | HDMI IN | VGA IN | Button Select |
| HDMI IN No / Yes | No HDMI IN | ||
| HDMI IN | Yes | Yes | VGA IN |
| VGA IN | Yes | Yes | HDMI IN |
| VGA IN | No | Yes | VGA IN |
Chapter 3: Automatic Input Detection
Table 3-3. After power or, change the input signal state.
| Current Input | HDMI IN | VGA IN | Input Select |
| HDMI IN Yes No | Yes/Yes->No | Yes/No | HDMI IN |
| HDMI IN No No | Yes VGA IN | ||
| HDMI IN Yes->No No HDMI IN | |||
| HDMI IN Yes->No Yes VGA IN | |||
| VGA IN No->Yes/Yes > No | Yes VGA IN | ||
| VGA IN | No Yes | Yes->No | HDMI IN |
Chapter 4: EDiD Presets
4. EDID Presets
For VGA input, see the next table.
Table 4-1. Set EDD-DP switch for VGA input.
| DIP Switch Setting VGA Input | |
| 1 = OFF (DOWN)2 = OFF (DOWN)3 = OH (DOWN) | Select 1260 x 800 as native video. |
| 1 = OFF (DOWN)2 = OFF (DOWN)3 = ON (UP) | Select 1520 x 1200 as native video. |
| 1 = OFF (DOWN)2 = ON (UP)3 = OH (DOWN) | Select 1520 x 1080 as native video.This is the output video. |
| 1 = OFF (DOWN)2 = ON (UP)3 = ON (UP) | Select 1260 x 720 as native video. |
| 1 = ON (UP)2 = OFF (DOWN)3 = OH (DOWN) | Select 1024 x 756 as native video. |
| 1 = ON (UP)2 = OFF (DOWN)3 = ON (UP) | Select 800 x 600 as native video. |
| 1 = ON (UP)2 = ON (UP)3 = OH (DOWN) | Reserved |
| 1 = ON (UP)2 = ON (UP)3 = ON (UP) | Reserved |
NOTE: To make the change effective, upplag the VGA cable and plug it in again.
Far HDMI input:
Always passthrough copy from the detected sink.
Chapter 5: Hardware Installation
5. Hardware Installation
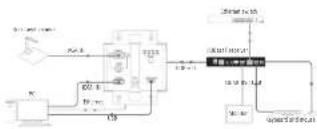
- Connect an HDMI or VGA input source (such as Blu-ray) to the VX-1002-TX transmitter.
NOTE: Be careful when connecting cables, do not force the case ends into the connection. - Connect a good quality, well-terminal CATset cable of no more than 230 feet (70 m) for 4K or 328 feet (100 m) for 1060p from the HDBeeT OUT and the Transientive HDBeeT box at the HDBeeT box
NOTE: 230 feet (70 m) @ 4K or 328 feet (100 m) @ 1060p video are maximum recommended transmissive distances for this model and remote posttransmission conditions—including straight cable runs with no electrical interference, bends, kints, touch panels, or well outlets.
If either of the above is a factor in your installation, transmission range may be affected—avoid where possible. - Connect an HDMI display device (LED/CD display or projector) to the HDMI OUT port on the HDBaseT receiver.
- Connect the IR emitter cable to the IR OUT port of the VX-1002-TX, connect the IR receiver cable to the IR RX port of the receiver, and connect the IR emitter to the IR TX port of the receiver.
- Power on the HDBaseT receiver, if the HDBaseT receiver doesn't support the PSE function, correct, a 12 V power supply to the VX-1002-TX transmitter.
flowchart
graph TD
    A["Control Unit"] --> B["Data Acquisition"]
    B --> C["Processing Unit"]
    C --> D["Output Unit"]
    D --> E["Output Data"]
    style A fill:#f9f,stroke:#333
    style E fill:#bbf,stroke:#333
Figure 5-1. typical application
877-877-2269 | blackbox.com Page 17
Chapter 6: Troubleshooting
- Troubleshooting
The majority of HD distribution installation issues are either caused by minor connection errors, communication problems between devices, or when the transmission of high signal bandwidth is attempted using insufficient cable. It you encounter any technical difficulties when installing and controlling the matrix, refer to the following troubleshooting checklist: if you cannot resolve your problem, contact Black Box Technical Support at 677-677-2269 or info@blackbox.com
Problem: No picture or poor-quality picture
Possible Solutions:
-
Power—is your transmission device and receiver powered with correct LED indication?
-
If possible, always use test equipment before installation and to troubleshoot any problems.
- Check that the display device supports HDCP, is switched to the correct source input mode, and is compatible with the member if you suspect any issues, replace the display device with another model.
- Distance: Is the cable top long for the signal to be transmitted effectively? Make sure the cable distance matches the project requirements and is well within the maximum transmission distance of the signal.
NOTE: If you need more distance than the transmitter can provide, use another extender set to be sure that the signal reaches its destination effectively. - Cable joins—Joins in the cable run or 10-45 connectors can impact signal strength, resulting in reduced transmission that may manifest itself in incorrect picture quality, picture dropping out, or no picture.
- Cable choice and signal reduction—Are stranded pouch leads used as interconnects between peach panels or wall outlets? CCA (Copper Clad aluminum) cables being used? These can reduce transmission rates by up to 40%—we recommend solid-core straighthrough cables with minimum connections used wherever possible.
- Correct connection—Double-check that all UIP, HDMI, power and R cables are connected to the correct ports.
NOTE: Even a fraction off target can make the difference between a perfect picture and a blank screen. Double-check all connections are firmly made in the correct ports.
Chapter 6: Troubleshooting
- Is the cable ward to 5686 standards? Is the cable ward and terminated correctly and are those terminations connected to the correct ports? Incorrect wiring and termination will result in unstable operation or a blank screen.
- Electrical interference—could any form of interference be generated? If so, attempt to remove the source of electrical interference or move the cable run to decrease the effects of the interference.
- Is a picture displayed when connecting the source directly to the display? It not, then the problem could be with the input or output device rather than the cable or matrix itself.
- HDMI lead condition and quality—HDMI cables and connectors are delicate and can be damaged much easier than component or case cable. Lead quality varies dramatically, particularly in lower price brackets. Swap HDMI leads and check operation—damage to or quality of your leads could be the problem. If in doubt, swap them over. Be careful when inserting and extracting your HDMI from matrix parts so you don't damage the connectors or ports.
- Picture speckles/HD "noise". A poorly established signal that may be caused by poor quality or excessive HDMI cable lengths. Try swapping the display adapters from a location that is functioning property or swapping the outputs of the matrix switch used.
If the problem remains on the same screen, this may be caused by a connection problem between matrix and display—turn off all equipment and swap the signal carrying cables at both ends to determine if the cable or termination is at fault.
I-D Noise (NO image) may be an HDCF Issue between the source and display, but poor cabling can also cause this via poor communication.
- Bu-ray: 3D—Is the equipment used 3D enabled compatible? Is a 3D disk playing in a 3D-enabled Bu-ray player or through a compatible AV receiver?
- Color distortion—a pink or green screen indicates an incompatibility between color spacing formats—the commonly used RGB or YUV used by older displays. Some sources allow switching between RGB and YUV which may save any color problems. If not, change the HDMI cable between the source and the matrix to rule out defective calling.
Chapter 6: Troubleshooting
Problem: No sound or poor-quality audio.
Possible Solutions:
Audio is transmitted within the video signal. there is no separate audio track so a problem with sound will be accompanied by a problem with picture. But you might have technical issues with audio caused by problems communicating between sources, displays, and/or AV receiver settings.
- Have specific speaker sets or zones been enabled? Some AV receivers allow individual speaker selections assigned to specific zones in the set up so check the speakers used are fully connected to the employer and correctly assigned within the system set up. An EDID issue might occur when the source reads the audio EDD from the display and only requests two channel audio. You might need to copy EDID from the AV receiver or use an embedded EDD in the AMP or matrix.
NOTE: If you have problems when using an AV receiver, the cause is usually the settings of the AV receiver itself. Refer to the AVS manufacturer's guidelines for the correct settings to use for your requirements. - Consistency of audio output between devices. Is there any discrepancy between the audio output of the source, the audio or onal settings of the AV receiver, and the speaker configuration used needed for successful audio replication? If outputting 7.1, make sure all devices connected are also in line using 7.1.
NOTE: Some source device settings might allow audio output through a IV or an HDMI port. If using an AV receiver, be sure to select the HDMI output option. - Do all the local sources work through the AV receiver? Check the operation of each source individually
- Bandwidth—If using a graphics-based source (such as a PC/Mac/media server), make sure the source resolution is set to a maximum of 1080p, 50 Hz. Higher resolutions available for graphics-based systems require higher bandwidth that may affect transmission of signals as well as incompatibility with devices.
NOTES
NOTES
Black Box Tech Support: FREE! Live, 24/7.
Tech support the way it should be.

Great tech support is just 60 seconds away at 877-877-2269 or Blackbox.com.

BLACK BOX
About Black Box
Black Box provides an extensive range of networking and infrastructure products. Your! -t end everything from collectors and risks and power and surge protection products as media converters and internet switches all supported by free, live 247 Tech support available in 60 seconds or less.
© Copyright 2016, the third Corporation. All rights reserved. Black Box. Same the Double Diamond logo is registered trademarks of 88 Technologies Inc. Any third party trademarks occurring in this whole report are also characterized by the property of their respective owners.
w-1002-wuserrev1
877-877-2269 | blackbox.com
- FCC and IC RFI Statements/NOM Statement
- FEDERAL COMMUNICATIONS COMMISSION AND INDUSTRY CANADA RADIO FREQUENCY INTERFERENCE STATEMENTS
- TRADEMARKS USED IN THIS MANUAL
- Important Safety Instructions
- Disclaimer
- Table of Contents
- Chapter 2: Overview
- Chapter 3: Automatic Input Detection
- Chapter 4: EDiD Presets
- EDID Presets
- Chapter 5: Hardware Installation
- Hardware Installation
- Chapter 6: Troubleshooting
- BLACK BOX
Brand : Black Box
Model : VX-1002-TX
Category : AV Extender