
Carat A binax - Hearing aid SIEMENS - Free user manual and instructions
Find the device manual for free Carat A binax SIEMENS in PDF.


| Product Type | Behind-the-ear (BTE) hearing aid |
| Model | Siemens Carat A binax |
| Dimensions (approx.) | 45 x 18 x 12 mm (without earmold) |
| Weight (approx.) | 5.5 g (without battery) |
| Power Source | Size 312 zinc-air battery |
| Battery Life (approx.) | 5–7 days depending on usage |
| Sound Processing | binax digital platform with feedback cancellation |
| Number of Channels | 12 frequency channels |
| Programs | Up to 4 listening programs (e.g., universal, noise, music, telephone) |
| Connectivity | Telecoil for compatible telephones and loop systems |
| Volume Control | Manual volume wheel with push button for program change |
| Low Battery Indicator | Double beep when battery is low |
| Care and Cleaning | Daily wipe with dry cloth; weekly cleaning of ear wax filters and dome |
| Safety Features | Moisture-resistant nano-coating; automatic listening level limiter |
| Spare Parts Available | Ear wax filters, domes, ear hooks, and batteries |
| Repairability | Serviceable by authorized Siemens repair centers |
| Warranty | 2 years against defects in materials and workmanship |
| IP Rating | IP57 dust and water resistant |
| Operating Temperature | 0°C to 40°C |
| Included Accessories | Hearing aid, soft carrying case, cleaning tool, battery package |
Frequently Asked Questions - Carat A binax SIEMENS
User questions about Carat A binax SIEMENS
0 question about this device. Answer the ones you know or ask your own.
Ask a new question about this device
Download the instructions for your Hearing aid in PDF format for free! Find your manual Carat A binax - SIEMENS and take your electronic device back in hand. On this page are published all the documents necessary for the use of your device. Carat A binax by SIEMENS.
USER MANUAL Carat A binax SIEMENS

Life sounds brilliant.
Content
Welcome 4
| Your hearing instruments 5 | |
| Instrument type 5 | |
| Getting to know your hearing instruments 5 | |
| Components and names 6 | |
| Controls 8 | |
| Settings 9 |
Batteries 10
| Battery size and handling tips | 10 |
| Replacing batteries | 11 |
| Recharging rechargeable batteries | 12 |
Daily use 13
| Turning on and off | 13 |
| Inserting and removing the hearing instruments | 15 |
| Adjusting the volume | 18 |
| Changing the hearing program | 19 |
| Further adjustments (optional) | 19 |
Special listening situations
| Setting the focus (optional) | 20 |
| On the phone | 22 |
| Audio induction loops | 24 |
| Audio input (FM system) | 25 |
Maintenance and care 27
Hearing instruments 27
Ear pieces 28
Professional maintenance 30
Further information 31
Wireless functionality 31
Accessories 31
Symbols used in this document 31
Troubleshooting 32
Service information 34
Country-specific information 35
Welcome
Thank you for choosing our hearing instruments to accompany you through everyday life. Like anything new, it may take you a little time to become familiar with them.
This guide, along with support from your Hearing Care Professional, will help you understand the advantages and greater quality of life your hearing instruments offer.
To receive the most benefit from your hearing instruments, it is recommended that you wear them every day, all day. This will help you get adjusted to them.

CAUTION
It is important to read this user guide and the safety manual thoroughly and completely. Follow the safety information to avoid damage or injury.
Your hearing instruments
This user guide describes optional features that your hearing instruments may or may not have. Ask your Hearing Care Professional to indicate the features that are valid for your hearing instruments.
Instrument type
Your hearing instruments are a RIC (Receiver-in-Canal) model. The receiver is placed within the ear canal and connected to the instrument via a receiver cable. The instruments are not intended for infants, small children or mentally disabled persons.
Getting to know your hearing instruments
It is recommended to familiarize yourself with your new hearing instruments. With the instruments in your hand try using the controls and note their location on the instrument. This will make it easier for you to feel and press the controls while wearing the hearing instruments.
If you have problems pressing the controls of your hearing instruments while wearing them, you can ask your Hearing Care Professional about a remote control option.
Components and names
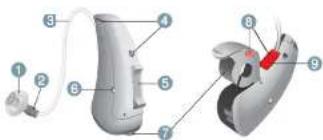
1 Ear piece
② Receiver
③ Receiver cable
4 Microphone openings
⑤ Rocker switch (control)
6 Charging contact (Carat binax only)
⑦ Battery compartment (on/off switch)
⑧ Side indicator (red = right ear, blue = left ear)
⑨ Receiver connection
Your hearing instruments6
You can use standard or custom-made ear pieces.
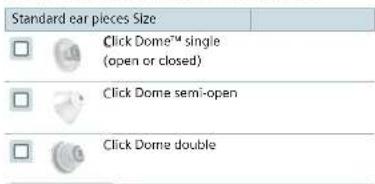
You can easily exchange the standard ear pieces. Read more in section "Maintenance and care".

Your hearing instruments 7
Controls
With the rocker switch you can, for example, adjust the volume or switch hearing programs. Your Hearing Care Professional has programmed your desired functions to the rocker switch.


You can also use a remote control.
| Rocker switch function LR | ||
| Press briefly: | ||
| Program up/down | ☐ | ☐ |
| Volume up/down | ☐ | ☐ |
| Tinnitus noiser level up/down | ☐ | ☐ |
| Sound balance | ☐ | ☐ |
| Focus selection (spatial configurator) | ☐ | ☐ |
| Sound mixer (audio input) | ☐ | ☐ |
| Press long: | ||
| Standby/turn on | ☐ | ☐ |
| Program up/down | ☐ | ☐ |
| Press very long: | ||
| Standby/turn on | ☐ | ☐ |
L - Left, R - Right
Your hearing instruments8
Settings
Hearing programs
| 1 |
| 2 |
| 3 |
| 4 |
| 5 |
| 6 |
| Read more in section "Changing the hearing program". |
Features
| Power-on delay enables whistle-free insertion of hearing instruments.Read more in section "Turning on and off". | |
| AutoPhoneTM automatically switches to the telephone program when the telephone receiver approaches the ear.Read more in section "On the phone". | |
| The tinnitus noiser generates a soft noise to distract you from your tinnitus. | |
| To recharge batteries in hearing instruments with charging contacts, simply place the instruments in the charger. After charging, the charger dehumidifies the hearing instruments. | |
| The e2e wireless functionality enables simultaneous control of both hearing instruments.Read more in section "Wireless functionality". |
Your hearing instruments 9
Batteries
When the battery is low the sound becomes weaker or you will hear an alert signal. The battery type will determine how long you have to replace or recharge the battery.
Battery size and handling tips
Ask your Hearing Care Professional for recommended batteries.
Battery size: 13
■ Always use the correct battery size for your hearing instruments.
■ Remove the batteries if you intend not to use the hearing instruments for several days.
■ Always carry spare batteries.
■ Remove empty batteries immediately and follow your local recycling rules for battery disposal.
Replacing batteries
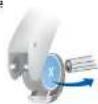
Removing the battery:
▶ Open the battery compartment.

▶ Use the magnet stick to pull out the battery. The magnet stick is available as an accessory.
Batteries 11
Inserting the battery:
If the battery has a protective film, remove only when you are ready to use the battery.

Insert the battery with the "+" symbol facing up (refer to the picture).

Carefully close the battery compartment. If you feel resistance, the battery is not inserted correctly.
Do not attempt to close the battery compartment by force. It can be damaged.
Recharging rechargeable batteries
Charge rechargeable batteries before first use.
To charge the batteries, follow the instructions in the charger's user guide.
After many recharging cycles, the battery lifetime may reduce. In this case, replace the rechargeable battery with a new one. To do so, follow the instructions for replacing batteries.
Daily use
Turning on and off
You have the following options to turn your hearing instruments on or off.
Via battery compartment:
▶ Turning on: Close the battery compartment. The default volume and hearing program are set.
▶ Turning off: Open the battery compartment to the first catch.
After charging
▶ Turning on: Take the instruments out of the charger. The default volume and hearing program are set.
Via rocker switch:
▶ Turning on or off: Press and hold the rocker switch for several seconds. Refer to section "Controls" for the settings of the rocker switch.
After turning on, the previously used volume and hearing program remain set.
Via remote control:
▶ Follow the instructions in the remote control's user guide.
After turning on, the previously used volume and hearing program remain set.
When wearing the hearing instruments, an alert tone can indicate when an instrument is being turned on or off.
When the power-on delay is activated, the hearing
Instruments turn on after a delay of several seconds. During this time you can insert the hearing instruments into your ears without experiencing unpleasant feedback whistling.
The "power-on delay" can be activated by your Hearing Care Professional.
Inserting and removing the hearing instruments
Your hearing instruments have been fine-tuned for your right and left ear. Colored markers indicate the side:
red marker – right ear
blue marker = left ear
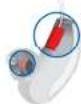
Inserting a hearing instrument:
Hold the receiver cable at the bend-clos the ear piece.
Carefully push the ear piece in the ear canal ①.
▶ Twist it slightly until it sits,well
Open and close your mouth to avoid accumulation of air in the ear canal.
▶ Lift the hearing instrument and slide it over the top of your ear 📋.

CAUTION
Risk of injury!
▶ Insert the ear piece carefully and not too deeply into the ear.

i
It may be helpful to insert the right hearing instrument with the right hand and the left hearing instrument with the left hand.
If you have problems inserting the ear piece, use the other hand to gently pull your earlobe downwards. This opens the ear canal and eases insertion of the ear piece.
The optional retention strand helps to securely retain the ear piece in your ear. To position the retention strand:
▶ Bend the retention strand and position it carefully into the bottom of the bowl of your ear (refer to the picture).

Removing a hearing instrument:
▶ Lift the hearing instrument and slide it over the top of your ear ①.
If your hearing instrument is equipped with a custom shell or a Click Mold, remove it by pulling the small removal cord toward the back of your head.
For all other ear pieces: Grip the receiver in the ear canal with two fingers and pull it carefully out ②.
Do not pull the receiver cable.


CAUTION
Risk of injury!
In very rare cases the ear piece could remain in your ear when removing the hearing instrument. If this happens, have the ear piece removed by a medical professional.
Clean and dry your hearing instruments after usage. Read more in section "Maintenance and care".
Adjusting the volume
Your hearing instruments automatically adjust the volume to the listening situation.
▶ If you prefer manual volume adjustment, press the rocker switch briefly or use a remote control.
Refer to section "Controls" for the setting of the rocker switch.
An optional signal tone can indicate the volume change.
Once the maximum or minimum volume has been reached, you may hear an optional signal tone.
Changing the hearing program
Depending on the listening situation, your hearing instruments automatically adjust their sound.
Your hearing instruments may also have several hearing programs which allow you to change the sound, if needed. An optional signal tone can indicate the program change.
To change the hearing program, press the rocker switch or use a remote control.
Refer to section "Controls" for the setting of the rocker switch. Refer to section "Settings" for a list of your hearing programs.
i
If the AutoPhone function is activated, the hearing program switches automatically to a telephone program when the telephone receiver is close to the ear. Read more in section "On the phone".
Further adjustments (optional)
The controls of your hearing instruments can also be used to change, for example, the sound balance or the tinnitus noiser level. Sound balance allows you to adjust the bass and treble to your preferences.
Refer to section "Controls" for the setting of your controls.
Special listening situations
Setting the focus (optional)
If you want to focus more directly on your conversation partner in front of you, or if you want to listen to the broader environment – the spatial configurator gives you control over your listening preference.
You can select different levels – from "focus to frontal position" (left picture) to "middle position" (center picture) to "hear all around" (right picture).

Prerequisites:
■ You need to wear two hearing instruments.
- On one of your hearing instruments the rocker switch needs to be set for the spatial configurator.
Refer to section "Controls" for the setting of the rocker switch.
With a suitable remote control and smartphone app you have even more control options.
Setting the focus manually:
▶ If you have several hearing programs, change to hearing program 1.
▶ Press the rocker switch that is set for this function.
The mid level is active by default.
▶ Press the upper rocker switch to focus more to the front, or the lower rocker switch to listen to the broader environment.
This function is intended for unique and temporary listening situations. The hearing instruments thus return automatically to the automatic setting of program 1 if the sound environment changes significantly or after approximately 45 minutes. You can also exit the spatial configurator mode.
Exiting spatial configurator mode:
▶ Toggle to the minimum or maximum level.
An optional signal tone can indicate the minimum and maximum level.
▶ Toggle one step further.
The same signal tone as for changing the hearing program is played, indicating that you have exited the spatial configurator mode.
On the phone
When you are on the phone, hold the telephone receiver slightly above your ear. The hearing instrument and telephone receiver have to be aligned. Turn the receiver slightly so that the ear is not completely covered.

Telephoneprogram
You may prefer a certain volume when using the phone. Ask your Hearing Care Professional to configure a telephone program.
▶ Switch to the telephone program whenever you are on the phone or use the automatic program switch.
If a telephone program or the automatic program switch are configured for your hearing instruments, it is listed in section "Settings".
Automatic program switch (AutoPhone)
Your hearing instrument can automatically select the telephone program when you bring the telephone handset close to the hearing instrument. When you are finished speaking on the phone, move the handset away from the hearing instrument and microphone mode will re-set itself.
If you want to use this function, ask your Hearing Care Professional to do the following:
■ Activate the AutoPhone function.
- Check the telephone receiver's magnetic field.
For the automatic program switch, your hearing instrument detects the telephone receiver's magnetic field. Not all telephones produce a magnetic field strong enough to activate the AutoPhone function. In this case, you can use the Siemens AutoPhone magnet, which is available as an accessory, and attach it to the telephone receiver.
See the AutoPhone magnet user guide for instructions on how to position the magnet.

NOTICE
Use the approved AutoPhone magnet only. Ask your Hearing Care Professional for this accessory.
Audio induction loops
Some telephones and public places like theatres offer the audio signal (music and speech) via an audio induction loop. With this system, your hearing instruments can directly receive the desired signal – without distracting noise in the environment.
You can usually recognize audio induction loop systems by certain signs.

Ask your Hearing Care Professional to configure a telecoil program.
▶ Switch to the telecoil program whenever you are in a place with an audio induction loop.
If a telecoil program is configured for your hearing instruments, it is listed in section "Settings".
Telecoil program and remote control

NOTICE
For instruments with wireless connectivity: When the telecoil program is active, the remote control may cause a pulsing noise.
▶ Use the remote control with a distance greater than 10 cm (4 inches).
Special listening situations24
Audio input (FM system)
With an audio input you can connect your hearing instruments to an FM system. An FM system consists of a transmitter and a receiver. It gathers speech at the voice source (via a separate microphone) and transmits the sound directly to the hearing instruments.
The signal is clearer and unaffected by poor room acoustics. This can be useful for adults in difficult listening situations and for children in classrooms.
Most FM systems allow for coupling with audio devices like an MP3 player.
Notes:
The battery compartment with audio input is available as an accessory only for Carat A hearing instruments.
As an alternative, you can use an audio streaming device (accessory) with a plug for FM receivers.
- Ask your Hearing Care Professional to configure your hearing instruments, for example:
- Adjust the mix of the audio input signal with surrounding sounds.
☐ Configure the rocker switch so that you can select between audio input signal only, surrounding sound only, or a mix of both signals.

WARNING
Risk of electric shock!
To prevent very rare cases of electric shock:
▶ Use the audio input only with battery operated devices or FM systems.

WARNING
Risk of electric shock!
Connect audio input only to a device conforming to IEC 60065, the IEC-Norm for audio, video and other electronic devices.
Maintenance and care
To prevent damage it is important that you take care of your hearing instruments and follow a few basic rules, which will soon become a part of your daily routine.
Hearinginstruments
Drying and storage
Dry your hearing instruments overnight.
▶ Ask your Hearing Care Professional for recommended drying products.
For longer periods of non-use, store your hearing instruments with open battery compartment and batteries removed in a drying system to avoid the adverse effects of moisture.
Cleaning
Your hearing instruments have a protective coating. However, if not cleaned regularly you may damage the hearing instruments or cause personal injury.
▶ Clean your hearing instruments daily with a soft, dry tissue.
▶ Never use running water or immerse the devices in water.
▶ Never apply pressure while cleaning.
▶ Ask your Hearing Care Professional for recommended cleaning products, special care sets, or more information on how to keep your hearing instruments in good condition.

Maintenance and care 27
Earpieces
Cleaning
Cerumen (ear wax) may accumulate on the ear pieces.
This may affect sound quality. Clean the ear pieces daily.
For all types of ear pieces:
Clean the
ear piece right
after removal
with a soft and
dry tissue
This prevents
that cerumen
becomes dry
and hard,

For Click Domes:
Squeeze the tip of the dome.

Maintenance and care28
Exchanging
Exchange standard ear pieces approximately every three months. Replace them sooner if you notice cracks or other changes. The procedure for exchanging standard ear pieces depends on the type of ear piece. In section "Components and names", your Hearing Care Professional has marked your type of ear piece.
Exchanging Click Domes
If you have problems removing the old Click Dome, use the removal tool or follow the instructions on the packaging of the Click Domes:

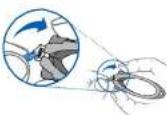
The removal tool is available as an accessory
▶ Take particular care that the new Click Dome clicks noticeable in place.

Maintenance and care 29
Professional maintenance
Your Hearing Care Professional can perform a thorough professional cleaning and maintenance.
Custom-made ear pieces and wax filters should be exchanged as needed by a professional.
Ask you Hearing Care Professional for your individual recommendation of maintenance intervals and for support.
Furtherinformation
Wirelessfunctionality
Your hearing instruments are equipped with wireless functionality. This provides synchronization between your two hearing instruments:
If you change the program or volume on one instrument, the other one is automatically changed, too.
■ Both hearing instruments automatically adapt to the listening situation simultaneously.
Wireless functionality enables the use of a remote control.
Accessories
The type of available accessories depends on the instrument type. Examples are: a remote control, an audio streaming device, or a smartphone app for remote control.
Consult your Hearing Care Professional for further information.
Symbols used in this document

Points out a situation that could lead to serious, moderate, or minor injuries.

Indicates possible property damage.

Advice and tips on how to handle your device better.
Troubleshooting
Problem and possible solutions
Sound is weak.
■ Increase the volume.
- Replace or recharge the empty battery (depending on the battery type).
■ Clean or exchange the ear piece.
Hearing instrument emits whistling sounds.
■ Reinsert the ear piece until it fits securely.
■ Decrease the volume.
■ Clean or exchange the ear piece.
Sound is distorted.
■ Decrease the volume.
- Replace or recharge the empty battery (depending on the battery type).
■ Clean or exchange the ear piece.
Hearing instrument emits signal tones.
- Replace or recharge the empty battery (depending on the battery type).
Problem and possible solutions
Hearing instrument does not work.
■ Turn the hearing instrument on.
Gently close the battery compartment completely.
- Replace or recharge the empty battery
(depending on the battery type).
■ Make sure the battery is inserted correctly.
Power-on delay is active.
Wait several seconds and check again.
Consult your Hearing Care Professional if you encounter further problems.
Service information
Serial numbers
Left:
Right:
Service dates
1:
2:
3
4
5
6
Your Hearing Care Professional
Date of purchase:
Country-specific information
Further information 35
Manufactured by Sivantos GmbH
under Trademark License of Siemens AG.
United Kingdom
Sivantos Limited
Platinum House
Sussex Manor Business Park
Getwick Road
Crawley, West Sussex RH10 9NH
Phone+44(0)1293 423700

Legal Manufacturer
Sivantos GmbH
Henri-Dunant-Strasse 100
91058 Erlangen
Germany
Phone +49 9131 308 0
Document No. A91SAT-02372-99102-7600 EN
Order/Item No. 108 264 04 | Master Rev03, 08.7014
© Siemens AG, 06.2015 | JN7464 | Printed in the UK
www.bestsound-technology.co.uk
- Welcome
- CAUTION
- Your hearing instruments
- Controls
- Batteries
- Daily use
- Adjusting the volume
- Changing the hearing program
- Further adjustments (optional)
- Special listening situations
- Automatic program switch (AutoPhone)
- NOTICE
- Audio input (FM system)
- Notes:
- WARNING
- Maintenance and care
- Exchanging
- Exchanging Click Domes
- The removal tool is available as an accessory
- Furtherinformation
- Wirelessfunctionality
- Accessories
- Troubleshooting
- Problem and possible solutions
Brand : SIEMENS
Model : Carat A binax
Category : Hearing aid