
PLDED4030A-RK - Television Proscan - Free user manual and instructions
Find the device manual for free PLDED4030A-RK Proscan in PDF.


| Product Type | LED TV |
| Screen Size | 40 inches (diagonal) |
| Resolution | 1920 x 1080 (Full HD) |
| Brightness | 280 cd/m² (Typical) |
| Contrast Ratio | 1500:1 (Typical) with Auto Contrast Enhancement |
| Response Time | 8 ms (grey to grey) |
| Viewing Angle | 178°/178° (Horizontal/Vertical) |
| Backlight Life | >30,000 hours |
| Power Input | AC 100-240V, 50/60Hz, 3A (Max) |
| Standby Power | <1W |
| Weight (with stand) | 24.95 lbs |
| Dimensions (without stand) | 36.60" x 21.64" x 3.35" |
| Dimensions (with stand) | 36.60" x 24.10" x 8.74" |
| Speakers | 6W per channel (2 speakers) |
| Sound Modes | Music, Standard, Movie, Laser, Sport |
| TV Tuner | NTSC, ATSC, QAM (Digital Cable Ready) |
| Connectivity | HDMI (3), Component, Composite, VGA, Coaxial, USB |
| Remote Control | Includes AAA batteries |
| Cleaning | Use dry soft cloth; avoid solvents |
| Safety | High voltage; do not open; keep away from moisture |
| Warranty | 1 year parts and labor |
Frequently Asked Questions - PLDED4030A-RK Proscan
User questions about PLDED4030A-RK Proscan
0 question about this device. Answer the ones you know or ask your own.
Ask a new question about this device
Download the instructions for your Television in PDF format for free! Find your manual PLDED4030A-RK - Proscan and take your electronic device back in hand. On this page are published all the documents necessary for the use of your device. PLDED4030A-RK by Proscan.
USER MANUAL PLDED4030A-RK Proscan
- Introduction
- Warning
- Caution
- Important Information
- Attaching or Removing the Stand
● Installing Batteries to the Remote Control
● Identifying Front and Rear Panel - Connection Suggestion
● Main Unit Description - Remote Control
- OSD Basic Adjustment
● How Do I Clean The TV
Introduction
Thank you very much for purchasing your LED TV. It serves as a normal colour TV and a PC monitor. To enjoy your set fully from the very beginning, read this manual carefully and keep it handy for future reference.
INSTALLATION
① Locate the receiver in the room where direct light does not strike the screen. Total darkness or a reflection on the picture screen can cause eyestrain. Soft and indirect lighting is recommended for comfortable viewing.
② Allow enough space between the receiver and the wall to permit ventilation.
③ Avoid excessively warm locations to prevent possible damage to the cabinet or premature component failure.
④ This TV can be connected to AC 100-240V\~50/60Hz.
⑤ Do not install the TV in a location near heat sources such as radiators, air ducts, direct sunlight, or in closed compartments and closed areas. Do not cover the ventilation openings when using the TV.
Warning

CAUTION RISK OF ELECTRIC SHOCK DO NOT OPEN

CAUTION: TO AVOID THE RISK OF ELECTRIC SHOCK. DO NOT REMOVE COVER (OR BACK). NO USER- SERVICEABLE PARTS INSIDE. REFER SERVICING TO QUALIFIED SERVICE PERSONNEL.

This symbol is intended to alert the user to avoid the risk of electric shock. This equipment may only be disassembled by qualified service personnel.
Caution
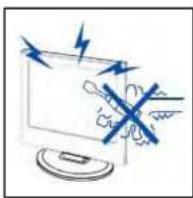
Caution
High voltages are used in the operation of this product. Do not open the product's casing. Refer servicing to qualified service personnel.
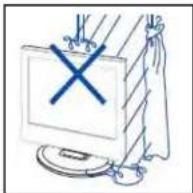
Caution
To prevent fire or electrical shock hazard, do not expose the main unit to rain or moisture. do not place objects filled with liquids, such as vases, on the apparatus.

Caution
Caution
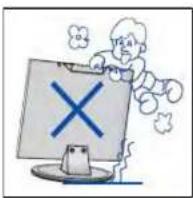

Caution
Never stand on, lean on or suddenly push the product or its stand. You should pay special attention to children.
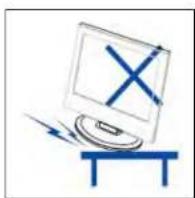

Caution
Do not place the main unit on an unstable cart stand, shelf or table. Serious injury to an individual and damage to the television may result if it should fall.

Caution
When the product is not used for an extended period of time, it is advisable to disconnect the AC power
Attacting or Removing the Stand
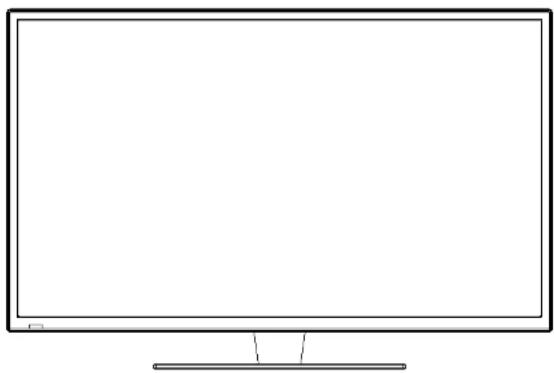
- To attach the base place the display unit flat on a table. Afterwards attach the stand onto the bottom of the stand. Screw in the 4 screws to secure the stand.
natural_image
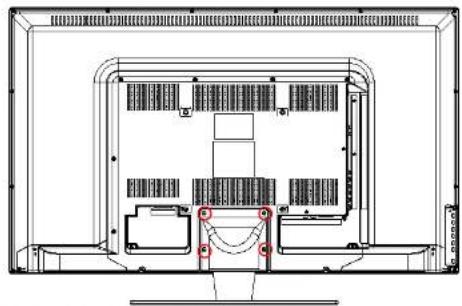
Line drawing of a flat-screen computer monitor with blank screen and stand (no text or symbols)- To remove the stand, remove the 4 screws in the area and the stand will come off.
natural_image
Technical line drawing of a mechanical or electrical enclosure with internal compartments and mounting brackets (no text or symbols)Installing Batteries to the Remote Control
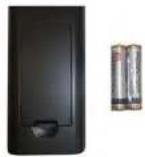
Please insert two AAA batteries into the remote control. Make sure that you match the (+) and (-) symbols on the batteries with the (+) and (-) symbols inside the battery compartment. Afterwards, re-attach the battery cover.
Identifying Front and Rear Panel
Front View
natural_image
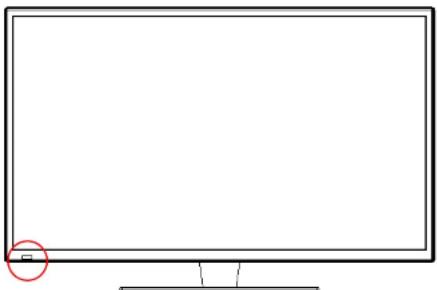
Front view of a blank television screen with a small red circle highlighting the front portion (no text or symbols)INDICATOR LIGHT – The light is red when power is plugged in but the TV is not turned on. The light turns blue when the TV is turned on. Because of the LED in the panel, the TV might take 10 – 12 seconds to power on.
REMOTE SENSOR – The remote sensor receives all the commands from the remote control.
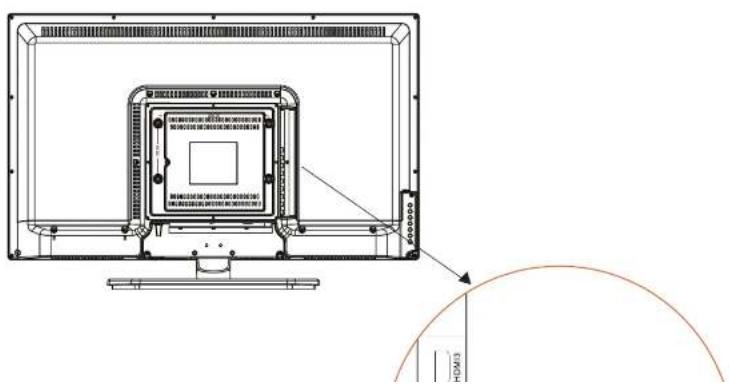
Rear View Mounting Pattern

Important Information
Television Antenna Connection Protection
External Television Antenna Grounding
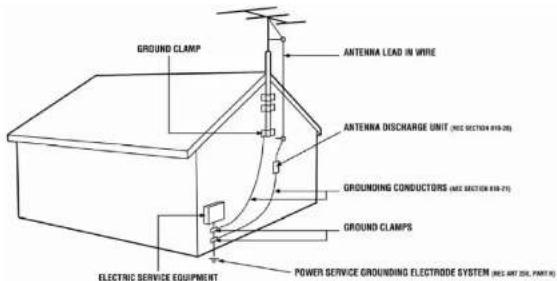
If an outside antenna or cable system is to be connected to the TV, make sure that the antenna or cable system is electrically grounded to provide some protection against voltage surges and static charges. Article 810 of the National Electrical Code, ANSI/NFPSA 70, provides information with regard to proper grounding of the mast and supporting structure, grounding of the lead-in wire to an antenna discharge unit, size of the grounding conductors, location of antenna discharge unit, connection to grounding electrodes, and requirements of the grounding electrode.
Connection Suggestions
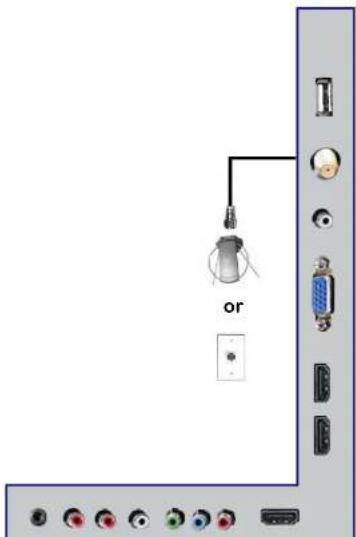
If You Have Digital Cable without Cable Box or Antenna...
Connecting DVD Player with Component YPhPr...
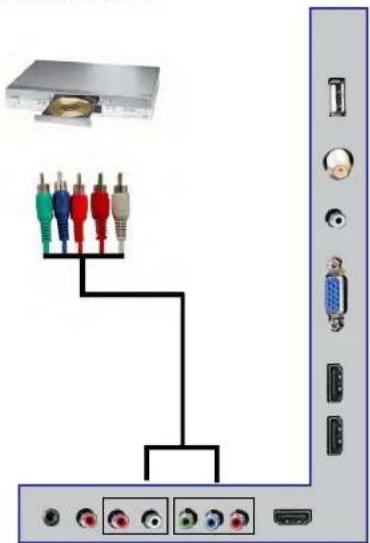
- Make sure the power of HDTV and your DVD player is turned off.
- Obtain a Component Cable. Connect the green color connector to both your DVD player and YPbPr's green connector port on the back of your HDTV.
- Connect the blue color connector to both your DVD player and YPhPr's blue
Connecting Wii ^TM with Composite...
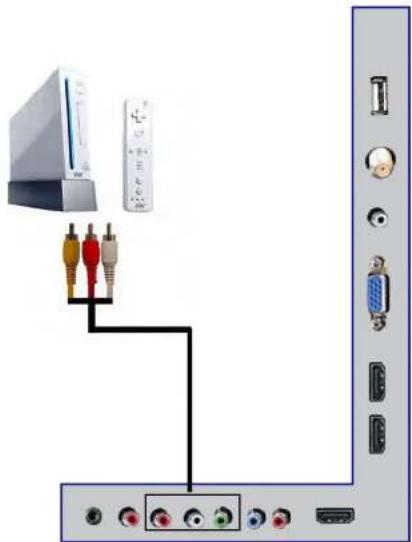
natural_image
Diagram showing connections between a computer and a server panel with multiple audio/video ports (no text or symbols visible)Make sure the power of HDTV and your Wii ^™ is turned off.
Connecting Cable or Satellite boxes with HDMI...
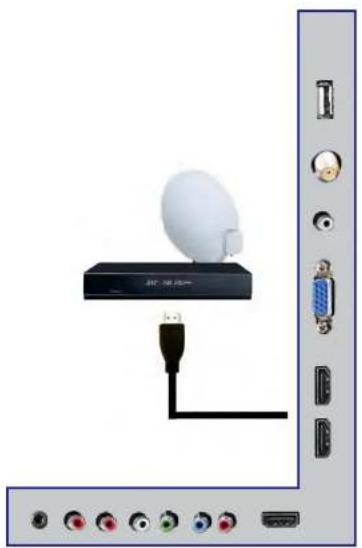
natural_image
Diagram of a computer interface showing a USB cable connected to a white satellite dish, with ports and connectors visible (no text or symbols on the device itself)Connecting to a PC with VGA and 3.5 mm minijack ...
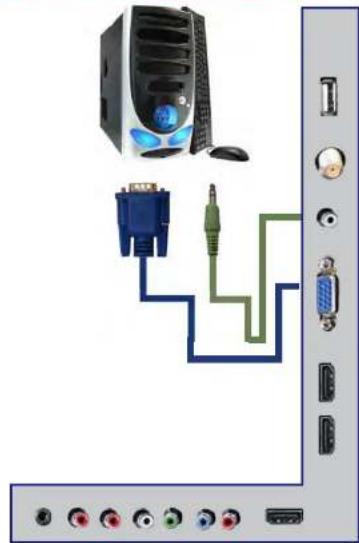
natural_image
Diagram showing computer tower connections with VGA, USB, and ports (no text or labels)-
Make sure the power of HDTV and your PC is turned off.
-
Obtain a 15-pin D-Sub VGA cable; connect to the VGA output of your PC and the other end to the VGA port on the back of your HDTV.
Connecting a Digital Audio Receiver with Coaxial...
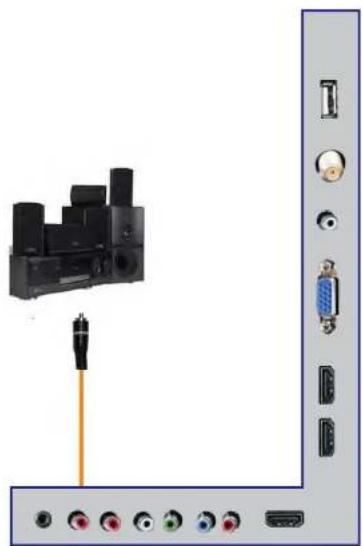
natural_image
Diagram showing a black electronic device connected to a wall-mounted port with multiple ports (no text or symbols visible)- Make sure the power of HDTV and your receiver is turned off.
- Obtain an COAXIAL cable command it to make reliable's COAXIAL digital
Main unit description
Control Panel Button Function
VOL+: Increase volume; if OSD is active, functions as right in the menu; in SOURCE menu, functions as ENTER.
VOL- : Decrease volume; if OSD is active, functions as left in the menu.
CH+ : Change channel up; if OSD is active, functions as up in the menu
CH- : Change channel down; if OSD is active, functions as down in the menu.
MENU : Press to select the main menu.
SOURCE : Select the input signal.
POWER : Switch on when at standby mode or enter the standby mode.
TV Terminal Connections
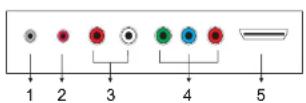
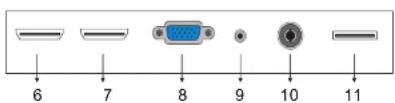
Remote control
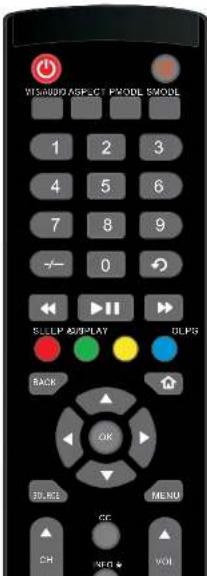
POWER: Power on/off button, press once to turn the TV on and press again to turn the TV off.
MUTE: Press this button to mute or restore sound.
MTS/AUDIO: When stereo program is received, press this key to switch sound system between mono and stereo.
When SAP program is received, press this button to switch sound system between mono and SAP
When stereo and SAP program is received, press this key to switch among mono, stereo and SAP.
Press this key to show the list of audio languages available for the current channel in ATSC.
ASPECT: Press to adjust picture ratio.
PMODE: Select picture mode.
SMODE: Select sound mode.
0-9: Select and switch to a channel using 0 - 9.
-/-: Switch the program digit.
Recall: Press to change to the previously viewed channel.
Roku ← Press to rewind, scroll left one page at a time
Roku ▶ Press to Start or Pause Playback
Roku ▶ Press to fast forward, scroll right one page at a time
SLEEP: Set the sleep timer.
DISPLAY: Display TV information.
EPC. Enter elastonic program guide
OSD basic adjustment
Installation Guide
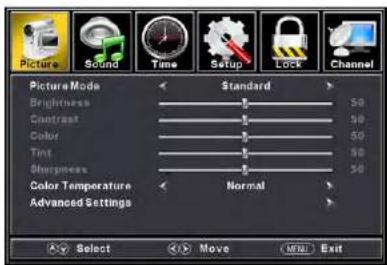
Press MENU button to display the MAIN OSD MENU; Press ◀ / ▶ button to select the MENU you want; Press ENTER button to enter the sub menu; Press ▼ / ▲ button to select the option and then press ◀ / ▶ to adjust the value in the sub menu; You can press MENU button to go back to the upper menu or EXIT button to close the OSD.
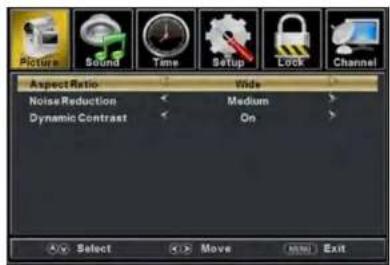
PICTURE
You can select the type of picture, which best corresponds to your viewing. Press the "MENU"
button to enter the OSD menu .Then press “◀/▶” button to select the “PICTURE” menu.
-
Press "▼" button to select "Picture Mode", press "◀/▶" button to select.
-
Press "▲/▼" button to select
"Brightness" and press the "◀/▶" button to enter brightness adjustment menu to adjust brightness.
- Press "▲/▼" button to select
"Contrast" and press the "◀/▶" button to enter contrast adjustment menu to
a. Press "▲/▼" button to select
"Aspect Ratio" and press the
“◀/▶” button to select.
b. Press "▲/▼" button to select
"Noise Reduction" and press the
“◀/▶” button to select.
c. Press "▲/▼" button to select
"Dynamic Contrast" and press the
“◀/▶” button to select “On” or
"Off".
SOUND
You can select the type of sound, which best corresponds to your listening.
Press the
"MENU" button to enter the OSD
menu .Then press “◀/▶” button to select the “SOUND” menu.
- Press "▼" button to select
"Equalizer Settings" and press the
"ENTER/▶" button to enter sub-menu.
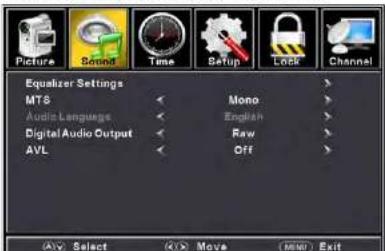
Note: The b、c、d、e、f、g function it is only available in USER mode.
- Press "▲/▼" button to select "MTS" and press the "◀/▶" button to adjust.
Note: It is only available in ATV.
- Press “▲/▼” button to select “Audio Language” and press the “◀/▶” button to adjust.
Note: It is only available in DTV.
-
Press "▲/▼" button to select "Digital Audio Output" and press the "◀/▶" button to adjust.
-
Press "▲/▼" button to select "AVL" and press the "◄/►" button to select "On" or "Off".
TIME
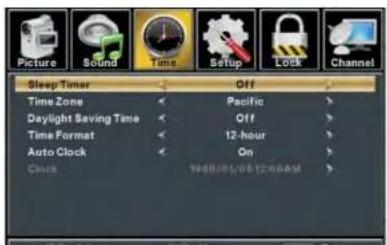
Press the "MENU" button to enter the OSD menu. Then press "◀/▶" button to select the "TIME" menu.
- Press “▼” button to select “Sleep Timer” and press the “◀/▶” button to enter sleep timer adjustment menu to adjust sleep timer.
SETUP
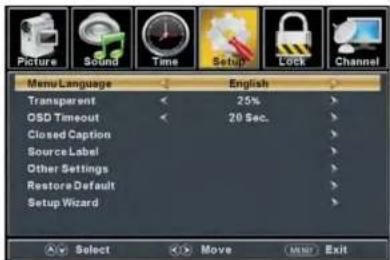
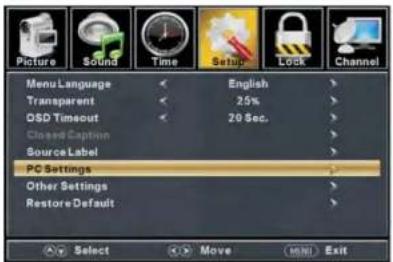
Press the "MENU" button to enter the OSD menu. Then press "◀/▶" button to select the "Setup" menu.
- Press “▼” button to select “OSD Language” and press the “◀/▶” button to select the OSD language which you desire.
- Press "▲/▼" button to elect "Transparent" and press the "◄/►" button to select.
- Press “▲/▼” button to select “OSD Timeout” the “◀/▶” button to adjust OSD timeout.
- Press "▲/▼" button to select "Closed Caption" and press the "ENTER/▶" button to enter sub-menu.
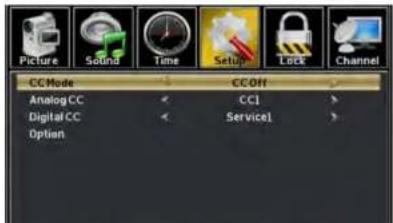
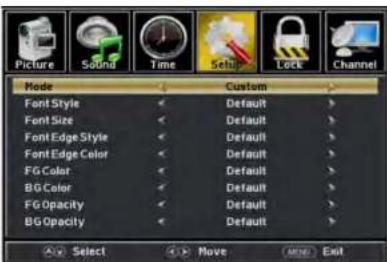
(a). Press “▲/▼” button to select “Mode” the “◀/▶” button to adjust.
(b). Press "▲/▼" button to select "Font Style" the "◀/▶" button to adjust.
(c). Press “▲/▼” button to select “Font Size” the “◀/▶” button to adjust.
(d). Press “▲/▼” button to select “Font Edge Style” the “◀/▶” button to adjust.
(e). Press “▲/▼” button to select “Font Edge Color” the “◀/▶” button to adjust.
(f). Press “▲/▼” button to select “FG Color” the “◀/▶” button to adjust.
(g). Press “▲/▼” button to select “BG Color” the “◀/▶” button to adjust.
(h). Press “▲/▼” button to select “FG Opacity” the “◀/▶” button to adjust.
(i). Press “▲/▼” button to select “BG Opacity” the “◀/▶” button to adjust.
Note: All the option it is not available in Custom.
- Press “▲/▼” button to select “Input Label” and press the “ENTER/▶” button to enter sub-menu.

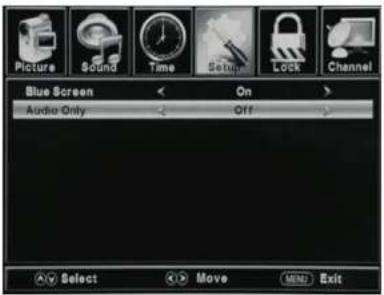
a. Press “▲/▼” button to select “Audio Only” the “◀/▶” button to select “On” or “Off”.
b. Press “▲/▼” button to select “Blue Screen” the “◀/▶” button to select “On” or “Off”. When select “On”, only listen sound and the screen is black; When select “Off”, watch TV normally.
- Press "▲/▼" button to select "Restore Default" and press the "ENTER/▶", Press "◀/▶" button selecting "Yes" to restore all setting to default setting default.
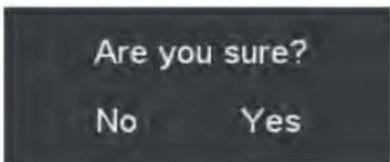
- Press "▲/▼" button to select "Setup wizard" and press the
"ENTER" button to enter sub-menu.

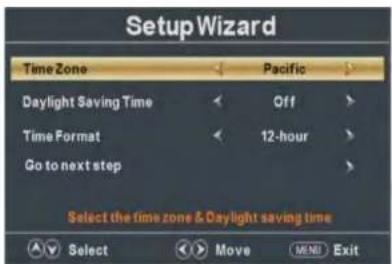
c. Press “▲/▼” button to select “Time Zone” and press the “◀/▶” button to select time zone.
d. Press “▲/▼” button to select “Daylight Saving Time” and press the “◀/▶” button to select “On” or “Off”.
e. Press “▲/▼” button to select “Time Format” and press the “◀/▶” button to select “12-hour” or “24-hour”.
f. Press “▲/▼” button to select “Go to next step” and press the “ENTER/▶” button to enter next step.
LOCK
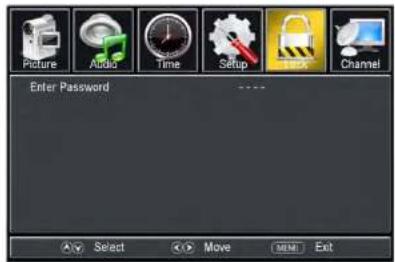
Press the "MENU" button to enter the OSD menu. Then press "◀/▶" button to select the "Lock" menu.
- Press "▼" button to select "Enter Password" and press select digital button to enter. Note: The default password is "0000"
- Press ▼ / ▲ button to select "Change Password", then press "ENTER/▶" button to adjust the value. If the password is changed, all of the passwords in the menu will be changed at the same time.
Note: If you forget your password, you can use "1470" to enter any menu locked.
- Press "▲/▼" button
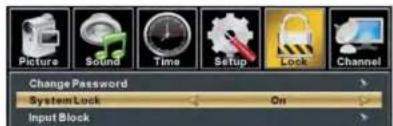
c. Press “▲/▼” button to select “Component” and press the “◀/▶” button to select
"Block" or "Unblock".
d. Press “▲/▼” button to select “HDMI” and press the “◀/▶” button to select “Block” or “Unblock”.
e. Press “▲/▼” button to select “PC” and press the “◀/▶” button to select “Block” or “Unblock”.
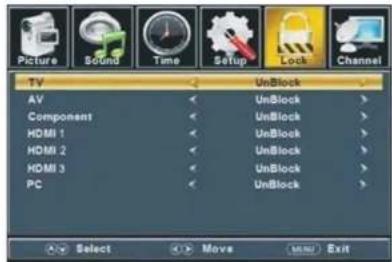
- Press “▲/▼” button to select “US Rating” and press “ENTER/▶” button to enter sub-menu.
a. Press "▲/▼" button to select "TV" and press "ENTER/▶" button to enter sub-menu.
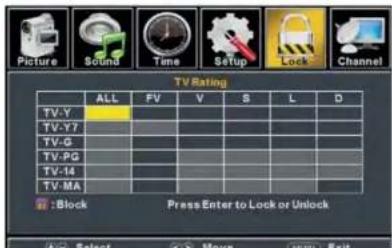
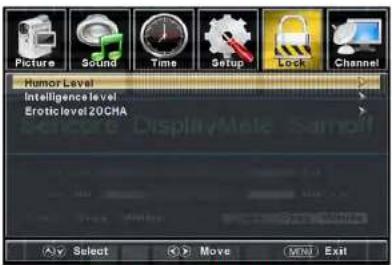
Note: The item is available only when current stream has downloadable rating data. 8. Press “▲/▼” button to select “Reset RRT” and press “ENTER/▶” button to reset.
Channel
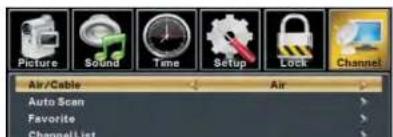
Press the "MENU" button to enter the OSD menu. Then press "◀/▶" button to select the "Channel" menu.
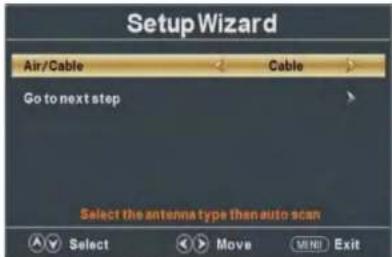
- Press “▼” button to select “AIR/CLABLE” and press the “◀/▶” button to select Cable or AIR.
PC Setting
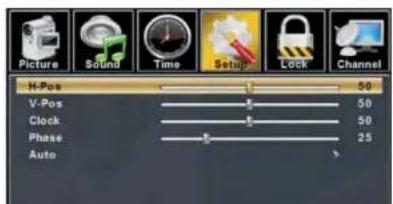
Press the "MENU" button to enter the OSD menu. Then press "◀/▶" button to select the "Setup" menu. And then press "▼" button to select "PC Setting" and press the "ENTER/▶" button to enter sub-menu.
How do I Clean the TV?
IMPORTANT
- The power cable has to be removed from the socket before cleaning the TV.
- Do not use volatile solvent (alcohol, rosin, and toluene) to clean the TV. These types of chemicals might damage the housing and the LED glass.
Cleaning the bezel and remote control
- Use a 100% cotton cloth or micro-fiber cloth for cleaning.
- If the remote control or bezel is dirty to the point where you cannot simply dry wipe it, please lightly dampen the wiping material (the wiping material cannot be dripping wet, because if water drips into the panel it will cause malfunction and possible permanent damage to the panel which will not be covered under the warranty) with clean water and wipe again. Wipe the display with a dry micro-fiber cloth or 100% cotton cloth afterwards.
Please Note :
- Make sure you wring the water out of the cloth before cleaning the bezel or remote in order to prevent water from penetrating into the electronics.
Cleaning the Screen
1 Use a 100% cotton cloth or micro-fiber cloth for cleaning
Troubleshooting
The following table contains the common problems and the solutions to these problems. Please check this list before you contact the technicians.
| Problems Solutions | |
| NO PICTURE | Connect power cord correctly. |
| Turn on power. | |
| Connect video cable correctly. | |
| Select the input signal source with proper cable connection with the source button. | |
| ABNORMAL COLORS | Match the colors on the cables to the ports off the back of the television. I.E. red cable to red colored port. |
| PICTURE IS TOO DARK | Adjust your contrast, brightness and lamp settings from the OSD Menu. For adjust controls |
| AUDIO ONLY NO PICTURE | Make sure you have connected both your video and audio cables. |
| The TV's tuner signal must not be lower than 65%. | |
| PICTURE ONLY NO AUDIO | Make sure the audio cable is connected. |
| Readjust your volume via the remote control. | |
| The TV's tuner signal must not be lower than 65%. | |
| REMOTE CONTROL DOES NOT WORK | Turn off the TV, unplug it from the socket. Remove the batteries out of the remote for 30 minutes. Press the remote buttons and the power button randomly for a good 2 seconds, and then reinstall the batteries. Try the remote to see if it works. For battery removal instructions. |
| The TV's remote sensor is also housed in the same place as the power indicator light. Please make sure there is line of sight from the remote control's front sensor to the remote sensor of the TV. | |
| CAMMAY - PRECIVILTH TAV, two crossed point not be lower than 62.0° (Choose the direction of non-circular and smooth)
| Problems Solutions | |
| TV CHANNELS ARE BLOCKED | Check your auto lock function's settings inside the OSD. You may have locked up some channels but forget about them. |
| UNIVERSAL REMOTE CODE | This TV follows NEC's universal remote code. Please check your hand book for NEC's codes then apply them. |
| THE TV TURNS ON OR OFF SLOWLY AND TIE SCREEN SHOWS UP SLOWLY | This TV is a High Definition liquid crystal display panel TV. It requires a few more seconds than normal TVs to power up and show the picture. |
| NO SOUND ON PC M | Make sure you have a 3.5 m to mini-jack cable connected from your pc's sound output to the 'TV's VGA STEREO INPUT. |
| HDCP VIDEO SAYS NO HDCP SUPPORT | Reboot your HDCP video device but turning them off and amplugging the power cord. Wait up to 8 minutes to plug the power back in to see if it works or not. |
| HDCP VIDEO HAS NO AUDIO | Make sure you have a 3.5 mm mini-jack cable connected from your HDCP video device's sound output to the TV's VGA STEREO INPUT. If your HDCP video device uses RCA AUDIO jacks, you'll need to obtain a RCA audio converted into 3.5 mm mini-jack cable. |
| CANNOT GET 1360X768 ON PC VGA | Make sure the TV is recognized as plug and play monitor. Try updating your video card's drivers as well. If that does not help, most likely you'll need to upgrade your video card to a newer one. |
| PICTURE IS DISTORTED OR HAS ABNORMAL SOUND | This might be from interference from large electrical appliances, cars, motorcycles, or fluorescent lights. If the TV is close to the wall, try moving the TV to another room in your house to see if the problem still occurs. |
| PICTURE DOES NOT COVER THE ENTIRE SCREEN | If you're using HDMI or a TV digital channel make sure you use the ASPECT button to switch to 16:9 format. If you are using VGA, use the AUTO ADJUST function to adjust to the screen. Please Note : If you are using regular analog TV, AV, or component in 480i resolution, use the ASPECT button to switch to 16:9 in order to fill up the screen. Please Note : This note this feature will distort the picture. |
| For best image quality, view HD widescreen programs where possible. If HD content is not available view | |
| SWITCHING A CHANNEL OR SOURCE CHANGES THE VOLUME | Different channels and inputs will sometimes have this effect because the channel signal's own volume is already loud. There is no way remove this completely. The TV has an AUTO VOLUME LEVEL, function that can combat this type of effect. Please make sure that function is turned on. |
| THERE IS NOISE OR TRASH PIXELS ON THE SCREEN | When your TV's resolution is higher than the digital channel's broadcast resolution, the signal is up converted to match your TV's resolution. Up converting can cause this type of effect. |
| TIPS FOR HIGH DEFINITION USERS | The TV is an ideal platform for viewing High Definition Content. The best image quality can be achieved by HDMI, YPbPr (Component), then VGA. However, due to variances in broadcast practices, it is possible some image distortions can occur. |
| TIPS FOR LETTERBOX CONTENT USERS | Letterboxed (Widescreen) versions of DVD movies are most commonly formatted for standard 4.3 TVs. The TV has the capability of expanding this content so the entire screen is filled at the expense of the image proportion. To use this function press the aspect button on the remote control and cycle among the available options. |
| I CANNOT FIND THE VOLUME AND CHANNEL CHANGING BUTTONS | The buttons are represented by the ▲▼◄► buttons located on the remote control. ▲▼ changes the channels and ◀► changes the volume. |
| TV TURNS OFF AUTOMATICALLY AFTER 5 MINUTES | The TV features a power saving mode which will automatically turn off the TV, if there's no signal provided for more than 5 minutes. |
| MY TV PICTURE IS VERY DIM | Check to see if you are under POWER SAVING mode for your picture mode. Keep pressing the PICTURE button on the remote control to cycle out of POWER SAVING. |
Specifications
| Display panel | |
| Item | Illustration |
| Active Area / Screen Size Diagonal 40 inches | |
| 1 nearestBW ritaR teepsA 6-8 | |
| PixelDia | 0.5302 (H) x RGB x 0.5303(V) un per one tind |
| Max.of Pixels(Resolution) | FID(1920 x 1080 pixels) resolution |
| Brightness | 280 m/s (Typical) |
| Contrast | 1500:1 (Typical) with Auto Contrast Enhancement |
| Response Time | 8 ms (grey to gray) |
| Viewing Angle | Typical 178/178 Degree (Horizontal/Vertical) |
| Lamp Life of Backlight | >30.000us |
| TV DISPLAY | |
| Dimension | 36.60" x 21.64" x 3.35" (without stand)36.60" x 24.10" x 8.74" (with stand) |
| Weight | 24.95lbs |
| Power input | AC 100 - 340V, 6050 Hz, 3A(Max.) |
| Function | |
| (2)Audio | |
| Sound Mode | Music/Standard/ Movie/Laser/Sport |
| seY /ortnoC cemaloV atxA | |
| Tone | 150Hz/500Hz/1KHz/5KHz/10KHz/Balance |
| yanoe/ seY mOEMX | |
| Speakers | 6 wait per channel |
| (3)General | |
| Hybrid TV Tunce | NTSC / ATSC / QAM (Digital Cable Ready) |
| Channel auto scan | Yes |
| Sleep dimer | Off/5mins/18mins/1.5mins/38mins/60mins/90mins/120mins/180mins/240mins |
| Standby power | Under /W |
| Timing support Video | 480 / 480p / 720p / 1080 / 1080p |
| PC turing | 1920/1880/660 Hz (NA/3VP)1024*768*60800*600*60640*480*60720s420s70 |
| (4)NTSC/ATSC | |
| NTSC | Sound: Mono / Stereo / SAP |
| Favorite Channel | |
| V-chip | |
| Closed caption(CCI-CC4, Text 1 Text 4) | |
| ATSC | Favorite Channel |
| V-chip | |
| Video input format: 1080i, 720p, 480p, 480i | |
| Analog closed caption | |
FCC Compliance Statement
This device complies with Part 15 of the FCC Rules.
Operation is subject to the following conditions:
This device may not cause harmful interference
This device must accept any interference received, including interference that my cause undesired operation.
Please Note: This equipment has been tested and found to comply with the limits for a Class B digital device, pursuant to part 15 of the FCC Rules. These limits are designed to provide reasonable protection against harmful interference in a residential installation. This equipment generates uses and can radiate radio frequency energy and, if not installed and used in accordance with the instructions, may cause harmful interference to radio communications. However, there is no guarantee that interference will not occur in a particular installation. If this equipment does cause harmful interference to radio or television reception, which can be determined by turning the equipment off and on, the user is encouraged to try to correct the interference by one or more of the following measures:
- Reorient or relocate the receiving antenna.
- Increase the separation between the equipment and the receiver.
- Connect the equipment into an outlet on a circuit different from that to which the receiver is connected.
Caution: To comply with the limits for an FCC Class B computing device, always use the signal cord and power cord supplied with this unit.
Hi!
Let's get started.
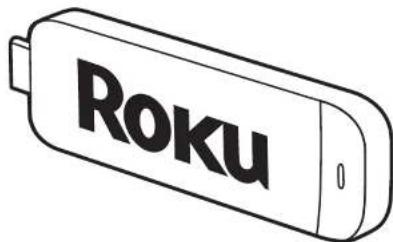
Roku Streaming Stick™
What you need
A
Know your Streaming Stick
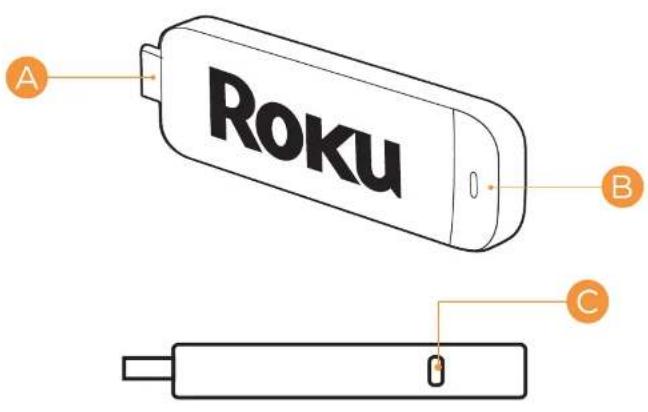

[MHL CONNECTOR] Plugs into the MHL part on the back of your TV
What to do
Plug it in
Plug your Roku Streaming Stick into the MHL port of your Roku Ready®TV. Simple as that!
Connect to network
Now you can grab your remote and jump right into guided setup. Have your network name and password ready and do the following:
- Select your network from the list of available networks.
- Enter your network password, if you use one. Remember, network passwords are once
What to do (cont.)
Complete guided setup
It's the final stretch and hooray—it's a breeze! Continue following the on-screen instructions and you'll:
• Get the latest software.
- Link the Roku Streaming Stick™ to your Roku account on your computer.

Your Roku account:
During setup, you'll be prompted to create your Roku® account
online at roku.com/link. Your Roku Streaming Stick™ will generate a unique code that links your player to your new account. Roku® accounts are free and secure. And while a valid credit card number is required to create your account, rest assured you will only be
Troubleshooting
Having trouble completing setup?
Don't worry: it's usually an easy fix.
If you cannot see a picture on your TV:
• Make sure your TV is turned on. (This tip could save you some embarrassment.)
• Make sure the video input on your TV or home theater
If you cannot connect to your wireless home network during guided setup:
If you are not getting 3 or more signal-strength bars above your wireless network, adjust the location of your Roku Streaming Stick™ and/or wireless router. Make sure there are no obstructions, like cement walls. between your
Troubleshooting (cont.)
• Make sure you enter the correct password, if your network is security-enabled (password is case sensitive).
- If you have turned off SSID broadcasting on your wireless router, you can add your network by selecting "My network is not shown" from the "Wireless" screen.
If you want to keep your job.
(cont.)
Make sure the volume on your TV or home theater receiver is turned up and isn't on mute.
PROSCAN
LIMITED PRODUCT WARRANTY
This quality product is warranted to be free from manufacturer's defects in material and workmanship, provided that the unit is used under the normal operating conditions intended by the manufacturer. Should you have any problem with this product, please and it is highly recommended to visit our website at www.curlisant.com before you take any other steps as we have additional copies of instruction manuals, operating manuals and trouble shooting tips on our website which gives you the answer on most of the questions you could have in operating the unit.
TERMS OF WARRANTY
C.I. Service Dept. warrants this product to be free from defects in materials and workmanship for 1 year on parts and labor. If you originally purchased your product more than 1 year ago, a repair fee may apply. Nothing within this warranty shall imply that C.I. will be responsible or liable for any damage to any items placed in this product, whether due to any defect of the product, or its use, whether proper or improper.
EXCLUSIONS
Save as herein provided, C.I. Service Dept. (Canada) or C.I. Service Dept. (USA), there are no other warranties, conditions, representations or guarantees, express or implied, made or intended by C.I. or its authorized distributors and all other warranties, conditions, representations or guarantees, including any warranties, conditions, representations or guarantees under any Sale of Goods Act or like legislation or statute is hereby expressly excluded. Save as herein provided, C.I. Service Dept. (Canada) or C.I. Service Dept. (USA), shall not be responsible for any damages to persons or property, including the unit itself, however caused or any consequential damages arising from the malfunction of the unit and by the purchase of the unit, the purchaser does hereby agree to indirmaturity and save harmless C.I. from any claim for damages to persons or property caused by the unit. Your warranty does not cover damages which are caused by: * Fire, accident, lighting, flood and/or other acts of God • Faulty installation, set-up adjustments, improper antenna, inadequate signal reception, adjustment of consumer controls and/or improper maintenance • Failure which results from misuse, abuse, neglect, mishandling, misapplication, and/or alteration.
TO OBTAIN REPAIRS UNDER THE TERMS OF THIS WARRANTY IF PURCHASED IN THE UNITED STATES OF AMERICA
- The original purchaser must present a copy of the original bill of sale and the service warranty card.
- Any alterations, abuse, misuse, battery corrosion or accidental damage voids the warranty.
- The warranty does not cover cabinets and accessories.
- No warranty or insurance contained or set out shall apply when damage or repair is caused by power failure; damage in transit or when moving the unit; improper power supply; use for commercial or industrial purposes; service calls resulting in customer education, etc.
- The defective product should be mailed prepaid to:
Curtis International Ltd
100 Lakeview Parkway
Vernon Hills, IL, 60061
For service assistance and product information, please call: 1-800-968-9853.
- C.I. reserves the right to repair or replace the parts which have become defective.
Roku Streaming Stick™
Important Product Information
Roku®
The License Agreement
The Roku and third-party software license terms can be found at: www.roku.com/license. Use of the Roku Streaming Stick™ ("Streaming Stick") constitutes acceptance of as well as agreement to those license terms.
One (1) Year Limited Hardware Warranty
Subject to the additional terms and conditions set forth below, Roku provides this Limited Warranty:
- Only to the person or entity that originally purchased the Streaming Stick from Roku or from one of its authorized re-sellers or distributors; and
- Only for Streaming Sticks purchased and delivered to the end user within the United States and Canada.
Limited Warranty
Roku warrants the Streaming Stick hardware against defects in materials and workmanship under normal use for a period of one (1) year from the date of purchase ("Warranty Period"). If Roku determines that the Streaming Stick's hardware is defective, Roku will either repair the unit or replace the unit with either a new or rebuilt Streaming Stick, at its option. If the Warranty Period has expired or is otherwise not applicable (see Scope and Limitation on Warranty below), we will return the Streaming Stick to you. More information about this warranty can be found at www.roku.com/support. THE FOREGOING SETS FORTH ROKU'S SOLE OBLIGATION AND YOUR EXCLUSIVE REMEDY IN THE EVENT OF ANY BREACH
Important: When emailing for a RMA number, please provide the following information with your request: (a) model number, (b) serial number, (c) problem description, (d) software version (located in the System Configuration menu), (e) date of purchase, (f) place of purchase (re-seller or online place of purchase), and (g) return shipping address (P.O. boxes are not accepted).
Scope of and Limitation on Warranty
The warranty on the Streaming Stick is limited to the repair or replacement of defective units as described in the Limited Warranty section above. This warranty does not cover customer training or education, installation, set up adjustments, or signal reception problems. This warranty also does not cover any issue related to the service provided by your Service Provider, including but not limited to service disruption, changes in service terms, changes in offerings, changes in format, or technical problems. This warranty does dnot dcover damage due dto acts dof dGod, daccident, misuse, dabuse, negligence, commercial use or modification of, or to any part of, your Streaming Stick. This warranty does not cover damage due to improper operation or maintenance, connection to improper voltage supply or attempted repair by anyone other than a facility authorized by Roku to service your Streaming Stick. This warranty does not cover consumables (such as fuses and batteries).
Legal Notices
Federal Communication Commission Interference Statement
This dequipment dhas dbeen dtested dand dfound dto dcomply dwith dthe dlimits dfor da dClass dE digital device, pursuant to Part 15 of the FCC Rules. These limits are designed to provide reasonable protection against harmful interference in a residential installation. This equipment generates, uses and can radiate radio frequency energy and, if not installed and used in accordance with the instructions, may cause harmful interference to radio communications. However, there is no guarantee that interference will not
FCC Caution: Any changes or modifications not expressly approved by the party responsible for compliance could void the user's authority to operate this equipment.
IEEE 802.11b or 802.11g operation of this product in the U.S.A. is firmware-limited to channels 1 through 11.
Wireless Radio Use:
This device is restricted to indoor use when operating in the 5.15 to 5.25 GHz frequency band.
IMPORTANT NOTE:
FCC Radiation Exposure Statement:
This equipment complies with FCC radiation exposure limits set forth for an uncontrolled environment. This equipment should be installed and operated with minimum distance 20cm between the radiator and your body.
This transmitter must not be co-located or operating in conjunction with any other antenna or transmitter.
Note to US model owner:
To comply with US FCC regulation, the country selection function has been completely removed from all US models.
The availability of some specific channels and/or operational frequency bands are country dependent and are firmware programmed at the factory to match the intended destination. The firmware setting is not accessible by the end user.
Industry Canada statement
This device complies with RSS-210 of the Industry Canada Rules. Operation is subject to the following two conditions: (1) this device may not cause harmful interference, and (2) this device must accept any interference received, including interference that may cause undesired operation. The device for operation in the band 5150-5250 MHz
Use and Handling
- Keep the Streaming Stick and any accessories, including the remote, out of the reach of small children.
- Do not touch the Streaming Stick during an electrical storm.
- Do not allow liquid, small particles or other foreign objects to get into the Streaming Stick or accessories.
- Do not expose the Streaming Stick to smoke or steam.
- Do not expose the Streaming Stick or accessories to high, temperatures, high humidity or direct sunlight.
www.roku.com
- Introduction
- INSTALLATION
- Warning
- Caution
- Attacting or Removing the Stand
- Identifying Front and Rear Panel
- Important Information
- Television Antenna Connection Protection
- External Television Antenna Grounding
- Connection Suggestions
- Main unit description
- Control Panel Button Function
- TV Terminal Connections
- Remote control
- OSD basic adjustment
- Installation Guide
- PICTURE
- SOUND
- TIME
- SETUP
- LOCK
- Channel
- PC Setting
- How do I Clean the TV?
- IMPORTANT
- Cleaning the bezel and remote control
- Please Note :
- Cleaning the Screen
- Troubleshooting
- FCC Compliance Statement
- Know your Streaming Stick
- What to do
- Plug it in
- Connect to network
- What to do (cont.)
- Complete guided setup
- Your Roku account:
- Troubleshooting (cont.)
- (cont.)
- PROSCAN
- LIMITED PRODUCT WARRANTY
- TERMS OF WARRANTY
- EXCLUSIONS
- TO OBTAIN REPAIRS UNDER THE TERMS OF THIS WARRANTY IF PURCHASED IN THE UNITED STATES OF AMERICA
- Roku Streaming Stick™
- Limited Warranty
- Scope of and Limitation on Warranty
- Legal Notices
- IMPORTANT NOTE:
- Use and Handling
Brand : Proscan
Model : PLDED4030A-RK
Category : Television