LPQ61407W Neo - Laptop Micromax - Free user manual and instructions
Find the device manual for free LPQ61407W Neo Micromax in PDF.


| Product Type | Laptop |
| Brand | Micromax |
| Model | LPQ61407W Neo |
| Display Size | 14 inches |
| Processor | Intel Celeron or comparable |
| RAM | 4 GB DDR4 |
| Storage | 64 GB eMMC |
| Operating System | Windows 10 Home S mode |
| Battery | Li-ion, 36 Wh, up to 5 hours |
| Dimensions (W x D x H) | 33 x 22 x 2 cm |
| Weight | 1.5 kg |
| Connectivity | Wi-Fi 802.11 b/g/n, Bluetooth 4.2 |
| Ports | USB 2.0, USB 3.0, HDMI, headphone/mic combo |
| Power Adapter | AC 100-240V, 50-60Hz, DC output 12V 2A |
| Maintenance | Clean with soft dry cloth; avoid liquids |
| Safety | Do not block air vents; avoid overheating |
| Spare Parts | Battery, charger, keyboard available from authorized service |
| Repairability | User-replaceable battery and RAM, SSD upgradeable |
| General Information | Includes webcam, microphone, stereo speakers |
Frequently Asked Questions - LPQ61407W Neo Micromax
User questions about LPQ61407W Neo Micromax
0 question about this device. Answer the ones you know or ask your own.
Ask a new question about this device
Download the instructions for your Laptop in PDF format for free! Find your manual LPQ61407W Neo - Micromax and take your electronic device back in hand. On this page are published all the documents necessary for the use of your device. LPQ61407W Neo by Micromax.
USER MANUAL LPQ61407W Neo Micromax
Power on Your Device 11
Charge the Battery....12
Battery Status 13
Connect to USB Device 14
Put your device in Sleep Mode....14
Microsoft Account....15
Wake up your computer....15
Taskbar 15
Start Menu 16
Notification area....16
Pin and unpin Applications....18
Removing an App....19
Power off Device 19
Settings Screen....21
Connect to Wi-Fi 22
Troubleshooting....24
Device Specifications 26
Safety Precautions....27
Taking Care of your device....27
Recycle your Device 28
Disclaimer 28
Copyright 28
Welcome
Thank you for purchasing the Micromax LPQ61407W device. Your LPQ61407W device is powered by Windows 10 Operating System which is set to revolutionize your PC experience in pleasant ways.

Layout


Insert Memory Card
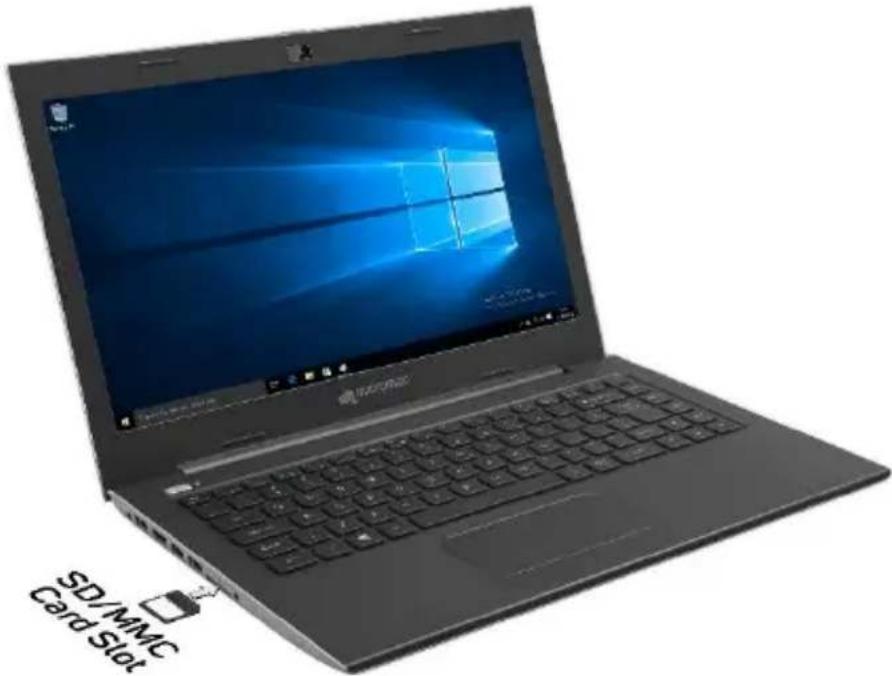
To store additional files and applications, you need to insert a memory card. Insert the memory card in the slot as shown below:
Touchpad
The keyboard comes with a touchpad which can be used as a built-in mouse. Place and drag your finder on the touchpad to move the mouse pointer across the screen. The lower left corner and lower right corner of the touchpad can be used as the left and right mouse-clicks respectively.

Function keys

To activate these functions, press the hot key associated with the desired function as below:
| Keys | Description |
 | Press key combination Fn+F1 to enter sleep mode. |
 | Press key combination Fn+F2 to enter power saving mode. |
 | Press key combination Fn+F3 to enter LCD/CRT/HDMI mode. This combination allows the user to switch between the following display modes: LCD only, LCD+ CRT, CRT only, HDMI+CRT, HDMI only, LCD+HDMI simultaneously. |
 | Press key combination Fn+F4 to switch all radios on or off. Note: FN+F4 works as combo key to switch Bluetooth and WI-FI function on/off. OSD instruction will only show the WI-FI icon. |
 | Press key combination Fn+F5 to see the OSD bar with the definition of function keys. |
 | Press key combination Fn+F6 to enable Touch pad mode. |
 | Press key combination Fn+F7 to switch the webcam on/off. |
 | Press key combination Fn+F8 to enable MUTE mode. |
 | Press key combination Fn+F9 to lower the Volume. |
 | Press key combination Fn+F10 to increase the Volume. |
 | Press key combination Fn+F11 to decrease brightness of the LCD display. |
 | Press key combination Fn+F12 to increase brightness of the LCD display. |
In addition to the functions key combinations, you can also use the following key combinations:
| Optional Keys | Description |
 | Press the Windows logo key + Q keys to open Search and search apps. |
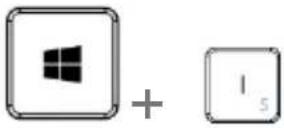 | Press the Windows logo key + I keys to open Settings. |
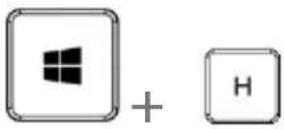 | Press the Windows logo key + H keys to open Share which helps you share files, photos, and info. |
 | Press the Windows logo key + K keys to view Devices associated with your system. |
Power on Your Device
It is strongly recommended to connect the AC adapter and charge the device before use. Connect the AC adapter and fully charge the battery. Press the power button (normally 1 to 2 seconds) until you see the power indicator light up.
Note: The AC adapter included in the package is approved for your notebook; using any other adapter model may damage either the notebook or other devices attached to it. Your adapter may vary based on your country.
CAUTION: Do not use inferior extension cords as this may result in damage to your notebook. The notebook comes with its own AC adapter. Do not use a different adapter to power the computer and other electrical devices.
NOTE: The power adapter may become warm to hot when in use. Be sure not to cover the adapter and keep it away from your body.
Charge the Battery
When the battery is low, the low-battery icon appears on the screen.
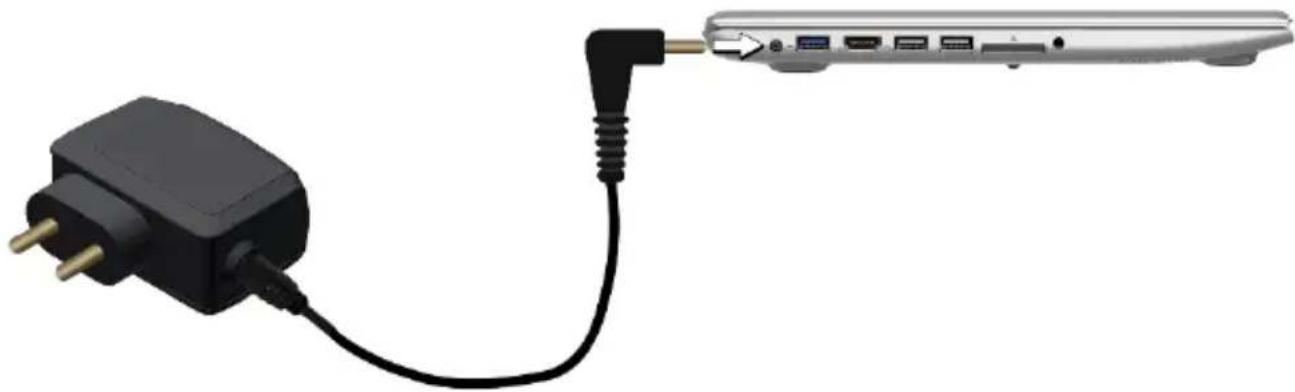
Plug the charger to the electrical outlet and plug the charging cable to the charging port on the device.
i
Before using the device for the first time, we recommend you to fully charge the battery. It takes around 4 to 5 hours to fully charge the battery. When not using the device for a long time, charge the device to 30 - 40% of its battery capacity to extend battery life.
i
Use only Micromax chargers and cables that came with the packaging. Other chargers or cables may damage the battery or your device. This will invalidate your device warranty.
Battery Status
On the Desktop screen, move the cursor to the battery icon in the taskbar. A pop-up dialog box appears and shows you the remaining battery percentage, as shown below:

| Battery is fully charged. | |
 | Battery is starting to drain. |
 | Battery has drained completely and you should stop using your device and charge it at once. |
 | Battery is being charged. |
Connect to USB Device
Your device comes with two USB ports compatible with USB devices. Once you plug a USB device into a USB port on your computer, Windows automatically loads a driver for that device. Once the driver has been loaded, you can disconnect and reconnect the same device without performing any additional steps.
Put your device in Sleep Mode
When you are away from your device for a short span of time, you can put your device into sleep mode. Press the power button briefly once. If you want to change the settings, click on the battery level icon on the taskbar, and select Power and Sleep settings.

Note: It is recommended that you put your computer to sleep before you move it. Moving your computer while the hard disk is spinning can sometimes damage the hard disk, causing loss of data.
Microsoft Account
Your Microsoft Account lets you take full advantage of applications and services offered by Microsoft. Configure your Microsoft account on this device to get access to Outlook, Windows Store, One Drive, and much more.
To configure your Microsoft account on the device,
- Connect to the Internet and open Settings → Accounts → Sign in with a Microsoft Account instead and tap the required credential(if you already have an account) or tap Create a new one.
- Enter the required details and follow the on-screen instructions to log in or create your new account.

You may add various other accounts, depending on your applications.
Wake up your computer
Do one of the following:
A: Press the power button briefly once (when it is already in sleep mode).
B: Press any key on the keyboard, tapping the touchpad, or open the display panel.
Taskbar
The black bar on the bottom of the desktop is called Taskbar. It provides several key features and they are:
- Start menu
- Search box
- App shortcuts area
- Notification area
Start Menu
To open the Start menu, you can either click on the windows icon (which is also known as Start button) located at the left end of the taskbar or press once on the windows key of the keyboard. And the Start menu will appear, as shown below:


Notification area
The right part of the taskbar holds several icons that show you the status of your laptop, as shown below.

This is an area called Notification Area which has the following icons:

Click here to show more status icons

Shows you the current battery status

Shows you the status of your wireless network connection

Click here to show the unread notifications
Pin and unpin Applications
1.Open the Start menu and select
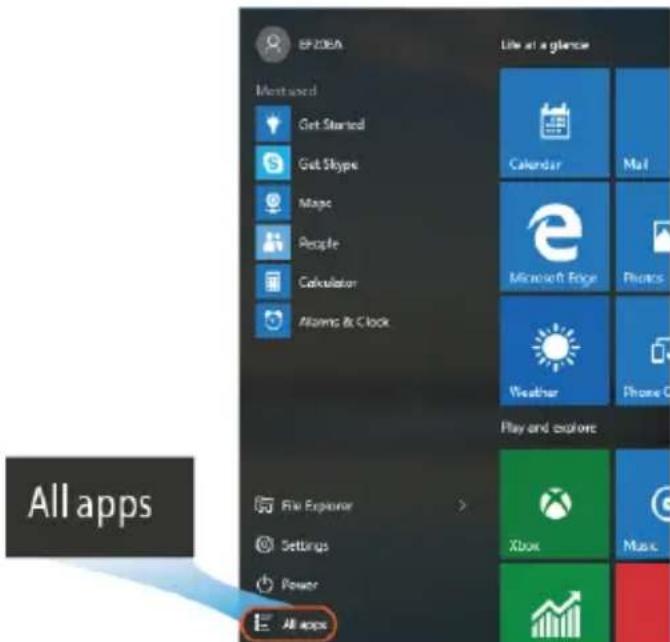
- Right-click on the app that you want to appear on your Start menu or taskbar, and an option menu appears.
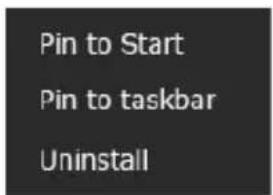
- Click
or to add the app to your Start menu or taskbar.
Removing an App
- Right click the app that you want to remove from your Start menu or taskbar.
- Click
or to remove it from your Start menu or taskbar.
Power off Device
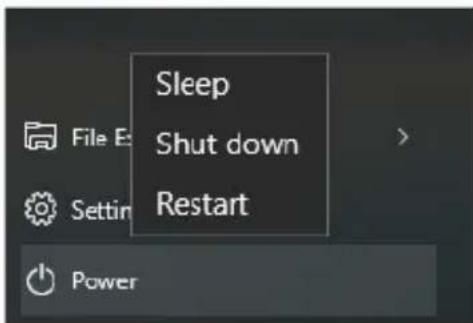
You can power off your device from either the Start menu or directly from the Power button.
- Click the Windows icon on the lower left corner of the desktop or press the Windows key on the keyboard.

- Click the Power option on the Start menu that appears.

- Select Shut Down from the Power option.
Settings Screen
- Click the Windows icon in the low-left corner of the Desktop. Or, press the Windows key in the keyboard.
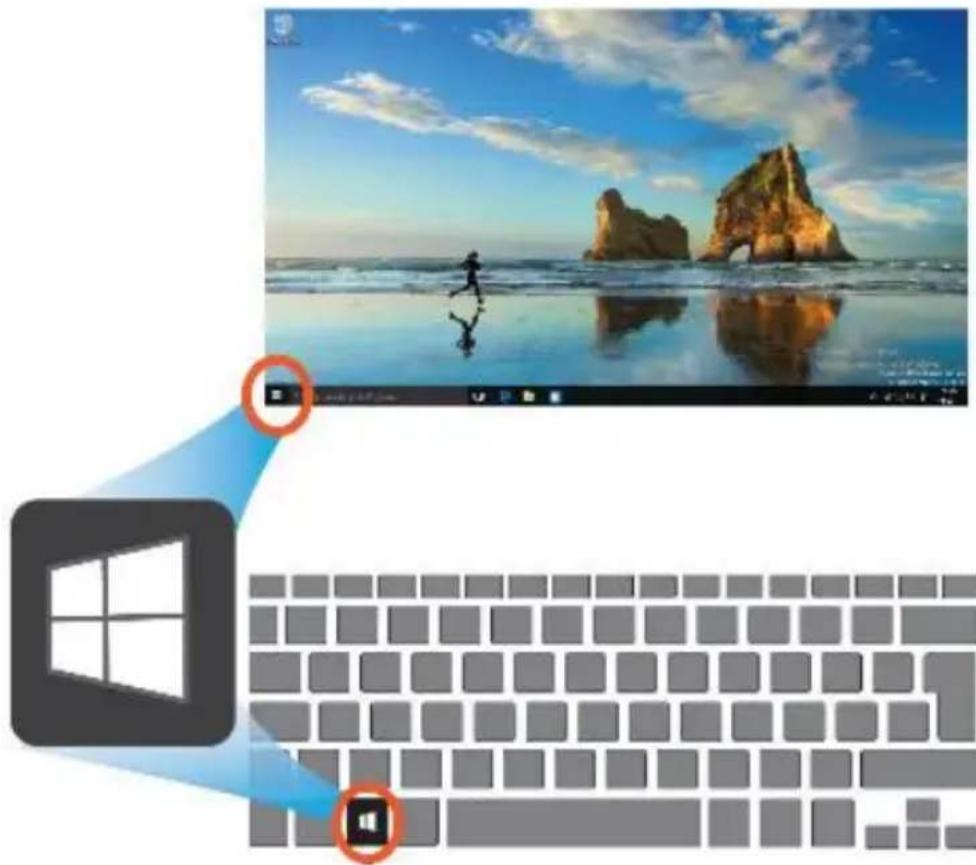
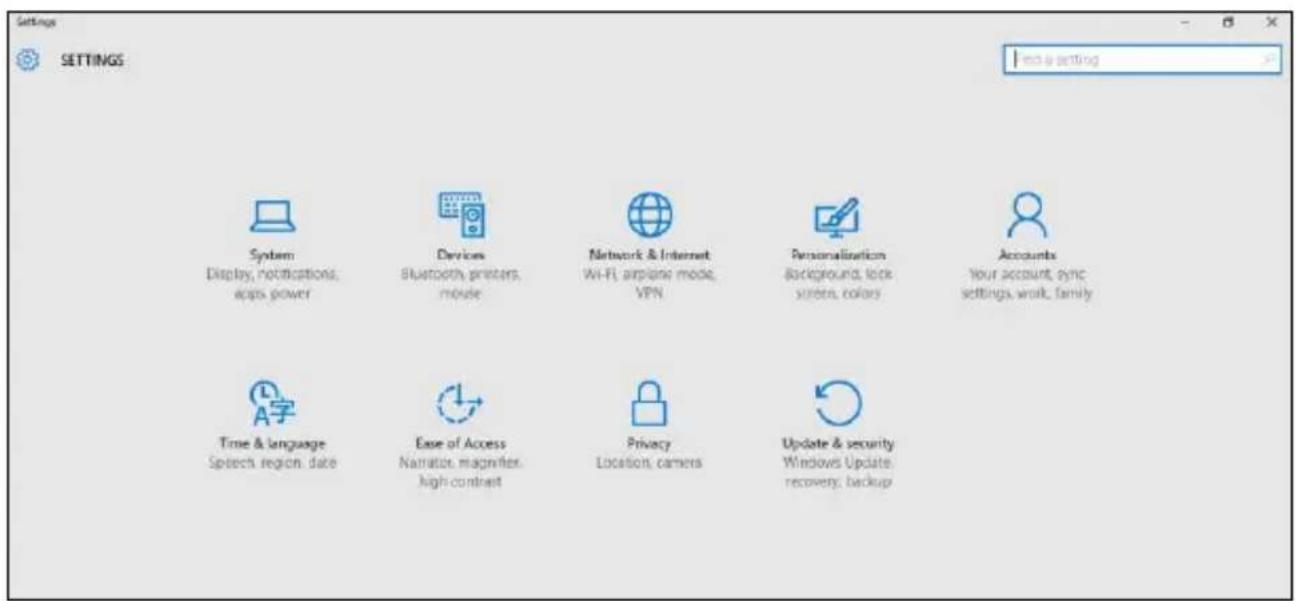
- Select Settings. This will open the Settings screen, as shown below.
Connect to Wi-Fi
- Open Settings and select Network & Internet.

Network & Internet Wi-Fi, airplane mode, VPN
- Select Wi-Fi and set the function to ON, as shown below:
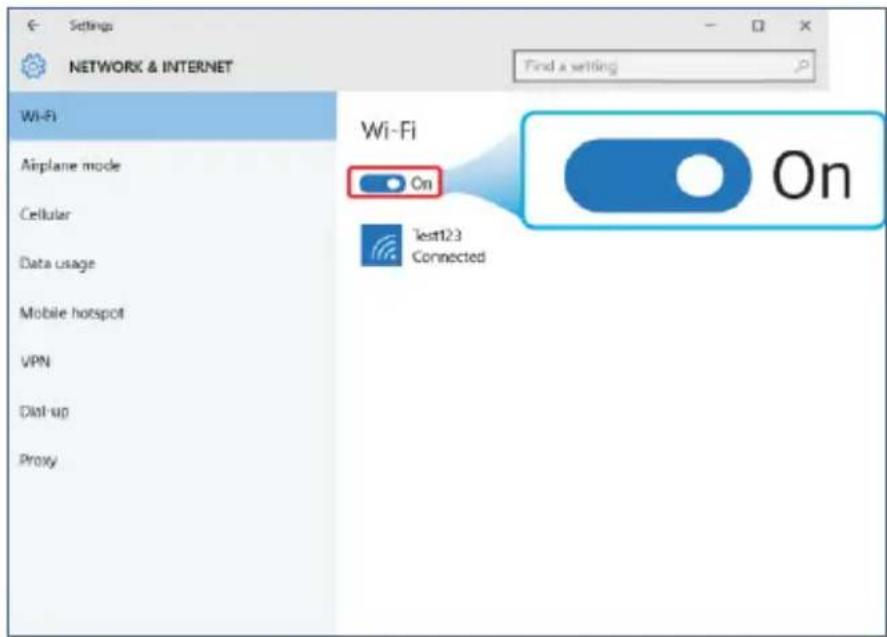
- Make sure you have switched the Airplane mode off. To confirm that Airplane mode is disabled, go to desktop and check the notification area. If you see an airplane icon on the lower right, disable the Airplane mode.
- Once the wireless has been enabled, the computer automatically scans for available wireless networks and displays them in the list.
- Click the network's name in the list, and then click Connect.
Note: Some networks require a network security key or password for connection. If necessary, ask the network administrator or the Internet service provider (ISP) for the required information.
Troubleshooting
This section describes some of the possible issues that might arise on your laptop along with their possible resolutions.
| Issue Description | Possible Resolutions |
| When I turn on the computer, nothing appears on the screen. | If the screen is blank, make sure that:The AC adapter is connected to the computer and the power cord is plugged into a working electrical outlet.The computer power is on. (Press the power button 6 seconds to force the power off, and power it on again.)If these items are properly set, and the screen remains blank, have the computer serviced. |
| My screen goes blank while the computer is on. | Your laptop is in sleep mode. Do one of the following to resume from sleep mode:Press any key on the keyboard for 2 to 3 seconds.Press the power button.Press the windows key button. |
| The critical low-battery error message appears, and the computer turns off | The battery power is getting low. Connect the AC adapter to the computer |
| The computer enters sleep mode immediately after Power-on. | Make sure that the battery is charged.The operating temperature may be too hot. Move to a cooler environment and try to wake the computer. |
| The computer does not return from sleep mode and the computer does not work. | If your computer is in sleep mode, connect the AC adapter to the computer, then press any button or the power button.If your computer is powered-off, connect the AC adapter to the computer, then press the power button to resume operation. |
| The screen is blank. | Do the following:If you are using the AC adapter, or using the battery, and the battery status indicator is on, press Fn + F12 to make the screen brighter.If the power indicator is blinking, press the power button to resume from sleep mode.If the problem persists, follow the solution in the next problem "The screen is unreadable or distorted." |
| The screen is unreadable or distorted. | Make sure that:The screen resolution and color quality are correctly set.The monitor type is correct. |
| Incorrect characters appear on the screen. | Are the operating system or programs installed correctly? If they are installed and configured correctly, has the computer been serviced? |
| No sound can be heard from the speaker even when the volume is turned up. | Check the following possibilities:The Mute function is off.The combo audio jack is not being used.Speakers are selected as the playback device. |
| Your computer does not respond. | To turn off your computer, press and hold the power button for 6 seconds or more. If the computer still does not respond, remove the AC adapter.Your device might lock when it enters sleep mode during a communication operation.Disable the sleep timer when you are working on the network. |
| The connected external device does not work. | Do not connect or disconnect any external device cables other than USB while the device power is on. Otherwise, you might damage your device.When using a high power consumption external device such as an external USB optical disk drive, use an external device power adapter. Otherwise, the device may not be recognized. |
Device Specifications
| Battery Voltage | Battery Nominal voltage 7.4V |
| Battery Capacity | 4700mAh |
| Device Environmental Rating | Temperature 40±5°C |
| Humidity Range | Relative humidity 65 ± 20% |
| Charger | |
| AC-DC adaptor I/P & O/P | DC Output: 12V/24W,Input Voltage: 100–240VAC NominalInput Frequency: 50–60Hz |
| Environmental Rating | Operating Temperature: 0°C--40°CStorage Temperature: -25°C--60°COperating humidity: 25%--60%Storage humidity: 5%---75% |
| Humidity Range | Ambient Temperature 25°C, Relative Humidity 35~65%RH |
| Input/output | 1 Mini DC-in jack3 x USB port (1 is USB 3.0 & others are 2.0)1 HDMI port1 SD Card slotAudio jack |
Note: It is however recommended to use this device where the preferred ambient temperature is not more than 35° C.
Safety Precautions

Your device's radio waves may interfere with inadequately shielded medical devices. Consult a physician or manufacturer of the medical device to know whether they are adequately shielded from external Radio Frequency. Switch off your device when regulations require you to do so.

Always keep the device and accessories out of reach of small children. Small parts such as the memory card can be swallowed by small children.

Manufacturers of medical devices recommend a minimum distance of 15.3 cm (6 inches) between a wireless device and an implanted medical device such as pacemaker or cardioverter defibrillator to avoid issues arising out of radio frequency interference.

The mains voltage (V) specified on the power supply unit must not be exceeded to prevent damage to the charging device. The power supply must be plugged into an easily accessible AC power socket when charging the battery.

Do not open the device under any circumstances. All other changes to this device are strictly prohibited and will invalidate the warranty.

The device must be repaired by Micromax authorized personnel only. Repairing this device by yourself other than our authorized service agents/centers goes against the warranty rules.
Taking Care of your device
Your device is a product of superior design and craftsmanship and should be handled with care. The following suggestions will help you protect your device:
- Keep the device dry. Precipitation, humidity, and all types of liquids or moisture can rust the electronic circuits. If your device gets wet, wipe it with a dry cloth and take it to an authorized service center.
- Do not store the device in high or cold temperature. Extreme temperatures can shorten the life of electronic devices and damage batteries.
-
Do not use or store the device in dusty, dirty areas. Its moving parts and electronic components can get damaged.
-
Do not drop, knock, or shake the device. Rough handling can break internal circuit boards and fine mechanics.
• Do not use harsh chemicals, cleaning solvents, or strong detergents to clean the device. Only use a soft, clean, dry cloth to clean the surface of the device. - Do not store your device near magnetic fields or allow your device to come in contact with magnetic fields for extended period of time.
Recycle your Device
The WEEE logo (shown at the left) appears on the product (battery, device, and charger) to indicate that this product must not be disposed off or dumped with your other household wastes. You are liable to dispose of all your electronic or electrical waste equipment by relocating over to the specified collection point for recycling of such hazardous waste.
Collection and proper recovery of your electronic waste equipment at the time of disposal will allow us to help preserve the environment. Recycling of the electronic waste equipment will ensure safety of human health and environment. For more information on best practices for disposal of electronic and electrical waste, please visit to our web site: www.micromaxinfo.com/weee.php.
Note: Micromax will not bear any responsibility for any incompliance with the above mentioned guidelines or improper usage of the device.
Disclaimer
- The colors, specifications, content, functions and graphics shown/mentioned in the user manual may differ from the actual product. In such a case, the latter shall govern. Images shown are for representation purpose only. Specifications are subject to change without prior notice. Micromax keeps the right to modify the content in this user guide without prior notice.
• Available storage memory may vary based on the device software.
Other product logos and company names mentioned herein may be trademarks or trade names of their respective owners.
Micromax privacy policy is available at www.micromaxinfo.com.
Copyright
All rights reserved. Reproduction, transfer, distribution or storage of part or all of the contents in this document in any form without the prior written permission of Micromax is strictly prohibited.
- WELCOME
- INSERT MEMORY CARD
- TOUCHPAD
- FUNCTION KEYS
- POWER ON YOUR DEVICE
- CHARGE THE BATTERY
- BATTERY STATUS
- CONNECT TO USB DEVICE
- PUT YOUR DEVICE IN SLEEP MODE
- MICROSOFT ACCOUNT
- WAKE UP YOUR COMPUTER
- TASKBAR
- START MENU
- NOTIFICATION AREA
- PIN AND UNPIN APPLICATIONS
- REMOVING AN APP
- POWER OFF DEVICE
- SETTINGS SCREEN
- CONNECT TO WI-FI
- TROUBLESHOOTING
- SAFETY PRECAUTIONS
- TAKING CARE OF YOUR DEVICE
- RECYCLE YOUR DEVICE
- DISCLAIMER
- COPYRIGHT
Brand : Micromax
Model : LPQ61407W Neo
Category : Laptop