001-098 - Drill Meec Tools - Free user manual and instructions
Find the device manual for free 001-098 Meec Tools in PDF.


| Type of product | Electric drill (corded) |
| Brand | Meec Tools |
| Model | 001-098 |
| Dimensions (approximate) | 25 x 20 x 8 cm |
| Weight | 1.5 kg |
| Power supply | 230 V AC, 50 Hz |
| Power consumption | 600 W |
| No-load speed | 0-3000 rpm (variable) |
| Chuck type | Keyless, 1-13 mm capacity |
| Max drilling capacity (steel) | 10 mm |
| Max drilling capacity (wood) | 25 mm |
| Functions | Forward/reverse, variable speed trigger, lock-on button |
| Safety features | Double insulation, safety switch lock-off |
| Maintenance | Clean ventilation slots, replace carbon brushes as needed |
| Repairability | User-replaceable brushes, spare parts available online |
| Certifications | CE marked, RoHS compliant |
| Warranty | 2 years |
Frequently Asked Questions - 001-098 Meec Tools
User questions about 001-098 Meec Tools
0 question about this device. Answer the ones you know or ask your own.
Ask a new question about this device
Download the instructions for your Drill in PDF format for free! Find your manual 001-098 - Meec Tools and take your electronic device back in hand. On this page are published all the documents necessary for the use of your device. 001-098 by Meec Tools.
USER MANUAL 001-098 Meec Tools
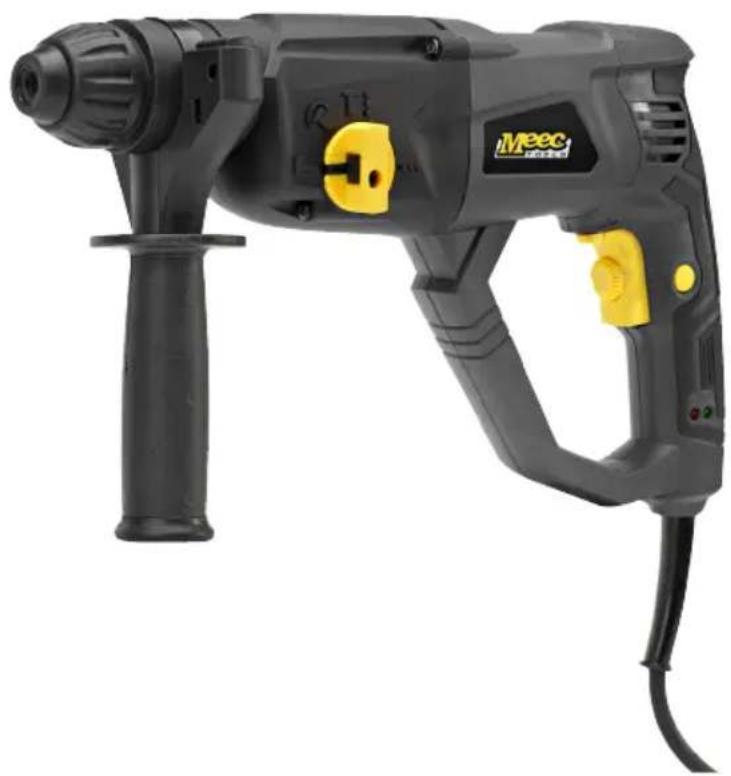
natural_image
Exterior view of a Meec-branded drill put tool (no text or symbols visible)EN - Operating instructions in original
Date of production: 2014-12-09
© Jula AB
SVENSKA....5
SÄKERHETSANVISNINGAR....5
Symboler på maskinen....10
TEKNISKA DATA....11
BESKRIVNING 12
HANDHAVANDE 12
Borrlägen 13
UNDERHÅLL 14
FELSÖKNING 15
NORSK 18
SIKKERHETSANVISNINGER 18
Symboler på maskinen....23
TEKNISKE DATA 24
BESKRIVELSE....25
HÄNDTERING 25
Borposisjoner....26
VEDLIKEHOLD 27
FEILS∅KING....28
POLSKI 31
ZASADY BEZPIECZEŃSTWA 31
SAFETY INSTRUCTIONS 44
Symbols on the machine 49
TECHNICAL DATA....50
DESCRIPTION 51
OPERATION....51
Drill settings 52
MAINTENANCE ....53
TROUBLESHOOTING 54
SÄKERHETSANVISNINGAR
natural_image
Symbol of a trash bin with no visible text or labelsVerne om miljøet!
natural_image
Pure electrical circuit lines without any symbolsDBAJ O ŚRODOWISKO!
Read the operating instructions carefully before use!
Please retain for future reference.
General safety information for power tools
- Failure to follow all instructions and safety information may result in electric shock, fire and/or serious injury.
- Retain all warnings and instructions for future reference.
- The term 'power tool' in the warnings below refers to your mains-operated (corded) power tool.
Working range
- Keep the work area clean and well lit. Cluttered or dark areas invite accidents.
- Do not operate power tools in explosive environments, for example in the presence of flammable liquids, gases or dust. Power tools create sparks which may ignite dust or fumes. Keep children and bystanders at a safe distance while operating a power tool.
- The user may become distracted and lose control of the rotary hammer drill.
Electrical safety
- The power tool plug must fit the power outlet. Never modify the plug in any way. Never use an adapter together with earthed devices. Unmodified plugs and matching outlets will reduce risk of electrocution.
- Avoid body contact with earthed surfaces such as pipes, radiators, cookers and refrigerators. There is an increased risk of electrocution if the user's body is earthed.
- Do not expose power tools to rain or wet conditions. Water entering a power tool will increase the risk of electrocution.
- Take care with the power cable. Never use the power cable for carrying, pulling or unplugging the power tool. Keep the power cable away from heat, oil, sharp edges or moving device parts. Damaged or entangled power cables increase the risk of electrocution.
- When operating the power tool outdoors, use an extension cord approved for outdoor use. Use of a cord suitable for outdoor use reduces the risk of electric shock.
- If operating a power tool in a damp location is unavoidable, use a power supply that is protected with a residual current device (RCD). Using an RCD reduces the risk of electrocution.
Personal safety
-
Be alert. Always be careful and use common sense when working with power tools. Do not use a power tool while you are tired or under the influence of drugs, alcohol or medication. A moment of inattention while operating power tools may result in serious injury.
-
Use personal protective equipment. Always wear eye protection. Protective equipment such as dust masks, non-skid safety shoes, hard hats and ear defenders that are tailored to the specific type and use of the tool will reduce the risk of injury.
- Avoid unintentional starting. Ensure that the switch is in the off position before connecting to the power source. Do not pick up or carry the power tool when it is in use. There is an increased risk of accident if the user carries the power tool with their finger on the switch or if the user plugs the power tool in when the switch is on.
- Remove any wrenches or similar objects before starting the power tool. Any tools left attached to a rotating part of the power tool may result in personal injury.
- Do not overreach. Keep a proper footing and balance at all times. This enables better control of the power tool in unexpected situations.
- Dress properly. Do not wear loose-fitting clothes or jewellery. Keep your hair, clothing and gloves away from moving parts. Loose clothes, jewellery or long hair can be caught in moving parts.
- If there is equipment for dust extraction and dust collection, this should be connected and used correctly. This type of equipment reduces the risk of problems caused by dust.
- Use only approved safety equipment. Unapproved safety equipment may not provide adequate protection Check that the protective equipment meets the requirements for the work which is to be done.
Use and care of power tools
- Do not force the power tool. Use the correct power tool for your application. The power tool will work better and be safer with the load for which it is designed.
- Do not use the power tool if it cannot be turned on and off by means of the switch. Any power tool that cannot be controlled with the switch is dangerous and must be repaired.
- Remove the power cord from the power source before making any adjustments, replacing accessories or storing the power tool. Such preventive safety measures reduce the risk of starting the power tool accidentally.
- Keep power tools that are not in use stored out of the reach of children. Never let children or persons unfamiliar with the power tool or who have not read these instructions operate it. Power tools are dangerous if they are used by inexperienced persons.
- Maintain the power tool. Check that moving parts are correctly adjusted and move freely, that no parts are incorrectly mounted or broken and that there are no other factors that can affect how it works. If damaged, have the power tool repaired before using again. Many accidents are caused by poorly maintained power tools.
- Keep cutting tools sharp and clean. Properly maintained cutting tools with sharp cutting edges do not bind as often and are easier to control.
- Use the power tool, accessories and tool bits etc. in accordance with these instructions, taking into account the working conditions and the work to be performed. It is dangerous to use power tools for purposes other than those for which they are intended.
Service
The power tool may only be serviced by qualified personnel using identical spare parts. This will ensure that safety is maintained when using the power tool.
Special safety instructions for rotary hammer drill
- Always wear ear protection while operating the rotary hammer drill. Exposure to noise may cause hearing loss.
- Use the auxiliary handle supplied with the rotary hammer drill. Loss of control of the rotary hammer drill can lead to injury.
- Use the insulated gripping surfaces to hold the rotary hammer drill when performing an operation where the tool could come into contact with hidden electrical wiring or its own cord. Contact with a live cable also makes the metal parts of the electrical tool live and can lead to an electric shock.
- Let the bits cool before touching, replacing or adjusting them. Bits get very hot during use and can cause burns.
- Immediately release the power switch if the drill bit gets stuck. The torque can cause injury or damage the drill bit.
- Make sure the labels and signs on the rotary hammer drill are in legible condition. They contain important safety instructions. Contact the retailer if the labels or signs are illegible.
- Avoid unintentional starting. Prepare the job before turning on the rotary hammer drill.
- Do not put the rotary hammer drill down until it has come to a complete stop. Moving parts can get stuck, causing the user to lose control of the rotary hammer drill.
- Hold the rotary hammer drill in both hands with a steady grip, so that you can handle the forces that arise when starting the tool.
- Do not leave the rotary hammer drill unattended when plugged in. Turn off the rotary hammer drill and unplug it from its electrical outlet before leaving the area.
- The rotary hammer drill is not a toy. Keep it out of the reach of children.
- Consult your doctor before using it if you have a pacemaker. Electromagnetic fields in close proximity to a heart pacemaker may cause pacemaker interference or pacemaker failure. The following applies to persons with a pacemaker:
- Do not work alone.
- Do not use the rotary hammer drill with a power switch that is locked in place.
- Maintain and inspect the rotary hammer drill in order to avoid electrocution.
- Correctly earth all electrical cables. Make sure that the electrical system has a residual current device – this prevents electrocution.
- Some types of dust created by sanding, sawing, drilling and other similar operations contain chemicals known to cause cancer, birth defects or other reproductive disorders. The following chemicals may be dangerous:
– Lead from lead-based paints.
– Silicon dioxide from bricks, cement and similar products.
- Arsenic and chromium from chemically treated timber.
The risk of exposure depends on the frequency with which this type of work is performed. Work in a well-ventilated area and use approved safety equipment such as a dust mask specially constructed for filtering microscopic particles.
- Handling the rotary hammer drill's electrical cable exposes you to lead, which can cause cancer, birth defects and other genetic disorders. Wash your hands after handling.
- The warnings, safety precautions and instructions in these operating instructions do not cover every circumstance or situation that can occur. In the end, the user must always rely on their common sense and take all necessary precautions.
Vibrations
The rotary hammer drill vibrates while operating. Repeated or long-term exposure to vibrations may cause temporary or permanent physical injury, in particular to the hands, arms and shoulders Follow the instructions below to reduce the risk of vibration-related injuries.
- Persons using vibrating tools regularly or for an extended period should be examined by a doctor before starting work, and then have regular check-ups to ensure that health problems are not being caused or exacerbated. Pregnant women or persons who have impaired blood circulation to the hands, previous hand injuries, nervous system disorders, diabetes, or Raynaud's disease should not use the rotary hammer drill. Immediately contact the doctor if you have any vibration-related symptoms (e.g. tingling, numbness, white or blue fingers).
- Do not smoke while working. Nicotine impairs the supply of blood to the hands and fingers, increasing the risk of vibration-related injuries.
- Use suitable gloves in order to reduce the effects of vibrations.
- Always use tools with the lowest amount of vibration possible.
- Work without vibrations for periods every day.
- Hold the rotary hammer drill as loosely as possible (but not so loosely that you no longer have full control over it). Let the rotary hammer drill carry out the work.
- Maintain the rotary hammer drill according to the operating instructions in order to reduce vibrations. Immediately stop using it if abnormal vibrations arise.
Earthing
To prevent electric shocks and fatalities due to improper earthing:
- Consult an electrician if you are uncertain whether the socket is earthed.
- Do not modify the rotary hammer drill's plug.
– Never remove the earth terminals from the plug. - Do not use the rotary hammer drill if the electrical cable or plug is damaged. Have a service centre repair the electrical cable or the plug before use.
- Have an electrician install a new electrical socket if the plug does not fit it.
Tools marked with the double insulation symbol do not need to be earthed. They have a special insulation system that meets applicable regulations.
Extension cables
- Earthed tools must be used with an extension cable with three wires. Tools with double insulation can be used with extension cables with two or three wires.
- The longer the distance between the electrical socket and the tool, the greater the cable capacity needed for the extension cable. Extension cables with incorrect cable capacity provide too little voltage, resulting in lower output and potential damage to the tool. (See table A.)
- The lower the number, the greater the capacity of the cable. E.g. a cable with No. 14 can handle greater current than a cable with No. 16. (See table A.)
- All cables must have at least the requisite cable capacity, if more than one extension cable is used. (See table A.)
- Add the current strengths found on the rating plates if the extension cable is used with more than one tool and decide the minimum cable capacity based on the total. (See table A.)
- Make sure that the extension cable is suitable for outdoor use if the job is to be done outdoors.
- Make sure that the extension cable is correctly connected and free from defects. Replace damaged extension cables or get an electrician to repair them prior to use.
- Protect extension cables from sharp objects, excessive heat, steam and damp areas.
Safety instructions for SDS rotary hammer drill
- The rotary hammer drill may only be used with the SDS Plus type drill accessories intended for the purpose. Do not use force to try to fit other types of accessory. When using an adapter chuck the hammer drilling mode must NOT be used.
- Using the rotary hammer drill incorrectly can cause permanent damage and can invalidate the warranty.
- Be aware of the effects of vibrations when using the hammer function. Rotary hammer drills of the SDS type produce greater vibrations than conventional rotary hammer drills.
- Be aware that both ends of the drill bit can be very hot after use. Wear gloves when changing a drill bit or chisel.
SYMBOLS ON THE MACHINE

Please read these instructions before use.

Wear approved safety goggles.

Use approved ear protection.

Double-insulated.
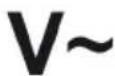
Alternating current.

Amperage.
n0 xxxx/min. Unloaded rpm.

Fire risk. Do not cover the ventilation holes.
Keep combustible objects at a safe distance from the tool.

Risk of electrical accidents. Check that the electrical cable is connected to an appropriate electrical socket.
TECHNICAL DATA
| Rated voltage 230 VAC / 50 Hz |
| Power 850 W |
| Unloaded rpm 1,100 rpm |
| Impact rate 0–5,200 strokes/min |
| Chuck SDS+ |
| Capacity in wood 40 mm |
| Capacity in concrete 26 mm |
| Capacity in steel 13 mm |
| Sound pressure level, LpA 92 dB(A), K=3 dB |
| Sound power level, LwA 103 dB(A), K=3 dB |
| Maximum vibration level 16 m/s ^2 , K=1,5 m/s ^2 |
Always use hearing protection!
The declared vibration value, which has been measured in line with a standardised testing method, can be used to compare different tools with each other and for a preliminary assessment of exposure.
WARNING The actual vibration level during the power tool's use can vary from the specified total value depending on how the tool is used. You must therefore identify the safety measures required to protect the user, based on an estimate of exposure during actual operating conditions (taking into account all parts of the work cycle as well as the time the tool is switched off and when running idle, in addition to the start-up time).
DESCRIPTION
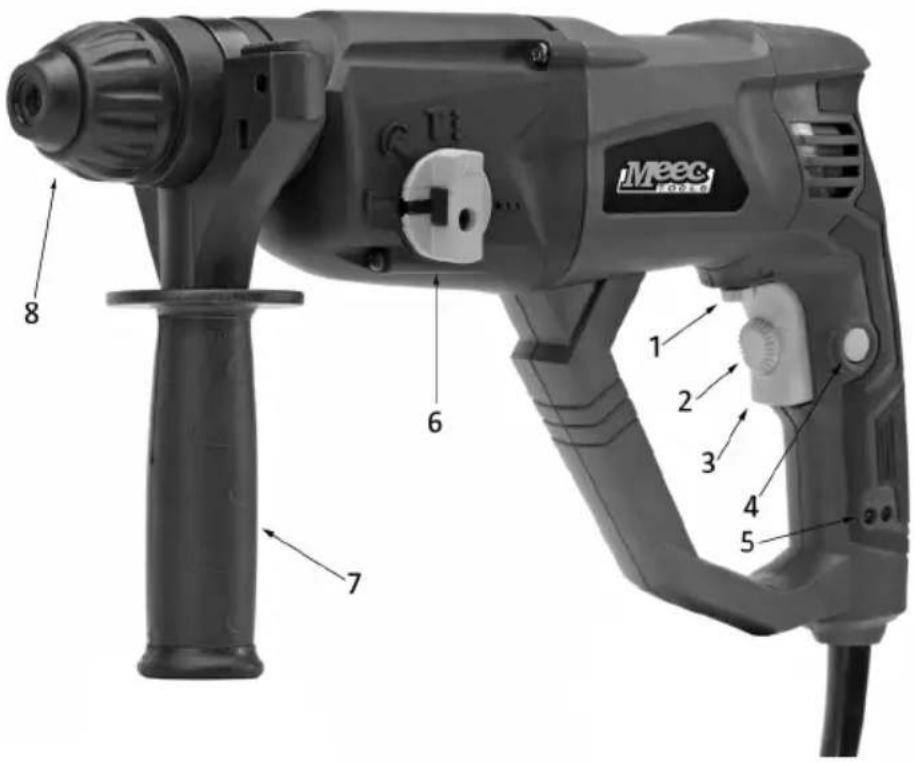
-
Direction selector
-
Function indicators
-
Speed control
-
Mode selector
-
On-Off switch
-
Auxiliary handle
-
Locking button
-
Chuck
OPERATION
- NB Always disconnect the rotary hammer drill before making any adjustments or replacing accessories.
Handle
• Always hold the auxiliary handle when drilling.
- The handle can be adjusted to suit the type of work to be carried out.
- To adjust the auxiliary handle, turn the handle anticlockwise to loosen the handle part. Move the handle to the desired position and secure by turning it clockwise.
Using the chuck
- The SDS system means that the drill bit can move in the chuck. This means that the chuck does not need to be tightened around the drill bit.
• Always grease the SDS drill shank. The drill bit must always be freshly greased and free of dirt
and dust before being used. Pull back the chuck collar and hold it firmly. Press the drill bit into the chuck as far as possible and rotate. Release the chuck collar. The drill bit should now be locked. Check by pulling the drill bit. If the drill bit comes loose, repeat the above procedure until it is positioned as it should be.
- To loosen the drill bit from the chuck, pull back the chuck collar and hold it firmly. The drill bit can then be removed from the drill.
- Remember that it might not be possible to drill holes with the same precision as with a conventional electric drill. This is because there is a certain amount of slack in the SDS chuck to enable the drill bit to move correctly.
WARNING Do not use any accessories which have a maximum speed lower than the machine's unloaded rpm.
On-Off switch
Always hold the drill firmly with both hands.
-
Start the rotary hammer drill tool by depressing the on-off switch (3).
-
Stop the rotary hammer drill by releasing the on-off switch (3).
Setting the speed
The rotary hammer drill's speed can be varied. The speed is adjusted using the on-off switch. The further the on-off switch is pressed in, the faster the drill turns.
Lock function
The rotary hammer drill is equipped with a lock button (4). This enables the on-off switch to be locked in a fully depressed position for a longer period of use
-
Activate the lock by fully depressing the on-off switch and then pressing the lock button. The drill now continues to run even when the on-off switch is released.
-
Stop the rotary hammer drill by depressing and then releasing the on-off switch.
DRILL SETTINGS
NB
- Excessively hard pressure on the rotary hammer drill does not make drilling go any faster or make it any more effective. If the pressure on the rotary hammer drill has a noticeable effect on the speed, the pressure should be reduced. Overloading the rotary hammer drill shortens its service life.
- When the drill bit penetrates into the material, it can get stuck or seize, which can make the rotary hammer drill suddenly jerk. To reduce the risk of injury, the rotary hammer drill must be held securely with both hands at all times, and sharp drill bits of the correct type must always be used.
- Make sure that the material is securely fastened at all times. Where appropriate, a vice or clamps should be used so that the rotary hammer drill can always be held with two hands.
The rotary hammer drill can be used in three different modes, depending on the application required:
Rotation drilling
The rotation drilling mode is suitable when working with wood, metal or plastic.
- Point the mode selector (6) at the symbol .
:
- Insert a suitable drill bit into the chuck.
Impact drilling
The impact drilling mode is suitable when working with brick, concrete and other types of masonry.
-
Point the mode selector (6) at the symbol . Ti
-
Insert a suitable drill bit into the chuck.
Cutting
The cutting mode is suitable when working with brick, concrete and other types of masonry.
-
Point the mode selector at the symbol . T
-
Insert a suitable chisel into the chuck.
Drilling in concrete
Use the impact drilling mode and press against the back of the drill, in the same direction as the drill bit. For best results when drilling, a drill bit with a tungsten carbide tip (TCT) is recommended. Check that the drill bit is not larger than the maximum size for the rotary hammer drill. Do not push too hard. If the drill hole is clogged with debris, run the drill slowly and remove the bit from the hole. Repeat until the hole has been cleared of debris.
Drilling in wood
Use only the rotation drilling mode. Check that the drill bit is suitable for drilling in wood and that it is not larger than the maximum size for the rotary hammer drill.
Drilling in metal
For the best possible precision, mark the location for the hole with a hammer and a spike. Use only the rotation drilling mode. Check that the drill bit is suitable for the type of metal which is to be drilled and that it is not bigger than the maximum size for the rotary hammer drill. Use suitable lubricant or drilling fluid and drill at medium speed for maximum effect and in order to extend the drill's service life.
Cutting
Use the cutting mode and press against the back of the drill, in the same direction as the chisel. Be aware that there is a high risk of shavings and other debris being ejected from the work piece.
MAINTENANCE
NB Always unplug the tool from its electrical outlet before carrying out maintenance or cleaning.
Cleaning
The rotary hammer drill must always be kept clean. Dirt and dust cause the internal components to wear more quickly, which shortens the rotary hammer drill's service life. Clean the casing with a soft brush or a dry cloth. Blow all the ventilation holes clean with dry, clean compressed air.
Carbon brushes
- The carbon brushes inside the motor can become worn over time.
- If the carbon brushes become too worn, this can lead to loss of output, interruptions to the power supply or spark formation.
- Replace the brushes by undoing the access panels from both sides of the rotary hammer drill. The worn brushes can then be pulled out and replaced with new ones. Replace the access panels. The carbon brushes can also be replaced by qualified service personnel.
TROUBLESHOOTING
| PROBLEM PROBABLE CAUSE REMEDY | ||
| The rotary hammer drill does not start. | The cable is not connected. Check that the cable is connected. | |
| No current from the electrical socket. | Check the current at the electrical socket. Shut off the tool and check the fuse if there is no current from the socket. Check that the power circuit is appropriate for the rotary hammer drill and that there are no other loads connected to the circuit if the fuse has been triggered. | |
| The rotary hammer drill's ther-moswitch (if there is one) has been triggered. | Turn off the rotary hammer drill and let it cool. Press the reset button on the rotary hammer drill. | |
| Internal damage or wear (e.g. carbon brushes or breakers). | Have a technician service the rotary hammer drill. | |
| The rotary hammer drill rotates slowly. | The extension cord is too long or the cable capacity is too small. | Connect the rotary hammer drill to an electrical socket close by so that an extension cable is not needed. Use a suitable extension cable with the correct cable area for the length and load. |
| The output diminishes over time. Dullled or damaged cutting tool. Make sure that the cutting tool is sharp. Replace as needed. | ||
| Loud noise or rattling sound. Internal damage or wear (e.g. carbon brushes or bearings). | Have a technician service the rotary hammer drill. | |
| Overheating. The rotary hammer drill is pressed too hard against the work piece. | Let the rotary hammer drill work at its own pace. | |
| The cutting tool is incorrectly mounted. | Check how the cutting tool has been mounted. | |
| Dulled or damaged cutting tool. Make sure that the cutting tool is sharp. Replace as needed. | ||
| The motor's ventilation holes are clogged. | Blow away dust from the motor with compressed air. | |
| The extension cord is too long or the cable capacity is too small. | Connect the rotary hammer drill to an electrical socket close by so that an extension cable is not needed. Use a suitable extension cable with the correct cable area for the length and load. | |
Jula reserves the right to make changes. In the event of problems, please contact our service department. www.jula.com
natural_image
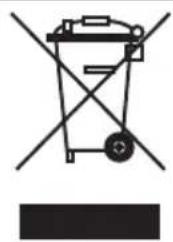
Pure mechanical diagram showing a binocular device with no text or symbolsCare for the environment!
Must not be discarded with household waste!
This product contains electrical or electronic components that should be recycled.
Leave the product for recycling at the designated station e.g. the clocal authority's recycling station.
CE
EC DECLARATION OF CONFORMITY EG FÖRSÄKRAN OM ÖVERENSSTÄMMELSE EF SAMSVARSERKLÆRING DEKLARACJA ZGODNOŚCI WE

Jula AB, Box 363, SE-532 24 SKARA, SWEDEN
RoHS Directive 2011/65/EU
This product was CE marked in year -14
- SVENSKA....5
- SÄKERHETSANVISNINGAR....5
- NORSK 18
- SIKKERHETSANVISNINGER 18
- POLSKI 31
- ZASADY BEZPIECZEŃSTWA 31
- SAFETY INSTRUCTIONS 44
- SÄKERHETSANVISNINGAR
- Verne om miljøet!
- DBAJ O ŚRODOWISKO!
- Read the operating instructions carefully before use!
- General safety information for power tools
- Working range
- Electrical safety
- Personal safety
- Use and care of power tools
- Service
- Special safety instructions for rotary hammer drill
- Vibrations
- Earthing
- Extension cables
- Safety instructions for SDS rotary hammer drill
- SYMBOLS ON THE MACHINE
- Always use hearing protection!
- DESCRIPTION
- OPERATION
- Handle
- Using the chuck
- On-Off switch
- Setting the speed
- Lock function
- DRILL SETTINGS
- NB
- Rotation drilling
- Impact drilling
- Cutting
- Drilling in concrete
- Drilling in wood
- Drilling in metal
- MAINTENANCE
- Cleaning
- Carbon brushes
- Care for the environment!
- CE
- EC DECLARATION OF CONFORMITY EG FÖRSÄKRAN OM ÖVERENSSTÄMMELSE EF SAMSVARSERKLÆRING DEKLARACJA ZGODNOŚCI WE
Brand : Meec Tools
Model : 001-098
Category : Drill