PJA003 - Charger Malmbergs - Free user manual and instructions
Find the device manual for free PJA003 Malmbergs in PDF.


| Brand | Malmbergs |
| Model | PJA003 |
| Product Type | Charger |
| Input Voltage | 100-240V AC, 50/60Hz |
| Output Voltage | 5V DC |
| Output Current | 2.1A |
| Output Power | 10.5W |
| Connector Type | USB-A |
| Number of Ports | 1 |
| Plug Type | EU (Type C) |
| Cable Length | 1.5m (integrated) |
| Dimensions (L x W x H) | 10 x 5 x 3 cm |
| Weight | 100 g |
| Material | Plastic (ABS) |
| Protection Features | Overcurrent, Overvoltage, Short Circuit, Overheating |
| Certifications | CE, RoHS |
| Compatible Devices | Smartphones, tablets, power banks, GPS, cameras, and other USB devices |
| Charging Indicator | LED (blue) |
| Operating Temperature | 0°C to 40°C |
| Storage Temperature | -20°C to 60°C |
| Humidity Range | 10% to 90% (non-condensing) |
| Cleaning | Disconnect from power, wipe with a dry cloth. Do not use liquids or abrasives. |
| Spare Parts | None user-serviceable. Contact Malmbergs support for replacement. |
| Repairability | Not user-repairable. Refer to qualified service personnel. |
| Warranty | 2 years (subject to local regulations) |
Frequently Asked Questions - PJA003 Malmbergs
User questions about PJA003 Malmbergs
0 question about this device. Answer the ones you know or ask your own.
Ask a new question about this device
Download the instructions for your Charger in PDF format for free! Find your manual PJA003 - Malmbergs and take your electronic device back in hand. On this page are published all the documents necessary for the use of your device. PJA003 by Malmbergs.
USER MANUAL PJA003 Malmbergs
natural_image
Red and black handheld electronic device with clamp and power cord (no visible text or symbols)MALMBERGS
SE ......sida 3-5
FI ......sivu 6-8
EN ......page 9-11

EN NOTE! Please read through the manual carefully before using the appliance and keep it for future reference.
FÖRSIKTIGHETSÅTGÄRDER
natural_image
Four electronic devices and probes, including a red flash device and three black cables (no visible text or symbols)BESKRIVNING AV DELAR

BESKRIVNING AV HUVUDFUNKTIONER
1. Batteriindikator
natural_image
Four electronic devices: a red flashlight, black cables, a black clamp, and a red clamp with wires (no visible text or symbols)TOIMINNOT
TOIMINTOJEN ESITTELY
- Please put the product out of reach of children, to avoid children playing with the product as a toy which might cause personal injury.
Cautions!
-
Only use the accessories that are supplied with unit.
-
Operating temperature: -20°C to 55°C.
-
Any use in environments below -20^ or above 55^ or use in wet areas may harm the product.
MAIN COMPONENTS
-
Jump-Starter
-
Clip Lead
The red clip is (+), the black clip is (-).
- Mains Charger
The output is 12V/1A.
- Car Charger

natural_image
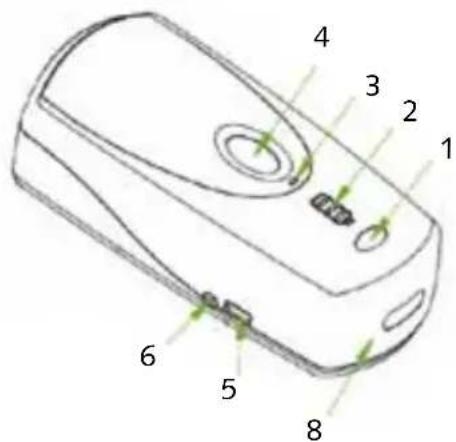
Four electronic devices and probes, including a red handheld device and three black cables (no visible text or symbols)INTRODUCTION OF PRODUCT PARTS
-
Power/LED Button
-
Battery/Charging indicator light
-
READY/FAIL indicator light
-
Jump-Start button
-
USB output socket
-
Charging socket
-
Socket for jumper cables
-
LED illumination

INTRODUCTION OF MAIN PRODUCT FUNCTIONS
1. Battery Indication Function
After pressing Power/LED Button, battery indicator light will show the current status of battery:
- Red-Yellow-Green lights are on: the battery is above 90%;
- Red-Yellow lights are on: the battery is 20-90%;
- Red light is on: the battery is below 20%.
2. Starting Function
1-1. Normal Start
Condition: The voltage of the battery of the product is above 12V.
Operating steps are as follows:
Step 1: Insert one end of the clip lead into the socket of the starter (7) and clamp the other end on the two ends of battery.
Step 2: Press the Power/LED Button to start the product in normal working mode (if the product is already in normal working mode, this step can be omitted);
Step 3: Press the Jump-Start button, pay attention to the READY/FAIL indicator light and Battery/Charging indicator light with following status:
- The green READY/FAIL indicator light is on: normal condition, the car can be start as normal;
- The red READY/FAIL indicator light is on and the battery indicator light is not flashing: this means that there is an open circuit between the car battery and the product and no connection;
- The red READY/FAIL indicator light is flashing: this means that there is a short circuit between both ends of the clip leads or it is connected to the car battery with incorrect polarity;
- The red READY/FAIL indicator light is on and the battery indicator light is flashing: this means that the battery of the jump starter is too low. Please recharge the unit.
3. Recharging the Unit
Only use the supplied mains charger or car charger when charging the unit.
Charging indications are as follows:
- When only the red light is flashing: the battery is below 20%;
- When the red light is on and the yellow light is flashing: the battery is 20-80%;
- When both the red and yellow light are on and the green light is flashing: the battery is above 80%;
- When the red, yellow and green lights are on: the battery is fully charged.
Remarks for charging the unit:
- When the battery is full, remove the car charger or mains charger. If the unit is still connected to any charger, it cannot enter Standby mode.
- If mains charger or car charger get removed during a charge, wait for more than 5 seconds before reconnecting into the charging socket.
- If the product is not used, it is suggested to charge once every 3 months at least.
4. USB Output Function
Condition: The battery voltage has to exceed 10.5V when putting on the power on the jump starter. If the battery voltage is lower than 10.5V, the USB output will be closed to protect the product. If the product cannot get into Standby mode, it needs charging, USB output will be reverted when the battery voltage is above 12V.
Press the Power/LED Button to start the appliance in normal working mode, the USB output is working normally. Connect the appliance that need charging. However, attention should be paid to following circumstances:
- The load must be above 15mA: if the load is below 15mA, the product will not work and will enter into Standby mode in 1 min;
- The load must below 2.1A: if the load is above 2.1A, the USB output will be cut off and output will restart in 10 seconds. Press the Power/LED Button to make the USB output work again.
5. Illumination Function
Condition: Battery voltage should be above 10.5V.
If product voltage is lower than 10.5V, the illumination function will be closed to protect the product.
Step 1: Press the Power/LED Button to enter normal working mode;
Step 2: Press and hold the Power/LED Button to enter into LED illumination mode, the LED light (8) will turn on; press Power/LED Button once again to enter into flashing mode; then press Power/LED Button once again to exit flashing mode.
6. Over-temperature Protection Function
When the temperature in the unit rises above 60^ C, the READY/FAIL indicator light will be flashing and all input and output will turn off to protect the battery of the product from overheating further.
7. Standby Function
If the USB output has no load and there is no voltage input in the charging socket, the product will enter into Standby mode in 1 min.
MALMBERGS
- FÖRSIKTIGHETSÅTGÄRDER
- BESKRIVNING AV DELAR
- BESKRIVNING AV HUVUDFUNKTIONER
- Batteriindikator
- TOIMINNOT
- TOIMINTOJEN ESITTELY
- Cautions!
- MAIN COMPONENTS
- INTRODUCTION OF PRODUCT PARTS
- INTRODUCTION OF MAIN PRODUCT FUNCTIONS
- Battery Indication Function
- Starting Function
- 1-1. Normal Start
- Recharging the Unit
- USB Output Function
- Illumination Function
- Over-temperature Protection Function
- Standby Function
- MALMBERGS
Brand : Malmbergs
Model : PJA003
Category : Charger