TM 321 W - Tumble dryer Tricity Bendix - Free user manual and instructions
Find the device manual for free TM 321 W Tricity Bendix in PDF.


| Product Type | Tumble Dryer |
| Brand | Tricity Bendix |
| Model | TM 321 W |
| Capacity | 6 kg |
| Dimensions (H x W x D) | 85 x 60 x 60 cm |
| Weight | 35 kg |
| Power Supply | 230 V ~ 50 Hz |
| Power Consumption | 2000 W |
| Drying System | Vented (requires external venting) |
| Heat Settings | 2 (High/Low) |
| Timer | Up to 120 minutes |
| Cool Down Cycle | Yes (last 10 minutes) |
| Lint Filter | Removable, clean after each use |
| Overheating Protection | Yes (auto shut-off) |
| Door | Reversible, 180° opening |
| Noise Level | 65 dB(A) |
| Energy Class | B |
| Spare Parts | Drum belt, filter, door hinge available |
Frequently Asked Questions - TM 321 W Tricity Bendix
User questions about TM 321 W Tricity Bendix
0 question about this device. Answer the ones you know or ask your own.
Ask a new question about this device
Download the instructions for your Tumble dryer in PDF format for free! Find your manual TM 321 W - Tricity Bendix and take your electronic device back in hand. On this page are published all the documents necessary for the use of your device. TM 321 W by Tricity Bendix.
USER MANUAL TM 321 W Tricity Bendix
OPERATING & INSTALLATION INSTRUCTIONS

natural_image
Abstract green brushstroke design with a circular element, resembling a stylized human head or emblem (no text or symbols)TUMBLE DRYER
TM 321 W

Important Safety Information
In the interest of your safety and to ensure the correct use, before installing and first using the appliance, read this user manual carefully, including its hints and warnings. To avoid unnecessary mistakes and accidents, it is important to ensure that all people using the appliance are thoroughly familiar with its operation and safety features. Save these instructions and make sure that they remain with the appliance if it is moved or sold, so that everyone using it through its life will be properly informed on appliance use and safety.
General safety
- It is dangerous to alter the specifications or attempt to modify this product in any way.
- This appliance is not intended for use by persons (including children) with reduced physical, sensory or lack of experience and knowledge, unless they have been given supervision or instruction concerning use of the appliance by a person responsible for their safety.
- Make sure that small pets do not climb into the drum. To avoid this, please check into the drum before using.
- Any objects such as coins, safety pins, nails, screws, stones or any other hard, sharp material can cause extensive damage and must not be placed into the machine.
- In order to avoid danger of fires caused by excessive drying, do not use appliance to dry the following items: Cushions, quilts and the like (these items accumulate heat).
- Items such as foam rubber (latex foam), shower caps, waterproof textiles, rubber backed articles and clothes or pillows fitted with foam rubber pads should not be dried in the tumble dryer.
- Always unplug the appliance after use, cleaning and maintenance.
- Under no circumstances should you attempt to repair the machine yourself. Repairs carried out by inexperienced persons may cause injury or serious malfunctioning. Contact your local Service Centre. Always insist on genuine spare parts.
- Items that have been soiled with substances such as cooking oil acetone, petrol, kerosene, spot removers, turpentine, waxes and wax removers should be washed in hot water with an extra amount of detergent before being dried in the tumble dryer.
- Danger of explosion: Never tumble dry items that have been in contact with inflammable solvents (petrol, methylated spirits, dry cleaning fluid and the like). As these substance are volatile, they could cause an explosion. Only tumble dry items washed with water.
- Risk of fire: items that have been spotted or soaked with vegetable or cooking oil constitute a fire hazard and should not be placed in the tumble dryer.
- If you have washed your laundry with stain
remover you must execute an extra rinse cycle before loading your tumble dryer.
- Please make sure that no gas lighters or matches have accidentally been left in pockets of garments to be loaded into appliance
WARNING!
Never stop a tumble dry before the end of the drying cycle unless all items are quickly removed and spread out so that the heat is dissipated.
RISK OF FIRE!
Installation
- This appliance is heavy. Care should be taken when moving it.
- When unpacking the appliance, check that it is not damaged. If in doubt, do not use it and contact the Service Centre.
- All packing must be removed before use. Serious damage can occur to the product and to property if this is not adhered to. See relevant section in the user manual.
- The final part of a tumble dryer cycle occurs without heat (cool down cycle) to ensure that the items are left at a temperature that ensures that items will not be damaged.
- Any electrical work required to install this appliance should be carried out by a qualified electrician or competent person.
- Care must be taken to ensure that the appliance does not stand on the electrical supply cable.
- If the machine is situated on a carpeted floor, please adjust the feet in order to allow air to circulate freely under the appliance.
- After having installed the appliance, check that it is not pressing or standing on its electrical supply cable.
- If the tumble dryer is placed on top of a washing machine, it is compulsory to use the stacking kit (optional accessory).
Use
- This appliance is designed for domestic use. It must not be used for purposes other than those for which it was designed.
- Only dry fabrics which are designed to be machine dried. Follow the instructions on each garment label.
- Do not dry unwashed items in the tumble dryer.
- Do not overload the appliance. See the relevant section in the user manual.
- Clothes which are dripping wet should not be placed in the dryer.
- Garments which have been in contact with volatile petroleum products should not be machine dried. If volatile cleaning fluids are used, care should be taken to ensure that the fluid is removed from the garment before placing in the machine.
- Never pull the power supply cable to remove the plug from the socket; always take hold of the plug itself.
- Never use the tumble dryer if the power supply cable, the control panel, the working surface or the base are damaged so that the inside of the tumble dryer is accessible.
- Fabric softeners, or similar products should be used as specified by the fabric softener instructions.
Child safety
- This machine is not intended for use by young children or infirm persons without supervision.
- Children should be supervised to ensure that they do not play with the appliance.
- The packaging components (e.g. plastic film, polystyrene) can be dangerous to children - danger of suffocation! Keep them out of children's reach.
- Keep all detergents in a safe place out of children's reach.
- Make sure that children or pets do not climb into the drum.
Contents
For the User
Important Safety Information 2
- Installation 2
- Child Safety 2
- Use 2
Your New Tumble Dryer 5
Description of the Appliance 5
The Control Panel 6
- Programme Chart 6
- Mains-on Light 6
- Low Temperature Button 6
- Start Button 6
• Water Full Indicator Light 6
• Time Selector Dial/On-Off Switch 6
Programme Chart 7
Operating Sequence 8
Hints & Tips on Drying 10
Maintenance and Cleaning 11
- External cleaning 11
- Cleaning the door 11
- Cleaning fluff filters 11
- Cleaning the condenser unit 11
• Emptying the water reservoir 12 - Cleaning the air intake grille 12
Something Not Working 13
Customer Care 13
Guarantee Conditions 14
For the Installer
Installation Instructions 15
Technical Specifications 15
- Unpacking 16
- Positioning 16
- Stacking kit (optional accessory) 16
- Door reversal 16
• Electrical connection 16-17
Guide to use the Instruction Book
The following symbols will be found in the text to guide you throughout the instructions:
Safety instructions
i Hints and tips
Environmental information

Your New Tumble Dryer
This tumble dryer will give your wash that soft, relaxed feel whatever the weather. Extremely high quality standards both during development and manufacturing guarantee a long service life for your appliance.
Maximum economy in the operation of your dryer is achieved through very frugal electricity consumption and short drying times.
Energy saving tips
To save energy we recommend that you follow these hints:
• Try to load the maximum capacity of the machine as small loads are uneconomical.
• Always load well spun laundry. The higher the spin speed, the lower the electricity consumption and the shorter the drying times.
- Do not over-dry laundry, this avoids creasing and saves energy.
•Clean the filters regularly to avoid excessive drying times and high electricity consumption.
•Ventilate the room well. The room temperature should not exceed +35°C during drying.

In the interest of the environment
•Materials marked with the symbol are recyclable.
•Check with your local Council or Environmental Health Office to see if there are facilities in your area for recycling this appliance.
- When the appliance is to be scrapped, cut off the power supply cable and make the door closing device unusable to prevent young children from being trapped inside.
• Help to keep your country tidy - use authorised disposal sites for your old appliance.
How do we help to protect the environment? We use recycled paper!
-Old appliance

The symbol on the product or on its packaging indicates that this product may not be treated as household waste. Instead it should be taken to the appropriate collection point for the recycling of electrical and electronic equipment. By ensuring this product is disposed of correctly, you will help prevent potential negative consequences for the environment and human health, which could otherwise be caused by in appropriate waste handling of this product. For more detailed information about recycling of this product, please contact your local council, your household waste disposal service or the shop where you purchased the product.
Description of the Appliance
1 Worktop
2 Control panel
3 Fluff filters
4 Rating Plate
5 Condenser unit
6 Water reservoir
7 Adjustable feet

The Control Panel

1 Time Selector Dial
Allows you to select time controlled drying. Turn the dial to the required time.
2 Delicate button
Pressing this button allows drying to be performed at a lower temperature, for delicate items.
3Textile Button
You can select 2 different options:
- Cotton: to be used for cotton,
- Synthetics: to be used for synthetic or delicate items.
4Indicator Lights
• Drying
- End/Anticrease
- Condenser
- Filter
- Empty Tank
5 Start Pause Button
Press this button to start the dryer after having selected the programme and the options.
Drying Programmes
| Programme | Max load kg | Type of laundry | Options | Description of programme |
| Time | 6 | Cotton | Textile• Synthetics• Cotton Delicate | If the Time programme has been selected, programme duration time of 15 minutes up to 150 minutes can be set by intervals of 5 minutes or 10 minutes. Drying thick or multi-layered textiles, e.g. terry towelling items. |
| 3 | Synthetics |
Size of load
It is not necessary to weigh the laundry, if these instructions are followed:
• Cottons, linen: full drum, but not overloaded.
- Synthetics: half drum.
For a mixed load (cotton and synthetics, for example) select the drying time suitable for the most delicate fabrics and then increase it by approx 10 mins.
Operating Sequence
Before using your tumble dryer for the first time, we recommend you place a few damp cloths inside the appliance and dry for 20 minutes.
There may be dust inside a brand new tumble dryer.
Drying

natural_image
Illustration showing a washing machine with a hand inserting a cable to a door, and a close-up of hands cleaning the interior of a washing machine (no text or symbols present)1. Load The Laundry
Connect the appliance. Open the door (see picture). Place the laundry in the drum, one item at a time, shaking them out as much as possible. Close the door. Please check the laundry does not get caught between the door and filter.
2. Select The Required Time.
Turn the programme selector dial to the required programme. The light Start/Pause starts to flash. Turn the dial to the required time.
The lights Drying, and End come on.
At the end of the programme the selector dial must be turned to position Off, to switch the machine off.
Attention!
If you turn the programme selector dial to another programme when the machine is working, the lights of the programme progress display start to flash. The machine will not perform the new selected programme.
3. Programme Option Buttons
Depending on the programme, different functions can be combined. These must be selected after choosing the desired programme and before depressing the Start/Pause button. When these buttons are pressed, the corresponding pilot lights come on. When they are pressed again, the pilot lights go out.
Delicate Button
Pressing this button allows drying to be performed at a lower temperature, for delicate items.
The corresponding pilot light comes on. .
DELICATE is only suitable for use with loads of up to 3kg!
When the programme has finished the pilot lights End is on.
Textile Button
Press the Textile button repeatedly, to select the desired option. The relevant light will light up.
You can select 2 different options:
Cotton: to be used for cotton, .
Synthetics to be used for synthetic or delicate items.
When the programme has finished the pilot lights End /Anticrease is on.
Start/Pause Button
Press this button to start the dryer after having selected the programme and the options. The relevant light will stop flashing. If the programme selector dial is turned to another position, when the machine is running, the buzzer will sound and the programme phase indicator lights will flash. The drum turns alternately in both directions during drying.
All drying programmes end with a 10 minute cooling phase. You may remove the laundry after this phase. If the door of the appliance or the small door at the bottom is opened while the programme is running, this button must be pressed again after closing the door in order to restart the programme from the point at which it was interrupted. This button must be depressed also after a power failure and after having reinserted the water reservoir, if it has been emptied in the middle of a programme after lighting up of light “Empty Tank”.
In both cases the light of the “Start/Pause” button flashes to remind you that the start button needs to be pressed again.
4. Indicator lights
These lights indicate the following functions:
- Drying light - this light indicates that the appliance is in the drying phase.
- End / Anticrease light - this light is on at the end of the cooling phase, during the anti-reasing phase and at the end of the programme.
- Empty Tank light - this light indicates that the appliance is in the drying phase. This light comes on at the end of the programme to remind you that the water reservoir must be emptied out. If this light illuminates during a programme this means that the water reservoir is full. The buzzer sounds, the programme stops, the light of the Start/Pause button flashes. This light comes on also when the water reservoir is not inserted correctly.
- Filter - this light illuminates at the end of the programme to remind you that the filters must be cleaned.
- Condenser- It comes on every 80 cycles to remind you that the condenser must be cleaned.
Cancelling a programme
Turn the selector dial to “Off” to cancel a programme which is running. You can now select a new programme.
At the end of the programme
If the laundry is not removed at the end of the cycle, the dryer performs an anticreasing phase (duration: 30 minutes maximum).
If you do not remove the laundry, the dryer will stop automatically at the end of the anti-reasing phase. Lights “End/Anticrease”, and “Empty Tank” remain lit and the buzzer sounds for 2 minutes.
Turn the programme selector dial to “Off” to switch the machine off. Remove the laundry from the drum and carefully check that the drum is empty.
If you do not intend to carry out another wash, close the water tap. Leave the door open to prevent the formation of mildew and unpleasant smells.
After each use
- Clean the filters (see page 11).
• Empty the water reservoir (see page 12).

Hints & Tips on Drying
Before placing articles of laundry in your tumble dryer, check the care labels to ensure they are recommended for tumble drying.
Care Labels you may find on your laundry

may be tumble dried

normal drying (high temperature)

delicate drying (low temperature)

do not tumble dry

Do not overload the appliance.
Here is a list of the approximate weight of some common laundry items.
Sheet 700 to 1000 g
Pillowcase 100 to 200 g
Tablecloth 400 to 500 g
Table Napkin 50 to 100 g
Kitchen Towel 70 to 120 g
Linen Hand Towel 100 to 150 g
Hand Towel 150 to 250 g
Bath Towel 700 to 1000 g
Bathrobe 1000 to 1500 g
Shirt 200 to 300 g
Apron 150 to 200 g
- Always load well spun laundry. The higher the spin speed the lower the electricity consumption and the shorter the drying time.
- DO NOT load dripping wet laundry into the dryer. Roll the article in a towel or spin to remove excess water.
- Close poppers and zips and fasten any buttons.
- Sort the laundry. Separate synthetics from cotton/linens, and dry separately.
- Remove the laundry immediately after the programme has finished.
- Use a fabric conditioning sheet to reduce static. We recommend the sheet is pinned to an article of laundry (using a safety pin).
- Mix the load i.e. large and small articles.
- When drying large items such as sheets, we recommend you periodically stop the dryer to redistribute the load.
DO NOT use the tumble dryer to dry the following:
- Articles contaminated with inflammable substances e.g. petrol, cleaning solvents, cooking oil, fats or hair lacquer.
- Woollen and synthetic/wool mixtures unless the item is labelled as suitable for tumble drying.
• Very delicate articles such as silk. - Very large and bulky items such as duvets or sleeping bags.
Maintenance and Cleaning
You must disconnect the appliance from the electricity supply, before you can carry out any cleaning or maintenance work.
External cleaning
Use only soap and water and then dry thoroughly. Important: do not use methylated spirit, diluents or similar products.
Cleaning the door
Clean periodically the interior part of the door to remove any fluff from the seals around the filter. Regular cleaning ensures correct drying.
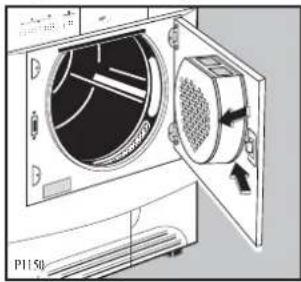
natural_image
Diagram of a washing machine with open door and side panel, showing internal components (no text or symbols)Cleaning the filters
Your dryer will only function well if the filters are clean.
The filters collect all the fluff which accumulates during drying and they must therefore be cleaned at the end of each programme, before removing the laundry, with a damp cloth.
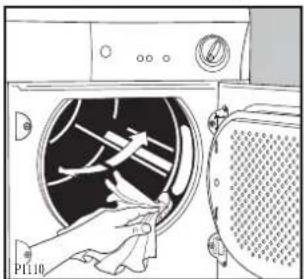

The filter in the inner door must be removed for cleaning.
Do not be alarmed by the amount of fluff. It is not due to excessive wear caused by the dryer. All fabric looses fluff when drying but it goes un-noticed in the air. In a tumble dryer it simply collects in the filter.
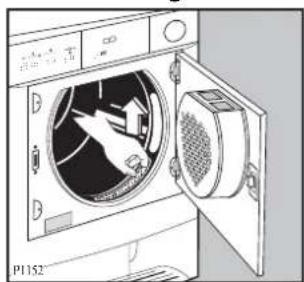
After a while, a whitish patina due to detergent residue on laundry forms on the filters. When this occurs, clean the filters (specially the filter in the door opening) with warm water using a brush. Remove it as per picture (it can be positioned with the tooth facing to the left or to the right).
natural_image
Line drawing of a washing machine with a door open, showing internal components (no text or symbols)
natural_image
Illustration of hands washing a faucet with water splashing, no text or symbols present
Do not use the appliance without filters.
Cleaning the condenser unit
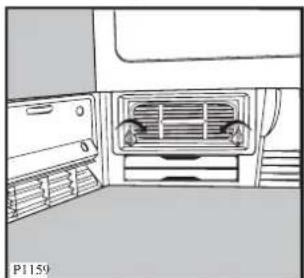
Clean the air condenser periodically, 3 or 4 times a year depending on how frequently the dryer is used. The condenser is situated at the lower part of the cabinet behind a small door. To open the door, push the catch as shown in the picture.

natural_image
Illustration of a hand pressing down on a slide with a ruler, next to a computer monitor (no text or symbols visible)To pull out the condenser, first turn the two red stops inwards as shown and then remove the condenser unit holding it at the handle.
natural_image
Interior view of a refrigerator or air conditioner unit with ventilation grilles and outlets (no text or symbols visible)
natural_image
Diagram of a hand pressing down on a device panel with a directional arrow (no text or symbols)Clean it with a brush and rinse it under the shower if necessary.

natural_image
Illustration of a hand using a tool to clean or store items on a surface, with no visible text or symbols.Also clean the outside, removing all fluff.
Clean the rubber seal round the condenser cabinet and in the inner part of the small door with a damp cloth.
Important! Do not use pointed objects or utensils to clean the spaces between the plates, as this could damage the condenser and make it permeable.
Re-fit the condenser, turn the red stops upwards and close the door.

Do not use this appliance if the condenser has not been fitted.
Emptying the water reservoir
Water extracted from the laundry condenses inside the machine and is collected in a reservoir.
The reservoir must be emptied after each drying cycle to ensure efficient operation when the machine is next used.
If this is not done a safety device trips: pilot light "Empty Tank" on the control panel comes on and the programme stops, leaving the laundry damp.
The reservoir can be emptied even in the middle of a programme.
Proceed as follows:
- Open the small door at the lower part of the cabinet
• Turn the yellow stop upwards
- Pull out the reservoir
- Open the small cover and let water flow down
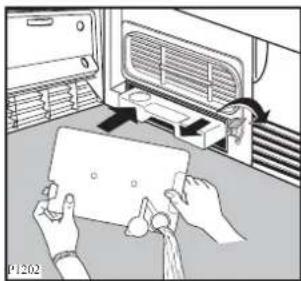
- Close the small cover and re-insert correctly the reservoir
- Push it until it clicks and turn the yellow stop downwards to lock it firmly.
- Close the small door and press the START/PAUSE button again to allow the programme to continue.
natural_image
Illustration of hands holding a card next to an air conditioner unit (no text or symbols visible)The reservoir must be re-inserted correctly. Push it until it clicks.
After inserting the reservoir the programme will continue after about 20 seconds.
Handy tip: The condensed water may be used in a steam iron or to top up a battery, etc. In this case it must be filtered (e.g. through a coffee filter)
Cleaning the air intake grille
Using a vacuum cleaner remove the fluff from the air intake grille at the back of the appliance.

natural_image
Line drawing of a mechanical device with a circular housing and a handle, no text or symbols presentSomething Not Working
Certain problems are due to lack of simple maintenance or oversights, which can be solved easily without calling out an engineer. Before contacting your local Service Centre, please carry out the checks listed below.
IMPORTANT: if you call out an engineer to a fault listed below, or to repair a fault caused by incorrect use or installation, a charge will be made even if the appliance is under guarantee.
| Symptom | Possible causes |
| The tumble dryer does not start | The door(s) has(have) not been closed.The plug is not properly inserted in the power socket.There is no current at the socket.The main fuse or the fuse in the plug has blown.The selector dial is not set correctly.The Start Button has not been depressed.The water reservoir is full or not properly inserted (the pilot light “full tank” is on ). |
| Drying takes too long or laundry is not dry enough. | The laundry has not been spun properly.The filters and/or the condenser are clogged up.The water reservoir is full or not correctly inserted.The room temperature is too high.The selected time or drying sector was not suitable for the laundry.The “low heat” function has been selected.There is too much laundry inside the appliance.The dryer is not correctly installed. |
If after the above checks, there is still a fault, call your local Tricity Bendix Service Force Centre.
Service & Spare Parts
In the event of your appliance requiring service, or if you wish to purchase spare parts, please contact your local Tricity Bendix Service Force Centre by telephoning:
0870 5 929929
Your telephone call will be automatically routed to the Service Force Centre covering your post code area.
For the address of your local Service Force Centre and further information about Service Force, please visit the website at www.serviceforce.co.uk.
Before calling out an engineer, please ensure you have read the details under the heading “Something Not Working”.
When you contact the Service Force Centre you will need to give the following details:
- Your name, address and post code
- Your telephone number
- Clear and concise details of fault
- The model and serial number of the appliance (found on the rating plate - see picture on page 6).
- The purchase date
Customer Care
For general enquiries concerning your Tricity Bendix appliance or for further information on Tricity Bendix products, please contact our Customer Care Department by letter or telephone as follows:
Customer Care Department
Major Appliances
Addington Way
Luton
Bedfordshire
LU4 9QQ
Tel 08705 950950*
* calls to this number may be recorded for training purposes.
Guarantee Conditions
Standard guarantee conditions
We, Tricity Bendix undertake that if, within 12 months of the date of the purchase, this Tricity Bendix appliance or any part thereof is proved to be defective by reason only of faulty workmanship or materials, we will, at our option, repair or replace the same FREE OF ANY CHARGE for labour, materials or carriage on condition that:
- The appliance has been correctly installed and used only on the electricity supply stated on the rating plate.
- The appliance has been used for normal domestic purposes only, and in accordance with the manufacturer's instructions.
- The appliance has not been serviced, maintained, repaired, taken apart or tampered with, by any person not authorised by us.
All service work under this guarantee must be undertaken by a Tricity Bendix Service Force Centre.
Any appliance or defective part replaced shall become the Company's property.
This guarantee is in addition to your statutory and other legal rights.
Home visits are made between 8.30am and 5.30pm Monday to Friday. Visits may be available outside these hours in which case a premium will be charged.
Exclusions
This guarantee does not cover:
- Damage or calls resulting from transportation, improper use or neglect, the replacement of any light bulbs or removable parts of glass or plastic.
- Costs incurred for calls to put right an appliance which is improperly installed or calls to appliances outside the United Kingdom.
- Appliances found to be in use within a commercial environment, plus those which are subject to rental agreements.
- Products of Tricity Bendix manufacture which are NOT marketed by Tricity Bendix.
European guarantee
If you should move to another country within Europe then your guarantee moves with you to your new home subject to the following qualifications:
- The guarantee starts from the date you first purchased your product.
- The guarantee is for the same period and to the same extent for labour and parts as exists in the new country of use for this brand or range of products.
- The guarantee relates to you and cannot be transferred to another user.
- Your new home is within the European Community (EC) or European Free Trade Area.
- The product is installed and used in accordance with our instructions and is only used domestically, i.e. a normal household.
- The product is installed taking into account regulations in your new country.
Before you move please contact your nearest Customer Care Centre, listed below, to give them details of your new home. They will then ensure that the local Service Organisation is aware of your move and able to look after you and your appliances.
France Senlis +33 (0)344 62 20 13
Germany Nurnberg +49 (0)800 234 7378
Italy Pordenone +39 (0)800 11 75 11
Sweden Stockholm +46 (0)20 78 77 50
UK Luton +44 (0) 8705 950950
Installation Instructions

It is dangerous to alter the specifications or attempt to modify this product in any way.
Care must be taken to ensure that the appliance does not stand on the electrical supply cable.

Any electrical work required to install this appliance should be carried out by a qualified electrician or competent person.
Technical Specifications
| DIMENSIONS Height 85 cm (33.5") | Width 60 cm (23.6")Depth 58 cm (22.8") | |
| POWER SUPPLY VOLTAGE 230-240 V/50 TOTAL POWER ABSORBED 2350 W (13A) | Hz | |
| MAXIMUM RECOMMENDED LOAD Cotton, linen 6.kgSynthetics 3 kg | ||
| DRUM VOLUME 1081 | ||
| CONSUMPTIONS Cotton, linen 3.8 kWh (6 kg store dry)Cotton, linen 3 kWh (6 kg iron dry)Synthetics | (6 kg iron dry)1.36 kWh (3 kg store dry) |

This appliance complies with the following E.E.C. Directives:
- 73/23 EEC of 19.2.73 (Low Voltage Directive) and subsequent modifications;
- 89/336 EEC of 3.5.89 (Electromagnetic Compatibility Directive) and subsequent modifications.
Unpacking
Warning!

Slide out the polythene bag containing the polystyrene block before using the appliance. Pull off adhesive strips from inside machine on top of drum.

natural_image
Line drawing of a hand inserting a component into a washing machine (no text or symbols)
Should the appliance be moved, it must be transported vertically.
Positioning
It is recommended that, for your convenience, the machine is positioned close to your washing machine.
The tumble dryer must be installed in a clean place, where dirt does not build up.
Air must be able to circulate freely all round the appliance. Do not obstruct the front ventilation grille or the air intake grille at the back of the machine.
To keep vibration and noise to a minimum when the dryer is in use, it should be placed on a firm, level surface.
Once in its permanent operating position, check that the dryer is absolutely level with the aid of a spirit level. If it is not, raise or lower the feet until it is.
The feet must never be removed.
Do not restrict the floor clearance through deep-pile carpets, strips of wood or similar. This might cause heat build-up which would interfere with the operation of the appliance.
The appliance must not be installed behind the lockable door, a sliding door or a door
with a hinge on the opposite side to that of the appliance.
Important
The hot air emitted by the tumble dryer can reach temperatures of up to 60°C. The appliance must therefore not be installed on floors which are not
resistant to high temperatures.
When operating the tumble dryer, the room temperature must not be lower than +5°C and higher than +35°C, as it may affect the performance of the appliance.
Stacking kit (optional accessory)
It should be possible to stack your new dryer on top of a front loading washing machine with a worktop depth of between 48 and 60 cm.
The instructions are supplied with the kit.
Please contact your Local Service Force Centre for further advice.

natural_image
Line drawing of a single refrigerator with front panel, side arm, and washing machine (no text or symbols)Door reversal
To make it easier to load or unload the laundry the door can be reversed.
This operation must be carried out by qualified personnel.
Please contact the nearest Service Force Centre.
This will be a chargeable option.
Electrical connection
Any electrical work required to install this appliance should be carried out by a qualified electrician or competent person.

WARNING: THIS APPLIANCE MUST BE EARTHED.
The manufacturer declines any responsibility for damage or injury through failure to comply with the above safety precautions.
Should the appliance power supply cable need to be replaced, this should be carried out by our Service Centre.

WARNING:
The power supply cable must be accessible after installing the machine.
Before switching on, make sure the electricity supply voltage is the same as that indicated on the appliance's rating plate. (See picture on page 6).
The appliance is supplied with a 13amp plug fitted. In the event of having to change the fuse in the plug supplied, a 13amp ASTA approved (BS 1363/A) fuse must be used.
Should the plug need to be replaced for any reason, proceed as described below.
The wires in the mains lead are coloured in accordance with the following code:
Green and Yellow - Earth
Blue - Neutral
Brown - Live

The wire coloured green and yellow must be connected to the terminal marked with the letter «E» or by the earth symbol ♦ coloured green and yellow.
The wire coloured blue must be connected to the terminal «N» or coloured black.
The wire coloured brown must be connected to the terminal marked «L» or coloured red.
Upon completion there must be no cut, or stray strands of wire present and the cord clamp must be secure over the outer sheath.

WARNING:
A cut off plug inserted into a 13 amp socket is a serious safety (shock) hazard.
Ensure that the cut off plug is disposed of safely.
Permanent connection
In the case of permanent connection it is necessary that you install a double pole switch between the appliance and the electricity supply (mains), with a minimum gap of 3mm between the switch contacts and of a type suitable for the required load in compliance with the current electrical regulations.
The switch must not break the yellow and green earth cable at any point.
TRICITY BENDIX
Customer Care Department
Major Appliances
Addington Way
Luton
Bedfordshire
LU4 9QQ
Consumer care telephone number 08705 950950
- Important Safety Information
- General safety
- WARNING!
- Installation
- Use
- Child safety
- Contents
- For the User
- Important Safety Information 2
- Your New Tumble Dryer 5
- Description of the Appliance 5
- The Control Panel 6
- Programme Chart 7
- Operating Sequence 8
- Hints & Tips on Drying 10
- Maintenance and Cleaning 11
- Something Not Working 13
- Customer Care 13
- Guarantee Conditions 14
- For the Installer
- Installation Instructions 15
- Technical Specifications 15
- Guide to use the Instruction Book
- Your New Tumble Dryer
- Energy saving tips
- In the interest of the environment
- -Old appliance
- Description of the Appliance
- The Control Panel
- Time Selector Dial
- Delicate button
- 3Textile Button
- 4Indicator Lights
- Start Pause Button
- Drying Programmes
- Size of load
- Operating Sequence
- Drying
- Load The Laundry
- Select The Required Time.
- Attention!
- Programme Option Buttons
- Delicate Button
- DELICATE is only suitable for use with loads of up to 3kg!
- Textile Button
- Start/Pause Button
- Indicator lights
- Cancelling a programme
- At the end of the programme
- After each use
- Hints & Tips on Drying
- Care Labels you may find on your laundry
- Do not overload the appliance.
- DO NOT use the tumble dryer to dry the following:
- Maintenance and Cleaning
- External cleaning
- Cleaning the door
- Cleaning the filters
- Cleaning the condenser unit
- Emptying the water reservoir
- The reservoir must be re-inserted correctly. Push it until it clicks.
- Cleaning the air intake grille
- Something Not Working
- Service & Spare Parts
- 5 929929
- Customer Care
- Major Appliances
- Guarantee Conditions
- Standard guarantee conditions
- Exclusions
- European guarantee
- Installation Instructions
- Unpacking
- Positioning
- Important
- Stacking kit (optional accessory)
- Door reversal
- Electrical connection
- WARNING:
- The power supply cable must be accessible after installing the machine.
- Permanent connection
- TRICITY BENDIX
Brand : Tricity Bendix
Model : TM 321 W
Category : Tumble dryer