
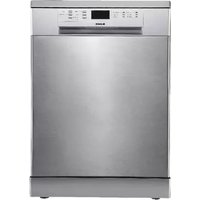
DWF6XP - Dishwasher BLANCO - Free user manual and instructions
Find the device manual for free DWF6XP BLANCO in PDF.


| Product Type | Built-in Dishwasher |
| Model | DWF6XP |
| Brand | BLANCO |
| Dimensions (H x W x D) | Approx. 85 x 60 x 60 cm |
| Weight | Approx. 45 kg |
| Power Supply | 220-240 V, 10 A |
| Total Power Output | 1900-2200 W |
| Heating Power | 1800 W |
| Water Pressure Range | 0.3 - 10 bar (30 - 1000 kPa) |
| Place Settings | 12 (typical) |
| Number of Programs | Multiple wash programs (refer to manual) |
| Drying System | Turbo fan heat drying (depending on model) |
| Water Protection | AQUASAFE+ (some models) |
| Baskets | Upper and lower baskets, cutlery basket (variable) |
| Upper Basket Height Adjustment | Yes, with lifting mechanism |
| Folding Tines | Yes, in upper rack |
| Glass Support | Yes |
| Salt Dispenser | Yes, approx. 2 kg capacity |
| Rinse Aid Dispenser | Yes, adjustable dose (1-6) |
| Detergent Dispenser | Yes, 40 cm³ capacity |
| Filter System | 3-piece (main, coarse, micro) |
| Spray Arms | Upper and lower, removable for cleaning |
| Child Safety | Yes (safety instructions provided) |
| Warranty | 2 years (parts and labour) |
| Installation Type | Built-in |
Frequently Asked Questions - DWF6XP BLANCO
User questions about DWF6XP BLANCO
0 question about this device. Answer the ones you know or ask your own.
Ask a new question about this device
Download the instructions for your Dishwasher in PDF format for free! Find your manual DWF6XP - BLANCO and take your electronic device back in hand. On this page are published all the documents necessary for the use of your device. DWF6XP by BLANCO.
USER MANUAL DWF6XP BLANCO
Instructions for the Use and Care and Installation of
DWF6XP DWF4X DWIN7
Dishwasher
Dear customer,
Please read carefully right through this instruction booklet before installing or operating your dishwasher. The following instructions should prevent the risk of personal injury and/or damage to the appliance.
Please keep these documents in a safe place for later reference.
This operating manual has been written for several different machines, and some of the features mentioned here may not apply to your particular model.
Symbols and legend
Following symbols are included in the user manual:
i Important information and tips about usage.
⚠ Warning for hazardous situations with respect to security of life and property.
⚠ Warning for electrical voltage and shock hazard.
TABLE OF CONTENTS
1 Getting To Know Your Machine 3
View of the Machine 3
2 Safety Instructions 4
Before Installation 4
Before First Use 4
Child Safety 4
Technical Specifications 4
For daily operation 5
Problems 5
What should not be washed in
your dishwasher 5
3 Directions for Assembly 6
Safety notes for installation 6
Installing Your Dishwasher 6
Water connection 7
Connect water inlet hose 7
Water drainage 8
Electrical connection 8
Disposal 8
4 Using Your Dishwasher 9
Filling the dishwasher salt 9
When operating for the first time: 10
Filling the Rinse Aid Dispenser 10
Filling the Detergent Dispenser 11
Detergent 12
Multipurpose Detergents 13
Loading the dishwasher 13
Suggestions for loading the
dishwasher 14
Loading suggestions 19
5 How to clean your dishwasher 23
Cleaning the filters 23
Cleaning the spray arms 24
6 Troubleshooting: 25
What to do if the dishwasher will not run 25
The cleaning results are unsatisfactory 25
Service 31
1 Getting To Know Your Machine
View of the Machine

- Upper dish basket with shelf
- Guide rail for the upper dish basket
- Salt container
- Cutlery basket
- Detergent dispenser
- Door
- Control panel
- Filters
- Lower sprayer arm
- Lower basket
- Upper sprayer arm
- Housing (depends on the model)
- Turbo fan heat drying system (depends on the model)
Technical Specifications
Permitted water pressure: 0,3–10
bar (= 3 - 100 N/cm² = 0,01-1,0Mpa)
Electrical connection: 220-240 Volts,
10 Amps (see type plate)
Output: 1900-2200 W
Heat output: 1800 W

This device corresponds to the following EU directives:
2006/95/EC: Low Voltage
Directive
2004/108/EC: EMV Directive
DIN EN 50242: Electrical dishwasher for home use Testing procedures for practical service conditions
Because we continually strive to improve our products, we may change
our specifications and designs without prior notice.
Note for Testing Institutes
The necessary information for performance testing will be provided upon request. The request can be done by e-mail through:
dishwasher@standardloading.com
Please do not forget to write the model code and stock code information of the appliance besides your contact information in the e-mail. The model code and stock code information can be found on the rating label, which is placed on the side of the door.
2
Safety Instructions
Before Installation
Check the appliance for transit damage. Never install or use damaged machines. If in doubt, contact your supplier.

Before First Use
- See Notes for Installation on page 6.
- Have the grounding system installed by a qualified electrician. The manufacturer cannot be held liable for any damage caused by operating the appliance without proper grounding.
- Before operating the system, please check that the information on the type plate corresponds to the information on your power supply.
- The dishwasher must be disconnected from the mains
during installation.
- The appliance must not be connected to the mains using an extension cable. Extension cables do not provide the necessary safety (e.g. danger of overheating).
• Always use the original plug delivered with the appliance. - The plug must be freely accessible after the appliance has been installed.
⚠️ Child Safety
- Do not allow children to play with the appliance.
- Dishwasher detergents are caustic and may cause injury to the eyes, mouth and throat. Please note the safety instructions provided by the manufacturers of the detergents.
• Never leave children unsupervised
while the appliance is open, as the appliance may still contain detergent leftovers.
- The water in the dishwasher is not drinking water. Danger of caustic injuries.
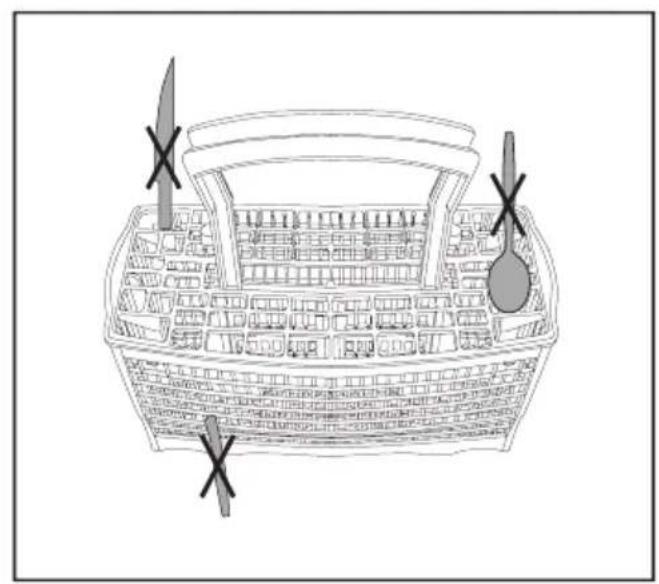
- Always place long and sharp/ pointed objects (e.g. serving forks, bread knives) into the cutlery basket with the pointed end down or flat on the upper basket to avoid possible injuries.
⚠ For daily operation
- Use your appliance only for the following domestic uses: Washing household dishes.
- Do not use chemical solvents in the appliance; there is a danger of explosion.
- This appliance is not intended for use by persons (including children) with reduced physical, sensory or mental capabilities, or lack of experience and knowledge, unless they have been given supervision or instruction concerning use of the appliance by a person responsible for their safety.
- Do not sit or stand on the opened door or place other objects on it. The appliance may tip over.
- Do not open the door while the appliance is running, as hot water or steam may escape.
- Do not leave the door open – an open door can be a hazard.
- If you need to move your appliance, do it in upright position and hold from the rear side. Tilting the appliance onto its front side may cause the electronic parts in it to get wet and damaged.
Problems
- Repairs and modifications to the appliance may only be carried out by qualified customer service personnel. - In the event of a problem, or before performing a repair, disconnect the appliance from the mains supply:
- disconnect the appliance by pulling out the mains plug - shut off the power.
- Do not pull on the cable – pull on the plug. Turn off the water supply tap.
What should not be washed in your dishwasher
• Rust sensitive steel parts
- Cutlery with wooden or horn handles
- Cutlery with mother of pearl or porcelain handles
• Non heat resistant plastic parts
• No glued dish or cutlery parts
- No items made out of copper, tin or aluminium
- Sensitive decorative glasses and porcelain parts
- Lead crystal glasses
• Art and crafted articles
- Aluminium and silver tend to discolour
- Glass and crystal articles may lose their shine over time
• Sponges and dishcloths
Do not wash items soiled with cigarette ash, candle wax, varnish, paints or chemicals.
Recommendation: When buying new dishes, note whether they are suitable for the dishwasher. (marked as dishwasher proof)
3
Directions for Assembly
Safety notes for installation
Prior to installing and using your appliance, please check it for possible transit damage.
If the appliance is damaged, please contact your supplier.
⚠️ Never install or use a damaged appliance.
The following directions must be followed to connect the dishwasher properly.
Before operating your dishwasher, please ensure that the information on the type plate corresponds to the current and voltage of your power supply.
The appliance may only be connected using a properly grounded socket. Ensure that the appliance is grounded according to regulations. The grounded socket must be easily accessible and close to the appliance.
⚠ Do not use extension cables or multiple adapters, as this can lead to overheating, which can be a fire hazard.
⚠️ Hardwiring may only be carried out by a qualified electrician.
⚠️ Check the power cable, the water inlet hose and the drainage hose. Damaged parts may only be replaced by customer service personnel or by a qualified electrical service expert.
Installing Your Dishwasher
- Choose a suitable location for your dishwasher. Take care to ensure that the appliance is stable on a level surface.
- Unevenness in the floor can be equalised by adjusting the screw feet. When the appliance is standing correctly, the door can be closed without difficulty.
- Water inlet and drainage hoses must be positioned so that they can move freely without bending or squeezing.
- The appliance may not be installed in a room where the temperature is below 0° Celsius.
Water connection
⚠️ Not recommended to run with hot water.
- There are two different types of water inlet hoses:
- Cold water inlet hose (up to 25°C)
- Hot water inlet hose (up to 60°C) please check which one is applicable to your model.
If you are willing to connect your machine to natural energy resources or to the central hot water supply, first check out whether your water inlet hose type is suitable by checking the temperature values written on the hose. If your hose is not suitable, apply to your authorized service to change the hose.
- The dishwasher may not be connected to open warm water devices or flow-through water heaters.
Permitted water pressure:
Lowest permitted water pressure: 0.3 bars = 3 N/cm 2 = 30 kPa
When the water pressure is below 1 bar, please contact your technician.
Highest permitted water pressure: 10 bar = 100N/cm 2 = 1Mpa
When the water pressure is above 10 bars, a pressure reduction valve must be installed (available in trade supply stores).
Connect water inlet hose
Ensure that the water inlet hose is not bent or squeezed. Do not install a used hose set.
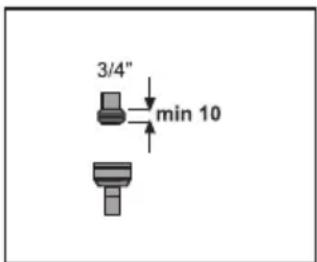
Use a screw-on hose connector to connect the water inlet hose to a water tap with a 34 inch external thread. If required, use a filter insert to filter deposits from the pipes.
Check that the connection does not leak.
For safety reasons, turn off the tap after every rinse process.

flowchart
graph TD
    A[" gears"] --> B[" shaft"]
    B --> C[" 3/4" "]
    B --> D[" 1/2" "]
    C --> E[" CH "]
    D --> F[" DK "]
    E --> G[" S "]
    F --> H[" N "]
    G --> I[" SF "]
AQUASAFE+ (some models)
The AQUASAFE+ System protects against water damage which may be caused at the water inlet hose.
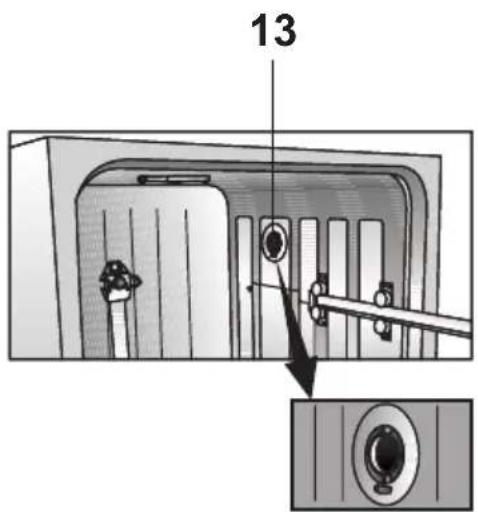
Do not immerse the system's valve box into water; it contains electrical components.
⚠ In case of damage, pull out the power supply plug.
Do not shorten or lengthen the hose insert as it contains electrical cables and components.

Water drainage
Connecting the drainage hose.
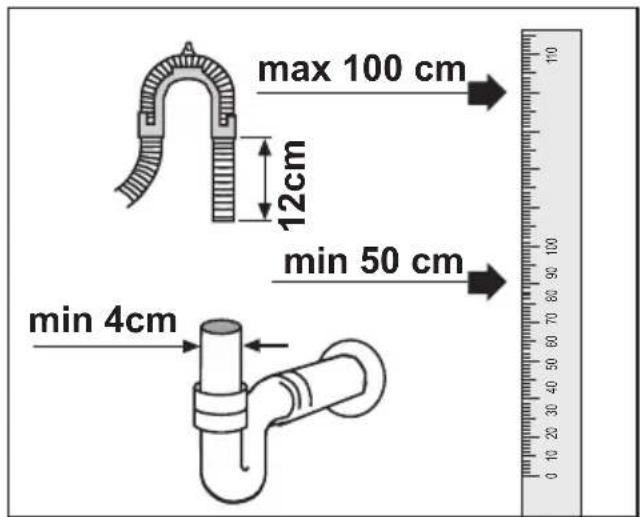
Take care to ensure that the drainage hose is not bent or squeezed.
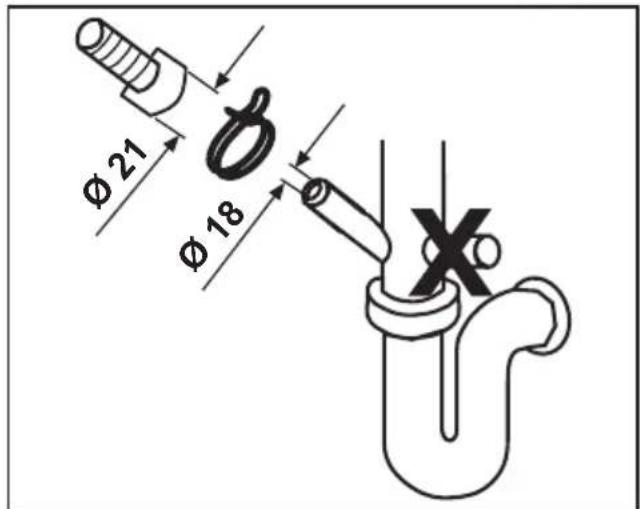
Check that the drainage hose is firmly seated.
Extension hoses
If a hose extension is required, a drainage hose of equal quality must be used.
i The maximum length must not exceed 4m. Using a longer hose will produce poorer cleaning results.
Siphon connection
i The drainage height must be between 50 and 100cm above the floor.
Use hose clamps to fasten the drainage hose to the siphon.
Electrical connection
Please refer to the type plate for information on current type, mains voltage, and fuse protection.
The type plate is located on the inside of the door.
The mains plug must be freely accessible after installation.
Power cables and insulated cables must not be accessible (exposed) after installation.
Disposal
Packaging
The packaging and some parts of your appliance are made from recyclable materials. These materials are marked with the recycling symbol and the relevant material type (PE, PS, POM).
Before operating your appliance, remove the packaging material and dispose of it in accordance with regulations.
⚠️ Packaging materials may be dangerous to children. Reusable substances may be dropped off at your local disposal facilities. You may obtain further information from your local authorities and disposal facilities.

Used appliances – Environmental notice
This product must not be disposed of with your regular household waste. Instead, you need to dispose of the waste equipment by handing it over to a designated collection point for the recycling of waste electrical and electronic equipment. This is indicated by a symbol to be found on the product, it's packaging or in the manual.
Materials used are recyclable according to their labelling. Reuse, recycling of materials and further reutilization of used products are important contributions to protect our environment.
Please ask your local town council for the nearest collection point.
⚠️ To avoid possible dangers, disable your waste appliance prior to discarding it. Pull the mains plug and cut the power cord. Disable any door locks.
4 Using Your Dishwasher
⚠ The electricity and water connections of the dishwater must be in compliance with the instructions in this booklet.
Filling the dishwasher salt
i Only use special dishwasher salt in your appliance. The manufacturer is not liable for damage resulting from the use of the wrong type of salt.
Use Diswasher salt only. Moderate or coarse grained and soluble salts are recommended. Don't use table salt, or any other type, these types of salt do not dissolve in water easily and will damage the softening device.
Remove the lower basket from the appliance.
Open the screw-in cap of the salt container by turning it counter clockwise (fig. A,B).
When operating for the first time:
- Pour 1 litre of water into the salt container (Fig. C).
- Pour the salt into the container with the aid of the salt funnel provided (Fig. D).
- Pour in enough salt to fill the container. The container holds approx. 2 kg.
- To speed up the rate of dissolution of salt in water, stir it with a spoon.
- Close the cap tightly.
- Begin a washing program immediately after filling the salt container. The washing program prevents damage to the appliance which may be caused by any spilled salt solution. After the first washing cycle, the salt level indicator light will go out.
Depending on the particle sizes of different salt brands in the market, tablet properties and water hardness, dissolution of the salt in water may take a couple of hours.
So, the salt indicator continues lighting for a while after filling salt into the machine. (For models with a salt indicator)

natural_image
Technical line drawing of a mechanical component with a base and mounting bracket (no text or symbols)
natural_image
Illustration of a hand adjusting a kitchen sink with a valve and two washers (no text or symbols)
natural_image
Illustration of a hand pouring liquid into a gas cylinder on a kitchen stove (no text or symbols)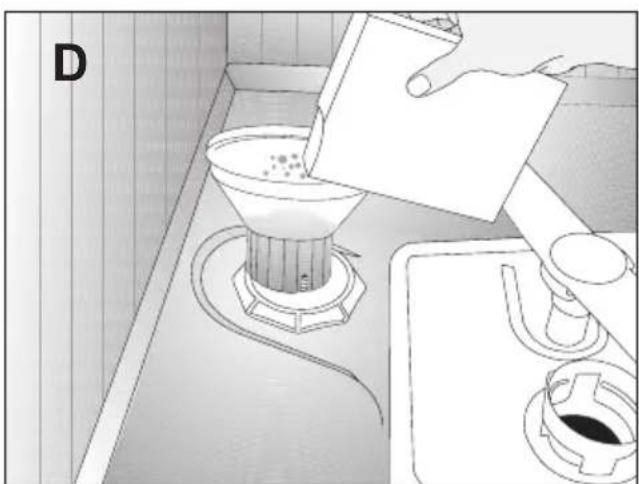
natural_image
Illustration of a kitchen scene with a funnel pouring liquid from a container into a stove (no text or symbols)Filling the Rinse Aid Dispenser
Rinse aids allow washing water to rinse off cleaner and prevent watermarks or streaks on the dishes. Only use rinse aid designed for use in dishwashers.
If you use “2 in 1” or “3 in 1” detergents / tablets, you do not need an additional rinse aid.
Open the rinse aid dispenser by pressing the locking lever (B)
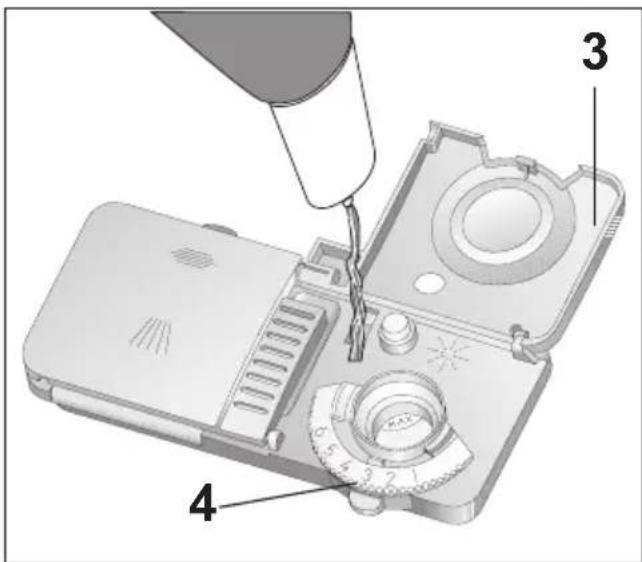
Carefully pour in rinse aid to the MAX mark. Close the lid until it clicks (3).
Carefully wipe off spilled rinse aid. Excessive rinse aid causes excessive foam formation, which may hinder cleaning.
Set the dose of rinse aid
The dose of rinse aid to be used can be set by means of the dispenser regulator (between levels 1 and 6) (4). Your appliance is pre-set at the factory to level 3.
Only change the setting if the following applies after washing:
• Watermarks are visible on the dishes: Set dosage higher
- Streaks are visible on the dishes: Set dosage lower

Dispenser
i Only use detergents formulated for use in dishwashers.
⚠ Do not put solvents into the washing compartment; there is the risk of explosion!
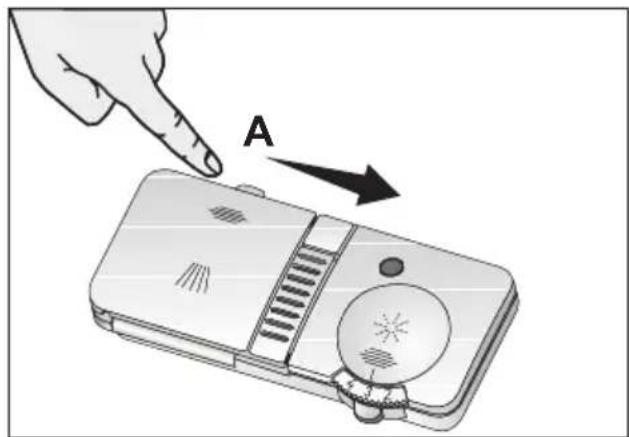
Open the detergent container by pushing the locking lever to the right (A).
The lines on the inside of the detergent container will help you measure the correct amount of detergent.
The detergent container holds a total of 40 cm 3 of detergent (1).
When the dishwasher is fully loaded and the dishes are very dirty, we recommend filling the detergent container up to the 25 cm 3 mark. When the dishes are less dirty, it is generally sufficient to fill the detergent up to the 15 cm 3 mark.
If your dishes have been in the dishwasher for some time without being washed, you should also fill the small detergent container up to the line (2).
The programme table shows the amounts of detergent required for the different wash programmes.
These may differ according to how dirty the dishes are and the water hardness in your location.

Detergent
Please use detergents produced specially for the dishwashers in your machine.
⚠️ Keep the opened detergent packages in a cool and dry place where children can not reach.
⚠️ We recommend you not to use detergents that contain chlorine and phosphate as they are harmful for the environment. Detergents that contain enzymes are effective in temperatures below 50 °C and help to obtain the same washing efficiency as obtained at higher temperatures.
Put the detergent into the detergent dispenser just before operating the machine.
Please contact the manufacturer to get detailed information about the detergent you are using.
Always use powder detergents in short programs without pre-washing. Fill in the powder detergent into the compartment nr. 2 with a grid cover as shown in the picture and close the detergent box lid. When completely full, this compartment will contain 6 g of powder detergent.
Do not use tablet detergents in short programs since the solubility of them changes depending on the temperature and time.
In programs with pre-washing and high temperature, in which you may use tablet detergents, make sure that the detergent box lid is closed firmly.
Excessive usage of powder detergents can cause the detergent not dissolve completely and can also cause scratches on the glassware.
Multipurpose Detergents
The best washing results in dishwashers is obtained by using detergent, rinse aid and water softening salt individually.
New products of the detergent producers what they call as "Multipurpose Detergent" can act as water softening salt and/or rinse aid in addition to acting as a detergent. Some types of these detergents can also contain special-purpose washing chemicals such as glass and stainless steel protectors.
Multipurpose detergents commonly found in the market:
2in1: Those contain detergent, rinse aid or water softening salt.
3in1: Those contain detergent, rinse aid and water softening salt.
4in1: Those containing glass protectors in addition to detergent, rinse aid and water softening salt.
5in1: Those containing glass and stainless steel protectors in addition to detergent, rinse aid and water softening salt.
Multipurpose detergents give satisfying results only under certain usage conditions. Observe the instructions of the detergent manufacturer on the package when using such detergents. Contact the detergent producer if your dishes are wet and/or if you notice lime spots particularly on your glasses after the washing program is over.
When you give up using such detergents:
Make sure that salt and rinse aid compartments are full.
Set the water hardness to its highest degree and perform an empty run.
After the empty washing review the user manual and readjust the water hardness level so as to suit your water supply.
Make the appropriate rinse aid settings.
Depending on the model, salt indicator and/or rinse aid indicator should be enabled again if they are disabled before.
Loading the dishwasher General:
Before you load the dishwasher with dishes
- Remove coarse food leftovers
- Place all containers such as cups, glasses and pots into the machine with the opening facing downwards (so that no water can collect)
-
Dishes and cutlery may not be placed above each other
• Glasses may not touch -
The movement of the spray arms must not be hindered
- Place all large and very dirty items in the lower basket.
- Small and light items can go into the upper basket.
- Long and narrow items are placed in the middle of the baskets.
⚠ Knives and other utensils with sharp tips and edges must be placed horizontally into the upper basket due to risk of injury.
i Please do not overload your dishwasher and pay attention to the notes regarding dishes which are suited to the dishwasher. Only in this manner will you obtain optimal washing results with a sensible use of energy.
i Start unloading the dishes from the lower basket, then switch to the upper basket.
Suggestions for loading the dishwasher
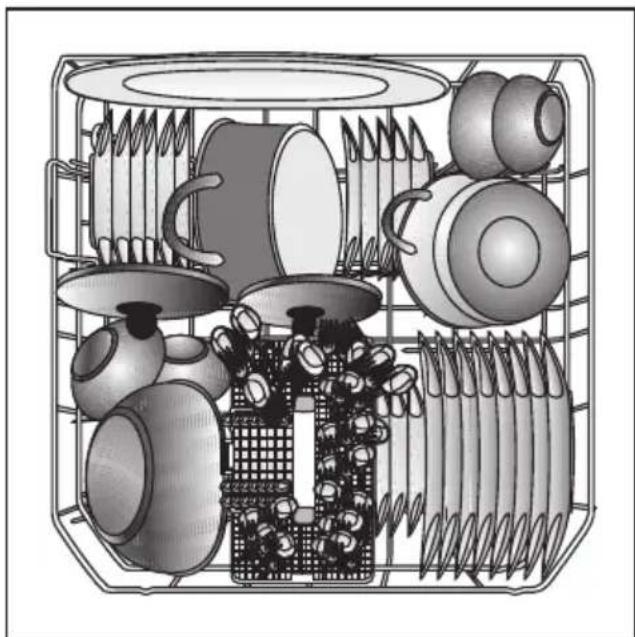
Use the lower basket for plates, bowls, pots etc.
natural_image
Cross-sectional diagram of a mechanical device with multiple components and no visible text or symbols4 folding plate support rods (depends on the model)
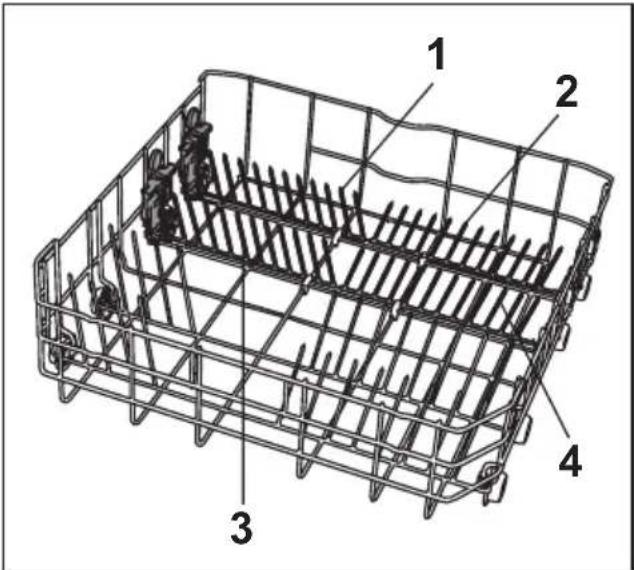
There are four separate "folding plate support rods" in the lower basket of your dishwasher designed to allow you more space to accommodate saucepans and large bowls in the lower basket. You can either fold each section (1, 2, 3, 4) individually or, all at once, to create a large empty space. Simply press the handgrips (A) and fold them down"

natural_image
Diagram of a hand operating a small mechanical device inside a wire cage (no text or symbols visible)2 folding plate support rods (depends on the model)
There are two separate "folding plate support rods" in the lower basket of your dishwasher designed to allow you more space to accommodate saucepans and large bowls in the lower basket. You can either fold each section (1, 2) individually or, all at once, to create a large empty space. Simply press the handgrips (A) and fold them down"


Bottle holder (depends on the model)
For cleaning your bottles. To remove, pull the holders apart in opposite directions (H).

natural_image
Technical line drawing of a mechanical assembly with labeled component 'H' (no readable text or symbols beyond label)Variable cutlery basket (depends on the model)
The variable cutlery basket can be separated into 3 parts depending on the amount of cutlery and the degree of dirtiness.
Small cutlery basket sections also fit into the upper basket.
To do this, turn the lock on the handle to the right (A).
Pull the smaller cutlery basket upwards and out of its holders (B).
To put the parts together again, proceed in the opposite direction.
Use the basket inset (C) for your cutlery so that all items in the basket are surrounded by a sufficient water flow.
For larger items (e.g. wire whisks), the basket inset may be removed (C).
To make loading easier, the cutlery basket can be removed.
Place long items such as ladles, cooking spoons etc. on the rack in the upper basket.

natural_image
Illustration of a woven textile or metal box with a handle and side compartments (no text or symbols visible)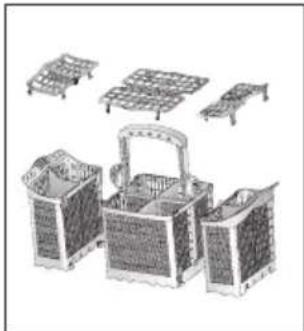
natural_image
Illustration of a woven basket with various compartments and structural supports (no text or symbols)
natural_image
Illustration of a hand holding a device with an arrow indicating rotation (no text or symbols)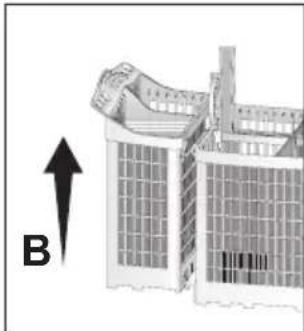
natural_image
Exterior view of a modern building with a curved roof and window structure, labeled 'B' with an upward arrow (no text or symbols on the structure itself)
natural_image
Illustration of a hand holding a small electronic device with a grid-like structure and a labeled component 'C' (no text or symbols on the device itself)
natural_image
Illustration of a hand holding a building with a floating object above it (no text or symbols)
natural_image
Architectural line drawing of a building facade with grid patterns and structural elements, no text or symbols present.
natural_image
3D model of a storage unit with a model inset showing its structural components (no text or symbols on the diagram itself)Cutlery Basket
(depends on the model)

natural_image
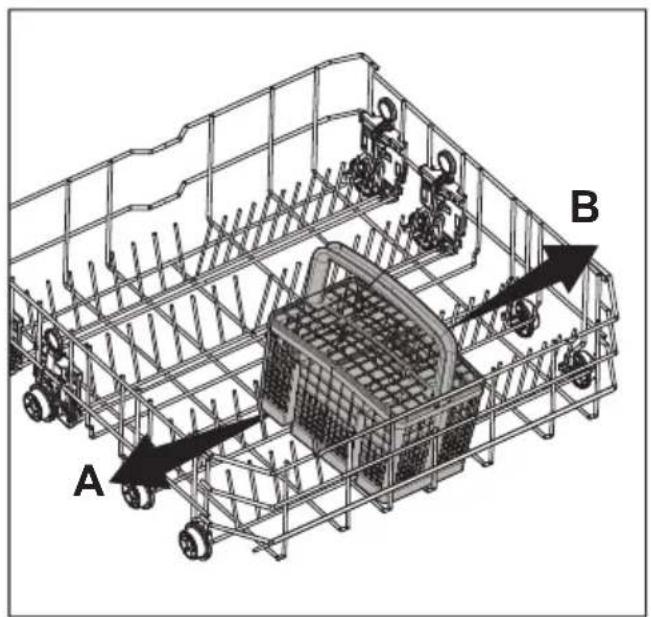
Line drawing of a basket with cutlery and handles, no text or symbols presentMovable Cutlery Basket (depends on the model)
Designed to allow free placement of the dishes according to their size, the movable cutlery basket can slide over the tines to the left (A) and right (B) side.
natural_image
3D wireframe diagram of a shopping cart with labeled parts A and B, showing internal structure and wheels (no text or symbols beyond labels)
natural_image
Illustration of hands assembling a grid-patterned plastic container (no text or symbols)Basket insert with variable height settings (depends on the model)
You can also use this insert in the lower basket for glasses and long-handled cutlery / utensils.
If you do not need the insert, fold the rack upwards at the angle shown (A).
Push the entire insert upwards (B). Place the insert in the upright position (C). Push the insert downwards and lock it into place with the holder (D).
When you want to use the basket again, reverse the procedure.
To set the height, push the rack upwards and fold it open in position (G).
When finished, check that the sprayer arm can still move freely.

natural_image
Technical line drawing of a mechanical assembly with two cylindrical components mounted on metal supports (no text or symbols)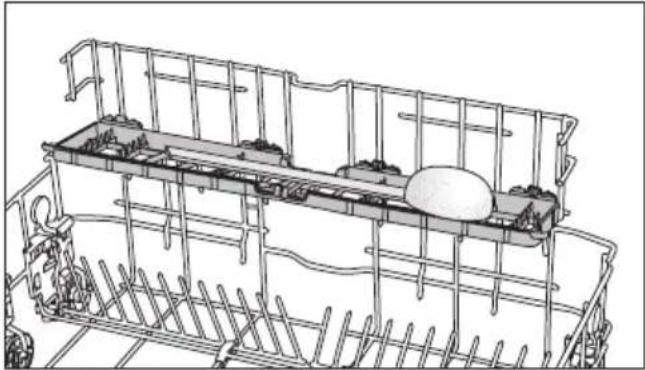
natural_image
Technical line drawing of a multi-level industrial container with internal components and structural supports (no text or symbols)

Loading suggestions
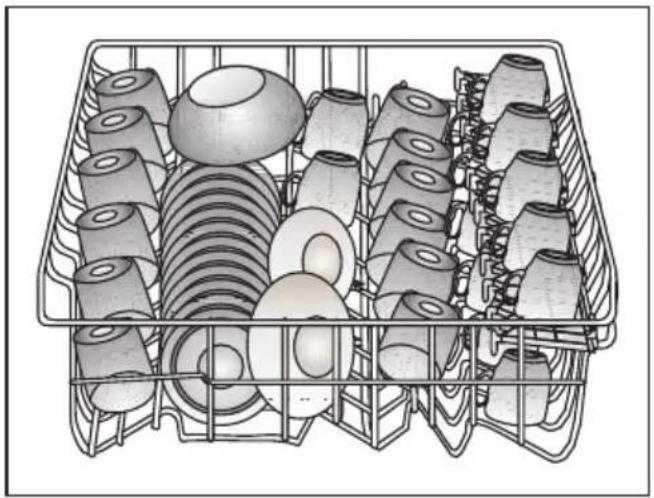
Load the upper basket with dessert plates, cups, glasses etc.
natural_image
Illustration of a multi-tiered plastic container filled with various cylindrical components (no text or symbols visible)Upper basket with variable height setting
(depends on the model)
The upper basket is equipped with a lifting mechanism which enables you to change the height of the basket without having to remove it from the dishwasher, even if it is fully loaded.

natural_image
Diagram of a hand interacting with a mechanical device inside a wire mesh cage, showing internal components and directional arrow (no text or symbols)The height of the upper basket was set to its lowest position at the factory. To lift the upper basket to the “high” (A) position, hold it on one side and carefully pull it upwards. To lift the opposite side of the basket, hold it and pull it upwards in the same manner (A).

To lower the upper basket, hold the basket lever on one side and carefully lower the basket without releasing the lever (B). Repeat the procedure with the lever on the opposite side of the basket. Make sure that both levers catch at the same height.
Upper basket with variable height setting (depends on the model)
The upper basket is equipped with a lifting mechanism which enables you to change the height of the basket without having to remove it from the dishwasher, even if it is fully loaded.
The height of the upper basket was set to its lowest position at the factory. To lift the upper basket to the “high” (A) position, hold it on one side and carefully pull it upwards. To lift the opposite side of the basket, hold it and pull it upwards in the same manner (A).
To lower the upper rack, hold and press in the rack lever on one side and carefully lower the rack without releasing the lever (B). Repeat the procedure with the lever on the opposite side of the basket. Make sure that both levers catch at the same height.

natural_image
Illustration of a hand interacting with a mechanical device labeled A, showing structural framework and motion direction (no text or symbols on the diagram itself)
natural_image
Diagram of a hand operating a mechanical device with a downward arrow and label B (no text or symbols on the diagram itself)Height setting with empty basket (depends on the model)
In this model, the height setting of the upper basket may be changed using the wheels which are mounted at two different heights.
Release the latches on both the right and left tracks of the upper basket by pushing them outwards (C).
Pull out the basket out completely (D).
Place the basket back into the tracks at the desired height (E).
Push the latches back into the correct position.

natural_image
Diagram showing a hand holding a wire mesh structure with an arrow indicating direction (no text or symbols present)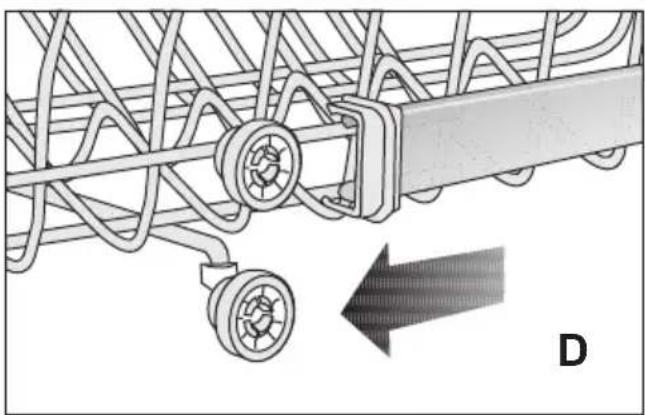
natural_image
Mechanical assembly diagram showing a wheel and chain with directional arrow (no text or symbols)
natural_image
Diagram of a mechanical assembly with spring-loaded components and a hand interacting with it (no text or symbols present)Folding Tines (depends on the model)
There are "folding tines" in the upper rack to allow you more space to accommodate glasses or cups.
Simply pull in the first front folding tine, move it to left (A) and right (B) to place in another position. When you need, take the tines down until the tines fall down.

Glass Support (depends on the model)
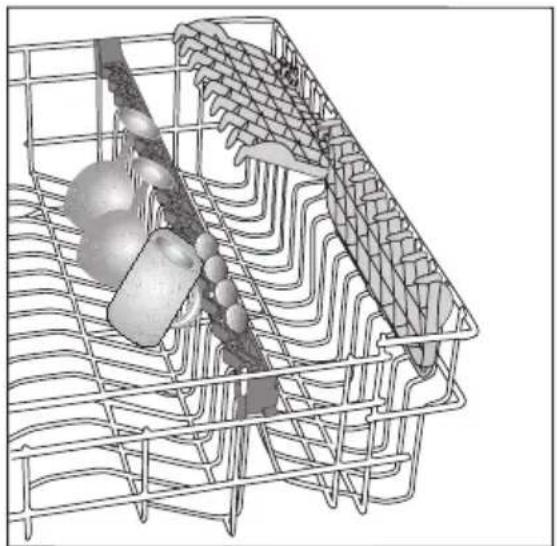
When placing the glasses or goblets with a long grip, lean them against the glass support, the edge of the basket or the shelf but not against the other pieces. Do not lean the long glasses against each other, otherwise they do not remain stable during washing cycle and may get damaged.
When you need to place the bulky pieces into the upper basket, disconnect the lug of the glass support from the bar of the basket where it is attached to. Thus, you will acquire a wider place.
natural_image
Diagram of a food basket with vegetables and meat, showing internal layers and contents (no text or labels)
natural_image
Topographic map view showing road networks and a marked area with an arrow (no text or labels)Upper Basket Drawer (depends on the model)
You can easily place additional desert spoons, small forks and knives into the drawer installed to the upper basket of your machine.

natural_image
Technical illustration of a mechanical component with internal channels and mounting brackets (no text or symbols)Rack (depends on the model)
Depending on the size of the glasses and cups, the rack height setting may be adjusted (C, D, E).

5 How to clean your dishwasher
Cleaning your machine at regular intervals ensures longer product life and reduces the risk of recurring problems.
⚠️ Always unplug the machine and turn off the water supply before cleaning. Use a gentle household cleaner for the outside and the door seals. Clean the control panel only with a moist cloth and clear water.
Cleaning the filters
Clean the filters and the spray arms regularly. A dirty machine will have a negative effect on the cleaning results.
- Main filter
- Coarse filter
-
Micro filter
-
Remove the lower basket from the machine.
-
Turn the coarse filter to the right and pull it out in an upward direction (A).
-
Pull out the main filter (B).
-
Press on the two tongues of the coarse filter and remove the micro filter (C).
-
Clean the filters thoroughly under running water. Use a brush if necessary.
-
Replace main fitler.
-
Replace the micro filter and the coarse filter into the main filter. Twist it clockwise until it clicks in.
Do not operate your dishwasher without a filter. Ensure that your filters are correctly installed. Clean the filters regularly.


natural_image
Illustration of a hand operating a mechanical device with a circular opening and an arrow indicating rotation (no text or symbols)

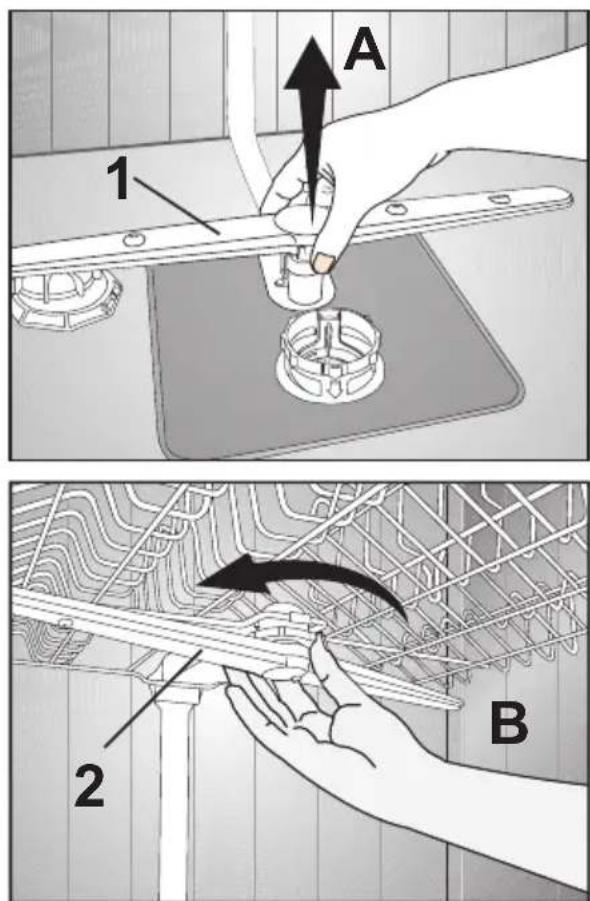
Cleaning the spray arms
Dirt or calcium residue may block the nozzles on the spray arms. For this reason, regularly check the spray nozzles.
- Lower spray arm
- Upper spray arm
- Remove the lower basket from the machine.
- Pull off the lower spray arm in an upward direction (A).
- Loosen the fastening screw of the upper spray arm and pull off the spray arm (B).
- Clean the spray arms under running water.
- Replace the spray arms.
i Ensure that the fastening screws are screwed tight.
Cleaning the filter inset in the water inlet hose (depends on the model)
Dirt from deposits in the water pipes is prevented by a filter in the water inlet hose. Check the filter and the water inlet from time to time.
- Close the water tap and unscrew the water inlet hose.
- Take out the filter and clean it under running water.
- Replace the cleaned filter.
- Fasten the water inlet hose to the water tap again.
6 Troubleshooting:
What to do if the dishwasher will not run
- Check that the mains plug is properly connected.
• Are all fuses working?
• Is the water supply fully turned on?
• Is the dishwasher door closed firmly?
• Have you pressed the On/Off button?
• Is the filter on the water intake and dishwasher clogged?
The cleaning results are unsatisfactory

natural_image
Hand holding a white ceramic bowl with liquid, placed on a kitchen sink (no visible text or symbols)Uncleaned Dishes
Disorderly placement
- Load your dishes as described in the manual.
Program selection
- For products with program selecting feature, choose a longer program that washes in higher temperatures.
Blocked impellers
- Prior to starting the program, ensure by turning by hand that the upper and lower impellers are freely rotating.
Clogged filters
- From time to time, remove the complete filter system as shown in the manual and wash it under flowing water.
Misplaced or displaced filters
- After washing the filter system, replace them as shown in the manual.
Clogged impeller holes
- Take out and clean the impellers from time to time as shown in the figure.
Overloading the baskets
- Do not overload the baskets in excess of their capacity
Detergent kept under unsuitable conditions
- If you are using powder detergents, do not store them in humid places after you open their boxes. Keep them in a closed container, if possible. For ease-of-storing, we recommend you to use tablet detergents.
Inadequate detergent
- If you are using powder detergents, adjust the amount of detergent according to the soiling degree of your dishes and/or program definitions. We recommend you to use tablet detergents for optimum results.
Inadequate rinse aid
- Increase rinse aid setting or add rinse aid into rinse aid compartment.
Unsealed detergent dispenser lid
- Always ensure that the detergent compartment lid is closed tightly after every detergent filling process.
Drying
Disorderly placement
- Load your dishes as described in the manual.
Inadequate rinse aid
- Increase rinse aid setting or add rinse aid into rinse aid compartment.
Unloading the machine right after dishwashing
- Do not unload your dishwasher right after washing process is completed. Slightly open the door and wait for evacuation of the inside steam for a while. Unload the dishes after the pieces cool down to a touchable level. Start unloading process from the lower basket.
Program Selection
- For products with program selecting feature, choose a longer program that washes in higher temperatures.
natural_image
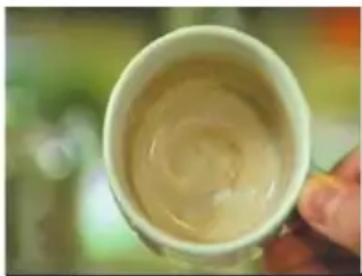
Close-up of a hand holding a white cup filled with light-colored tea, blurred green background (no text or symbols visible)Tea, Coffee And Lipstick Stains
Program Selection
- For products with program selecting feature, choose a longer program that washes in higher temperatures.
Detergent kept under unsuitable conditions
- If you are using powder detergents, do not store them in humid places after you open their boxes. Keep them in a closed container, if possible.
- For ease-of-storing, we recommend you to use tablet detergents.
Usage of silverware-kitchenware with corrupted surface quality
- Silverware or kitchenware with corrupted surface quality should not be washed in dishwashers.

natural_image
Close-up of a wine glass against a solid blue background (no text or symbols visible)Lime Stains, Hazy Look
Inadequate rinse aid
- Increase rinse aid setting or add rinse aid into rinse aid compartment.
Insufficient water softening
- In products equipped with water softening setting, water softening should be properly set in accordance with the hardness of the supply water. Add salt into the salt container, if necessary.
Salt leakage\*
- Use the supplied salt funnel while filling in softening salt. Make sure that the salt box cover is tightly closed after finishing the filling process. Run a washing program to clean up the salts spilled in the machine. Recheck the salt box cover after the program is completed.
Metallic Look In Bluish Rainbow Color
Excessive rinse aid
- Lower rinse aid setting.

natural_image
Close-up of a gloved hand holding a transparent glass with blue liquid, against a dark background (no text or symbols visible)Hazy, Milky-Dish Look And Bluish / Rainbow Color Appearance In Glassware When They Are Hold Against Light
Glass corrosion due to soft water
- In products equipped with water softening setting, water softening should be properly set in accordance with the hardness of the supply water. If your supply water is soft (<5dH), do not use salt. For products with program selecting feature, choose programs that wash in higher temperatures (e.g. 60-65°C).
Kitchenware containing Aluminum
- Kitchenware that contains aluminum should not be washed in dishwashers.
Salt leakage\*
- Use the supplied salt funnel while filling in softening salt. Make sure that the salt box cover is tightly closed after finishing the filling process. Run a washing program to clean up the salts spilled in the machine. Recheck the salt box cover after the program is completed.
Low water softening setting, inadequate salt\*
- In products equipped with water softening setting, water softening should be properly set in accordance with the hardness of the supply water. Add salt into the salt container, if necessary.
Detergent kept under unsuitable conditions
- If you are using powder detergents, do not store them in humid places after you open their boxes. Keep them in a closed container, if possible. For ease-of-storing, we recommend you to use tablet detergents.
Overloading the baskets
- In order to avoid scratches and breaks in glasses and other glass tableware because of collision with each other during washing process arising from their placement, do not overload the baskets in excess of their capacity.

natural_image
Close-up of two metallic surgical instruments against a solid blue background (no text or symbols visible)Rusts, Blackening And Corruption Of Surface
Unsealed closing of the salt box cover\*
Salt may cause oxidation on metal surfaces. Use the supplied salt funnel while filling in softening salt. Make sure that the salt box cover is tightly closed after finishing the filling process. Run a washing program to clean up the salts spilled in the machine. Recheck the salt box cover after the program is completed.
Grounding line
- Check if your dishwasher is connected to the actual grounding line. Otherwise, the static electric created in the dishwasher may remove the protective coating on metal surfaces and cause blackening and corruption.

natural_image
White plastic mechanical component with internal parts, placed on a tray (no visible text or symbols)Detergent Remains In The Detergent Dispenser
Damp detergent compartment
- Make sure that the detergent dispenser is well dried prior to filling it with detergent.
Putting detergent in the detergent dispenser long before washing
- Take care that detergent is put shortly before startup of washing.
Blocking the opening of detergent dispenser lid dwing washing
- Ensure that the lid of detergent dispenser is not blocked by improper loaded dishes. The detergent dispenser lid should op/en without any block during washing.
Detergent kept under unsuitable conditions
- If you are using powder detergents, do not store them in humid places after you open their boxes. Keep them in a closed container, if possible. For ease-of-storing, we recommend you to use tablet detergents.
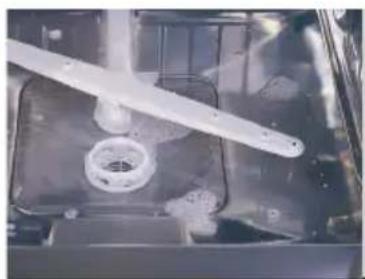
Clogged impeller holes
- Take out and clean the impellers from time to time as shown in the figure.
natural_image
Close-up of a white plastic kitchen appliance with a circular component inside, no visible text or symbolsWater Remained In The Dishwashing Compartment After Washing
Clogged filters
- From time to time, remove the complete filter system as shown in the manual and wash it under flowing water.
Blocking / twisting of drainage hose
- Connect the drainage hose as described in the manual.
Odour
Odor of new dishwasher
- A new dishwasher has a peculiar odor. It will fade out after a couple of washing.
Clogged filters
- From time to time, remove the complete filter system as shown in the manual and wash it under flowing water.
Leaving the dishes in the dishwasher for a long time
- If you are not going to run your dishwasher immediately, load the dishes into your machine after scraping the excessive soil on them and do not tightly close the door of the machine. Every other day, perform washing without detergent in the shortest program for products with program selecting feature.

natural_image
Interior view of a transparent container with metal grilles and a flat surface (no text or symbols visible)Foam
Loading the dishes into the dishwasher without completely drying after washing them with hand-wash detergent.
- Hand-wash detergents do not contain antifoam. There is no need to hand-wash the dishes with detergent before loading the dishes into the machine. Scraping the coarse soil on the surfaces with a tissue paper or fork will be sufficient.
Spilling rinse aid in the machine while filling
- Take care that rinse aid is not spilled in the machine when you are filling it. Clean any spilled amount with the help of a tissue paper/towel.
Leaving the rinse aid lid open or not closing it
- Rinse aid compartment should always be closed as shown in the manual after it is filled with rinse aid.

natural_image
Two decorative plates with floral patterns on a blue background (no text or symbols)Erasing Of Decorations
Usage of decorated glasses and porcelains
- Decorated glasses and decorated luster porcelains are not suitable for dishwasher washing. Manufacturers of glassware and porcelain tableware items do not recommend washing these items in the dishwashers either.
*: In products with a salt container
Service
If your appliance ever malfunctions, check the notes and advice given in the operating manual.
If this does not fix the problem, our customer service staff are available to assist you.
Because Life's Meant To Be Easy
BLANCO DISHWASHER PRODUCT WARRANTY
- Subject to the "Statement of Standard Warranty Conditions" this product is covered by the following Warranty.
TWO (2) YEARS WARRANTY from date of purchase, covering all parts and labour. - The appliance is warranted under normal single family domestic installation and use, as set out in the instruction manual, against manufacturing defects for the Warranty periods shown above.
- Should service be required under this Warranty, the purchaser should contact an approved BLANCO Service Provider during their normal business hours.
- At no time does BLANCO/MEA have liability for any freight or transportation costs or for any damage during transit or for any consequence of failure of this appliance outside of the normal service area, unless such limitation of liability is prohibited by statute.
- This Warranty excludes replacement of parts required due to normal wear and tear including light globes.
- This Warranty only applies, provided the appliance has been used in accordance with the manufacturer's instructions and provided an accident, misuse, neglect or abuse has not damaged the appliance.
- None of the above Warranties purport to exclude, restrict or modify either the application or the exercise of a right conferred by any applicable Statute.
- Please complete the details below, which should be retained for future reference along with your proof of purchase:
Date of Purchase: ....
Model No: ....
Serial No:
STATEMENT OF STANDARD WARRANTY CONDITIONS
- The Warranty only applies provided that the appliance has been used in accordance with the manufacturer's instructions and provided that the appliance has not been damaged by an accident, misuse, neglect or abuse of any person other than the manufacturer or BLANCO/Major Electrical Appliances ("MEA") or from faulty installation, misadjustment or tampering by unauthorised persons.
- When a service inspection reveals the alleged fault or faults are caused by incorrect operation, contrary to the instruction manual, and otherwise the appliance is in good order and working condition, the purchaser shall be liable for a service fee charged by BLANCO/MEA or one of its' Service Providers.
- If the appliance is used in Commercial Applications or for Rental purposes, a separate warranty of Twelve (12) months covering all parts with Three (3) months on the labour will apply.
- Subject to the provisions of any applicable statute this Warranty applies to the original retail purchaser only and is not transferable.
- Subject to the provisions of any applicable statute, at no time does BLANCO/MEA have liability for freight, transport or travel costs outside normal service areas.
- None of the above Warranties purport to exclude, restrict or modify either the application or the exercise of a right conferred by any applicable statute.
- Subject to any Warranties implied by statute, at no time will BLANCO/MEA or its' Service Providers be liable for any economic loss consequent upon the failure of the appliance.
- This Warranty is only valid for major appliances imported and distributed by BLANCO/MEA, purchased and used in Australia.
Blanco Contact Information.
NEW SOUTH WALES
Head Office, Sales & Marketing Office
104 Vanessa Street
Kingsgrove NSW 2208
Telephone: 02 9503 2888
Facsimile: 02 9503 2810
NSW Showroom*
40 Ebley Street
Bondi Junction NSW 2022
Telephone: 02 9386 1190
Facsimile: 02 9386 1671
Service and Spare Parts
All General Whitegoods Service
Telephone: 02 8788 8666
Facsimile: 02 9756 1091
AUSTRALIAN CAPITAL TERRITORY
Service and Spare Parts
Detlevs Appliance & Electrical Care
1/88 Sheppard Street
Hume
ACT 2905
Telephone: 02 6260 1033
Facsimile: 02 6260 1035
VICTORIA
State Office and Showroom*
35 Centre Road
Scoresby VIC 3179
Telephone: 03 8756 7888
Facsimile: 03 8756 7907
Service and Spare Parts
Advantage Appliances
Telephone: 03 9874 4222
Facsimile: 03 9874 6917
QUEENSLAND
State Office and Showroom*
148 Robinson Road - East
Geebung
QLD 4034
Telephone: 07 3259 2555
Facsimile: 07 3265 6933
Service and Spare Parts
Endeavour Appliances
Telephone: 07 3872 7444
Facsimile: 07 3852 2465
Platinum Appliance Service
Telephone: 07 3862 1154
Facsimile: 07 3862 1114
Roshad (Gold Coast)
Telephone 07 5535 7044
Facsimile 07 5535 7407
SOUTH AUSTRALIA & NORTHERN TERRITORY
Agent and Sales Office
S C Lighting & Electrical Supplies
47 North Terrace
Hackney SA 5069
Telephone: 08 8362 4599
Facsimile: 08 8362 4591
Service and Spare Parts
Prestige Appliance Repair Centre
Telephone: 08 8352 2022
Facsimile: 08 8352 3044
WESTERN AUSTRALIA
1 Alvan Street
SUBIACO WA 6008
Telephone: 08 9382 1611
Facsimile: 08 9382 1622
Service and Spare Parts
Metropolitan Appliance Repairs
Telephone: 08 9330 1724
Facsimile: 08 9317 1296
TASMANIA
Agent and Sales Office
Mark Pearce Agencies
23 Tranmere Road
Howrah TAS 7018
Tel/Fax: 03 6247 9215
Service and Spare Parts
Electrical Equipment Service (Launceston)
Telephone: 03 6339 3873
Facsimile: 03 6339 4588
Baldocks Appliance Service (Hobart)
Telephone: 03 6234 5995
Facsimile: 03 6234 8134
BLANCO CUSTOMER SERVICE
1300 739 033
Website: www.meaappliances.com.au
* Contact Showrooms to confirm hours of business.

- Symbols and legend
- TABLE OF CONTENTS
- Getting To Know Your Machine 3
- Safety Instructions 4
- Directions for Assembly 6
- Using Your Dishwasher 9
- How to clean your dishwasher 23
- Troubleshooting: 25
- Getting To Know Your Machine
- Technical Specifications
- This device corresponds to the following EU directives:
- Note for Testing Institutes
- dishwasher@standardloading.com
- 2
- Safety Instructions
- Before Installation
- Before First Use
- ⚠️ Child Safety
- ⚠ For daily operation
- Problems
- What should not be washed in your dishwasher
- 3
- Directions for Assembly
- Safety notes for installation
- Installing Your Dishwasher
- Water connection
- Permitted water pressure:
- Connect water inlet hose
- AQUASAFE+ (some models)
- Water drainage
- Extension hoses
- Siphon connection
- Electrical connection
- Disposal
- Packaging
- Used appliances – Environmental notice
- Using Your Dishwasher
- Filling the dishwasher salt
- When operating for the first time:
- Filling the Rinse Aid Dispenser
- Set the dose of rinse aid
- Dispenser
- Detergent
- Multipurpose Detergents
- Loading the dishwasher General:
- Suggestions for loading the dishwasher
- folding plate support rods (depends on the model)
- folding plate support rods (depends on the model)
- Bottle holder (depends on the model)
- Variable cutlery basket (depends on the model)
- Movable Cutlery Basket (depends on the model)
- Basket insert with variable height settings (depends on the model)
- Loading suggestions
- Upper basket with variable height setting
- (depends on the model)
- Upper basket with variable height setting (depends on the model)
- Height setting with empty basket (depends on the model)
- Folding Tines (depends on the model)
- Glass Support (depends on the model)
- Upper Basket Drawer (depends on the model)
- Rack (depends on the model)
- How to clean your dishwasher
- Cleaning the filters
- Cleaning the spray arms
- Cleaning the filter inset in the water inlet hose (depends on the model)
- Troubleshooting:
- What to do if the dishwasher will not run
- The cleaning results are unsatisfactory
- Uncleaned Dishes
- Disorderly placement
- Program selection
- Blocked impellers
- Clogged filters
- Misplaced or displaced filters
- Clogged impeller holes
- Overloading the baskets
- Detergent kept under unsuitable conditions
- Inadequate detergent
- Inadequate rinse aid
- Unsealed detergent dispenser lid
- Drying
- Unloading the machine right after dishwashing
- Tea, Coffee And Lipstick Stains
- Usage of silverware-kitchenware with corrupted surface quality
- Lime Stains, Hazy Look
- Insufficient water softening
- Salt leakage\*
- Metallic Look In Bluish Rainbow Color
- Excessive rinse aid
- Hazy, Milky-Dish Look And Bluish / Rainbow Color Appearance In Glassware When They Are Hold Against Light
- Glass corrosion due to soft water
- Kitchenware containing Aluminum
- Low water softening setting, inadequate salt\*
- Rusts, Blackening And Corruption Of Surface
- Unsealed closing of the salt box cover\*
- Grounding line
- Detergent Remains In The Detergent Dispenser
- Damp detergent compartment
- Putting detergent in the detergent dispenser long before washing
- Blocking the opening of detergent dispenser lid dwing washing
- Water Remained In The Dishwashing Compartment After Washing
- Blocking / twisting of drainage hose
- Odour
- Odor of new dishwasher
- Leaving the dishes in the dishwasher for a long time
- Foam
- Loading the dishes into the dishwasher without completely drying after washing them with hand-wash detergent.
- Spilling rinse aid in the machine while filling
- Leaving the rinse aid lid open or not closing it
- Erasing Of Decorations
- Usage of decorated glasses and porcelains
- Service
- Because Life's Meant To Be Easy
- BLANCO DISHWASHER PRODUCT WARRANTY
- STATEMENT OF STANDARD WARRANTY CONDITIONS
- NEW SOUTH WALES
- AUSTRALIAN CAPITAL TERRITORY
- VICTORIA
- QUEENSLAND
- SOUTH AUSTRALIA & NORTHERN TERRITORY
- WESTERN AUSTRALIA
- TASMANIA
- BLANCO CUSTOMER SERVICE
- 739 033
Brand : BLANCO
Model : DWF6XP
Category : Dishwasher