
Audrey BL67 - Sewing machine BABY LOCK - Free user manual and instructions
Find the device manual for free Audrey BL67 BABY LOCK in PDF.


| Product Type | Sewing Machine |
| Brand | Baby Lock |
| Model | Audrey BL67 |
| Series | A-LINE Series |
| Power Supply | 120V, 60Hz (polarized plug) |
| Foot Control Model | Matsushita Electric, Model YSD180034 |
| Maximum Stitches | 66 stitch patterns |
| Buttonhole Styles | 1-step auto buttonhole, 7 styles (including keyhole and corded) |
| Needle Positions | Adjustable (left, center, right) |
| Stitch Width Range | 0.0 – 7.0 mm |
| Stitch Length Range | 0.0 – 4.5 mm |
| Sewing Speed | Variable speed control with slide lever and foot pedal |
| Start/Stop Button | Yes, with slow start for first 3 stitches |
| Reverse Stitch | One-touch reverse button |
| Needle Up/Down | Push-button control |
| Free Arm Capability | Yes, removable extension table |
| Extension Table | Removable with accessory storage |
| Drop Feed | Manual lever for darning/free-motion |
| Thread Tension | Adjustable dial |
| Automatic Needle Threader | Yes (for needles sizes 11, 14, 16) |
| Bobbin Winding | Independent bobbin winder with automatic stop |
| Included Accessories | All-purpose foot, zipper foot, buttonhole foot, overcasting foot, blind hem foot, straight stitch foot, open toe foot, darning foot, 1/4 inch foot, needle set, bobbins, screwdrivers, seam ripper, tote bag |
| Lighting | 1 watt lamp |
| Dimensions (approx.) | Standard home sewing machine size |
Frequently Asked Questions - Audrey BL67 BABY LOCK
User questions about Audrey BL67 BABY LOCK
0 question about this device. Answer the ones you know or ask your own.
Ask a new question about this device
Download the instructions for your Sewing machine in PDF format for free! Find your manual Audrey BL67 - BABY LOCK and take your electronic device back in hand. On this page are published all the documents necessary for the use of your device. Audrey BL67 by BABY LOCK.
USER MANUAL Audrey BL67 BABY LOCK
Audrey
A-LINE SERIES Model BL67
Instruction and Reference Guide

FOR THE LOVE OF SEWING
IMPORTANT SAFETY INSTRUCTIONS
When using an electrical appliance, basic safety precautions should always be followed, including the following.
Read all instructions before using this sewing machine.
DANGER - To reduce the risk of electric shock:
- This sewing machine should never be left unattended when plugged in. Always unplug this sewing machine from the electric outlet immediately after using and before cleaning.
- Always unplug before replacing light bulb. Replace bulb with same type rated 1 watts.
WARNING - To reduce the risk of burns, fire, electric shock, or injury to persons:
- Do not allow to be used as a toy. Close attention is necessary when this sewing machine is used by or near children.
- Use this sewing machine only for its intended use as described in this manual. Use only attachments recommended by the manufacturer as contained in this manual.
- Never operate this sewing machine if it has a damaged cord or plug, if it is not working properly, if it has been dropped or damaged, or dropped into water. Return the sewing machine to the nearest authorized retailer or service center for examination, repair, electrical or mechanical adjustment.
- Never operate the sewing machine with any air openings blocked. Keep ventilation openings of the sewing machine and foot control free from the accumulation of lint, dust, and loose cloth.
- Never drop or insert any object into any opening.
6.Do not use outdoors.
7.Do not operate where aerosol (spray) products are being used or where oxygen is being administered. - To disconnect, turn switch to the off position, then remove plug from outlet.
- Do not unplug by pulling on cord. To unplug, grasp the plug, not the cord.
- Keep fingers away from all moving parts. Special care is required around the sewing machine needle.
- Never sew with a damaged needle plate as this can cause needle to break.
12.Do not use bent needles. - Do not pull or push fabric while stitching. It may deflect the needle causing it to break.
- Switch the sewing machine OFF when making any adjustments in the needle area, such as threading needle, changing needle, threading bobbin, or changing presser foot, etc.
- Always unplug sewing machine from the electrical outlet when removing covers, lubricating, or when making any other user servicing adjustments mentioned in the instruction manual.
CAUTION. Moving parts - To reduce risk of injury, switch off before servicing.
Close cover before operating machine.
SAVE THESE INSTRUCTIONS
This product is for household use, or equivalent.
FOOT CONTROL (USA ONLY)
ELECTRONIC MODEL
Use Matsushita Electric, Model YSD180034 with this sewing machine.
POLARIZED PLUGS CAUTION
This appliance has a polarized plug (one blade wider than the other). To reduce the risk of electric shock, this plug is intended to fit in a polarized outlet only one way. If the plug dose not fit fully in the outlet, reverse the plug. If it still does not fit, contact a qualified electrician to install the proper outlet. Do not modify the plug in any way.
IMPORTANT SAFETY INSTRUCTIONS
CONTENTS....1
MAIN PARTS 2
ACCESSORIES 4
EXTENSION TABLE / ACCESSORY STORAGE. 4
REMOVING THE EXTENSION TABLE 5
OPENING THE ACCESSORY STORAGE 5
TOTE BAG 5
CHANGING THE PRESSER FOOT 6
REMOVING THE PRESSER FOOT HOLDER 6
INSERTING THE NEEDLE 6
CONNECTING THE MACHINE 7
CONTROL BUTTONS & DROP FEED LEVER....8
START/STOP BUTTON....8
SETTING THE STITCH WIDTH AND STITCH LENGTH 10
VARIOUS NEEDLE POSITIONS....10
BOBBIN WINDING 11
REMOVING THE BOBBIN 11
WINDING THE BOBBIN 11
INSERTING THE BOBBIN 12
THREADING THE MACHINE 13
THREADING THE UPPER THREAD....13
NEEDLE THREADER....14
DRAWING UP THE BOBBIN THREAD.... 14
STARTING TO SEW.... 15
REVERSE STITCHING 16
TURNING CORNERS 16
SEWING HEAVY FABRIC 16
SEAMING GUIDE ON THE STITCH PLATE 16
ADJUSTING THE THREAD TENSIONS 17
FABRIC, THREAD AND NEEDLE TABLE 18
STRAIGHT STITCH SEWING 19
ZIGZAG STITCH SEWING 20
SATIN STITCHING or APPLIQUE 20
FREE ARM SEWING 20
OVERCASTING-OVERLOCKING 21
USING THE OVERCASTING FOOT 21
USING THE GENERAL PURPOSE FOOT 21
BLIND HEM STITCHING 22
BUTTONHOLE SEWING 23-24
CORDED BUTTONHOLES 24
MULTI-STITCH ZIGZAG 25
ELASTIC STITCH SEWING 25
STRAIGHT STITCH SEAMING AND QUILTING .....26
STRAIGHT STITCH SEAMING 26
QUILTING. 26
FEED DOG CONTROL 26
DARNING 26
PATCH WORK....27
APPLIQUE 27
INSERTING ZIPPERS AND PIPING 28
PIPING 28
SCALLOP STITCH 29
SCALLOP HEM 29
DECORATIVE SCALLOP EDGE....29
ADJUSTING DECORATIVE PATTERNS 29
SEWING LIGHTWEIGHT FABRICS 29
CARING FOR YOUR MACHINE 30
CLEANING THE FEED DOGS AND HOOK AREA ....30
HELPFUL HINTS 31
BL67 -STITCH CHART CONVERSION 32-35
ACTION BEEPS. 35

1.Face Cover
2. Needle Up / Down button
3. Reverse Stitch button
4.Low speed button
5.Thread cutter
6.Start / Stop button
7. Extension table / Accessory Storage
8.Slide speed control lever
9. Stitch length button
10. Pattern selector button
11.Stitch width button
12.Handwheel
13. Bobbin winder stop
14. Bobbin winder shaft
15. Horizontal spool pin
16. Thread Tension Dial
17. Bobbin winder tension disc
18. Direct select buttons
19. Reinforcement button

- Carrying Handle
- Thread guide for upper threading
22.Power switch - Air vent
- Foot control plug
25.Plug socket
26.Power cord
27.Foot control - Lower thread guide
- Needle threader lever
- Needle threader
- Buttonhole lever
- Presser foot thumb screw
33.Needle plate
34.Bobbin cover
35.Bobbin cover release lever
36.Presser foot holder - Presser foot
- Needle thread guide
- Needle clamp screw
- Presser foot lever
- Drop feed lever

Some accessories are provided in the accessory case.
- Needle Set
2.Bobbins
3.Spool pin cap (large)
-
Spool pin cap (small)
-
Needle plate screwdriver
6.Screwdriver
-
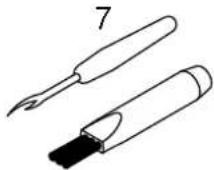
Seam ripper / buttonhole cutter / lint brush
-
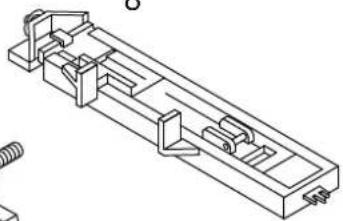
Buttonhole foot
-
Overcasting foot
10.Zipper foot
-
Blind hem foot
-
Straight stitch foot
-
All purpose foot (on machine)
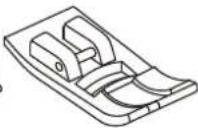
14.Open toe foot
- Darning foot
16.1/4 inch foot
- Tote bag
1

2

3

5

8

10

11

12

13
14


16
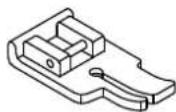

EXTENSION TABLE / ACCESSORY STORAGE
Accessories can be stored in the extension table.
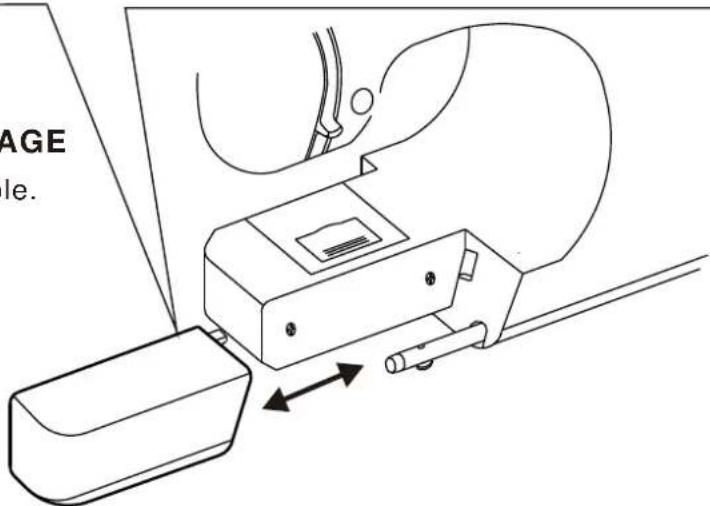
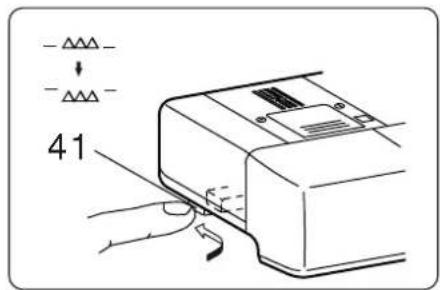
a. REMOVING THE EXTENSION TABLE
Hook your finger in the bottom of extension table and slide to the left. To attach, position and slide to the right.
b. OPENING THE ACCESSORY STORAGE
To open the accessory storage box, remove extension table from machine and open as illustrated.
TOTE BAG
Unzip the tote bag for storing or carrying the machine.


The presser foot must be changed according to the stitch you sew, or work you do.

CAUTION: To prevent accidents.
Turn OFF the power switch before you change the presser foot
- Turn the handwheel toward you until the needle is at its highest position.
- Raise the presser foot lifter.
- Remove the presser foot by pushing the presser foot release lever toward you.
- Place desired foot with its pin A directly under the slot B in presser foot holder.
- Lower the presser foot lifter and the presser foot will snap into place.
REMOVING THE PRESSER FOOT HOLDER
You may need to remove the presser foot holder to use some presser feet.
To remove, raise the presser foot lifter and loosen the presser foot thumb screw (C).
To attach, tighten the screw after raising the presser foot holder.
INSERTING THE NEEDLE

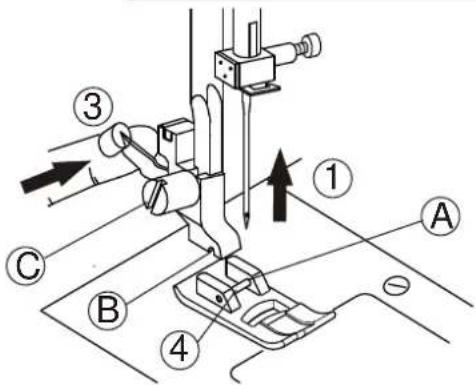
Ⓐ Presser foot pin
⑧ Presser foot holder slot
© Presser foot thumb screw
Select a needle of the right type and size for the fabric to be sewn.
(See Fabric, Thread and Needle Table on page 18.)

CAUTION: To prevent accidents.
Turn OFF the power before removing the needle.
- Turn the handwheel toward you until the needle is at its highest position.
- Loosen the needle clamp screw.
- Remove the needle.
- Insert new needle into needle clamp with the flat side to the back and push it up as far as it will go.
- Tighten the needle clamp screw.
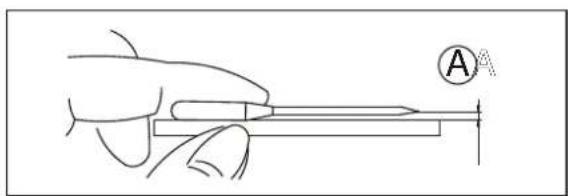
A. Place needle on a flat surface and check to see if bent.
Do Not use any bent or dull needles.

Place the machine on a stable table.
-
Connect the power cord to the machine by inserting the 2-hole plug into the plug socket.
-
Connect the power cord plug to the electric outlet.
-
Turn "ON" the power switch.
-
A lamp will light up when switch is turned on.
-
To disconnect, turn the power switch to the "0FF" position, then remove plug from outlet.
POLARIZED PLUG INFORMATION
This appliance has a polarized plug (one blade wider than the other). To reduce the risk of electric shock, this plug is intended to fit in a polarized outlet only one way. If the plug does not fit fully in the outlet, reverse the plug. If it still does not fit, contact a qualified electrician to install the proper outlet. Do not modify the plug in any way.


DANGER:
-To reduce the risk of electric shock.
Never leave the machine unattended when plugged in. Always unplug this machine from the electric outlet immediately after using and before maintenance.

WARNING:
-To reduce the risk of burns, fire, electric shock, or injury to persons.
Do not unplug by pulling on the cord. To unplug, grasp the plug, not the cord.
A. START / STOP BUTTON
The machine will start running when the START / STOP button is pressed and will stop when pressed the second time. The machine will sew slowly the first 3 stitches sewn.
B.SLIDE SPEED CONTROL LEVER
When using the START / STOP button, the machine will sew faster when the slide speed control lever is moved to the right, and sew slower when the lever is moved to the left.
C.LOW SPEED BUTTON
The machine will sew in low speed while holding the low speed button. Press the START / STOP button or foot control to return to regular speed.
D.REVERSE STITCH BUTTON
Stitches 1, 2 and 6: The REVERSE STITCH button will sew in reverse while the button is pressed and return to forward stitching when the button is released.
Other stitches: The REVERSE STITCH button will sew 3-4 stitches to tie-off the stitching and then stop sewing. Continue sewing by pressing the START / STOP button or foot control.
When the presser foot is down, the needle can be raised or lowered by pressing this button. When the presser foot is up, press this button for one complete stitch.
F.DROP FEED LEVER
The feed dogs project up through the needle plate, directly below the presser foot move the fabric being sewn. Located under the left end of the free arm, the drop feed lever moves the feed dogs into the up or down position.
For darning or free motion embroidery or whenever fabric is to be fed by hand, push the lever in and to the back of machine to lower the feed dogs into the DOWN position.
For return to ordinary sewing, move the lever in and forward to release the lever to move out. This will position the feed dogs in the UP position for machine feeding.
G. READY INDICATOR
Green light indicates that the machine is ready to sew.
Red light means an additional step is needed before beginning to sew.
See instructions for the specific stitch selected.
H.DIRECT SELECT BUTTONS
Press one of the seven lighted buttons to quickly select one of the most often used stitches (For other stitches, refer to page 10).
I.REINFORCEMENT BUTTON
Stop the machine and press this button to sew 4 stitches and tie-off your stitching.

Use of foot control will permit control of start, stop and speed with your foot.

CAUTION: To prevent accidents.
- Turn "OFF" the power switch.
- Push foot control plug into receptacle on machine.
- Place foot control at your feet and turn"ON" power switch.
Sew faster by increasing the pressure on the foot control. To stop, remove your foot from the foot control.


CONTROL BUTTON FUNCTIONS
Some control button functions described in previous page will change when the foot control is connected.
A. START/STOP BUTTON
This button will be deactivated.
B.SLIDE SPEED CONTROL LEVER
This button is not operable when foot control is used.
C.REVERSE STITCH BUTTON
When using stitches 1,2, and 6, the machine will continue to sew reverse at slow speed while this button is pressed. When released, the machine will sew forward.
When sewing other stitches, the reverse stitch button is used as tie-off.
SAFETY FEATURE OF ELECTRONIC MODEL
If the machine is jammed, it will stop with three beep sounds. After the cause of jamming is removed, step on the foot control and it will run in normal condition.

WARNING:
-To reduce the risk of burns, fire, electric shock, or injury to persons.
-
Handle the foot control with care and avoid dropping it on the floor. Be sure not to place anything on top of it.
-
Use only foot control provided with this machine.
STITCH SELECTION
- STRAIGHT STITCH
- LEFT POSITION, STRAIGHT STITCH
- QUILT STITCH, LIKE HAND SEWN
- TRIPLE STRAIGHT STITCH
- STEM STITCH FOR STRETCH FABRICS
- ZIGZAG STITCHING
07\~14. BUTTONHOLES - 3-STEP ZIGZAG
- SATIN STITCH
- RICK-RACK
- OVERLOCK
- DOUBLE OVERLOCK
- SHELL
- BLIND HEM
- STRETCH BLIND HEM
- DOUBLE ACTION
- BRIDGING
- FEATHER
- FEATHER
27\~66. DECORATIVE AND FUNCTIONAL STITCHES

SETTING THE STITCH WIDTH AND STITCH LENGTH
Preset stitch length and stitch width are indicated by the number of LED lights.
The longer or wider the stitch length/stitch width is, more of the LED lights are on.
Some stitches have a blinking light which indicates the setting between two LED lights.

VARIOUS NEEDLE POSITIONS
When straight stitch pattern 01 has been selected, stitch width button B may be used to adjust the needle position.
For stitch length and stitch width of each pattern, refer to table on page 32 through 35.
REMOVING THE BOBBIN
-
Remove the bobbin cover by sliding the release lever to right and push down the left corner of bobbin cover at the same time.
-
Remove the bobbin from the machine.
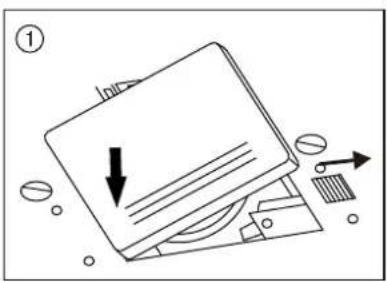

WINDING THE BOBBIN

- Raise presser foot lever.
Pivot spool pin into highest position.
Place a spool of thread on the spool pin.
Secure it with the spool cap to ensure smooth flow of thread.
Use a spool cap closest in size to the spool of thread being used.
2.Pass thread from spool through thread guides as shown.
-
Pull end of thread through hole in bobbin as shown.
-
Move bobbin winder shaft to the left. Place bobbin onto shaft and rotate till it snaps into position with the end of thread coming from top of bobbin. Push bobbin winder shaft to right until it clicks. Hold onto end of thread.
-
Start machine to wind the bobbin. Stop machine after a few turns to trim the thread tail with scissors. Bobbin will stop turning when completely filled.
Cut the thread and push shaft to the left to remove bobbin.
INSERTING THE BOBBIN
-
Place bobbin into bobbin holder with the thread unwinding counter clockwise.
-
Draw thread into notch (A).
-
Pull thread toward the left and along the inside of spring (B) until it slips into notch (C) being sure that thread does not slip out of notch (A).
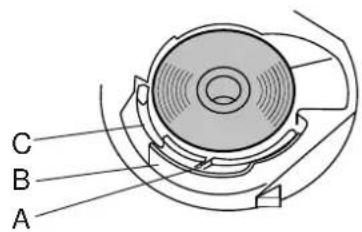
- Pull thread out about 10 inches and replace the bobbin cover by inserting the left side and lowering the right side till snaps into position.


THREADING THE UPPER THREAD

-
Raise presser foot lever.up position.
-
Press the needle up / down button or rotate the handwheel toward you to raise the needle into the up position.
-
Place a spool of thread onto the spool pin and secure with the proper size spool cap (see page 11).
-
Pass the thread into the thread guide for upper threading and snap forward between the thread guide and guide plate.
-
Bring thread forward down the right channel, then to the left and up the left channel.
-
Pull the thread into the take-up lever from right to left and pull thread forward.
-
Pass the thread down the left channel and into the thread guide at the base of the face cover from right to left.
-
Pass the thread from right to left into the thread guide on the needle clamp.
-
Thread the needle from front to back or follow directions for needle threader on next page.


NEEDLE THREADER
- Lower the presser foot.
- Set needle in up position.
-
Lower the threader slowly and draw thread through thread guide (A) and pull toward the right.
-
Lower the lever as far as it will go The threader will turn and the hook pin will go through the needle eye.
-
Position thread below the needle eye and under the hook pin.
-
Hold thread loosely and slowly return lever to original position. Hook will turn and passthread through needle eye while making a loop of thread.
-
Raise presser foot and pull thread out about 10 inches from needle eye.


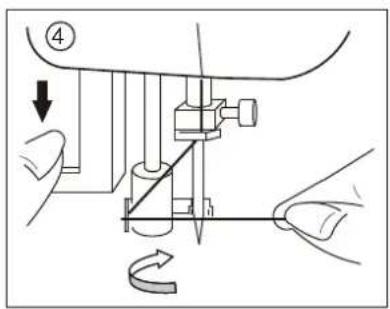

Note: The needle threader can only be used for needle sizes 11, 14, and 16.
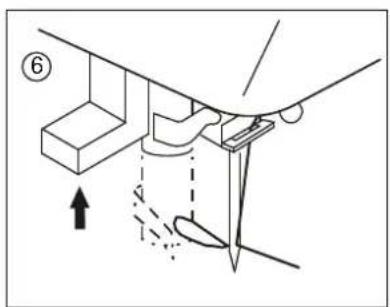


CAUTION: To prevent accidents.
Do not lower the threader lever while machine is operating
DRAWING UP THE BOBBIN THREAD
- Raise the presser foot.
- Hold the upper thread loosely and press needle up/down button. The handwheel will turn one complete turn.
-
Pull upper thread lightly. Bobbin thread will come up in a loop.
-
Pull both upper and bobbin threads about 10 inches toward the back and under the presser foot.


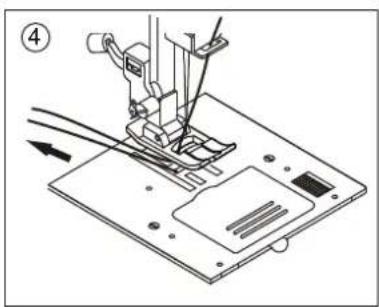
The machine will be set at 01 automatically to sew straight stitches when power switch is turned on.

CAUTION: To prevent accidents.
While sewing, special care is required around the needle.
The machine will automatically feed the fabric, do not pull or push fabric.
Simply guide the fabric to sew straight.
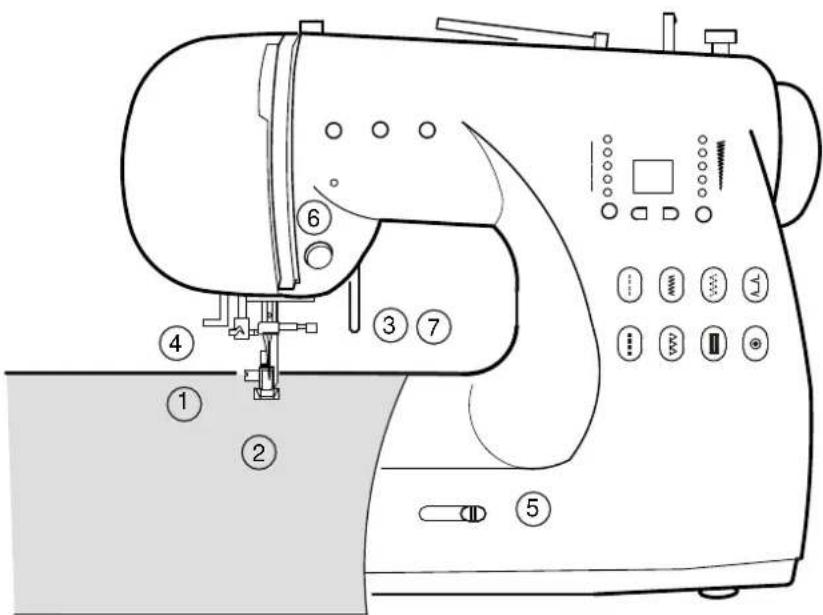
-
Check the presser foot (All Purpose Presser Foot is on new machine.) Refer to page 6 for changing the presserfoot.
-
Place the fabric under the presser foot.
-
Lower the presser foot.
-
Hold both threads to the back when starting to sew. Let threads go after sewing a few stitches.
-
While sewing regulate the speed with slide speed control lever or foot control.
-
Stop machine when you reach end of seam.
-
Raise the presser foot lever.
-
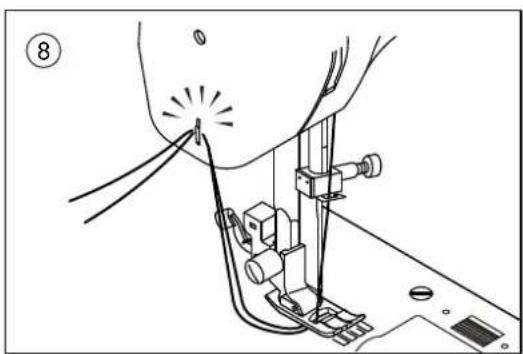
When you have reached the end of a seam, stop sewing and turn the handwheel toward you to bring the needle to highest position. Raise the presser foot and pull the fabric out from under the foot to the back of the machine.
Cut the threads in the thread cutter on the left side of the machine.
REVERSE STITCHING
Reverse stitching is used for reinforcing the ends of the seams.
- Place the fabric in position where back stitching is to be made and lower the presser foot.
- Press reverse stitch button and sew 4-5 stitches. (If using the foot control, press pedal while pressing reverse stitch button.)
- Press start button and resume sewing. (If using the foot control, release reverse stitch button and press foot control to sew forward.)
- When you reach the end of seam, press reverse stitch button and sew 4-5 reverse stitches.
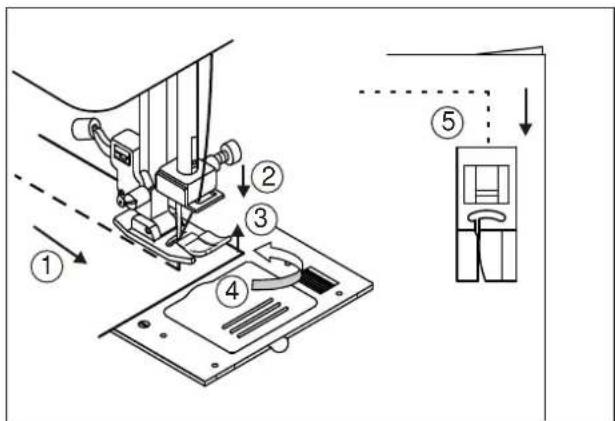
TURNING CORNERS
- Stop the machine when you reach a corner.
- Lower needle into the fabric.
To lower the needle, you can either use the needle up/down button or turn the handwheel toward you. - Raise the presser foot.
- Use the needle as a pivot and turn fabric.
- Lower the presser foot and resume sewing.
SEWING HEAVY FABRIC
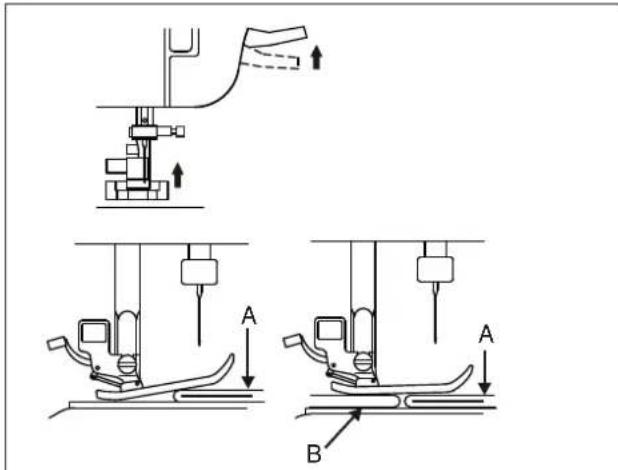
When sewing heavy fabrics, the toe end of presser foot tends to lift up and sewing will hesitate at the point that the fabric is thicker. In this case, place a piece of cardboard or fabric of same thickness under the heel end of the presser foot.
- The presser foot lever can be raised 1 step higher for placing heavy materials under the presser foot easily.
Carefully guide the fabric with your hand when sewing over thick fabric areas.
A: Fabric B: Thick paper or fabric
SEAMING GUIDE ON THE STITCH PLATE
The figure on each guide line on the stitch plate indicates the distance between this guide line and the center needle position. Guide the fabric along the specific guide line in order to get the desired seam allowance between the stitching and the edge of the fabric.


The thread tension must be properly balanced. If adjustment is required, it can be made by changing the upper thread tension.
A. Correct Thread Tension
Upper and bobbin threads should interlock in the middle of fabric.
B. When bobbin thread appears on top side of fabric.
Turn the tension dial to a lower number to loosen the upper thread tension.
C. When upper thread appears on the bottom side of fabric.
Turn the tension dial to a higher number to tighten the upper thread tension.
D.Thread Tension for Zigzag Stitches
To sew zigzag stitches, the thread tension should be set to a slightly weaker tension than when sewing straight stitches.
You will obtain a nicer stitch when upper thread appears slightly on bottom side of fabric.



- Helpful Hint
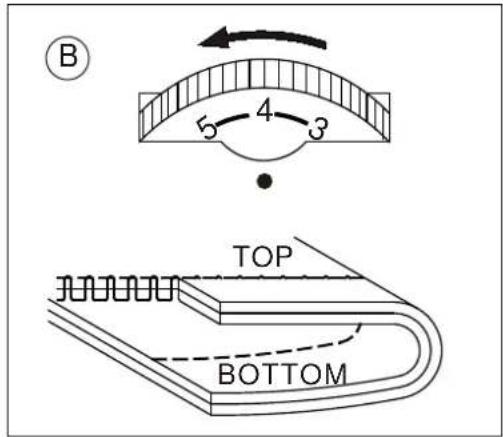
When stitches on top side of fabric are good but bottom side tends to have a bunch of thread (as illustrated), the upper thread is not threaded correctly, especially in the upper thread tension area. Refer to page 13 and rethread machine correctly.

CAUTION: To prevent accidents.
The feed dog will feed the fabric automatically. Do not pull or push fabric with hands. This could cause needle breakage or poor quality stitches.
FABRIC, THREAD AND NEEDLE TABLE
Select size of thread and needle according to the fabric to be sewn.
| Type of Fabric Thread Size | Needle Size | |
| ● Light Weight-thin georgette, organdy, viole, taffeta, silk, etc. | Ctn.# 80 - 100Silk 60 - 80Syn. 80 - 100 | 9/70-11/7510/70-12/80 |
| ● Medium Weight-gingham, pique, linen, cotton, satin, thin corduroy, velvet | Ctn.# 50- 80Silk 50Syn. 50 - 80 | 12/80-14/90 |
| ● Heavy Weight-gabardine, tweed, denim, corduroy | Ctn.# 40 -50Silk 50Syn. 50 - 60 | 14/90-16/100 |
| ● Stretch-double knit, tricot, spandex, jersey | Ctn.# 50 - 80Silk 50Thread for knit | 12/80-14/90Needle for knit and synthetic fabric |
To change needle, see page 6.
Straight stitch patterns should be selected according to the type of fabric being sewn.
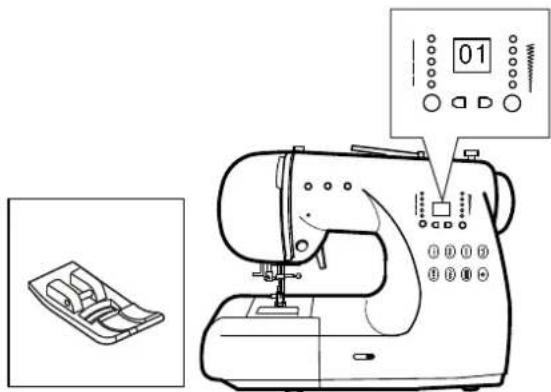
- Select the straight stitch pattern 01 or 02
- Attach all purpose foot.
-
Adjust the stitch length and stitch width (see page 10) according to the type of fabric being sewn.
-
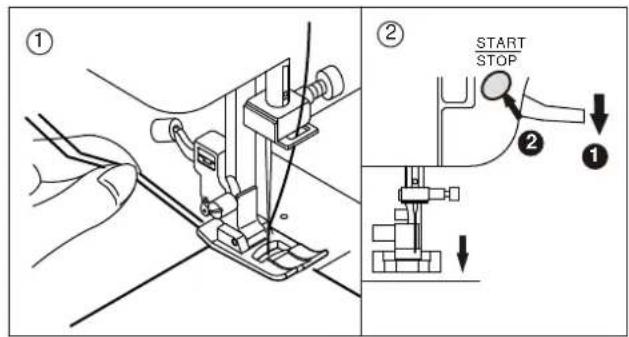
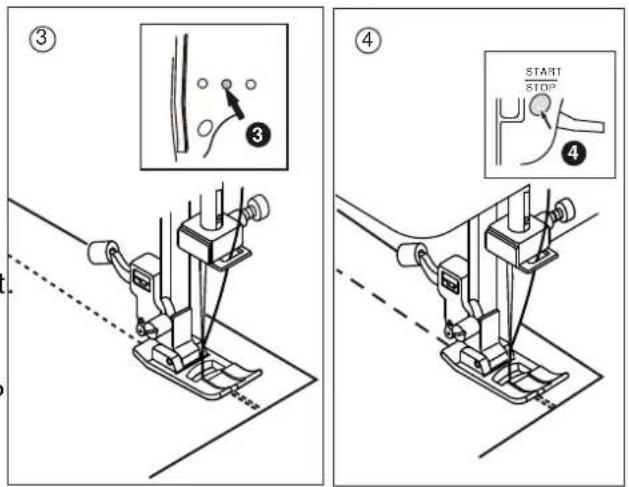
Position the fabric under the presser foot and lower it. Hold the upper thread and bobbin thread loosely behind the presser foot.
- Lower the presser foot lever and press START/STOP button to start sewing.
(When foot control is used, press the pedal.)
Place hand lightly on the fabric while sewing to guide the fabric.
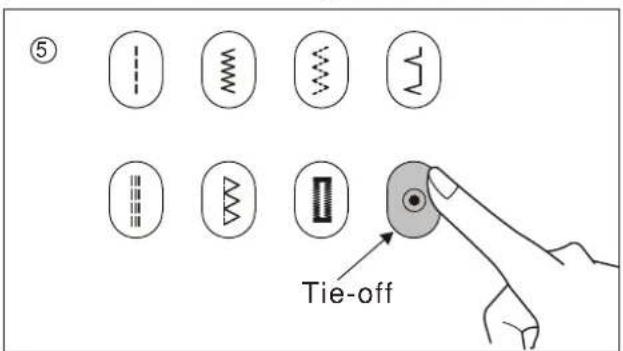
- When you reach the end of seam, press the reverse button to sew 3-4 stitches.
- Release the reverse button and stop sewing by pressing the START/STOP button (or releasing the pressure on foot control.)
- Touch the REINFORCEMENT button to sew 4 tie-off stitches.
- Raise the presser foot and cut thread.

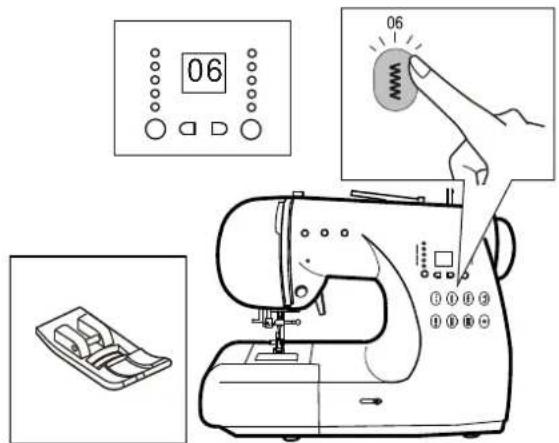
Your machine can sew zigzag stitches of various widths and lengths by changing the settings of the stitch width and stitch length. See page 10 for changing width and length instructions.
- Attach all purpose presser foot.
- Select stitch 06 by touching direct select button.
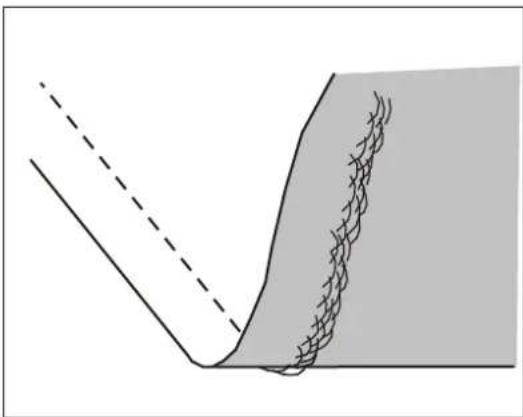
zag stitches are very good for joining two pieces of
rics or overlocking.
For joining knit or stretch fabrics, sew with the left side of the zigzag stitching along the seam line.
For overlocking, sew with the right side of the zigzag at the edge of the fabric.
SATIN STITCHING or APPLIQUE
You can sew a satin stitch with the zigzag stitch by shortening the stitch length.

FREE ARM SEWING
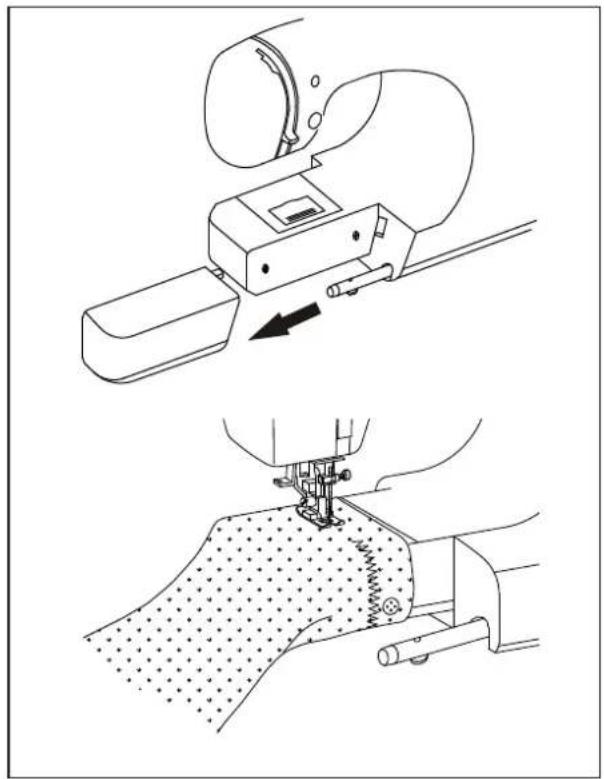
By simply removing the extension table, machine becomes a free arm machine making hard to reach areas readily accessible.
- Refer to page 5 for Removing The Extension Table.
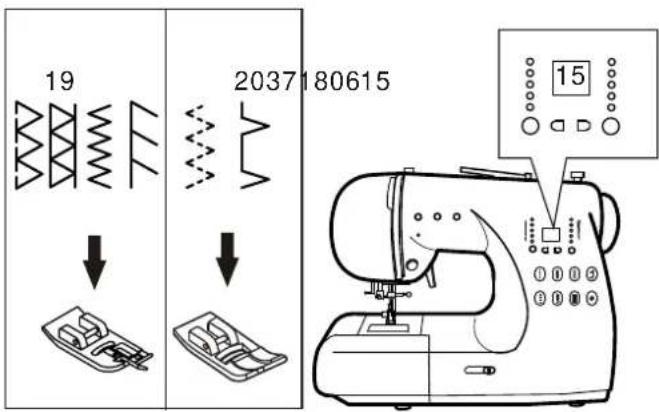
USING THE OVERCASTING FOOT
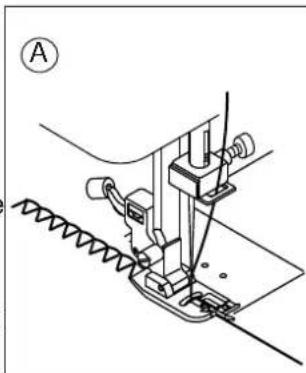
Position the fabric against the guide plate of the overcasting foot so that the needle falls near the edge of the fabric.
A. Overcasting stitches (width 6.5-5.0) are used for preventing raveling of fabrics.
B. Some stitches can sew the seam and overcasting at the same time.
Therefore, it is convenient for sewing easy to ravel and stretch fabrics.

CAUTION: To prevent accidents.
Overcasting foot should be used for sewing patterns 06,18,19,and 37 only and do not change the stitch width narrower than 5.0 It is possible that needle could hit the presser foot and break when sewing other patterns and width.
USING THE GENERAL PURPOSE FOOT
When using the all-purpose foot, place the fabric so that the needle will fall near the edge of fabric.
C. For thin or fine fabrics, use a narrower zigzag width or 3 step zigzag stitch.
D. Adjust the width and length for various weights of knit and stretch fabrics.(When using overcasting foot, do not change the width narrower than 5.0mm.)
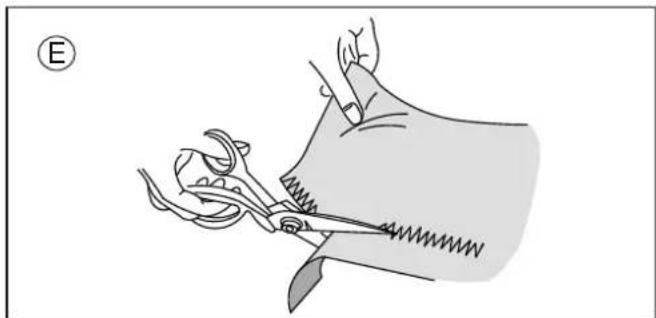
E. For1/2 inch seam allowances, sew then trim the excess fabric close to the stitching Be careful not to cut thread when cutting the fabric edge.

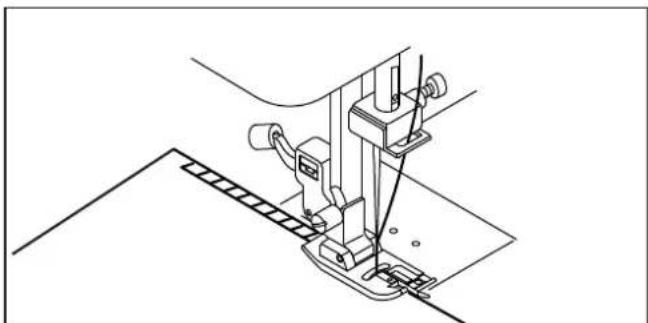




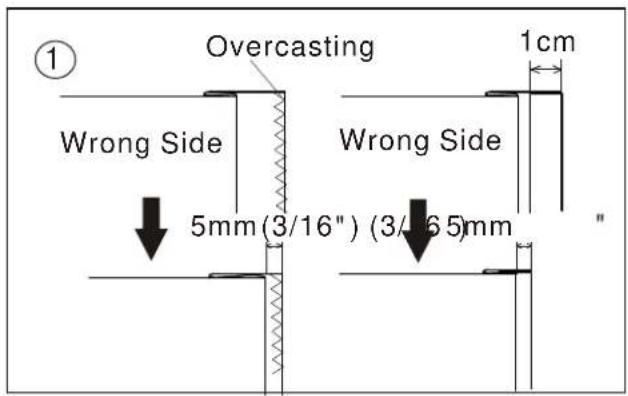
This stitch will sew without stitches showing on right side of fabric.
- Fold the fabric as shown on drawing. Leave 5mm (approximately 3/16 inch) extended past the folded edge.
- The guide (A) on the blind hem foot ensures even feeding of the fabric when blind hem stitching. The guide (A) is adjusted by turning the adjusting screw (B).
- Place fabric so that the straight stitches are on the extended hem edge and the zigzag stitches just catch one thread of the folded edge. Turn the screw so that the guide barely touches the folded edge of fabric.
- Lower the presser foot and sew hem, guiding fabric evenly along the guide.
- Turn the fabric over when you have completed sewing.


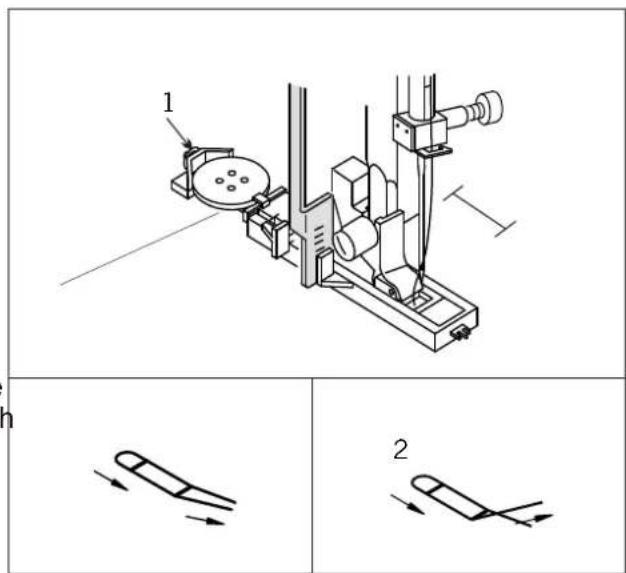
- Mark position and length of buttonhole on fabric.
- Set button on the base and slide base forward to secure button.
* If button does not fit on the base, adjust slide on base to diameter of button plus thickness of button.
a= Length of button + thickness
3.Pass upper thread through the hole of buttonhole foot and attach buttonhole foot to machine.
Bring upper and bobbin threads to the left under foot.
4. Position fabric under presser foot so that the center line mark is in the center of the needle opening in the buttonhole foot. With the main part of the foot pushed to the back, lower the presser foot lever.
- Lower the buttonhole foot lever so it is positioned behind the raised finger on the foot (see step 5 illustration).
Note: Machine will not start to sew if buttonhole lever is not lowered properly or buttonhole foot is not positioned correctly.
Note: If machine does not reset for second buttonhole, be sure the presser foot raised finger is pressed against the lever.
- Hold upper thread lightly and start the machine.


![graph TD A["07"] --> B["1"] B --> C["2"] C --> D["3"] D --> E["4"] E --> F["5"] F --> G["6"] H["09"] --> I["1"] I --> J["2"] J --> K["34"] K --> L["11"] L --> M["131"] M --> N["214"] N --> O["3"] style A fill:#f9f,stroke:#333 style H fill:#f9f,stroke:#333 style I fill:#f9f,stroke:#333 style J fill:#…](/content/2026/05/923419/images/b14dc29ee0a598c920415e338192ba01f40d30d7b70e5324c73dff3a8af95820.jpg)
- Machine will sew the buttonhole in the order as shown and stop automatically when buttonhole is complete.
- Cut threads. Raise presser foot lever to highest position to restart same Buttonhole in another place on fabric.
NOTE: To sew over buttonhole 08 a second time, raise presser foot to return fabric to starting position.
- With buttonhole cutter, cut center of buttonhole open. Be careful not to cut stitches on either side. Use a pin as a stopper.

CAUTION: To prevent accidents.
When using buttonhole cutter, do not put your finger in the path of the cutter.
NOTE: When sewing stretch fabric
It is suggested that you use interfacing on the backside of the fabric.
Note: Density of buttonhole legs may be adjusted with stitch length control.
CORDED BUTTONHOLES
Hook the filler cord(crochet thread or buttonhole twist) to the spur in the back of the foot. Pull both ends of the cord forward and parallel under the guide.
Sew buttonhole in the way that zigzag stitches cover the cord. When completed, release the cord from foot.
Pull ends of the cord forward and snip off extra length.


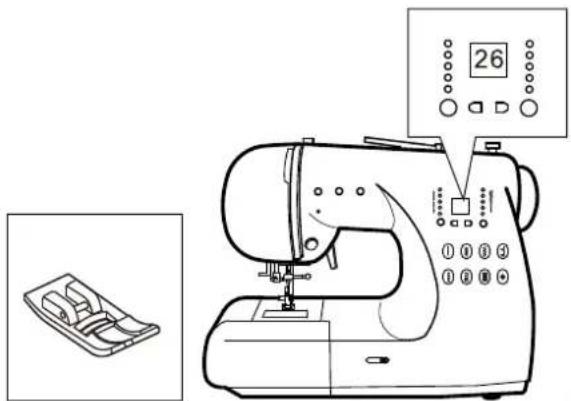
Used for sewing on elastic band and overcast stitching on knit fabrics.
A. Elastic Sewing
Stretch elastic in front and back of needle while sewing. Be careful not to bend needle while stitching.
B. Overcast stitching
Used for easy to ravel and knit fabrics. Guide fabric so stitch on right side is at the edge on the fabric.


ELASTIC STITCH SEWING

Elastic stitch sewing assures you of a stitch that is strong and flexible and will give with the fabric without breaking.
Good for stretch or knit fabrics and seams that require flexibility.
It is good for joining durable fabricssuch as denims.
We recommend that you use a needle forknit and synthetic fabrics to prevent skipped stitches and thread breakages.

STRAIGHT STITCH SEAMING AND QUILTING
Select stitch #1 in the center needle position.
Because of the small opening, the straight stitch is the ONLY stitch to be used when sewing with the straight stitch, quilting or 1/4 foot. Turn the handwheel and watch that the needle will go into the needle hole of the foot.
STRAIGHT STITCH SEAMING
The straight stitch foot is designed with a small opening in the foot to provide additional support against the feed dog teeth when sewing lightweight fabrics.
QUILTING 0103
The markings on the 1/4" foot are to aid in guiding fabric edges for perfect 1/16",1/8", or 1/4" seams. Align the fabric edge with the marking of the foot for the appropriate seam width. Sew, guiding the fabric edge along the marking.

NOTE: When using stitch 03 thread monofilament in the upper thread and tighten the upper tension to 7. Sew at slow speed and the bobbin thread will appear on the surface of the fabric to resemble hand stitch quilting.
FEED DOG CONTROL
The feed dogs control the movement of the fabric that is being sewn.
They should be raised for all general sewing purposes and lowered for darning, freehand embroidery and monogramming so that you, not the feed dogs, are moving the fabric.
The feed dog lever is located under the left end of the free arm.
① Push the lever in and to the back of machine to lower the feed dogs.
② Move the lever forward and to the left to raise the feed dogs. Turn the handwheel forward one complete turn for the feed dogs to return to sewing position.
DARNING
Select straight sewing stitch number 1. Width setting should be on 3. Lower the feed dogs.
The length dial setting does not apply when the feed dogs are lowered.
Remove presser foot and presser foot holder.
Screw the darning foot onto the presser bar with the extended arm of the foot resting above the needle clamp screw.
Stretch fabric using embroidery hoops placing the hole to be darned in the center.
Holding the needle thread, take one stitch and pick up bobbin thread through the fabric.
Lower presser foot lever and start sewing at a slow to medium speed, moving the fabric back and forth with a steady rhythm. Turn fabric and sew another layer of stitching across over the first layer of stitching.


For additional decorative purposes, use different kind of materials.
- Place two pieces of fabric right sides together and sew a basting stitch.
- Press the seam open.
- Place fabric right side up and stitch with the seam line in the center of the foot Stitches should fall on both sides of the seam line.
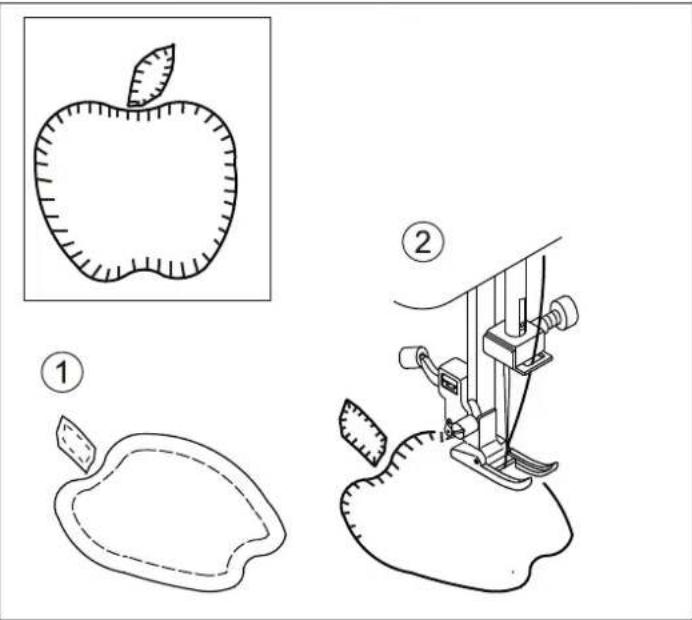
APPLIQUE 34 \~ 38
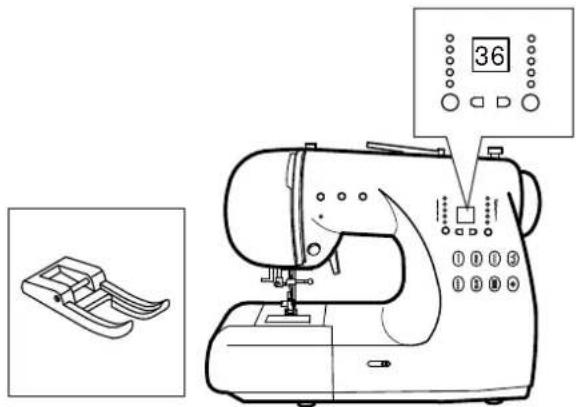
- Position the applique on fabric with fabric glue, fusible iron on stabilizer or basting stitches. (When using fabric with frayed edges for the applique, press under 1/4 inch on all the edges.)
- Sew along the edge of the applique. Align the straight part of the stitch with the edge of the applique to give this project a hand-made appearance.
- When pivoting corners, lower the needle in the right side of the stitch. Raise the presser foot and use the needle to pivot and turn the fabric.




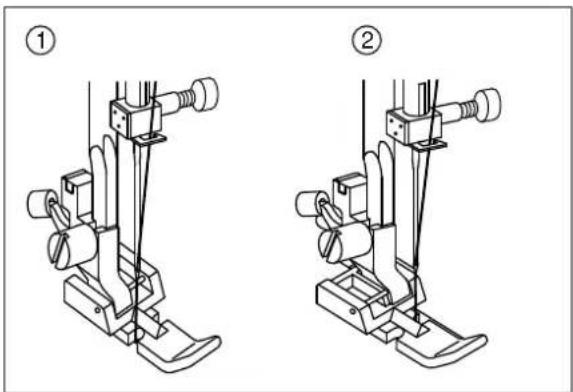
Align the right side or the left side of the zipper foot pin with the presser foot holder, lower the presser foot lever to attach the foot.
- Needle stitches to the left of foot.
- Needle stitches to the right of foot.
- To insert zippers, consult the zipper package for instructions on how to prepare zipper placket and place zipper. To sew close to the zipper on the right side, snap the zipper foot onto the presser foot holder on the left side so the needle passes through the opening on the left side of the foot. Snap the foot onto the presser foot holder of other side of the loose to the left side of the zipper.
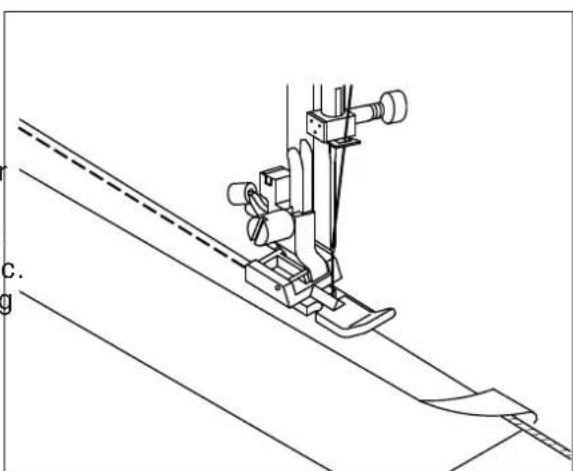
PIPING
To insert piping, purchase pre-made piping or cover cording with a bias strip of fabric using the zipper foot snapped on to the right side of the presser foot holder. Place the piping between two layers of fabric Stitch with the piping next to the foot so the stitching is tight against the cord.


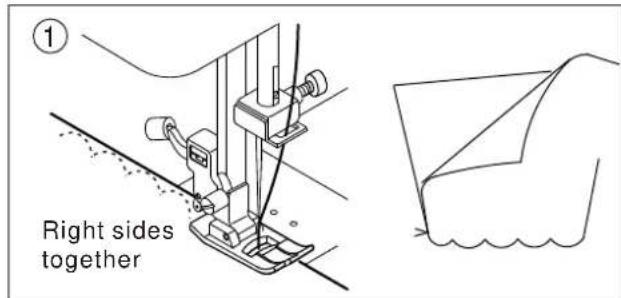
These stitches are used to sew a decorative edge on garments and table cloths.
① SCALLOP HEM 28
- Fold the fabric with right sides together and sew near the edge.
- Cut the fabric along the seam leaving an allowance of 3 mm(1/8") for seaming. Notch the allowance.
- Turn fabric with right sides out and gently push out the curved seam press.
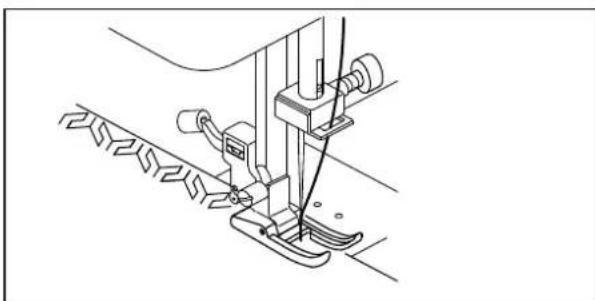
② DECORATIVE SCALLOPEDGE 29 66
- Place the fabric with wrong sides together and stitch near the edge.
- Trim along the outside edge of the stitching (being careful not to cut the stitching).
- Use seam sealant or fabric glue to secure edges of the scallop stitching.

ADJUSTING DECORATIVE PATTERNS
303233 40~66

Use the open toe foot for continuous decorative stitch patterns. An indentation on the underside permits the flow of satin stitching and the open front allows clear visibility.
To tailor decorative stitch patterns, adjust the length and width of the pattern. More LED lights results in a longer or wider stitch pattern. Fewer LED lights gives you a shorter or narrower stitch pattern. Experiment with sample fabric until you get the desired length and width.
Note: Some stitch patterns do not have both length and width adjustment.
SEWING LIGHTWEIGHT FABRICS
When sewing lightweight fabrics, it is suggested that you use interfacing on the backside of the fabric.


To ensure the best possible operation of your machine, it is necessary to keep the essential parts clean at all times. Always disconnect the machine from power supply by removing the plug from the electric outlet.
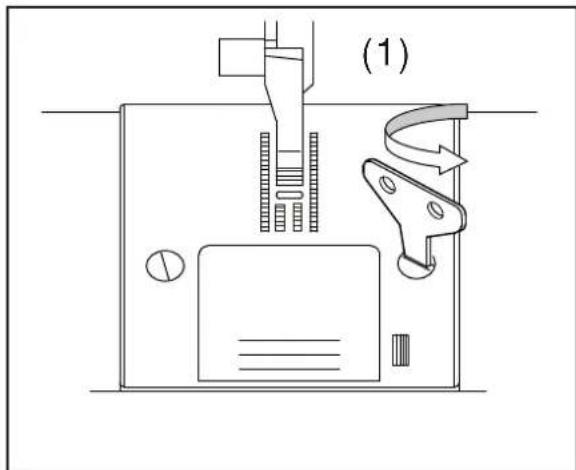
CLEANING THE FEED DOGS AND HOOK AREA
- Raise the needle to its highest position.
- Remove the needle plate (1)
- Remove the bobbin and bobbin case (2)
- Clean the feed dogs and hook area with the lint brush
NOTE: Put drop of sewing machine oil on the hook race as indicated by the arrow A.
- Replace the bobbin case with the projection (3) positioned against the spring (4). Replace the needle plate.

| PROBLEM | CAUSE | CORRECTION | PAGE |
| Upper thread breaks | Machine not properly threaded.Thread entwined around bobbin.Needle inserted incorrectly.Thread tension too tight.Thread of incorrect size or poor quality. | Rethread machine.Clean bobbin area and rethread bobbin case.Reinsert needle.Readjust thread tension.Choose correct thread. | 131261718 |
| Lower thread breaks | Bobbin threaded incorrectly.Bobbin wound unevenly or too full.Dirt in the bobbin and hook area. | Rethread the bobbin.Rewind the bobbin.Clean the bobbin and hook area. | 121130 |
| Machine skips stitches | Needle inserted incorrectly.Bent or blunt needle.Incorrect size of needle.Incorrect size needle on stretch fabric. | Reinsert needle.Insert new needle.Choose correct size needle for fabric.Use stretch needle. | 661818 |
| Fabric puckers | Machine not properly threaded.Bobbin threaded incorrectly.Blunt needle.Thread tension too tight. | Rethread machine.Rethread the bobbin.Insert new needle.Readjust thread tension. | 1312617 |
| Machine makes loose stitches or loops | Bobbin threaded incorrectly.Machine not properly threaded.Tension not adjusted properly. | Rethread the bobbin.Rethread machine.Readjust thread tension. | 121317 |
| Threader does not thread needle eye | Needle is not raised.Needle inserted incorrectly.Bent needle. | Raise the needle.Reinsert needle.Insert new needle. | 866 |
| Machine does not feed properly | Feed dogs are lowered.Lint and dust accumulated around feed dogs. | Raise the feed dogs.Clean the feed dogs area. | 830 |
| Needle breaks | Fabric pulled while sewing.Needle is hitting the presser foot.Needle inserted incorrectly.Incorrect size needle or thread for fabric being sewn. | Do not pull fabric.Select correct foot and pattern.Reinsert needle.Choose correct size needle and thread. | 1519618 |
| Machine runs with difficulty | Dirt or lint accumulated in the hook race and feed dog. | Remove the needle plate and bobbin case and clean the hook race and feed dog. | 30 |
| Machine will not run | Cord not plugged into electrical outlet.Power switch is not turned on.Bobbin winder spindle is pushed to the right.Presser foot is not lowered.Buttonhole Sewing Mode;Buttonhole lever is not lowered completely.Buttonhole foot is not attached. | Insert plug fully into outlet.Turn on the switch.Push spindle to the left.Lower the foot.Lower the buttonhole lever.Attach the buttonhole foot. | 7711152323 |
BL67 -STITCH CHART CONVERSION
* = LED light blinking
2 = 2 LED lights
3 = 3 LED lights
4 = 4 LED lights
1 = one LED light
2 * = 2 LED plus one blinking
3* = 3 LED plus one blinking
4 * = 4 LED plus one blinking
1* = one LED plus one blinking
5 = 5 LED lights
- The default stitch length and width settings have been underlined on the chart for your reference.
- All measurements are listed in millimeters.
- For easy use and understanding of the stitch length and stitch width settings, the numbers have been rounded to the closest single digit or decimal.
| No. | Stitch | Stitch name | Stitch Length (L) - Stitch Width (W) - LED light conversion chart in millimeters (mm) | |||||||||||||||||||
| * | 1 | 1* | 2 | 2* | 3 | 3* | 4 | 4* | 5 | |||||||||||||
| L(mm) | W(mm) | L(mm) | W(mm) | L(mm) | W(mm) | L(mm) | W(mm) | L(mm) | W(mm) | L(mm) | W(mm) | L(mm) | W(mm) | L(mm) | W(mm) | L(mm) | W(mm) | L(mm) | W(mm) | |||
| 01 | ---# | Straight center | 0 | - | 0.4 | - | 0.7 | - | 1.0 | - | 1.5 | - | 2.0 | 2.5 | - | 3.0 | 4.0 | - | 4.5 | |||
| Needle position | - | 0.0Left | 1.5 | - | 2.0 | - | 3.8 | - | Center | - | 4.0 | - | 5.0 | - | 5.5 | 6.0 | - | 7.0Right | ||||
| 02 | ---# | Straight Left | 0 | - | 0.4 | - | 0.7 | 1.0 | - | 1.5 | - | 2.0 | 2.5 | - | 3.0 | 4.0 | - | 4.5 | - | |||
| 03 | --= | Quilt stitch | 0.4 | - | 0.6 | - | - | 1.0 | - | - | 2.0 | - | - | - | 3.0 | - | - | 4.5 | ||||
| Needle position | - | 0.0Left | - | - | - | - | - | - | 3.5Center | - | - | - | - | - | - | - | - | - | 7.0Right | |||
| 04 | ≡≡≡ | Triple stitch | 0.4 | - | 0.6 | - | - | 1.0 | - | - | 2.0 | - | - | - | 3.0 | - | - | - | 4.5 | - | ||
| Needle position | - | 0.0Left | - | - | - | - | - | - | 3.5Center | - | - | - | - | - | - | - | - | - | 7.0Right | |||
| 05 | ### | Stem stitch | - | - | 0.6 | 1.5 | - | - | 1.0 | 3.0 | - | - | 2.0 | 4.0 | - | - | 3.0 | 6.0 | - | - | 4.5 | 7.0 |
| 06 | WWW | Zigzag | 0 | 0.0 | 0.4 | 0.5 | 0.6 | 1.0 | 0.8 | 1.5 | 1.3 | 2.5 | 1.8 | 3.5 | 2.5 | 4.0 | 3.0 | 5.0 | 3.5 | 6.0 | 4.5 | 7.0 |
| 07 | ### | Bartack buttonhole | - | - | 0.3 | - | - | - | 0.4 | - | - | - | 0.6 | - | - | - | 0.7 | - | - | - | 1.0 | 5.0 |
| 08 | ### | Buttonhole | - | - | 0.3 | - | - | - | 0.4 | - | - | - | 0.6 | - | - | - | 0.8 | - | - | - | 1.0 | 5.0 |
| 09 | ### | Keyhole buttonhole | - | - | - | - | - | - | 0.4 | - | - | - | 0.6 | - | - | - | 0.7 | - | - | - | 1.0 | 5.0 |
| 10 | ### | Keyhole buttonhole | - | - | - | - | - | - | 0.4 | - | - | - | 0.6 | - | - | - | 0.8 | - | - | - | 1.0 | 5.0 |
| 11 | Buttonhole | - | - | - | - | 0.4 | - | - | - | 0.6 | - | - | - | 0.8 | - | - | - | 5.0 | ||||
| 12 | Buttonhole | - | - | - | - | 0.8 | - | - | - | - | - | - | - | - | - | - | 5.0 | |||||
| 13 | Buttonhole | - | - | - | - | 0.8 | - | - | - | - | - | - | - | - | - | - | 5.0 | |||||
| 14 | Buttonhole | - | - | - | - | 0.8 | - | - | - | - | - | - | - | - | - | - | 5.0 | |||||
| 15 | 3-step zigzag | - | 0.6 | - | 1.0 | 3.5 | - | 2.0 | 5.0 | - | 3.0 | 6.0 | - | 4.5 | 7.0 | |||||||
| 16 | Satin stitch | - | 0.9 | - | 0.4 | 3.5 | - | 0.6 | 5.0 | - | - | 0.7 | 6.0 | - | 1.0 | 7.0 | ||||||
| 17 | Rick-rack | - | 0.6 | - | 3.8 | - | 2.0 | 5.0 | - | 3.0 | 6.0 | - | 4.5 | 7.0 | ||||||||
| 18 | Overlock | - | 0.6 | - | 3.8 | - | 2.0 | 5.0 | - | 3.0 | 6.0 | - | 4.5 | 7.0 | ||||||||
| 19 | Double overlock | - | 0.6 | - | 3.8 | - | 2.0 | 5.0 | - | 3.0 | 6.0 | - | 4.5 | 7.0 | ||||||||
| 20 | Shell | - | 0.6 | - | 3.8 | - | 2.0 | 5.0 | - | 3.0 | 6.0 | - | 4.5 | 7.0 | ||||||||
| 21 | Blind hem | - | 0.6 | - | 3.8 | - | 2.0 | 5.0 | - | 3.0 | 6.0 | - | 4.5 | 7.0 | ||||||||
| 22 | Zigzag blind hem | - | 0.6 | - | 3.8 | - | 2.0 | 5.0 | - | 3.0 | 6.0 | - | 4.5 | 7.0 | ||||||||
| 23 | Double action | - | 0.6 | - | 3.8 | - | 2.0 | 5.0 | - | 3.0 | 6.0 | - | 4.5 | 7.0 | ||||||||
| 24 | Bridging | - | 0.6 | - | 3.8 | - | 2.0 | 5.0 | - | 3.0 | 6.0 | - | 4.5 | 7.0 | ||||||||
| 25 | Feather | - | 0.6 | - | 3.8 | - | 2.0 | 5.0 | - | 3.0 | 6.0 | - | 4.5 | 7.0 | ||||||||
| 26 | Feather | - | 0.6 | - | 3.8 | - | 2.0 | 5.0 | - | 3.0 | 6.0 | - | 4.5 | 7.0 | ||||||||
| 27 | Decorative | - | 0.6 | - | - | - | 2.0 | 5.0 | - | - | - | 4.5 | 7.0 | |||||||||
| 28 | Decorative | - | - | 0.6 | - | - | - | - | - | - | 2.0 | - | - | - | - | - | - | - | 4.5 | 7.0 | ||
| 29 | Decorative | - | - | 0.6 | - | - | - | - | - | - | 2.0 | - | - | - | - | - | - | - | 4.5 | 7.0 | ||
| 30 | Decorative | - | - | - | - | - | - | - | - | - | - | - | - | - | - | - | 4.5 | 7.0 | ||||
| 31 | Decorative | - | 0.6 | - | - | - | 2.0 | 5.0 | - | - | - | 4.5 | 7.0 | |||||||||
| 32 | Decorative | - | 0.6 | - | 3.8 | - | 2.0 | 5.0 | - | 3.0 | 6.0 | - | 4.5 | 7.0 | ||||||||
| 33 | XXX | Decorative | - | 0.6 | 2.5 | - | 1.0 | 3.5 | - | 2.0 | 5.0 | - | 3.0 | 6.0 | - | 4.5 | 7.0 | |||||
| 34 | //// | Overcasting | - | 0.6 | 2.5 | - | 1.0 | 3.5 | - | 2.0 | 5.0 | - | 3.0 | 6.0 | - | 4.5 | 7.0 | |||||
| 35 | □□ | Decorative | - | 0.6 | 2.5 | - | 1.0 | 3.5 | - | 2.0 | 5.0 | - | 3.0 | 6.0 | - | 4.5 | 7.0 | |||||
| 36 | TTT | Appliqué | - | 0.6 | 2.5 | - | 1.0 | 3.5 | - | 2.0 | 5.0 | - | 3.0 | 6.0 | - | 4.5 | 7.0 | |||||
| 37 | LLL | Overcasting | - | 0.6 | 2.5 | - | 1.0 | 3.5 | - | 2.0 | 5.0 | - | 3.0 | 6.0 | - | 4.5 | 7.0 | |||||
| 38 | YYY | Decorative | - | 0.6 | 2.5 | - | 1.0 | 3.5 | - | 2.0 | 5.0 | - | 3.0 | 6.0 | - | 4.5 | 7.0 | |||||
| 39 | +++ | Decorative | - | 0.6 | 2.5 | - | 1.0 | 3.5 | - | 2.0 | 5.0 | - | 3.0 | 6.0 | - | 4.5 | 7.0 | |||||
| 40 | XXXX | Decorative | - | - | - | - | - | - | - | - | - | - | - | - | 4.5 | 7.0 | ||||||
| 41 | XXXXXX | Decorative | - | - | - | - | - | - | - | - | - | 4.5 | 7.0 | |||||||||
| 42 | XXX | Decorative | - | - | - | - | - | - | - | - | - | 4.5 | 7.0 | |||||||||
| 43 | XXXX | Decorative | - | - | - | - | - | - | - | - | - | 4.5 | 7.0 | |||||||||
| 44 | XXXXX | Decorative | - | - | - | - | - | - | - | - | - | 4.5 | 7.0 | |||||||||
| 45 | XXXXX | Decorative | - | - | - | - | - | - | - | - | - | 4.5 | 7.0 | |||||||||
| 46 | XXXXX | Decorative | - | 0.6 | 2.5 | - | 1.0 | 3.5 | - | 2.0 | 5.0 | - | 3.0 | 6.0 | - | 4.5 | 7.0 | |||||
| 47 | XXXXX | Decorative | - | 0.6 | 2.5 | - | - | - | 2.0 | 5.0 | - | - | - | 4.5 | 7.0 | |||||||
| 48 | XXXXX | Decorative | - | 0.6 | 2.5 | - | 1.0 | 3.5 | - | 2.0 | 5.0 | - | 3.0 | 6.0 | - | 4.5 | 7.0 | |||||
| 49 | XXXXX | Decorative | - | - | - | - | - | - | - | - | - | 4.5 | 7.0 | |||||||||
| 50 | XXXXX | Decorative | - | - | - | - | - | - | - | - | - | 4.5 | 7.0 | |||||||||
| 51 | XXXXX | Decorative | - | 0.6 | 2.5 | - | - | - | 2.0 | 5.0 | - | - | - | 4.5 | 7.0 | |||||||
| 52 | XXXXX | Decorative | - | 0.6 | 2.5 | - | 1.0 | 3.5 | - | 2.0 | 5.0 | - | 3.0 | 6.0 | - | - | 4.5 | 7.0 | ||||
| 53 | XXXXX | Decorative | - | 0.6 | 2.5 | - | - | - | 2.0 | 5.0 | - | - | - | 4.5 | 7.0 | |||||||
| 54 | XXXXX | Decorative | - | 0.6 | 2.5 | - | - | - | - | 2.0 | 5.0 | - | - | - | - | 4.5 | 7.0 | |||||
| 55 | XXXXX | Decorative Cross stitch | -- | 0.6 | 2.5 | - | - | - | - | - | 2.0 | 5.0 | - | - | - | - | - | - | 4.5 | 7.0 | ||
| 56 | XXXXX | Decorative Cross stitch | -- | 0.6 | 2.5 | - | 1.0 | 3.5 | - | - | 2.0 | 5.0 | - | - | 3.0 | 6.0 | - | - | 4.5 | 7.0 | ||
| 57 | Decorative Cross stitch | -- | 0.6 | 2.5 | - | - | - | 2.0 | 5.0 | - | - | - | 4.5 | 7.0 | ||||||||
| 58 | Decorative Cross stitch | -- | 0.6 | 2.5 | - | - | - | 2.0 | 5.0 | - | - | - | 4.5 | 7.0 | ||||||||
| 59 | Decorative Cross stitch | - | 0.6 | 2.5 | - | - | - | 2.0 | 5.0 | - | - | - | 4.5 | 7.0 | ||||||||
| 60 | Decorative Cross stitch | - | 0.6 | 2.5 | - | - | - | 2.0 | 5.0 | - | - | - | 4.5 | 7.0 | ||||||||
| 61 | Decorative Satin stitch | - | 0.6 | - | - | 1.0 | - | - | 2.0 | - | - | 3.0 | - | - | 4.5 | 7.0 | ||||||
| 62 | Decorative Satin stitch | - | 0.6 | - | - | 1.0 | - | - | 2.0 | - | - | 3.0 | - | - | 4.5 | 7.0 | ||||||
| 63 | Decorative Satin stitch | - | 0.6 | - | - | 1.0 | - | - | 2.0 | - | - | 3.0 | - | - | 4.5 | 7.0 | ||||||
| 64 | Decorative Satin stitch | - | 0.6 | 2.5 | - | 1.0 | - | - | 2.0 | 5.0 | - | 3.0 | - | - | 4.5 | 7.0 | ||||||
| 65 | Decorative Satin stitch | - | 0.6 | 2.5 | - | 1.0 | - | - | 2.0 | 5.0 | - | 3.0 | - | - | 4.5 | 7.0 | ||||||
| 66 | Decorative Satin stitch | - | 0.6 | - | - | 1.0 | - | - | 2.0 | - | - | 3.0 | - | - | 4.5 | 7.0 | ||||||
ACTION BEEPS
For each activity in the electronic control part of the machine, there will be a warning to let you know that the electronic panel has received the command.
| WARNING | BEEP | WHAT IT MEANS | WHAT TO DO |
| UP ↓ | ONE BEEP | Needle is stopped in UP position. | Remove fabric or change stitch when needle is in UP position. |
| DOWN ↑ | ONE BEEP | Needle is in DOWN position. | Pivot the fabric for continued stitching or raise the needle to remove the fabric. |
| LOW SPEED | ONE BEEP | You have pressed the low speed button. | Sew low and release the button to continue sewing normal speed. |
| BACK ⬇ | ONE BEEP | Machine sews reverse stitching | Continue sewing reverse or release. |
| START ENABLED | ONE BEEP | Foot control has been unplugged. | Press START/STOP button to run machine. |
| START DISABLE | ONE BEEP | START/STOP button is pressed when foot control is plugged in | Unplug foot control to use START/STOP button. |
| START DISABLE | ONE BEEP | Foot control is plugged into machine. | START/STOP button cannot be used when control is plugged into machine |
| WARNING | THREE BEEP | Machine is defective. | -Reposition buttonhole foot to continue.-Wait a few seconds or turn machine off and back on to reset the program.-If machine still beeps, contact your authorized retailer or service center. |

- AUDREY
- A-LINE SERIES MODEL BL67
- INSTRUCTION AND REFERENCE GUIDE
- IMPORTANT SAFETY INSTRUCTIONS
- DANGER - TO REDUCE THE RISK OF ELECTRIC SHOCK
- WARNING - TO REDUCE THE RISK OF BURNS, FIRE, ELECTRIC SHOCK, OR INJURY TO PERSONS
- SAVE THESE INSTRUCTIONS
- FOOT CONTROL (USA ONLY)
- ELECTRONIC MODEL
- POLARIZED PLUGS CAUTION
- EXTENSION TABLE / ACCESSORY STORAGE
- REMOVING THE EXTENSION TABLE
- OPENING THE ACCESSORY STORAGE
- TOTE BAG
- CAUTION: TO PREVENT ACCIDENTS
- REMOVING THE PRESSER FOOT HOLDER
- INSERTING THE NEEDLE
- POLARIZED PLUG INFORMATION
- DANGER
- WARNING
- START / STOP BUTTON
- B.SLIDE SPEED CONTROL LEVER
- C.LOW SPEED BUTTON
- D.REVERSE STITCH BUTTON
- F.DROP FEED LEVER
- READY INDICATOR
- H.DIRECT SELECT BUTTONS
- I.REINFORCEMENT BUTTON
- CONTROL BUTTON FUNCTIONS
- SAFETY FEATURE OF ELECTRONIC MODEL
- STITCH SELECTION
- SETTING THE STITCH WIDTH AND STITCH LENGTH
- VARIOUS NEEDLE POSITIONS
- REMOVING THE BOBBIN
- WINDING THE BOBBIN
- INSERTING THE BOBBIN
- THREADING THE UPPER THREAD
- NEEDLE THREADER
- DRAWING UP THE BOBBIN THREAD
- REVERSE STITCHING
- TURNING CORNERS
- SEWING HEAVY FABRIC
- SEAMING GUIDE ON THE STITCH PLATE
- CORRECT THREAD TENSION
- WHEN BOBBIN THREAD APPEARS ON TOP SIDE OF FABRIC
- WHEN UPPER THREAD APPEARS ON THE BOTTOM SIDE OF FABRIC
- D.THREAD TENSION FOR ZIGZAG STITCHES
- HELPFUL HINT
- FABRIC, THREAD AND NEEDLE TABLE
- SATIN STITCHING OR APPLIQUE
- FREE ARM SEWING
- USING THE OVERCASTING FOOT
- USING THE GENERAL PURPOSE FOOT
- NOTE: TO SEW OVER BUTTONHOLE 08 A SECOND TIME, RAISE PRESSER FOOT TO RETURN FABRIC TO STARTING POSITION
- NOTE: WHEN SEWING STRETCH FABRIC
- CORDED BUTTONHOLES
- ELASTIC STITCH SEWING
- STRAIGHT STITCH SEAMING AND QUILTING
- STRAIGHT STITCH SEAMING
- QUILTING 0103
- FEED DOG CONTROL
- DARNING
- PIPING
- ADJUSTING DECORATIVE PATTERNS
- SEWING LIGHTWEIGHT FABRICS
- CLEANING THE FEED DOGS AND HOOK AREA
- BL67 -STITCH CHART CONVERSION
Brand : BABY LOCK
Model : Audrey BL67
Category : Sewing machine