
CM HM QBB0 - Coffee maker HOTPOINT - Free user manual and instructions
Find the device manual for free CM HM QBB0 HOTPOINT in PDF.


| Product Type | Coffee Maker with Milk Frother |
| Brand | Hotpoint |
| Model | CM HM QBB0 |
| Power Supply | 220-240 V ~ 50/60 Hz |
| Power Rating | 1100-1300 W |
| Capsule System | UNO Capsule System |
| Water Tank Capacity | Approx. 1.0 L |
| Milk Frother Type | Separate jug with whisk attachment |
| Beverage Options | Short coffee, long coffee; hot or cold milk froth |
| Used Capsule Container Capacity | Up to 10 capsules |
| Auto Shut-Off | After 10 minutes of inactivity |
| Descaling Frequency | Every 4 weeks (more often with hard water) |
| Safety Features | Overheat protection, auto shut-off, child safety lock (if applicable) |
| Dimensions (approx.) | 30 x 20 x 40 cm (H x W x D) |
| Weight (approx.) | 3.0 kg |
| Materials | Plastic body, stainless steel internal components |
| Cleaning | Removable drip tray, water tank, and used capsule container; hand wash only |
Frequently Asked Questions - CM HM QBB0 HOTPOINT
User questions about CM HM QBB0 HOTPOINT
0 question about this device. Answer the ones you know or ask your own.
Ask a new question about this device
Download the instructions for your Coffee maker in PDF format for free! Find your manual CM HM QBB0 - HOTPOINT and take your electronic device back in hand. On this page are published all the documents necessary for the use of your device. CM HM QBB0 by HOTPOINT.
USER MANUAL CM HM QBB0 HOTPOINT

CM HM Q...
220-240V
1100-1300W
C


D


E


INFORMAZIONI PER LA SICUREZZA IMPORTANTE, DA LEGGERE E OSSERVARE
- Before using the appliance carefully read the Health and Safety, and Use/Care guides.
- Keep these instructions close at hand for future reference.
- YOUR SAFETY AND SAFETY OF OTHERS IS VERY IMPORTANT
- This manual and the appliance itself provide important safety warnings, to be read and observed at all times
- All safety warnings give specific details of the potential risk presented and indicate how to reduce risk of injury, damage and electric shock resulting from improper use of the appliance. Carefully observe the following instructions.
- Failure to observe these instructions may lead to risks. The Manufacturer declines any liability for injury to persons or animals of property if these advices and precautions are not respected.
- This product should not be used by children under 8 years old, unless supervised by an adult.
- Children from 8 years old and above and persons with reduced physical, sensory or mental capabilities or lack of experience and can use this appliance only if they are supervised. Alternatively these people can use if have been given instructions on safe appliance use and if they understand the hazards involved. Children shall not play with the appliance. Cleaning and user maintenance shall not be made by children without supervision.
- This appliance can be used by children aged from 8 years and above if they have been given supervision or instruction concerning use of the appliance in a safe way and if they understand the hazards involved. Cleaning and user maintenance shall not be made by children unless they are older than 8 and supervised. Keep the appliance and its cord out of reach of children aged less then 8 years.
- Appliances can be use by persons with reduced physical, sensory or mental capabilities or lack of experience and knowledge if they have been given supervision or instruction concerning use of the appliance in a safe way and understand the hazards involved.
INTENDED USE OF THE PRODUCT
• This appliance is designed solely for domestic use.
- This product is not intended for commercial use. The manufacturer declines all responsibility for innapropiate use or incorrect setting of the controls.
- This appliance is not intended for use by persons (including children) with reduced physical, sensory or mental capabilities, or experience and knowledge, unless they have been given supervision or instruction concerning use of the appliance by a person responsible for their safety.
• Children should be supervised to ensure that they do not play with the appliance
- CAUTION: The appliance is not intended to be operated by means of an external timer or separate remote control system.
- Do not use the appliance outdoors.
- Do not store explosive or flammable substances such as aerosol cans and do not place or use gasoline or other flammable near the appliance: a fire may break out if the appliance is inadvertently switched on.
- Do not use accessories or attachments that are not recommended by the appliance manufacturer.
- Do not immerse the appliance body in water since this would give rise to electric shock.
INSTALLATION
- Repairs must be carried out by a qualified technician, in comp with the manufacturer's instructions and local safety regulations. Do not repair or replace any part of the appliance unless specifically stated in the user manual.
- Children should not perform installation operations. Keep children away during installation of the appliance. Keep the packaging materials (plastic bags, polystyrene parts, etc.) out of reach of children, during and after the installation of the appliance.
en
- After unpacking the appliance, make sure that it has not been damaged during transport. In the event of problems, contact the dealer or our After Sales Service Dept.
- Keep children away during installation of the appliance.
- The appliance must be disconnected from the power supply before carrying out any installation operation.
- During installation, make sure the appliance does not c power cable.
- Only activate the appliance when the installation procedure has been completed.
- Do not let the supply cord hang over the edge of a table / counter or contact any hot surfaces.
- Do not place the appliance on or near a gas or electric cooktop (hob) or in a heated oven.
- Remove any protective wrapping or plastic bag before operating the appliance.
• Use the appliance on a level stable work surface.
• The appliance is only to be used with the stand provided.
ELECTRICAL WARNINGS
- Make sure the voltage specified on the rating plate corresponds to that of your home.
- Regulation require that the appliance is connected to an earthed supply outlet.
- For appliances with a fitted plug, if the plug is not suitable for you socket outlet, contact a qualified technician.
- Do not use extension leads, multiple sockets or adapte connect the appliance to a socket which can be operated by remote control.
- The power cable must be long enough for connecting the appliance, once fitted in its housing, to the main power supply.
- Do not pull the power supply cable.
-
If the power cable is damaged it must be replaced with an identical one. The power cable must only be replaced by a qualified technician in compliance with the manufacturer instruction and current safety regulations. Contact an authorised service center.
-
Do not operate this appliance if it has a damaged mains cord or plug, if it is not working properly, or if it has been damaged or dropped. Do not immerse the mains cord or plug in water. Keep the cord away from hot surfaces.
- Do not touch the appliance with any wet part of the body and do not operate it when barefoot.
- If the power supply is cut, the appliance stays ON and starts again operating as soon as the power supply is restored.
CORRECT USE
- Turn the appliance off and unplug from the supply outlet when not in use, before cleaning, assembly, disassembly or interacting with any accessory.
- Do not leave the appliance unattended while is operating.
- The appliance is exclusively designed and must only be used to make espresso coffee with “Uso Capsule System” capsules.
• Any other use shall be held improper and potentially dangerous. - The manufacturer shall not be held responsible for any damage due to improper, incorrect or unreasonable use.
- Always disconnect the plug from the electrical socket before filling the tank.
- Use only cold tap water to fill the water tank. Use fresh water, only. Do not use sparkling mineral water or other fluids. Always ensure that the tank is filled with water.
- Running the water pump with no water will cause the pump to overheat.
• WARNING: Do not remove the milk frother lid while the milk is heating. - CAUTION: Position the milk frother lid so that steam is directed away from the handle.
- CAUTION: Insure that the appliance is switched off before removing it from its stand.
CLEANING AND MAINTENANCE
- The appliance must be disconnected from the power supply before carrying out any cleaning or maintenance operation.
• Never use steam cleaning equipment. - Before use, and specially recommended before very first use, carefully wipe the outside of the appliance to remove any dust that may have accumulated, then dry it with a soft cloth. Do not use any harsh abrasive cleaners, alkaline cleaning agents or scouring agents.
- Wash the accessories in warm soapy water and then dry with a dry towel.
- To prevent any damage to the appliance do not use harsh solvents, alkaline cleaning agents, abrasive cleansers or scouring agents of any kind when cleaning. Do not immerse the main unit or supply cord in water.
- Wash the tank using a hard brush, water and washing-up liquid, then clean it thoroughly, dry it and put it back to place.
PARTS AND FEATURES
- Capsule loading lever
- Short and long coffee buttons
- Used-capsules container
- Drip grid
- Espresso cup support
- Drip drawer
- Coffee maker main body
- Removable water tank
- Water tank lid
- Milk frother supply base
- Milk frother buttons
- Milk frother handle
- Milk frother jug
- Milk frother lid
- Short long coffee button (fig. B)
- Long coffee button (fig. B)
- Hot preparation (fig. I)
- Cold preparatio (fig. I)
- Frothing whisks (fig. J)
- Mixing whisks (fig. J)
INTRODUCTION
Thank you for purchasing our product.
In doing so, you have opted for an effective high-performance appliance.
If the instructions on the correct use of this appliance are not observed, the manufacturer shall assume no responsibility for any resulting damage.
The operating instructions may refer to different models: any difference is clearly identified.
Before you assemble the coffee maker, the power cord is unplugged and take care main body and all other parts are clean. See other details in “Cleaning and Maintenance” section.
To assemble the coffee maker:
-
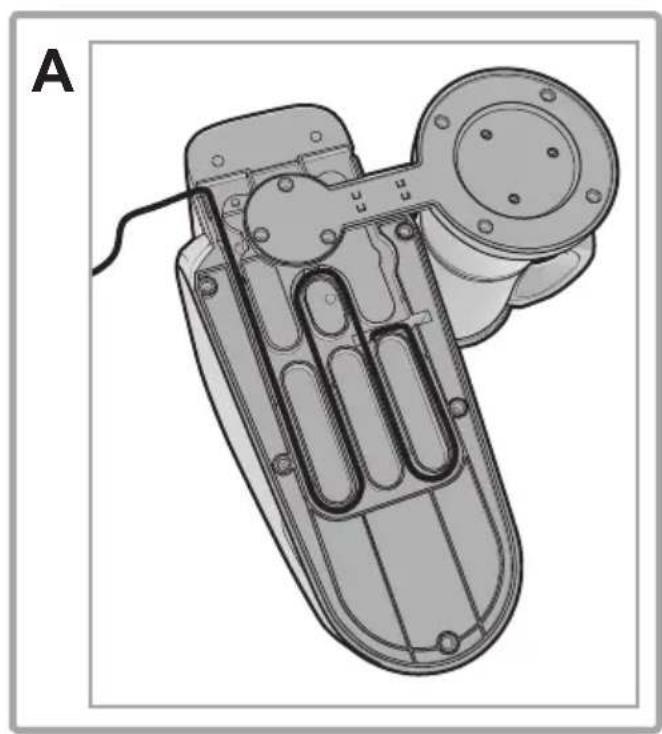
Fit the power cord on the cable rack bottom of the machine based on its distance from the outlet (PICTURE A).
-
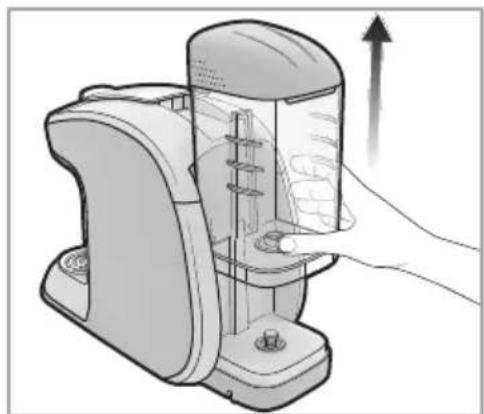
Remove the tank by lifting it upwards. In case it is not easy to take out, turn it slightly outwards. Fill the tank with water until maximum Reinstall the tank by leaning it in place and press the top part until the complete joint. Make sure
that the tank is securely fastened in prevent water spill. Place the lid (PICTURE C).
- Connect the plug to the socket. Switch coffee maker pressing the ON/OFF button on the back. The product turns on and the buttons flash together during the heating up of the machine. When the correct temperature is reached, the buttons light stops blinking.
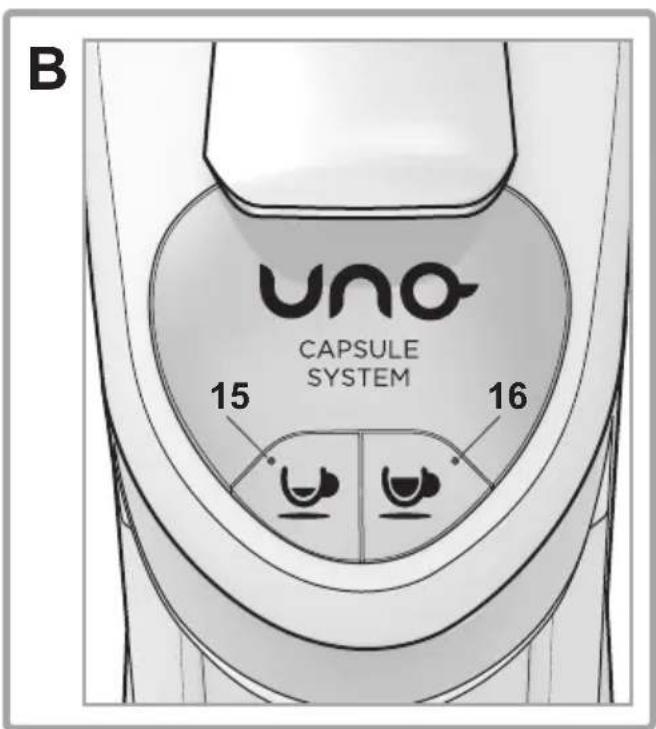
- Place a cup or a glass under the supplying spout. With the appliance heated up, and without inserting any capsule, press the short coffee button (PICTURE B) and supply water for 10 seconds, then press the button again to stop. Repeat this procedure 3 times.
In case the coffee maker does not supply water, remove and plug the water tan checking the correct positioning. Repeat the operation until the machine dispenses water.
Use this procedure also in case the appliance has not been used for long time.
PREPARING THE COFFEE
Use UNO CAPSULE SYSTEM capsules, only.
- Check the water level inside the water Make sure the water is greater than level and enough to brew the coffee.
- Connect the plug to the socket, switch ON/OFF button and wait until the buttons light stops blinking.
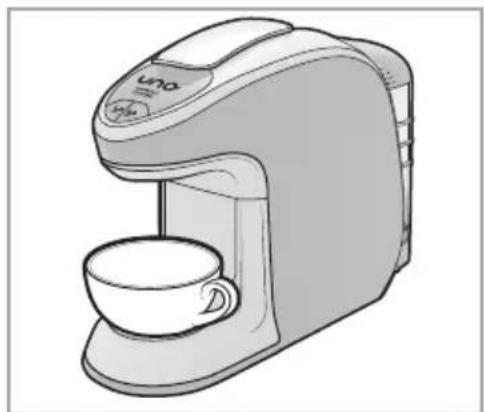
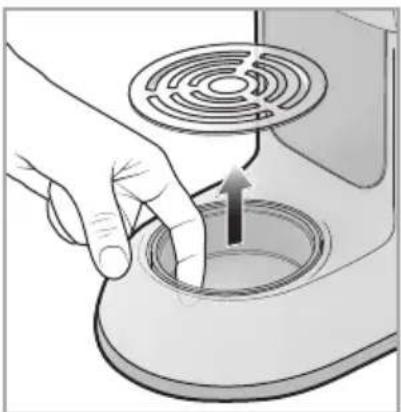
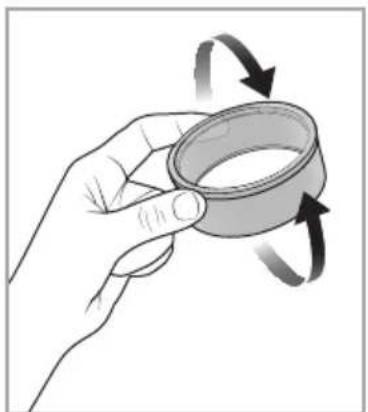
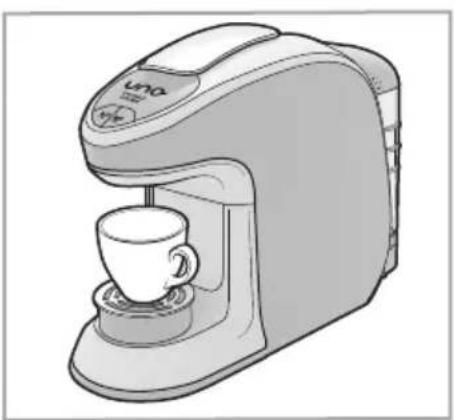
- Adjust the cup height. Both small espresso cups and large cappuccino cups can be used with this appliance. When supplying an espresso coffee remove the drip grid support from the drawer and place it upside-down on the drip container. Place the drip grid above the support. When supplying a cappuccino, place the drip grid support inside the drip container (PICTURE D).
- Place the cup on the drip grid and center it under the supplying spout.
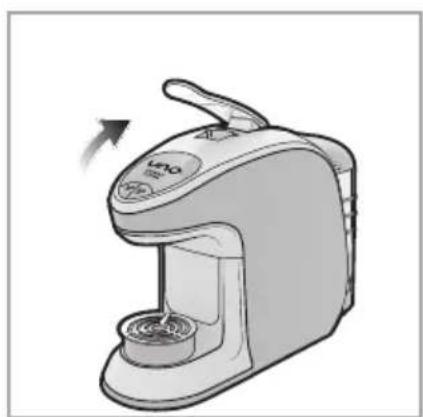
sure that S. Slowly lift the loading lever back, until it at the Put the capsule into the dedicated compartment and place its outer edges in the guides. Fully lower the lever (PICTURE E).
-
Push dispensing button (PICTURE B). The on the machine automatically stops dispensing beverages with two configurations for short long coffee. Push the button again to stop it beforehand. The amount of brewed coffee in the cup may vary depending on the coffee level blend used.
-
Once completed the supply, slowly lift the lever back until it stops to remove the used capsule. It is recommended to not leave the used capsule in the brewing unit, but discharge it in the used capsules container as soon as the end of the supply.
- Once supply 10 coffees, the buttons lights start blinking alternately. This alert indicates were dispensed 10 coffees and consequently the used-capsules-container may be full and it necessary to empty it. If the coffee maker is switch off or unplug from power supply, the warning could be reset.
- Slightly lift the drip tray up and pull it out of the appliance. Remove the container from the tray, empty it and rinse it. Clean the tray and the grid from water and coffee residues. Reassemble all the components and put the drip tray place, together with the container (PICTURE F).
- Push one of the coffee supply buttons to eliminate the warning of "full used-capsules-container".
The unit enters standby mode after 10 minutes of inactivity. To turn it on, press the one of the two coffee supply buttons.
TIPS
Use thick, preheated cups when preparing Espresso: this will keep your coffee warm for longer.
- Daily, wash the supplying unit pressing the long coffee button without inserting any capsule and supply water for 10 seconds, then press the button again to stop. Place a cup to collect the water dispensed.
- Use a wet cloth to clean the unit, do not use abrasive detergents.
- After using the appliance, slightly lift the drip tray up slightly and pull it out of the appliance. Wash the components with lukewarm water normal washing-up liquid. Empty the water from the tank, rinse it and dry it.
DESCALING
Lime scale built-up is a natural consequence of appliance use. Descaling must be performed once every 4 weeks; if the water is very high, it is needed more often. Descaling frequency may be reduced with soft waters. To descale your appliance, use any commercially available non-toxic product.
- Unplug the appliance from main supply, remove the tank and empty it.
- Fill the tank with the descaling solution follow the instructions on the product package.
- Plug the appliance and wait until it heats up. Press the long coffee button without inserting any capsule and supply water for 10 seconds,
that then press the button again to stop. Place a cup to collect the water dispensed. - Unplug the appliance from main supply and leave the descaling solution in for about 10-15 minutes, with the appliance off.
- Repeat the procedure of point 3 and 4 until there is no more descaling solution in the tank.
- Remove the water tank, rinse it thoroughly and fill it again with fresh drinkable water.
- Plug the appliance and wait until it heats up. Back Press the long coffee button without inserting any capsule and supply water for 10 seconds, then press the button again to stop. Repeat the procedure until the tank is emptied. Place a cup to collect the water dispensed.
- When the tank is empty, Unplug the ap from main supply and fill the water ta and repeat the procedure from point 6.
- When the second rinsing cycle is complete up the tank again. The appliance will ready for use.
LONG PERIODS WITHOUT USING THE APPLIANCE
- If the appliance is not used for longer periods of time, switch it off and unplug it from the wall.
- Store the appliance in a dry place, away from dust and out of the reach of children.
- It is recommended to store the appliance in its original packaging.
- Temperatures in the storage area should not be lower than 5° C, in order to avoid any damage to the inner parts of the appliance due to water freezing.
USING THE MILK FROTHER
PREPARING THE MILK FROTHER
of Before assembling and using the milk frother, make sure that the power plug is unplugged and check that hard, maide-saying and other components are clean. For further details, please refer to "Cleaning and Maintenance" sections.
desfadingassemblig the milk frother:
- Place the milk frother power supply base on the worktop choosing the preferred side of the coffee
maker to place the milk frother (left side or right side).
- Lift the coffee maker and place it back on the small connector on the milk frother power supply base. The coffee maker must be stable on the worktop (PICTURE G).
- Place the milk frother on the power supply base with the handle turned to front side to have access to buttons.
- Plug the machine and switch on the coffee maker pushing the ON/OFF button on the back.
Do not turn the milk frother power supply base having the appliance switched on or plugged to power supply.
At very first use or after long time after use, clean the unit referring “Maintenance and Cleaning” section.
PREPARING THE BEVERAGE
We recommend using milk with a high fat content. For best results, take the milk out of the refrigerator immediately before using it. The bottom of the jug and the milk frother supply base must be clean and dry.
PRELIMINAY INFRMATIONS
- Use the whisky with metallic wire (19, PICTURE J) for frothed preparation, bth cold and hot.
- Use just the plastic support removing the metallic wire from the whisky (20, PICTURE J) to warm the milk.
- Obser that the jug is filled with at least 80 ml (minimum level) and no more than 200 ml (maximum level) of milk.
• For hot preparation press button 17 (PICTURE I).
• For cold preparation press button 18 (PICTURE I).
HEAT OR FROTH THE MILK
- Remove the lid from the milk frother jug.
- Fit the appropriate whisky in to the jug holder according the preparation required.
- Pour the desidered amount of milk into the jug taking care about minimum and maximum levels.
- Fit the lid back onto the jug and place the milk frother on the power supply base.
- Push the button to activate the cold or hot preparation.
- If selected a hot preparation, the milk temperature reaches the perfect level, the cycle ends. If selected a cold preparation, the cycle ends after about 60 seconds.
-
In case of need, the cycle can be interrupted at any time pressing tone of the two buttons. The set temperature will not be reached if selected hot preparation.
-
Once the cycle has terminated, remove the jug from the base and pour its content into a cup or mug. Can use a spoon to push the froth out of the jug, or simply shake the jug slightly while pourig.
MAINTENANCE AND CLEANING
- The appliance should be cleaned after use. Rinse with cold water.
- Leave some water at the bottom of the frother for a few minutes and then empty and wipe clean with a cloth.
- If you wish, you can run a program with water, considering minimum and maximum levels, to make the cleaning easier.
• If you are heating milk or frothing milk continuously, clean the jug after each use as described above. - Do not put the appliance in the dishwasher.
- Do not immerse the appliance in water or other liquids.
- Do not use any aggressive or abrasive cleaning products, nor any sharp objects such as knives or hard brushes when cleaning.
SAFEGUARDING THE ENVIRONMENT DISPOSAL OF PACKAGING MATERIALS

The packaging material is 100% recyclable and is marked with the recycle symbol (*). The various parts of the packaging must therefore be disposed of responsibility and in full compliance with
local authority regulations governing waste disposal.
SCRAPPING OF HOUSEHOLD APPLIANCES
When scrapping the appliance, make it unusable by cutting off the power cable and delete and removing the doors and shelves, so that children cannot easily climb inside and become trapped.

This appliance is manufactured with recyclable (*) or reusable materials. Dispose of it in accordance with local waste disposal regulations.
For further information on the treatment, recovery and recycling of household electrical appliances, contact your competent local authority, the collection service for household waste or the store where you purchased the appliance.
en
This appliance is marked in compliance with European Directive 2012/19/EU, Waste Electrical and Electronic Equipment (WEEE).
By ensuring this product is disposed of correctly, you will help prevent potential negative consequences for the environment and human health, which could otherwise be caused by inappropriate waste handling of this product.

The symbol (*) on the product or on the accompanying documentation indicates that it should not be treated as domestic waste but must be taken to an appropriate collection centre for the recycling of electrical
and electronic equipment.
DECLARATION OF CONFORMITY
This appliance has been designed, constructed and distributed in compliance with the safety requirements of European Directives:
• 2006/95/EC Low Voltage Directive
• 2004/108/EU Electromagnetic Compatibility Directive

Indesit Company SpA Viale Aristide Merloni, 47 60044 Fabriano (AN), Italy
www.indesitcompany.com
CM HM Q... - MILK 12/2015 - ver.3.0


- INFORMAZIONI PER LA SICUREZZA IMPORTANTE, DA LEGGERE E OSSERVARE
- INTENDED USE OF THE PRODUCT
- INSTALLATION
- EN
- ELECTRICAL WARNINGS
- CORRECT USE
- CLEANING AND MAINTENANCE
- PARTS AND FEATURES
- INTRODUCTION
- PREPARING THE COFFEE
- TIPS
- DESCALING
- LONG PERIODS WITHOUT USING THE APPLIANCE
- USING THE MILK FROTHER
- PREPARING THE MILK FROTHER
- PREPARING THE BEVERAGE
- PRELIMINAY INFRMATIONS
- HEAT OR FROTH THE MILK
- MAINTENANCE AND CLEANING
- SAFEGUARDING THE ENVIRONMENT DISPOSAL OF PACKAGING MATERIALS
- SCRAPPING OF HOUSEHOLD APPLIANCES
- DECLARATION OF CONFORMITY
Brand : HOTPOINT
Model : CM HM QBB0
Category : Coffee maker