
NP31ZL - Projector Accessory NEC - Free user manual and instructions
Find the device manual for free NP31ZL NEC in PDF.


| Product Type | Short Focus Zoom Lens |
| Model | NP31ZL |
| Brand | NEC |
| Compatible Projectors | NEC PX750U, PX700W, PX800X |
| Lens Type | Short focus zoom |
| Throw Distance (100") | PX750U: 1.6-2.0 m; PX700W: 1.7-2.1 m; PX800X: 1.6-2.0 m |
| Screen Size Range | 40" to 500" |
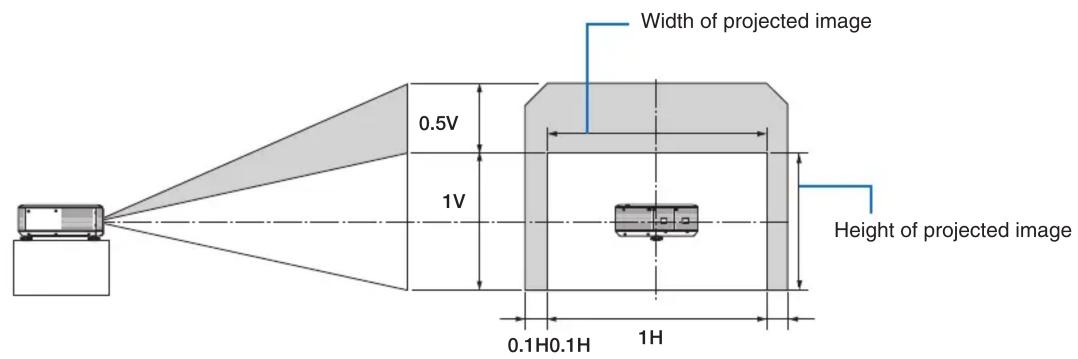
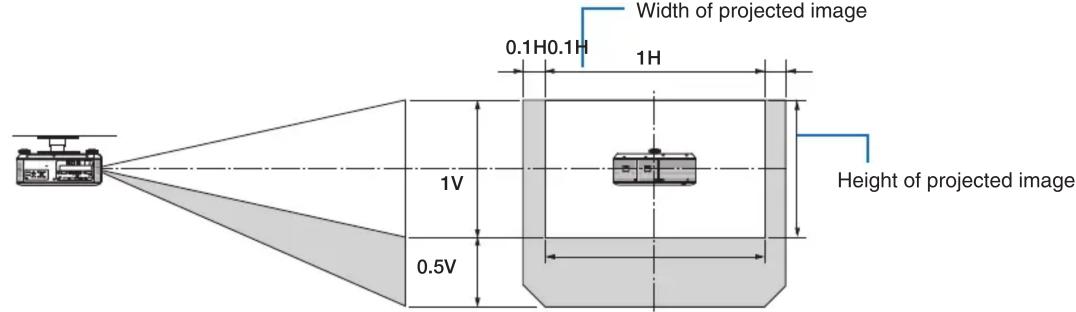
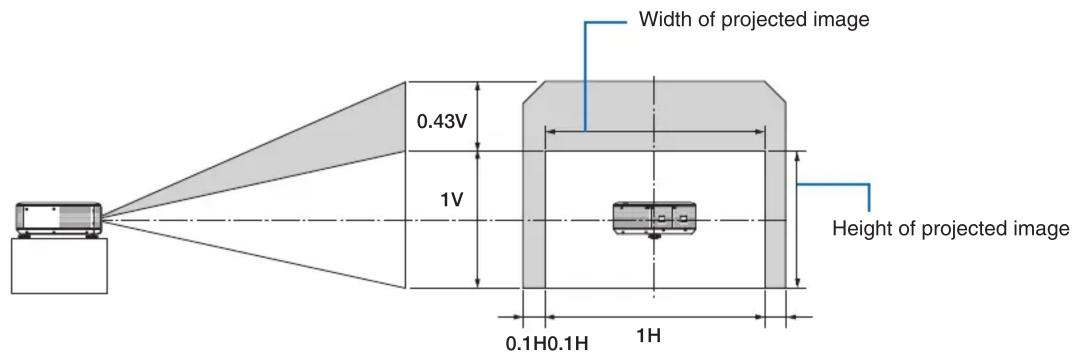
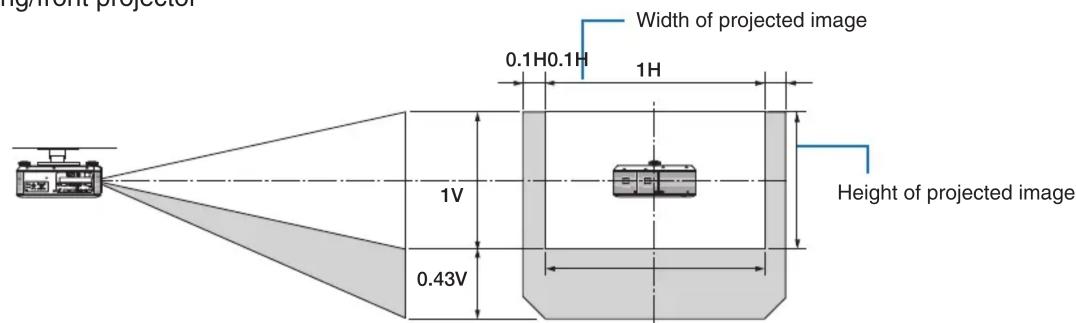
| Lens Shift (Vertical) | Up to 0.5V (PX750U/PX700W) or 0.43V (PX800X) from optical axis |
| Lens Shift (Horizontal) | Up to 0.1H from optical axis |
| Focus Adjustment | Powered (buttons) and manual edge focus ring |
| Lens Memory Function | Supports storing lens shift, zoom, and focus settings |
| Mounting | Desk/front and ceiling/front projection |
| Cleaning | Refer to projector user manual |
| Weight | Approx. 0.5 kg |
| Dimensions (Dia x L) | Approx. 80 mm x 100 mm |
Frequently Asked Questions - NP31ZL NEC
User questions about NP31ZL NEC
0 question about this device. Answer the ones you know or ask your own.
Ask a new question about this device
Download the instructions for your Projector Accessory in PDF format for free! Find your manual NP31ZL - NEC and take your electronic device back in hand. On this page are published all the documents necessary for the use of your device. NP31ZL by NEC.
USER MANUAL NP31ZL NEC
This manual discusses specifications and focus adjustment for the NP31ZL short focus zoom lens.
For cautions on handling the lens, see the User's Manual supplied with the lens.
For instructions on mounting, removing, and cleaning the lens, see the User's Manual supplied with the projector.
NOTE: The drawings in this manual may differ slightly from the actual product.
Specifications
Throw distance (Unit: m)
| Projector model name | |||
| Screen size (inch) PX750U PX700W PX800X | |||
| 40” 0.6 - 0.8 0.7 - 0.8 0.6 - 0.8 | |||
| 50” 0.8 - 1.0 0.8 - 1.1 0.8 - 1.0 | |||
| 60” 1.0 - 1.2 1.0 - 1.3 0.9 - 1.2 | |||
| 80” 1.3 - 1.6 1.4 - 1.7 1.3 - 1.6 | |||
| 100” 1.6 - 2.0 1.7 - 2.1 1.6 - 2.0 | |||
| 120” 2.0 - 2.5 2.1 - 2.6 1.9 - 2.4 | |||
| 150” 2.5 - 3.1 2.6 - 3.2 2.4 - 3.0 | |||
| 200” 3.3 - 4.1 3.5 - 4.3 3.2 - 4.0 | |||
| 240” 4.0 - 5.0 4.2 - 5.2 3.9 - 4.9 | |||
| 300” 5.0 - 6.2 5.2 - 6.5 4.8 - 6.1 | |||
| 400” 6.6 - 8.3 7.0 - 8.7 6.5 - 8.1 | |||
| 450” 7.5 - 9.4 7.8 - 9.8 7.3 - 9.1 | |||
| 500” 8.3 - 10.4 8.7 - 10.9 8.1 - 10.2 | |||
TIP:
Calculation of the throw distance from the screen size (m)
PX750U: H x 0.75 to H x 0.93 : 0.62 m (min.) to 10.41 m (max.)
PX700W: H x 0.79 to H x 0.98 : 0.65 m (min.) to 10.91 m (max.)
PX800X: H x 0.77 to H x 0.97 : 0.61 m (min.) to 10.16 m (max.)
* “H” (Horizontal) refers to the screen width.
* Figures differ by several % with the table above because the calculation is approximate.
Lens shifting range
Button operations on the projector or on the remote control allow you to move the position of the projected image in the vertical and horizontal directions based on the following ranges.
Description of symbols: V indicates vertical (height of the projected image), H indicates horizontal (width of the projected image).
For adjusting the lens shift, see the User's Manual supplied with the projector.
PX750U/PX700W
Desk/front projection
Ceiling/front projector
PX800X
Desk/front projection
Ceiling/front projector
Adjusting the focus
1. Focus on the projected image around the optical axis. (Powered focus)
The drawing below shows an example when the projected image is shifted upward. In this case the optical axis is at the bottom edge of the projected image.
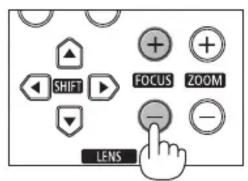
Adjusting with buttons on the cabinet
Use the FOCUS (+) or (-) button on the projector cabinet.
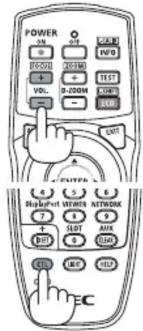
Adjusting with the remote control
Hold the CTL button and press the VOL/FOCUS +/- button.
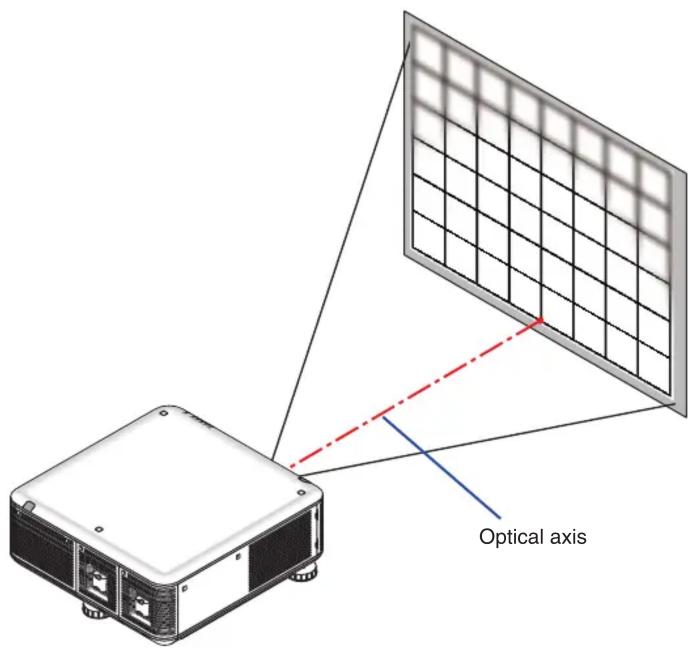
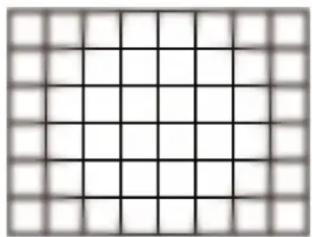
* With the lens shift in the center position the optical axis is at the center of the image. In this case, adjust the focus at the center of the projected image.
natural_image
Grid pattern with uniform black squares on a light gray background (no text or symbols)2. Adjust the focus at the edges of the projected image. (Manual focus)
Turn the edge focus ring clockwise or counterclockwise.
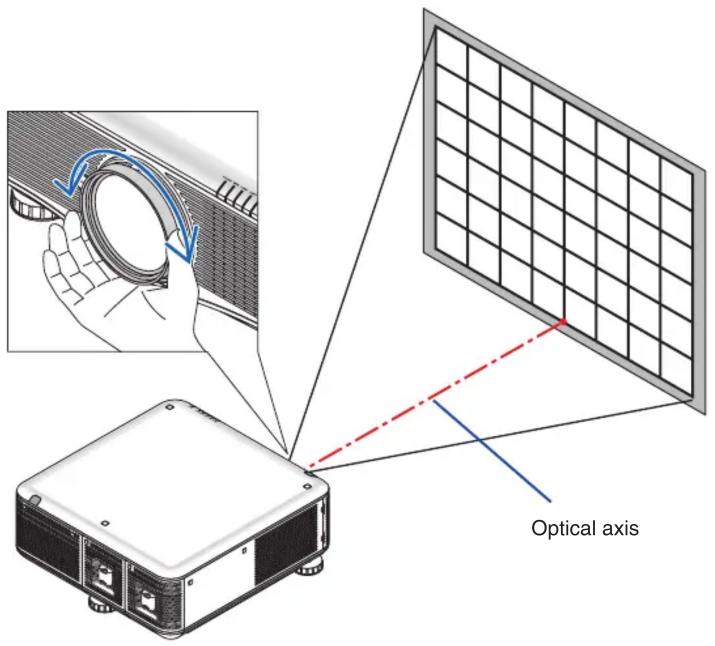
This completes adjusting the projected image's overall focus.
- For zooming in or out, see the User's Manual supplied with the projector.
NOTE:
The NP31ZL supports the Lens Memory function, which allows you to store changes for Lens Shift, Zoom, and Focus.
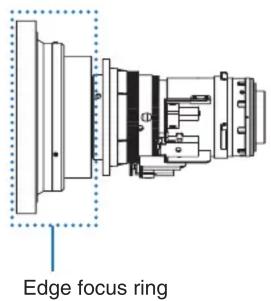
If you accidentally move the Edge focus ring (drawing shown below) after having stored adjusted values, the adjusted values stored in the Lens Memory will not be correctly applied.
After having removed the lens from the projector and mounted it back, call up the adjusted values stored in the Lens Memory and then follow Step 2 in the procedure above to adjust the focus at the edges of the projected image again.
- Specifications
- Lens shifting range
- PX750U/PX700W
- PX800X
- Adjusting the focus
- Focus on the projected image around the optical axis. (Powered focus)
- Adjusting with buttons on the cabinet
- Adjusting with the remote control
- Adjust the focus at the edges of the projected image. (Manual focus)
- This completes adjusting the projected image's overall focus.
- NOTE:
Brand : NEC
Model : NP31ZL
Category : Projector Accessory