
TEW-714TRU - Powerline Adapter TRENDNET - Free user manual and instructions
Find the device manual for free TEW-714TRU TRENDNET in PDF.


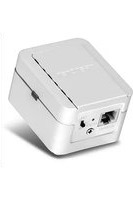
| Product Type | N150 Wireless Travel Router / Powerline Adapter |
| Brand | TRENDnet |
| Model | TEW-714TRU |
| Dimensions (Approx.) | 70 x 50 x 30 mm |
| Weight (Approx.) | 100 g |
| Power Supply | Built-in universal AC adapter, 100-240V, 50/60Hz |
| Power Consumption | Up to 5W (with GREENnet technology reducing consumption by up to 50%) |
| Wireless Standard | IEEE 802.11b/g/n (2.4GHz, up to 150Mbps) |
| Operation Modes | Router, WISP, Repeater (switchable via hardware switch) |
| Ports | 1x 10/100 Ethernet (LAN/WAN), 1x USB File Share, 1x USB Quick Charge |
| Wireless Security | 64/128-bit WEP, WPA/WPA2-PSK, WPA/WPA2-Radius, WPA2 mixed |
| WPS (Wi-Fi Protected Setup) | Push button or PIN method |
| LED Indicators | Power/Status (red/orange/green), WPS pairing |
| Reset Button | Yes (press and hold 2 seconds to factory reset) |
| Network ON/OFF Switch | Yes (disables network but keeps USB charging) |
| Interchangeable Plugs | US, Euro, UK included |
| USB File Sharing | Supports FAT32/NTFS flash drives and HDDs via SMB/CIFS/FTP |
| USB Quick Charge | Up to 2.1A for smartphones/tablets (auto-detection) |
| Package Contents | TEW-714TRU, Multi-Language QIG, CD-ROM, Network Cable (1m), US/Euro/UK Plugs |
| Warranty | 3-Year Limited Warranty |
| Certifications | FCC, CE, RoHS |
Frequently Asked Questions - TEW-714TRU TRENDNET
User questions about TEW-714TRU TRENDNET
0 question about this device. Answer the ones you know or ask your own.
Ask a new question about this device
Download the instructions for your Powerline Adapter in PDF format for free! Find your manual TEW-714TRU - TRENDNET and take your electronic device back in hand. On this page are published all the documents necessary for the use of your device. TEW-714TRU by TRENDNET.
USER MANUAL TEW-714TRU TRENDNET
TEW-714TRU User's Guide Table of Contents
Table of Contents
Product Overview....1
Package Contents....1
Features....1
Front Panel....2
Power Plugs 2
Side View .... 3
Product Preset Information .... 3
General Setups....4
Where to find setup information....4
Reset Your Router 4
USB Power Charging ....4
Web Management....5
Setup Wizards ....7
Router Mode....7
WISP Mode 9
Repeater Mode....13
Locate Your Router Properly....17
Wireless Performance Considerations....17
System configuration....18
System Management and Default Settings....18
Setup Wizard....19
Basic Network Status 26
Basic Wireless Network 26
File Sharing 30
Advanced Settings 34
Administrator....34
Advanced Setups ...... 39
Advanced Wireless Settings....43
Troubleshooting 45
Federal Communication Commission Interference Statement......46
Europe – EU Declaration of Conformity....47
RoHS 47
Limited Warranty 49
TEW-714TRU User's Guide Product Overview
Product Overview
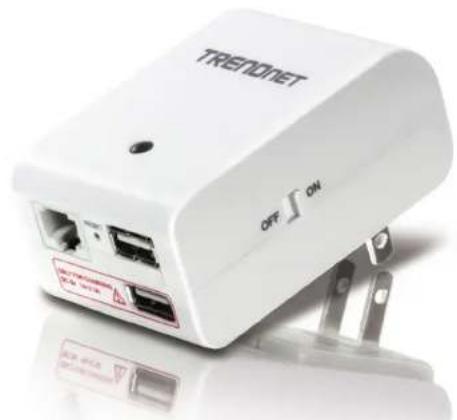
TEW-714TRU
Package Contents
TEW-714TRU package includes:
- TEW-714TRU
• Multi-Language Quick Installation Guide
• CD-ROM (User's Guide)
• Network Cable (1 m / 3 ft.)
• US, Euro, and UK Power Plug
If any package contents are missing or damaged, please contact the retail store, online retailer, or reseller/distributor from which the product was purchased.
Features
TRENDnet's N150 Wireless Travel Router, model TEW-714TRU, is a flexible travel router for on the go professionals. Router mode turns a wired Internet connection into a wireless network. Repeater and WISP modes leverage an existing wireless network. Connect a USB storage drive to share content across the wireless network. Quickly charge mobile devices with the convenient quick charge port. Interchangeable power plugs keep you connected on all continents.
• Share a single Internet connection with multiple users
- Router, WISP, and Repeater modes
- Router Mode turns a wired Internet connection into a wireless network
- Repeater and WISP (Wireless ISP) Modes leverages an existing wireless network
• One touch network connection with the WPS button
• Reliable 150 Mbps* Wireless N
- Advance wireless security with 64/128-bit WEP, WPA/WPA2 Radius and WPA-PSK/WPA2-PSKIPv6 network support
- USB File Share port
• USB Quick Charge port
• Interchangeable Power plugs: USA, Euro, and UK
- Embedded GREENnet technology reduces power consumption by up to 50%
• 3-year limited warranty
*Maximum wireless signal rates are referenced from IEEE 802.11 theoretical specifications. Actual data throughput and coverage will vary depending on interference, network traffic, building materials and other conditions.
TEW-714TRU User's Guide Product Overview
Front Panel

| Reset Button Push and hold for 2 seconds to reset TEW-714TRU | ||
| LED Indicator | OFF Powered off | or LED system boot up |
| Blinking red System | m is not ready | |
| Blinking orange | Looking for Internet connection | |
| Blinking Green W | PS pairing in progress | |
| Solid Green Inter | net connection established | |
| Network Port | Connects to hotel network or your laptop by network cable. (This port behaves differently in different operation modes.) | |
| USB Share Port | Plug in your USB flash drive or portable hard drive for instant file sharing | |
| USB Quick Charge Port | Charges your iPhone, iPad, or smart phone | |
Power Plugs

TEW-714TRU has a built-in universal power adapter. Simply choose the type of plug that matches the available power source and plug in the TEW-714TRU.

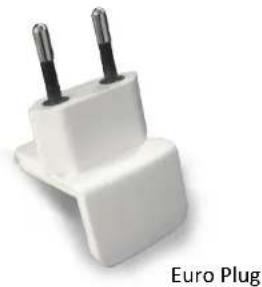

TEW-714TRU User's Guide Product Overview
Side View Product Preset Information

Network ON/OFF Switch

WPS Network Mode Button Selection Switch
| Network ON/OFF Switch | ON | Turn on TEW-714TRU network and file sharing services. |
| OFF | The network service is turned off. The USB Quick Charge Port will still work if TEW-714TRU is plugged in to a power source. | |
| WPS Button | Push and release the WPS button to activate WPS pairing. The LED indicator will begin blinking green when WPS is activated | |
| Network Mode Selection Switch | Select one of the three network modes: router, repeater, and WISP. Then plug TEW-714TRU in to a power source to start service. | |

Preset label on package
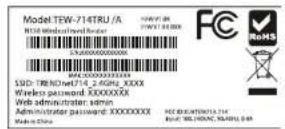
Device label
with preset information
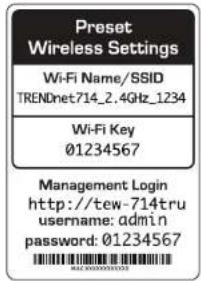
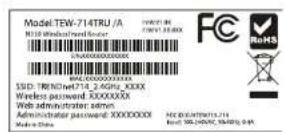
There are two preset product labels comes with the package. The first label is located on plastic wrapping of TEW-714TRU. The second label is located on the bottom of the TEW-714TRU. You can find default SSID, wireless key, administrator account name, and administrator password there. The default static management IP is 192.168.10.1.
TEW-714TRU User's Guide General Setups
General Setups
Where to find setup information
The TEW-714TRU is a multi-functioning router and your best traveling partner. Depending on your location and Internet availability, you need to setup your TEW-714TRU to operate in different network mode from time to time. This section describes general network setups and how to access system configurations. For specific setup task, please go to the page directly.
USB Power Charging: The TEW-714TRU Quick Charge Port can recognize iPhones, iPads, and many portable devices for quick power charging. Read instructions here for more details. ...... page 4
Web Management: How to log into the web management interface .... page 5
Router: If you have a wired Internet connection, you can set network mode to Router mode to connect to the Internet ...... page 7
WISP: Wireless Internet Service Provider mode. If you have an 802.11 wireless connection provided by the ISP, hotel, library, or hot spot and you want to share this connection to your multiple devices, you can setup TEW-714TRU in WISP mode ...... page 9
Repeater: Simply repeats weak Wi-Fi signals to a better Internet connection ...... page 13
System Configuration: The TEW-714TRU has many advanced configuration option; Read this section for complete instructions on how to fine tune your TEW-714TRU. page 18
File Sharing: To download picture from your camera or share documents in a meeting, simply plug in your flash drive to the USB File Share Port. For more information, see this section ....page 30
Reset Your Router
All instructions in this user's guide assume that you have a brand new TEW-714TRU out of box, or that you have reset your configurations to factory default. If you are not sure whether your TEW-714TRU currently set to factory defaults, power on your TEW-714TRU, wait for the LED lights up, then press and hold the Reset button at the bottom of router for 2 seconds.

USB Power Charging
TEW-714TRU comes with a USB Charge Port which is the lower the USB port on the TEW-714TRU. This power charging port detects iPhones, smart phones and tablets. When the TEW-714TRU detects your portable device, it will intelligently communicate with it, providing more than 500mA (up to 2.1A) to quickly charge your device. For devices not recognized by the TEW-714TRU, you can still charge your device with 500mA limit gracefully.
* Router Switch: If you want TEW-714TRU works as a charger only, you can switch off the router
TEW-714TRU User's Guide General Setups
Web Management
This section shows you how to setup a connection with the TEW-714TRU and how to login to the web management page.
1 Choose the power plug suitable to your traveling area. Slide in the power plug. Push it firmly until it clicks.


2 Switch the TEW-714TRU wireless router on and then plug into a wall socket.
OFF

ON
3 Search for available wireless connections in your computer network settings. The default SSID of TEW-714TRU is shown on the preset label and the device label. This is the SSID that you will need to connect to. When your computer prompts you for the wireless key, you can push the WPS button on TEW-714TRU to send the wireless key automatically, or you can enter the wireless key manually. The default wireless key can be found on the preset label on the package or on the device label on the bottom of the TEW-714TRU.

Preset label on package

Device label with preset information

TEW-714TRU User's Guide General Setups
4 Open a web browser and enter http://TEW-714TRU to access the web administration page.

If you have a static IP set on your PC, please open a web browser and enter http://192.168.10.1 The TEW-714TRU login page will appear.

Enter the administrator login information (The default user name is admin and the password is printed on the preset label and the device label.)

* Please reference the troubleshooting section if you are unable to access the administration web page.
TEW-714TRU User's Guide Setup Wizards
Setup Wizards
Router Mode
If you have an Ethernet connection want to connect to it wirelessly, or if you have friends or family with you and want to share a single Internet connection, or if you want to connect multiple portable devices, such as laptops, tablets, and smart phones, you can select router mode to network your devices..

1 Choose the power plug suitable to your traveling area. Slide in the power plug. Push it firmly until it clicks.

2 Push the power button to the "ON" position and the Network Mode button to "Router" position.

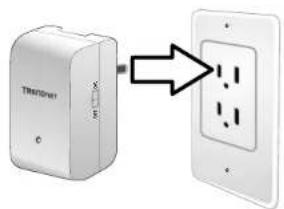
3 Plug TEW-714TRU into a wall socket.
TEW-714TRU User's Guide Setup Wizards
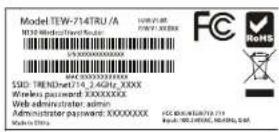
4 Search for available wireless connections in your computer network settings. The default SSID of TEW-714TRU is shown on the preset label and the device label. This is the SSID that you will need to connect to.

Preset label on package
Device label with preset information

When your computer prompts you for the wireless key, you can push the WPS button on TEW-714TRU to send the wireless key automatically, or you can enter the wireless key manually. The default wireless key can be found on the preset label on the package or on the device label on the bottom of the TEW-714TRU.
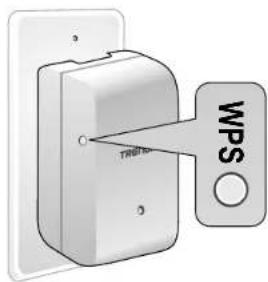
5 Connect one end of network cable to TEW-714TRU network port. Connect the other end of network cable to hotel network port or a network router. Then you are connecting to the Internet.

You are connecting to the Internet
TEW-714TRU User's Guide Setup Wizards
WISP Mode
If you have a Wi-Fi connection available in a hotel, airport, or coffee shop and you want to share the single connection with your friends or family, or if you want to provide wireless to multiple portable devices, such as laptop, tablets, or smart phones, you can set the TEW-714TRU to WISP (Wireless ISP) mode to network your devices.

1 Choose the power plug suitable to your traveling area. Slide in the power plug. Push it firmly until it clicks.

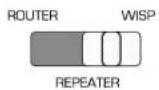
2 Push the power button to the "ON" position and the Network Mode button to "WISP" position.

3 Plug TEW-714TRU into a wall socket.

TEW-714TRU User's Guide Setup Wizards
4 Search for available wireless connections in your computer network settings. The default SSID of TEW-714TRU is shown on the preset label and the device label. This is the SSID that you will need to connect to.

Preset label on package

Device label with preset information

When your computer prompts you for the wireless key, you can push the WPS button on TEW-714TRU to send the wireless key automatically, or you can enter the wireless key manually. The default wireless key can be found on the preset label on the package or on the device label on the bottom of the TEW-714TRU.

TEW-714TRU User's Guide Setup Wizards
5 Open a web browser and enter http://TEW-714TRU to access the web administration page.

If you have a static IP set on your PC, please open a web browser and enter http://192.168.10.1 The TEW-714TRU login page will appear.

Enter the administrator login information (The default user name is admin and the password is printed on the preset label and the device label.)
* Please reference the troubleshooting section if you unable to access the administration web page.
6 Click on the Basic tab, then click the Wizard button to begin the WISP setup wizard. Read the description and then click on Next.

7 Choose Automatic Setup to automatically search for available wireless connections. Click Next.

TEW-714TRU User's Guide Setup Wizards
8 Choose the wireless network you want to join in. Click Select on the row, then click Next
If you don't see the wireless network you want to join, click Site Survey to search the network again. Or, you can skip this step and enter your network information manually.

9 Enter the Wi-Fi key for your wireless Internet connection, and then click Apply.
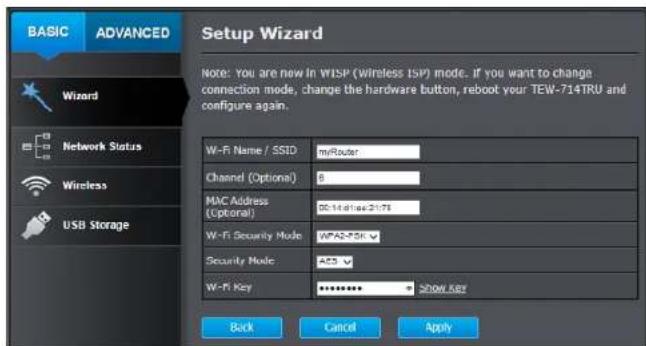
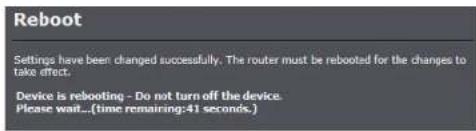
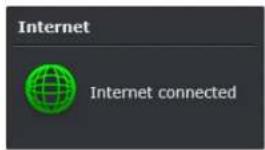
10 The TEW-714TRU will reboot and connect to the Internet.
TEW-714TRU User's Guide Setup Wizards
Repeater Mode
If you are experiencing weak wireless connection and want to extend the wireless range, you may want to setup the TEW-714TRU in Repeater mode to extend the wireless range. The TEW714TRU's repeater mode can be easily setup. It copies the same wireless security setup from your access point.

1 Choose the power plug suitable to your traveling area. Slide in the power plug. Push it firmly until it clicks.

2 Push the power button to the "ON" position and the Network Mode button to "Repeater" position.

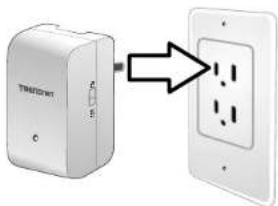
3 Plug TEW-714TRU into a wall socket.
TEW-714TRU User's Guide Setup Wizards
4 Setup with WPS button: If you have the right to enable the WPS pairing process on access point or router, you can copy the wireless settings by pushing WPS buttons in this step. Otherwise, skip this step and go to step 5 directly.
a) Push WPS button on the access point for 2 seconds.
b) Push WPS button on TEW-714TRU for 2 seconds.
c) The LED indicator will blink in green when proceed the pairing. After pairing, if success, the TEW-714TRU will reboot. The LED indicator will off for about a minute, then blink in amber, and finally shows solid green. It means the repeater is setup properly.
5 Search for available wireless connections in your computer network settings. The default SSID of TEW-714TRU is shown on the preset label and the device label. This is the SSID that you will need to connect to.

Preset label on package

Device label with preset information

Enter wireless key manually. The default wireless key can be found on the preset label on the package or on the device label on the bottom of the TEW-714TRU.
TEW-714TRU User's Guide Setup Wizards
6 Open a web browser and enter http://TEW-714TRU to access the web administration page.

If you have a static IP set on your PC, please open a web browser and enter http://192.168.10.1 The TEW-714TRU login page will appear.
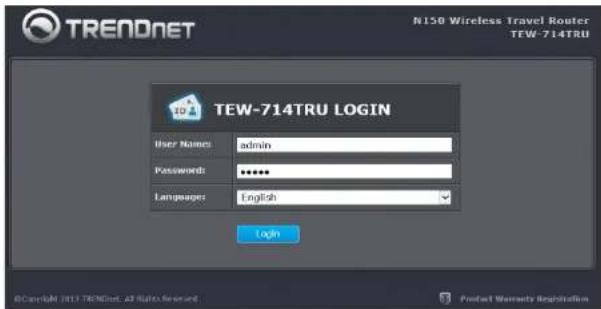
Enter the administrator login information (The default user name is admin and the password is printed on the preset label and the device label.)
* Please reference the troubleshooting section if you unable to access the administration web page.
7 Click on the Basic tab, then click the Wizard button to begin the Repeater setup wizard. Read the description and then click on Next.
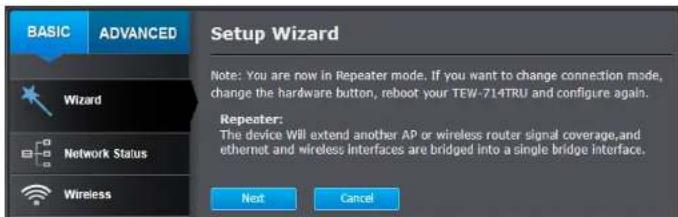
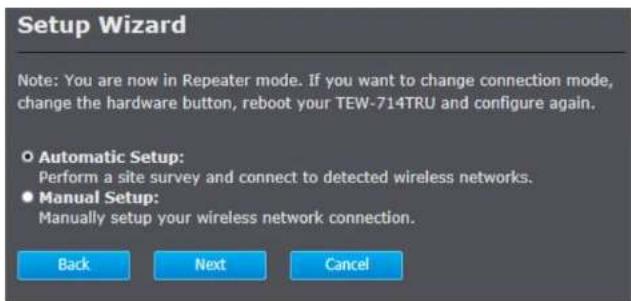
8 Choose Automatic Setup to automatically search for available wireless connections. Click Next.
TEW-714TRU User's Guide Setup Wizards
9 Choose the wireless network you want to join in. Click Select on the row, then click Next
If you don't see the wireless network you want to join, click Site Survey to search the network again. Or, you can skip this step and enter your network information manually.

10 Enter the Wi-Fi key of your wireless Internet connection, and then click Apply.

11 The TEW-714TRU will reboot and connect to the Internet.


TEW-714TRU User's Guide Locate Your Router Properly
Locate Your Router Properly
Wireless Performance Considerations
There are a number of factors that can impact the range of wireless devices. Adjust your wireless devices so that the signal is traveling in a straight path, rather than at an angle. The more material the signal has to pass through the more signal you will lose. Keep the number of obstructions to a minimum. Each obstruction can reduce the range of a wireless device. Position the wireless devices in a manner that will minimize the amount of obstructions between them.
Building materials can have a large impact on your wireless signal. In an indoor environment, try to position the wireless devices so that the signal passes through less dense material such as dry wall. Dense materials like metal, solid wood, glass or even furniture may block or degrade the signal.
Antenna orientation can also have a large impact on your wireless signal. Use the wireless adapter's site survey tool to determine the best antenna orientation for your wireless devices.
Interference from devices that produce RF (radio frequency) noise can also impact your signal. Position your wireless devices away from anything that generates RF noise, such as microwaves, radios and baby monitors.
Any device operating on the 2.4GHz frequency will cause interference. Devices such as 2.4GHz cordless phones or other wireless remotes operating on the 2.4GHz frequency can potentially drop the wireless signal. Although the phone may not be in use, the base can still transmit wireless signal. Move the phone's base station as far away as possible from your wireless devices.
Adjust the wireless power setting on your router if you have more than one wireless network. Covering only the range necessary. Covering more than necessary may cause wireless interference and slow down the networks.

TEW-714TRU User's Guide System Configuration
System configuration
System Management and Default Settings
If you have a brand new TEW-714TRU or if you just reset your TEW-714TRU to factory defaults by pressing and holding the reset button for over 2 seconds while it is powered on, your TEW-714TRU has the following settings:

Management IP : 192.168.10.1
Administrator name : admin
Administrator password : (printed on device label)
Default SSID : (printed on device label)
Default SSID passphrase : (printed on device label)
Preset label on package
Device label with preset information
* Instructions on how to login to the web administration page is on page 5
TEW-714TRU User's Guide System Configuration
Setup Wizard
The TEW-714TRU has three different setup wizards that switch based on the position of the network mode switch. To use the setup wizard in a certain network mode, push the power button to the "ON" position and the Network Mode button to the mode you want.
OFF

ON
Router mode - Dynamic IP address (DHCP)

1 Click on the Basic tab and then the Wizard button to enter the Router setup wizard. Read the description and then click Next.

2 Select DHCP and then click Next.

3 Click Apply to end the wizard.

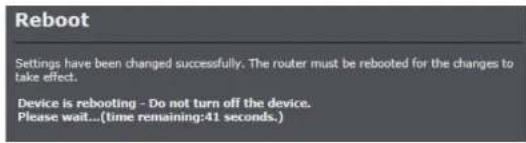
4 The TEW-714TRU will reboot and connect to the Internet.
TEW-714TRU User's Guide System Configuration
Router mode - Static Mode (Fixed IP)
1 Click on the Basic tab and then click Wizard button to enter the Router setup wizard. Read the description and then click Next.
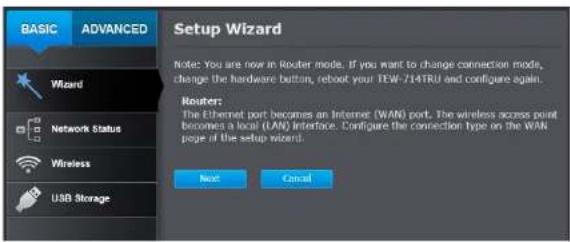
2 Select Static Mode and then click Next.

3 Enter your fixed IP address information.

IP Address : Specify an IP address IP Subnet Mask : Specify a subnet mask for the IP address Default Gateway : Default route for TEW-714TRU First DNS Address : Primary DNS server address Second DNS Address : Secondary DNS server address
TEW-714TRU User's Guide System Configuration
3 Click Apply to end the wizard.

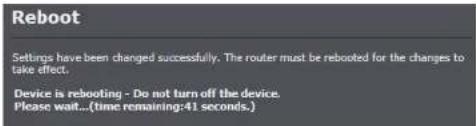
4 The TEW-714TRU will reboot and connect to the Internet.
Router mode - PPPoE
If you have a timed ADSL service, you may need to configure PPPoE for network authentication.
1 Click the Basic tab and then click Wizard button to enter to Router setup wizard. Read the description and then click Next.

2 Select PPPoE (ADSL) and then click Next.

TEW-714TRU User's Guide System Configuration
3 Enter your PPPoE account information.
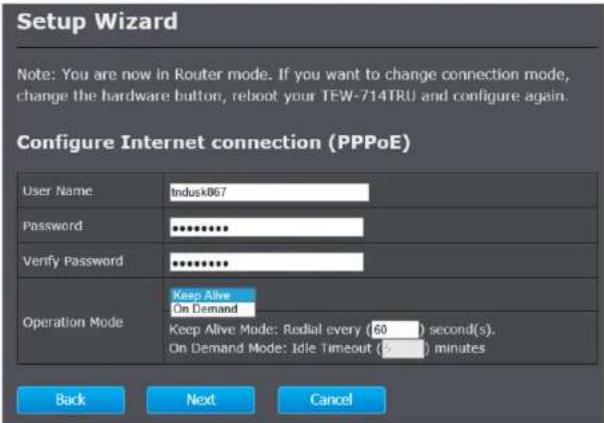
| User Name: | PPPoE account user name |
| Password: | PPPoE account password |
| Verify Password: | Enter the same password again to verify that your password was entered correctly. |
| Operation Mode: | Keep Alive Mode:In this mode, the TEW-714TRU will try to connect PPPoE service if the connection was dropped for a period of time. The time interval can be set in following text field. 0 means redial immediately if the connection was dropped. (default: 60 seconds) |
| On Demand Mode:In this mode, TEW-714TRU will try to connect PPPoE service when the traffic is going to the Internet. It will drop the connection after a period of time if there's no traffic going to the Internet. The time interval can be set in following text field. 0 means redial immediately if the connection was dropped. (default: 5 minutes) |
3 Click Apply to end the wizard.

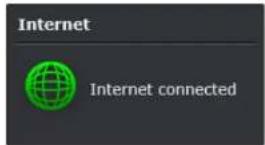
4 The TEW-714TRU will reboot and connect to the Internet.

TEW-714TRU User's Guide System Configuration
WISP mode
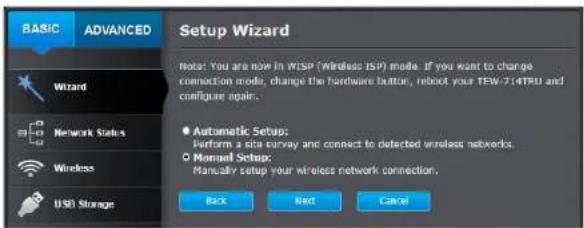
1 Click on the Basic tab and then click Wizard button to enter the WISP setup wizard. Read the description and click Next.

2 Choose Automatic Setup to search for available wireless connections automatically. Click Next.

You can choose Manual Setup to skip site survey. Choose this option if you have a hidden SSID that isn't broadcasting. Click Next and skip the next step, then go to step 4.
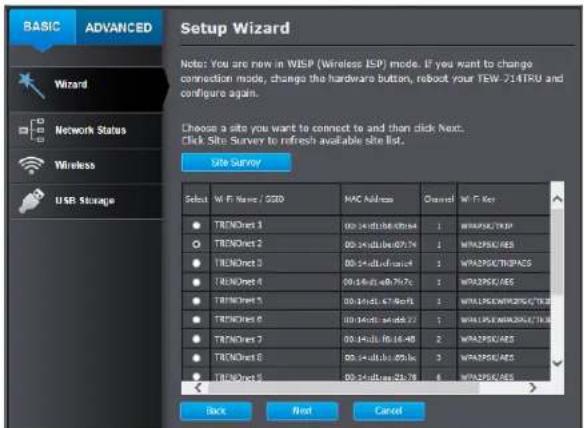
3 Choose the wireless network you want to join in. Click Select on the row, then click Next
If you don't see the wireless network you want to join, click Site Survey to search the network again. Or, you can skip this step and enter your network information manually.
TEW-714TRU User's Guide System Configuration
4 Enter the Wi-Fi key for your wireless Internet connection and then click Apply.
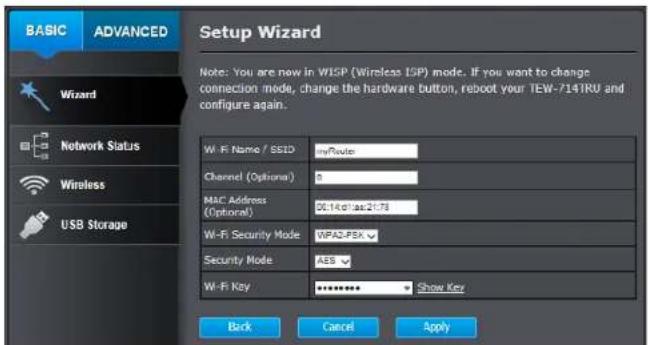
5 The TEW-714TRU will reboot and connect to the Internet.


Repeater mode

1 Click the Basic tab and then click Wizard button to enter Repeater setup wizard. Read the description and then click Next.

2 Choose Automatic Setup to search for available wireless connections automatically. Click Next.

You can choose Manual Setup to skip site survey. Choose this option if you have a hidden SSID that isn't broadcasting. Click Next and skip next step, then go to step 4.
TEW-714TRU User's Guide System Configuration

3 Choose the wireless network you want to join. Click Select on the row, then click Next
If you don't see the wireless network you want to join, click Site Survey to search the network again. Or, you can skip this step and enter your network information manually.

4 Enter the Wi-Fi key for your wireless Internet connection and then click Apply.
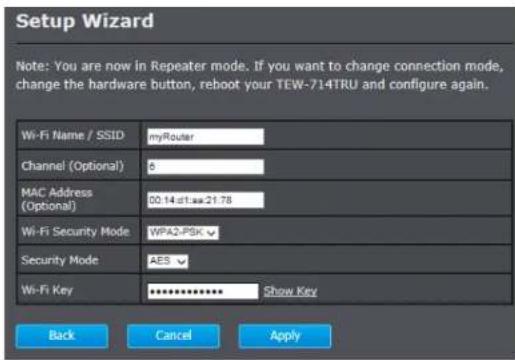
5 The TEW-714TRU will reboot and the router is setup properly

TEW-714TRU User's Guide System Configuration
Basic Network Status
This page shows the TEW-714TRU's basic information. The status is automatically updated every few seconds.
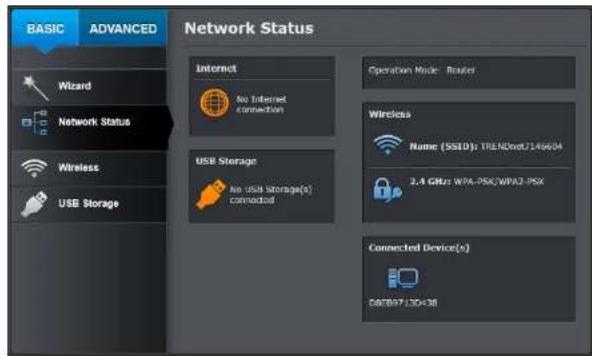
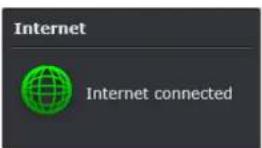
| Internet : | Globe in orange No Internet connection |
| Globe in green Internet connected | |
| USB Storage : | USB in orange No USB Storage |
| USB in green USB Storage detected | |
| Operation Mode : | Shows which one of the 3 modes, Router, Repeater, or WISP, is running now |
| Wireless : | Shows current wireless name (SSID) and encryption type. |
| Connected Devices : | Shows how many and what devices are connected to the TEW-714TRU. The label shows the MAC address of each device. |
Basic Wireless Network
Wireless Settings
Set up your wireless name, channel and security settings in this page. Select the SSID you want to set up, change the value and then click Apply to commit the changes. Enabling security prevents any unauthorized wireless clients from connecting to your network.
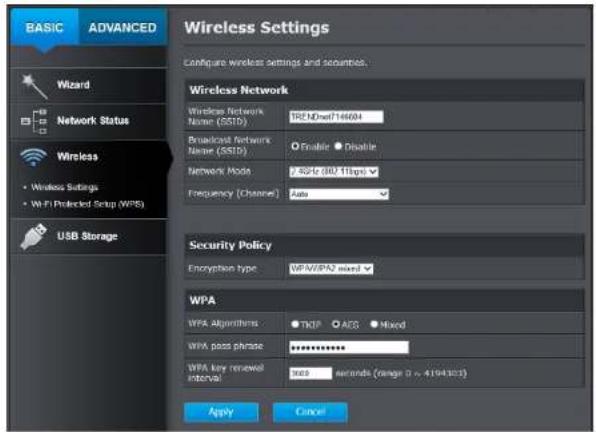
| Wireless Network | |
| Wireless Network Name (SSID) : | Enter your wireless network name here. |
TEW-714TRU User's Guide System Configuration
| Broadcast Radio Name (SSID): | Select Enable or Disable button. This is the SSID broadcast feature. When this option is set to Enable, your wireless network name is broadcast to anyone within wireless signal range. When this is disabled, you must enter the Wireless Network Name (SSID) on the client manually to connect to the network. |
| Network Mode :2.4GHz (802.11b)2.4GHz (802.11g)2.4GHz (802.11bg)2.4GHz (802.11n)2.4GHz (802.11bgn) | Choose between N only, G only, B only, BG mixed, or BGN mixed mode. The rule of the thumb is choose single mode if your devices all works in the same mode. Mixed mode increases compatibility, but sometimes lowers the transmission speed. |
| Frequency (Channel) :Auto2412MHz (Channel 1)2417MHz (Channel 2)2422MHz (Channel 3)2427MHz (Channel 4)2432MHz (Channel 5)2437MHz (Channel 6)2442MHz (Channel 7)2447MHz (Channel 8)2452MHz (Channel 9)2457MHz (Channel 10)2462MHz (Channel 11) | If you experience wireless interference and want to setup fixed channel, choose a channel number to switch your radio frequency. Otherwise, useautowhich is set by default.US: Channel 1 - 11Euro: Channel 1 - 13 |
| Security Policy :NoneWEPWPAWPA2WPA/WPA2 mixed | Choose between disable, WEP, WPA, WPA2 or mixed WPA and WPA2 for your wireless security. |
| Broadcast Radio Name (SSID): | Select Enable or Disable button. This is the SSID broadcast feature. When this option is set to Enable, your wireless network name is broadcast to anyone within wireless signal range. When this is disabled, you must enter the Wireless Network Name (SSID) on the client manually to connect to the network. |
| Network Mode :2.4GHz (802.11b)2.4GHz (802.11g)2.4GHz (802.11bg)2.4GHz (802.11n)2.4GHz (802.11bgn) | Choose between N only, G only, B only, BG mixed, or BGN mixed mode. The rule of the thumb is choose single mode if your devices all works in the same mode. Mixed mode increases compatibility, but sometimes lowers the transmission speed. |
| Frequency (Channel) :Auto2412MHz (Channel 1)2417MHz (Channel 2)2422MHz (Channel 3)2427MHz (Channel 4)2432MHz (Channel 5)2437MHz (Channel 6)2442MHz (Channel 7)2447MHz (Channel 8)2452MHz (Channel 9)2457MHz (Channel 10)2462MHz (Channel 11) | If you experience wireless interference and want to setup fixed channel, choose a channel number to switch your radio frequency. Otherwise, useautowhich is set by default.US: Channel 1 - 11Euro: Channel 1 - 13 |
| Security Policy :NoneWEPWPAWPA2WPA/WPA2 mixed | Choose between disable, WEP, WPA, WPA2 or mixed WPA and WPA2 for your wireless security. |
None
No wireless security. Anyone can access the TEW-714TRU and Internet without password.

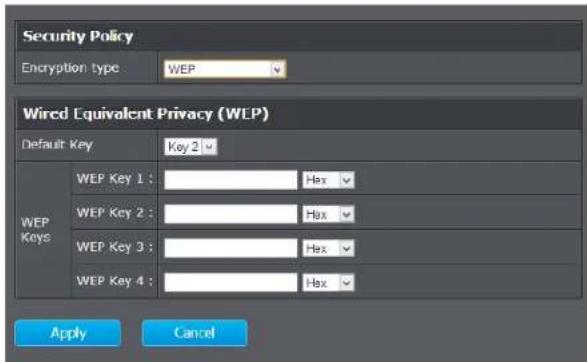
WEP
This is a minimum and legacy wireless security. Some legacy wireless products work only up to WEP encryption.
TEW-714TRU User's Guide System Configuration
| Default Key : | You may choose one of your 4 different WEP keys from below |
| Encryption Key 1-4 : | You may enter four different WEP keys. Select a key type from the drop-down list. Keys are defined by entering in a string in HEX (hexadecimal - using characters 0-9, A-F) or ASCII (American Standard Code for Information Interchange - alphanumeric characters) format. ASCII format is provided so you can enter a string that is easier to remember |
WPA, WPA2, Mixed WPA and WPA2
WPA2 is currently the most advanced wireless encryption.
Choose this option if all of your devices support WPA2.
Otherwise choose WPA or WPA & WPA2 mixed
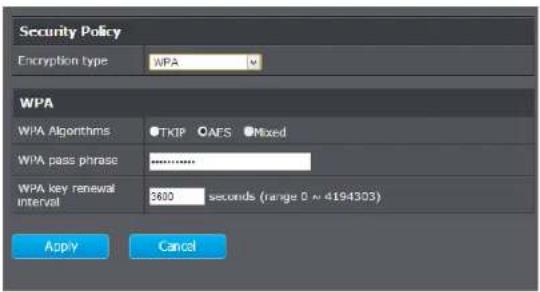
| WPA Algorithm : | Select TKIP, AES, or Mixed. This is the encryption algorithm used to secure data communication. TKIP (Temporal Key Integrity Protocol) provides per-packet key generation and is based on WEP. AES (Advanced Encryption Standard) is a very secure block based encryption. Note that, if the bridge uses the AES option, the bridge can associate with the access point only if the access point is also set to use only AES. |
| WPA pass phrase : | The pass-phrase is up to 63 alphanumeric characters in ASCII (American Standard Code for Information Interchange) format at both ends of the wireless connection. It cannot be shorter than eight characters, although for proper security it needs to be of ample length and should not be a commonly known phrase. This phrase is used to generate session keys that are unique for each wireless client |
| WPA key renewal interval : | Specify how often the wireless key should be renegotiated. Shorter time intervals are more secure, but cause more overhead.(default: 3600 seconds/1 hour) |
TEW-714TRU User's Guide System Configuration
WPS
WPS is the simplest way to connect a wireless client to the TEW-714TRU. You don't have to select the encryption mode and fill in a long encryption passphrase every time you try to setup a wireless connection. You only need to press a button on both the wireless client and the TEW-714TRU, and the WPS will do the rest for you.

WPS Config
Choose Enable or Disable and then click Apply to enable or disable WPS functionality. The default setup is enabled.
WPS Summary
This summary shows WPS settings of TEW-714TRU. You can generate a new AP PIN by click Generate. Or, you can click Reset to change the WPS settings back to default.
WPS Progress
The TEW-714TRU supports two types of WPS: WPS via Push Button and WPS via PIN code. If you want to use the Push Button, you have to push a specific button on the wireless client or in the utility of the wireless client to start the WPS pairing. Make sure you select Push Button Configuration, and then click the Apply button in this section to start WPS pairing.
If you want to use the PIN code, you have to know the PIN code of the wireless client and switch it to WPS mode, then fill-in the PIN code of the wireless client in the PIN text field. Select PIN and then click Apply.
WPS Status
The WPS status window shows the WPS actions the TEW-714TRU is taking. It's shown here for trouble shooting purpose.
TEW-714TRU User's Guide System Configuration
File Sharing
Simply plug in your flash drive to the File Share Port, and you can create an instant file sharing folder between your devices.

Only File Share Port (the upper one) works for file sharing. The other USB port does not work with file sharing. To connect to multiple flash drives, You can plug in a USB HUB to File Share Port and connect your flash drives to the USB HUB.


File sharing works only in Router mode or WISP mode. You can hardly tell when you are connecting to your TEW-714TRU and when you are connecting to access point. So, the file sharing is not working in Repeater mode.


Plug in you flash device to the File Share Port
Access folder through web browser
1 Make sure you are connecting to the TEW-714TRU correctly
2 Open a web browser and enter http://TEW-714TRU or the host name that you setup in to access administration page.

If you have a static IP set on your PC, please open a web browser and enter http://192.168.10.1 The TEW-714TRU login page will appear.

Enter login information (You can setup up to four accounts for file sharing. If you didn't setup any other user before, log in as an administrator. The default administrator name is "admin")
TEW-714TRU User's Guide System Configuration
3 Click on the Basic tab and then click USB Storage. Plug in your USB flash drive if you have not plugged it in yet.
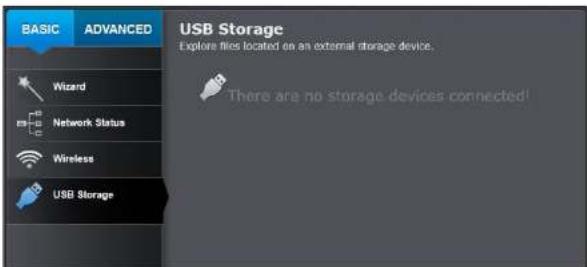
2 The TEW-714TRU will recognize the USB storage in a couple of seconds. Reload your web page to access your files.

Navigate through folders: Click on the folder name to get to the sub folder you want to go. Click the parent directory by clicking the folder name in the Path.
Open a file: Click on the file name and the file will be opened in browser.
Download a file: Right-click on the file name. Then click on Save target as ... to save the file on your computer.
| Disk partition: | If you have more than one flash drive to connect to the File Share Port through USB HUB, you can change the drive location by clicking Disk Partition |
| Delete file: | Select the file by checking the box in front of the file name. (If you want to select all files, check the box in the first row.) Then click Delete |
| Upload file: | Click Upload, then choose the file you want to upload and click OK. |
| Refresh: | Click Refresh, the file list will be refreshed immediately. |
| Eject Disk: | Before you remove the flash drive from the USB port, please click Eject Disk. Wait for the TEW-714TRU release USB storage device. |
TEW-714TRU User's Guide System Configuration
Access files through Windows file sharing (CIFS)

If you just change the user information. Please power cycle your TEW-714TRU to make file system recognize the new user privileges.
For Windows system:
1 Open your File Explorer

2 Enter two backward slashes followed by the TEW-714TRU's host name in the directory field. The default host name is TEW-714TRU. With the default host name, enter \tew-714tru (case insensitive)

\\tew-714tru
3 Login with one of the user account, (The default administrator user name is "admin" and the password is printed on the preset label and the device label. Please reference "User Settings" on page 37 for more details on user account settings.)

For OS X systems:
1 Open the Finder

2 Click Go > Connect to server or press command + K hot key
![Go Window Help Back ⌘[ Forward ⌘] Select Startup Disk on Desktop ⌘T All My Files ⌘F Documents ⌘O Desktop ⌘D Downloads ⌘L Home ⌘H Computer ⌘C AirDrop ⌘R Network ⌘K Applications ⌘A Utilities ⌘U Recent Folders ▶ Go to Folder... ⌘G Connect to Server... ⌘K](/content/2026/05/922966/images/789940088618fb933559d652c95fedc2df8c53fc7a9f87d6d93847ea86e2c02a.jpg)
3 Enter smb:// followed by the TEW-714TRU host name in the directory field. The default host name is TEW-714TRU. With the default host name, please enter enter smb://tew-714tru (case insensitive). Then click Connect to connect to TEW-714TRU's USB storage.

TEW-714TRU User's Guide System Configuration
4 Login with one of the user account, (The default administrator user name is "admin" and the password is printed on the preset label and the device label. Please reference "User Settings" on page 37 for more details on user account settings.)
Access files through File Transmission Protocol (FTP)
Enter your host name as the FTP server address and enter your user information to connect to TEW-714TRU USB storage. The default host name is TEW-714TRU. With the default host name, please enter tew-714tru (case insensitive) as the host name. Enter one of the user name and password to login to FTP. (The default administrator user name is "admin" and the password is printed on the preset label and the device label. Please reference "User Settings" on page 37 for more details on user account settings.)

More than one USB storage device
1 You can connect more than one USB storage device to the TEW-714TRU File Share Port by expanding USB ports with a USB HUB.

File sharing works only in Router mode or WISP mode. Only File Share Port (the upper one) works for file sharing. The other USB port does not work with file sharing.
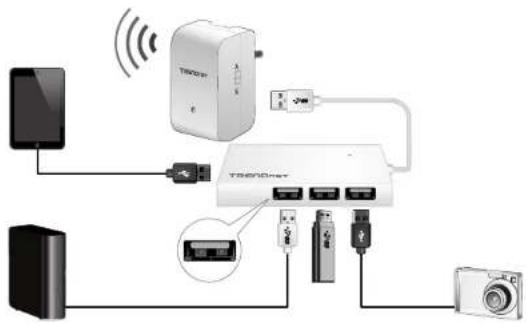
2 The USB storage page will show different devices as different partitions.

Manual
Access the guide for the TRENDnet TEW-714TRU here, completely free. This manual falls under the powerline adapters category and has been rated by 2 users with an average score of 8.8. The manual is presently available in the following languages: English. If you have any specific questions about the TRENDnet TEW-714TRU or need further assistance with your product, feel free to ask.
Ask your question here

TEW-714TRU User's Guide Advanced Settings
Time Zone Setting
The Time Zone Setting allows your TEW-714TRU maintain accurate system logs.

| NTP Settings | |
| Current Time : | The time TEW-714TRU currently has. You can click Sync with host to synchronize the TEW-714TRU with your PC. |
| Time Zone : | Select the time zone of the you are currently in. The TEW-714TRU will set its time based on your selection. |
| NTP Server : | Specify a time server (NTP server) to synchronize with. (e.g. pool.ntp.org) |
| NTP synchronization : | What is the time interval TEW-714TRU synchronize the time with NTP server. Default: 6 hours. |
Apply : Click this button to apply the change
Cancel : Click this button to abandon the change
Wireless Client List
This page shows all wireless clients connected to this TEW-714TRU.

| MAC Address : | List the MAC address of wireless client |
| AID : | Association ID. A unique association number assigned by TEW-714TRU |
| PSM : | Power Saving Mode.1 : client power saving mode enabled0 : client power saving mode disabled |
| MIMO PS: | MIMO Power saving mode |
| MCS : | Modulation and Coding Scheme( 0 - 7 ) |
| BW : | Wireless Channel Bandwidth( 20 or 40 MHz) |
| SGI : | Short Guard Interval |
| STBC : | Space-time block code |
TEW-714TRU User's Guide Advanced Settings
System Log
This page allows users to view a running log of the TEW-714TRU's events and activities.

Clear : Click this button to clear up the log
Refresh : Click this button to refresh the log
Statistics
This page allows users to view system performance with key statistic numbers.

TEW-714TRU User's Guide Advanced Settings
User Settings
There are 4 user accounts with 3 levels of privileges setup in the TEW-714TRU.
The account on first row is preset as the default administrator. It cannot be disabled and it's privileges can not be changed. However, you can change the login user name and password for this account.
Three other accounts are available for router access and file sharing. They are disabled by default. Select the account you want and change the name, password, privileges and account enable/disable status. Then click Apply. The account settings will take effect immediately.

Please power cycle your TEW-714TRU to make file system recognize the new user privileges.

3 Privileges
| Administrator: Full administrative access to modify all TEW-714TRU settings and read/write access to attached storage devices |
| Power user: View, not edit, the TEW-714TRU's basic settings with read/write access to attached storage devices |
| Guest: View, not edit, basic TEW-714TRU settings with read only access to attached storage devices |
TEW-714TRU User's Guide Advanced Settings
System
This page allows you to do basic system management, upgrade firmware, restart system and reload factory defaults.

Reset to Factory Default
Click Load Default Settings to reload factory defaults to the TEW-714TRU. Always load factory defaults after you upgrade to a new firmware.
Import Settings / Export Settings
Click Export to save your TEW-714TRU system settings. Choose a previous saved file by clicking Select File and then click Import to load your previous settings.
Upgrade Firmware
TRENDnet may periodically release firmware upgrades that might add features or fix problems associated with your TRENDnet model and version. To find out if there is a firmware upgrade available for your device, please check your TRENDnet model and version using the link.
http://www.trendnet.com/downloads/
- If a firmware upgrade is available, download the firmware to your computer.
- Unzip the file to a folder on your computer.
- Log into the TEW-714TRU
- Click on Advanced and then System
- Click Browse... and navigate to the folder on your computer in which the unzipped firmware file (.bin) is.
- Located and select it the firmware file.
- Click Apply.
- After system reboot, comeback to the same page reset your settings to default again.
Import Settings / Export Settings
Click Logout to leave the web management page.
TEW-714TRU User's Guide Advanced Settings
Advanced Setups
LAN Settings

| Hostname : | The host name is the name TEW-714TRU's identity on a network. If you change your host name, you have to change the web access or file access directory name. |
| IP Address : | Specify an IP address |
| Subnet Mask : | Specify a subnet mask for the IP address |
| MAC Address : | MAC address of LAN interface |
| DHCP Type : | Enable or disable DHCP server |
| DHCP Start IP : | Starting IP address of DHCP pool |
| DHCP End IP : | Last IP address of DHCP pool |
| Subnet Mask : | Specify a subnet mask for the IP address |
| Primary DNS Server : | Primary DNS server address |
| Secondary DNS Server : | Secondary DNS server address |
| Default Gateway : | Default route for TEW-714TRU |
| DHCP Lease Time : | How long the assigning IP will be valid |
Apply : Click this button to apply the change
Cancel : Click this button to abandon the change
TEW-714TRU User's Guide Advanced Settings
Internet Settings
Setup your Internet access with DHCP, fixed IP or PPPoE

DHCP
Enter the host name (optional) and click Apply.

Static Mode (Fixed IP)
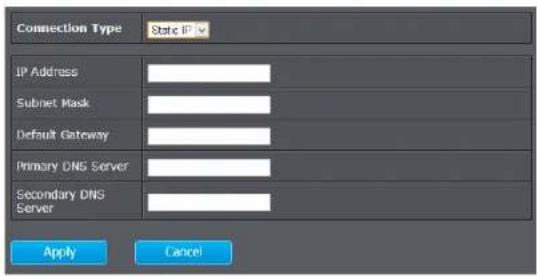
| IP Address : | Specify an IP address |
| Subnet Mask : | Specify a subnet mask for the IP address |
| Default Gateway : | Default route for TEW-714TRU |
| Primary DNS Server : | Primary DNS server address |
| Secondary DNS Server : | Secondary DNS server address |
Apply : Click this button to apply the change
Cancel: Click this button to abandon the change
PPPoE (ADSL)

| User Name : | PPPoE account user name |
| Password : | PPPoE account user name |
| Verify Password : | Enter the same password again to verify your password was entered correctly. |
TEW-714TRU User's Guide Advanced Settings
| Operation Mode : | Keep Alive Mode:With this mode, TEW-714TRU will try to connect PPPoE service if the connection was dropped for a period of time. The time interval can be set in following text field. 0 means redial immediately if the connection was dropped. (default: 60 seconds) |
| On Demand Mode:With this mode, TEW-714TRU will try to connect PPPoE service when the traffic is going to the Internet. It will drop the connection after a period of time if there's no traffic going to Internet. The time interval can be set in following text field. 0 means redial immediately if the connection was dropped. (default: 5 minutes) |
Apply : Click this button to apply the change
Cancel: Click this button to abandon the change
Dynamic DNS Settings
Dynamic DNS setting allows your local services to be found by Internet names. Enter the DDNS service information and then click Apply.

Apply : Click this button to apply the change
Cancel: Click this button to abandon the change
TEW-714TRU User's Guide Advanced Settings
IPv6 Settings
The TEW-714TRU can perform IPv6 static routing. Enable IPv6 static routing and enter the routing information.

| LAN IP/Prefix : | Specify LAN IPv6 address and its network size |
| WAN IP/Prefix : | Specify WAN IPv6 address and its network size |
| Default Gateway : | Default route from LAN to WAN |
TEW-714TRU User's Guide Advanced Settings
Advanced Wireless Settings

| Channel Bandwidth : | Select channel bandwidth for 1) Dynamic select 20 MHz and 40MHz bandwidth or 2) choose 20MHz channels only. |
| 20/40 Coexistence : | Enable or disable 20MHz coexist with 40MHz channel or not. |
| MCS : | Select different 802.11N Modulation and Coding Scheme (MCS) against particular wireless noise. Or, select auto letting TEW-714TRU select MCSs dynamically. |
| BG Protection Mode : | Enable BG protection if you have 802.11b and 802.11b clients running at the same time. This protection mode ensures that the router waits long enough for slower protocols. |
| Beacon Interval : | Beacons are packets sent by a TEW-714TRU to synchronize wireless devices. Specify a Beacon Interval value between 20 and 999. The default value is set to 100 milliseconds. |
| Data Beacon Rate (DTIM) : | A DTIM is a countdown informing clients of the next window for listening to broadcast and multicast messages. When the TEW-714TRU has buffered broadcast or multicast messages for associated clients, it sends the next DTIM with a DTIM Period value. Wireless clients detect the beacons and awaken to receive the broadcast and multicast messages. The default value is 1. Valid settings are between 1 and 255. |
| Fragment Threshold : | Packets over the specified size will be fragmented in order to improve performance on noisy networks. Specify a value between 256 and 2346. The default value is 2346. |
| RTS Threshold : | Packets over the specified size will use the RTS/CTS mechanism to maintain performance in noisy networks and preventing hidden nodes from degrading the performance. Specify a value between 0 and 2347. The default value is 2347 |
TEW-714TRU User's Guide Advanced Settings
| TX Power : | Wireless signal transmission power. Set transmission power to appropriate value to avoid wireless interference. The default value is 100%. Valid settings are between 1 and 100 (%). |
| Short Preamble : | Select a short or long preamble. For optimum performance it is recommended to also configure the client device to the same preamble type. |
| Short Slot : | Enable Short Slot Time to increase performance if you do not have 802.11b clients |
| Tx Burst : | Condense transmission in a short period of time or not. It is energy saving to condense transmission, but it may cause jitter or delay in real-time communication. |
| Packet Aggregate : | Combine short packets and send them together. Enabling packet aggregate will increase data throughput. However, it may cause jitters or delays in real-time communication. |
Apply : Click this button to apply the change
Cancel: Click this button to abandon the change
TEW-714TRU User's Guide Troubleshooting
Troubleshooting
Situation: I enterd http://tew-714tru but I am not able to access the unit. What should I do?
Solution:
Please enter the default IP address (192.168.10.1) to login.
Proceed following steps:
- Turn the TEW-714HRE's power switch on.
- Reset the device to factory default settings by pushing the reset button for 2 seconds.
- Make sure you have a good wireless connection to the default SSID:TRENDnet714_2.4GHz_XXXX printed on device label.
- Make sure your laptop/PC does not join to any domain
- Open a browser and enter http://tew-714tru (The leading http:// has to be entered to resolve the host name)
Situation: How do I reset the device to factory default?
Solution:
- Use a pin such as a staple to press and hold the reset button at the bottom of the TEW-714TRU for 2 seconds.
- You can also reset from the management page.
Situation: I enterd http://192.168.10.1 but I am not able to access the unit. What should I do?
Solution:
- Turn the TEW-714TRU's switch on.
- Reset the device to factory default settings by pushing the reset button for 2 seconds.
- Make sure you have a good wireless connection to the default SSID:TRENDnet714_2.4GHz_XXXX printed on device label.
- Make sure your computer has no other network connections. For example, disconnect your Ethernet cable.
- Open a browser and enter http://192.168.10.1
Situation: How do I make sure my unit is connected to a router/AP?
Solution:
The LED will turn solid green when the TEW-714TRU is successfully connected to a router/AP.
Situation: How can I access the TEW-714TRU once it is setup?
Solution:
You can use its host name (http://tew-714tru) or IP address to access the TEW-714tru. When setup in repeater mode, the TEW-714TRU will get an IP address from your router (DHCP). Check the DHCP client list on your router if you want to access the TEW-714TRU with its IP address.
TEW-714TRU User's Guide FCC Interference Statement
Federal Communication Commission Interference Statement
This equipment has been tested and found to comply with the limits for a Class B digital device, pursuant to Part 15 of the FCC Rules. These limits are designed to provide reasonable protection against harmful interference in a residential installation. This equipment generates uses and can radiate radio frequency energy and, if not installed and used in accordance with the instructions, may cause harmful interference to radio communications. However, there is no guarantee that interference will not occur in a particular installation. If this equipment does cause harmful interference to radio or television reception, which can be determined by turning the equipment off and on, the user is encouraged to try to correct the interference by one of the following measures:
• Reorient or relocate the receiving antenna.
- Increase the separation between the equipment and receiver.
- Connect the equipment into an outlet on a circuit different from that to which the receiver is connected.
- Consult the dealer or an experienced radio/TV technician for help.
FCC Caution: Any changes or modifications not expressly approved by the party responsible for compliance could void the user's authority to operate this equipment.
This device complies with Part 15 of the FCC Rules. Operation is subject to the following two conditions: (1) This device may not cause harmful interference, and (2) this device must accept any interference received, including interference that may cause undesired operation.

IMPORTANT NOTE:
FCC Radiation Exposure Statement:
This equipment complies with FCC radiation exposure limits set forth for an uncontrolled environment. This equipment should be installed and operated with minimum distance 20cm between the radiator & your body.
This transmitter must not be co-located or operating in conjunction with any other antenna or transmitter.
The availability of some specific channels and/or operational frequency bands are country dependent and are firmware programmed at the factory to match the intended destination. The firmware setting is not accessible by the end user.
TEW-714TRU User's Guide Declaration of Conformity
Europe – EU Declaration of Conformity
This device complies with the essential requirements of the R&TTE Directive 1999/5/EC, 2006/95/EC and 2009/125/EC.. The following test methods have been applied in order to prove presumption of conformity with the essential requirements of the R&TTE Directive 1999/5/EC, 2006/95/EC and 2009/125/EC:
EC No. 278/2009
EN 60950-1:2006+A11:2009+A1:2010+A12:2011
IEC 60950-1:2005 (2nd Edition) Am 1:2009
Safety of Information Technology Equipment
EN 62311:2008
Product standard to demonstrate the compliance of radio base stations and fixed terminal stations for wireless telecommunication systems with the basic restrictions or the reference levels related to human exposure to radio frequency electromagnetic fields (110MHz - 40 GHz) - General public
EN 300 328 V1.8.1
Electromagnetic compatibility and Radio spectrum Matters (ERM); Wideband transmission systems; Data transmission equipment operating in the 2,4 GHz ISM band and using wide band modulation techniques; Harmonized EN covering essential requirements under article 3.2 of the R&TTE Directive
EN 301 489-1 V1.9.2
Electromagnetic compatibility and Radio Spectrum Matters (ERM); ElectroMagnetic Compatibility (EMC) standard for radio equipment and services; Part 1: Common technical requirements
EN 301 489-17 V2.2.1
Electromagnetic compatibility and Radio spectrum Matters (ERM); ElectroMagnetic Compatibility (EMC) standard for radio equipment and services; Part 17: Specific conditions for 2,4 GHz wideband transmission systems and 5 GHz high performance RLAN equipment
This device is a 2.4 GHz wideband transmission system (transceiver), intended for use in all EU member states and EFTA countries, except in France and Italy where restrictive use applies.
In Italy the end-user should apply for a license at the national spectrum authorities in order to obtain authorization to use the device for setting up outdoor radio links and/or for supplying public access to telecommunications and/or network services.
This device may not be used for setting up outdoor radio links in France and in some areas the RF output power may be limited to 10 mW EIRP in the frequency range of 2454 – 2483.5 MHz. For detailed information the end-user should contact the national spectrum authority in France.

RoHS
This product is RoHS compliant.

TEW-714TRU User's Guide Declaration of Conformity
| česky [Czech] | TRENDnet tímto prohlašuje, že tento TEW-714TRU je ve shodě se základními požadavky a dalšími příslušnými ustanoveními směrnice 1999/5/ES, 2006/95/ES, a 2009/125/ES. |
| Dansk [Danish] | Undertegnede TRENDnet erklærer herved, at følgende udstyr TEW-714TRU overholder de væsentlige krav og øvrige relevante krav i direktiv 1999/5/EF, 2006/95/EF, og 2009/125/EF. |
| Deutsch [German] | Hiermit erklärt TRENDnet, dass sich das Gerät TEW-714TRU in Übereinstimmung mit den grundlegenden Anforderungen und den übrigen einschlägigen Bestimmungen der Richtlinie 1999/5/EG, 2006/95/EG und 2009/125/EG befindet. |
| Eesti [Estonian] | Käesolevaga kinnitab TRENDnet seadme TEW-714TRU vastavust direktiivi 1999/5/EÜ, 2006/95/EÜ ja 2009/125/EÜ põhinõuetele ja nimetatud direktiivist tulenevatele teistele asjakohastele sätetele. |
| English | Hereby, TRENDnet, declares that this TEW-714TRU is in compliance with the essential requirements and other relevant provisions of Directive 1999/5/EC, 2006/95/EC, and 2009/125/EC. |
| Español [Spanish] | Por medio de la presente TRENDnet declara que el TEW-714TRU cumple con los requisitos esenciales y cualesquiera otras disposiciones aplicables o exigibles de la Directiva 1999/5/CE, 2006/95/CE, 2009/125/CE y. |
| Eλληνική [Greek] | ME THN ΠΑΡΟΥΣΑ TRENDnet ΔΗΛΩΝΕΙ OTI TEW-714TRU ΣΥΜΜΟΡΦΩΝΕΤΑΙ ΠΡΟΣ ΤΙΣ ΟΥΣΙΩΔΕΙΣ ΑΠΑΙΤΗΣΕΙΣ ΚΑΙ ΤΙΣ ΛΟΙΠΕΣ ΣΧΕΤΙΚΕΣ ΔΙΑΤΑΞΕΙΣ ΤΗΣ ΟΔΗΓΙΑΣ 1999/5/EK, 2006/95/EK, 2009/125/EK καλ. |
| Français [French] | Par la présente TRENDnet déclare que l'appareil TEW-714TRU est conforme aux exigences essentielles et aux autres dispositions pertinentes de la directive 1999/5/CE, 2006/95/CE, 2009/125/CE et. |
| Italiano [Italian] | Con la presente TRENDnet dichiara che questo TEW-714TRU è conforme ai requisiti essenziali ed alle altre disposizioni pertinenti stabilite dalla direttiva 1999/5/CE, 2006/95/CE e 2009/125/CE. |
| Latviski [Latvian] | Ar šo TRENDnet deklarē, ka TEW-714TRU atbilst Direktīvas 1999/5/EK, 2006/95/EK, un 2009/125/EK būtiskajām prasībām un citiem ar to saistītajiem noteikumiem. |
| Lietuvių [Lithuanian] | Šiuo TRENDnet deklaruojá, kad šis TEW-714TRU atitinka esminius reikalavimus ir kitas 1999/5/EB, 2006/95/EB ir 2009/125/EB Direktyvos nuostatas. |
| nlNederlands[Dutch] | Hierbij verklaart TRENDnet dat het toestel TEW-714TRU in overeenstemming is met de essentiële eisen en de andere relevante bepalingen van richtlijn 1999/5/EG, 2006/95/EG, en 2009/125/EG. |
| mtMalti[Maltese] | Hawnhekk, TRENDnet, jiddikjara li dan TEW-714TRU jikkonforma mal-ħtiġijiet essenzjali u ma provvedimenti oħrajn relevanti li hemm fid-Dirrettiva 1999/5/KE, 2006/95/KE, u 2009/125/KE. |
| tmMagyar[Hungarian] | Alulirott, TRENDnet nyilatkozom, hogy a TEW-714TRU megfelel a vonatkoźó alapvető kõvetelményeknek és az 1999/5/EK irányelv, a 2006/95/EK és a 2009/125/EK irányelv egyéb elõírásainak. |
| plPolski[Polish] | Niniejszym TRENDnet oświadcza, że TEW-714TRU jest zgodny z zasadniczymi wymogami oraz pozostalými stosownymi postanowieniami Dyrektywy 1999/5/WE, 2006/95/WE i 2009/125/WE. |
| ptPortuguês[Portuguese] | TRENDnet declara que este TEW-714TRU está conforme com os requisitos essenciais e outras disposições da Directiva 1999/5/CE, 2006/95/CE e 2009/125/CE. |
| slSlovensko[Slovenian] | TRENDnet izjavlja, da je ta TEW-714TRU v skladu z bistvenimi zahtevami in ostalimi relevantnimi določili direktive 1999/5/ES, 2006/95/ES, a 2009/125/ES. |
| skSlovensky[Slovak] | TRENDnet týmto vyhlasuje, że TEW-714TRU spĺňa základné požiadavky a všetky príslušné ustanovenia Smernice 1999/5/EF. |
| fiSuomi[Finnish] | TRENDnet vakuuttaa täten että TEW-714TRU tyyppinen laite on direktiivin 1999/5/EY, 2006/95/EY ja 2009/125/EY oleellisten vaatimusten ja sită koskevien direktiivin muiden ehtojen mukainen. |
| svSvenska[Swedish] | Härmed intygar TRENDnet att denna TEW-714TRU står I överensstämmelse med de väsentliga egenskapskrav och övriga relevanta bestämmelser som framgår av direktiv 1999/5/EG, 2006/95/EG och 2009/125/EG. |
TEW-714TRU User's Guide Warranty
Limited Warranty
TRENDnet warrants its products against defects in material and workmanship, under normal use and service, for the following lengths of time from the date of purchase.
- TEW-714TRU – 3 Years Warranty
If a product does not operate as warranted during the applicable warranty period, TRENDnet shall reserve the right, at its expense, to repair or replace the defective product or part and deliver an equivalent product or part to the customer. The repair/replacement unit's warranty continues from the original date of purchase. All products that are replaced become the property of TRENDnet. Replacement products may be new or reconditioned. TRENDnet does not issue refunds or credit. Please contact the point-of-purchase for their return policies.
TRENDnet shall not be responsible for any software, firmware, information, or memory data of customer contained in, stored on, or integrated with any products returned to TRENDnet pursuant to any warranty.
There are no user serviceable parts inside the product. Do not remove or attempt to service the product by any unauthorized service center. This warranty is voided if (i) the product has been modified or repaired by any unauthorized service center, (ii) the product was subject to accident, abuse, or improper use (iii) the product was subject to conditions more severe than those specified in the manual.
Warranty service may be obtained by contacting TRENDnet within the applicable warranty period and providing a copy of the dated proof of the purchase. Upon proper submission of required documentation a Return Material Authorization (RMA) number will be issued. An RMA number is required in order to initiate warranty service support for all TRENDnet products. Products that are sent to TRENDnet for RMA service must have the RMA number marked on the outside of return packages and sent to TRENDnet prepaid, insured and packaged appropriately for safe shipment. Customers shipping from outside of the USA and Canada are responsible for return shipping fees. Customers shipping from outside of the USA are responsible for custom charges, including but not limited to, duty, tax, and other fees.
WARRANTIES EXCLUSIVE: IF THE TRENDNET PRODUCT DOES NOT OPERATE AS WARRANTED ABOVE, THE CUSTOMER'S SOLE REMEDY SHALL BE, AT TRENDNET'S OPTION, REPAIR OR REPLACE. THE FOREGOING WARRANTIES AND REMEDIES ARE EXCLUSIVE AND ARE IN LIEU OF ALL OTHER WARRANTIES, EXPRESSED OR IMPLIED, EITHER IN FACT OR BY OPERATION OF LAW, STATUTORY OR OTHERWISE, INCLUDING WARRANTIES OF MERCHANTABILITY AND FITNESS FOR A PARTICULAR PURPOSE. TRENDNET NEITHER ASSUMES NOR AUTHORIZES ANY OTHER PERSON TO ASSUME FOR IT ANY OTHER LIABILITY IN CONNECTION WITH THE SALE, INSTALLATION
MAINTENANCE OR USE OF TRENDNET'S PRODUCTS.
TRENDNET SHALL NOT BE LIABLE UNDER THIS WARRANTY IF ITS TESTING AND EXAMINATION DISCLOSE THAT THE ALLEGED DEFECT IN THE PRODUCT DOES NOT EXIST OR WAS CAUSED BY CUSTOMER'S OR ANY THIRD PERSON'S MISUSE, NEGLECT, IMPROPER INSTALLATION OR TESTING, UNAUTHORIZED ATTEMPTS TO REPAIR OR MODIFY, OR ANY OTHER CAUSE BEYOND THE RANGE OF THE INTENDED USE, OR BY ACCIDENT, FIRE, LIGHTNING, OR OTHER HAZARD.
LIMITATION OF LIABILITY: TO THE FULL EXTENT ALLOWED BY LAW TRENDNET ALSO EXCLUDES FOR ITSELF AND ITS SUPPLIERS ANY LIABILITY, WHETHER BASED IN CONTRACT OR TORT (INCLUDING NEGLIGENCE), FOR INCIDENTAL, CONSEQUENTIAL, INDIRECT, SPECIAL, OR PUNITIVE DAMAGES OF ANY KIND, OR FOR LOSS OF REVENUE OR PROFITS, LOSS OF BUSINESS, LOSS OF INFORMATION OR DATE, OR OTHER FINANCIAL LOSS ARISING OUT OF OR IN CONNECTION WITH THE SALE, INSTALLATION, MAINTENANCE, USE, PERFORMANCE, FAILURE, OR INTERRUPTION OF THE POSSIBILITY OF SUCH DAMAGES, AND LIMITS ITS LIABILITY TO REPAIR, REPLACEMENT, OR REFUND OF THE PURCHASE PRICE PAID, AT TRENDNET'S OPTION. THIS DISCLAIMER OF LIABILITY FOR DAMAGES WILL NOT BE AFFECTED IF ANY REMEDY PROVIDED HEREIN SHALL FAIL OF ITS ESSENTIAL PURPOSE.
Governing Law: This Limited Warranty shall be governed by the laws of the state of California.
Some TRENDnet products include software code written by third party developers. These codes are subject to the GNU General Public License ("GPL") or GNU Lesser General Public License ("LGPL").
Go to http://www.trendnet.com/gpl or http://www.trendnet.com Download section and look for the desired TRENDnet product to access to the GPL Code or LGPL Code. These codes are distributed WITHOUT WARRANTY and are subject to the copyrights of the developers. TRENDnet does not provide technical support for these codes. Please go to http://www.gnu.org/licenses/gpl.txt or http://www.gnu.org/licenses/lgpl.txt for specific terms of each license.
8/2013
TEW-714TRU User's Guide V1.0
TRENDNET®
Product Warranty Registration
Please take a moment to register your product online. Go to TRENDnet's website at http://www.trendnet.com/register
TRENDnet
20675 Manhattan Place
Torrance, CA 90501. USA
Copyright ©2013. All Rights Reserved. TRENDnet.

- TEW-714TRU USER'S GUIDE TABLE OF CONTENTS
- TABLE OF CONTENTS
- TEW-714TRU USER'S GUIDE PRODUCT OVERVIEW
- PRODUCT OVERVIEW
- PACKAGE CONTENTS
- TEW-714TRU PACKAGE INCLUDES
- FEATURES
- TEW-714TRU USER'S GUIDE GENERAL SETUPS
- GENERAL SETUPS
- WHERE TO FIND SETUP INFORMATION
- RESET YOUR ROUTER
- USB POWER CHARGING
- WEB MANAGEMENT
- TEW-714TRU USER'S GUIDE SETUP WIZARDS
- SETUP WIZARDS
- ROUTER MODE
- WISP MODE
- REPEATER MODE
- TEW-714TRU USER'S GUIDE LOCATE YOUR ROUTER PROPERLY
- LOCATE YOUR ROUTER PROPERLY
- WIRELESS PERFORMANCE CONSIDERATIONS
- TEW-714TRU USER'S GUIDE SYSTEM CONFIGURATION
- SYSTEM CONFIGURATION
- SYSTEM MANAGEMENT AND DEFAULT SETTINGS
- SETUP WIZARD
- ROUTER MODE - STATIC MODE (FIXED IP)
- ROUTER MODE - PPPOE
- 3 ENTER YOUR PPPOE ACCOUNT INFORMATION
- 3 CLICK APPLY TO END THE WIZARD
- 4 THE TEW-714TRU WILL REBOOT AND CONNECT TO THE INTERNET
- BASIC NETWORK STATUS
- BASIC WIRELESS NETWORK
- WIRELESS SETTINGS
- NONE
- WEP
- WPA, WPA2, MIXED WPA AND WPA2
- WPS
- WPS CONFIG
- WPS SUMMARY
- WPS PROGRESS
- WPS STATUS
- FILE SHARING
- ACCESS FOLDER THROUGH WEB BROWSER
- ACCESS FILES THROUGH WINDOWS FILE SHARING (CIFS)
- FOR WINDOWS SYSTEM
- TEW-714TRU
- FOR OS X SYSTEMS
- ACCESS FILES THROUGH FILE TRANSMISSION PROTOCOL (FTP)
- MORE THAN ONE USB STORAGE DEVICE
- MANUAL
- TEW-714TRU USER'S GUIDE ADVANCED SETTINGS
- TIME ZONE SETTING
- WIRELESS CLIENT LIST
- SYSTEM LOG
- STATISTICS
- USER SETTINGS
- SYSTEM
- RESET TO FACTORY DEFAULT
- IMPORT SETTINGS / EXPORT SETTINGS
- UPGRADE FIRMWARE
- ADVANCED SETUPS
- INTERNET SETTINGS
- DHCP
- DYNAMIC DNS SETTINGS
- IPV6 SETTINGS
- TEW-714TRU USER'S GUIDE TROUBLESHOOTING
- TROUBLESHOOTING
- SOLUTION
- PROCEED FOLLOWING STEPS
- TEW-714TRU USER'S GUIDE FCC INTERFERENCE STATEMENT
- FEDERAL COMMUNICATION COMMISSION INTERFERENCE STATEMENT
- IMPORTANT NOTE
- FCC RADIATION EXPOSURE STATEMENT
- TEW-714TRU USER'S GUIDE DECLARATION OF CONFORMITY
- EUROPE – EU DECLARATION OF CONFORMITY
- ROHS
- TEW-714TRU USER'S GUIDE WARRANTY
- LIMITED WARRANTY
- TRENDNET®
- PRODUCT WARRANTY REGISTRATION
Brand : TRENDNET
Model : TEW-714TRU
Category : Powerline Adapter