
TPL-331EP - Powerline Adapter TRENDNET - Free user manual and instructions
Find the device manual for free TPL-331EP TRENDNET in PDF.


| Product Type | Powerline Adapter |
| Brand | TRENDnet |
| Model | TPL-331EP |
| Standards | HomePlug AV, IEEE 802.3, IEEE 802.3u |
| Data Transfer Rate | Up to 200 Mbps |
| Ports | 2 x 10/100 Mbps Ethernet Ports |
| Dimensions (L x W x H) | Approx. 7.0 x 5.0 x 3.5 cm |
| Weight | Approx. 90 g |
| Power Supply | Built-in AC 100-240V, 50/60Hz |
| Power Consumption | Max 3W (standby), 5W (active) |
| Encryption | 128-bit AES |
| Main Functions | Extend wired network via electrical wiring; plug-and-play setup; QoS for traffic prioritization |
| Maintenance & Cleaning | Wipe with dry cloth; avoid liquids; unplug before cleaning |
| Safety | CE, FCC; operate in dry indoor environment only; do not cover |
| Spare Parts & Repairability | Power supply integrated, non-serviceable; dispose according to local e-waste regulations |
| General Information | Works with any HomePlug AV compatible device; no additional software required |
Frequently Asked Questions - TPL-331EP TRENDNET
User questions about TPL-331EP TRENDNET
0 question about this device. Answer the ones you know or ask your own.
Ask a new question about this device
Download the instructions for your Powerline Adapter in PDF format for free! Find your manual TPL-331EP - TRENDNET and take your electronic device back in hand. On this page are published all the documents necessary for the use of your device. TPL-331EP by TRENDNET.
USER MANUAL TPL-331EP TRENDNET
natural_image
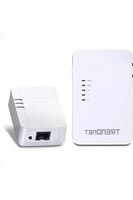
Two white TREADNet devices with ventilation grilles and ports, shown against a dark background (no visible text or symbols on the devices themselves)Powerline 200 AV PoE+ Adapter Powerline 200 AV PoE+ Adapter Kit
TPL-331EP / TPL-331EP2K
TRENDnet User's Guide
Table of Contents
Contents
Product Overview....1
Package Contents....1
Features....1
Product Hardware Features....2
Expanding a Powerline Network 3
Basic Installation....4
Installing your Powerline Adapters 5
Powerline Security....5
Before you Install....5
Connect a Powerline adapter to your router....6
Add adapters to your network....6
Connect a PoE+ Device....7
Securing your Powerline Network....7
Scramble your Network Name and Encryption....7
The Powerline Utility....8
Powerline Utility System Requirements 8
Software Installation....8
Using the Utility 12
Powerline Utility – Map View.... 13
Powerline Utility – Detailed View.... 15
Powerline Utility – Device Setup 16
Powerline Utility – Advanced 17
Powerline Utility – Options.... 18
Powerline Utility – About.... 19
Technical Specifications 20
Troubleshooting 21
Appendix....22
Product Overview
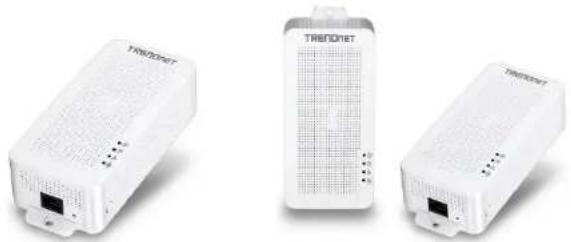
natural_image
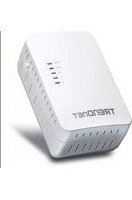
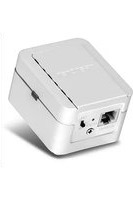
Three white wireless devices labeled 'TRENDYET' with ventilation grilles and ports, shown from different angles (no visible text or symbols on the devices themselves)TPL-331EP TPL-331EP2K
Package Contents
TPL-331EP package includes:
- TPL-331EP
- Quick Installation Guide
• Network cable (1.2m / 4 ft.)
TPL-331EP2K package includes:
- 2 x TPL-331EP
- Quick Installation Guide
• 2 x network cables (1.2m / 4 ft.)
If any package contents are missing or damaged, please contact the retail store, online retailer, or reseller/distributor from which the product was purchased.
Features
Powerline 200 AV PoE+ Adapter (TPL-331EP)
TRENDnet's Powerline 200 AV PoE+ Adapter, model TPL-331EP, creates a high-speed Powerline 200 network using your home's existing electrical system. It features a PoE+ output port to connect PoE devices such as IP cameras, wireless access points and VoIP handsets over a Powerline network. Two adapters are needed to start a network. No CD installation required—encrypted TRENDnet adapters auto-connect out of the box. Plug in the first adapter and network it to your existing router. Plug in other adapters on the same electrical system and they auto-connect to the first adapter for instant internet access.
Powerline 200 AV PoE+ Adapter Kit (TPL-331EP2K)
TRENDnet's Powerline 200 AV PoE+ Adapter Kit, model TPL-331EP2K, comes with two PoE+ Powerline adapters that add PoE+ capabilities to your existing Powerline network. Each adapter features a single PoE+ output port to connect PoE+ devices such as IP cameras, wireless access points and VoIP handsets over a Powerline network. Two adapters are needed to start a network. Encrypted TRENDnet adapters auto-connect out of the box.
Sync Button
Press the Sync button to change existing Powerline encryption keys
Powerline 200
Powerline 200 technology delivers fast and stable networking to seamlessly connect devices.
PoE+ Port
Features a PoE+ output port for connecting PoE devices such as IP cameras, wireless access points and VoIP handsets over a Powerline network.
Cross Compatibility
Cross compatible with Powerline 1200, 600, 500, and 200 adapters
TRENDnet User's Guide
TPL-331EP / TPL-331EP2K
Expandable
Use up to 8 adapters on a single Powerline network
Easy Installation
TRENDnet adapters auto-connect out of the box
128-bit AES Encryption
Powerline communication is protected with 128-bit AES encryption
Note:
* Maximum of 8 adapters (nodes) recommended for streaming video across your network.
** 200Mbps is the maximum theoretical Powerline data rate when connected to another Powerline 200 device. Data throughput may vary by circuit wire conditions.
*** Powerline communication works on a single electrical system. (Usually controlled by a single distribution panel). Power strip, GFCI outlets, and AFCI circuit breakers may degrade Powerline network signals.
Product Hardware Features

| Button | Action | Function |
| Sync | Press for 3 seconds | Begins synchronization session. The POWER LED will begin to blink for 2 minutes. Press the Sync button on additional adapters within the time frame to synchronize to the powerline network. |
| Reset | Press for 10 seconds | Resets device to factory defaults settings (All LEDs will turn off and on again).Note: Will reset to the factory default private network name “HomePlug AV”. |
Power Save Mode: The Powerline adapter will automatically going into standby mode to reduce power usage when there is no network traffic for more than 10\~20 minutes. All LEDs are going off. It can be wake up automatically when the network traffic is coming again. It will take a couple of seconds to wake up and resume back to full speed of service.
| LED | Color | Sequence | Definition |
| Power | Green | Solid | Device is powered on |
| N/A | Off | Device is powered off or in sleep mode | |
| Powerline | Green | Solid | Powerline connected |
| Green | Blinking | Data transmitting over powerline | |
| N/A | Off | Powerline is not connected | |
| Ethernet | Green | Solid | Ethernet port connected |
| Green | Blinking | Data transmitting over Ethernet port | |
| N/A | Off | Ethernet is not connected | |
| PoE | Green | Solid | PoE/PoE+ device connected |
| N/A | Off | No PoE/PoE+ device connected |
Powerline Connections: Powerline LED color indicates the strength and quality of the Powerline connection through the electrical system. The following factors may affect the Powerline network's connection quality:
- Ground Wire - Adapters should use all 3 wire sockets to boost up the Powerline communication speed to gigabit.
- Noise – Generated by appliances which use your electrical system (e.g. Microwaves, ovens, hair dryer, irons, dishwashers, etc.). The quality of your household electrical wiring may also cause additional noise on your electrical system.
- Distance—Long lengths of electrical wiring through your electrical system between connected Powerline adapters.
Expanding a Powerline Network
What is a network?
A network is a group of computers or devices that can communicate with each other. A home network of more than one computer or device also typically includes Internet access, which requires a router.
A typical home network may include multiple computers, a media player/server, a printer, a modem, and a router. A large home network may also have a switch, additional routers, access points, and many Internet-capable media devices such as TVs, game consoles, and Internet cameras.
- Modem – Connects a computer or router to the Internet or ISP (Internet Service Provider).
- Router – Connects multiple devices to the Internet.
- Switch – Connect several wired network devices to your home network. Your router has a built-in network switch (the LAN port 1-4). If you have more wired network devices than available Ethernet ports on your router, you will need an additional switch to add more wired connections.
How to expand a home network
Wireless Access Points add or extend wireless connectivity to an existing network. Integrated Powerline technology allows you to further extend your network using your existing electrical system in your home using multiple powerline adapters.
Where to find more help
In addition to this User's Guide, you can find help below:
- http://www.trendnet.com/support (documents, downloads, and FAQs are available from this Web page)
TRENDnet User's Guide
TPL-331EP / TPL-331EP2K
Basic Installation
Note: It is recommended to plug the adapters into nearby outlets before installing the devices to the desired locations.
Note: If you are connecting the adapters to a third-party powerline device other than TRENDnet and encounter issues, please refer to the manufacturer's documentation for the appropriate sync button procedure.
Note: The sync button procedure steps below demonstrate using TRENDnet powerline model TPL-331EP, but the same procedure applies to TRENDnet powerline models TPL-406E / TPL-407E / TPL-420E / TPL-421E / TPL-422E / TPL-423E / TPL-331EP.
Connecting the adapters using Powerline
Requirement:
Must have existing TRENDnet Powerline Network.
NOTE: TRENDnet adapters auto-connect out of the box over a pre-encrypted Powerline signal.
① In your existing powerline network press the Sync button on the powerline adapter connected to your router for 3 seconds. The POWERLINE LED will begin to blink.
② Plug the TPL-331EP into an available outlet. Press the Sync button for 3 seconds. The POWERLINE LED will blink and then turn solid.
③ Connect a PoE+ device to TPL-331EP's LAN Port.

flowchart
graph TD
    A["Internet"] --> B["Remote Device"]
    B --> C["TV-only Device"]
    C --> D["3D Camera"]
    D --> E["To Connect Additional Adapters: Repeat Steps 1 and 2."]
    C -.-> F["LAN"]
    C -.-> G["LAN"]
Installing your Powerline Adapters
Powerline Security
All out-of-the-box TRENDnet HomePlugAV Powerline adapters can be connected to each other without further configuration. To add additional network security to your network, you can change your Powerline network name away from the factory default. With a customized private network name, no one can connect to your Powerline network with an out-of-the-box HomePlugAV adapter.
TRENDnet HomePlugAV certified Powerline adapters have the same default network name "HomePlugAV". TRENDnet recommends that you change the Powerline network name away from the factory default to increase network security. Once configured, the Powerline network name will be saved on device. You can freely unplug the adapter and moved to the other location within its operating range. If a mistake is made in the settings, the adapter can be reset to the factory default settings by pressing the Reset button for 1 second.
If you want to use the default network name for easy connection, skip the synchronization steps and go directly to Connect a Powerline adapter to your router on page 6.
Scramble your Network Name Away from the Factory Default
There are two ways to change the default network name:
- (Recommended) Use the physical Sync button on your Powerline adapter to generate a random private network name.
OR
- Create a customized private network name for your Powerline network by using the included Powerline Utility. See The Powerline Utility on page 8.
* If the Powerline adapter settings have been changed, the adapter must be reset to the factory default settings to be recognized by Powerline Utility.
Before you Install
-
Before you proceed with the installation, verify the following:
-
You already have a router already installed.
- You already have Internet access through your existing network.
• An Ethernet port (also called LAN port) is available on your router. - Verify that you have at least two Powerline adapters. You will need at least two Powerline adapters to create a Powerline network.
•
-
Plan the location of where you will install your Powerline adapters.
-
Avoid plugging the adapters into power strips, extension cords, or surge protectors as this may prevent the adapter from functioning correctly or degrade performance.
- Avoid plugging the adapters into wall power outlets that are controlled by a light switch to prevent the Powerline adapter from being turned off accidentally.
- Avoid plugging the adapters into wall power outlets that are located near appliances that consume a lot of power (e.g. refrigerators, washers, dryers) as this may degrade performance.
- Make sure there are available wall power outlets in the room where the router is installed and the room where you want to extend network connectivity.
- For AV2 Powerline adapters, make sure your electric network has 3 wires properly installed.
TRENDnet User's Guide
TPL-331EP / TPL-331EP2K
Connect a Powerline adapter to your router
- Plug the Powerline adapter into an available wall power outlet near your router.
Note: This will allow devices connected to your Powerline network to access the Internet and other devices connected to your network. - Connect the included Ethernet cable (also called network cable) from the Ethernet port (also called network port) of your Powerline adapter to an available Ethernet port (also called LAN port) on your router.
- Once the Powerline adapter is installed and connected to your router, verify that the Power LED is on or blinking and the Ethernet LED is on or blinking.

Add adapters to your network
Once you have installed and connected the first Powerline adapter to your router, you can easily extend your network to other rooms by adding additional Powerline adapters. TPL-331EP is best suited as an added adapter because it's Ethernet port can be used to power PoE+ devices.
To extend your network using an additional Powerline adapter:
- First, make sure the first Powerline adapter is installed and connected to your router.
Note: This will allow devices connected to your Powerline network to access the Internet and other devices connected to your network. - Plug the additional Powerline adapter into an available wall power outlet in another room near a computer or network device (e.g. game consoles, network-enabled TVs, network attached storage, network media server/players, etc.) that you would like to connect to your network.
-
Connect the included Ethernet cable from the Ethernet port on your Powerline adapter to the to the Ethernet port of your computers or network devices.
-
After the additional Powerline adapter is connected and installed to your computer or network device, wait for the POWERLINE LED to turn on. After the POWERLINE LED turns on, verify that the Power LED is on, the POWERLINE LED is on or blinking, and the Ethernet LED is on or blinking.
Note: To verify that your Powerline adapters are connected successfully to your network, you can check if the computer(s) or network device(s) can access the Internet through your Powerline network.
To install additional Powerline adapters in other rooms, repeat the steps above for each adapter.
Connect a PoE+ Device
TPL-331EP is best suited as an added adapter because its Ethernet port can be used to power PoE+ devices. After connecting a powerline adapter to your router and syncing with TPL-331EP, simply use TPL-331EP's Ethernet port to provide up to 30W of power to PoE+ devices.
Securing your Powerline Network
Powerline networks consist of two or more Powerline devices connected together using the same encryption key. TRENDnet Powerline adapters automatically connect to each other over a secure encrypted signal and share the same encryption key (Default encryption key: HomePlugAV).
In order for your Powerline devices to connect to the same Powerline network, the same encryption key must be assigned to all Powerline devices in that network. Powerline devices that are not assigned the same encryption key will not be able to connect to the Powerline network.
For additional security, TRENDnet recommends changing adapter default encryption key to prevent a neighbor with a Powerline adapter and the same default encryption key from gaining access to your network.
Note: After the default encryption key has been changed and the Powerline adapters have been connected using a new encryption key, the Powerline adapters will retain their security settings when they are unplugged and moved to a new location. No additional reconfiguration of the Powerline adapters is needed after the default encryption has been changed.
To change the default encryption key:
- Use the physical Sync/Link button on your Powerline adapter to generate a random encryption key.
****Recommended method****
Scramble your Network Name and Encryption
TRENDnet adapters auto-connect out of the box over a pre-encrypted Powerline signal. The following optional steps are recommended to secure your powerline network.
- Make sure your TPL-331EPis powered on and not in sleep mode.
- The physical Sync button on the Powerline adapter provides an easy way to change the network name. Push and hold the Sync button for 15 seconds. All LEDs will turned off and then turned on again. This will generate a new random network name for your Powerline adapter.
- Push the Sync button on each adapter within the powerline network for 3 seconds to re-sync to the new network name and encryption. The POWERLINE LEDs will turn solid when devices have successfully reconnected.
Note: Powerline networks can also be secured by creating a customized private network name for your Powerline network using the included Powerline Utility. See The Powerline Utility on page 8.
The Powerline Utility
The Powerline Utility allows you doing following jobs:
- Create a customized network name for your powerline network and apply it to multiple Powerline adapters at the same time.
- View Powerline adapters connected to your network (using the MAC address) and the approximate connection quality and speed of each Powerline adapter.
- View and upgrade Powerline adapter firmware.
Note: Link speed displayed in the utility of your Powerline adapters to another through your electrical system is estimated. Actual link speed may vary.
Powerline Utility System Requirements
- Windows ^ 10, 8.1, 8, 7, Vista, XP
- Microsoft® .NET Framework 3.5 installed
Software Installation
- The Powerline Utility download link can be found in the Download / Support tab on the TRENDnet website.
- After installing the Utility zip file, extract the files and run the setup wizard.
The installer will first check if you have a previous WinPcap utility.
- Click OK.

Note: The Powerline Utility requires WinPcap as a base application. If this prompt does not appear, you may already have the WinPcap application installed. Windows 8 require WinPcap 4.1.3. Windows 7 and older will work with previous versions of WinPcap. If you have installed a previous version of WinPcap, please uninstall it manually. And then, start the installation from the beginning.
TRENDnet User's Guide
TPL-331EP / TPL-331EP2K
- At the WinPcap installer window, click Next.

- Click Yes to allow installation.
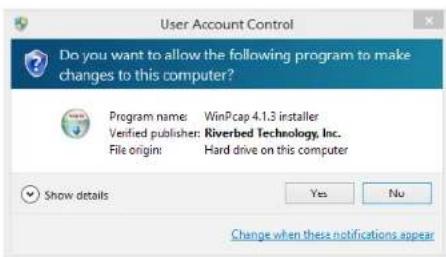
- Review the license agreement and click I Agree.

- In the Installation Options window, leave the Automatically start the WinPcap driver at boot time checked and click Install.

TRENDnet User's Guide
TPL-331EP / TPL-331EP2K
- Wait for the WinPcap installation to complete.

- After the process has been completed, click Finish.
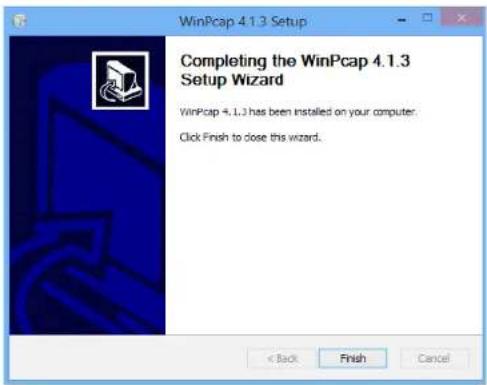
- At the TRENDnet Powerline Utility Setup Wizard, click Next.
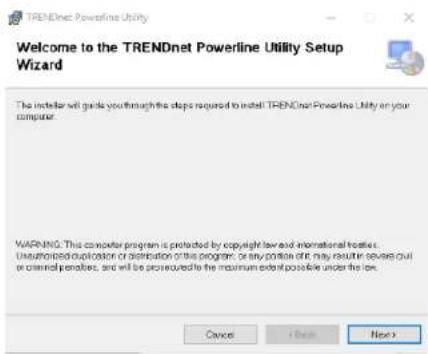
- In the License Agreement window, click I Agree, and then click Next.

TRENDnet User's Guide
TPL-331EP / TPL-331EP2K
- In the Select Installation Folder window, click Next.

- In the Confirm Installation window, click Next.
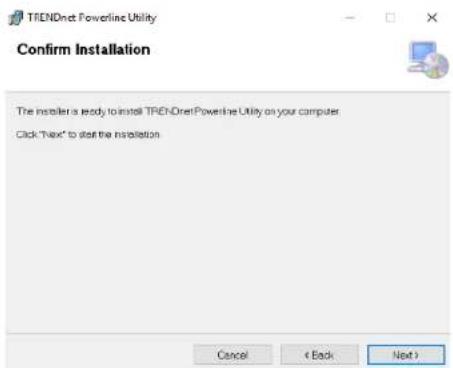
- Wait for the Powerline Utility installation to complete. At the Installation Complete window, click Close.

Using the Utility
Before using the utility, please do the following:
- Write down the Device Password (DPW) (16-digit characters A-Z only) and MAC Address (12-digit characters a-f, A-F, 0-9) of each Powerline adapter as this will be required to change the network name for multiple Powerline adapters. Both the DPW and MAC Address can be found on the device label on the back of each powerline device.
- Make sure the computer in which you are installing the utility is connected to your network and your Powerline adapters are also connected to your network.
- If you have changed your network name using the Sync button and you are creating a customized network name, it is required to reset all powerline devices to defaults using the physical Reset button on your Powerline adapter first before using the utility. See Product Outlook on page 2.
- Please ensure that your Powerline adapters are already installed and connected and the Ethernet port on each adapter is connected to a device powered on.
Upon completing the software installation, a desktop shortcut is automatically created. Double-click the icon to start the utility or open the utility if it is already running. Closing the utility will exit the application.
You can also launch the utility from Start Menu. Start > Programs (or All Programs) > TRENDnet > TRENDnet Powerline Utility.

Powerline Utility – Map View
Local Device
All Powerline adapters connected to the same network as your computer will be listed here.
The default device name is main chip number, followed by the MAC address and firmware version number. You can mouse over the header and adjust column width by clicking and dragging this cursor+.
Remote Devices
These are Powerline adapters in remote locations connected to a selected local Powerline adapter on the electrical system.
You can mouse over the header and adjust the column width by clicking and dragging this cursor + to see more information.
Manage your device
Highlight a device by clicking the row and click buttons below

Auto Scan
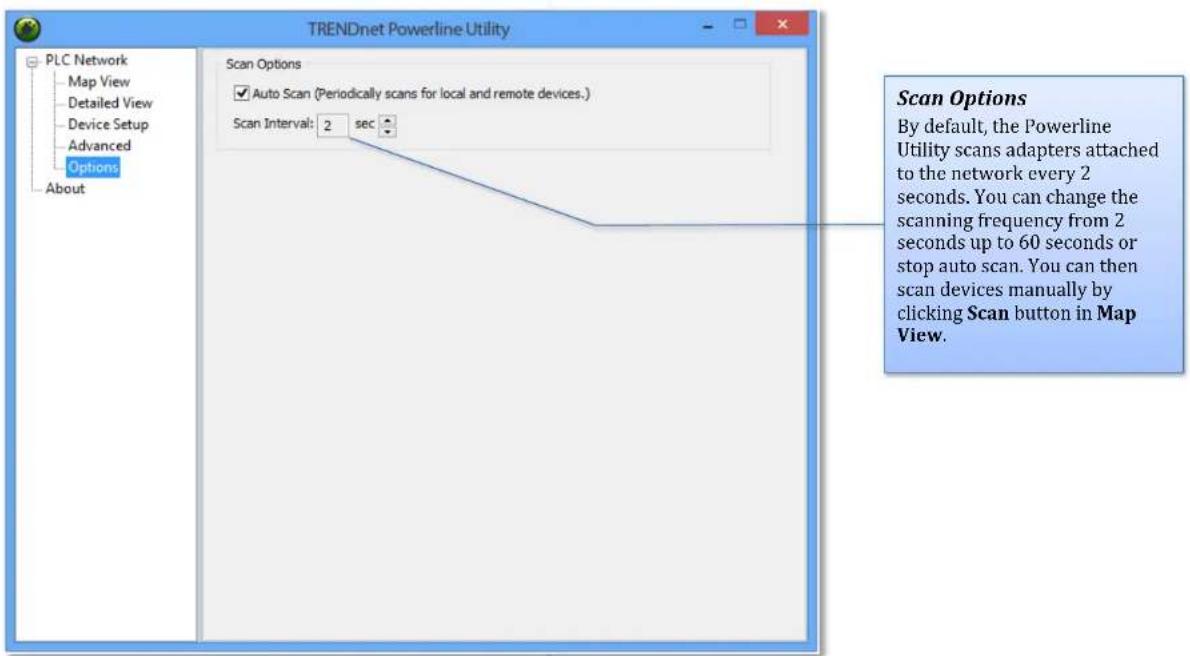
Auto Scan is selected by default. The utility will scan for remote devices in specific intervals (default: 2 sec, you can change it from 2 to 60 secs). Auto scan can be disabled by deselecting it. Remote adapters can be scanned manually by clicking the Scan button below.
Network Type
The default network type is public. When the network name is customized and changed, it becomes private.
Scan
Manually scan remote Powerline devices which have the same network name
* DPW (Device Password) is shown on device label
** TPL-331EP has a Power Save Mod. The device setting can only be changed when the device is active. To keep remote Powerline adapter in an active state, you can power cycle the device or connect it to a network device, such as a router or a computer.
TRENDnet User's Guide
TPL-331EP / TPL-331EP2K
Rename remote device
(Click and select a remote device and then click Rename button in Map View)

Enter Password
(Click and select a remote device and then click the Enter Password button in Map View)
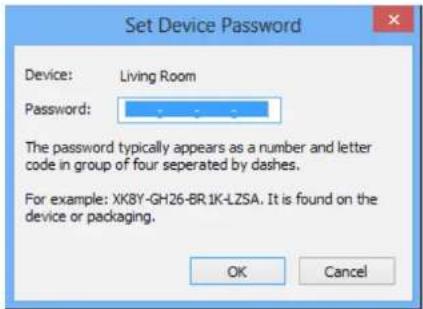
The device password (DPW) can be found on the device label. You have to enter the DPW in order to manage the Powerline adapter remotely.
Add Device
(Click the Add Device button in Map View)
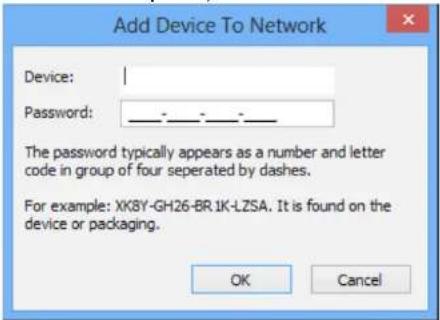
Enter the device name and DPW to add an adapter manually
Scan
Click Scan button in Map View to scan other Powerline adapters manually.
Powerline Utility – Detailed View

Powerline Utility – Device Setup
Private Network Name
This is the network name of your powerline network. The default network name is "HomePlugAV". When a network name is set to "HomePlugAV", it is considered a public network because most out of box Powerline adapters can join this network.
Powerline adapters can only connect to each other when the network name is the same. Change the network name to make your network private (recommended to increase network security).
You have to remember your network name (Private Network Name). It will be encrypted and saved to device. Even the TRENDnet Powerline Utility cannot read it in plain text again. When you visit this Private Settings again and the Private Network Name shows UnknownNetworkName, it means the network name is private.

Use Default
If you don't remember what network name you set previously, you can set the network public. Then set it back to private later.
Set Local Device
Change network name on device selected above.
Set Remote Devices
All devices currently connected locally to your computer or connected remotely through powerline network will set to the new network name.
Multicast Address
Click this button to synchronize multicast address on all adapters on same powerline network.
Powerline Utility – Advanced
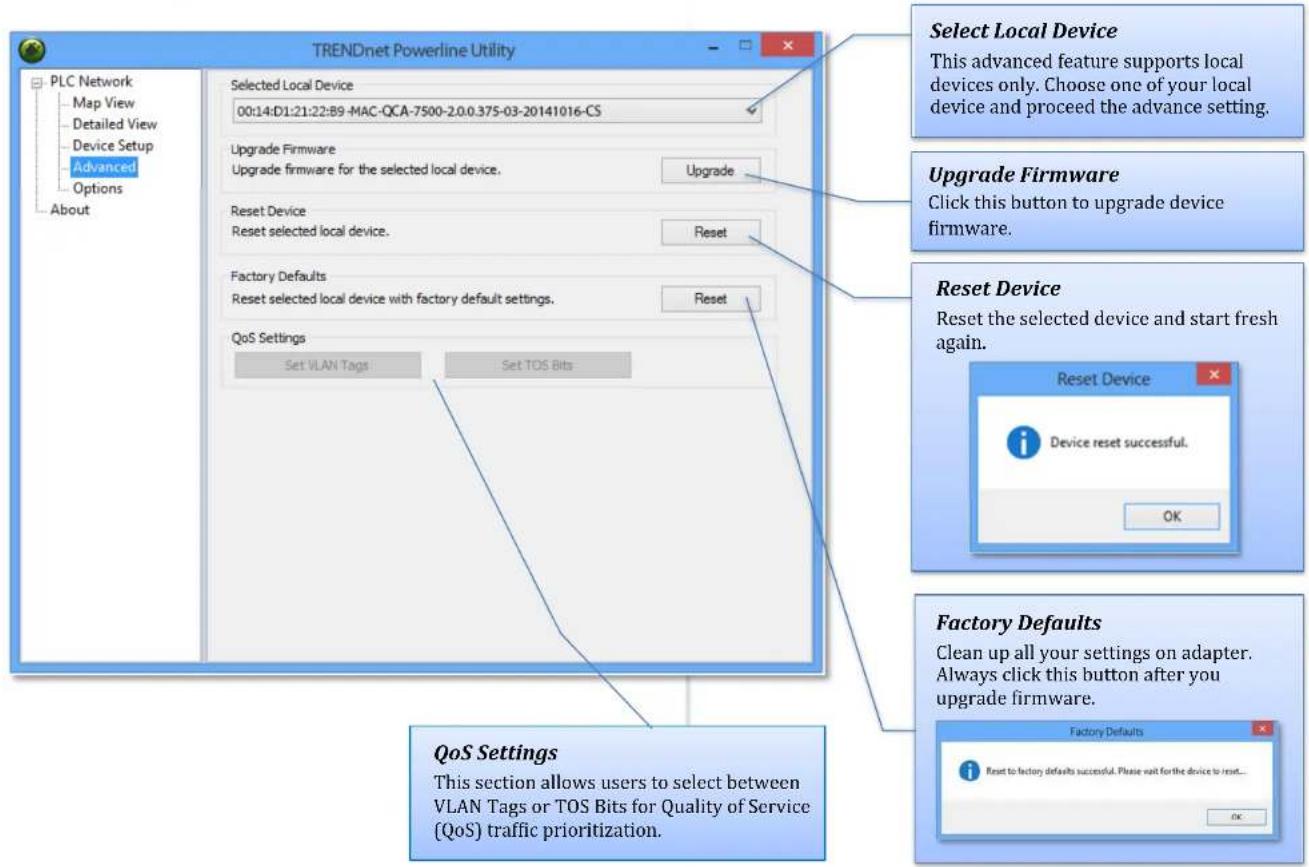
Powerline Utility – Options
Powerline Utility – About
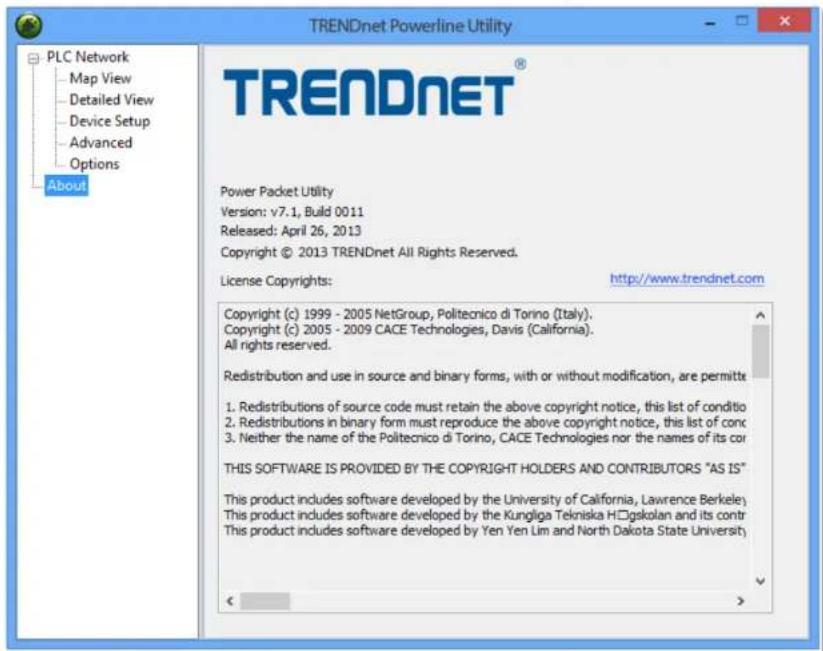
About Powerline Utility
This Powerline Utility manages TPL-423E and most legacy HomePlug certified Powerline adapters.
For more information, please visit our website www.trendnet.com
TRENDnet User's Guide
TPL-331EP / TPL-331EP2K
Technical Specifications
Standards
- IEEE 802.3
- IEEE 802.3u
- IEEE 802.3x
- IEEE 802.3af
- IEEE 802.3at
Device Interface
• 1 x 10/100Mbps PoE+ port
- Sync button
- Reset button
- LED indicators
Frequency Band
2-28MHz
Modulation/Protocol
• OFDM, 4096/1024/256/64/16/8-QAM, QPSK, BPSK, ROBO
• CSMA/CA, TDMA, CSMA
Data PHY Rate
- Up to 200Mbps
Networking Distance
• Powerline: Up to 300m (980ft.) linear distance over electrical power lines***
Encryption
• 128-Bit AES (Advanced Encryption Standard)
Powerline Nodes
- Up to 8 (max.)
Overlapping Powerline Networks
- Up to 4 (per electrical system)
Special Features
• Auto-connects to other TRENDnet Powerline adapters
- IPv6 support
• IGMP / MLDv2 Streams
Power
• Input: 100 - 240V AC, 50-60Hz
- Consumption: Active mode: 2.3W (max.); Standby mode: 1.7W (max.)
• PoE Budget: 30 Watts (max.)
Operating Temperature
0-55°C(32-131°F)
Operating Humidity
• Max. 93 % non-condensing
Certifications
• FCC
Dimensions
- 156 x 67 x 43 mm (6.14 x 2.6 x 1.7 in.)
Weight
• 205g (7.2 oz.)
Warranty:
• 3 year limited
Troubleshooting
Please reference the items below if you continue to experience difficulty with installing and using your Powerline adapters.
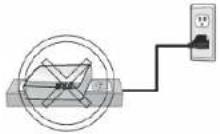
- Do not plug the Powerline adapters into a power strip. Make sure to plug the adapters directly into a power outlet and not through power strip. Using adapters through a power strip may negatively affect Powerline connectivity and performance.
- Do not use the Sync button for more than 2 Powerline adapters to connect simultaneously. Wait for each Powerline adapter to connect to your Powerline network one at a time before connecting the next adapter. Using more than one adapter to Sync simultaneously may cause some of your adapters not to Sync and establish connection to your Powerline network.
- Power-cycle the Powerline adapters by disconnecting them from their power outlets for 15 seconds and then reconnect them.
- If the Powerline (PL) LED is red, try plugging the Powerline adapter into another available power outlet. The quality of the connection may be better in a different power outlet.
- If you are having issues connecting the Powerline adapters after changing the encryption key using the Sync button or Powerline utility, reset the Powerline adapters to defaults using the physical Reset button.
- Using a pin or paperclip; press and hold the Reset button for 1 second on each Powerline adapter. All LEDs will turn off then turn back on. This will reset the Powerline adapters to their default settings. The default encryption key is HomePlugAV.
- The Powerline adapters can provide better connectivity and performance when plugged directly into a power outlet. Connecting the Powerline adapters to a power strip or surge protector may degrade or block Powerline signals.
-
Avoid using the Powerline adapters on GFI protected outlets and electrical systems with AFCI circuit breakers. They may degrade or block Powerline signals.
• The Powerline adapters should not be used in areas with excessive heat. -
Florescent and incandescent lighting can generate significant Powerline interference.
- If your building has more than one circuit breaker box, the Powerline adapter may not be able to establish connectivity between them. In this case, connect a Powerline adapter into a power outlet located on each of the circuit breaker boxes. Then connect an Ethernet cable between the Powerline adapters to bridge the two circuits together.
Overlapping Powerline Networks
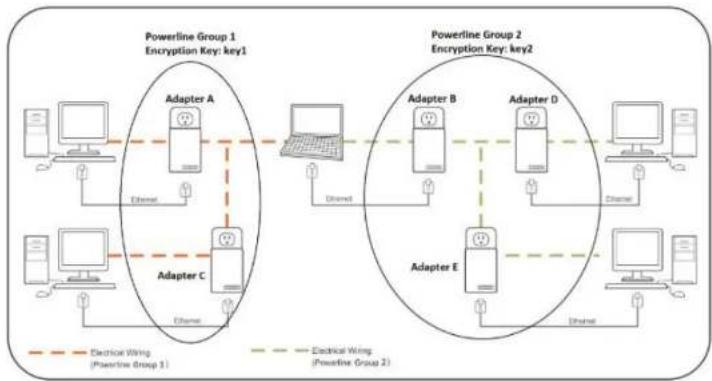
It is possible to create multiple Powerline networks on the same electrical system separated and grouped by different network encryption keys. The Powerline networks will work and communicate independently of each other which can provide security between different groups of Powerline adapters. For example, if you have five powerline adapters (Adapter A, Adapter B, Adapter C, Adapter D, Adapter E), you can group Adapters A, B, and C together on one powerline network and group Adapters D and E on a different Powerline network. Each group will use a different encryption key.
Note: It is recommended that only a maximum of up to 4 Powerline networks can be created per electrical system. Any additional Powerline networks above the recommended may result in significant degradation in Powerline performance.
flowchart
graph TD
    subgraph_Powerline_Group1["Powerline Group 1"]
        A["Adapter A"] -->|Electrical Wing (Powerline Group 1)| B["Computer"]
        C["Adapter C"] -->|Electrical Wing (Powerline Group 2)| D["Computer"]
        E["Adapter E"] -->|Electrical Wing (Powerline Group 2)| F["Computer"]
    end
    subgraph_Powerline_Group2["Powerline Group 2"]
        G["Adapter B"] -->|Electrical Wing (Powerline Group 1)| H["Computer"]
        I["Adapter D"] -->|Electrical Wing (Powerline Group 2)| J["Computer"]
        K["Adapter E"] -->|Electrical Wing (Powerline Group 2)| L["Computer"]
    end
    style PowerlineGroup1 fill:#f9f,stroke:#333
    style PowerlineGroup2 fill:#f9f,stroke:#333
Appendix
Federal Communication Commission Interference Statement
This equipment has been tested and found to comply with the limits for a Class B digital device, pursuant to Part 15 of the FCC Rules. These limits are designed to provide reasonable protection against harmful interference in a residential installation. This equipment generates, uses and can radiate radio frequency energy and, if not installed and used in accordance with the instructions, may cause harmful interference to radio communications. However, there is no guarantee that interference will not occur in a particular installation. If this equipment does cause harmful interference to radio or television reception, which can be determined by turning the equipment off and on, the user is encouraged to try to correct the interference by one of the following measures:
• Reorient or relocate the receiving antenna.
- Increase the separation between the equipment and receiver.
- Connect the equipment into an outlet on a circuit different from that to which the receiver is connected.
- Consult the dealer or an experienced radio/TV technician for help.
FCC Caution: Any changes or modifications not expressly approved by the party responsible for compliance could void the user's authority to operate this equipment.
This device complies with Part 15 of the FCC Rules. Operation is subject to the following two conditions: (1) This device may not cause harmful interference, and (2) this device must accept any interference received, including interference that may cause undesired operation.
For product, available in the USA/Canada market, only channel 1\~11 can be operated. Selection of other channels is not possible.
This device and its antennas(s) must not be co-located or operating in conjunction with any other antenna or transmitter except in accordance with FCC multi-transmitter product procedures.
IMPORTANT NOTE:
FCC Radiation Exposure Statement:
This equipment complies with FCC radiation exposure limits set forth for an uncontrolled environment. This equipment should be installed and operated with minimum distance 20cm between the radiator & your body.

RoHS
This product is RoHS compliant.

Limited Warranty
TRENDnet warrants its products against defects in material and workmanship, under normal use and service, for the following lengths of time from the date of purchase.
TPL-331EP/TPL-331EP2K - 3 Years Warranty
AC/DC Power Adapter, Cooling Fan, and Power Supply carry 1 year warranty.
If a product does not operate as warranted during the applicable warranty period, TRENDnet shall reserve the right, at its expense, to repair or replace the defective product or part and deliver an equivalent product or part to the customer. The repair/replacement unit's warranty continues from the original date of purchase. All products that are replaced become the property of TRENDnet. Replacement products may be new or reconditioned. TRENDnet does not issue refunds or credit. Please contact the point-of-purchase for their return policies.
TRENDnet shall not be responsible for any software, firmware, information, or memory data of customer contained in, stored on, or integrated with any products returned to TRENDnet pursuant to any warranty.
There are no user serviceable parts inside the product. Do not remove or attempt to service the product by any unauthorized service center. This warranty is voided if (i) the product has been modified or repaired by any unauthorized service center, (ii) the product was subject to accident, abuse, or improper use (iii) the product was subject to conditions more severe than those specified in the manual.
Warranty service may be obtained by contacting TRENDnet within the applicable warranty period and providing a copy of the dated proof of the purchase. Upon proper submission of required documentation, a Return Material Authorization (RMA) number will be issued. An RMA number is required in order to initiate warranty service support for all TRENDnet products. Products that are sent to TRENDnet for RMA service must have the RMA number marked on the outside of return packages and sent to TRENDnet prepaid, insured and packaged appropriately for safe shipment. Customers shipping from outside of the USA and Canada are responsible for return shipping fees. Customers shipping from outside of the USA are responsible for custom charges, including but not limited to, duty, tax, and other fees.
WARRANTIES EXCLUSIVE: IF THE TRENDNET PRODUCT DOES NOT OPERATE AS WARRANTED ABOVE, THE CUSTOMER'S SOLE REMEDY SHALL BE, AT TRENDNET'S OPTION, REPAIR OR REPLACE. THE FOREGOING WARRANTIES AND REMEDIES ARE EXCLUSIVE AND ARE IN LIEU OF ALL OTHER WARRANTIES, EXPRESSED OR IMPLIED, EITHER IN FACT OR BY OPERATION OF LAW, STATUTORY OR OTHERWISE, INCLUDING
WARRANTIES OF MERCHANTABILITY AND FITNESS FOR A PARTICULAR PURPOSE. TRENDNET NEITHER ASSUMES NOR AUTHORIZES ANY OTHER PERSON TO ASSUME FOR IT ANY OTHER LIABILITY IN CONNECTION WITH THE SALE, INSTALLATION MAINTENANCE OR USE OF TRENDNET'S PRODUCTS.
TRENDNET SHALL NOT BE LIABLE UNDER THIS WARRANTY IF ITS TESTING AND EXAMINATION DISCLOSE THAT THE ALLEGED DEFECT IN THE PRODUCT DOES NOT EXIST OR WAS CAUSED BY CUSTOMER'S OR ANY THIRD PERSON'S MISUSE, NEGLECT, IMPROPER INSTALLATION OR TESTING, UNAUTHORIZED ATTEMPTS TO REPAIR OR MODIFY, OR ANY OTHER CAUSE BEYOND THE RANGE OF THE INTENDED USE, OR BY ACCIDENT, FIRE, LIGHTNING, OR OTHER HAZARD.
LIMITATION OF LIABILITY: TO THE FULL EXTENT ALLOWED BY LAW TRENDNET ALSO EXCLUDES FOR ITSELF AND ITS SUPPLIERS ANY LIABILITY, WHETHER BASED IN CONTRACT OR TORT (INCLUDING NEGLIGENCE), FOR INCIDENTAL, CONSEQUENTIAL, INDIRECT, SPECIAL, OR PUNITIVE DAMAGES OF ANY KIND, OR FOR LOSS OF REVENUE OR PROFITS, LOSS OF BUSINESS, LOSS OF INFORMATION OR DATE, OR OTHER FINANCIAL LOSS ARISING OUT OF OR IN CONNECTION WITH THE SALE, INSTALLATION, MAINTENANCE, USE, PERFORMANCE, FAILURE, OR INTERRUPTION OF THE POSSIBILITY OF SUCH DAMAGES, AND LIMITS ITS LIABILITY TO REPAIR, REPLACEMENT, OR REFUND OF THE PURCHASE PRICE PAID, AT TRENDNET'S OPTION. THIS DISCLAIMER OF LIABILITY FOR DAMAGES WILL NOT BE AFFECTED IF ANY REMEDY PROVIDED HEREIN SHALL FAIL OF ITS ESSENTIAL PURPOSE.
Governing Law: This Limited Warranty shall be governed by the laws of the state of California.
Some TRENDnet products include software code written by third party developers. These codes are subject to the GNU General Public License ("GPL") or GNU Lesser General Public License ("LGPL").
Go to http://www.trendnet.com/gpl or http://www.trendnet.com Download section and look for the desired TRENDnet product to access to the GPL Code or LGPL Code. These codes are distributed WITHOUT WARRANTY and are subject to the copyrights of the developers. TRENDnet does not provide technical support for these codes. Please go to http://www.gnu.org/licenses/gpl.txt or http://www.gnu.org/licenses/lgpl.txt for specific terms of each license.
2018/12/1
TRENDNET®
Product Warranty Registration
Please take a moment to register your product online. Go to TRENDnet's website at http://www.trendnet.com/register
TRENDnet
20675 Manhattan Place
Torrance, CA 90501. USA
Copyright ©2018. All Rights Reserved. TRENDnet.

- TRENDnet User's Guide
- Table of Contents
- Contents
- Product Overview
- Package Contents
- Features
- Sync Button
- Powerline 200
- PoE+ Port
- Cross Compatibility
- Expandable
- Easy Installation
- 128-bit AES Encryption
- Note:
- Expanding a Powerline Network
- What is a network?
- How to expand a home network
- Where to find more help
- TPL-331EP / TPL-331EP2K
- Basic Installation
- Connecting the adapters using Powerline
- Requirement:
- Installing your Powerline Adapters
- Powerline Security
- Scramble your Network Name Away from the Factory Default
- Before you Install
- Connect a Powerline adapter to your router
- Add adapters to your network
- To extend your network using an additional Powerline adapter:
- Connect a PoE+ Device
- Securing your Powerline Network
- Scramble your Network Name and Encryption
- The Powerline Utility
- Powerline Utility System Requirements
- Software Installation
- Using the Utility
- Before using the utility, please do the following:
- Powerline Utility – Map View
- Local Device
- Remote Devices
- Manage your device
- Auto Scan
- Network Type
- Scan
- Rename remote device
- Enter Password
- Add Device
- Powerline Utility – Detailed View
- Powerline Utility – Device Setup
- Private Network Name
- Use Default
- Set Local Device
- Set Remote Devices
- Multicast Address
- Powerline Utility – Options
- Powerline Utility – About
- About Powerline Utility
- Technical Specifications
- Standards
- Device Interface
- Frequency Band
- Modulation/Protocol
- Data PHY Rate
- Networking Distance
- Encryption
- Powerline Nodes
- Overlapping Powerline Networks
- Special Features
- Power
- Operating Temperature
- Operating Humidity
- Certifications
- Dimensions
- Weight
- Warranty:
- Troubleshooting
- Appendix
- Federal Communication Commission Interference Statement
- IMPORTANT NOTE:
- RoHS
- Limited Warranty
- TRENDNET®
- Product Warranty Registration
Brand : TRENDNET
Model : TPL-331EP
Category : Powerline Adapter