
DAC12005 - Air conditioner DIMPLEX - Free user manual and instructions
Find the device manual for free DAC12005 DIMPLEX in PDF.


| Product Type | Portable Air Conditioner |
| Model | DAC12005 |
| Brand | Dimplex |
| Cooling Capacity | 12000 BTU/h |
| Dehumidification Capacity | 2.5 L/h (at 86°F, 60% RH) |
| Energy Efficiency Ratio (EER) | 11.0 |
| Power Supply | 115 V, 60 Hz, 10 A |
| Dimensions (W x D x H) | 17.5 x 17.5 x 28.5 inches |
| Weight | 65 lbs (29.5 kg) |
| Refrigerant | R-410A |
| Noise Level (Low/High) | 50 / 56 dB(A) |
| Airflow (High) | 220 CFM |
| Modes | Cool, Dehumidify, Fan |
| Fan Speeds | 3 (Low, Medium, High) |
| Thermostat Control | Electronic with remote control |
| Timer | 24-hour on/off timer |
| Filter Type | Washable mesh filter |
| Filter Cleaning | Clean every 2 weeks; rinse with water and dry |
| Drainage | Self-evaporating (continuous drain option in dehumidify mode) |
| Safety Features | Overheat protection, auto restart after power failure |
| Window Kit Included | Yes (exhaust hose and window panel) |
| Warranty | 1 year limited |
Frequently Asked Questions - DAC12005 DIMPLEX
User questions about DAC12005 DIMPLEX
0 question about this device. Answer the ones you know or ask your own.
Ask a new question about this device
Download the instructions for your Air conditioner in PDF format for free! Find your manual DAC12005 - DIMPLEX and take your electronic device back in hand. On this page are published all the documents necessary for the use of your device. DAC12005 by DIMPLEX.
USER MANUAL DAC12005 DIMPLEX
natural_image
Line drawing of an air conditioner unit with ventilation grilles and wheels (no text or symbols)Portable Air Conditioner – DAC 9005 – DAC 12005
Please read this manual carefully before use and keep it for future reference.
CONTENTS
Page
Introduction.... I
Features....2
Specification....2
Important Safeguards 3
Energy Saving Tips 3
Parts 4
Accessories 5
Installation 5
Operation 8
Drainage 9
Maintenance....II
Trouble Shooting Guide....12
Warranty 14
INTRODUCTION
Thank you for choosing a Dimplex portable air conditioner. This manual contains information, regulations and warnings which are of fundamental importance if the appliance is to be installed correctly and the highest performance, in the safest possible conditions is to be obtained. We suggest that you read the manual carefully before installing or starting up the appliance.
These new Dimplex appliances represent the most highly developed air conditioning units available today.
FEATURES
The air-conditioning unit is of the mono tube type, transportable (on wheels) with air/air operating system for domestic use and has 3 settings.
- V entilate/Fan.
- Cool.
- Dehumidify.
The ventilation mode "moves" the air allowing for its recycling much like a fan.
The cooling mode, a refrigerating circuit (compressor), cools the room by transferring the heat from inside to outside though the air exhaust hose. While cooling, the air-conditioning unit also dehumidifies the room air.
Dehumidification, in the cooling mode your air-conditioner does remove moisture from the air however another feature of this machine it can be set up to operate as a dehumidifier with greater moisture removal performance.
SPECIFICATIONS DAC9005 DACI2005
| Cooling Capacity 9000BTU/hr 12000BTU/hr | ||
| 2270Kcal/hp 3024Kcal/hp2638 watts 3529 watts | ||
| Power consumption | 830 Watts | 850 Watts |
| Air Volume (max setting) | 470m3/h | 520m3/h |
| Humidity removal capacity | 26L/day | 31L/day |
| Net weight | 29kg | 31kg |
| Power supply | 230-240V/50Hz | 230-240V/50Hz |
| Compressor | Rotary | Rotary |
| Refrigerant | R407C | R407C |
| Fan Speed | 2 | 2 |
| Timer | 1-8 hours | 1-8 hours |
| Thermostat | 18-32°C | 18-32°C |
| Dimension(WxDxH) | 377x400x750 mm | 430x403x753 mm |
| Test Conditions | Temperature 27°CHumidity 60% | Temperature 27°CHumidity 60% |
IMPORTANT SAFEGUARDS
- The air conditioning unit must always be stored and transported upright, otherwise you may cause irreparable damage to the compressor; in case of doubt we suggest you wait for at least 24 hours before you start the air-conditioning unit.
- Avoid restarting the air conditioning unit unless 4 minutes have passed since its turned off or the compressor may get damaged.
- Never use the mains plug as a switch to start and turn off the air conditioning unit. Use the provided ON/OFF switch located on the control panel.
- A lways place the portable air conditioner on a stable surface.
- Connect the portable air conditioner to a correct wall socket.
- Mount the exhaust hose on the portable air conditioner.
- The air conditioning unit should only be used by adults: do not allow children to play with it.
ENERGY SAVING TIPS
- Do not cover or restrict the airflow from the Outlet or Inlet grills. The minimum distance from furniture and walls should be 50cm.
- Keep blinds and/or draperies on any windows, closed during the sunniest part of the day.
- Keep the filter and side vent clean. Under normal conditions, the filters should be cleaned approximately every 30 days. Since the filters remove airborne particles, more frequent cleaning maybe necessary, depending on the indoor air quality.
- Set the fan speed switch to high cool and the thermostat to the coolest position for the initial start-up, then set the Fan switch to low cool and lower the thermostat to a comfortable setting.
- Please read the instructions carefully and save them in a safe place for future reference.
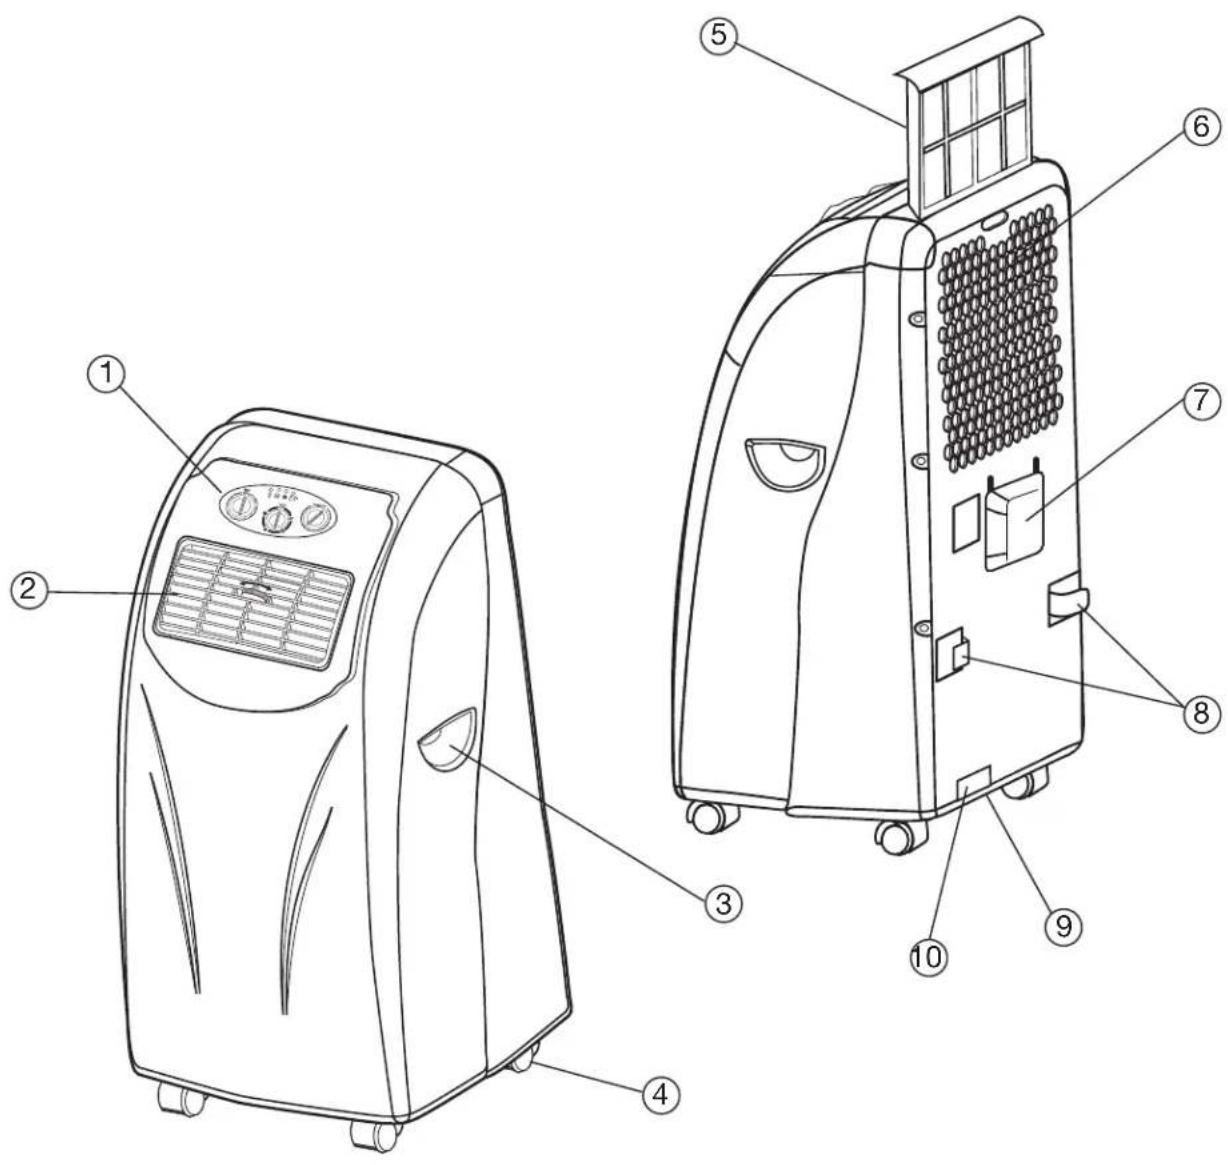
KNOW YOUR AIR CONDITIONER
I. Control panel
-
Cooling air outlet
-
Handle
-
Castor
-
Air filter
-
Air inlet
-
Exhaust air outlet
-
Cord hanger
-
Water stopper (rubber plug inside)
-
Water inlet draw
ACCESSORIES
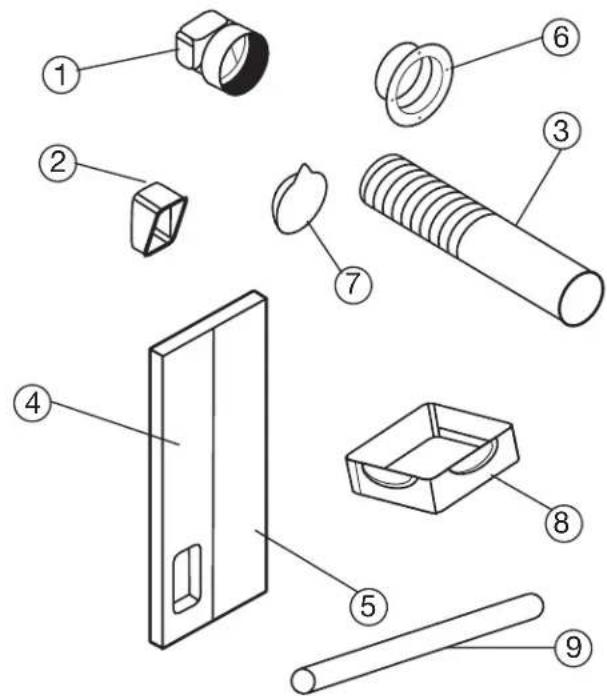
I. Adaptor - for insertion over hose and into back of the air conditioner.
2. Adaptor - for insertion over hose and into foam strip. (DAC9005)
3. Exhaust hose
4. Foam strip - for filling the open window space and with hole for connection to exhaust hose.
5. Foam strip - for filling the open window space.
6. Round window, floor and wall connector.
7. Cap for round connector.
8. Water tray.
9. Drain hose.
INSTALLATION
Mounting of the unit
This unit is a PORTABLE AIR CONDITIONER. It can be moved from room to room, so the cooling can follow you anywhere. The mounting is easy, beneath a window or wall. Please refer to either of the following ways -
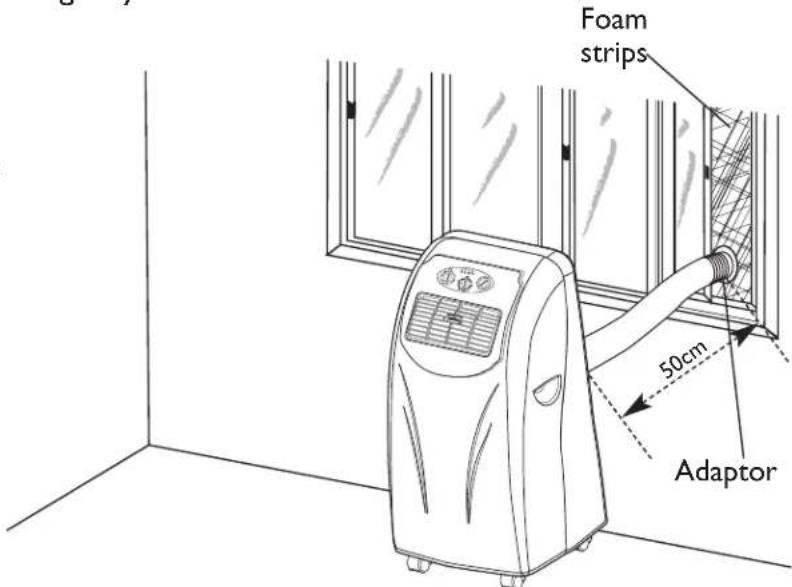
I. Using the foam strips
- Connect the supplied foam strips with the exhaust pipe, allowing the hot air to flow to the outside.
- Should the foam strip(s) be too large, cut off the extra part to fit the window.
- M inimum distance from the wall should be 50cm.
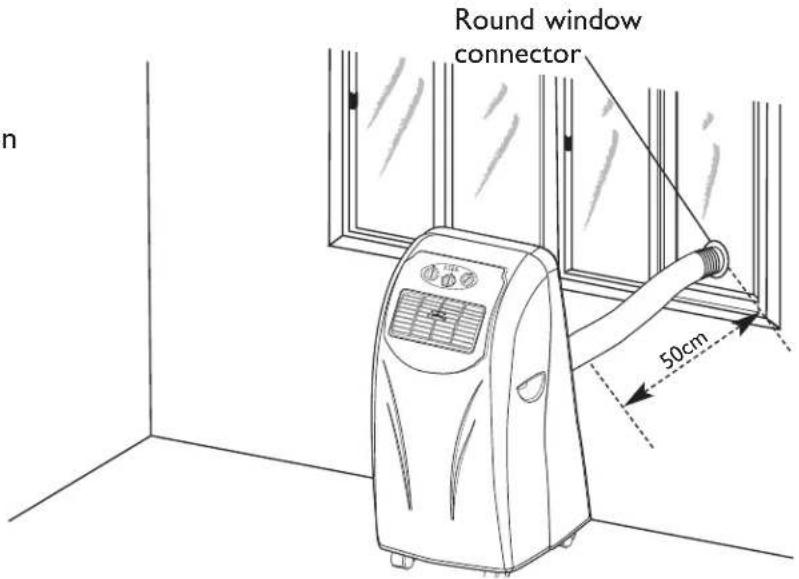
-
Using the round window connectors.
-
M ake a hole to suit adaptor on the wall/glass to fit the supplied round window connector.
- Take off the adaptor (the one which does not connect with the unit), fit the hose directly to the round window connector. DAC 9005
- When the hole is not in use. Use the cap for the round window connector to cover the hole.
Mounting of the exhaust pipe
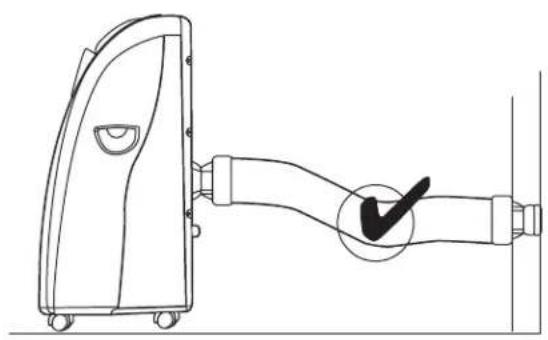
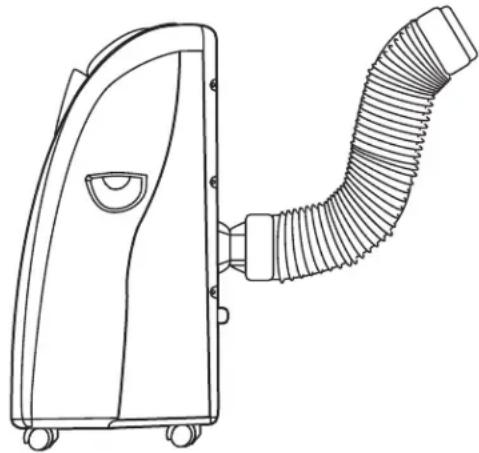
I. The supplied exhaust hose can be extended from 50cm to 150cm for mounting. It is recommended that you use the hose in the shortest possible length.
- Take care to prevent any bow or bend in the middle of the exhaust hose, as this will trap hot exhaust air, which will radiate into the room and cause this unit to shut itself off due to overheating.
WARNING!
The length of the exhaust pipe is specially designed according to the specification of this product. Do not replace or extend it with your own private hose as this could cause the unit to malfunction AND VOIDS YOUR WARRANTY
natural_image
Line drawing of a mechanical device with a handle and circular component, no text or symbols present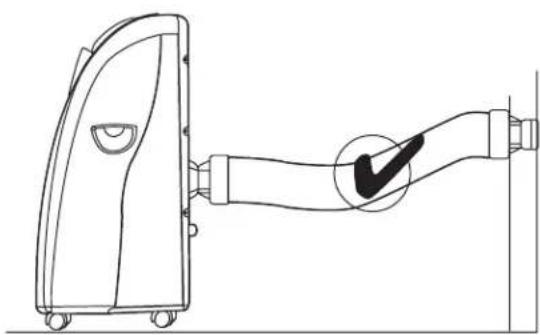
natural_image
Line drawing of a door handle with a checkmark indicating the handle (no text or symbols present)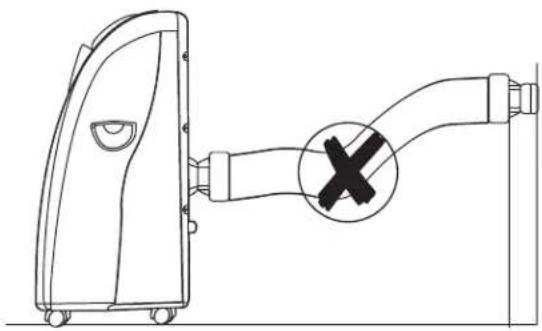
natural_image
Diagram of a device with a cross symbol indicating a warning or rejection, no text or labels presentADDING WATER
An added feature of these models.
Humidity absorbed from the air condenses at the Evaporator, turns into water and is collected in the internal tank. When enough water is collected it is pumped up and over the condenser, assisting the cooling of the refrigerated gas, increasing the COOLING CAPACITY. Some of this recycled water is evaporated at the condenser and expelled from the machine as water vapour though the exhaust hose.
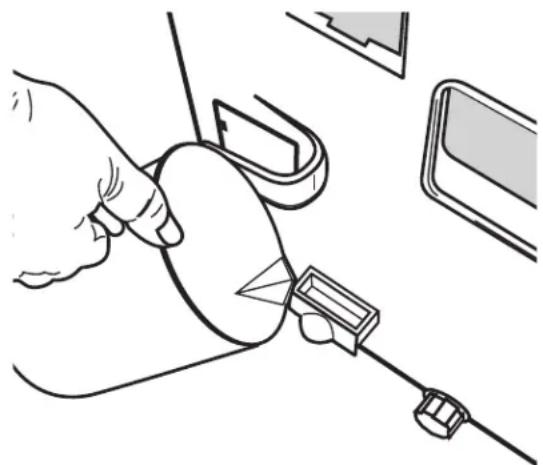
To utilise the full potential of your air conditioner from initial start up, we recommend that 800 mls of water be added to the internal water tank via the small draw located at the rear bottom left side of the machine.
Normally an adequate quantity of water is collected to keep the recycling process operating.
During very humid conditions the collection of water may over take the evaporation rate and the internal tank may become full.
The maximum water level in the tank is controlled by a float and micro switch, when the preset level is exceeded the Full Water indicator light will illuminate and the compressor will shut off automatically, the fan motor will stay on circulating the air.
natural_image
Line drawing of a hand using a tool to connect a cable to a device (no text or symbols present)At this time, you must empty the water tank as described "Drainage" page 9.
However during low humidity it may be necessary to add more water to the internal tank to increase the cooling capacity.
If there is any doubt regards the quantity of water in the tank we suggest that you drain the tank and start again adding the 800 mls.
OPERATION
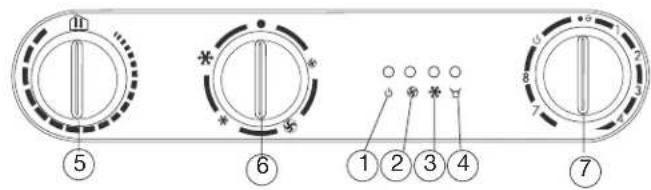
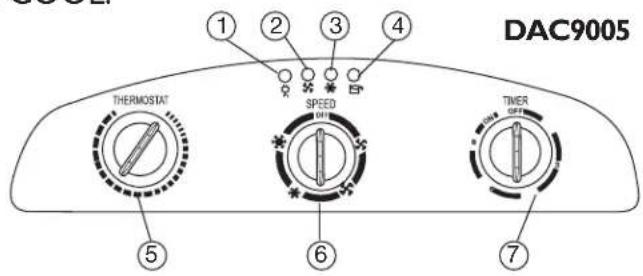
I. Power indicator
2. Fan operating indicator
3. Cooling operating indicator
4. FULL WATER indicator
5. Thermostat
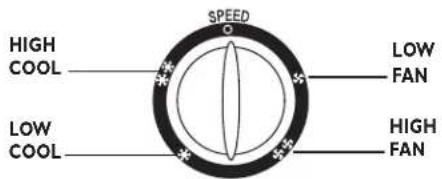
6. Speed switch with options for - LOW FAN, HIGH FAN, LOW COOL, HIGH COOL.
7. Timer (1-8 hours) as well as ON/OFF switch
Turning ON/OFF
- Set TIMER to ON for continuous operation (the unit will operate as long as it is not turned off). Power indicator comes on.
- T o turn off the unit, turn the TIMER to OFF position.
Set Timer
Set the TIMER to the desired operating time (1 to 8 hours). When the set time has been reached, the machine will shut off automatically.
Setting the Temperature
Turn the THERMOSTAT to regulate the temperature you desired. (This is for cooling mode only.)
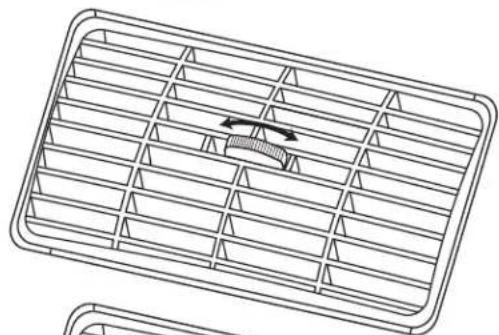
Regulating air flow direction
Turn the roller on air vent to control the air flow direction of the vertical louvres. (only DAC 9005)
Move the air vent directly to adjust the air flow direction of the horizontal louvres.
NOTICE!
To prolong the compressor's life, the compressor will only work 3 minutes after you switch the unit on or re-switch on. The cooling system will switch off if the ambient temperature is lower than the set one. The ventilation however, keeps working on the set level. If the ambient temperature rises above the selected level, the cooling will return to work.
DACI2005
natural_image
Technical line drawing of a rectangular grid structure with internal structural elements and an arrow indicating direction (no text or symbols)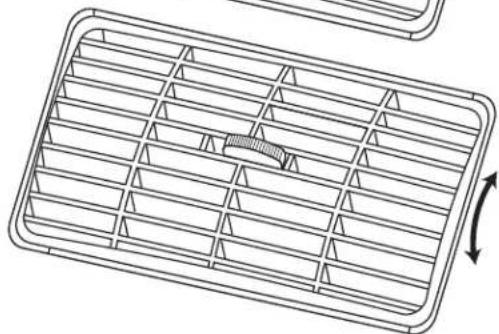
natural_image
Technical line drawing of a rectangular grid structure with internal triangular elements and an arrow indicating rotation (no text or symbols)DRAINAGE IN HIGH HUMIDITY CONDITIONS - AND STORAGE ONLY
During the process of cooling, water will be generated from the air and collected in the water tank inside the unit. When the tank is full, the compressor will stop and the Full Water indicator on the control panel will come on to remind you to empty
the water tank. During this time the fan will continue to operate circulating the air. The water tank should be emptied as follows:
I. Turn off the unit.
2. Position the supplied plastic water tray, flat on the floor, under the drain hole.
3. Remove the water stopper and the rubber plug. Empty the condensed water from the air conditioner.
4. When the water tray is almost full, replace the rubber plug to stop the flow of water, empty the water tray.
5. Repeat step 2, 3, 4, till all the condensed water is emptied.
6. After all condensed water is drained, replace the rubber plug and water stopper.
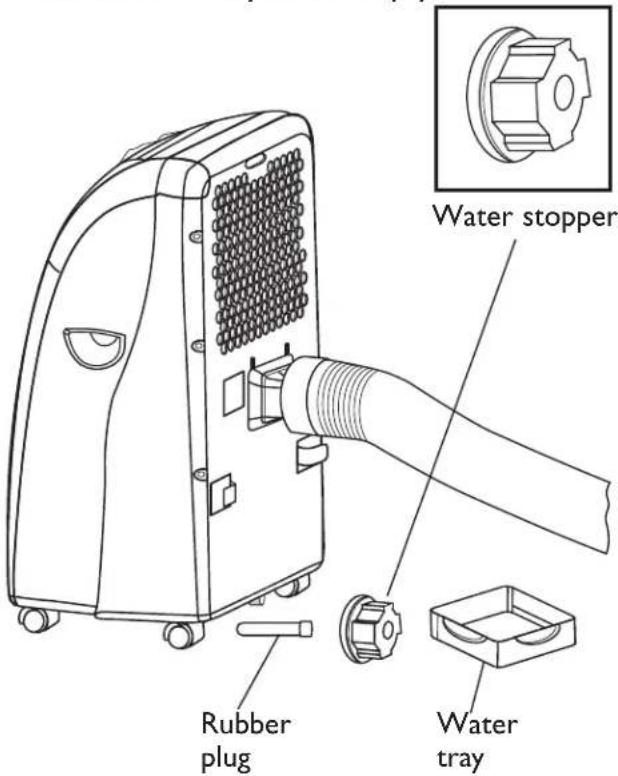
The FULL WATER indicator should be off now.
ATTENTION!
I. All condensed water must be drained prior to relocation or storage.
Dehumidification.
NOTE! The machine operates in the cooling mode but it does not lower the room temperature. It absorbs the excessive humidity present in the air.
I. Plug the unit into a proper electrical outlet.
2. Position the exhaust tube as shown or remove from the air-conditioner.
3. Turn the TIMER to position ON or 1 to 8 hours automatic timer setting.
4. Set the FAN SPEED control to the desired output of airflow, high or low.
5. Set the THERMOSTAT to the maximum cooling position.
- When the water tank is full, the Full Water indicator will illuminate and the compressor will shut off automatically, the fan will stay on
natural_image
Line drawing of a portable air conditioner unit with coiled hose (no text or symbols)circulating the air. At this time, you must empty the water tank as described in the Drainage section.
Continuous Drainage.
In very humid conditions to avoid the unit from shutting down when the water tank is full the unit can also be continuously drained if a convenient drainage position is available.
Important!
The water is only gravity drained therefore the tube must lay lower and drain at a lower level than the outlet tube at the rear of the air conditioner.
- Before operating the air conditioner, remove the water stopper, take out the rubber plug and connect a PVC tube 12mm diameter.
MAINTENANCE
Always unplug the unit from the mains before beginning the cleaning.
Cleaning the housing
- Use a soft, damp cloth to wipe the body clean.
- Never use aggressive chemicals, gasoline, detergents, chemically treated cloths, or other cleansing solutions. These all could possibly damage the cabinet.
Cleaning the filter and side vent
- U se a vacuum cleaner or tap the filter lightly to remove loose dust and dirt from the filters and then rinse thoroughly under running water (no hotter than 40^ ).
• D ry thoroughly before replacing.
NOTICE! Never operate the unit without the filters.
End of season storage
- Unplug the unit.
- Drain the condensed water COMPLETELY (Please refer to drainage clause).
• C lean or change the filter. - T urn on the unit in ventilation mode for a couple of hours, so the inside can dry out completely.
- It is recommended that the unit be put back into the original carton for storage and do not stack heavy objects on top of the unit.
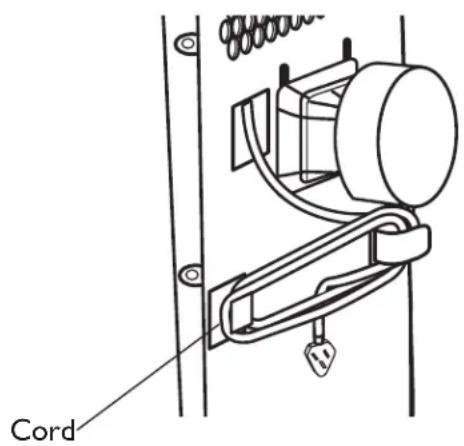
Power cord storage
- When the unit is not in use, please store the power cord as per illustration opposite.
TROUBLE SHOOTING GUIDE.
If the product is treated in the right manner, you should encounter no problems. In case of difficulties, please check the following points before consulting the maintenance service.
Product does not work • Check whether the product is plugged in.
No cool air • Has three minutes passed after switching on the unit, check whether the water tray is full.
- The room temperature should be in the operation range of 18^ - 32^
- Is the set temp higher than the room temp.
- A dd water as described on page 7.
Weak ventilation performance • Check if the exhaust hose blocked or kinked.
- C heck if the filter and side vent is blocked.
The unit is noisy • Check that the unit is setting on a level surface.
After long usage, the product should be cleaned by a professional maintenance service centre.
- Portable Air Conditioner – DAC 9005 – DAC 12005
- CONTENTS
- Page
- INTRODUCTION
- FEATURES
- IMPORTANT SAFEGUARDS
- ENERGY SAVING TIPS
- KNOW YOUR AIR CONDITIONER
- ACCESSORIES
- INSTALLATION
- Mounting of the unit
- Mounting of the exhaust pipe
- WARNING!
- ADDING WATER
- OPERATION
- Turning ON/OFF
- Set Timer
- Setting the Temperature
- Regulating air flow direction
- NOTICE!
- DRAINAGE IN HIGH HUMIDITY CONDITIONS - AND STORAGE ONLY
- ATTENTION!
- Dehumidification.
- Continuous Drainage.
- Important!
- MAINTENANCE
- Cleaning the housing
- Cleaning the filter and side vent
- End of season storage
- Power cord storage
- TROUBLE SHOOTING GUIDE.
Brand : DIMPLEX
Model : DAC12005
Category : Air conditioner