
DIMC10RC - Air-conditioner DIMPLEX - Free user manual and instructions
Find the device manual for free DIMC10RC DIMPLEX in PDF.


| Product Type | Portable Air Conditioner |
| Model | DIMC10RC |
| Brand | Dimplex |
| Cooling Capacity | 10000 BTU |
| Power Supply | 115 V, 60 Hz |
| Power Consumption (Cooling) | 950 W |
| Refrigerant | R-410A |
| Dimensions (W x D x H) | 18.5 x 14 x 28.5 in (47 x 35.5 x 72 cm) |
| Weight | 63.9 lb (29 kg) |
| Noise Level | 52 dBA |
| Airflow | 250 CFM |
| Dehumidification | 1.5 L/h |
| Timer | 24-hour programmable |
| Remote Control | Yes, included |
| Filter | Washable mesh filter |
| Casters | 4 swivel casters |
| Exhaust Hose Length | 5 ft (1.5 m) |
| Window Kit | Adjustable for slider/vertical windows |
| Energy Efficiency Ratio (EER) | 9.5 |
| Auto Restart | Yes |
| Self-Evaporative System | Yes (most water evaporated) |
| Safety | Overheat protection, auto shut-off |
Frequently Asked Questions - DIMC10RC DIMPLEX
User questions about DIMC10RC DIMPLEX
0 question about this device. Answer the ones you know or ask your own.
Ask a new question about this device
Download the instructions for your Air-conditioner in PDF format for free! Find your manual DIMC10RC - DIMPLEX and take your electronic device back in hand. On this page are published all the documents necessary for the use of your device. DIMC10RC by DIMPLEX.
USER MANUAL DIMC10RC DIMPLEX
natural_image
Line drawing of a portable air conditioner unit with control panel and wheels (no text or symbols)PORTABLE AIR CONDITIONER
IMPORTANT INFORMATION
Carefully read this instruction manual before you install or use your portable air conditioner. Please retain this manual for product warranty and for future reference.
CAUTION
- Make sure the inlet and outlet vents are never blocked.
- Ensure the appliance is on a stable, even surface when operating to avoid water leakage.
- Do not operate this unit in an explosive or corrosive atmosphere.
- When switched to cooling, only operate this unit in ambient temperatures between 17^ C and 43^ C. For heating, only operate this unit in ambient temperatures between 5^ C and 23^ C.
- Clean the air filter frequently to ensure efficient operation.
- To prevent compressor damage when the unit has been operating and is turned off, please wait at least 3 minutes before restarting.
- This unit needs to be plugged into a 220-240V \~ 50Hz AC, 10 Amp power outlet.
- Do not use any extension cords with this unit.
- This unit is for indoor operation only.
- Open the adjustable air vent and extend the exhaust pipe (and drain pipe, if fitted) to the closest window before using.
- Only ever have a professional technician, manufacturer or service agent replace a damaged power cord.
- The batteries from the remote control must be removed and disposed of safely, before the appliance is scrapped.
- This appliance is not intended for use by persons (including children) with reduced physical, sensory or mental capabilities, or lack of experience and knowledge, unless they have been given supervision or instruction concerning use of the appliance by a person responsible for their safety.
- Children should be supervised to ensure that they do not play with the appliance.
Important.
The air conditioner must always be stored and transported upright. In case of doubt we suggest you wait for at least 24 hours before operation. (Please keep unit upright at all times)
PACKAGE CONTENTS
Portable air conditioner
Remote control
Batteries for remote control
Extendable window kit
Water tray
PARTS
- Controls
- Remote receiver
- Adjustable air vent
- Window kit adaptor
- Exhaust tube
-
Upper drain plug
-
Cool air inlet
- Cool air filter
- Hot air inlet
- Hot air filter
- Lower drain plug
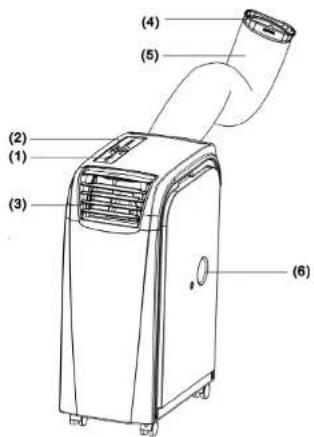
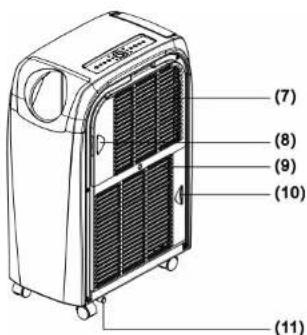
Note: Make sure drain plugs (6 and 11) are fitted before use.
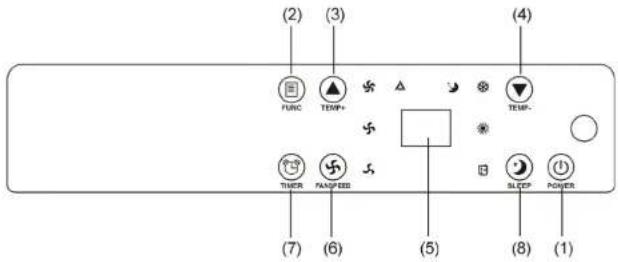
CONTROLS AND DISPLAY
DIMC10RC
DIMC12RC/ DIMC15RC
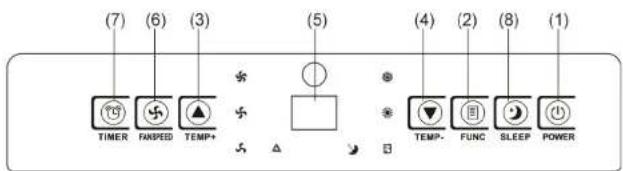
1. POWER
Press the POWER button to turn the unit "ON" or "OFF".
※ The portable air conditioner is fitted with a compressor delay protection circuit. This protects the unit from possible damage due to rapid starting and stopping of its compressor. Compressor operation begins 3 minutes after the unit is switched on or the mode is switched from dehumidify to air conditioning.
2. FUNCTION
Press this button to select cooling, heating or dehumidification.
※ When the heating or dehumidification functions are used the upper drain plug (6) must be removed and a drain hose must be attached.
3. TEMP+
In cooling function, this button raises the set temperature by 1^ each time it is pressed to a maximum of 30^ . In heating function, this button raises the set temperature by 1^ each time it is pressed to a maximum of 25^ .
4. TEMP-
In cooling function, this button lowers the set temperature by 1^ each time it is pressed, to a minimum of 17^ . In heating function, this button lowers the set temperature by 1^ each time it is pressed to a minimum of 15^ .
※ The time taken to reach the desired set temperature will depend on the environment and the size of the space in which the unit is operating in. For example, if the ambient temperature is too hot or the room is too large, the rate at which the temperature descends will be slow as the cooling may be less effective.
5. DISPLAY
The display indicates the current, the set temperature or the timer setting. When the timer or temperature is adjusted, the new setting is shown then the display returns to the current set temperature.
※ The display is also used to show error codes should a fault occur, see ERROR CODES.
6. SPEED
Press SPEED to select LOW, MEDIUM, HIGH or AUTO fan speed. If AUTO fan speed is selected, the unit operates at maximum capacity and high fan speed while the room temperature is more than 2^ from the set temperature. When the room temperature is within 2^ of the set temperature, the unit operates at medium capacity and fan speed. Once the room temperature equals the set temperature, the unit will operate at minimum capacity and low fan speed to efficiently maintain the desired temperature. When HIGH, MEDIUM or LOW speed is selected, the unit operates at maximum capacity until the set temperature is reached. The fan operates at the selected speed.
7. TIMER ON/OFF button for the programmable timer.
The timer can be used to turn the unit on automatically after a set time delay is complete.
- With the unit OFF, press the "TIMER" button to set the desired time delay before the unit is to start.
- Choose the function desired (cooling, heating or dehumidification.)
- Once the set time delay is complete, the unit will turn on automatically.
- If you press the "POWER" button before the time delay is complete, the delay will be cancelled and the unit will turn on immediately.
The timer can be used to turn the unit off automatically after a set time period is complete.
- With the unit ON, press the "TIMER" button to set the desired time for the unit to remain on.
- Once the set time period is complete, the unit will turn off automatically.
- If you press the "POWER" button before the time delay is complete, the delay will be cancelled and the unit will turn off immediately.
8. SLEEP
Press the SLEEP button to select the sleep comfort mode.
When the unit is cooling and sleep mode is selected, the unit will raise the set temperature 1^ each hour to a maximum of 2^ over two hours. When the unit is heating and sleep mode is selected, the unit will lower the set temperature 1^ each hour to a maximum of 2^ over two hours. These temperatures will be maintained for the balance of the time set and help maximize sleep comfort.
When setting the "sleep comfort" mode, please ensure that you set the number of hours required by using the TIMER function. The hours set will be shown on the display by pressing either the TEMP + or TEMP- buttons.
REMOTE CONTROL
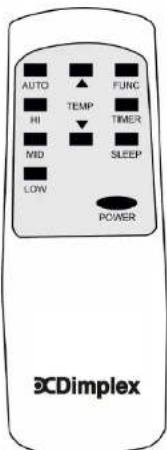
POWER
FUNC
TIMER
AUTO
HI
MID
LOW
SLEEP
▲
▼
ON/OFF switch
Function selector
Timer programming
Automatic fan speed
High fan speed
Medium fan speed
Low fan speed
Sleep comfort mode selector
Raise Set Temperature
Lower Set Temperature
INSTALLATION
Unpacking the unit.
natural_image
Technical line drawing showing three views of a washing machine (top, front, side) with no visible text or symbols-
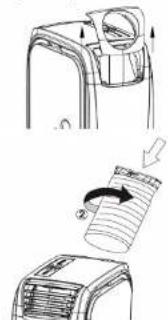
Remove the exhaust tube from its storage under the rear air outlet. Replace the rear air outlet.
-
Install the exhaust tube by rotating it clockwise onto the rear air outlet. Please ensure it is fully inserted before use.
Locating the unit.
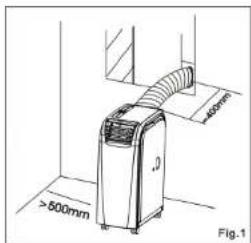
Install the portable air conditioner in a flat location with adequate space to ensure the air inlets and outlets will not be blocked.
Keep a minimum clearance of 50cm from walls and other objects. Locate the unit to allow the exhaust pipe and drain hose to reach a suitable window, as shown.
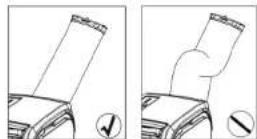
Avoid sharp bends or kinks in the exhaust pipe.
The optional adjustable window slider is included to ensure the exhaust pipe is held in place (in the window) and prevents expelled hot air re-entering the room.
The appliance should not be used in damp areas such as a laundry or bathroom.
Do not place the unit where it will be in direct sunlight as it may overheat and turn off.
ADJUSTABLE WINDOW SLIDER KIT
The adjustable window slider kit is installed as shown below.
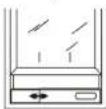
Window slider kit
min: 55cm
max: 100cm
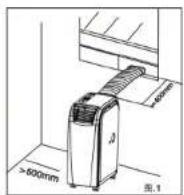
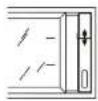
Window slider kit
min: 65cm
max: 100cm
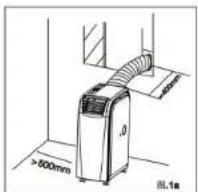
HEATING AND DEHUMIDIFICATION
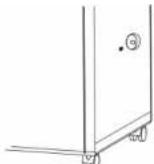
When the heating or dehumidification functions are used the upper drain plug (6) must be removed and a drain hose must be attached.
HEATING
When using the heating function move the rear air outlet with the exhaust tube to the front of the unit as below:
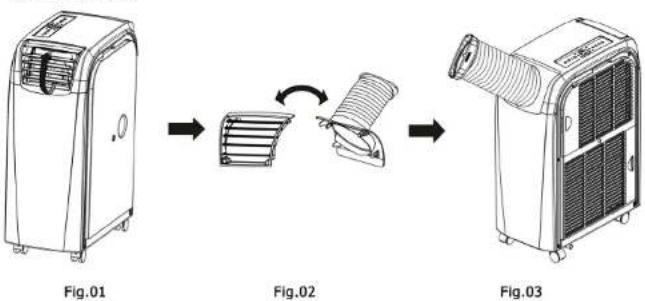
flowchart
graph LR
    A["Image Air Conditioner Unit"] --> B["Receiving Panel"]
    B --> C["Coiled Bag Cover"]
    C --> D["Product Air Heater Unit"]
The outlet exhaust must still be attached to the window when using the heating function.
Return the outlet and tube to the rear of the unit for cooling or dehumidification.
WATER DRAIN (Error code E4)
When the air conditioner is used, excess water condensation may be produced that cannot be removed via the exhaust hose. This water is captured by an internal container. When this container is full, the unit will stop working and display the E4 error code.
When the error code E4 is displayed the water collected in the internal container must be manually drained:
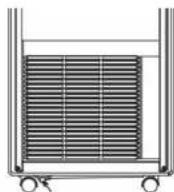
- Switch off and unplug the unit.
- Move the unit to a suitable place to drain the water.
Consider placing a tray or suitable container under the outlet pipe to catch the drained water.
- Remove the lower drain plug (11), refer to parts illustration.
- Slightly tilt the unit to the rear to drain the water.
- Replace the drain plug.
Make sure the drain plug is re-fitted to the drain outlet before use.
Extend the exhaust to the window before the unit is restarted.
MAINTENANCE
WARNING: ALWAYS UNPLUG THE UNIT BEFORE MOVING OR CLEANING.
CLEANING
Air filters
The air filters located on the rear of the unit can be removed simply by pulling the filter frame slightly out and then across to the side.
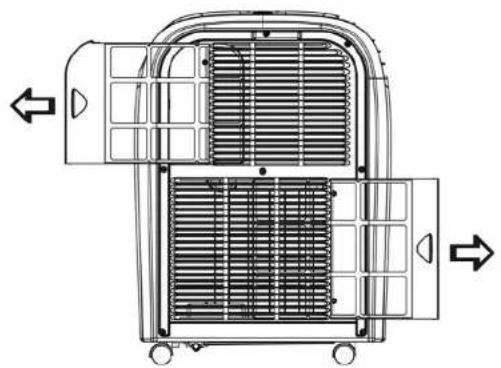
natural_image
Technical line drawing of a mechanical device with internal compartments and directional arrows indicating flow or movement (no text or symbols)Cabinet
Wipe with a damp cloth and polish with a soft cloth.
CARE OF THE UNIT
- Only plug the unit into a suitable 220-240V\~50Hz AC 10 AMP power supply.
- Hold the plug when unplugging the unit, never pull on the cord.
- Do not place the unit in direct sunlight. This can fade the plastic case.
- Do not operate the unit in a confined space.
- Do not place objects on top of the unit. This blocks the air outlet.
-
Do not place the unit where the air inlets or outlets may be blocked by curtains or furniture.
-
Keep the filters clean.
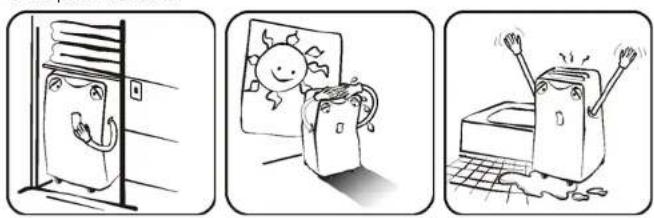
OVERHEAT PROTECTION
This unit is fitted with an overheat prevention device. If the unit overheats it will automatically turn off. The unit can be restarted after 30 minutes.
ERROR CODES
Error codes are shown on the display should a fault occur.
E1: Indicates open circuit or short circuit in the room temperature sensor.
E2: Indicates open circuit or short circuit in the pipe temperature sensor.
E4: Indicates the internal water container is full. Refer to WATER DRAIN.
If error code E4 persists, please contact an authorized service centre.
TROUBLE SHOOTING
| Never try to repair or dismantle the air conditioner yourself. Unauthorized repairs may result in the loss of warranty and can endanger the user and their property. | ||
| Problem | Cause | Solution |
| The air conditioner does not operate. | No power supply. Connect to a functioning power supply socket and switch on. | |
| Error code E4 is shown, indicating the internal water container is full. | Empty the internal water container.(Refer to WATER DRAIN) | |
| The start timer function is active. | Press the POWER button to deactivate the TIMER function. | |
| The air conditioner does not seem to operate efficiently. | The air conditioner is in direct sunlight. | Close the curtains. |
| Windows or doors are open. Close windows and doors. | ||
| The filters are dirty. Clean the filters. | ||
| The air inlets or outlets are blocked. | Remove the blockage. | |
| The room temperature is below the set temperature. | Lower set temperature. | |
| The air conditioner is noisy. | The air conditioner is not level. | Place the air conditioner on an even, solid surface. |
| The compressor does not work. | The overheat protection is activated. | Wait 30 minutes until the temperature has decreased, then turn the air conditioner on again.Note: Compressor operation begins 3 minutes after the unit is switched on. |
| The remote control does not function. | The distance between the remote control and the air conditioner is too great. | Move closer to the air conditioner. Aim the remote control directly at the control panel. |
| The batteries are flat. Replace the batteries. | ||
If you have any issues with your unit, please contact Glen Dimplex for your nearest service agent.
Proof of purchase is required at the time of service.
WARRANTY
The warranty period is 24 months from the date of purchase.
Glen Dimplex Australia Pty Ltd Glen Dimplex Australasia Ltd
| Unit 1, 21 Lionel Road. | 38 Harris Road, East Tamaki, |
| Mount Waverley VIC 3149. | Manukau, Auckland 2013 |
| Australia | New Zealand |
| Ph: 1300 556 816 | Ph: (09) 274 8265 |
| Fax: 1800 058 900 | Fax: (09) 274 8472 |
Web: www.dimplex.com.au Web: www.dimplex.co.nz
DISPOSAL
- Do not dispose of electrical appliances as unsorted municipal waste. Use separate collection facilities.
- Contact your local government for information regarding the collection systems available.
- If electrical appliances are disposed of in landfills or dumps, hazardous substances can leak into the ground water, polluting the food chain and damaging health and well-being.
SPECIFICATIONS
| Model No. | DIMC10RC | DIMC12RC |
| Power Source 220-240V ~ 50Hz AC | 220-240V ~ 50Hz AC | |
| Power Consumption (EN14511) | 1245W / 1090W | 1452W / 1246W |
| Rated Power (EN60335) | 1280W / 1100W | 1480W / 1300W |
| Cooling / Heating Capacity | 3000W / 3000W | 3500W / 3500W |
| Air Flow 360 M | ^3/H | 450 M^3/H |
| Moisture Removed 40 L/DAY | 60 L/DAY | |
| Refrigerant | R410A | R410A |
| Min. room size 10m | ^2 | 10 m^2 |
| Max. room size 22m | ^2 | 25 m^2 |
| Dimensions (mm) 300W x 507D x 627H | 300W x 550D x 760H | |
| Net Weight 28KG | 29.5KG | |
| Model No. | DIMC15RC |
| Power Source 220-240V ~ 50Hz AC | |
| Power Consumption (EN14511) | 1826W / 1566W |
| Rated Power (EN60335) | 1700W / 1500W |
| Cooling / Heating Capacity | 4400W / 4400W |
| Air Flow 550 M | ^3 /H |
| Moisture Removed 75 L/DAY | |
| Refrigerant | R410A |
| Min. room size 10m | ^2 |
| Max. room size 29m | ^2 |
| Dimensions (mm) 300W x 550D x 760H | |
| Net Weight 31.5KG | |
- PORTABLE AIR CONDITIONER
- IMPORTANT INFORMATION
- CAUTION
- Important.
- PACKAGE CONTENTS
- PARTS
- CONTROLS AND DISPLAY
- POWER
- FUNCTION
- TEMP+
- TEMP-
- DISPLAY
- SPEED
- TIMER ON/OFF button for the programmable timer.
- The timer can be used to turn the unit on automatically after a set time delay is complete.
- The timer can be used to turn the unit off automatically after a set time period is complete.
- SLEEP
- ADJUSTABLE WINDOW SLIDER KIT
- HEATING AND DEHUMIDIFICATION
- HEATING
- WATER DRAIN (Error code E4)
- MAINTENANCE
- CLEANING
- Air filters
- Cabinet
- CARE OF THE UNIT
- OVERHEAT PROTECTION
- ERROR CODES
- WARRANTY
- DISPOSAL
Brand : DIMPLEX
Model : DIMC10RC
Category : Air-conditioner