
PBX-3080BT - Docking Station QFX - Free user manual and instructions
Find the device manual for free PBX-3080BT QFX in PDF.


| Product Type | Powered Portable PA System with Docking Station |
| Brand | QFX |
| Model | PBX-3080BT |
| Power Output | 60W RMS |
| Power Supply | AC 120V-240V (selectable), DC 12V external battery, internal rechargeable battery |
| Battery Charging Time | Approx. 8 hours |
| Battery Playtime | Approx. 4-5 hours (fully charged) |
| Battery Lifespan | Approx. 300 recharge cycles |
| Inputs | 2x Line (RCA, 1/8"), 2x Mic (1/4"), Guitar (1/4"), USB, SD/MMC, Bluetooth, FM Antenna |
| Display | LED screen showing input mode, EQ, repeat, track number, FM frequency |
| Audio Controls | Master Volume, Bass, Treble, Mic Echo, Mic Volume, Guitar Volume, 7-band Equalizer |
| Playback Media | USB flash drive (max 8GB), SD card (max 8GB), MP3 files, Bluetooth streaming, FM radio |
| Bluetooth | Yes, password "0000", device name "QFX" |
| Remote Control | Included with functions: standby, input mode, mute, track skip, volume, EQ, play/pause, repeat |
| Microphone | Wired microphone included (1/4" connection) |
| Docking Station | Device slot for mobile or tablet |
| USB Charger | Yes, for charging external devices |
| Fuse | 6.12V fuse, replaceable |
| Cleaning | Use a dry cloth only |
| Safety | Do not expose to rain or moisture; no user-serviceable parts; refer servicing to qualified technician |
| Maintenance | Charge battery every 60 days if not in use |
Frequently Asked Questions - PBX-3080BT QFX
User questions about PBX-3080BT QFX
0 question about this device. Answer the ones you know or ask your own.
Ask a new question about this device
Download the instructions for your Docking Station in PDF format for free! Find your manual PBX-3080BT - QFX and take your electronic device back in hand. On this page are published all the documents necessary for the use of your device. PBX-3080BT by QFX.
USER MANUAL PBX-3080BT QFX
natural_image
Black and white photo of a portable audio amplifier device with a handheld screen displaying a sunset image, no visible text or symbols on the device body.PBX-3080BT
120V-240V
60W RMS
WARNING!
CAUTION: TO REDUCE THE RISK OF ELECTRIC SHOCK, DO NOT REMOVE THE COVER ON THIS SPEAKER.
THERE ARE NO USER-SERVICEABLE PARTS INSIDE. REFER ALL SERVICING TO A QUALIFIED TECHNICIAN.
The lightning flash with arrowhead symbol within an equilateral triangle is intended to alert the user to the presence of dangerous voltage within the product's enclosure that may be of sufficient magnitude to constitute a risk of electric shock to humans. Users should exhibit extra safety when this symbol appears in this instruction manual and follow all precautions as they are stated.
The exclamation point within an equilateral triangle is intended to alert the user to the presence of important operating and maintenance (servicing) instructions in this manual.
1- Read these instructions.
2- Keep these instructions.
3- Heed all warnings.
4- Follow all instructions.
5- WARNING: To prevent fire or electric shock, do not expose this equipment to rain or moisture. Do not store or operate this product near any liquids.
6- Clean only with a dry cloth.
7- Do not store or operate this product near any heat sources such as radiators, heat registers, stoves, or other apparatuses (including amplifiers) that produce heat. Keep this product in a well ventilated area.
8- Do not defeat the safety purpose of the polarized or grounding-type plug. A polarized plug has two blades with one wider than the other. A grounding plug has two blades and a round grounding prong. The wide blade or third prong is provided for your safety. If the provided plug does not fit your outlet, consult an electrician for the replacement of the ob solete outlet.
9- Protect all the wires connected to this unit from being walked on or pinched, particularly plugs and the point where they exit from the unit. When removing the cord from the poweroutlet, remove it by holding the plug, not by pulling the cord.
10- Unplug the unit during lightning storms or when unused for long periods of time.
11- When wiring this unit and all other equipment used in connection to this unit make sure that all of your equipment is turned OFF.
12- Once installation and wiring is complete power on all your equipment with the volume and level controls turned DOWN. Once all the equipment in ON slowly raise the volume or level controls to their proper positions.
13- Before Placing, Installing, rigging, or suspending any product, inspect all hardware, suspension, cabinets, transducers, brackets and associate equipment for damage. Any missing, corroded, deformed, or non-load rated component could significantly reduce the strength of the installation, placement or array. Any such condition severely reduces the safety of the installation and should be immediately corrected. Use only hardware which is rated for the loading conditions of the installation and any possible short-term, unexpected overloading, Never exceed the rating of the hardware or equipment.
14- Consult a licensed, Professional Engineer regarding physical equipment installation, Ensure that all local, state and national regulations regarding the safety and operation of equipment are understood and adhered to.
15- Refer all servicing to qualified service personnel. Servicing is required when the apparatus has been damaged in any way, such as power supply cord or plug is damaged, liquid has been spilled or objects have fallen into the apparatus, the apparatus has been exposed to rain or moisture, does not operate normally, or has been dropped.
Introduction
Congratulations and thank you for your purchase of this QFX Powered Portable PA System with wired microphone, USB & SD Card, bluetooth inputs. To get the most from your system, we recommend you review all the information provided in this instruction Manual.
BE SURE THAT YOU HAVE COMPLETELY CHARGED THE BATTERY PRIOR TO FIRST USE TO MAXIMIZE THE BATTERY'S LIFESPAN.
PBX-3080BT REAR PANEL

PBX-3080BT FRONT PANEL
- LINE1 Input (RCA): The RCA Input is designed to connect directly to a CD/DVD/TV or any other stereo level audio device.
Please note that there are two LINE Inputs, RCA and 1/8". If both the RCA and 1/8"inputs are connected the unit is automatically play from the 1/8" Line input. To play from the RCA Line input, please disconnect the 1/8" connection from the 1/8" Line Input.
-
LINE2 Input(1/8"): The 1/8" Line Input is designed to connect directly to a mp3 player or any other stereo level audio device. Please note that there are two LINE Inputs, RCA and 1/8". If both the RCA and 1/8" inputs are connected the unit is automatically play from the 1/8" Line input.
-
Power Supply: The power switch should be set to the off position before the power supply is connected.
-
Voltage Selector 120V-240V. Be sure the unit's voltage in the outlet you are using.
-
Power Button: Press this button to power the unit on, off or to charge the unit. If the battery needs to be charged, set the unit to AC and connect the power cable to the rear of the unit. When set to AC, the unit can also be powered by an external power supply (electrical outlet) even if the battery is dead. In this case you need to have the unit set to the voltage corresponding to the voltage of the outlet. To turn the unit off set the power button to OFF. It is recommended to fully charge the battery prior to using the unit for the first time. It is also recommended to charge the battery at least every 2-3 months to keep the battery operating to it highest capacity.
6.12V FUSE: Provided battery is damaged or internal short circuit, the fuse will be burnt in order to protect the machine &battery. The unit can work well after replace a new fuse.
7.DC 12V IN is for connecting to 12V external battery if needed.
- Antenna is for receiving the FM signal. Before use, pull up the telescopic FM antenna. After use, pack up the FM antenna to better protect it.
PBX-3080BT FRONT PANEL

-
Input Mode Button: Press this button to toggle between the various inputs (LINE, USB, SD & FM). The INPUT Switch (14) must firstly set to "Line/FM/MP3".
-
Play/Pause Button: The play /pause button will only control the USB flash drive/SD card and FM inputs.
When on the mode of USB/SD, short press this button to play or pause the track for USB/SD. Long press this button to repeat the playing track, long press again to cancel the repeat. When on the mode of FM, press this button to auto scan all channels.
-
SD/MMC card slot: Connect your SD/MMC card memory storage (flash drive) device here. The maximum size of the SD/MMC card can not exceed 8GB. The speaker will only play .mp3 files from the SD/MMC card input. Do not connect your computer to this input as it will not play files directly from a computer.
-
USB slot: Connect your USB memory storage (flash drive) device here. The maximum size of the USB card can not exceed 8GB. The speaker will only play .mp3 files from the USB card input. Do not connect your computer to this input as it will not play files directly from a computer.
-
Next Track Button: When on USB/SD mode, short press this button to move to the next track for USB/SD. Long press this button to increase the volume for USB/SD.
When on FM mode, short press this button to move to the next channel. Long press this button to increase the volume for FM.
- Previous Track Button: When on USB/SD mode, short press this button to move to the previous track for USB/SD. Long press this button to reduce the volume for USB/SD.
When on FM mode, short press this button to move to the previous channel. Long press this button to reduce the volume for FM.
-
Remote control receiver
-
Master Level Control: Turn this knob to adjust the master volume.
-
Charge Indicator: When you charing the battery of this unit, the charge indicator will illuminate.
-
Bass adjustment: Turn this knob to increase the bass on the LINE/USB/SD/FM inputs
-
Treble adjustment: Turn this knob to increase the treble on the LINE/USB/SD/FM inputs
-
Microphone Echo Knob: Use this knob to adjust the echo for the microphone input(Mic1& Mic2).
-
Microphone Volume Knob: Turn this knob to adjust the microphone volume level of the microphone input (Mic1& Mic2)
-
Guitar Volume Control: Turn this knob to adjust the volume for the guitar.
-
LINE Audio/FM/ MP3/Bluetooth mode selector: Move this switch to the left to select the LINE Audio/FM/ MP3 input. Move this switch to the right to select Bluetooth input.
-
Guitar Input (1/4"): Connect a guitar cable to this input terminal.
-
Microphone Input(1/4"): Connect a microphone to this microphone input terminal.
-
Microphone Input(1/4"): Connect a microphone to this microphone input terminal.
-
Seven Band Equalizer: Move the individual sliders to adjust certain frequencies to desires levels.
PBX-3080BT DISPLAY

flowchart
graph TD
    A["1"] --> B
    B --> C
    C --> D
    D --> E
    E --> F
    F --> G
    G --> H
    H --> I
    I --> J
    J --> K
    K --> L
    L --> M
    M --> N
    N --> O
    O --> P
    P --> Q
    Q --> R
    R --> S
    S --> T
    T --> U
    U --> V
    V --> W
    W --> X
    X --> Y
    Y --> Z
DIGITAL AUDIO PLAYER DIGITAL AUDIO PLAYER DIGITAL AUDIO PLAYER

DIGITAL AUDIO PLAYER
USB
SD
LINE
0004
-
Input Mode: The LED display screen will display the information of input mode for USB/SD/LINE/FM.
-
When a USB flash drive / SD Card is inserted into the USB/SD input, the unit will automatically switch to USB/SD mode and begin playing .mp3 audio files from the USB flash drive / SD Card. EQ Mode: EQ modes will display here.
Repeat Mode: When the USB flash or SD card mode is selected, press the REP button on the remote control to select the one repeat for playing track for USB/SD. Press again to cancel repeat mode.
-
Track Number: The track number currently playing from the USB/SD will display.
-
FM Mode: All FM channels display here. Long press "play/pause" button on front panel for auto scan all channels.
DIGITAL AUDIO PLAYER
93.6
③
PBX-3080BT MICROPHONE

- Before powering on the microphone, be sure to set the Microphone Volume Knob to zero. Once the microphone is powered on, slowly increase the microphone volume.
- If you notice static or distortion in the microphone, check if XLR is fixed to the body properly or echo volume is too high.
- When not in use, turn off the power of the microphone.
PBX-3080BT TOP PANEL

natural_image
Black QFX air conditioner device with a smartphone on top, showing front panel and control panel (no visible text or symbols)
USB charger
Device slot is available for putting any device such as mobile or tablet PC.
USB Charger: Any device such as mobile or tablet PC can charge with the USB cable.
PBX-3080BT BATTERY
- The PBX-3080BT is a battery powered PA loudspeaker. Be sure that you have completely charged the battery prior to first use to maximize the battery's lifespan.
The PBX-3080BT takes approximately 8 hours to fully charge. The PBX-3080BT will automatically begin charging once the power cord is connected to a power source and Power Switch is set to ON.
The unit will also power on when connected to a power source even if the battery power is low.
When connected to a power source the PBX-3080BT will play while also charging the battery.
When the battery is full, the charging indicator light on the front panel will OFF. - Upon completion of the charging, Please disconnect the power cable.
- If the unit's Low Battery indicator is illuminating green, please power off the unit and begin charging the battery.
- With standard usage, a fully charged battery can play for about 4-5 hours.
- Battery can be recharged about 300 times in its lifetime.
- When not in use, the speaker should always be set fo OFF to prevent the unit from draining the battery.
- When the unit is not used for prolonged periods of time, the battery will gradually lose its power. It is recommended to fully charge the battery at least every 60 days.
PBX-3080BT BIUETOOTH
Bluetooth Mode : When chose the bluetooth mode, after pressing the button to the right, the unit will sent out a beep. At the same time, the bluetooth indicate will go twinkle. Then it will search the Bluetooth signal. Open the bluetooth of moilephone. Find the bluetooth name of the unit called "QFX" to connect. Then enter the password for "0000". After a successful match, you can play the music in mobile phone. When playing the music, you switch the other mode, you can press the play button to continue the music without reconnect the bluetooth.
PBX-3080BT REMOTE CONTROL
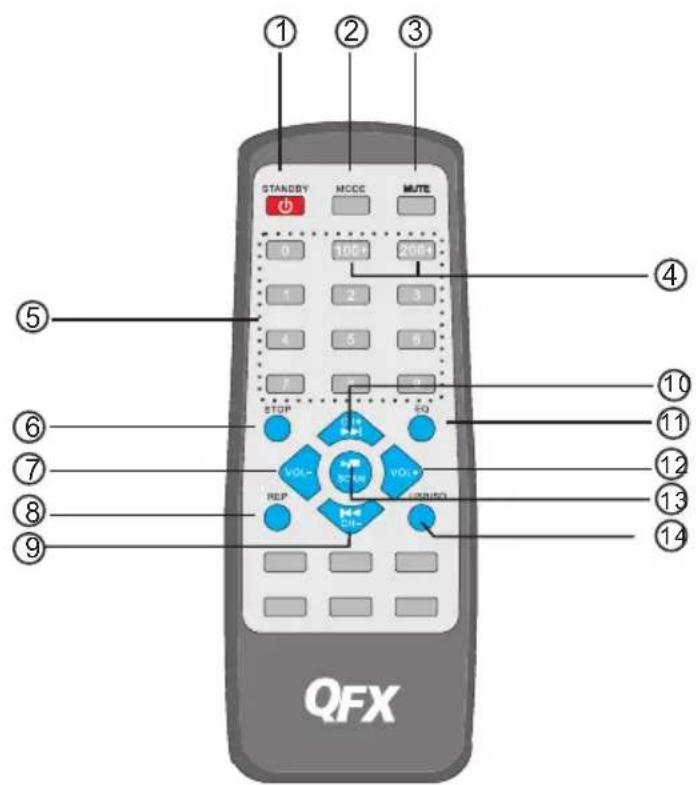
- STANDBY: Press standby button to make the unit to be standby mode.
- Input Mode Button: Press this button to toggle between the various inputs (LINE, USB, SD, FM).
- Mute: Press this button to mute the track for USB/SD.
- Track Button: Press this button to move to the certain track above 100th or 200th on USB flash drive or SD card.
- KEY Number for selecting the certain track for USB flash drive or SD card.
- STOP: Press this button to stop the track for USB flash drive or SD card.
- VOL-: Press this button to reduce the master volume for USB/SD/LINE/iPad/FM.
- REP: Press this button to repeat the playing track for USB flash drive or SD card.
- Previous Track: Press this button to select the previous track for USB flash drive or SD card and previous channel for FM.
- Next Track: Press this button to select the next track for USB flash drive or SD card and next channel for FM.
- EQ: Press this button to select the EQ mode of Normal, Jazz, Rock, Pop, Class.
- VOL+: Press this button to increase the master volume for USB/SD/LINE/iPad/FM.
- PLAY/PAUSE: When on the mode of USB flash or SD, press this button to play or pause the track. When on the mode of FM, press this button to auto scan all channels.
- USB/SD: Press this button to select the mode between USB flash drive or SD card.
ADVERTENCIA !
flowchart
graph TD
    A["1"] --> B
    B --> C
    C --> D
    D --> E
    E --> F
    F --> G
    G --> H
    H --> I
    I --> J
    J --> K
    K --> L
    L --> M
    M --> N
    N --> O
    O --> P
    P --> Q
    Q --> R
    R --> S
    S --> T
    T --> U
    U --> V
    V --> W
    W --> X
    X --> Y
    Y --> Z
DIGITAL AUDIO PLAYER DIGITAL AUDIO PLAYER DIGITAL AUDIO PLAYER

DIGITAL AUDIO PLAYER
USB
SD
LINE
0004
natural_image
Black QFX portable audio workstation with a smartphone on top, showing front panel and control buttons (no readable text or symbols)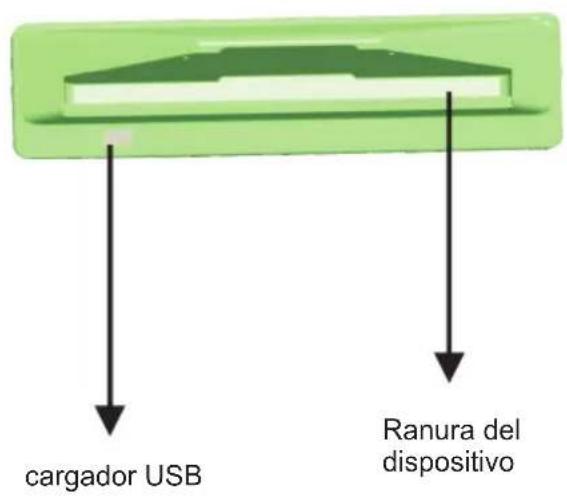
PBX-3080BT BLUETOOTH
natural_image
Abstract geometric pattern with intersecting diagonal lines forming a curved, grid-like structure (no text or symbols)


Brand : QFX
Model : PBX-3080BT
Category : Docking Station