
SWHOM-DOOREC - Intercom SWANN - Free user manual and instructions
Find the device manual for free SWHOM-DOOREC SWANN in PDF.


| Product Type | Video Door Intercom System |
| Brand | Swann |
| Model | SWHOM-DOOREC |
| Monitor Display | 7-inch TFT LCD, 800x480 resolution |
| Outdoor Camera | CMOS sensor, 720p, night vision (up to 5m) |
| Audio | Two-way full-duplex, built-in microphone and speaker |
| Door Unlock | Supports electric strike release (12V) |
| Power Supply | DC 12V, 1A adapter (included) |
| Wireless Range | Up to 100m in open area (2.4GHz) |
| Motion Detection | Yes, adjustable sensitivity |
| Night Vision | IR LEDs, automatic activation |
| Monitor Dimensions | 175 x 125 x 20 mm |
| Outdoor Unit Dimensions | 110 x 50 x 35 mm |
| Monitor Weight | 400 g |
| Outdoor Unit Weight | 200 g |
| Operating Temperature | -10°C to 50°C |
| Waterproof Rating (Outdoor) | IP65 |
| Mounting | Wall mount (screws and template included) |
| Compatibility | Works with standard door chime (8-12V AC) |
| Spare Parts Availability | Replacement monitors and outdoor units available separately |
| Cleaning | Use a soft, dry cloth. Avoid solvents. |
Frequently Asked Questions - SWHOM-DOOREC SWANN
User questions about SWHOM-DOOREC SWANN
0 question about this device. Answer the ones you know or ask your own.
Ask a new question about this device
Download the instructions for your Intercom in PDF format for free! Find your manual SWHOM-DOOREC - SWANN and take your electronic device back in hand. On this page are published all the documents necessary for the use of your device. SWHOM-DOOREC by SWANN.
USER MANUAL SWHOM-DOOREC SWANN
natural_image
Close-up of a metallic circular device with a central button and sound waves, set against a blue background (no text or symbols visible)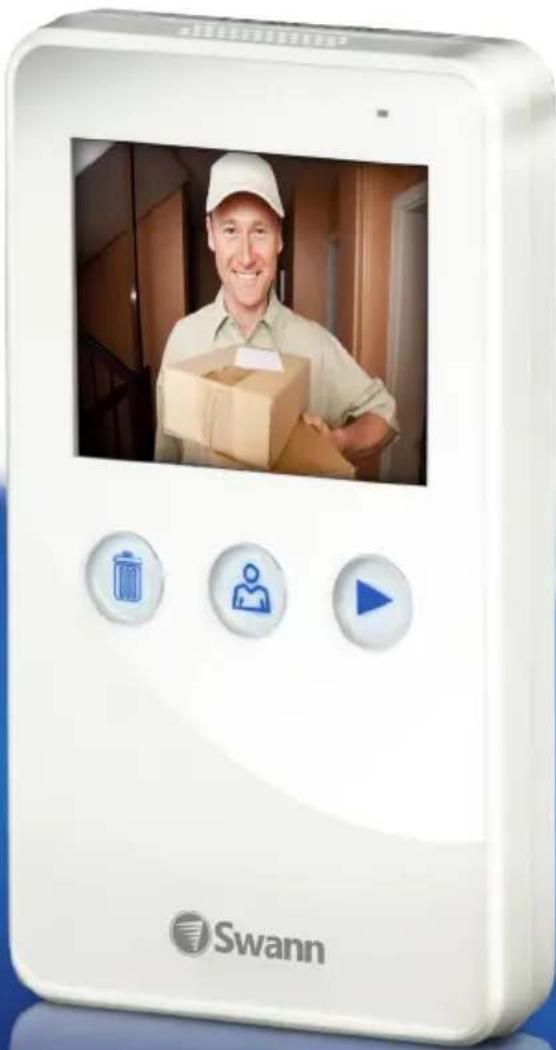
natural_image
White Swann digital device displaying a delivery person holding a package, with control buttons and play button (no readable text or symbols on device)
DoorEye Camera
Package Contents
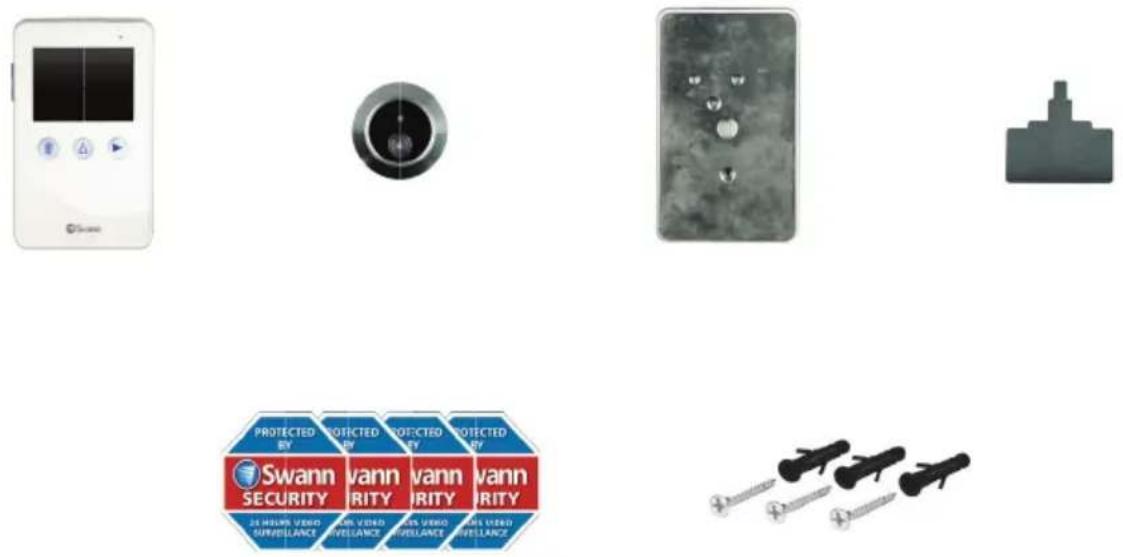
What is included:
2.8" TFT LCD monitor, Outdoor camera, Bracket, Connector, Installation stud, Wrench, Lithium battery, Screws x 4, Theft deterrent stickers x 4, USB cable, Double sided tape, User manual
Safety Notice
- Keep the DoorEye Camera device away from water or moisture and dusty areas. Avoid environments where the DoorEye Camera will be exposed to direct sunlight and strong magnetic fields.
- Never store the DoorEye Camera in hot or very cold areas.
- Do not drop the DoorEye Camera as it may cause damage and may void the warranty.
- Do not dispose of used batteries in general waste and ensure they are disposed of safely.
Layout
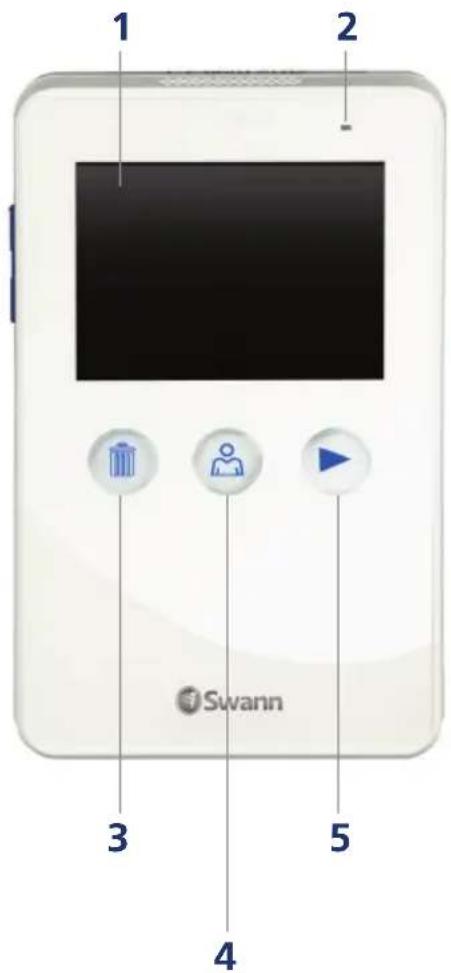
- 2.8" TFT display
- LED indicator
- TRASHCAN button - delete saved images on the SD card, adjust time and date
- MONITOR button - press to display an image from the camera
- PLAY button - preview images saved to the SD card, adjust date and time
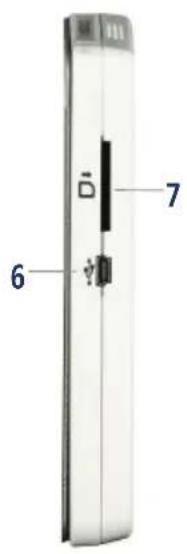
- Mini USB connection to a computer
- SD card slot
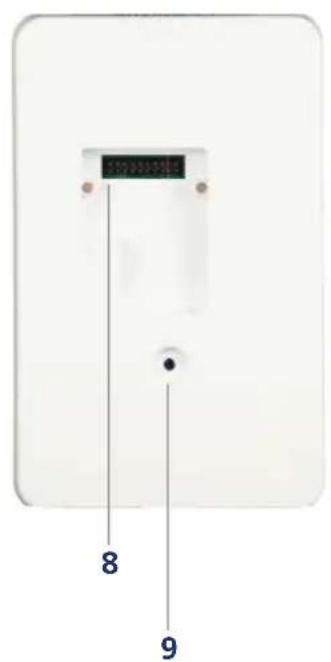
- Terminal connection to the TFT display
- Installation hole
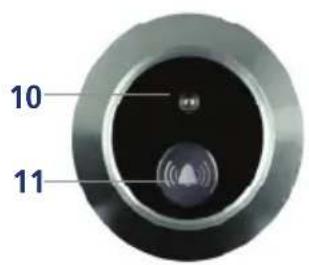
- DoorEye camera
- Doorbell
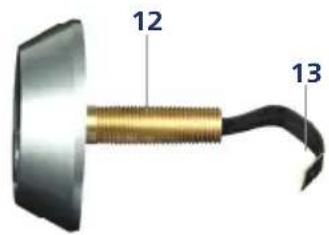
- Installation stud
- Connects the outdoor unit to the indoor unit
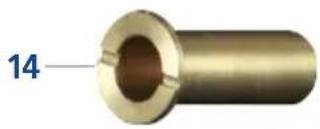
- Brass screw that secures the camera to the monitor bracket
natural_image
Close-up of a metallic cylindrical mechanical part with a flanged end and central hole (no text or symbols visible)Installation
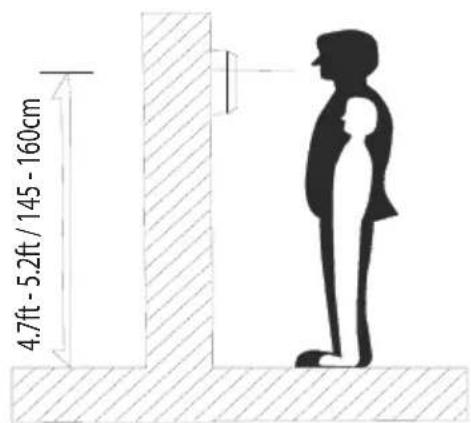
Step 1: It is recommended to use a 12 inch / 13mm drill bit when drilling a hole in the door. The ideal height is 4.7ft - 5.2ft / 145cm - 160cm from the ground. If you currently have a peephole viewer installed, remove it and use the same hole for installation.
natural_image
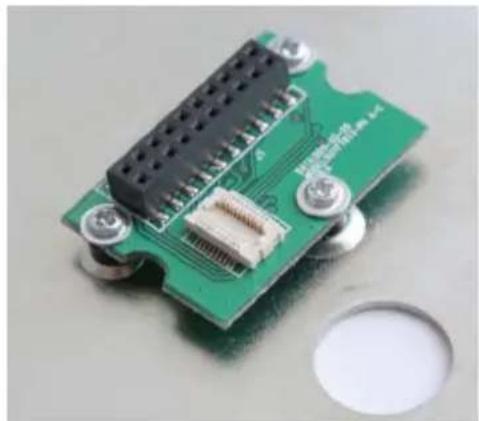
Close-up of a green printed circuit board with connector pins and a circular component (no visible text or symbols)Step 2: Using the provided screws, fasten the connector to the LCD monitor bracket as shown.
natural_image
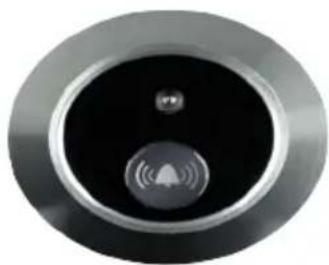
Close-up of a circular electronic device with a black top and indicator lights (no visible text or symbols)Step 3: Peel off one side of the double sided tape and stick this on the back of the DoorEye camera. Peel off the other side and install the DoorEye camera into the door, ensuring that the camera and doorbell are vertically aligned. Make sure the data cable is visible on the other side.
natural_image
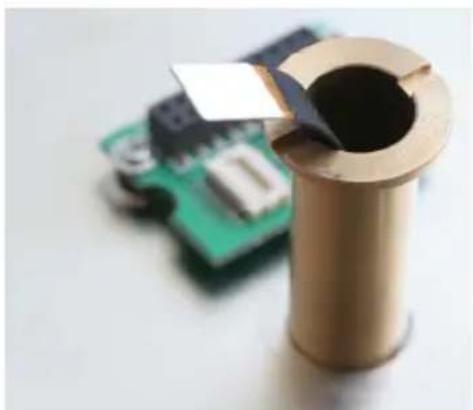
Close-up of a brass cylindrical component with a small white plastic clip, next to a blurred green circuit board (no visible text or symbols)Step 4: Place the monitor bracket on the back of the door. Insert the data cable through the brass screw, and then screw clockwise onto the installation stud by hand until firm. Use the provided wrench to tighten.
Installation
natural_image
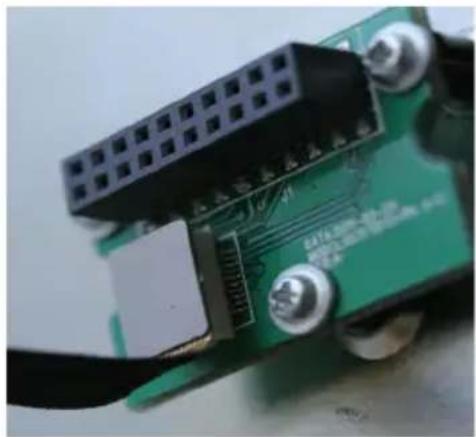
Close-up of a green electronic circuit board with black connectors and a connector pin (no readable text or symbols)Step 5: Connect the data cable attached to the DoorEye camera, to the connector as shown. Be careful when connecting the data cable as the connection is fragile.
natural_image
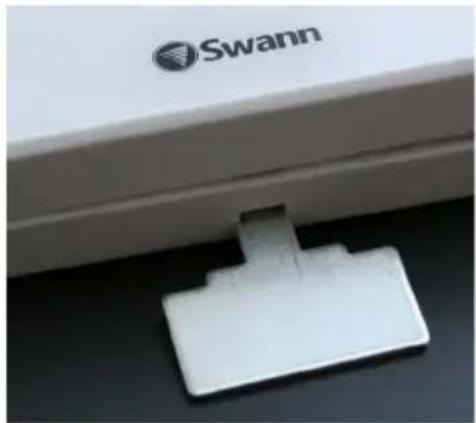
Close-up of a white plastic clip attached to a white electronic device labeled 'Swann' (no additional text or symbols visible)Step 6: Use the provided wrench to take off the front panel of the LCD monitor. Insert the wrench into the bottom of the LCD monitor as shown, then push downwards.
natural_image
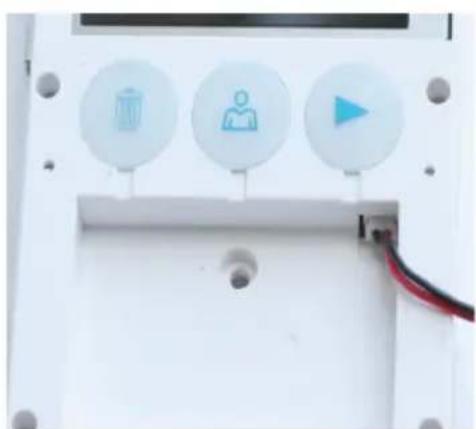
Three circular icons on a white panel: trash bin, person silhouette, and play button, mounted on a black surface with wires (no text or symbols visible)Step 7: Place the LCD monitor onto the terminal connection located on the connector. Remove the battery pack and fasten the LCD monitor to the LCD monitor bracket with the provided screw. If you see a protective film over the LCD screen, please remove this.
natural_image
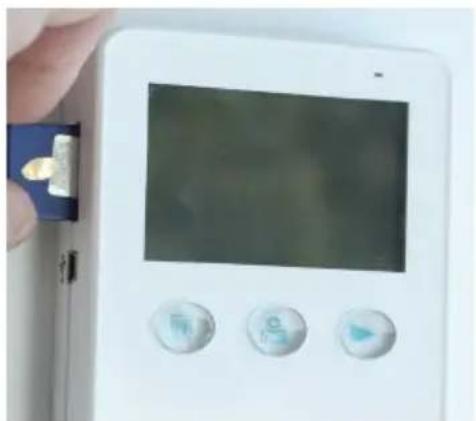
Close-up of a hand holding a digital device with three control buttons (no visible text or symbols)Step 8: Replace the battery pack and ensure it is correctly connected, then install the front panel back onto the LCD monitor. The DoorEye Camera does not include an SD card. A formed SD card can be used (maximum size is 2GB) but is not required. Images are saved to the internal memory by default.
There are three modes available for the DoorEye Camera.
Monitoring Mode
A visitor presses the doorbell, the chime of the doorbell will be heard inside. Two seconds after, the image of the visitor will appear on the LCD screen and an image will be saved to the internal memory. The LCD screen will go into standby after 10 seconds of inactivity. Press the MONITOR button to continually save an image to the internal memory. When images are saved to the SD card, you will see an ENABLE SD CARD message on the LCD screen.
Browsing Mode
When the unit is in standby mode, press the MONITOR button to turn on the device. Press the PLAY button to view images saved to the SD card. You will see a play symbol in the top left-hand corner of the LCD screen and a counter on the bottom left-hand corner indicating how many images have been saved to the SD card. Each image will have the time and date stamp embedded.
To delete images on the SD card, select the image that you want to delete then press the TRASHCAN button. You will see a DEL Y / N message on-screen. Press the TRASHCAN button again to delete the image. If you don't want to delete that image, press the PLAY button to select N and press the TRASHCAN button to confirm.
The LCD screen will go into standby after 10 seconds of inactivity.
Date and Time Mode
When the unit is in standby mode, press the MONITOR button to turn on the device. Press the TRASHCAN button to enter date and time mode. You will see the year, month, date and time in the top left-hand side of the LCD screen.
To alter the date and time, press the TRASHCAN button to increase the selection, for example 2012 > 2013 and press the PLAY button to decrease the selection, for example 2013 > 2012. Press the MONITOR button to move to the next selection and repeat the same steps.
The LCD screen will go into standby after 10 seconds of inactivity and all changes will be saved.
Charging the Lithium battery
When the battery is running low, you will see a LOW POWER message on-screen after pressing the MONITOR button. To charge the Lithium battery, connect the LCD screen to a spare USB port on your computer using the provided USB cable. The LED indicator will turn blue when charging. A full charge will take about 4 hours.
Troubleshooting
I don't see an image from the camera on the LCD monitor:
Make sure the data cable that is attached to the camera is correctly and securely connected to the connector. Check that there is nothing obstructing the view of the camera. Check that the lithium battery is connected and fully charged.
I do not hear the doorbell after the doorbell button is pressed:
Make sure the data cable that is attached to the camera is correctly and securely connected to the connector. Check that the Lithium battery has been charged.
Images are failing to save to the SD card:
Check that the lock or write protect tab is not enabled. Check that you have enough space available on the SD card.
What size SD card can I use?
The maximum size SD card that you can use is 2GB.
How do I transfer images from the SD card to the computer?
Connect the LCD screen to a spare USB port on your computer using the provided USB cable.
Windows
Click 'Start', 'Computer', the DoorEye Camera will be detected as a device with removable storage. Double click this device and double click the 'DCIM' folder to access the images files. You can copy the images to a folder on your hard drive or delete images that you no longer require.
Mac
Open 'Finder', double click the removable drive icon. Double click the 'DCIM' folder to access the image files. You can copy the images to a folder on your hard drive or delete images that you no longer require.
Technical Specifications
Camera sensor: Viewing angle: Screen type: Screen size: Power: Power duration: SD card: Capacity:
300,000 pixels (640 x 480)
78 degrees
TFT LCD
2.8 inches
Lithium battery
3600 hours
Up to 2GB maximum
Internal memory: Up to 120 images
External memory: Up to 6000 images on a 2GB SD card
Helpdesk / Technical Support Details
Swann Technical Support
All Countries E-mail: tech@swannsecurity.com
Telephone Helpdesk
USA toll free
1-800-627-2799
(Su, 2pm-10pm US PT)
(M-Th, 6am-10pm US PT)
(F 6am-2pm US PT)
USA Exchange & Repairs
1-800-627-2799 (Option 1)
(M-F, 9am-5pm US PT)
AUSTRALIA toll free
1300 138 324
(M 9am-5pm AUS ET)
(Tu-F 1am-5pm AUS ET)
(Sa 1am-9am AUS ET)
NEW ZEALAND toll free
0800 479 266
UK
0203 027 0979
See http://www.worldtimeserver.com for information on time zones and the current time in Melbourne, Australia compared to your local time.
Warranty Information
Swann Communications USA Inc.
12636 Clark Street
Santa Fe Springs CA 90670
USA
Swann Communications
Unit 13, 331 Ingles Street,
Port Melbourne Vic 3207
Swann Communications LTD.
Stag Gates House
63/64 The Avenue
SO171XS
United Kingdom
Swann Communications warrants this product against defects in workmanship and material for a period of one (1) year from it's original purchase date. You must present your receipt as proof of date of purchase for warranty validation. Any unit which proves defective during the stated period will be repaired without charge for parts or labour or replaced at the sole discretion of Swann. The end user is responsible for all freight charges incurred to send the product to Swann's repair centres. The end user is responsible for all shipping costs incurred when shipping from and to any country other than the country of origin.
The warranty does not cover any incidental, accidental or consequential damages arising from the use of or the inability to use this product. Any costs associated with the fitting or removal of this product by a tradesman or other person or any other costs associated with its use are the responsibility of the end user. This warranty applies to the original purchaser of the product only and is not transferable to any third party. Unauthorized end user or third party modifications to any component or evidence of misuse or abuse of the device will render all warranties void.
By law some countries do not allow limitations on certain exclusions in this warranty. Where applicable by local laws, regulations and legal rights will take precedence.

Swann.
© Swann Communications 2012
FCC Verification
This equipment has been tested and found to comply with the limits for Class B digital device, pursuant to part 15 of the FCC Rules. These limits are designed to provide reasonable protection against harmful interference in a residential installation. This equipment generates, uses and can radiate radio frequency energy and, if not installed and used in accordance with the instructions, may cause harmful interference to radio or television reception, which can be determined by turning the equipment off and on, the user is encouraged to try to correct the interference by one or more of the following measures:
Reorient or relocate the receiving antenna
Increase the separation between the equipment and the receiver
- Connect the equipment into an outlet on a circuit different from that to which the receiver is connected
- Consult the dealer or an experienced radio/TV technician for help
WARNING: Modifications not approved by the party responsible for compliance could void user's authority to operate the equipment.
- DoorEye Camera
- Package Contents
- What is included:
- Safety Notice
- Layout
- Installation
- Monitoring Mode
- Browsing Mode
- Date and Time Mode
- Charging the Lithium battery
- Troubleshooting
- I don't see an image from the camera on the LCD monitor:
- I do not hear the doorbell after the doorbell button is pressed:
- Images are failing to save to the SD card:
- What size SD card can I use?
- How do I transfer images from the SD card to the computer?
- Windows
- Mac
- Technical Specifications
- Helpdesk / Technical Support Details
- Warranty Information
- Swann.
- FCC Verification
Brand : SWANN
Model : SWHOM-DOOREC
Category : Intercom