
600CGH MK2 - Range hood STOVES - Free user manual and instructions
Find the device manual for free 600CGH MK2 STOVES in PDF.


| Product Type | Range Hood (Cooker Hood) |
| Brand | Stoves |
| Model | 600CGH MK2 |
| Power Supply | 220-240 V ~ 50 Hz |
| Rated Power | 140 W |
| Lighting | 2 x 20 W (max) |
| Number of Speeds | 3 (Low, Medium, High) |
| Control Type | Push Buttons |
| Filter Type | Aluminum Mesh Grease Filter |
| Charcoal Filter Compatible | Yes (optional) |
| Material | Stainless Steel (estimated) |
| Installation Type | Wall-mounted with Chimney |
| Minimum Height Above Cooktop | 650 mm |
| Maximum Height Above Cooktop | 750 mm |
| Noise Level (estimated) | ~65 dB |
| Weight (estimated) | 12 kg |
| Dimensions (Width x Depth) | 600 mm x 500 mm (approx.) |
| Exhaust Duct Diameter | 150 mm (estimated) |
| Warranty | 1 Year |
| Included Accessories | Brackets, Screws, Expansion Plugs, Exhaust Pipe, Chimney, Filter, Cable Ties, Stencil |
| Safety Features | Earthing Required, Automatic Shut-off (if overload) |
| Disposal | Recyclable – Do not dispose with household waste |
Frequently Asked Questions - 600CGH MK2 STOVES
User questions about 600CGH MK2 STOVES
0 question about this device. Answer the ones you know or ask your own.
Ask a new question about this device
Download the instructions for your Range hood in PDF format for free! Find your manual 600CGH MK2 - STOVES and take your electronic device back in hand. On this page are published all the documents necessary for the use of your device. 600CGH MK2 by STOVES.
USER MANUAL 600CGH MK2 STOVES
| NO. | NAME | QUANTITY |
| 1 | Man body | 1 |
| 2 | User instructions | 1 |
| 3 | Bracket assembly | 2 |
| 4 | Expanding screw | 6 |
| 5 | Expanding plug | 6 |
| 6 | Screw ST4*10 | 4 |
| 7 | Plastic Exhaust Pipe | 1 |
| 8 | Hood | 2 |
| 9 | Alum. filter | 1 |
| 10 | Cable ties | 1 |
| 11 | Drill hole stencil | 1 |

GLEN DIMPLEX
HOME APPLIANCES
COOKER HOOD
INSTRUCTION

MODEL
600CGH Mk2


Carefully read these user instructions before using your appliance
Please store in a safe place for future reference.

PREFACE

CONTENTS
Preface
Thank you for buying this high quality appliance!
This handbook is designed to help you through each step of owning your new appliance, from installation, to use.
Please read through all of this guide carefully before you start using this appliance, as we have endeavoured to answer as many questions as possible, and provide you with as much support as we can.
If, however, you should find something missing, or not covered, please contact the Customer Care team who will be only too happy to assist you on:
0844 815 3747
Correct Disposal of this product

This marking indicates that this product should not be disposed with other household wastes. To prevent possible harm to the environment or human health from uncontrolled waste disposal, recycle it responsibly to promote the sustainable reuse of material resources. To return your used device, please use the return and collection systems or contact the retailer where the product was purchased. They can take this product for environmental safe recycling.
Clean the metal filter
Contents
Information and advice
Information and advice ---- 1 ----
Know your hood
Parts generalization ---- 2 ----
Operating Instructions
Establishment of function ---- 3 ----
Data ---- 3
Installation
Installation position and height ---- 4 ----
Fixing the cooker hood ---- 5 ----
Exhaust pipe connection----7----
Installation of chimney----8
Troubleshooting
Troubleshooting----9
Maintenance
C 10
Replacing the Bulb 10
Cooker hood

INFORMATION AND ADVICE
Information and advice
- All our packaging materials are recyclable and environmentally friendly. Please help us to protect our environment by disposing of all packaging in an environmentally friendly manner. Please contact your local authority for the nearest recycling centre. • This cooker hood is designed for domestic use only.
- Maintenance of the hood should only be carried out by a competent person.
- If you find any damage on the cooker hood, please do not connect the appliance and contact the local customer service centre or dealer immediately.
- If the supply cord is damaged, it must be replaced by competent person in order to avoid a hazard.
- This appliance is not intended for use by persons (including children) with reduced physical, sensory or mental capabilities, or lack of experience and knowledge, unless they have been given supervision or instruction concerning use of the appliance by a person responsible for their safety. Children should be supervised to ensure that they do not play with the appliance.
In certain circumstances, electrical appliances may be a danger.
A) There shall be adequate ventilation of the room when the cooker hood is used at the same time as appliances burning gas or other fuels. B) Do not check the status of the filters while the cooker hood is operating. C) Do not touch the light bulb within half an hour after appliance use. D) Do not flambe under the cooker hood. E) Constantly check food frying to avoid that the overheated oil may become a fire hazard. F) Disconnect the electrical plug prior to any maintenance. G) The power socket must be attainable after installation. H) The air must not be discharged into a flue that is used for exhausting fumes from appliances burning gas and other fuels. I) Regulations concerning the discharge of air have to be fulfilled.

KNOW YOUR HOOD
Make sure that all the light bulbs and filters of the hood are correctly fixed before using.
- Please do not plug in or pull out the power supply cord with wet hands.
- Please make sure that the power system of your house (current, voltage, and connecting lead) can satisfy the normal load request of the cooker hood.
- Please do not use a fuse with a higher power capacity.
Parts generalization
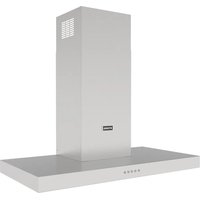
1 Chimney 2 Air duct assembly 3 Glass 4. Main body assembly 5 Filter assembly

OPERATING INSTRUCTIONS
Establishment of function

Press the switch of light to be on, the bulbs light on. Otherwise the bulbs don't work. When press the push button "1" or "2" or "3" or "4" or "5" on, the motor runs at low speed. When press the push button "2" or "3" or "4" or "5" or "6" on, the motor runs at middle speed. When press the push button "3" or "4" or "5" or "6" on, the motor runs at high speed. When press the push button "0" or "1" or "2" on, the motor stops running.
Data
Power Supply:220-240V ~ 50Hz
Rating:140 watts
Light: Lamp 2 x 20 watts
Our policy is one of continual improvement in design and development, therefore strict accuracy of illustrations and descriptions cannot be guaranteed.
This appliance conforms to the
following EC Directive:
This appliance meets the provisions
Of the following directives:
2004/108/EC (electromagnetic compatibility), 2006/95/EC
(electrical equipment designed for use within certain voltage limits) as amended.
Retention of this instruction book.
Keep this book in a handy place for reference. It contains important details on the safe and proper use of your appliance.
3
Cooker hood


INSTALLATION
Installation position and height
- The cooker hood should be fixed right above and on the same axis as the cooker.
- We recommend that after installation the bottom of the hood should be no less than 650mm and no more than 750mm above the cookers heating element/burners.

This cooker hood must be earthed.
4
Cooker hood

INSTALLATION INSTALLATION
Fixing the cooker hood
Ensure the power has been turned off before beginning this installation.
You will need the following tools and material to complete this installation:
Drill, flat head screwdriver, Phillips head screwdriver or cordless drill and Phillips head bit, tin snips, 3/8 nut driver or ratchet with extension, measuring tape, hand saw or jig saw, electrical tape, duct tape
- Remove the hood from the carton.
- Lay the hood upside down on a table covered with cardboard or paper to prevent scratching of the table or hood.
- Hood installation should be within 0.8m radius range from the socket.


3
According to Fig.3, make sure the position of the hoods on the wall. Then use the stencil to drill four 8 holes on the wall. Fix four sets expanding plugs and screws aimed at the four holes.

Hang the hood and let its 4 installation holes aim at 4 screws. Adjust it to setting position.

Please make sure the outside dimension of the screws is 10mm.

Screw down the four screws. First screw down the upper two screws, then screw down the lower two screws.


Exhaust pipe connection and installation of chimney
To extract in the kitchen:
Please select an appropriate exhaust pipe according to the damper diameter size.
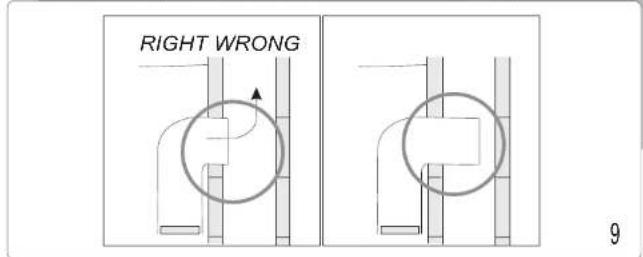
Please connect one end of the exhaust pipe to the cooker hood and tie it with cable ties, and the other end to the public flue or the hole in the wall.


According to the dimensions of the chimney fixed bolster, determine the position of the chimney.


Install the chimney fixed bolster on the corresponding position on the wall.

Use the screw ST4*10 to connect the chimney fixed bolster and the upper chimney.

TROUBLESHOOTING
Troubleshooting
Before you assume the worst, check this simple fault-finding guide to get to the root of the problem:
| Light bulb doesn't come on | A replacement is probably necessary, but check first that the bulb is firmly screwed in to its holder. If the Filament is broken replace the bulb, remember that the light bulbs are not covered by our guarantee. Remember to disconnect the mains electricity supply before removing the bulbs |
| Motor is on but no ira is being sucked up | Switch off immediately and check that the setting lever is set to the appropriate mode for your application. |
| Motor is on but fan doesn't seem to be as efficient as usual | Check the grease filter. If it has not been cleaned or be replaced recently , it might be clogged with grease.If filter is relatively clean, check charcoal filter. If this hasn't been replaced for more than six months, remove and insert a new one. As lime goes by, accumulated grease tends to stifle the charcoal filter in just the same way as the grease filter, thereby reducing the efficiency of both the fan and the filter itself |
| Controls fail to switch motor on | Check plug, socket and fuses. If these are in order and fault persists, it could be that an accumulation of grease has impaired the efficiency of the switch mechanism . Try rapidly moving switch on and off several times in succession to clear grease deposit. If fault continues, call service agent. |
| Appliance does not work at all | Check your cooker hood is switched on at the mains. Next, check for an unexpected power cut by switching on adjacent lights etc. |
| Still not working?Call the service agent | If, having consulted the above diagnostic chart you are still unable to remedy the situation, please call the service telephone number at the rear of this booklet. |

MAINTENANCE
Clean the metal filter
It is recommendable to clean the metal filter every 2-3 weeks by carrying out the following instructions:
Remove the metal filter from the cooker hood and wash it in a solution of water and neutral liquid detergent, leaving to soak. Rinse thoroughly with warm water and leave to dry.
The metal filter may also be washed in the dishwasher.
The metal filter may alter in color after several washes. This is not cause for customer complaint nor replacement of metal filter.
![graph LR A["Screen with granular material"] --> B["Beaker with waste bin"] B --> C["Flush into bowl"] C --> D["Cleaner with waste bin"]](/content/2026/05/921454/images/574a4420ff6da401b18bf0a08f16fdf33084fab89c4a61c7bc5131896697000e.jpg)
Replacing the Bulb

Maintenance of spot light
There is a fire risk if cleaning is not carried out in accordance with the instructions.
Please disconnect the electric plug prior to clean or maintain the cooker hood.
Please do not wash the cooker hood with water directly. Please clean and maintain the cooker hood periodically according to your using frequency and environment. This can help to keep your cooker hood work well as well as a long working life.
Contact US
Should you need to get in touch with us »UK and Northern Ireland only, please call the Customer Care Helpline on:
0844 815 3747
For customers outside the UK and Northern Ireland, please contact your local supplier
Your 1st Year Guarantee
To fulfil the conditions of your guarantee, this appliance must be correctly installed and operated, in accordance with these instructions, and only be used for normal domestic purposes
Please note that the guarantee, and Service availability, only apply to the UK and Republic of Ireland.

GLEN DIMPLEX HOME APPLIANCES
Stoney Lane, Prescot, Merseyside, L35 2XW
- PREFACE
- CORRECT DISPOSAL OF THIS PRODUCT
- CONTENTS
- INFORMATION AND ADVICE
- KNOW YOUR HOOD
- OPERATING INSTRUCTIONS
- ESTABLISHMENT OF FUNCTION
- DATA
- INSTALLATION
- INSTALLATION POSITION AND HEIGHT
- INSTALLATION INSTALLATION
- FIXING THE COOKER HOOD
- EXHAUST PIPE CONNECTION AND INSTALLATION OF CHIMNEY
- TROUBLESHOOTING
- MAINTENANCE
- CLEAN THE METAL FILTER
- REPLACING THE BULB
Brand : STOVES
Model : 600CGH MK2
Category : Range hood