
ENUTV-2 - TV Tuner for Computer ENCORE - Free user manual and instructions
Find the device manual for free ENUTV-2 ENCORE in PDF.


| Product Type | USB TV Tuner for Computer |
| Brand | ENCORE |
| Model | ENUTV-2 |
| Dimensions (approx.) | 10 cm x 3 cm x 1.5 cm |
| Weight (approx.) | 50 g |
| Power Supply | USB powered (5V DC) |
| Interface | USB 2.0 |
| TV System Support | DVB-T (terrestrial), analog |
| Video Input | Antenna / RF input |
| Main Functions | Watch live TV, record programs, pause live TV (time-shift), channel scanning, electronic program guide (EPG) |
| Remote Control | Included infrared remote |
| Software Compatibility | Windows (XP/Vista/7/8/10), likely includes bundled application |
| Accessories Included | Antenna, remote control, USB cable, software CD, quick guide |
| Care and Cleaning | Keep dry; clean with a soft, dry cloth; avoid solvents |
| Safety Precautions | Do not expose to moisture; avoid mechanical shock; operate in ventilated area |
| Spare Parts and Repairability | No user-serviceable parts; contact seller for repairs |
| General Information | Compact design; compatible with desktop and laptop computers |
Frequently Asked Questions - ENUTV-2 ENCORE
User questions about ENUTV-2 ENCORE
0 question about this device. Answer the ones you know or ask your own.
Ask a new question about this device
Download the instructions for your TV Tuner for Computer in PDF format for free! Find your manual ENUTV-2 - ENCORE and take your electronic device back in hand. On this page are published all the documents necessary for the use of your device. ENUTV-2 by ENCORE.
USER MANUAL ENUTV-2 ENCORE
natural_image
Red and white abstract logo design with diagonal stripes (no text or symbols)ENCORE
ELECTRONICS
Personal Video Recorder
ENUTV-2
(USB TV Capture Box)
ENUTV-2 Series
User's Guide
User's Notice
No part of this manual, including the products and software described in it, may be reproduced, transmitted, transcribed, stored in a retrieval system, or translated into any language in any form or by any means, except documentation kept by the purchaser for backup purposes, without the express written permission of us.
WE PROVIDES THIS MANUAL “AS IS” WITHOUT WARRANTY OF ANY KIND, EITHER EXPRESS OR IMPLIED, INCLUDING BUT NOT LIMITED TO THE IMPLIED WARRANTIES OR CONDITIONS OF MERCHANTABILITY OR FITNESS FOR A PARTICULAR PURPOSE. IN NO EVENT SHALL US, ITS DIRECTORS, OFFICERS, EMPLOYEES OR AGENTS BE LIABLE FOR ANY INDIRECT, SPECIAL, INCIDENTAL, OR CONSEQUENTIAL DAMAGES (INCLUDING DAMAGES FOR LOSS OF PROFITS, LOSS OF BUSINESS, LOSS OF USE OR DATA, INTERRUPTION OF BUSINESS), EVEN IF WE HAS BEEN ADVISED OF THE POSSIBILITY OF SUCH DAMAGES ARISING FROM ANY DEFECT OR ERROR IN THIS MANUAL OR PRODUCT.
Product warranty or service will not be extended if: (1) the product is repaired, modified or altered, unless such repair, modification of alteration is authorized in writing by us; or (2) the serial number of the product is defaced or missing.
Products and corporate names appearing in this manual may or may not be registered trademarks or copyrights of their respective companies, and are used only for identification or explanation and to the owners' benefit, without intent infringe.
Windows, MS-DOS, and DirectX are registered trademarks of Microsoft Corporation.
✗ Adobe and Acrobat are registered trademarks of Adobe Systems Incorporated.
The product name and revision number are both printed on the product itself. Manual revisions are released for each product design represented by the digit before and after the period of the manual revision number. Manual updates are represented by the third digit in the manual revision number.
SPECIFICATIONS AND INFORMATION CONTAINED IN THIS MANUAL ARE FURNISHED FOR INFORMATION USE ONLY, AND ARE SUBJECT TO CHANGE AT ANY TIME WITHOUT NOTICE, AND SHOULD NOT BE CONSTRUED AS A COMMITMENT BY US. WE ASSUME NO RESPONSIBILITY OR LIABILITY FOR ANY ERRORS OR INACCURACIES THAT MAY APPEAR IN THIS MANUAL, INCLUDING THE PRODUCTS AND SOFTWARE DESCRIBED IN IT.
Copyright Encore Electronics © 2007. All Rights Reserved.
Chapter 1: Introduction ......4
1.1 Package Contents....4
1.2 System Requirements...... 4
Chapter 2: Getting Started .... 5
2.1 Connect USB ENUTV-2....5
2.2 Device Driver Installation.... 5
2.3 Install the DirectX®....7
2.4 Install the ENUTV-2 Utility Software....9
Chapter 3: Launch the ENUTV-2 Program.... 11
3.1 Running the ENUTV-2 for the first time 11
3.2 Watch TV programs or movies from DVD/VCR/Camcorder.... 12
3.3 Record Video 13
3.4 Snapshot Image.... 14
3.5 Playback Video 14
3.6 Browse Image 16
Chapter 4: Using the Remote Control.... 17
Chapter 5: Technical Support:.... 18
Chapter 1: Introduction
1.1 Package Contents
Upon receiving your ENUTV-2, please make sure the following items are included in the package.
- ENUTV-2
- Driver CD
- Remote Control
- USB Cable
- Quick Guide
1.2 System Requirements
- IBM PC or compatible
• P4 1.6 (for Preview); P4 2.4 or above(Mpeg 4 need 2.8) (for Record)
• Minimum 128 MB memory (256MB is better)
• Minimum 100 MB hard disk space available
• VGA and with DirectDraw driver supporting 16 bit color or higher
• One free USB2.0 slot - Microsoft Windows ^ 7 / XP / Windows Vista ^TM
- CD-ROM drive
Chapter 2: Getting Started
2.1 Connect USB ENUTV-2
To install the ENUTV-2 into your computer, follow the steps below:

- Connect the antenna cable to the "TV" connector.
- Connect the Device to PC USB Hub.
2.2 Device Driver Installation


- Once you connect ENUTV-2 to the USB port, you can just follow the system's prompted messages to finish the driver installation.
- When you insert ENUTV-2, system will show the "Found New Hardware" dialogue box.
- Insert "Driver & Utilities" CD into CD-ROM(or DVD-ROM), and click "Setup Driver" button to setup the driver.


-
Click "Next" button.
-
Click "Install" button.
-
Click "Next" button.
-
Wait Installation Wizard copying necessary driver files onto your system.


-
Click "Continue Anyway" button.
-
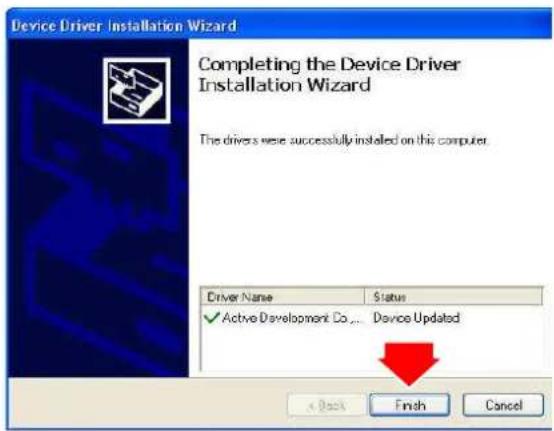
Click "Finish" button.
-
Click "Finish" button again to complete installation.
2.3 Install the DirectX®
Microsoft DirectX® allows 3D hardware acceleration support in Windows® 98, 2000, Windows® XP. For software MPEG support in Windows 98, you must first install Microsoft DirectX®, and then an MPEG compliant video player. Follow the installation steps below to install Microsoft DirectX®.
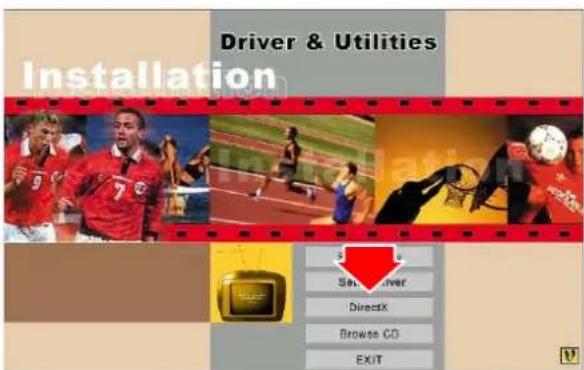


- Insert the installation CD into the CD-ROM drive. The setup screen will automatically appear.
- Click the "DirectX" button.
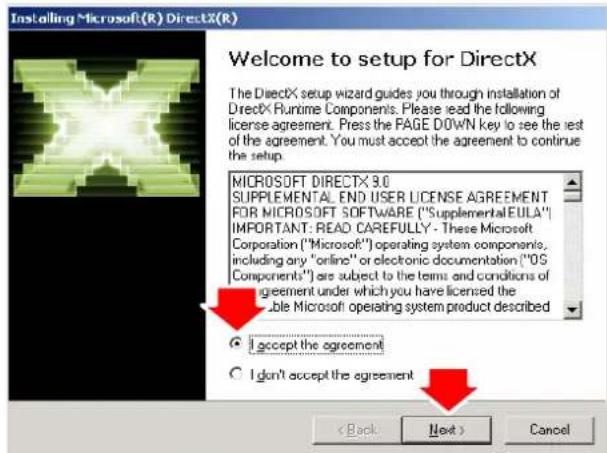
- Click "Accept the agreement" radio button then click "Next"
- Click "Next" to confirm the installation of DirectX
- Click "Finish"
NOTE:
The computer will automatically restart. Please close all programs if any and save files if needed before hitting the "Finish" button.
2.4 Install the ENUTV-2 Utility Software.
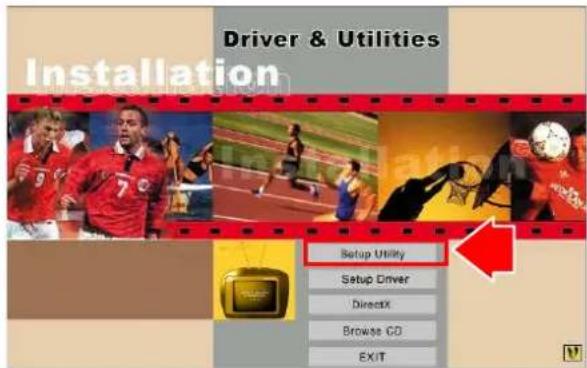
- Click "Setup Utility" to begin installing TV application.
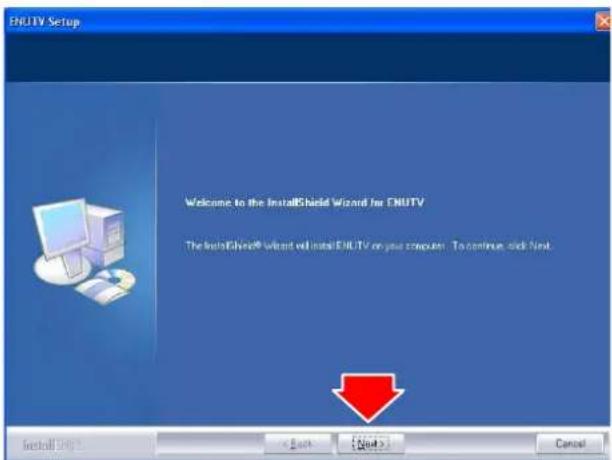
- Click "Next" button to start installing.

- Please read the License Agreement and click "Next" to begin copying files.

- Click "Next" or choose setup folder for installation.

- Then click "Finish" to complete the installation of ENUTV-2.

- Select the "Yes, I want to restart my computer now" and click the "OK" to restart your computer.
Chapter 3: Launch the ENUTV-2
Program
3.1 Running the ENUTV-2 for the first time

Click "Start", move your mouse to "Programs\ENUTV-2\ENUTV-2" then click ENUTV-2
NOTE:
When the ENUTV-2 Program is first started, it will prompt you to select your country and language:
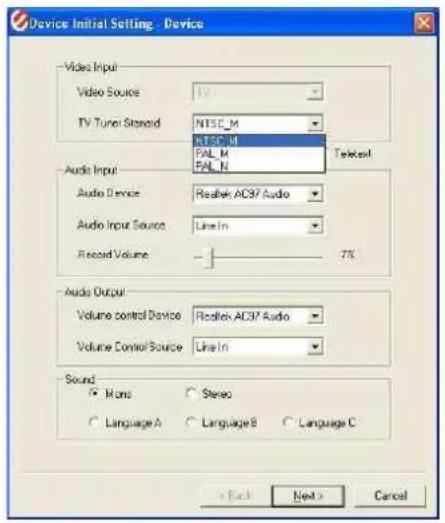
-
Select the video signal format in your area (NTSC or PAL) from the "TV Tuner Standard" drop-down menu.
-
Click "Next"

-
This step will give you an option to scan for TV channels. Select which signal source you are connected to in the "TV Scan Type" line then click "Search". There are two types of scans.
-
One is scan by TV channel table "Cable", "Antenna" and "Extend"
- One is scan by frequency that scans low frequency to high frequency. The "Auto" scan mode is not for the TV table order.
3.2 Watch TV programs or movies from DVD/VCR/Camcorder

- TV wall display: Show 4x4 TV wall on screen
- Channel List: This is listing all available TV channel.
- Channel control: Set channel up or down
- Volume control: Adjust the Volume or mute.
- Search TV channel: Click to search available TV channel.
- Double click to full screen display..

When you do a full screen display, you can use the panel bar to set up your TV box.
- Fix Panel: To fix the display panel. Show / Hide as mouse drags.
- Hide Panel: To hide the sub-panel.
- Snapshot: Same as "Snapshot" button of main panel.
- TV Wall: To launch TV Wall function, same as "TV Wall" button,
- Start / Stop Record: Record the current playing audio/video, same as "Start/Stop Record" of main panel.
- Switch Next Channel: Switch to next channel, same as "Switch Next Channel" button of main panel.
- Switch Previous Channel: Switch to previous channel, same as "Switch Previous Channel" button of main panel.
- Volume Adjustment: To adjust the output volume, same as "Volume Adjust" scroll bar of the main panel.
- Mute: Audio Mute
3.3 Record Video
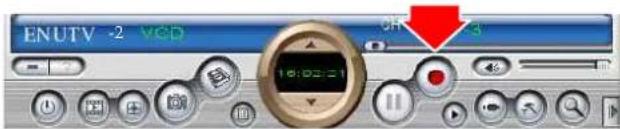
Click "Record" button to start recording video.
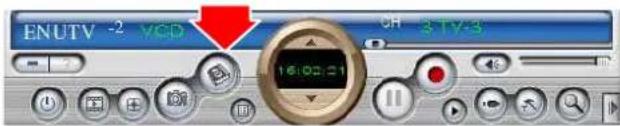
You can use the control panel or setting table to set the video format. It can be set to the following format. MPEG-1, 2, 4; DVD, VCD, HiDVD...

3.4 Snapshot Image

Click the "Snapshot" button to capture still image.

Click the "Setting" button to setup the image format. ENUTV-2 supports BMP and JPEG image format. Please choose your desired format.
3.5 Playback Video

Click the "Playback" button to Play the recording Video.

Click "Play List" button to select video file. Choose the video then click "open" button.

Exit :
To exit the video playback window, press [Esc] or [ALT]+[F4] on keyboard

Minimize :
To minimize the video playback window, click "MoviePlayer" in desktop taskbar to restore display

Hide Control Panel :
To hide video control panel, right click video window and select "Control Panel" to restore display

Setting :
Click to pop-up setting dialog, you can test the video playback; refer to "Playback Setting" page.

Browse Image :
To launch image browse window and browse the snapshot or saved image in your computer, refer to "Image Browse" page

Step Backward :
To reverse play video

Step Forward :
To step forward play video

Slow Backward :
To slow reverse play video

Slow Forward :
To slow forward play video file

Play/Pause :
Click to play the current video file, click again to pause, click once more to continue play

Fast Backward : To fast reverse play video file

Fast Forward : To fast forward play video file

Mute : To close sound. Click again to restore.

Volume Adjust : Drag the slider to adjust volume, or use Left and Right arrow on keyboard

Stop Play :
Stop playing current video file

Snapshot :
Save current video as BMP or JPG image File is default named as snapshot time and saved into C:\My Pictures folder. You also can open "Snap Setting" option in "Options" dialog, set snapshot save directory, image format, and select rename after snapshot or not, refer to "Playback Setting" page

Play List : Click to pop-up sub panel below main panel, the default list for the record file is under the record directory, from which you can select the needed item to play.
3.6 Browse Image


Click the "Browse Image" to retrieve the saved pictures.
You can use the "Browse Image" software to control picture zoom in/out, or rename.
The top toolbar contains many function buttons for you to easily operate:

Refresh :
To renew display snapshot image in current folder.

Path Panel :
Show/Hide path panel on left of window, which is for you to easily browse and select folder.

Image Panel :
Show/Hide image panel on left of window, through which you can easily preview snapshot image.

Set Wallpaper :
Set the current image as wallpaper for Windows desktop, click the right drop arrow and you can select the wallpaper display mode.

Skin :
To set appearance of image browse window, you can select your favorite panel from the right drop box.

Zoom out :
To shrink display current image

Zoom in :
To magnify current image

Match Zoom :
You can select the matched display mode in the right drop box.
Full Size: Shows image at 100% magnification
Fit Image: Magnifies image to fit screen or window
Fit Width: Magnifies image to fit width of screen or window
Fit Height: Magnifies image to fit height of screen or window
Lock: Locks the viewer at the current magnifying level.
Chapter 4: Using the Remote Control
The Remote control allows you to operate the ENUTV-2 program, such as turning the TV on or off, changing channel and volume, etc. Aim the upper front side of the Remote Control to the Remote Control Receiver as you would do on other infrared remote control. For default button assignments, please refer to the list below:
Remote Control Default Settings:

- Open or Close ENLTV Program.
- Mute
- Number keys.
- Single or Double digits channel.
- Return to the previous channel last viewed
- Switch TV signals, S-Video and A/V signal
- Snapshot
- Channel Up
- Channel Low
- Volume High
- Volume Low
- Full screen
- Record
- Record Pause
- Video Settings : Click to respectively adjust video brightness, contrast, hue and saturation (use together with the right two direction key).
- Decrease video setting.
- Increase video setting.
- Click to set video brightness, contrast, hue and saturation to default value.
- Hide / Display ENLTV Control Panel.
- Set time to shutdown Windows system.
Chapter 5: Technical Support:
For Technical Support or Installation Hotline contacts please visit our web site at
www.encore-usa.com
NOTES:
NOTES:


- ENUTV-2
- User's Notice
- Chapter 1: Introduction ......4
- Chapter 2: Getting Started .... 5
- Chapter 3: Launch the ENUTV-2 Program.... 11
- Chapter 4: Using the Remote Control.... 17
- Chapter 5: Technical Support:.... 18
- Chapter 1: Introduction
- Package Contents
- System Requirements
- Chapter 2: Getting Started
- Connect USB ENUTV-2
- Device Driver Installation
- Install the DirectX®
- NOTE:
- Install the ENUTV-2 Utility Software.
- Chapter 3: Launch the ENUTV-2
- Program
- Running the ENUTV-2 for the first time
- Watch TV programs or movies from DVD/VCR/Camcorder
- Record Video
- Snapshot Image
- Playback Video
- Exit :
- Minimize :
- Hide Control Panel :
- Setting :
- Browse Image :
- Step Backward :
- Step Forward :
- Slow Backward :
- Slow Forward :
- Play/Pause :
- Stop Play :
- Snapshot :
- Browse Image
- Refresh :
- Path Panel :
- Image Panel :
- Set Wallpaper :
- Skin :
- Zoom out :
- Zoom in :
- Match Zoom :
- Chapter 4: Using the Remote Control
- Chapter 5: Technical Support:
- NOTES:
Brand : ENCORE
Model : ENUTV-2
Category : TV Tuner for Computer