
ZPS1000 - Print Server Zonet - Free user manual and instructions
Find the device manual for free ZPS1000 Zonet in PDF.


| Product Type | Print Server |
| Brand | Zonet |
| Model | ZPS1000 |
| Connectivity | 1x USB 2.0, 1x Parallel, 1x RJ-45 10/100 Ethernet |
| Supported Protocols | TCP/IP, IPX/SPX, NetBEUI |
| Dimensions (W x D x H) | 150 x 100 x 30 mm |
| Weight | 200 g |
| Power Input | 5V DC, 1A |
| Operating Systems Supported | Windows, Mac OS, Linux |
| Management | Web-based interface, SNMP |
| Printer Support | Up to 2 printers (USB and Parallel) |
| Print Queue Management | Built-in spooler |
| Security | Password protection, IP filtering |
| LED Indicators | Power, Link/Activity, Status |
| Reset Button | Factory default reset |
| Operating Temperature | 0°C to 40°C |
| Humidity | 10% to 90% non-condensing |
| Certifications | FCC, CE, RoHS |
| Included Accessories | Power adapter, Setup CD, Quick Start Guide |
Frequently Asked Questions - ZPS1000 Zonet
User questions about ZPS1000 Zonet
0 question about this device. Answer the ones you know or ask your own.
Ask a new question about this device
Download the instructions for your Print Server in PDF format for free! Find your manual ZPS1000 - Zonet and take your electronic device back in hand. On this page are published all the documents necessary for the use of your device. ZPS1000 by Zonet.
USER MANUAL ZPS1000 Zonet
1. INTRODUCTION ....4
PRODUCT OVERVIEW 4
COMPONENTS AND FEATURES 4
HARDWARE INSTALLATION....5
2. PRINT SERVER INSTALLATION....6
PREPARATION 6
CONFIGURATION SOLUTION TABLE 6
3. THE SETUP UTILITY FOR WINDOWS-BASED 7
INSTALLING THE SETUP WIZARD 8
USING PSADMIN....16
WIZARD 17
MANUAL SETUP 19
REFRESH....22
MULTIPLE PRINT QUEUES CONFIGURATION 22
UNINSTALLING THE PSADMIN ON WINDOWS PC 22
4. INTERNET PRINTER CONNECTION AND HP WEB JETADMIN 24
IPP OVERVIEW 24
IPX/SPX-COMPATIBLE PROTOCOL INSTALLATION 44
NETBEUI PROTOCOL INSTALLATION 44
WINDOWS 95/98/ME/NT/2000/XP INSTALLATION PROCEDURE....45
UNINSTALLING NETWORK PRINT PORT ON WINDOWS 95/98/ME/NT/2000/XP 47
7. TCP/IP LPR PORT PRINTING INSTALLATION 48
BASIC TCP/IP INSTALLATION OVERVIEW 48
ASSIGNING AN IP ADDRESS 48
WINDOWS NT LPR PORT PRINTING INSTALLATION....48
WINDOWS 2000/XP STANDARD TCP/IP PORT PRINTING INSTALLATION....49
UNIX INSTALLATION....53
8. UPGRADING PRINT SERVER....61
OVERVIEW....61
UPGRADING THE PRINT SERVER FROM PSADMIN 61
UPGRADING THE PRINT SERVER FROM WINDOWS NT/2000/XP (THROUGH TCP/IP)....61
UPGRADING THE PRINT SERVER FROM UNIX (THROUGH TCP/IP)....62
UPGRADING THE PRINT SERVER FROM BROWSER 62
9. TROUBLESHOOTING 64
GENERAL TROUBLESHOOTING OVERVIEW....64
POWER RELATED PROBLEMS....64
WINDOWS 95/98/ME/NT/2000/XP TROUBLESHOOTING....65
MOVING THE PRINT SERVER TO A NEW SEGMENT 66
MOVING YOUR COMPUTER TO A NEW SEGMENT....67
NOVELL NETWARE TROUBLESHOOTING 67
TCP/IP TROUBLESHOOTING....67
APPENDIX: 70
LOAD DEFAULT VALUE 70
FREQUENTLY ASKED QUESTIONS 71
ADDITIONAL INSTALLATION INSTRUCTIONS 73
Trademarks
NetWare is a registered trademark of Novell Inc and Windows 95/98/Me and Windows NT/2000/XP/2003 are registered trademarks of Microsoft Corp. All other brands and product names are trademarks of their respective companies.
Copyright
No part of this publication may be reproduced in any form or by any means or used to make any derivative (such as translation, transformation or adaptation) without the express written consent of the manufacturer as stipulated by the United States Copyright Act of 1976.
FCC Warning
This equipment has been tested and found to comply with the limits for a Class A digital device, pursuant to subpart J of Part 15 of the FCC Rules. These limits are designed to provide reasonable protection against harmful interference when the equipment is operated in a commercial environment. This equipment generates, uses, and can radiate radio frequency energy and, if not installed and used in accordance with the instruction manual, may cause harmful interference to radio communications. Operation of this equipment in a residential area is likely to cause harmful interference in which the user will be required to correct the interference at their own expense.
Part No. 535UCD-V1.2
1. Introduction
Product Overview
The external print servers enhance capability by letting you place your printers, plotters, or equality printers at convenient locations directly on the Ethernet network, and by increasing network printer performance and management.
Network Management
The print servers support the Simple Network Management Protocol (SNMP), which remote printer management and a warning. A standard SNMP agent is permanent on these print servers. Any standard SNMP-based application can be used to access and manage these print servers.
Network configuration
The print servers provide an embedded web server that can be accessed via a prop web browser. We also subsidiary Windows-based PSAdmin utility which help administrator to setup print server environment. For example, Netware, Windows 95/98/Me, Windows NT/2000/XP, Mac or Unix system.
Components and Features
1-USB Port Print Server
- 1 USB 1.1 port
- Fast Ethernet network port: RJ-45 for 10Base-T or 100Base-TX
- 1 LED to indicate Status, 2 LED's to indicate 10/100M link lights
- One Setup CD for Windows 95/98/Me/NT/2000/XP/2003, User's Guide
• One external AC power adapter
• One Quick Installation Guide
• Built-in Reset Button
Before you start, you should prepare:
■ One Win9X/Me/2000/XP/2003 computer with CD-ROM
■ One Printer with USB port
Hardware Installation
To install the print server(s), you need to complete these steps:
- Confirm that your printer port work well.
- Connect the print server to the network and printer(s) and plug in the print server.
- Create a configuration page from the print server.
Follow these instructions to install the print server(s), please refer to any peripheral you are connecting to the print server:
- To ensure your printer(s) work well, do one of the following:
-
Send data through the parallel (USB) port of each printer you are connecting to the print server, or generate a printer self-test page.
-
Turn off the power for each printer.
-
Connect the print server to printer(s).
Note: One port print server attaching only one printer; further three ports print server can expand three printers.
-
Plug the AC power adapter to the print server.
-
Power on the Print Server.
-
Check the LED's marked as Status on topside or beside of the print server. It should be flash five times normally, if not, please contact your local dealer for repair or replacement.
-
Turn on the power of your printer(s) to begin printing.
2. Print Server Installation
Preparation
To meet users' network printing needs in today's heterogeneous and multiple protocol networking environments, the print server supports industrial standard protocols, including TCP/IP, IPX/SPX, NetBEUI and AppleTalk. This means that the print server supports the most popular network operating systems today, including NetWare, Windows 95/98/Me/NT/2000/XP/2003, UNIX systems and Macintosh computer(Postscript). As such, there might be several ways to deploy the print server on your network.
Supported Networks
Print server supports a variety of network protocols, including TCP/IP, IPX/SPX, NetBEUI and AppleTalk. In addition, we provide software for network configuration on the following networks:
• Novell NetWare 3.12, 4.x, 5.x (Bindery, NDS and NDPS)
• Microsoft Windows 95/98/Me
• Microsoft Windows NT/2000/XP/2003
- Apple EtherTalk(Postscript printer only)
- UNIX /Linux system
- Internet (via Internet Printer Connection software)
Configuration Solution Table
| Setup Operating System | Function | Remarks |
| PSAdmin utility | ||
| Windows95/98/MeWindowsNT/2000/XP/2003NetWare 3.12,4.x, 5.x | Install a single network on a peer-to-peer or client-server network | Easy printer installation runs from CD |
| Embedded Web server | ||
| Windows95/98/MeWindowsNT/2000/XP/2003 | Remote setup print server from private LAN as soon | Follow standard browse, for example, IE or Netscape |
| NetWare 3.12,4.x, 5.x | ||
| HP Web JetAdmin | ||
| WindowsNT/2000/XP/2003NetWare 3.12,4.x, 5.x | Remotemanagement ofprint server,includealert andconsumables | Print server solution for continual management of multiple printers- anywhere on your LAN |
| Internet Printing Protocol | ||
| WindowsNT/2000/XP/2003 | Printing via theinternet toInternet PrintingProtocol-enabled printserver | Allows saving distribution of HQ hardcopydocument over Internet, replacing fax, mail |
Comment
Configuration solution Table has many installations way to setup Windows 95/98/Me, Windows NT/2000/XP/2003, NetWare, UNIX / Linux system and Mac computer. Firstly, we introduce PSAdmin utility, HP Web JetAdmin program and Internet Printing Protocol solution. Then we will discuss Embedded Web Server Installation with print server.
3. The Setup Utility for Windows-based
The PSAdmin is a proprietary Windows based management program that can assist you in configuring and managing your print server in NetWare environments. The program can be run from any Windows PC.
Installing the Setup Wizard
To install Wizard, please follow the directions listed below.
- Insert the Utility CD into your CD-ROM drive.
-
The Autorun program starts and the following window appears. If the setup program does not start automatically, run Autorun.exe in the root folder from the CD-Rom.
-
Choose Install Setup Utility, the program will install the Setup Wizard into your computer.
-
After installation completes, the Setup Wizard message appears. Click on "Network Print Server Setup Wizard" to configure Print Server settings and add Printer to the PC.

- Click Network Print Server Setup Wizard and the following message appear.
Network Print Server Setup Wizard


Welcome to the Network
Print Server Setup Wizard
This Wizard guides you through the installation of the network print server that is connected to the local area network on this computer.
Before you proceed, make sure the print server and the printer are properly connected and turned on.
To continue, click Next.
Version 0.94.09
< Back

Cancel
Click NEXT; the wizard will automatically discover the print server.
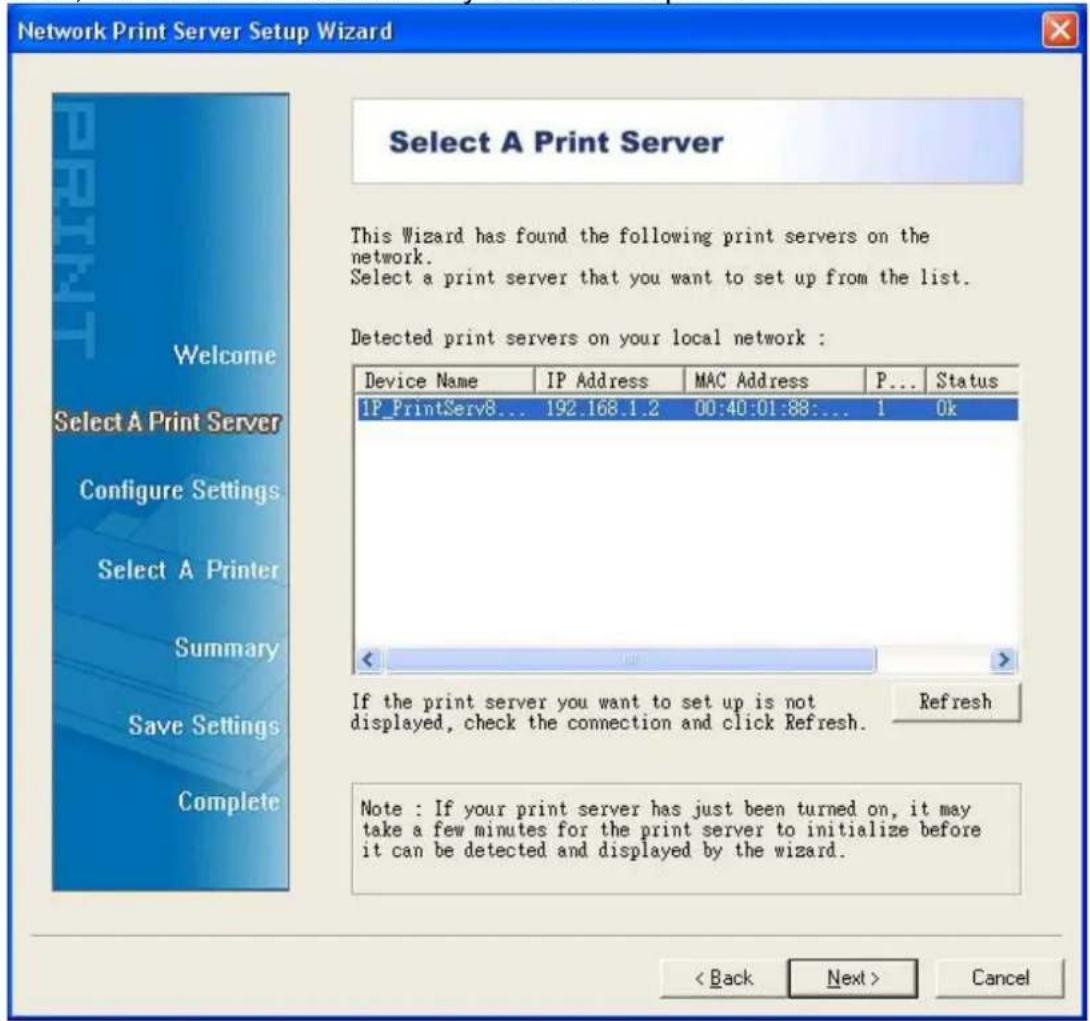
- Select YES if you want to change the configuration and press NEXT to continue.
Network Print Server Setup Wizard


Change Settings
This Wizard allows the network administrator to change some basic settings of the print server. If you are not the network administrator, do not change settings. Wrong settings may cause the print server not to function properly.
- Yes, I want to change settings.
password:
C No, I don't want to change settings.
To change settings, you must enter a password. A brand-new network print server has no default password. In the next step, you may have to configure the IP address of the network print server.
< Back Next > Cancel
- Configure TCP/IP settings. If you have a DHCP server on the network, select "Obtain an IP address automatically", or click "Specify and IP address" and input the IP, Mask, and Gateway IP addresses. Click "Next".

- TCP/IP settings saved, click Next to start install the printer for your PC.

- Click Next and choose the printer you want to install. You can also add a new printer in this step.
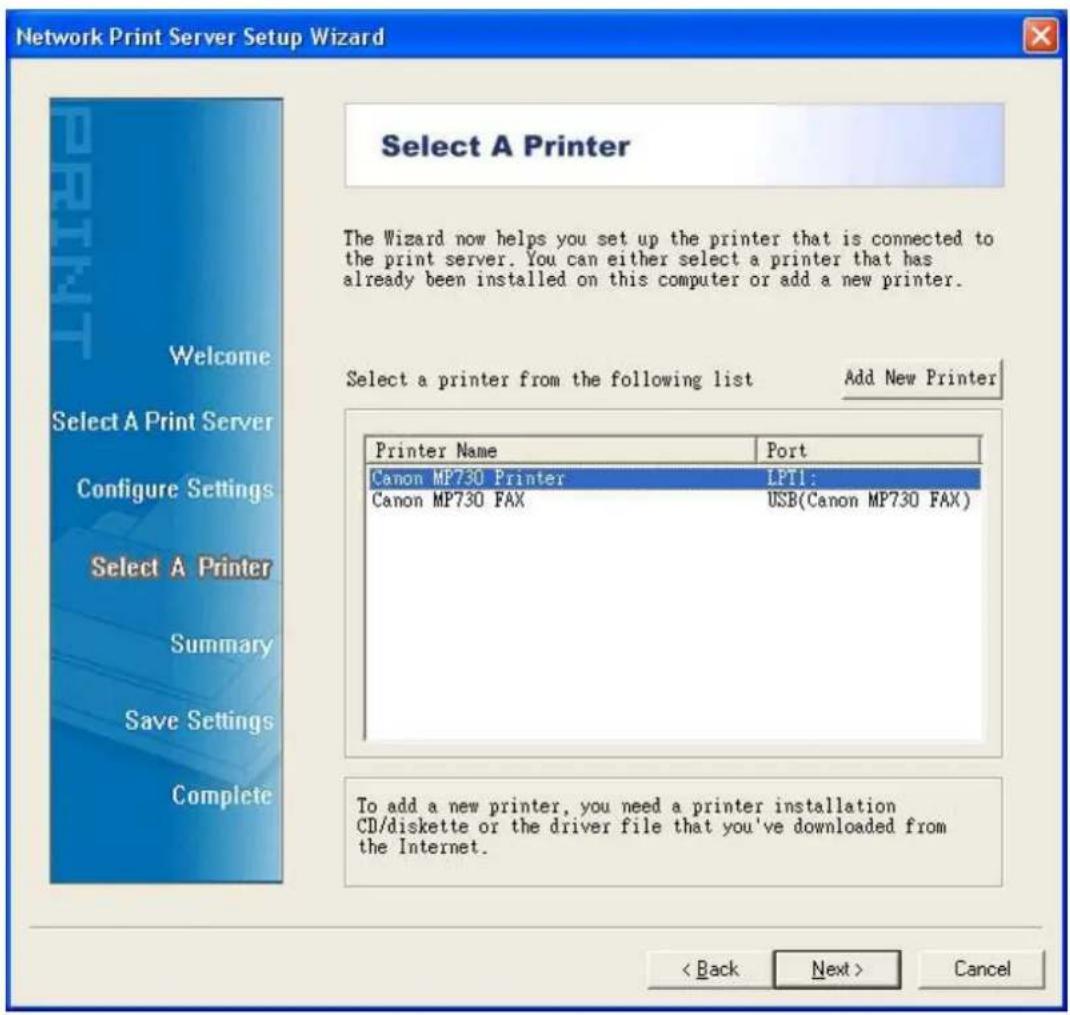
If the printer is not listed under Printer Name, click on Add New Printer and follow the below instruction.
Help For Adding A New Printer
You have chosen to add a new printer. Windows Add Printer Wizard has been brought up to help you add a new printer. Follow the instructions in this Help to add a new printer on this computer. Please note though these steps might vary slightly, depending on which Windows version is used, the functionality of these procedures is exactly the same.
After Windows Add Print Wizard finishes, you must return to Network Print Server Setup Wizard.
- When Windows Add Printer Wizard starts, click Next.
- Click Local printer, and then click Next.
- Select LPT1: (Recommended Printer Port), and then click Next.
- Follow the instructions on the screen to finish setting up the printer by selecting the manufacturer and model of your printer and typing a name for your printer.
- Do not print a test page to the printer.
- Click Finish to complete the Windows Add Printer Wizard.
- Now return to the Network Print Server Setup Wizard and continue setting up the network print server.
After new printer is added the printer will be listed under the Print Name section, select the printer and click NEXT.
- Click Next and setup program will display the summary of your printer's configuration.

- Now, your print server has been successfully connected with your printer.
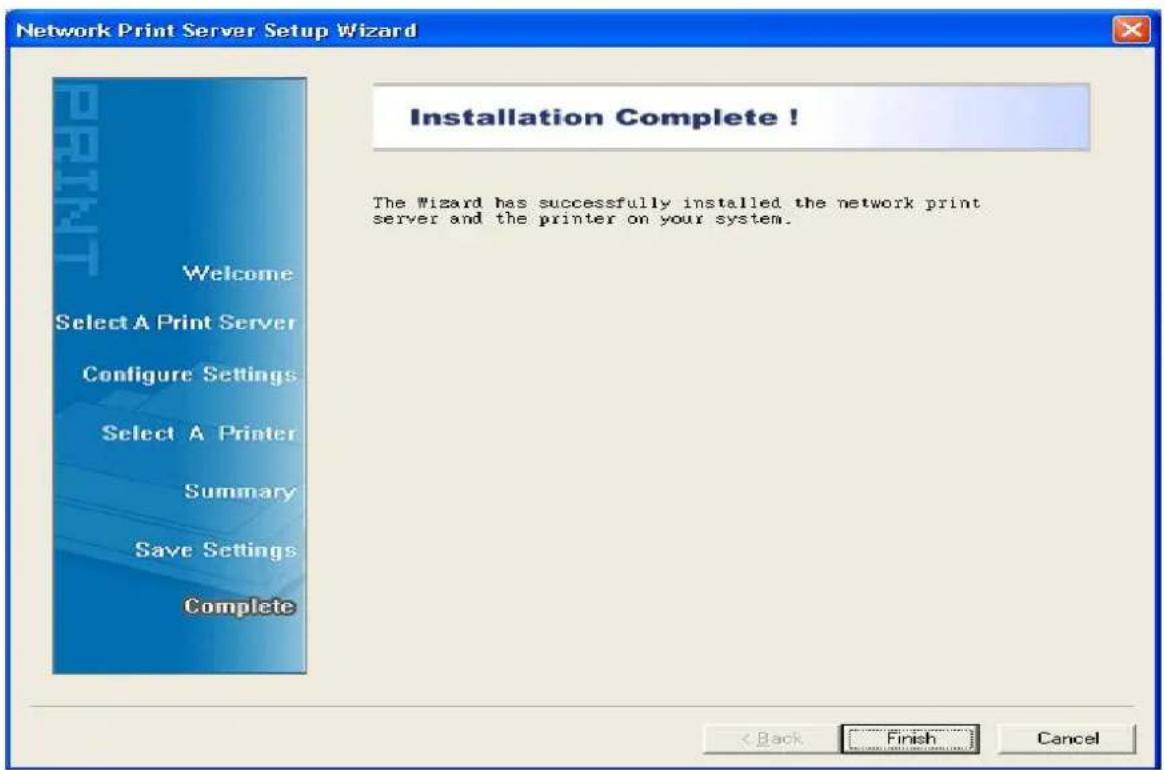
Using PSAdmin
After PSAmin is successfully installed, run the program by double-clicking the PSAadmin icon from "Network Print Server" program. The screen will then appear as follow picture.

All print server(s) feature Novell NetWare function on the LAN will be displayed along with their respective device name, MAC Address, print server name, firmware version, and status. The terms are defined as follows:
Device Name: The name of the print server hardware used for identification purposes.
MAC Address: The Ethernet address of the print server.
Print server Name: The print server to which the device is attached.
Version: The firmware version of the print server.
Status: To come up a Printer's status presently.
Wizard
Wizard is a configuration program that can assist you in setting up the necessary parameters for your print server device to function. Setup a print server by using Wizard.
TCP/IP Wizard
- Click Wizard button just like a picture < img>.and select TCP/IP Wizard.
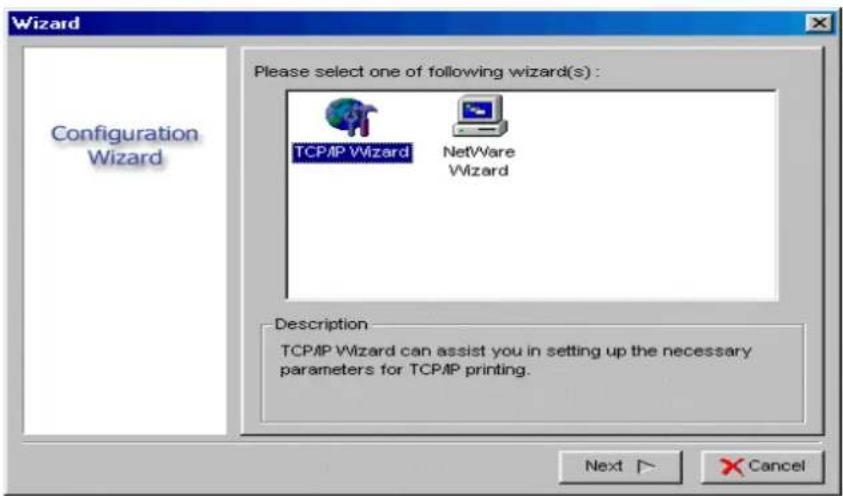
2 Select "Obtain an IP address from DHCP server". If there is a DHCP server on your network. This option allows the print server to obtain IP-related settings automatically from your DHCP server. This setting, by default, is disabled. If you would like to manually specify an IP address to the device, please skip to the following step.
3 In the IP Address option, type an IP address for the print server. The IP address must meet the IP addressing requirements of the network segment.

4 (Optional) In the Subnet Mask option, type the Subnet Mask your LAN or network segment is currently configured to use.
5 (Optional) In the Gateway field, type the IP address of gateway.
6 When done, click OK button. The program will save the above settings into the print server.
7 Done
NetWare Wizard
- Log into your NetWare file server as a Supervisor (Admin.) or equivalent.
- Click Wizard button just like a picture <.> .and select NetWare Wizard, as follow picture.

- Select the NetWare File Server to which the print server device will be attached.
-
Type in a Print server.
-
Type in a Print Queue Names.
Note: Each print queue corresponds to each print port of the print server.
- Click OK.
- Done.
- From your NetWare client computer, such as Windows 95/98/Me, create a printer that is connected (redirected) to one of the NetWare print queues serviced by the print server.
Manual Setup
Manual Setup is a configuration program designed for more experienced users of NetWare. To setup the print server by using Manual Setup follow the steps:
- Run PCONSOLE in NetWare 3.x or NetWare 4.x and create the necessary parameters (Refer to your Novell NetWare print server/Services manual for details).
- Log into your NetWare file server as a Supervisor (Admin.) or equivalent. From your Windows 95/98/Me, run PSAdmin.
- Select the print server that you wish to configure.
- Click Properties in the tool bar and the following screen will appear, Properties button just like a picture <>, as follow picture.

- Select NetWare and type in the Print server that created during PCONSOLE.
-
(Optional) In Bindery Settings, Select NetWare file server(s) that print server can do Bindery mode.
-
(Optional) In NDS Settings, Select NetWare file server(s), NetWare 4.x or later that print server can do NDS mode.
- Click OK. From your NetWare client computer, such as Windows 95/98/Me, create a printer that is connected (redirected) to one of the NetWare print queues serviced by the print server.
Properties –TCP/IP Options
The TCP/IP options allow you to modify the print server's TCP/IP settings. Each option is detailed as follows.
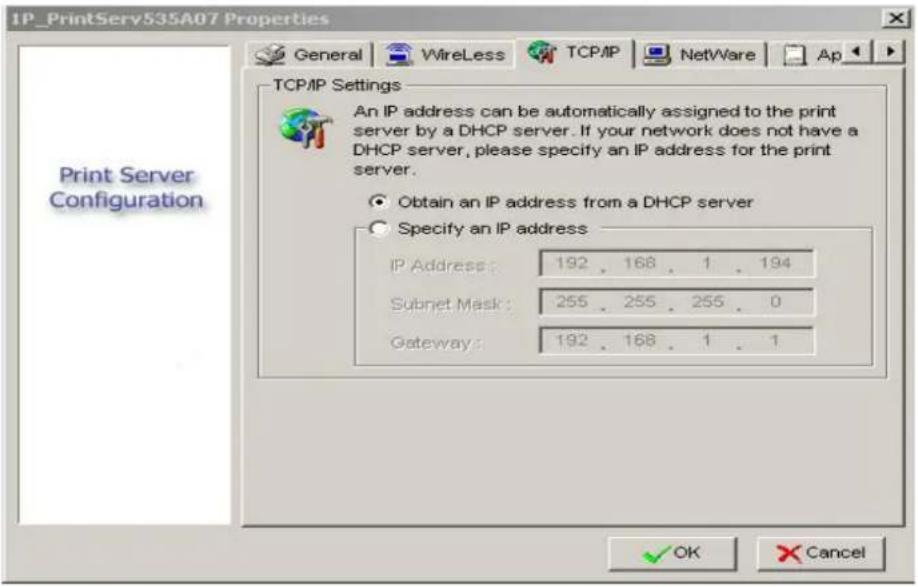
Obtain an IP address from a DHCP server:
This option enables or disables the DHCP feature of the print server. When this option is enabled, the print server will obtain an IP address automatically from the DHCP server on your LAN. The default value is "Disable".
Note: 1. Once this option is enabled, the following IP address, Subnet Mask, Gateway will be grayed out and are not available for editing.
2. While the print server supports DHCP, we strongly recommend you manually specify a fixed IP address to the print server.
Specify an IP address:
IP Address: This option shows the print server's current IP address maybe obtained from your DHCP server or manually specified. This option also allows you to manually specify an IP address to the print server, if DHCP option is disabled.
Subnet Mask: This option shows the print server's current subnet mask maybe obtained from the DHCP server or manually specified. This option also lets you manually specify a subnet mask to the print server, if DHCP option is disabled. This value is optional.
Gateway: This option shows the print server's current gateway address maybe obtained from the DHCP server or manually specified. The option also allows you to manually specify the IP address of the gateway to the print server, if DHCP option is disabled. This value is optional
Upgrade
Upgrade allows the user to upgrade the print server device. In order to upgrade the unit please perform the steps as follows:
- Click Upgrade button just like a picture <>, as shown as follow picture

- Select General Upgrade. Make sure that the upgrade file is located in the same directory as PSAdmin.
Reset
-
Click Reset button just like a picture <.
-
Reset allows the user to reset the print server device in order to establish a new connection or for new settings to take effect.
Refresh
- Click Refresh button just like a picture <.
- Refresh searches the network for all attached print server(s).
Note: Configure the print speed in the Advanced label, must match the printer's speed which connect to the print server. Undependable configuration will cause printer to abnormal printing.
Multiple Print Queues Configuration
To configure the print server to service multiple print queues, please follow the instructions listed below:
- Log into your NetWare file server as a Supervisor (Admin.) or equivalent.
- Run the PSAdmin from your Windows.
- Select the print server and to be configured.
- Click the Wizard icon in the tool bar.
- Type in a Print server and a Print Queue Name (For more detailed information about Wizard, please refer to the "Wizard" section in this chapter).
- Run the NetWare's PCONSOLE and create additional print queues.
- Select the Print server name you specify in Step 5.
- Select the "Print server Configuration" option and select the "Queue Serviced by Printer" option (For NetWare 4.x's PCONSOLE, please select "Printers" option and select "Printer 0" instead).
- Select the "Printer 0" and press the [Insert] key to add the print queues you create in Step 6 into the list (For NetWare 4.x's PCONSOLE, please select "Print queues assigned" option instead).
- Reset the print server by clicking the "Reset" icon from the PSAdmin. Done.
Note: Please refer to NetWare's Print server/Services manuals for detailed PCONSOLE commands.
Uninstalling the PSAmin on Windows PC
To help users easily remove all installed software components of the PSAdmin from their Windows PC, and the PSAdmin software comes with un-installation wizard program that can automatically remove the software components from their Windows PC systems in minutes. Please follow the directions listed below to proceed with the un-installation procedure.
After the PSAmin is removed, the print server is no longer accessible via the PSAmin. You have to re-install the PSAmin on your system in order to access the print server again.
Procedure:
- Click Start, point to Settings, and select Control Panel.
- Double click the Add/Remove Programs icon.
- Click Change or Remove Programs tab.
- Select Network Print Monitor for Windows 95/98/NT/2000/XP and click Change/Remove button.
- The un-installation wizard program will be launched.
- Follow the directions on the screen to complete the un-installation procedure.
4. Internet Printer Connection and HP Web JetAdmin
IPP Overview
Print server(s) support the Internet Printing Protocol (IPP). Using the appropriate software on your system, you can create an IPP print path from your system as Windows PC over the Internet.
Note: For incoming print path requests, the network administrator have to configure the firewall to accept incoming IPP requests.
Windows NT/2000/XP/2003
For Windows NT/2000/XP/2003, you can use a supported Web Browser, for example, Netscape or IE to view the embedded web server on the print server. Contact your administrator to get the IP address or URL of the printer and browse to the print server's web page.
For example, to install Windows 2000 by IPP service you must follow below information:
- Click Start button.
- Select Settings, and then select "Printers" option.
- Click Add Printer icon. Appear welcome to the add printer wizard, Click Next.
- Select Network printer option, and then click "Next".
- Select Connect to a printer on the Internet or on your intranet option, appear as follow picture.

- In URL's box, input print server's IP address, for example, http://192.168.10.182/lp1. Then Click Next.
** One port should be the port name as lp1.
** Three ports should be the port name as lp1, lp2, and lp3.
- It will check print server to connect to HP printer, if not, it will appear as follow picture. Then Click OK.

- Select the appropriate printer manufacturer and printer type and click "Next", appear as follow picture.

- If you want your Windows-based programs to use this printer as the default printer, please select "Yes", and Click Next. It will appear as follow picture

- Click Finish button.
- Done.
HP Web JetAdmin Overview
HP Web JetAdmin allows you to use a Web browse to revise, view, manage and diagnose devices connected to the print server or any standard printer MIB devices.
For more information about a procedure or Windows in the HP Web JetAdmin software, see about HP's relation document.
System Requirements
HP Web JetAdmin software runs on Microsoft Windows NT, HP-UX, Solaris, Red Hat Linux and SuSE Linux system. For information on supported operating systems and browser versions, we recommend IE or Netscape version 4 or higher. Please access HP Customer Care Online at http://www.hp.com/go/webjetadmin.
Note: When installed on a supported host server, HP Web JetAdmin can be accessed from any client through a supported Web browser by browsing to the HP Web JetAdmin host.
Installing HP Web JetAdmin
Before installing the HP Web JetAdmin software, you must have domain administrator or root privileges:
Download the installation files from HP Customer Care Online at http://www.hp.com/go/webjetadmin/.
Follow the instructions on the screen to install the HP Web JetAdmin software.
Note: Installation instructions are also contained in the HP Web JetAdmin install file.
Confirming Installation and Supply Access
- Confirming that the HP Web JetAdmin software is correctly installed by navigating to it with your browser as shown in the following. For example, http:// server domain port/ where server domain is the host name of your web server and port is the port number assigned during installation.
- Supply users access to HP Web JetAdmin software by adding a link to your web server's home page that is addressed to HP Web JetAdmin's URL. For example: http://server.domain:port/
Configuring and Modifying a Device
Using your browser, navigate to HP Web JetAdmin's URL. For example:
http://server.domain:port/
Follow the instructions on the appropriate home page to configure or modify your printer.
Note: You can also substitute the server domain with TCP/IP address.
Removing HP Web JetAdmin Utility
To remove HP Web JetAdmin software from your web server, use the uninstall program provided with the software package.
5. Configuration from Embedded Web Server
Overview
The Print Server contains an embedded web server that can be accessed through a supported web browser on a LAN, for example, IE 4.0, Netscape 4.0 or above is recommended.
The embedded web server provides access to configuration and management pages for the print server and the connected peripheral device.
Using Embedded Web Server
Before you can use the embedded web server, the print server must be configured with an IP address. There are many ways to configure the print server's IP address. For example, the Windows-based of PSAmin utility can easily set an IP address with the print server, please see the Properties – TCP/IP options of chapter 3.
After an IP address is established on the print server, perform the following step:
Status Menu
Once you have finished the IP address configuration with print server. You should be use web browser to view and management the print server. The status menu of the print server helps administrator control the print server's System, Printer, NetWare, TCP/IP, SNMP and AppleTalk of status for the time being.
Preparation
Enter the IP address of the print server as the URL, for example, 192.168.1.2. Then the print server's home page will appear in content of the web browser.
Please follow this information in the status menu of the print server:
System Status
- Click Status, it then appears the sub-menu.
- Click System, it then as shown in the following picture.

Device Name: This option allows you to view device name of the print server. To correct the print server's device name.
System Contact: This option allows you to view contact name of the print server. To check the print server's contact name who in charge of this device.
System Location: This option allows you to view Location name of the print server. To confirm the print server's location name where the print server is located in the office's LAN.
System Uptime: This option allows you to view uptime of the print server. When you start the print server, it will compute the print server from start time to power off time.
Firmware Version: This option allows you to view firmware version of the print server. To verify the print server's firmware version is newer in this time.
MAC Address: This option allows you to view Node ID of the print server. The Node ID is unique from any print server.
Printer Status
- Click Status, it then appears the sub-menu.
- Click Printer, it then as shown in the following picture.

Manufacturer: This option allows you to view manufacturer of the printer. When the printer connected with the print server, it will be show in the manufacture box.
Model Number: This option allows you to view model of the printer. When the printer connected with the print server, it will be show in the model box.
Printing Language Supported: This option allows you to view command to set the printer. When the printer connected with the print server, it will be show in the command box.
Current Status: This option allows you to view status of the printer. When the printer connected with the print server, it will be show in the status box. For Example, Waiting for job. It is means the printer already to printing.
TCP/IP Status
- Click Status, it then appears the sub-menu.
- Click TCP/IP, it then as shown in the following picture.

Use DHCP/BOOTP: This option allows you to view DHCP/BOOTP status. If there is a DHCP/BOOTP server on your network, this option allows the print server to obtain IP-related settings automatically from your DHCP server.
IP Address: This option allows you to view IP address from the print server. The IP address must meet the IP addressing requirements of the network segment.
Subnet Mask: This option allows you to view subnet mask from the print server. The IP address must meet the IP addressing requirements of the network segment.
Gateway's IP: This option allows you to view gateway from the print server. This IP address of gateway must meet the router or gateway to go across of the network segment.
Netware Status:
- Click Status, it then appears the sub-menu.
- Click Netware it then as shown in the following picture.

General Settings:
Print Server Name: This option allows you to view print server's name would be configured by PSAdmin utility.
Polling Time: This option allows you to view polling time from the print server. This function is search for NetWare Server by per time.
NetWare NDS Setting:
Use NDS Mode: Enable or Disable.
Name of the NDS Tree.
Name of the NDS Content.
Current Status: Connect or Disconnect.
NetWare Bindery Setting:
Use Bindery Mode: Enable or Disable.
Name of the File Server:
Current Status: Connect or Disconnect.
AppleTalk Status
- Click Status, it then appears the sub-menu.
- Click AppleTalk, it then as shown in the following picture.

Zone Name: If no any zone exists, the print server itself displays the zone name as an asterisk (*) in the current AppleTalk Status of the print server in the web browser.
Port Name:
Printer Type: This option allows you to view printer type from the print server. If you are using a PostScript printer you can select the LaserWriter 8 icon from your Mac computer.
Data Format: This option allows you to view data format from the print server. If you are using a PostScript printer you can select ASCII, TBCP or BCP format from web configuration.
SNMP Status
- Click Status, it then appears the sub-menu.
- Click SNMP, it then as shown in the following picture.
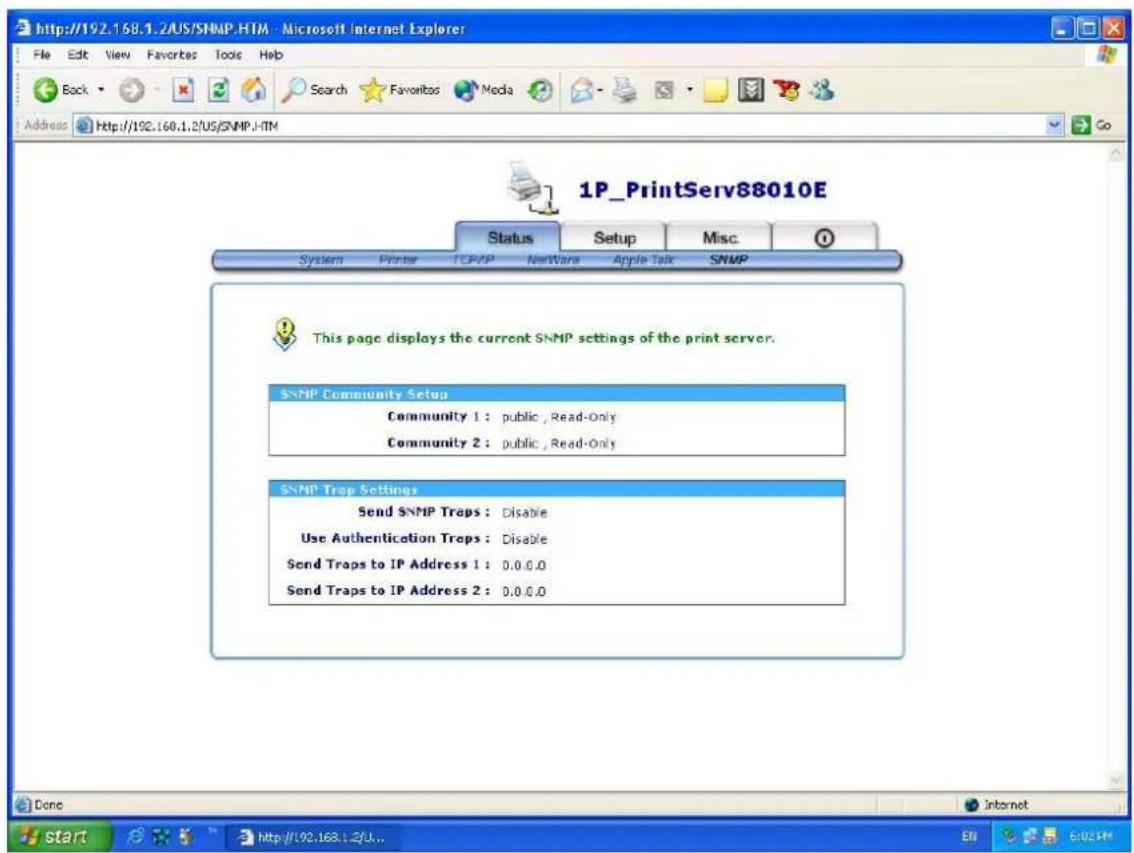
SNMP Communities: This option allows you to view SNMP communities from the print server. There are two communities that control message from the network management of the print server.
SNMP Traps: This option allows you to view SNMP traps from the print server.
Setup Menu
Meanwhile, you have finished the IP address configuration with print server. You should use web browser to configure the print server. The setup menu of the print server helps administrator to setup the print server's System, Printer, NetWare, TCP/IP, SNMP and AppleTalk.
Preparation
Enter the IP address of the print server as the URL, for example, 192.168.1.2. Then the print server's home page will appear in content of the web browser.
Please follow this information in the setup menu of the print server:
System Setup
- Click Setup, it then appears the sub-menu.
- Click System, it then as shown in the following picture.

Email Alert: This option allows the wireless to send e-mail to the administrator when the printer is ready or offline.
Device Name: This option allows you to input device name of the print server. To correct the print server's device name.
System Contact: This option allows you to input contact name of the print server. To check the print server's contact name who in charge of this device.
System Location: This option allows you to input Location name of the print server. To confirm the print server's location name where the print server is located in the office's LAN.
Password: This option allows you to input setup password of the print server. When you select setup menu of web configuration from the print server, it then as shown in the following picture.
Re-type Password.

- User Name: You must be input the default administration user name: admin as login user name.
- Password: The default password is empty. After setup password is completed from the print server, you should to remember this password to input password box.
TCP/IP Status:
- Click Setup, it then appears the sub-menu.
- Click TCP/IP, it then as shown in the following picture.

DHCP/BOOTP: This option allows you to select DHCP/BOOTP option. If there is a DHCP/BOOTP server on your network. This option allows the print server to obtain IP-related settings automatically from your DHCP server.
IP Address: This option allows you to input IP address from the print server. The IP address must meet the IP addressing requirements of the network segment.
Subnet Mask: This option allows you to input subnet mask from the print server. The IP address must meet the IP addressing requirements of the network segment.
Gateway: This option allows you to input gateway from the print server. This IP address of gateway must meet the router or gateway to go across of the network segment.
NetWare Setup
1.Log into your NetWare file server as a Supervisor (Admin.) or equivalent.
-
Select NetWare and type in the Print server that created during PCONSOLE Select the NetWare File Server to which the print server device will be attached.
-
Click Setup, it then appears the sub-menu.
-
Click NetWare, it then as shown in the following picture.

Print Server Name: This option allows you to input print server name which configured by PSAdmin utility or PCOMSOLE program.
Polling Time: The time interval in which the print server unit polls the file server for servicing of print queues.
Logon Password: This option allows you to input encrypted password from the print server. The print server login to NetWare server that administrator set password from selected print server.
NDS Mode: To Enable NDS Mode, if you want to setup NDS environment. To select Tree Name of NetWare then input context name in the Context box.
Bindery Mode: To Enable Bindery Mode, if you want to setup Bindery environment. To select File Server Name of NetWare.
Installing Print Server on NetWare 4.x/5.x
Due to its architecture and functionality, the print server must work under NetWare 4.x/5.x NDS Bindery Emulation. When you install the NetWare file server for the first time, by default, the installation program will automatically set up the Bindery Emulation function for you by adding "SET BINDERY CONTEXT =" in the AUTOEXEC.NCF file. By default, the bindery context will only be set on your organization (O) object.
If you have ever modified this line, or if you have ever added any organization units (OU) to your NDS tree after the NetWare system was installed, please read the following section before you install the print server.
For the purpose of illustration, we assume the NDS tress structure is as follows:

flowchart
graph TD
    A["ROOT"] --> B["(O)ABC"]
    B --> C["(OU)ABC-USA"]
    B --> D["Admin"]
    B --> E["FileServer-1"]
    C --> F["(OU)Sales"]
    D --> G["(OU)Tech"]
Installation Procedure
- At your file server console, type "load install".
- Select "NCF files options".
- Select "Edit AUTOEXEC.NCF file".
- Add or Modify the "SET BINDERY CONTEXT=" line to include the NDS organization (O) and all organization unit (OU) objects where users are located. For example: SET BINDERY CONTEXT = O=ABC; OU=SALES.OU=ABC-USA.O=ABC; OU=TECH.OU=ABC-USA.O=ABC;
- When done, save the new AUTOEXEC.NCF file. Please restart your NetWare file server in order for new settings to take effect immediately.
- Next, please refer to "Auto Setup" section in this chapter to finish installing your print server.
- Log into your NetWare file server as a Supervisor (Admin.) or equivalent via a Bindery connection.
- Run NetWare's PCONSOLE and add users to the "Queue Users" list.
- From your NetWare client computer, such as Windows 95/98/Me, create a printer that is connected (redirected) to the NetWare print queue serviced by the print server.
Note: Please refer to NetWare's Print Server/Services manuals for detailed PCONSOLE commands.
AppleTalk Setup
The print server can print jobs submitted from Macintosh workstations connected to an Ethernet using AppleTalk protocol. The basic configuration is for the print server in an AppleTalk environment is performed simply by opening the Chooser window and selecting a printer that is connected to the print server.
- Click Setup, it appears the sub-menu.
- Click AppleTalk, it as shown in the following picture.

- Zone Name: In this option, type an AppleTalk Zone name that you want the print server to belong to or leave it in default (This enables the print server automatically search and link itself to the default zone that is set on the AppleTalk router, if found). We also assume that at least an AppleTalk Zone exists on the network. If no any zone exists, the print server itself displays the zone name as an asterisk (*) in the current AppleTalk Status of the print server in the web browser.
- Port Name: In this option, type a name for identification purpose or just leave it in default (recommended).
Note: The default print server's Chooser name is as shown as follows:
-
Printer Type: In this option, the LaserWriter of printer type by default (recommended).
-
Data Format: In this option, data format includes ASCII, TBCP and BCP.
Setting Up a Macintosh Computer
- At a Macintosh computer, from the Apple menu, select Chooser.
- The Chooser window then displays an Apple Zone list. Select the Zone name that you specified when configuring the PRINT SERVER.
Note: If you select a Zone that the PRINT SERVER doesn't belong to, as you specified in the previous section, no N7119+ will be displayed in the Step 4.
-
If you are using a PostScript printer you can select the LaserWriter 8 icon.
-
The Chooser window then displays PRINT SERVER (s) featuring the support for AppleTalk protocol, along with its default Chooser Name in the right-hand Select A PostScript Printer dialog box.
Note: 1. You may change the default Chooser name and Zone name of a PRINT SERVER by using your web browser before proceeding with this installation. Please see the previous section in this chapter for details.
2. If you use Mac OS 8.x or 9.x, please make sure your printer support PostScript.
-
Click Setup... button and choose the PPD file matching your printer, and click OK. If your printer does not appear in the PPD file list, please contact your printer vendor. You may also use the Generic PPD if you do not need any printer specific features.
-
Close the Chooser Windows.
-
Done.
SNMP Setup
TCP/IP networks use a standard management protocol called Simple Network Management Protocol (SNMP). SNMP is widely used in the industry as a solution for remote network management and monitoring of networking devices. SNMP actually includes a protocol, a database structure specification, and a set of database objects. The database objects are contained in a standard database called Management Information Base (MIB) that is stored on the networking device called SNMP agent. The print server's SNMP implementation runs in a TCP/IP environment.
A host on the network running Network Management System (NMS) software can access the print server device by reading and writing the MIB objects stored in the device. The Network Management Systems are available from many third-party vendors, such as Hewlett-Packard's OpenView.
When accessing (traversing) MIB objects in the print server using NMS software called SNMP manager, you need to provide a community name in each SNMP request for
authentication purpose. The print server supports up to two community names. The default community name is public (case-sensitive), with Read Only access right in default.
When an unusual condition or activity occurs, the SNMP agent alerts the SNMP manager through SNMP traps. Following list summaries SNMP trap messages that the print server will send out.
Activities/SNMP Trap Messages Description
| Link Up or Link Down | When the network interface on the print server fails, a link down trap message is generated; if the network interface comes back to life, a link up trap message is sent. |
| Cold Start or Warm Start | When the print server restarts, the cold start or warm start trap message is generated. |
| Authentication Failure | When the print server received a SNMP request with a community name that does not match the community name the print server is configured with (stored in the print server's memory), an authentication failure trap message is generated. |
In the print server's SNMP implementation, the following MIB objects are available for updating.
MIB Object Names Description
| system.sysContact | Indicates the network administrator's name. |
| system.sysName | Indicates the print server's name for identification. |
| system.sysLocation | Indicates the location of the print server. |
| snmp.snmpEnableAuthenTraps | Enables or disables the function of sending SNMP AuthenticationFailure trap message to the network administrator, if thecommunity name within a SNMP request is not correct. |
Users can set up print server's SNMP functions by using their browsers.
- Click Setup, it then appears the sub-menu.
- Click SNMP, it then as shown in the following picture.

SNMP Community: The print server supports up to two community names. The default community name is public (case-sensitive), with Read Only access right in default.
Support HP WebJetAdmin: This option allows user determine to disable/enable the Support HP WebJetAdmin.
SNMP Traps: Enable the function of sending SNMP Authentication Failure trap message to the network administrator, if the community name within a SNMP request is not correct.
6. Network Print Monitor
Preparation
The print server supports TCP/IP, IPX/SPX and NetBEUI protocols under MS-Windows. Please make sure that the following steps have been completed before proceeding with installation under Windows PC.
Select A Desired Protocol
TCP/IP
☐ The TCP/IP Protocol must be installed. For further information, please read “TCP/IP Protocol Installation” section in this chapter.
Note: If TCP/IP protocol is chosen, please refer to “Assigning an IP Address to the print server” section later in this chapter.
IPX/SPX
The IPX/SPX-compatible Protocol must be installed. For further information, please read "IPX/SPX-compatible Protocol Installation" section in this chapter.
NetBEUI
The NetBEUI protocol must be installed. For further information, please read "NetBEUI Protocol Installation" section in this chapter.
TCP/IP Protocol Installation
- Click Start, point to Settings and select Control Panel.
- Double click the Network icon.
- If the TCP/IP Protocol is not already installed, click Add.
- Select Protocol and click Add.
- Select Microsoft from the Manufacturers list.
-
Select TCP/IP Protocol from the Network Protocols list.
-
Specify an IP address, Subnet Mask, and Gateway address or specific "Obtain IP address automatically", if a DHCP server is available on the LAN.
- Restart the computer.
- Done.
Note: Using TCP/IP protocol to access the print server requires well-configured TCP/IP settings. If you are not familiar with these settings, please consult your network administrator for details or ask for help.
IPX/SPX-compatible Protocol Installation
- Click Start, point to Settings, and select Control Panel.
- Double click the Network icon.
- If the IPX/SPX-compatible Protocol is not already installed, click Add.
- Select Protocol and click Add.
- Select Microsoft from the Manufacturers list.
- Select IPX/SPX-compatible Protocol from the Network Protocols list and follow the instructions on the screen.
- Restart the computer.
- Done.
NetBEUI Protocol Installation
- Click Start, point to Settings, and select Control Panel.
- Double click the Network icon.
- If the NetBEUI is not already installed, click Add.
- Select Protocol and click Add.
- Select Microsoft from the Manufacturers list.
- Select NetBEUI from the Network Protocols box and follow the instructions on the screen.
- Restart your computer for new settings to take effect.
8. Done.
Note: For more detailed information, please refer to your Microsoft Windows 9X/ME/NT/2000/XP manuals.
Windows 95/98/Me/NT/2000/XP Installation Procedure
Please perform the steps as follows to ensure a smooth installation:
- Run Setup from the print server's NetWare, Win 95/98/Me/NT/2000/XP Setup diskette
- The Network Print Monitor for Windows 95/98/Me Setup will then appear. Click Next.
- A message reading, "Setup is complete. You may add the Network Print Port by using the PSAmin" will appear. Click OK.
- Click Start, point to Settings, and select Printers.
- Double-click the Add Printer icon.
- Select Local Printer and click Next.
- Select the appropriate printer manufacturer and printer type and click Next.
- Select LPT1 and click Next.
- Type in the Printer Name and click Next.
- A message reading, "After your printer is installed, Windows can print a test page so you can confirm that the printer is set up properly." Select No and click Finish.
- Double-click the newly created Printer Name icon.
- Select Printer and Properties.
- Click Details tab and select Add Port.
- In the Add Port dialog box, select Other, as shown in the following picture.
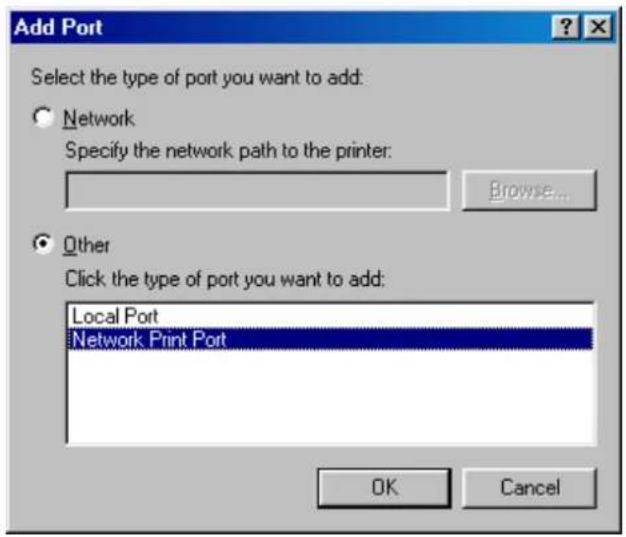
- Select the Network Print Port and click OK.
- The Add Port box will then appear, along with the print server's Node ID (The last 6 digits of the Node ID, located on the back of the print server unit). Select one printer server port from the list, which is now connected to (one of) your printer(s), as shown in the following picture.

■ By default, the computer will first search for the print server(s) on the network by using the IPX/SPX protocol.
If the IPX/SPX protocol is installed, the print server will be displayed along with its Node ID, as shown in Node column. (The last 6 digits of the Node ID, located on the back of the print server unit). Select one of the print server's ports from the list.
If the IPX/SPX protocol is not installed, no print server will be shown in the display box. Then please select TCP/IP or NetBEUI alternatively.
It starts again to search for the print server on the network by using the protocol you specify in the step above. When finished, the print server will be displayed along with the its Node ID, as shown in the following picture. (The last 6 digits of the Node ID, located on the back of the print server unit). Select one of the print server's ports from the list.
Uninstalling Network Print Port on Windows 95/98/Me/NT/2000/XP
To provide users an easiest way to remove all of the Network Print Port components from Windows 95/98/Me, the Network Print Port software comes with un-installation wizard program to help users remove the software components from their Windows 95/98/Me/NT/2000/XP systems in minutes. Please follow the directions listed below to proceed with the un-installation procedure.
After the Network Print Port is removed, the print server is no longer accessible via the Network Print Port. You have to re-install the Network Print Port on your system in order to access the print server again.
Procedure:
- Click Start, point to Settings, and select Control Panel.
- Double click the Add/Remove Programs icon.
- Click Add/Remove tab.
- Select Network Print Monitor for Windows 95/98/Me and click Add/Remove button.
- The un-installation wizard program will be launched.
- Follow the directions on the screen to complete the un-installation procedure.
Note: We recommend you restart your computer after un-installation is finished.
7. TCP/IP LPR Port Printing Installation
Basic TCP/IP Installation Overview
When installing your print server in a TCP/IP environment, IP addresses are essential as a basic means of communications. It is therefore necessary to first assign an IP address to your print server unit. After assigning an IP address, the print server can be configured accordingly.
Assigning an IP Address
The first step to install a print server on a TCP/IP network is to assign the print server an IP address and other related TCP/IP settings before the print server can function. You can select the following two methods to specify an IP address the print server. Each method will be detailed in the following section.
- Use the Network Print Monitor utility.
- Manually specify (using DOS commands or UNIX text-mode commands. This applies to Windows NT/2000/XP and UNIX systems).
Note: The Network Print Monitor can only search for the print server(s) over the same network segment the Windows NT/2000/XP/UNIX computer is located. You would like to install a print server on a different network segment.
DHCP
The print server supports DHCP feature, allowing the print server to obtain an IP address and related TCP/IP settings automatically from a DHCP server. While the print server supports DHCP, we strongly recommend you manually specify a fixed IP address to the print server. By default, the print server's DHCP function is disabled.
Windows NT LPR Port Printing Installation
- Click Start, point to Settings, and select Printer.
- Run Add Printer.
- The Add Printer Wizard screen will appear, Select My Computer and click Next.
-
Click Add Port.
-
From the Printer Ports box as shown in the following picture, select the LPR Port.

- The Add LPR compatible printers box will then appear as shown in the following picture. Type in the IP address assigned to the print server in the Name or address of server providing lpd box.

- In the Name of printer or print queue on that server box, type in a printer name, for example, Ip1. Click OK.
- In the Printer Ports box, select Close.
- Click Next.
- Select the appropriate printer manufacturer and printer type list and click Next.
- Select Shared. Type in a new Share Name or leave it in default and click Next.
- A message reading, "After your printer is installed, Windows can print a test page so you can confirm that the printer is set up properly." Select Yes (Recommended) and click Finish.
- Done.
Windows 2000/XP Standard TCP/IP Port Printing Installation
-
Click Start, point to Settings, and select Printer.
-
Run Add Printer, Click Next.
- The Add Printer Wizard screen will appear, Select Local Printer and click Next.
- From the type of Create a new port box as shown in the following picture, select the Standard TCP/IP Port, Click Next and Next.

- The Add Standard TCP/IP Printer Port Wizard box will then appear as shown the picture as below, and type in the IP address assigned to the print server in the Printer Name or IP Address box, Click Next.

- In the Add Standard TCP/IP Printer Port Wizard box as shown in the following picture, Select Custom, Click Settings button, and click Next.

- In the Configure Standard TCP/IP Port Monitor box as shown in the following picture, select LPR form Protocol, type in a queue name, for example, Ip1 for Port 1, Ip2 for Port 2 and Ip3 for Port 3.
- Click OK, and Next.

Note: Please DO NOT type any other name than lp1 or lp2 or lp3 in this step.
- Click Finish.
-
Select the appropriate printer manufacturer and printer type list and click Next.
-
Type in a new Printer name or leave it in default, and click Next button.
- A message reading, "To confirm that the printer is installed properly, you can print a test page". Select Yes (Recommended) and click Finish.
- Done.
UNIX Installation
After the IP address is assigned, the Print Server is ready to be configured. For some popular UNIX systems, SCO OpenServer and UnixWare, Sun Solaris, IBM AIX, and Linux, we include the detailed installation procedures below. If you can't find the installation procedure corresponding to your UNIX system, please refer to your UNIX manuals for details about configuring your UNIX for the "remote printing system".
SCO UNIX (OpenServer 5.0.x)
1. Login root
2. Type "arp -s "
The Print servers node ID can be found from the white label on the backside of the Print Server.
For example:
arp -s 192.72.214.103 00:40:01:05:01:8c
3. Type "ping < Print server's IP address>"
For example:
ping 192.72.214.103
(You should get the responses from the print Server).
4. Type "tftp < Print server's IP address>"
For example:
tftp 192.72.214.103
At the tftp prompt, type "get config.txt" to retrieve the Print Server's configuration file. For example:
tftp > get config.txt
-
Quit from tftp, and then use your editor to modify the "05 BoxIPAddress" field in the config.txt file from 0.0.0.0 to the IP address you specify in Step 2.
-
(Optional) Modify the "06 Gateway" field from 0.0.0.0 to your gateway's IP address.
-
(Optional) Modify the "07 SubnetMask" field from 0.0.0.0 to the subnet mask.
-
When done, save the new config.txt.
9. Type "tftp < Print server's IP address>"
At the tftp prompt, type "put config.txt" to save the new configuration file back to the Print Server.
For example:
tftp > put config.txt
10. Type "mkdev rlp"
After this step, the Remote Printer Configuration appears. Answer the questions as follows:
a. Do you want to install or remove printing (i/r/q) ? [q] : ----> i
b. Do you wish to change the printer description file /etc/printcap (y/n) [n] ? ----> y
c. Enter information for remote printers or local printers accepting remote printing requests
Please enter the printer name (q to quit): --->printer-1
You can enter a printer name you like in this option.
d. Is xxxx a remote printer or a local printer (r/l) ----> r
e. Please enter the name of the remote host that xxxx is attached to: ----> the Print server's IP address you specified in Step 2, for example, 192.72.214.103
Note: You can add the host name associated with the IP address in the /etc/hosts file. If you have done this, please use the host name instead of the IP address.
f. Printer xxxx is connected to host 192.72.214.103 Is this correct? (y/n) ----> y
g. After it shows some messages, it will ask you a question. If you're not sure, answer 'n'? (y/n) [n] ----> n
h. Would you like this to be the system default printer? (y/n) [n]---->answer this question if you like to make it as a default printer.
i. Do you want to install or remove printing (i/r/q)? [q] : ----> q j. Do you want to star remote daemon now (y/n) ----> y
- Done. Submit print jobs by using "lp" or "lpr" command. For example: lp -d printer-1 /etc/printcap
SUN Solaris 2.x
-
Login root
-
Type "arp -s
< Print server's node ID>"
The node ID can be found from the white label on the backside of the Print Server. For example:
arp -s 192.72.214.103 00:40:01:05:01:8c
- Type "ping < Print server's IP address>"
For example:
ping 192.72.214.103
(You should get the responses from the Print Server).
- Type "tftp < Print server's IP address>"
For example: tftp 192.72.214.103
At the tftp prompt, type "get config.txt" to get the Print Server's configuration file.
For example: tftp > get config.txt
- Quit from tftp, and then use your editor to modify the "05 BoxIPAddress" field in the config.txt file from 0.0.0.0 to the IP address you specify in Step 2.
- (Optional) Modify the "06 Gateway" field from 0.0.0.0 to your gateway's IP address.
- (Optional) Modify the "07 SubnetMask" field from 0.0.0.0 to the subnet mask.
- When done, save the new config.txt.
- Type "tftp < Print server's IP address>"
At the tftp prompt, type "put config.txt" to save the new configuration file back to the Print Server.
For example:
tftp > put config.txt
- Type "Ipsystem -tbsd
"
For example:
Ipsystem -tbsd 192.72.214.103
Note: You can add the host name associated with the IP address in the /etc/hosts file. If you have done this, please use the host name instead of the IP address.
- Type "Ipadmin -pprinter-1 -s
"
, where printer-1 represents the Print Server's parallel port. You can enter a printer name you like.
For example: Ipadmin -pprinter-1 -s192.72.214.103
-
Type "accept printer-1" For example: accept printer-1
-
Type "enable printer-1" For example: enable printer-1
-
Submit print jobs by "lpr" command. For example: lpr -Pprinter-1 /etc/hosts
IBM AIX 4.xx
-
Login root.
-
(Optional) Edit the /etc/hosts file. Add a line of the Print Server's host name and its associated IP address.
Note: Before this step, please make sure you have follow the directions on page 80 to manually assign an IP address to the Print Server.
- Under the prompt sign, type smit and press Enter.
- Select Device.
- Select Printer/Plotter.
- Select Printer Spooling.
- Select Add a Print Queue.
- Select Remote.
9. Select Standard Process.
- In the Queue Name option, type in a printer name. For example: printer-1
- In the Host Name option, type in the IP address of the Print Server.
Note: You can add the host name associated with the IP address in the /etc/hosts file. If you have done this, please use the host name instead of the IP address.
- In the Name of Queue on Remote Server option, type in a print queue name. For example: printer-1-q.
- Done.
Redhat Linux 9
The Print Server can work under any Linux-based systems, including Slackware, RedHat, etc, without any problems.
Basically, the Linux's printing system is based on BSD system. Although many commercial Linux systems are available in the market and their commands will vary slightly, depending upon which version is used, the functionality of the Linux-based variants is exactly the same. Following are the outlined procedures (recommended for all users) on Red Hat Linux 7.2/7.3 or later with X-Window system installed.
a. Make sure that the TCP/IP is well configured on your RedHat system, including network interface card's driver and IP-related settings say, IP address, subnet mask, and gateway IP).
b. Log in root.
c. Assign Print Server an IP address. At shell mode:
c.1. arp -s
c.2. Execute tftp < Print Server 's IP> get config.txt and quit tftp.
c.3. Edit the config.txt and modify the IP address, subnet mask, and gateway IP. When done, save the config.txt.
c.4. Execute tftp
d. Start X-windows by typing startx at the shell mode.
e. Open Printer Configuration.
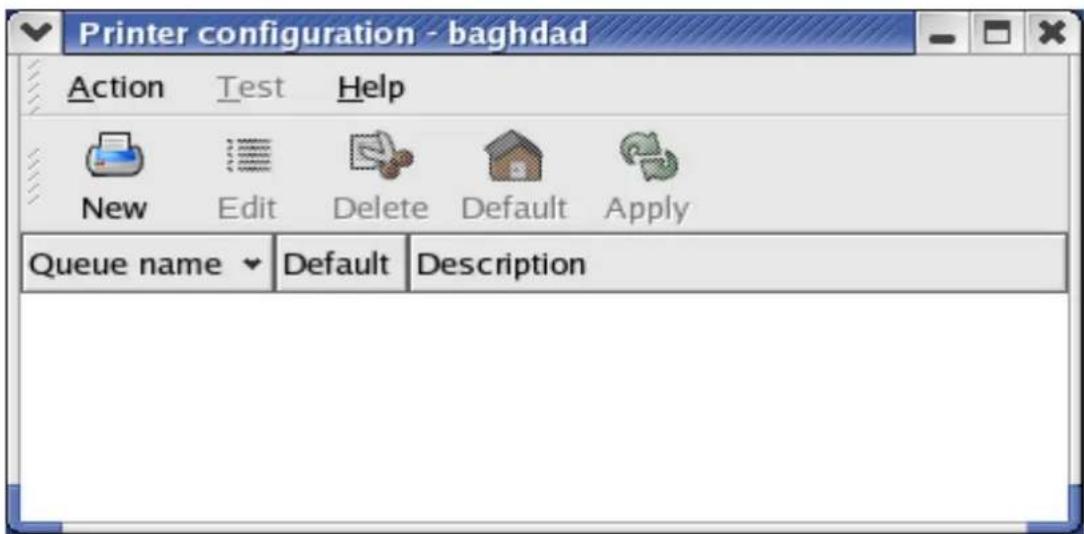
f. Click New button.

g. Click Forward button.

h. In the Name field, type a user-defined name, click Forward.
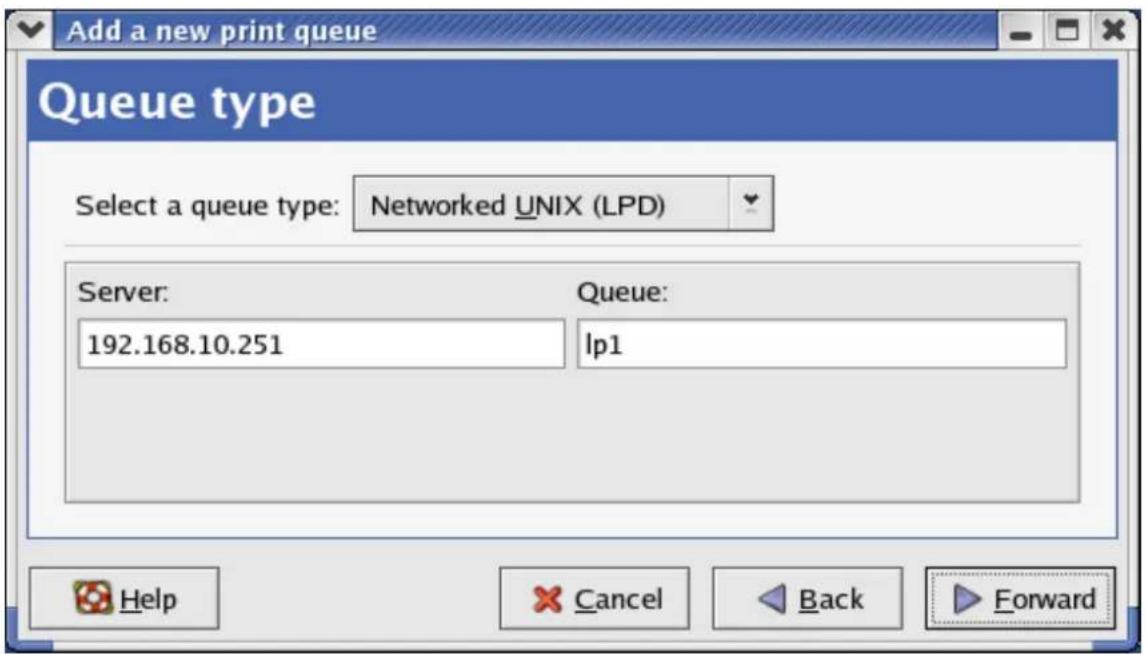
i. In the Queue Type field, choose Networked UNIX.
j. In the Server field, type the IP of print server
k. In the Queue field, type a print server's port name, which connect to the printer. For example: lp1.
I. Click Forward button.
m. In the Printer field, choose Postscript Printer.

n. Choose the model of printer and click Forward.
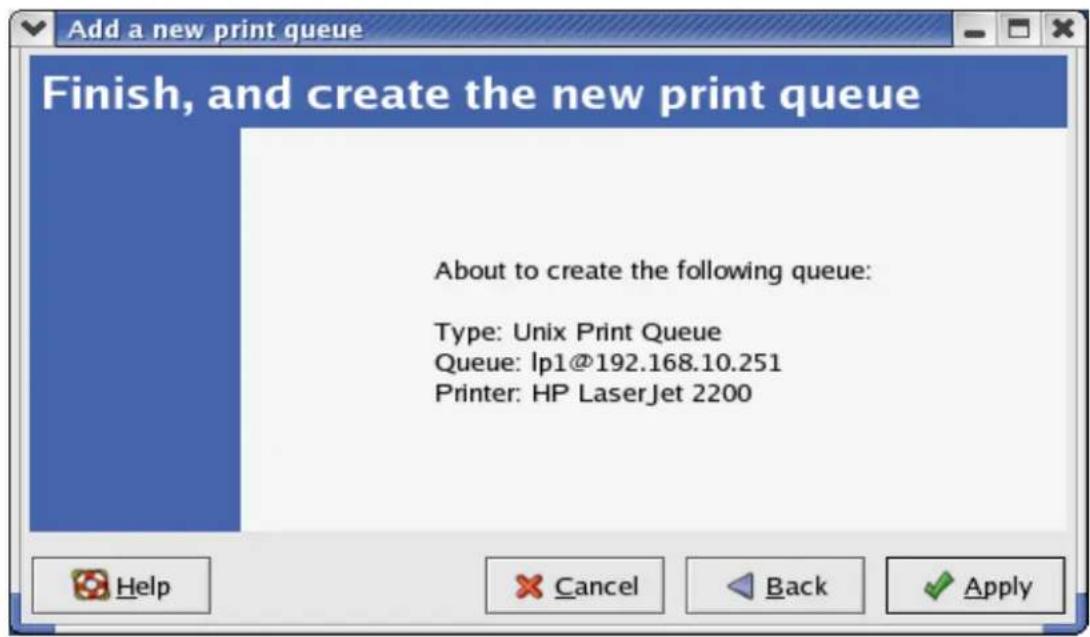
o. Done.
UnixWare 7
- Login root.
- Run CDE (Common Desktop Environment).
- Open the subpanel under the SCO icon in the Front Panel.
- Select SCO Admin.
- Select Print Setup Manager from System Administration window.
- Click LPD icon in the tool bar of Print Setup window.
- In Name field, type a name for the printer for identification purpose.
- In Protocol field, select lpd(BSD).
- Select your printer's make and model from the Make/Model list.
- In Printer Connection Type, select On Remote Server.
- It then appears a (new) Remote System option. Type the IP address of the print server.
- In Remote Printer field, type a name for the print server's print port. For example, Port1.
- When done, click OK button.
Now run Printer Manager, and you'll see an icon for the printer that is connected to the print server device.
8. Upgrading Print Server
Overview
Upgrading print server will allow you to replace its firmware inside the print server while the newer software version of the print server is available from your local dealer. Depending on the different systems users might use, this chapter is divided into several Sections; please refer to the following list for your systems.
- Upgrading the print server from PSAdmin
- Upgrading the print server from Windows NT/2000/XP
- Upgrading the print server from UNIX system
Note: 1. Before you proceed to upgrade the print server, please ensure that the necessary binary file is located in your current working directory.
- Before upgrading print server, please ensure print server is not printing jobs. In case of printing, you have to wait till the current print job is finished before you can proceed.
Upgrading the print server from PSAdmin
- Log into your NetWare file server as a Supervisor (Admin.) or equivalent.
- Ensure binary file is located in the PSAadmin directory.
- Run PSAdmin from your Windows PC.
- Click the Upgrade icon in tool bar.
Upgrading the print server from Windows NT/2000/XP (Through TCP/IP)
- Ensure binary file is located in your current working directory.
- At NT/2000/XP's DOS prompt, and type "tftp
get upgrade". - Type "tftp -i
put mpsXX.bin". -
Wait for the transfer successful message.
-
Done!
Upgrading the print server from UNIX (Through TCP/IP)
- Log in as root
- Type "tftp
". - At tftp prompt, type "get upgrade".
- Change to binary mode.
- At tftp prompt, type "put mpsXX.bin".
- Wait for the file transfer to complete.
- Quit from tftp.
-
Done.
-
Ensure binary file is located in your current working directory.
Upgrading the print server from Browser
- Ensure binary file is located in your current working directory.
- Enter the IP address of the print server as the URL.
- Click Misc, and then choose Upgrade From Browser, it then as shown in the following picture.

- Click Upgrade form Browser and select the firmware file.
- Click Upgrade.
- Done.
9. Troubleshooting
General Troubleshooting Overview
The most common problems, which cause the print server to perform improperly, are covered in this chapter. If a problem still exists after reading this chapter, please contact your dealer for technical support.
LED Light Indicators
The print server is equipped with LED to assist in diagnosing problems that are the result of the network and/or the print server hardware itself.
Status (Orange)
When the print server unit is powered on, the Status LED will flash five times as part of the unit's Power On Self Test (POST). This indicates that the print server hardware is properly configured. This LED, however, may flicker whenever the data are being transmitted and printed.
Note: Make sure that the Orange LED flashes five times (POST) upon connecting the power. If the unit does not flash five times, contact your dealer for a replacement or repair.
Flow/Link (Green: 100M; Orange: 10M)
If the network cabling is Twisted-Pair Cable, and when this light is ON, the Twisted-Pair cable connection is problem free.
Cable Related Problems
In most cases, the print server fails to send and receive network data due to incorrect use of the network cable and/or to connector problems. Twisted-Pair Cable is 10BaseT/100BaseT 8-wire Unshielded Twisted-Pair Cable. The pin assignments for the RJ-45 connector used for this cable must conform to the UTP cable specifications.
Power Related Problems
The print server requires an external AC power adapter in order for it to function. If you have a power problem, check to see whether the power cord or its connectors are damaged. More importantly, check to see that the AC power adapter included with the print server matches the AC voltage in your country or area. Using an incorrect AC adapter will damage your print server.
USB Port Related Problems
Printing data failure may be caused by a loose connection of the print server to the USB port of the printer. Check to see if the USB connectors are damaged. In addition, check the cable connection. If the connectors are damaged, contact your dealer for a replacement connector.
Windows 95/98/Me/NT/2000/XP Troubleshooting
Multi-Segment LAN Environment Installation (through the Network Print Port)
If your print server and Windows 95/98/Me/NT/2000/XP are located on two different segments, and your Windows NT server is used as the router/gateway you will need to implement the following procedures in order for your print server to function properly:
☐ Add the RIP for NWLink IPX/SPX compatible transport. See RIP for NWLink IPX/SPX compatible transport Installation Procedure later in this section.
☐ Add the frame type 802.2 for both Ethernet adapters. See Multi-Segment Frame Type 802.2 Installation later in this section.
RIP for NWLink IPX/SPX compatible transport Installation Procedure
- From your Windows NT server that is used as a router, select Start from the bottom left hand corner of the screen.
- Select Settings.
- Select Control Panel.
- Double-click the Network icon.
- Select Services.
- Select Add.
- In the Select Network Service box, select the RIP for NWLink IPX/SPX compatible transport. Click OK.
- Follows the directions on the screen.
- Done!
Multi-Segment Frame Type 802.2 Installation
- From your Windows NT server that is used as a router, select Start from the bottom left hand corner of the screen.
- Point to Settings, and select Control Panel.
- Double-click the Network icon.
- Select Protocols. Select the NWLink IPX/SPX Compatible Transport.
- Select Properties.
- Select your (first) network interface card and select Manual Frame Type Detection.
- Click Add.
- In the Frame Type field, select Ethernet 802.2.
- In the Network Number field, type in a unique 8-digit hexadecimal network number. For example: 12345ABC.
-
Select Add.
-
Repeat the Steps 8-12 for the other Ethernet adapter.
- Restart the computer.
- Done.
Moving the print server to A New Segment
If the print server is moved from one network segment to another after the initial installation, through the Network Print Port, the print server must be reconfigured on the original Windows NT server or on each Windows 95/98 computer using this print server in order for the print server's driver on each computer to re-establish a new connection.
Print Server Reconfiguration Procedure on Windows 95/98/Me
- Click Start on the bottom left hand corner of the screen.
- Select Settings and select Printers.
- Select your printer connected to the print server, and right-click the printer icon. Select Properties.
- Click Details tab.
- Click Port Settings as shown in the picture below. The print server will be displayed on the next print server's configuration screen.
Find your original print server according to its Port Name or other distinguished name and click this print server.
-
Click OK and it returns to the printer's Properties page.
-
Click OK.
-
Done!
Print server Reconfiguration Procedure on Windows NT
- Click Start on the bottom left hand corner of the screen.
- Select Settings and select Printers.
- Select your printer connected to the print server, and right-click the printer icon. Select Properties.
- Click Ports tab.
- Click Configure Port. The print server will be shown on the next screen.
- Find your original print server according to its Port Name or other distinguished name and click this print server.
- Click OK and it returns to the printer's Properties page.
- Click OK.
9. Done!
Moving Your Computer to A New Segment
If you are using the print server through the Network Print Port on your NT or Windows 95/98/Me computer and your computer is going to be moved onto another segment, you have to reconfigure the print server on your computer to use your print server. However, this situation is like moving the print server to a new segment. Please refer to the “Moving the print server to a new segment” section for more detailed reconfiguration instructions.
Novell NetWare Troubleshooting
Many printing problems can be traced back to incorrect or incomplete print server installations. It is always wise to check the installation configurations first.
In some cases, if necessary, delete the print server, print queue(s) or other setting(s). Next recreate the necessary parameters or reconfigure the print server by running the PSAmin.
TCP/IP Troubleshooting
When you are configuring a new print server on your NT/UNIX server through LPR Port printing under TCP/IP protocol, you might encounter the following problem in your initial installation steps:
"I can do the "arp" command. However, when I am going to ping or tftp the print server, it always shows Request timed out. I have checked the print server's power and it exactly passed the POST. Besides, the network cabling is OK. As such, I can't do tftp command to get and put the print server's configuration file and save its IP address permanently. I can't, therefore, continue installing the print server."
Regarding this problem, there are three possible causes:
A. The print server's Node ID you specified in the "arp" command is not correct.
If this is the case, please ensure the Node ID field in the corresponding entry of the print server's IP address in NT's ARP cache table is correct by typing the following command at NT's DOS prompt. "arp -a"
If the Node ID shown on the screen doesn't match the print server's Node ID, please follow the instructions below to reset the entry.
- At NT's DOS prompt, type "arp -d
" to delete the current entry. - Type "arp -s
" to specify a new ARP entry. - Refer to Chapter 7 for the detailed instructions to complete the installation.
B. The print server's IP address is duplicated or is as same as another computer's IP address on the network.
If this is the case, please consult your network administrator to obtain an unused IP address for your print server.
C. The print server is on one segment and your Windows NT server is on the other segment.
(This troubleshooting guide will also apply to a multiple-segmented network while installing the print server)
For example, assuming the print server is on Segment A, NT server is on Segment B, and there is a gateway computer between Segment A and Segment B. The network might be a complete TCP/IP network, or a hybrid of TCP/IP and IPX/SPX network.
If this is the case, you have to adopt the following steps, depending on which platform the gateway computer is.
a. If the gateway computer is a NT/UNIX server:
You have to do the same "arp" command to specify an entry on the NT/UNIX computer as a gateway in order for it to forward your subsequent "ping" or/and "tftp" commands to the print server.
b. If the gateway computer is a Novell NetWare file server:
- Due to the presence of this NetWare file server, the IPX/SPX protocol might be used on your network. Therefore, we strongly suggest you run the PSAdmin from any client computer and select "Manual Setup" to specify the print server's IP address (For more detailed information about Manual Setup, please refer to Chapter 3).
- If the solution described above is not applicable, you have to follow the instructions below to set up the print server's IP address.
For the purpose of explanation, we assume the NT server is on Segment A and its IP address is 192.72.214.66 (subnet mask: 255.255.255.224), the print server is going to be installed on Segment B, with IP address, for example, 192.72.214.100.
- Find an unused IP address on Segment A for temporary use in the following steps, for example, 192.72.214.68.
- Connect your print server to Segment A as a networked node.
- On your NT server, type, for example, "arp -s 192.72.214.68 00-40-01-3F-02-AB". Please note, in this arp command you have to type 192.72.214.68 on purpose. Do not type this IP address as 192.72.214.100.
- Type "tftp 192.722.214.68 get config.txt". The configuration file will then be retrieved and transferred to your NT server.
-
Type "edit config.txt" to modify this configuration file.
-
In your editor, modify "BoxIPAddress" field from "0.0.0.0" to "192.72.214.100". Leave other options as default and do not change their values. When done, save this new file and quit from your editor. Please note, in this step you must specify an IP address which is valid on Segment B, such as 192.72.214.100 in this example, rather than 192.72.214.68.
- Type, for example, "tftp 192.72.214.68 put config.txt" to save this new configuration back to print server.
- Move the print server back to the Segment B.
- Done!
Appendix:
Load Default Value
You can load the default value of print server by press the reset button.
Please press 5 to 10 seconds until the status LED flash and the default value is restored.
Or, you can load the default setting from the WEB management as following:

Frequently Asked Questions
Question A
Print jobs are sent to the print queue successfully, but fail to be sent to the printer.
Possible explanations
- The Print server Name/Print Queue configuration in PCONSOLE is incorrect.
- The Print server name specified and stored in the print server memory doesn't match the same one set in PCONSOLE.
- The network cable or power adapter connected to the print server is loose or disconnected.
- The printer is off-line, jammed or out of paper.
Solutions
- Check all the information in PCONSOLE.
- Check all the information of the print server by running PSAdmin.
- Check to see that if the network cabling and power adapter are properly connected.
- Recheck the print server connection by running the PSAdmin. It should read "Connected."
Question B
Print jobs start printing, but print very slowly or print unknown characters.
Possible explanation and solution
A printer driver is missing or is incompatible with that printer. Using a print driver that is not specific for the printer can cause printing errors. Install the proper printer driver. If these printer drivers are not available to you, please contact your printer manufacturer.
Question C
The upgrading process indication bar stops and does not seem to proceed again while upgrading the print server.
Possible Explanation
There might be a network problem. This causes the upgrading procedure to fail.
Solutions
- Check the network cabling, especially from the workstation running the PSAdmin to the print server unit.
- Run the PSAdmin and upgrade the print server again.
Question D
The Status LED light keeps blinking after POST.
Possible explanation and solution
The last upgrade process was not completed. The print server must be upgraded again by using the PSAmin. Please see Chapter 3 for details.
Question E
The PSAdmin reports "Create Print server Error", "Create Printer Error", or "Create Print Queue Error" while using Auto Setup.
Possible Explanation
The print server name, the printer name, or the print queue name you specified in the Auto Setup dialogue box contains a space.
Solution
Check to see if there is a space in the print server name, the printer name, or the queue name. Type in a new name without a space between two characters or replace a space by a dash (-) or an underscore (_).
Question F
The PSAdmin reports "Print server Already Exists", "Printer Already Exists", or "Print Queue Already Exists" after specifying the print server name, or the print queue name in Auto Setup.
Possible Explanation
A same print server name or queue names exist in the specific NetWare file server as the one you specified in the Auto Setup dialogue box.
Solution
Specify a new print server name or queue name in the Auto Setup.
Question G
The setup Wizard can't find print server.
Possible Explanation
The Personal Firewall installed in your computer blocks the connection.
Solution
Please disable the Personal Firewall or adjust the security level to lower.
Additional Installation Instructions
Panasonic KX-P6100/6300/6500
If you are using a Panasonic KX-P6100/6300/6500 laser printer with the print server through the Network Print Port under Windows 95/98, please redirect the printer named "Panasonic KX-P6100 PCL" or "Panasonic KX-P6300 PCL", or "Panasonic KX-P6500 PCL" to the print server through the Network Print Port.
DO NOT redirect the printer named "Panasonic KX-P6100 GDI", "Panasonic KX-P6300 GDI", or "Panasonic KX-P6500 GDI" to the print server.

- INTRODUCTION ....4
- PRINT SERVER INSTALLATION....6
- THE SETUP UTILITY FOR WINDOWS-BASED 7
- INTERNET PRINTER CONNECTION AND HP WEB JETADMIN 24
- TCP/IP LPR PORT PRINTING INSTALLATION 48
- UPGRADING PRINT SERVER....61
- TROUBLESHOOTING 64
- APPENDIX: 70
- Trademarks
- Copyright
- FCC Warning
- Introduction
- Product Overview
- Network Management
- Network configuration
- Components and Features
- 1-USB Port Print Server
- Before you start, you should prepare:
- Hardware Installation
- Follow these instructions to install the print server(s), please refer to any peripheral you are connecting to the print server:
- Print Server Installation
- Preparation
- Supported Networks
- Configuration Solution Table
- Comment
- The Setup Utility for Windows-based
- Installing the Setup Wizard
- Network Print Server Setup Wizard
- Welcome to the Network
- Print Server Setup Wizard
- Change Settings
- Help For Adding A New Printer
- Using PSAdmin
- Wizard
- TCP/IP Wizard
- NetWare Wizard
- Manual Setup
- Properties –TCP/IP Options
- Obtain an IP address from a DHCP server:
- Specify an IP address:
- Upgrade
- Reset
- Refresh
- Multiple Print Queues Configuration
- Uninstalling the PSAmin on Windows PC
- Procedure:
- Internet Printer Connection and HP Web JetAdmin
- IPP Overview
- Windows NT/2000/XP/2003
- HP Web JetAdmin Overview
- System Requirements
- Installing HP Web JetAdmin
- Confirming Installation and Supply Access
- Configuring and Modifying a Device
- Removing HP Web JetAdmin Utility
- Configuration from Embedded Web Server
- Overview
- Using Embedded Web Server
- Status Menu
- System Status
- Printer Status
- TCP/IP Status
- Netware Status:
- General Settings:
- NetWare NDS Setting:
- NetWare Bindery Setting:
- AppleTalk Status
- SNMP Status
- Setup Menu
- System Setup
- TCP/IP Status:
- NetWare Setup
- Installation Procedure
- AppleTalk Setup
- Setting Up a Macintosh Computer
- SNMP Setup
- Network Print Monitor
- TCP/IP
- IPX/SPX
- NetBEUI
- TCP/IP Protocol Installation
- IPX/SPX-compatible Protocol Installation
- NetBEUI Protocol Installation
- Done.
- Windows 95/98/Me/NT/2000/XP Installation Procedure
- Uninstalling Network Print Port on Windows 95/98/Me/NT/2000/XP
- TCP/IP LPR Port Printing Installation
- Basic TCP/IP Installation Overview
- Assigning an IP Address
- DHCP
- Windows NT LPR Port Printing Installation
- Windows 2000/XP Standard TCP/IP Port Printing Installation
- UNIX Installation
- SCO UNIX (OpenServer 5.0.x)
- Login root
- Type "arp -s
- Type "ping < Print server's IP address>"
- Type "tftp < Print server's IP address>"
- Type "tftp < Print server's IP address>"
- Type "mkdev rlp"
- SUN Solaris 2.x
- IBM AIX 4.xx
- Select Standard Process.
- Redhat Linux 9
- UnixWare 7
- Upgrading Print Server
- Upgrading the print server from PSAdmin
- Upgrading the print server from Windows NT/2000/XP (Through TCP/IP)
- Upgrading the print server from UNIX (Through TCP/IP)
- Upgrading the print server from Browser
- Troubleshooting
- General Troubleshooting Overview
- LED Light Indicators
- Status (Orange)
- Flow/Link (Green: 100M; Orange: 10M)
- Cable Related Problems
- Power Related Problems
- USB Port Related Problems
- Windows 95/98/Me/NT/2000/XP Troubleshooting
- RIP for NWLink IPX/SPX compatible transport Installation Procedure
- Multi-Segment Frame Type 802.2 Installation
- Moving the print server to A New Segment
- Print Server Reconfiguration Procedure on Windows 95/98/Me
- Print server Reconfiguration Procedure on Windows NT
- Done!
- Moving Your Computer to A New Segment
- Novell NetWare Troubleshooting
- TCP/IP Troubleshooting
- The print server's Node ID you specified in the "arp" command is not correct.
- Appendix:
- Load Default Value
- Frequently Asked Questions
- Question A
- Question B
- Question C
- Question D
- Question E
- Question F
- Question G
- Additional Installation Instructions
- Panasonic KX-P6100/6300/6500
Brand : Zonet
Model : ZPS1000
Category : Print Server