Zonet ZPS1002 - Print Server

ZPS1002 - Print Server Zonet - Free user manual and instructions

Find the device manual for free ZPS1002 Zonet in PDF.

📄 11 pages English EN Download 💬 AI Question 10 questions ⚙️ Specs
Notice Zonet ZPS1002 - page 2
Pick your language and provide your email: we'll send you a specifically translated version.
Product Type Print Server
Brand Zonet
Model ZPS1002
Dimensions (approx.) 120 x 80 x 30 mm
Weight (approx.) 200 g
Power Supply AC power adapter (included)
Network Interface Ethernet 10/100 Base-T
Printer Connection Parallel (LPT) or USB (via included cable)
Default IP Address 192.168.0.10
Subnet Mask 255.255.255.0
Setup Method CD-ROM with Setup Wizard
Supported OS Windows (based on provided content)
Installation Type Wizard-based or Manual
Hardware Installation Connect printer to print server, then to network via hub
Power On Self Test (POST) 10 seconds after power-on
Password Protection Optional (no default password)
Maintenance & Cleaning Keep device in a clean, dry place; avoid dust
Safety Use only supplied AC adapter; disconnect during storms
Spare Parts & Repairability Contact Zonet support for replacement parts
General Information Supports multiple printers via hub; FCC and CE certified

Frequently Asked Questions - ZPS1002 Zonet

How do I install the Zonet ZPS1002 print server?
Connect the printer to the print server using the supplied cable, then connect the print server to your network hub via Ethernet. Plug in the AC adapter and wait 10 seconds for POST. Insert the setup CD and run the Setup Wizard.
What is the default IP address of the ZPS1002?
The default IP address is 192.168.0.10 with subnet mask 255.255.255.0. It can be changed during setup if needed.
How do I add a printer that is not in the list during setup?
Select Add New Printer in the Setup Wizard. This will launch the Windows Add Printer Wizard, where you can manually select the printer driver from a disk or downloaded file.
Can I change the print server settings after installation?
Yes, you can run the Setup Wizard again and select Yes, I want to change settings. You may need to enter the password if one was set (default is blank).
Why isn't my print server detected by the Setup Wizard?
Ensure the print server is powered on and connected to the network. It may take a few minutes to initialize. Click Refresh in the wizard. Also verify your computer's IP address is on the same subnet (e.g., 192.168.0.x).
What type of printer connection does the ZPS1002 support?
It supports both parallel (LPT) and USB printers. The included cable connects to the printer; the wizard detects it via the print server's port (e.g., LPT:PS5CD1-1).
Do I need a hub to use the print server?
Yes, the print server connects to your network through a hub or switch. The computer(s) also connect to the same hub.
How do I verify that the print server is working?
After installation, go to Printers and Faxes, right-click your printer, select Properties > Ports and confirm the print server port (e.g., LPT:PS5CD1-1) is listed. Then click Print Test Page on the General tab.
Can I install multiple print servers?
Yes, run the Setup Wizard again from Start > All Programs > Network Print Server > PSWizard and repeat the installation for each additional print server.
What should I do if I forgot the print server password?
If no password was set, leave it blank. If a password was set and forgotten, you may need to reset the print server to factory defaults (consult the manual). Note: a brand-new print server has no default password.

User questions about ZPS1002 Zonet

0 question about this device. Answer the ones you know or ask your own.

Ask a new question about this device

The email remains private: it is only used to notify you if someone responds to your question.

No questions yet. Be the first to ask one.

Download the instructions for your Print Server in PDF format for free! Find your manual ZPS1002 - Zonet and take your electronic device back in hand. On this page are published all the documents necessary for the use of your device. ZPS1002 by Zonet.

USER MANUAL ZPS1002 Zonet

Before you start, you should prepare the following items:

● One Windows-based PC with print server setup CD
- One printer
- One printer cable
One HUB

Wired Network with Print Server:

Zonet ZPS1002 - Wired Network with Print Server: - 1

flowchart
graph TD
    A["Printer"] --> B["Print Server"]
    B --> C["HUB"]
    C --> D["Computer Computer Computer"]
    C --> E["Computer Computer"]
    C --> F["Computer"]

Hardware Installation:

  1. Turn off the printer's power.
  2. Connect the print server to your printer with the supplied printer cable.
  3. Turn the printer's power on.
  4. Plug the AC power adapter into the power connector on the print server.
  5. Wait 10 seconds as part of the print server's Power On Self Test (POST).

Software Installation:

  1. To enable network communication with print server, your computer must have a proper IP address, e.g. 192.168.0.100
  2. Insert the setup CD into your CD-drive, and the following message appears.

Network Print Server Setup Setup Wizard Manual Installation Documentation Exit Welcome to the Network Print Server CD ROM Browser. Select one of the options to continue.

  1. Choose Setup Wizard to install the print server and configure the connected printer.
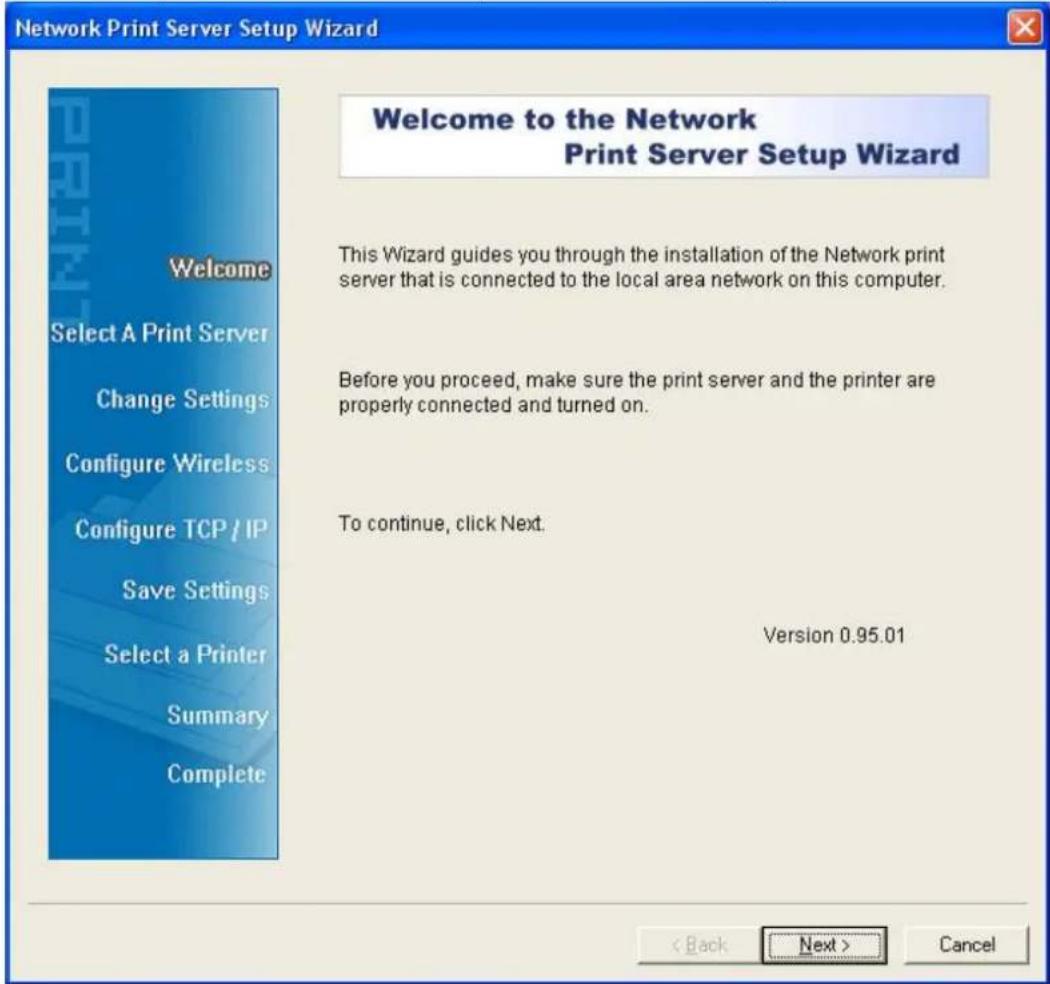
Network Print Server Setup Wizard Welcome to the Network Print Server Setup Wizard This Wizard guides you through the installation of the Network print server that is connected to the local area network on this computer. Before you proceed, make sure the print server and the printer are properly connected and turned on. To continue, click Next. Version 0.95.01 < Back Next > Cancel

  1. Click Next, the wizard will automatically discover the print server.
  2. From the Select A Print Server screen, select the print server that you want to configure and click Next.

Network Print Server Setup Wizard Select A Print Server This Wizard has found the following print servers on the network. Select a print server that you want to set up from the list. Detected print servers on your local network : Device Name IP Address MAC Address Port 1P_PrintServ525CD1 192.168.0.10 00:40:01:52:5C:D1 1 If the print server you want to set up is not displayed, check the connection and click Refresh. Refresh Note : If your print server has just been turned on, it may take a few minutes for the print server to initialize before it can be detected and displayed by the wizard. < Back Next > Cancel

6. On the Change Settings screen, select No or Yes:

Network Print Server Setup Wizard Welcome Select A Print Server Change Settings Configure Wireless Configure TCP / IP Save Settings Select a Printer Summary Complete Change Settings This Wizard allows the network administrator to change some basic settings of the print server. If you are not the network administrator, do not change settings. Wrong settings may cause the print server not to function properly. Yes, I want to change settings. Password : No, I don't want to change settings. To change settings, you must enter the password. A brand-new Network print server has no default password. If you are configuring a wireless print server and it's now operating in Diagnostic mode, you don't need to enter the password. < Back Next > Cancel

Click No if you want the print server to keep using the default IP address and keep the default settings, and then click Next.

● IP address: 192.168.0.10
- Subnet Mask: 255.255.255.0

Click Yes if you want change IP address to the print server, and then click Next.

Note:

The IP address of print server must be within the same subnet as your network adapter.

  1. On the Select A Printer screen, select an already configured printer from the list, click Next and then Finish to complete the installation.

or

Select Add New Printer if the print server is connected to a printer that hasn't been installed before and does not appear in the list.

Network Print Server Setup Wizard Select A Printer The Wizard now helps you set up the printer that is connected to the print server. You can either select a printer that has already been installed on this computer or add a new printer. Select a printer from the following list Add New Printer Printer Name Port Samsung ML-1750 Series LPT:PS5CD1-1 Canon S200SP FILE: Canon MP730 Printer USB001 Canon MP730 FAX USB(Canon MP730 ... To add a new printer, you need a printer installation CD/diskette or the driver file that you've downloaded from the Internet. < Back Next > Cancel

  1. Click Add New Printer to launch Windows Add Printer Wizard.

Add Printer Wizard Welcome to the Add Printer Wizard This wizard helps you install a printer or make printer connections. If you have a Plug and Play printer that connects through a USB port (or any other hot pluggable port, such as IEEE 1394, infrared, and so on), you do not need to use this wizard. Click Cancel to close the wizard, and then plug the printer's cable into your computer or point the printer toward your computer's infrared port, and turn the printer on. Windows will automatically install the printer for you. To continue, click Next. < Back Next > Cancel

  1. Click Next and select Local Printer, make sure the Automatically detect and install my Plug and Play printer check box is NOT checked. Then click Next.

Add Printer Wizard Local or Network Printer The wizard needs to know which type of printer to set up. Select the option that describes the printer you want to use: ○ Local printer attached to this computer □ Automatically detect and install my Plug and Play printer ○ A network printer, or a printer attached to another computer To set up a network printer that is not attached to a print server, use the "Local printer" option. < Back Next > Cancel

  1. Make sure the Use the following port radio-button is clicked and select LPT1: (Recommended Printer Port) from the pull-down list. Then click Next.

Add Printer Wizard Select a Printer Port Computers communicate with printers through ports. Select the port you want your printer to use. If the port is not listed, you can create a new port. Use the following port: LPT1: (Recommended Printer Port) Note: Most computers use the LPT1: port to communicate with a local printer. The connector for this port should look something like this: Create a new port: Type of port: Local Port < Back Next > Cancel

  1. Select Manufacturer and Printer from the lists of printer's driver. Then click Next.

Add Printer Wizard Install Printer Software The manufacturer and model determine which printer software to use. Select the manufacturer and model of your printer. If your printer came with an installation disk, click Have Disk. If your printer is not listed, consult your printer documentation for compatible printer software. Manufacturer Gestetner Hewlett-Packard HP IBM infotec Printers Hewlett-Packard HP-GL/2 Plotter HP 2000C HP 2500C Series HP 2500C Series PCL5Ce This driver is digitally signed. Tell me why driver signing is important Windows Update Have Disk... < Back Next > Cancel

  1. If you already have the printer's driver installed, you will be asked whether to keep it or to replace it. Click Next. Supply a name for the printer and choose whether you want to make it your default printer. Then click Next.

  2. Then, choose whether you want to share the printer with other network users, print a test page (please select No.), etc. Select the appropriate radio-button and click Next and Finish.

  3. In the setup wizard, finish the installation by highlighting the installed printer in the Select a Printer list and click Next -> Finish.

Network Print Server Setup Wizard Select A Printer The Wizard now helps you set up the printer that is connected to the print server. You can either select a printer that has already been installed on this computer or add a new printer. Select a printer from the following list Add New Printer Printer Name Port HP LaserJet 1200 Series PCL LPT1: Samsung ML-1750 Series LPT:PS5CD1-1 Canon S200SP FibE: Canon MP730 Printer USB001 Canon MP730 FAX USB(Canon MP730 ... To add a new printer, you need a printer installation CD/diskette or the driver file that you've downloaded from the Internet. < Back Next > Cancel

  1. From Windows system, go to start -> Printers and Faxes and highlight your newly installed printer.

Printers and Faxes File Edit View Favorites Tools Help Back Search Folders Address Printers and Faxes Go Printer Tasks See Also Other Places Details HP LaserJet 1200 Series PCL Documents: 0 Status: Ready Model: HP LaserJet 1200 Series PCL HP LaserJet 1200 Series PCL Samsung ML-17... Status: Ready Documents: 0

  1. Right-click, select Properties -> Ports and verify that the print server's port appears.

HP LaserJet 1200 Series PCL Properties General Sharing Ports Advanced Device Settings HP LaserJet 1200 Series PCL Print to the following port(s). Documents will print to the first free checked port. Port Description Printer COM3: Serial Port COM4: Serial Port FILE: Print to File USB001 Virtual printer port ... Samsung ML-1750 Series LPT:PS5401-1 192.168.0.10,PID:1 HP LaserJet 1200 Series Add Port... Delete Port Configure Port... Enable bidirectional support Enable printer pooling Close Cancel Apply

  1. Go to General; click Print Test Page to verify the configuration.

  2. Done.

Note:

If you wish to install more print servers, start setup wizard from your Windows Start menu: start -> All Programs -> Network Print Server -> PSWizard and repeat the installation procedure.

All contents are subject to change without prior notice.

FC CE

Manual assistant
Powered by Anthropic
Waiting for your message
Product information

Brand : Zonet

Model : ZPS1002

Category : Print Server