
CXCD400 - CD Player COBY - Free user manual and instructions
Find the device manual for free CXCD400 COBY in PDF.


| Product Type | CD Player with Cassette and Radio |
| Brand | Coby |
| Model | CXCD400 |
| AC Power Supply | AC 230V ~50Hz (or 110/220V ~60/50Hz optional) |
| DC Power Supply | DC 12V, 8 x D (UM-1/R-20) batteries |
| Power Consumption | 19 Watts |
| RMS Output Power | 2.2 Watts per channel |
| Peak Output Power | 50W total (4 Ω at 1 kHz, THD 10%) |
| Frequency Range (AM) | 530 - 1710 kHz |
| Frequency Range (FM) | 88 - 108 MHz |
| Frequency Range (SW) | 4 - 12 MHz (optional) |
| Cassette Playback | Two cassette compartments (Tape A playback only, Tape B playback/record) |
| Cassette Recording | From built-in radio or dubbing from Tape A |
| CD Playback | Play, pause, stop, forward/backward skip/search |
| Repeat Modes | Repeat 1, Repeat All |
| Program Play | Yes (program button present) |
| Dubbing Speed | Normal and High speed |
| Speaker System | Detachable left and right speakers |
| Headphone Jack | Stereo headphone jack (3.5mm assumed) |
| Antenna | Telescopic antenna for FM/SW; built-in AM antenna |
| FM Stereo Indicator | Indicates when receiving stereo FM broadcast |
| Auto Stop System | Stops tape at end |
| Maintenance | Clean tape heads with cleaning cassette or alcohol-soaked swab |
| Safety Warning | Do not expose to rain or moisture; no user serviceable parts |
Frequently Asked Questions - CXCD400 COBY
User questions about CXCD400 COBY
0 question about this device. Answer the ones you know or ask your own.
Ask a new question about this device
Download the instructions for your CD Player in PDF format for free! Find your manual CXCD400 - COBY and take your electronic device back in hand. On this page are published all the documents necessary for the use of your device. CXCD400 by COBY.
USER MANUAL CXCD400 COBY
natural_image
Line drawing of a multi-tiered electronic device with four speakers and a control panel (no text or symbols)LOCATION OF CONTROLS
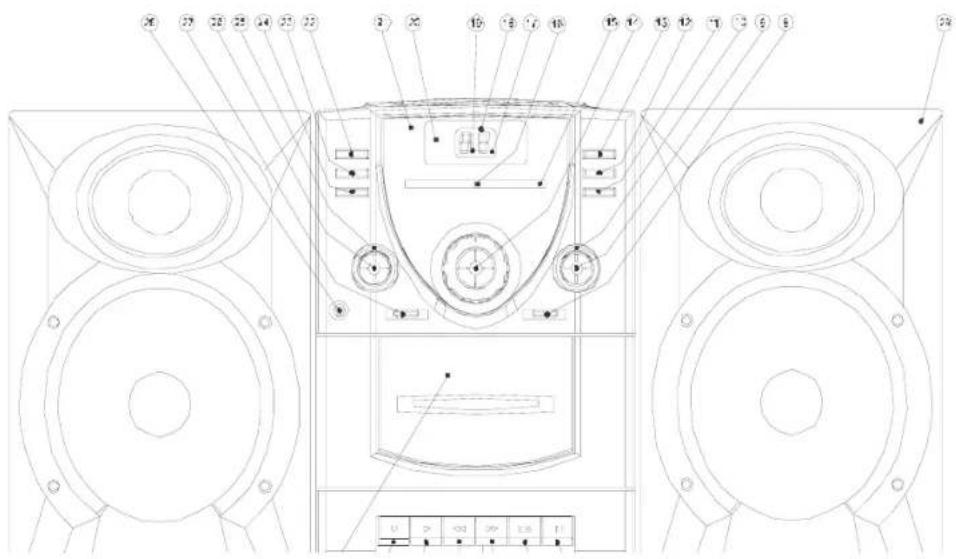
Front View
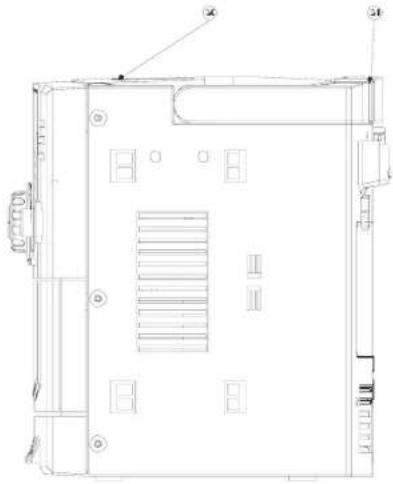
SideView
natural_image
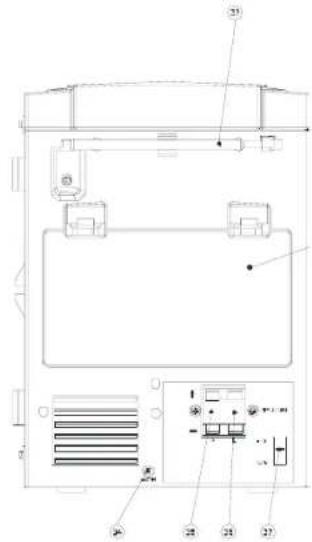
Architectural floor plan outline showing room layout and door placements (no text or labels)RearView
LOCATION OF CONTROLS (Cont.)
- PAUSE BUTTON
- STOP/EJECT BUTTON
- FAST FORWARD BUTTON
- REWIND BUTTON
- PLAY BUTTON
- RECORD BUTTON
- CASSETTE COMPARTMENT
- BAND SWITCH
- TUNING KNOB
- FM STEREO INDICATOR
- REPEAT BUTTON
- CD FORWARD SKIP/SEARCH BUTTON
- CD PLAY / PAUSE BUTTON
- VOLUME CONTROL
- RADIO DIAL SCALE
- DIAL POINTER
- PLAY/PAUSE INDICATOR
- LED DISPLAY
- REPEAT 1/ALL INDICATOR
- PROGRAM INDICATOR
- REMOTE SENSOR
- CD STOP BUTTON
- CD BACKWARD SKIP/SEARCH BUTTON
- PROGRAM BUTTON
- POWER INDICATOR
- POWER SWITCH
- FUNCTION SWITCH
- HEADPHONE JACK
- SPAEKER BOX
- CD OPEN/CLOSE CONTROL DOOR
- HANDLE
- ROD ANTENNA
- BATTERY COMPARTMENT
- AC POWER CORD
- AC/DC VOLTAGE SELECTOR
- SPEAKER JACK (RIGHT)
- SPEAKER JACK (LEFT)
- 110V/220V AC VOLTAGE SELECTOR
GENERAL OPERATION
POWER SOURCES Before connecting the Unit to an AC outlet, check that the operating voltage of the Unit is identical with the voltage of your local power supply. Connect the supplied AC power cord to the AC in jack.
BATTERY OPERATION Switch the AC/DC selector to DC position. Open the Battery Compartment Door and insert 8 UM-1 D size batteries, making sure that the indicated battery polarity is observed. Note: The AC cord must be completely disconnected if no AC/DC selector switch.
RADIO OPERATION Slide the Function Switch to the RADIO position. Slide the Band Switch, as you prefer. Turn the tuning knob to your desired radio station. Adjust the Volume Controls.
SPEAKER PLACEMENT This unit features a detachable speaker system. The left and right speaker enclosures can be detached from the main unit, and placed where desired. When the speakers enclosure are attached to the main unit, the unit can be carried to any location desired.
TO ATTACH THE SPEAKER ENCLOSURES
1 Attach the speaker enclosure to the main unit about halfway up, and slide the speaker enclosure to the locked position.
2 Extend the speaker wire to the desired length.
3 Insert the speaker wire plug into the SPEAKER JACK.
1 Remove the speaker wire plug from the SPEAKER JACK.
2 Push the RELEASE lever as illustrated and lift the speaker enclosure.
3 Wind the excess speaker wire onto the post, on the back of each speaker enclosure.
FM STEREO INDICATOR Slide Band Switch to FM position, The FM Stereo indicator is on if stereo broadcasts are received.
ANTENNAS Fully extend the Telescope Antenna to receive FM and SW (Option) stations. For AM reception the unit has a built-in antenna. Turn the whole unit for best reception.
STEREO HEADPHONE JACK For private listening, insert the plug of a Stereo Headphone into the Stereo Headphone JACK and adjust Volume Control Knobs, accordingly. During the use of headphone, the External Speakers are automatically disconnected.
CASSETTE OPERATION
Tape A playback only. Depress the Stop/Eject Button to open the cassette door, insert a cassette into the door and push the cassette door to close. Slide the Function Switch to the TAPE position. Depress the Play Button, Adjust the Volume Control Knobs, to the listening level. To stop the tape, depress the Stop/Eject button.
Tape B playback Depress the Stop/Eject Button to open the cassette door, Insert a cassette into the door and push the cassette door to close. Slide the Function Switch to the TAPE position. Depress the Play Button. Adjust the Volume Control Knobs to the listening level. To stop the tape, depress the Stop/Eject Button.
Fast Forward and Rewind The tape be fast advanced or rewind by depressing the Fast Forward button or Rewind Button respectively.
Pause Function During playback or recording, the tape can be stopped temporarily by depressing the pause Button. To release this button, press it again.
Auto Stop System When the tape runs to the end during playback or recording, the play button will release itself automatically, stopping the tape at the same time.
RECORDING
A. RECORDING FROM THE BUILT-IN RADIO
- Tune into the desired station.
- Load a cassette into the TAPE b cassette compartment
- Press the PAUSE button of TAPE B
- Press the RECORD button of TAPE B, which also engages the PLAY button.
- Press the PAUSE button again to begin recording.
B. DUBBING
Tape A Tape B Insert the tape to be copied into the Tape A Cassette Door. Insert the blank tape into the Tape B Cassette Door. Slide the Function switch to the Tape or Dubbing position. For 'NORMAL' or 'HIGH' speed dubbing. Depress Play Button of Tape A and both Record Button of Tape B at the same time. Signals from Tape A will be recorder/dubbed on to Tape B.
CD PLAYBACK
1 Slide the FUNCTION switch to CD position.
2 Press the CD Open/Close button to open the CD compartment.
3 Place a CD on the spindle, label side up.
4 Close the CD compartment. The total number of tracks will be displayed. If the compartment is not close or there is no disc, “- -” sign will be displayed.
5 Press the PLAY/PAUSE button to start playback from the first track and the track number displayed during playback. The 'Play/Pause LED Indicator' is light up.
TO INTERRUPT PLAYBACK
1 Press the PLAY/PAUSE button, and play back is interrupted. The 'Play/Pause LED Indicator' is flashing.
2 Press the button again to resume playback from the same point.
TO STOP PLAY BACK
Press the STOP button, then the total number of track will displayed again.
PRECAUTIONS
1 Do not open the CD compartment while the disc is rotating.
2 Keep foreign objects out of the CD compartment.
3 If TV or radio interference occurs during CD operation, move the unit away from the TV or RADIO.
4 Subjecting the unit to shock or vibration can cause mistracking.
5 Playing some compact discs at high volume can also cause mistracking. In this case, listen at lower volume.
6 Keep the CD compartment closed except when loading discs.
FF/FR FUNCTION
1 Press the FF button to fast forward the playing program
2 Press the FR button to fast backward the playing program
REPEAT PLAY
1 During PLAY mode, if REPEAT key is pressed. 'REPEAT 1' mode is engaged then the 'REPEAT LED Indicator' is flashing, and the current will be repeated continuously until 'STOP' or 'REPEAT' key is pressed.
2 If REPEAT key is pressed when 'REPEAT 1' mode is already engaged. 'REPEAT ALL' will engage then the 'REPEAT LED Indicator' is light up, and the disc will be played repeatedly until 'STOP' or 'REPEAT' key is pressed.
3 If REPEAT key is pressed when 'REPEAT ALL' mode is engaged, All REPEAT functions are off.
WARNING
- TO PREVENT FIRE OR SHOCK HAZARD.
- DO NOT EXPOSE THE APPLIANCE TO RAIN OR MOISTURE.
- DO NOT REMOVE COVER.
- PILOT LAMPS SOLDERED IN PLACE.
- NO USER SERVICEABLE PARTS INSIDE.
- REFER SERVICING TO QUALIFIED SERVICE PERSONEL.
MAINTENANCE
CLEANING THE TAPE HEADS Clean the heads frequently to remove dust and tape residue. Dirt on the heads will impair the sound quality of both recording and playback. There are two methods for head cleaning
A. The simple method is to use a head-cleaning cassette, available at most audio stores. Follow the instructions supplied with the closing cassette.
B. The heads can be also cleaned manually.
1 Depress the EJECT button of Tape A and Tape B in order to open the cassette.
2 Depress the PLAY button of Tape A and Tape B.
3 Wipe the heads with a soft not - free cloth or cotton swab that has
been partially soaked in alcohol, until the heads are free of all dirt and residue deposits.
SPECIFICATIONS
GENERAL
Power Supply : AC 230V \~ 50Hz AC 110/220V \~ 60/50Hz (Option) DC 12V
= 8 x "D" (UM-1/R-20) size batteries (not included)
Frequency Range: AM 530 - 1710 KHz FM 88 - 108
MHz SW 4 - 12 MHz (Option)
Power Consumption: 19 Watts
RMS Output: 2.2 Watts per channel
CX400 Peak Output Power: 50W total (4 Ω at 1 kHz, THD 10%)
Remarks: The manufacturer reserves the right to amend the specification without prior notice. Version: Rev. 2 (Toshiba IC)


Brand : COBY
Model : CXCD400
Category : CD Player