
CX-CD250 - CD Player COBY - Free user manual and instructions
Find the device manual for free CX-CD250 COBY in PDF.


| Product Type | Portable CD Player with Radio and Cassette Recorder |
| Brand | Coby |
| Model | CX-CD250 |
| Power Supply | AC 110/220V 60/50Hz 10W or DC 12V (8x D size batteries, not included) |
| Dimensions (W x H x D) | 16 1/4 x 8 1/4 x 5 3/4 inches |
| Weight | 8 lbs (without batteries) |
| Speakers | 3 inch wide range, 8 ohm |
| Output Power | 2 x 2W |
| CD Player Laser Wavelength | 760-800 nm |
| CD Tracking Method | 3-spot error detection, 3.86mm lens |
| Radio Frequency Bands | FM 88-108 MHz, AM 530-1600 kHz |
| Cassette Tape Type | Standard normal bias (Type I) |
| Cassette Frequency Response | 125-10,000 Hz |
| Headphone Jack | 3.5mm stereo, 32 ohms impedance |
| Remote Control | Includes buttons for Play, Stop, Rewind, Fast Forward, Repeat, Program, Random |
| CD Repeat Modes | Repeat one track, repeat all tracks |
| Recording Sources | Radio and CD to cassette tape |
| Automatic Level Control (ALC) | Yes, for cassette recording |
| Cleaning | Use a soft, clean cloth dampened with lukewarm water; avoid solvents |
| Safety Certification | PROP 65 Warning: handles lead-coated wires; wash hands after use |
Frequently Asked Questions - CX-CD250 COBY
User questions about CX-CD250 COBY
0 question about this device. Answer the ones you know or ask your own.
Ask a new question about this device
Download the instructions for your CD Player in PDF format for free! Find your manual CX-CD250 - COBY and take your electronic device back in hand. On this page are published all the documents necessary for the use of your device. CX-CD250 by COBY.
USER MANUAL CX-CD250 COBY
natural_image
Line drawing of a portable radio device with buttons and dials (no text or symbols)Please read instruction manual before use.
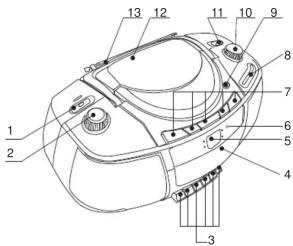
LOCATION OF CONTROLS
-
Function Selector
-
Volume Control
3.Cassette Operation Buttons
- Cassette Compartment
5.CD Display
6.Remote Sensor
7.CD Operation Buttons
8.Tuning Indicator Window
9.CD Compartment Open/Close Button
- Tuning Control
11.Band Selector
12.CD Compartment
13.Telescopic Antenna
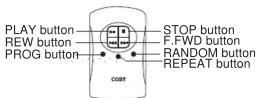
REMOTE CONTROL
IMPORTANT SAFEGUARDS
Always operate the product from a power supply of the same voltage, frequency and rating as indicated on the product identification plate.
Do not operate product with a damaged cord or plug. Never install the unit where there are heat sources such as radiators, heat registers, stoves, direct sunlight,
excessive dust or where there is mechanical vibration or shock. Switch off and unplug from AC outlet when not in use.
IMPORTANT
The CD mechanism and the sensitive circuitry may cause interference to a radio tuner nearby. Do not operate this unit while operating other radio devices
Danger This product utilizes invisible laser radiation. Avoid direct exposure to the beam.

Caution Use of controls, adjustments or procedures not listed in this manual may result in hazardous radiation exposure.
CONCERNING COMPACT DISCS
Only compact discs identified with this
mark can be used with this player.

CARE and MAINTENANCE
Handle your unit with care to extend the life of the unit. Use a soft and clean cloth damped with plain lukewarm water to clean the exterior of the unit.
Never use solvents such as benzene or other strong chemical cleaners since these could damage your unit.
It is important that no liquid reaches the inside of the unit.
Do not touch the CD laser part or look directly at it.
INTRODUCTION
Please read and follow the instruction manual carefully before operating in order to avoid any damage to the unit.
POWER SUPPLY
- By using AC power
Insert one end of the AC power cord into the AC socket on the rear of the unit and the other end into a standard wall socket.
- By using batteries
Insert 8x"D*size batteries (not included) in the battery compartment in the back of the unit by matching the polarities.
● The unit will not operate on battery power when
the AC power cord is plugged into the AC socket.
- Replace batteries when the power indicator dims, the volume decreases or the sound distorts.
● Use batteries of high quality and check them
regularly. Alkaline batteries are recommended.
- Do not mix new batteries with old or used batteries.
● Use only batteries of the same brand and type
- Batteries should not be left in the unit if they are exhausted or if the unit is not to be used for a long period of time as they may leak and damage the unit. Battery leakage is not covered under the warranty.
HEADPHONES (Not included) Repeat Mode
You can use headphones with 3.5mm diameter stereo plug and have impedance of 32ohms. When the headphones are connected, the speakers are disconnected automatically.
Set the VOLUME to a low level before using headphones and gradually adjust the Volume Control to the comfortable listening level.
Do not play the VOLUME too loud for extended periods of time to avoid any damage your hearing.
RADIO OPERATION
- Slide the Function Selector switch to radio.
- Select the desired AM or FM with the band switch.
- Tune the desired station by turning the Tuning Control.
- Adjust the volume with Volume Control as desired.
- Extend Telescopic Antenna and adjust the direction and angle to obtain the optimum reception.
- Set the Function Switch to Tape for power standby mode.
CD OPERATION
Set the FUNCTION Selector to the CD position and insert a CD.
- Play/Stop/Pause Mode
- Press PLAY/PAUSE button to play.
- Press PLAY/PAUSE button to pause while in play mode.
- Press PLAY/PAUSE button once more to resume play.
- Press STOP to stop play.
- Always press STOP and wait for complete stop to remove CD from CD player.
•
- Press Repeat button once to repeat current track. repeat light will flash.
- Press Repeat buton twice to repeat all tracks.
- Press Repeat buton again to cancel repeat track.repeat light will dim.
- Tracking Mode
-
To go back to beginning of current track, press once.
-
To go back to previous tracks, press repeatedly.
-
To go to next track, press once or repeatedly to play
your desired track.
- Remote control
You can also play with remote control, there are Play(■),Stop(■),REW(■),FF(■),Repeat one and all.PROGRAM,RANDOM buttons on the remote, you can operate the unit with corresponding button.
- Set the FUNCTION Selector to the TAPE (OFF) position.
- Press STOP/EJECT to open the tape deck door. Insert
a tape and close the door. - Press PLAY to start play, the tape will stop automatically at the end.
- Press to rewind or press to fast forward tape.
- Press STOP/EJECT to stop play.
- Press STOP/EJECT one more time to open the cassette door and take the tape out.
- Adjust the sound with the VOLUME control.
We recommend that you use only type1 (Normal Bias) cassette tape with your tape player.
This unit is equipped with ALC (Automatic Level control) circuitry that automatically sets the recording to the optimum level.
Adjusting the VOLUME control does not effect the recording.
We recommend that the unit be powered by AC (house current) when recording since this function uses the most power. We recommend that you use Type 1 (normal bias) cassette tapes only
●Recording from Radio
- Set the FUNCTION Selector to the RADIO position.
- Set the BAND Selector to AM or FM.
- Turn the TUNING Dial to tune in a radio station.
4.Open the cassette deck door and insert the blank tape. - Press PAUSE, then press RECORD, the PLAY key is automatically engaged with RECORD button.
- Release the PAUSE button to begin recording. You can use the PAUSE button to edit any unwanted commercials or programs during your recording.
- Recording will stop automatically at the end of the tape or press STOP to end the recording manually.
- Recording from CD
- Set the FUNCTION selector to the CD position.
- Insert a CD.
3.Open the cassette deck door and insert the blank tape. - Press RECORD and the PLAY key is automatically engaged.
-
Press the PLAY/PAUSE button on the CD player, the Play/Pause indicator will illuminate.
-
Press the STOP button to manually end recording or it will stop automatically at the end of recording.
SPECIFICATIONS
Power Source : AC 110/220V 60/50Hz 10W DC 12V (8x"D" size batteries)(not included)
Speakers : 3" Wide range, 8 ohm
Output Power : 2x2W
Dimensions : 5 3/4"x16 1/4"x8 1/4"(WHD)
Weight : 8 lbs (without batteries)
Tape Player/Recorder
Tape : Standard normal bias
Frequency Response : 125-10,000Hz
Radio
Frequency Response : FM 88-108MHz
AM 530-1600KHz
CD Player
Laser Wavelength : 760-800NM
Tracking Method : 3-spot error detection/3.86mm lens
PROP: 65 WARNING: Handling the coated electrical wires of this product exposes you to lead, a chemical known to the State of California to cause cancer, birth defects and other reproductive harm. Wash hands after use.


- LOCATION OF CONTROLS
- IMPORTANT SAFEGUARDS
- IMPORTANT
- CONCERNING COMPACT DISCS
- CARE and MAINTENANCE
- INTRODUCTION
- POWER SUPPLY
- HEADPHONES (Not included) Repeat Mode
- RADIO OPERATION
- CD OPERATION
- - Play/Stop/Pause Mode
- - Tracking Mode
- - Remote control
- ●Recording from Radio
- - Recording from CD
- SPECIFICATIONS
- Tape Player/Recorder
- Radio
- CD Player
Brand : COBY
Model : CX-CD250
Category : CD Player