ZWE-12176 - Dishwasher Mastercook - Free user manual and instructions
Find the device manual for free ZWE-12176 Mastercook in PDF.


| Product Type | Freestanding Dishwasher |
| Brand | Mastercook |
| Model | ZWE-12176 |
| Place Settings | 12 standard place settings |
| Dimensions (Approx.) | 60 x 60 x 85 cm (W x D x H) |
| Weight (Approx.) | 45 kg |
| Power Supply | 230 V ~ 50 Hz, 2100 W |
| Energy Efficiency Class | Not specified in manual (likely A+ or similar) |
| Water Consumption | 10 – 16.5 L per cycle (depending on program) |
| Noise Level | Not specified in manual (typical ~49 dB) |
| Wash Programs | Intensive 70°C, Normal 60°C, Eco 45°C, Quick 30' 45°C, Soak, etc. |
| Water Softener | Adjustable water softener with salt dispenser |
| Detergent Dispenser | Integrated dispenser for powder, liquid, or tablets |
| Rinse Aid Dispenser | Adjustable dosage (1-3) |
| Delay Start | 3, 6, 9, or 12 hours |
| Safety Features | Child lock, anti-overflow, anti-leak system |
| Filter System | Three-stage filtration (waste filter, main filter, micro filter) |
| Interior Light | Not specified |
| Basket Features | Height-adjustable upper basket, folding spikes in lower basket, cutlery basket with movable grills |
| Spare Parts Availability | Original spare parts available through after-sales service |
| Country of Origin | France |
Frequently Asked Questions - ZWE-12176 Mastercook
User questions about ZWE-12176 Mastercook
0 question about this device. Answer the ones you know or ask your own.
Ask a new question about this device
Download the instructions for your Dishwasher in PDF format for free! Find your manual ZWE-12176 - Mastercook and take your electronic device back in hand. On this page are published all the documents necessary for the use of your device. ZWE-12176 by Mastercook.
USER MANUAL ZWE-12176 Mastercook
natural_image
Simple line drawing of a faucet pouring liquid into a bucket (no text or symbols)
natural_image
Simple line drawing of a pipette stirring liquid in a glass (no text or symbols)
natural_image
Illustration of a hand using a tool to interact with a strip of squares and droplets (no text or symbols)• TABELA TWARDOŚCI
natural_image
Line drawing of a hand holding a coin next to a metal rack (no text or symbols)
natural_image
Line drawing of a train with a speedometer and overhead structure (no text or symbols)
Ważne :
natural_image
Line drawing of a cleaning rack with multiple compartments and a handle (no text or symbols)
Wskazówka :
natural_image
Line drawing of a kitchen appliance rack with multiple dish units and a drawer (no text or symbols)
natural_image
Line drawing of two woven basket designs, one with handle and patterned side panel, the other with handle and tray (no text or symbols)
Ważne :
natural_image
Illustration of a hand holding a small object with a circular symbol labeled 'A' below (no text or symbols on the object itself)
natural_image
Illustration of a hand holding a tool with a circular component and a labeled point B (no text or symbols on the object itself)
natural_image
Illustration of a hand holding a small object with a circular symbol below (no text or labels)rys. 16

Ważne :
rys. 17
Mastercook
Dear Customer,
You have just acquired a Mastercook dishwasher and we would like to thank you.
We have invested all our dedication and know-how in this appliance so that it would best meet your needs. With innovation and performance, we designed it to be always easy to use.
In the Mastercook product range, you will also find a wide choice of ovens, microwaves, cooking hobs, ventilation hoods, cookers, washing machines, driers, fridges and freezers, that you can coordinate with your new Mastercook dishwasher.
Visit our website www.mastercook.pl where you will find all of our products, as well as useful and complementary information.
Mastercook
As part of our commitment to constantly improving our products, we reserve the right to make changes to them based on technical advances to their technical and functional features and appearance.

Warning :
Before installing and using your appliance, please carefully read this Guide to Installation and Use, which will allow you to quickly familiarise yourself with its operation.
www.mastercook.pl

1 / FOR THE USER'S ATTENTION
- Safety instructions ____ 4
• Environmental protection ____ 5 - Economical, environmentally friendly washing ____ 5
2 / DESCRIPTION OF YOUR APPLIANCE
- General presentation of the dishwasher 6
- Control panel ____ 7
3 / INFORMATION
- The water hardness 8
4 / WHAT TO DO BEFORE FIRST USING THE MACHINE
- Measure the water hardness and select the type of detergent _ 9
- Hardness table 9
5 / WATER SOFTENER ADJUSTMENTS 10
6 / YOUR DISHWASHER'S SAFETY SYSTEMS ____ 11
7 / LOADING THE DETERGENT PRODUCTS 12
8 / LOADING THE REGENERATING SALT 13
9 / LOADING THE RINSING PRODUCT 14
10 / YOUR DISHWASHER'S EQUIPMENT
- The lower basket ____ 15
- The upper basket ____ 16
• The cutlery basket ____ 17
11 / WASHING PROGRAMMES 18
12 / PROGRAMMING 20
13 / CLEANING YOUR APPLIANCE
- Cleaning the waste filters 22
- Extended period of non use or house relocation 23
14 / IF OPERATING ABNORMALITIES OCCUR ____ 24
15 / AFTER-SALES SERVICE 29
16 / INDICATIONS FOR THE TESTING LABORATORIES
See end of booklet (page 30)

Important :
Keep this user's manual with your appliance. If the appliance is sold or transferred to someone else, ensure that the manual is with it. Please take note of these instructions before installing and using your appliance. They have been drawn up for your own and other people's safety.
• SAFETY INSTRUCTIONS
- Installation
- When you receive your appliance, unpack it or have it unpacked immediately. Check that it has not suffered any damage during transport. Express any reservations in writing on the delivery note, of which you keep a copy. Never connect up a damaged machine. If your appliance is damaged, please contact your dealer.
- Before proceeding to connect up your machine, please refer to the instructions in your Installation Guide.
- Your dishwasher must be kept disconnected from the mains supply throughout the whole of the installation process.
– The electrical connection details on your appliance's description plate must comply with those for the mains supply. - The socket must still be accessible once your appliance has been installed.
- Do not alter or attempt to alter the appliance's characteristics. This could put you at risk.
- If your installation has to be altered, only entrust the electrical and plumbing work to a qualified electrician or plumber respectively.
- Your appliance is designed for normal domestic use. Do not use it for industrial or commercial purposes or for any other purpose than that for which it has been designed.
-
Your appliance is designed to be used for household and similar applications such as:
-
staff kitchenettes in shops, offices and other professional environments,
- farmhouses,
- use by guests at hotels, motels and other residential-type facilities,
• bed and breakfast type facilities. - The dishwasher's walls must not be pierced under any circumstances.
- Children's safety
- This appliance is not intended for use by young children or infirm persons unless they have been adequately supervised by a responsible person to ensure that they can use the appliance safely.
- This appliance must only be used by adults. Ensure that children do not touch it and do not use it as a toy. Ensure that they do not operate the appliance's controls.
- Keep young children away from the appliance when it is operating.
– Detergents contain irritant and abrasive substances. These products can have caustic effects on the eyes, the mouth or the throat. They can be extremely dangerous if ingested. Avoid any contact with the skin and the eyes. Ensure that the appliance's detergent container is empty at the end of the washing cycle. - Place detergents out of children's reach and do not put any detergent in the machine until just before you start the washing programme.
- The water in your dishwasher is not drinking water; this is why children must not go near the appliance when its door is open.
- Do not allow children to play with or sit on the door when it is open, as the dishwasher could overturn.
- Once you have unpacked your appliance, place the packaging out of children's reach.
- Keep all the packaging materials (e.g. plastic bags, polystyrene, etc.) out of children's reach because they can be dangerous for children (ie. risk of suffocation).
- Use
- This appliance is not intended for use by persons (including children) with reduced physical, sensory or mental capabilities, or lack of experience and knowledge, unless they have been given supervision or instruction concerning use of the appliance by a person responsible for their safety.
- When machine is running, do not open door. This may provoke steam leakage or splattering of water.
- Only use products specially designed for your dishwasher (water softening salt, detergent and rinsing products).
- As far as possible, avoid opening the dishwasher's door when it is operating, and in particular during the heating phases, because scalding steam may escape or you may be splashed with hot water. The machine is fitted with a safety system that immediately blocks the dishwasher's operation if the door is opened.
– Never use chemical solvents in your appliance because these could cause an explosion.
- Always close your appliance's door after loading or removing your items.
- Do not lean or sit on your appliance's door when it is open.
– Unplug your machine before carrying out any technical work on it.
- Avoid placing your machine immediately next to a cooking or heating appliance to prevent any risk of heat damage;
- Do not place any items in your machine, which are not certified as dishwasher safe.
- If you have removed an item before the end of the washing programme, it is important to rinse it carefully to remove any residual washing products.
- If your appliance breaks down, never attempt to repair it yourself. Any repairs made by non-qualified personnel can cause significant damage or lack of control.
– The machine complies with applicable safety regulations. Any repairs should be carried out by qualified technicians. Repairs or changes that do not conform may be dangerous for the users. In case of replacement, only use original parts.
- If the machine malfunctions due to other causes than those mentioned in this booklet, disconnect the machine (remove the plug) or break the circuit concerned and contact after-sales service.
• ENVIRONMENTAL PROTECTION
This appliance's packaging material is recyclable. Help recycle it and protect the environment by dropping it off in the municipal receptacles provided for this purpose.

Your appliance also contains a great amount of recyclable material. It is marked with this label to indicate that in countries that are a members of the European Union the used appliances should not be mixed with other waste. This way, the appliance recycling organised by your manufacturer will be done under the best possible conditions, in compliance with European Directive 2002/96/EC on Waste Electrical and Electronic Equipment. Contact your town hall or your retailer for the used appliance collection points
closest to your home.
We thank you doing your part to protect the environment.
• ECONOMICAL, ENVIRONMENTALLY FRIENDLY WASHING
- Remove any food residue from your crockery (bones, pips, etc.)
- Do not pre-wash your items by hand (useless waste of water).
- Utilise your dishwasher's capabilities to the full for an economical, environmentally friendly wash.
- Always select a washing programme suitable for the crockery type and how dirty they are.
- Avoid overdosing with detergent, regenerating salt and rinsing liquid. Follow the recommendations in this guide (pages 8-14) and the instructions on the product packs.
- Ensure that the water softener is correctly set (see page 10).
• GENERAL PRESENTATION OF THE DISHWASHER

A Upper basket
B Wash product dispenser
© Anti-block guide wire
D Cutlery basket
E Lower basket
F Lower sprinkler arm
G Salt compartment
H Waste filter
1 Main filter
J Rinse aid dispenser
K Reference plate (Ref. S.A.V.)
Control panel

Advice :
This user's guide is applicable to several models. There may be some slight differences in the details and the equipment between your appliance and the descriptions provided here.
• CONTROL PANEL (Some models only)
![Mastercook Intensywn 70°C Normality 60°C OPTI® 50° Codstenny 55°C Eco 45°C Seybid 30° 45°C Stop A B Press [Km] Sh Sh 12h Sh Optimely 300 Sh shs Fig. 02a](/content/2026/05/920813/images/56b1f779986a2abced13d374b7b07cd54c1d1c949917d84b2f07294a08fbd329.jpg)
A Programme selector (3 functions):
- Choosing a programme : Turn the selector to make your programme choice.
- Opcje : Turn the selector to the "Opcje" position to access the softener settings.(see page 10)
- Stop: Turn the selector to the "Stop" position when the programme has finished.
B Set, Delayed start :
Changing the settings (see page 10). Adjusting the time delay (see page 20).
© Start/Pauza :
Press this button to start up the programme. In case of error, hold down this button for a few seconds to cancel a selection or a programme that is already running.
D Pilot lights :
Salt :
On : indicates the salt compartment is empty or almost empty.
※ Rinse aid :
On : indicates the rinse aid compartment is empty or almost empty.
Multi-function products :
On : this indicates the "4/1" function is activated (see page 10). The programmes are automatically adapted to multi-function products.
Praca :
On : indicates the programme is running.
Koniec :
On : indicates the programme has finished.

Important :
For your dishwasher to provide excellent washing and drying results and leave no marks, you must correctly adjust it using the water softening system, which works with dishwasher salt.
- Scale, when rainwater filters into the soil, it takes in mineral salts, some of which are found in solid form and are commonly referred to as scale. Scale in the water reduces the detergent's washing efficiency, causes deposits to form on the dishwasher itself and leaves white marks on the dishes.
The more scale there is in the water, the "harder" the water is.
You should use products suited to the water hardness in your particular area.
- There are so many different types of product. How can I choose the best one?
For impeccably clean dishes, you should use a combination of classic products :
① Wash product for perfectly clean dishes (powder or liquid detergent or standard tablets).
② Dishwasher salt for correct functioning of your dishwasher's water softener.
③ Rinse aid to help the dishes dry and eliminate drop marks.

Important :
Never use normal washing-up liquid.
For ease of use and in certain water hardness conditions only (< 25°F), multi-purpose products can make the use of regenerating salt and rinsing liquid unnecessary.
- “Two-in-one” tablets contain detergents and rinsing liquid or an agent serving the function of the salt.
- “Three-in-one” tablets contain detergents and rinsing liquid as well as an agent serving the function of the salt.
- “Four-in-one” “Five-in-one” tablets... also contain additives to prevent “wear” to glasses (i.e. to stop them clouding), risk of corrosion and discolouring of stainless steel.

Important :
Follow the instructions in the user's manual and the recommendations on the multi-purpose detergent's pack.

NB :
If in any doubt, please contact the detergent's manufacturer if the items are very wet at the end of the programme or if chalky deposits appear.
• MEASURE THE WATER HARDNESS AND SELECT THE TYPE OF DETERGENT: TRADITIONAL OR MULTI-PURPOSE
In one simple action, you can test the your water's lime content using the testing strip supplied with your dishwasher. Alternatively, contact your local water utility to ascertain your water's hardness.
- Let the water run from the tap for a few moments.
- Fill a glass with water.
- Take the test strip from its holder and immerse it for 3 seconds.
- Wait 1 minute, shake it and look at the colours to ascertain your water's hardness.

natural_image
Simple line drawing of a faucet pouring liquid into a bucket (no text or symbols)
natural_image
Illustration of a pipette stirring liquid in a glass (no text or symbols)
natural_image
Illustration of a hand holding a ruler with a droplet falling (no text or symbols)- HARDNESS TABLE
![Test strip Hardness 0-10°F 0-1mmol/l 0 - 5,6 °dH 10-18°F 1-1,8mmol/l 5,6 - 10 °dH 18-25°F 1,8-2,5mmol/l 10 - 14 °dH 25-40°F 2,5-4mmol/l 14 - 22,4 °dH 40-55°F 4-5,5mmol/l 22,4 - 30,8 °dH 55-70°F 5,5-7,0mmol/l 30,8 - 39,2 °dH > 70°F > 7,0mmol/l > 39,2 °dH Water Soft Slightly hard Slightly hard Hard Hard Hard Very hard Water softening and use of salt Optional Essential if using traditional products Essential if using traditional products Mandatory Mandatory Mandatory Mandatory Possible use of traditional products ① ① [P or or] + S + R or multi-function products ② Use only of traditional products ① [P or L or ] + S + R](/content/2026/05/920813/images/36a54835569d57b402722e4cda2f0797db90e189ffc7c21679e47166d573c66b.jpg)
1 Traditional products: P: Powder detergent or L: Liquid detergent or single tablet
+ S : Regenerating Salt + R : Rinsing product
② Multi-function products : Multi-function tablets

It is essential to correctly adjust the water softener according to the hardness of the water in your area.
-If the adjustment is too low, scale may be left on the dishes.
-If the adjustment is too high, there is a risk of glasses becoming cloudy.
If you move house, adjust the water softener again.
- Proceed as follows to adjust the water softener to the control table :
- Turn the selector to the "Opcje" position. The steady lights show the setting 3h, 6h, 9h, 12h, "Praca", "Koniec", " [icon]".
- Press the button, The lights displays the setting (Factory setting: 3h, 9h, 12h lights lit).
- To modify this setting (depending on water hardness), proceed by successively pressing the button. Each press changes the setting. Refer to the table below.
- The setting is automatically validated when you exit "Opcje", namely, when the selector is in the programme or "Stop" position.
- To use multi-purpose tablets, you must select setting depending on the water hardness < a25^ (2,5 mmol/l): light constantly lit.
| Test strip | □□□□□ | ■□□□□ | ■■□□□ | ■■□□□ | ■■□□□ | ■■□□□ | ■■□□□ |
| Hardness | 0-10°F0-1mmol/l0 - 5,6 °dH | 10-18°F1-1,8mmol/l5,6 - 10 °dH | 18-25°F1,8-2,5mmol/l10 - 14 °dH | 25-40°F2,5-4mmol/l14 - 22,4 °dH | 40-55°F4-5,5mmol/l22,4 - 30,8 °dH | 55-70°F5,5-7,0mmol/l30,8 - 39,2 °dH | >70°F>7,0mmol/l>39,2 °dH |
| Traditional products |  |  |  | 1:2h 9h | 3h1:2h 9h | 3h 6h1:2h 9h | Praca3h 6h1:2h 9h |
| Multi-purpose products | Light steady : 12hLight unlit or flashing : 12h | ||||||
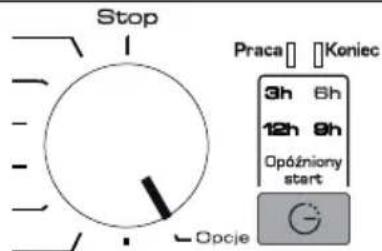
The multi-purpose products 1-10°F, 0-1 mmol/l, setting enables you to de-activate the salt product warning light.
• Door not properly closed
The light "Praca" flashes when the door is not closzed or not closed properly.
• Programme access block
While a dishwasher programme is running, the buttons are automatically blocked to prevent them from being pressed accidentally. The dishwasher will automatically unblock at the end of the programme or you can cancel by holding down the button for few seconds.
• Anti-overflow safety system
This system automatically activates the drain pump if the water level in the tank is exceptionally high.
• Anti-leak safety system
This system cuts off the water supply if any leakage is detected under the appliance.
- Error display
The "Koniec" light flashes rapidly.
Please refer to the table on page 24.

Observation :
After rectifying the error, hold down the button for few seconds to unblock access..
- Loading the detergent products. (Fig. 03-04-05)
To make loading the detergent easier, the distributor is located on the front of the upper basket. It is compatible with all the products recommended for your dishwasher.
• Powders or liquids (Fig 03)
– Pull out the dispenser drawer
- Fill at least up to the minimum mark for slightly dirty crockery and to the maximum mark for dirty crockery. If the crockery is very dirty and for programmes with a pre-wash we recommend that you add 5g of detergent (a dessert spoonful) into your dishwasher's tub in accordance with the programmes table.
- Close the distributor.
- "Multi-purpose" or Traditional tablets (Fig 04 and 05)
- Place the tablet in the external compartment (Fig 04).
or, for optimum operation,
- pull out the distributor's drawer and lay the tablet there. (Fig 05).
- Close the distributor.

natural_image
Line drawing of a hand pouring liquid into a metal rack (no text or symbols)
natural_image
Line drawing of a hand holding a coin next to a metal rack (no text or symbols)
natural_image
Technical line drawing of a mechanical assembly with no visible text or symbols
Important :
Keep these products out of the reach of children and away from damp (the protective film on the tablets might be water-soluble).
Only use products specially designed for dishwashers.
- Loading the regenerating salt. (Fig. 06)

Important :
Use special salt for dishwashers. Never use table salt or cooking salt as this could damage the appliance.
A Unscrew and remove the compartment cap.
B Fill the compartment with special dishwasher salt. Use the funnel supplied with the dishwasher.
Firmly screw the cap back on.
C The first time you fill the compartment with salt, fill it up to the top with water.
- Determining the regenerating salt level:
This pilot light comes on when the salt needs refilling. After refilling the light may remain on until the salt has dissolved. This normally happens after a cycle has been run, or if the salt fill is not complete.
This can be deactivated as indicated in the page 10.


Important :
If the salt overflows from the dispenser, remove the excess salt crystals to prevent risk of the tank rusting and run a Soak programme or, failing this, a short programme (see page 18-19) with no load in the dishwasher.
Firmly screw the compartment cap back on.
- Loading the rinsing product (Fig. 07)

Important :
Use a special dishwasher rinse aid product to improve drying and prevent filming.
A Unscrew and remove the compartment cap.
B Before starting up the dishwasher, fill the compartment with rinse aid up to the adjustment lever.
Firmly screw the cap back on.

The default adjustment is 2.
If drying is inefficient or marks are left the glasses (after having run several cycles), you may increase the dosage by setting the adjustment to 3;

Tip :
Setting the adjustment to 1 reduces rinse aid consumption and may be sufficient for your needs.
- Determining the rinse aid product level:
This pilot light comes on when rinse aid needs to be added.


Important :
If the rinse aid overflows onto the door on refilling, sponge off the excess to prevent foam from forming.
Washing capacity : 12 standard place settings

Very important :
Items not suitable for washing in a dishwasher
- Wooden cutting boards,
- Stainless steel utensils or plastic utensils that are not heat-resistant,
- Copper or pewter items,
- Glued crockery and cutlery,
- Cutlery with wooden, horn or mother-of-pearl handles,
- Antique or hand-painted porcelain.
When purchasing crockery, glasses or cutlery, ensure that it is dishwasher-safe.
• THE LOWER BASKET
Arrange your items so that the water can circulate freely and spray over all the utensils. Place large diameter dishes and pans at the sides.
Do not intersperse, jam together or superimpose flat plates and concave dishes (Fig. 08).
The folding spikes make it easier to arrange your large dishes (Fig. 09) (depending on the model).

Advice :
When you re-insert the lower basket, ensure that nothing catches on the upper basket's gauge wire to avoid blocking the rotor.
Unloading your items.
First of all empty the lower basket to avoid drips from the upper basket falling onto the lower basket.
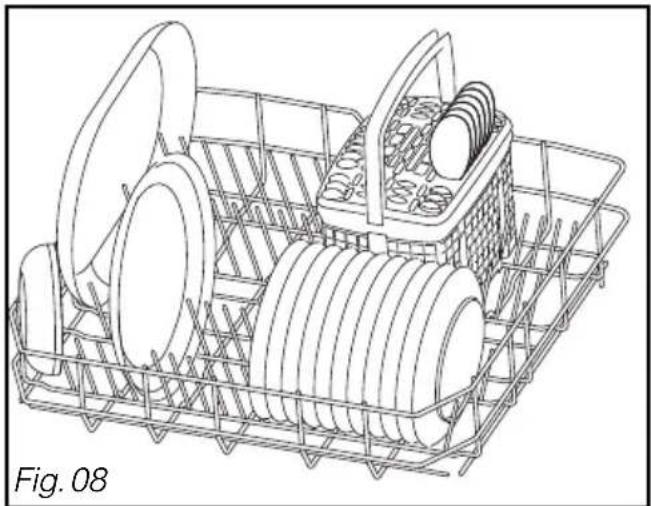
natural_image
Line drawing of a cleaning rack with multiple circular components and a handle (no text or symbols)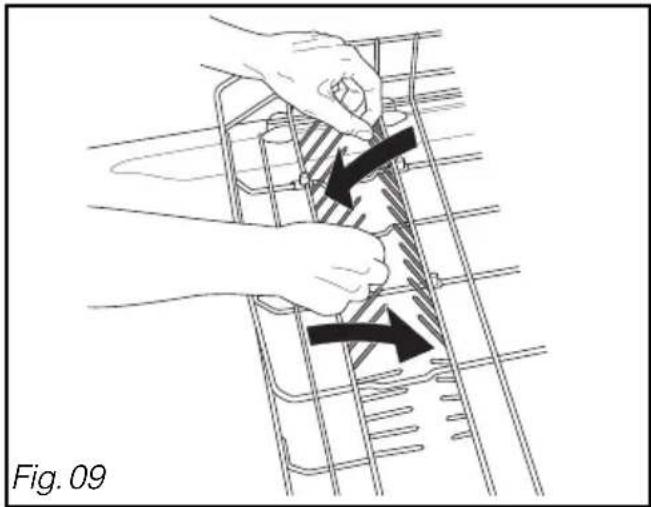
natural_image
Illustration of hands installing or adjusting a metal grid structure with directional arrows (no text or symbols)• THE UPPER BASKET
This basket is particularly designed to take glasses, cups, ramekins, small salad bowls, bowls and saucers.
Arrange your items methodically (arranging glasses, cups or bowls together) to save on space (Fig. 10).
You can also arrange cups, ladles, etc. on the folding cup racks.

Advice:
Position the cavities of glasses, cups or bowls facing downwards.
- Adjusting the height of the upper basket
(some models only)
For large dishes to be loaded in the lower basket, the upper basket must be set the to high position. This can be done with the basket fully loaded (Fig. 11)
① Setting in HIGH POSITION :
Gently raise your basket on each side until it engages.
② Setting in LOW POSITION :
Raise your basket completely on both sides to unlock it and then lower it to the low position.

Important :
Check that the two slides are set to the same height and the basket is horizontal.
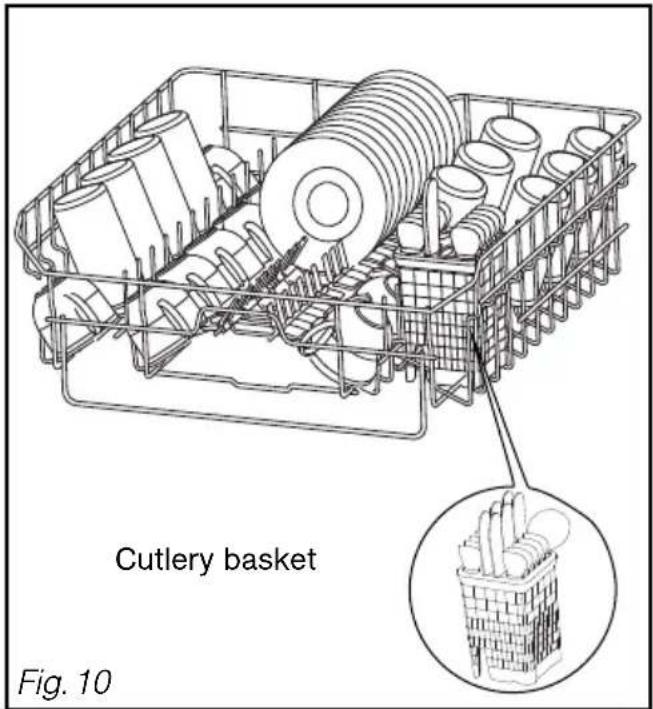

• THE CUTLERY BASKET
The cutlery basket slides along runners for flexible loading.
You can place it in any part of the lower basket you wish, to change the loading arrangement according to the items in the load (Fig 12.).
If the cutlery or dishes are too large and do not fit, adjust the height of the upper basket (if it is adjustable on your model of dishwasher).
Movable grills are available for if you wish to load your cutlery in an orderly manner.
For optimum washing and drying, use these separation grills partially or totally (Fig. 13).
Point the handles on the cutlery downwards.

Important :
For safety reasons, we recommend that you place knives with pointed ends with the point facing downwards in the cutlery basket (to avoid the risk of an accident).
Long-bladed knives and other sharp kitchen utensils must be placed flat in the upper basket.
Avoid washing cutlery with horn handles in your dishwasher.
Separate silverware from other metals using the separation grill.

natural_image
Line drawing of a kitchen sink with dish, drawer, and plate (no text or symbols)
natural_image
Line drawing of two woven basket designs, one with handle and one with handle, labeled Fig. 13 (no text or symbols on the baskets themselves)• PROGRAMME CHART
| Type of crockery :porcelain, pans,cutlery, glassesetc... | Mixed | Delicate | Mixed |
| Amount,type andstate of foodresidues. | Very short cycle(no detergent)to rinse and keepthe dishes wetbefore washing thefollowing day or theday after.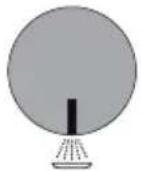 | Very short30-minute washspecially designedfor a small amountof daily items with alimited amount ofnon-greasy residue,not dried on. Szybki 30'45°C Szybki 30'45°C | Medium dirtyan average amountof food residue andgrease.This is the mosteconomicalprogramme asregards water andenergy saving.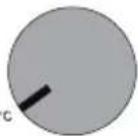 Eoo 45° Eoo 45° |
| Programmes | Pre-wash | Flash 30'45°C | * * * |
| Programmesequence. | Cold prewash |  |    |
| for guidance |  |  | |
| Duration (min) | 15 | 30 | 180 |
| Water (l) | 4,5 | 11 | 10 |
| Energy (kWh) | 0,02 | 0,8 | 0,94 |
These values refer :
- to normal usage conditions with separated products (detergents, salt, rinsing product).
- only to multifunction product usage conditions
They may vary depending on the load, the water temperature, the softener setting, the presence of rinsing product and the supply voltage.
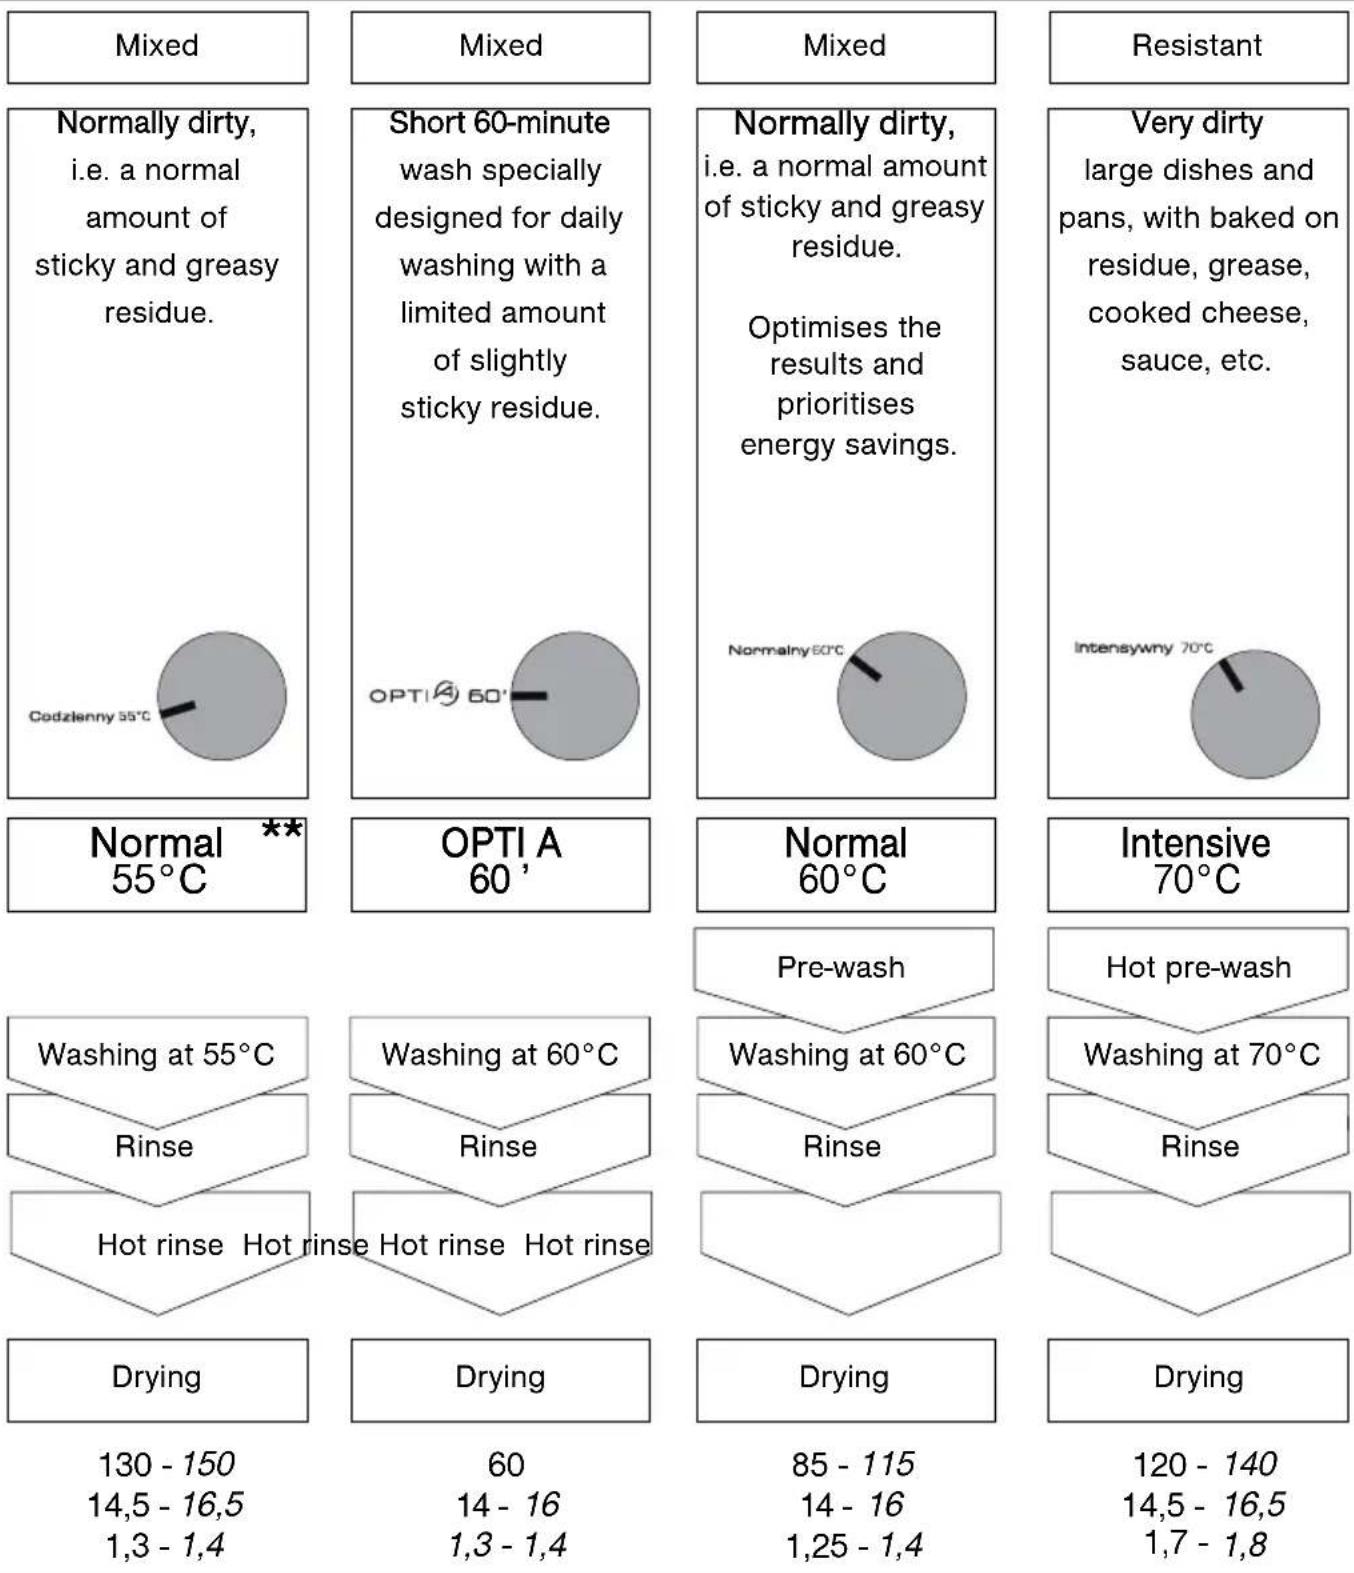
other
| Category | Value | | :--- | :--- | | Normal 55°C | ** | | Short 60-minute wash specially designed for daily washing with a limited amount of slightly sticky residue. | Codzlenny 55°C | | Normally dirty, i.e. a normal amount of sticky and greasy residue. | | | Optimises the results and prioritises energy savings. | Normalny 60°C | | Very dirty large dishes and pans, with baked on residue, grease, cooked cheese, sauce, etc. | Intensywny 70°C | | Washing at 55°C | | | Washing at 60°C | | | Pre-wash | Washing at 60°C | | Hot pre-wash | Washing at 70°C | | Rinse | | | Hot rinse Hot rinse Hot rinse | | | Drying | | | Drying | | | 130 - 150 | 14,5 - 16,5 | | 14,5 - 16,5 | 1,3 - 1,4 | | 60 | 14 - 16 | | 85 - 115 | 14 - 16 | | 120 - 140 | 14,5 - 16,5 | | Drying | 1,7 - 1,8 |Recommended programme :
* EN50242
** IEC 436/DIN 44990
"off-mode": ≤0,5 W
"left-on mode": ≤1 W

Consult the Programmes table on the preceding pages to determine the programme you need for the type of items, the quantity and the amount of food residue.
• Immediate programme start
Choose the desired programme by turning the selector A.
Validate your choice by pressing button C The programme will start up.
The "Praca" D light comes on.

The door's electrical safety system can cause the indicator lights to illuminate briefly when the door is opened or closed. This phenomenon does not affect your machine's operation.
If required, and particularly after the water softener has been reset, the programme may start with three minutes of resin regeneration. This is a silent operation.
• Delayed programme start
You may choose to delay the start of the wash programme with this dishwasher :
Choose the desired programme by turning the selector A.
Press button Bce.
Press the Bitton a number of times to delay the program by 3, 6, 9 or 12 hours.
Programme light D I come on.
Validate your choice by pressing button ©
The "Praca" D light comes on.

The "Koniec" D light flashes a few minutes before the end of the programme and then lights permanents once the programme has finished.
You can then remove your crockery.

- Cancelling a programme
To cancel a programme or if you have made the wrong selection, hold down button C or a few seconds: the programme stops and the "Praca" D light goes out.
You can then programme the dishwasher again.

- Switching off the appliance
When the program has finished, turn the selector A to the "Stop" position.
• CLEANING THE WASTE FILTERS
The filtration system consists of several elements :
A - The waste filter.
B - The large main filter.
© - The micro filter.
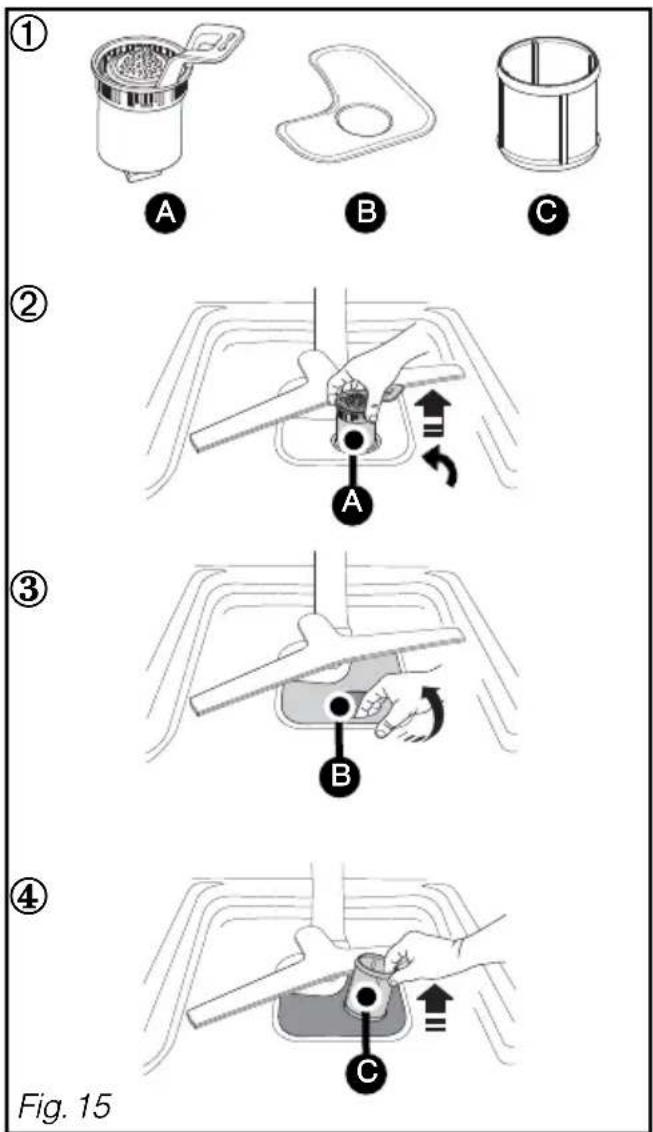
The filters are located in the centre of the tub and must be washed regularly to obtain optimum washing results..
- Procedure :
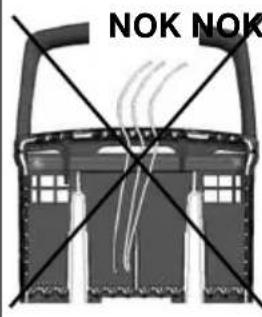
① Before removing the filters, remove the waste from the large main filter using a sponge, to prevent this waste from blocking the sprinkler arms. Position the sprinkler system as shown in the diagram (Fig. 15)
② Turn the waste filter a quarter of a turn and remove it A.
③ Remove the main filte B
④ Remove the microfilter mesh ©
⑤ Carefully clean filters A, B and C under the tap. (Fig. 16)
Re-installation :
Proceed in reverse order, inserting filters C and B and thA

Important :
Remember to lock the waste filter A
in place by pushing it in fully and turning it a quarter turn.
⑤
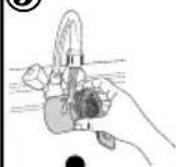


Fig. 16
- Periodically
Every 3 or 4 months, it is recommended to run the hottest programme, "Intensywny 70°C" (with the dishwasher empty), using a special dishwasher cleaning product available in shops.

Important :
Keep this product out of the reach of children.
- EXTENDED PERIOD OF NON USE OR HOUSE RELOCATION
Unplug it from the mains and cut off the water supply, then thoroughly clean the dishwasher. Protect the dishwasher from frost.

Tip :
Do not use abrasive powder, metal cleaning pads or alcohol or solvent based products.
Use a cloth or sponge.
• SUMMARY OF THE FAULTS
| 3h 6h 9h12h | ← for non-display models : light(s) flashing → | 3h 6h 9h12h | |
| ● ○○○ | d01: water intake fault (tap). | d07: overflow/leak protection fault | ● ● ● ○ |
| ○ ●○○ | d02: draining fault. | d08: sprinkler distribution fault. | ○○○ ● |
| ● ● ○○ | d03: heating fault. | d11: sprinkler distribution fault. | ● ● ○ ● |
| ○○ ●○ | d04: temperature sensor fault. | d12: water level fault (siphoning through drain tube) | ○○ ● ● |
| ● ○●○ | d05: low pump flow fault. | d13: overheating fault. | ● ○ ● ● |
| ○ ●●○ | d06: high pump flow fault. | d14: bad drain tube connection or tap flow insufficient or filters dirty. | ○ ● ● ● |

Tip:
If one of the above faults occurs and you need to call a repair man, remember to tell him the message displayed (d01, d02..) as this information will help him.
• BEFORE CALLING FOR SERVICE
| Problem Possible | causes What to do? | |
| The door falls heavily when opened (integratable model) | - Door springs not tensioned enough to compensate for the weight of the panel. | - Tighten the two tensioning screws accessible in the bot-tom section above the front feet. |
| The door does not stay horizontal when open or returns too quickly (integratable model) | - Door springs tensioned too much.- No wooden panel. | - Loosen the two tensioning screws accessible in the bot-tom section above the front feet.- Fit a temporary wooden panel on the appliance and adjust the springs. |
| The door catches when closing | - Appliance not stable- Door not centred on the tub | - Adjust the feet.- Re-centre by adjusting the rear feet. |
| The upper basket does not stay in the high position | - Poor manipulation (the basket is being pulled upwards too quickly) | - Act more progressively (see instructions), one side and then the other. |
| Small leak around or under the appliance (move the appliance to locate the leak) | - Leak from the tap.- Leak from the appliance.(Cf. table fault d07). | - Check that a seal is fitted and retighten the nut.- Close the water tap and call a technician. |
| Small leak at the door | - Appliance not stable or not level- Door not centred on the tub. | - Adjust the feet.- Re-centre by adjusting the rear feet. |
• THE INDICATOR LIGHTS
| Problem Possible | causes What to do ? | |
| The salt light does not go out - No salt or an insufficient quantity of salt in the tank to trigger the float. | - Refill the tank and wait for the cycle to end. If you have soft water that requires no salt, the light is constantly lit. | |
| The lights all light up one after the other | - Wrong programme. | - Cancel the current programming by holding down the Start button for 3 seconds and then re-programme. |
| A light flashes and the programme does not start | - On some models,programme selector wrongly positioned (between two notches) | - Reposition the selector on a programme. |
- RELATING TO PROGRAMMING, DISPLAY
| Problem Possible causes What to do ? | ||
| The cycle lasts too long - IThe energy-saving programmes last longer because the agitation and drying times are longer to compensate for the lower washing and drying temperatures | - Use these programmes preferably at night when it is not so important how long the programme lasts or when it ends. | |
| The appliance trips the circuit breaker | - Insufficient amperage to supply all the appliances being operated simultaneously.- Internal fault in the appliance. | - Check the socket's amperage (10A minimum) and the meter's capacity.- Call a technician. |
| The appliance does not start - No mains power to the socket.- Tap closed. (Cf. table fault d01).- Selection error or programme lock.- Start button pressed too long (>2").- Appliance in Safety mode (anti-leak).(Cf. table fault d07). | - Check the socket and the fuse- Check the tap is open.- Check the hose line is OK.- Cancel by holding down Start for 3" and re-programme.- Just press Start briefly to start the programme.- Call a technician. | |
| Problem Possible | causes What | to do? |
| The appliance will not restart - Door opened during a washing cycle. | - Wait for the time delay to end (controlled internally by the appliance). | |
| The appliance does not drain (Cf. table fault d02). | - The cover has not been removed from the sink's U-bend.- Drain hose kinked.- Filters totally blocked.- Pump blocked. | - Remove the cover.- Check the drain hose line behind the machine is OK.- Remove and clean the filters and the drain.- Initiate a Soaking programme If the fault persists, call a technician. |
| The appliance will no longer function (see table, fault 14). | - installation of non-compliant drainage system: drainage too low down or pipe pushed too far in.- siphoning: the appliance is emptying as the same time as it is filling up.- filter system clogged | - adhere to the drainage tube installation dimensions.- Cleaning the filters |
• POOR WASHING RESULTS
| Problem Possible | causes What to do ? | |
| Food traces, deposits, “sand grains” in the glasses | - Items poorly arranged (masked by another larger item or situated underneath it, items nested or jammed together).- Upper rotor blocked by cutlery or a dish etc.- Filter poorly locked and lifting during washing.- Micro filter screen clogged.- One or more holes in the rotor blocked. | - Arrange the items properly. Use the most appropriate areas and accessories for each type of item (see instructions).- Check that the rotor rotates freely (gauge wire). Set the basket in the high position if necessary.- Check the filter’s facing and that the filter is locked in place (push it in fully, turning it to the right).- Remove all, the filters and clean them (in warm water), including the micro filter’s screen (once a month).- Remove the rotor by turning the lever a quarter of a turn and clean it under the tap (do not use any tool that could damage the holes). Re-install the rotor. |
| Traces of grease - Detergent dose | too low; ineffi-cient detergent ; stale product.- Inappropriate programme (temperature too low; duration too short). | - Increase the dose ; try another detergent.- Select a programme with a higher temperature. |
• POOR WASHING RESULTS...
| Problem Possible causes What to do? | ||
| White marks (identify what type) | - Chalky film (removable with vinegar).- Traces of salt (items have a salty taste). | - Check that there is salt in the tank (light unlit = OK).- Check the water hardness at the tap and that the water softener is set correctly. Adjust it to a higher level if necessary.- Water too hard for using a “4-in-1” detergent without the addition of salt.- Check that the stopper on the salt container is closed correctly. |
| White marks (identify what type) | - Glass cloudy because water too soft (cannot be removed). | - Check the water hardness at the tap and that the water softener is set correctly. Some detergents in pellet form are more aggressive to glasses and decorations (change the product and use a protective product if necessary). |
| Coloured marks (tea, wine, coffee) | - Items poorly arranged- Detergent dose too low; inefficient detergent- Programme temperature too low.- If you use a multifunction product. | - Turn the cavities in the items towards the jets.- Increase the dose; try another detergent.- Select a more suitable programme with a higher temperature.- Use the “4-in-1” option (depending on the model). |
| Streaks or dried droplets on glasses | - Lack or insufficient amount of rinsing product.- Rinsing product out-of-date or inefficient.- If you use a multifunction product. | - Check the indicator light and fill the tank completely. Adjust the dispensing unit to a higher position if necessary.- Use a recent product (a good product dilutes easily and foams in cold water).- Use the “4-in-1” option (depending on the model). |
| Dried-on marks on glasses, dullness. | - If you use a multifunction product. | - Use the “4-in-1” option (depending on the model). |
• POOR OPERATION
| Problem Possible | causes What to do ? | |
| Constant fillingA lot of waste on the large filter at the end of the cycle. | - Drain wand fallen on the floor.- Drain hole situated too low for the appliance (Cf. table fault d12).- The filters and drain outlets are blocked with too much residue. | - Check the installation of drain- Remove and clean the filters and the bottom of the drain outlets. Remove large residue from the plates before putting them in the machine. |
| Traces of rust on stainless steel | - Quality of the stainless steel not dishwasher-safe (knives in particular) | - Use “special dishwasher-safe” cutlery.- Check that the stopper on the salt container is closed correctly. |
• POOR DRYING RESULTS
| Problem Possible | causes What | to do? |
| A lot of droplets on the glasses. | - Lack or insufficient amount of rinsing product.- The dose has not been distributed.- Positioning of the items. | - Check the indicator light and fill the tank completely.- If the tank is not empty after approximately 60 washings, call a technician.- To alleviate the phenomenon, arrange the items to restrict water retention as much as possible. Leave the door ajar for a few minutes, if possible |
| Droplets on plastic items, Tefal coatings, etc. | - These insulating items have a low calorific mass. | - Arrange them preferably in the upper basket. |
| Poorer drying on rapid programmes | - On rapid programmes, the drying temperature and drying period are reduced to cut down the duration of the cycle as much as possible. | - Select a rapid programme carefully or leave the door ajar for a few minutes. |
| Condensation on the wall of the inside door or the tub. | - Condensation may form on the walls, particularly after the appliance has cooled down (sound insulation increases the phenomenon) |
• INTERVENTION WORK
Any intervention work on your appliance must be performed by a qualified professional approved by the manufacturer. When you call, please mention the full reference for your appliance (model, type and serial number).
This information is shown on the description plate (see Fig. 17)
ORIGINAL PARTS
When maintenance is being carried out, ask for only certified original spare parts to be used.


Fig. 17
• Details common to all models
– Washing capacity ---- 12 standard place settings
- Arrangement of the items ---- Figs. A-B-C; see next page
- Loading as per the indications on next page, without side shelves
- Setting for upper basket ---- Low position
- Setting for rinsing product distributor ---- 3
- Adjusting the water softener 1.8 - 2.5 mmol/l
(See § 5 for details).
For detailed information on the comparison tests regarding the level of soiling, the types of crockery and cutlery, etc., contact the equipment manufacturer before commencing the tests.
• Tests to Standard EN 50242
- Recommended programme ---- see Programmes table
– Dosage of detergent 30 g of detergent B
• Tests according to the mixed IEC 436/DIN 44990 method
- Recommended programme ---- see Programmes table
- Dosage of detergent 5 + 25 g of detergent C
NB: When conducting tests using a multi-function tablet: Setting for hardness < 2.5 mmol/l (See § 5 for details)
- Check that the water softener is correctly set for the water hardness
– Pull out the detergent distribution drawer and place the tablet in the interior compartment.
- Built in or full built in model: Measuring the noise level in accordance with Standard EN60704-2-3
- Align the plinth on the housing unit with the door panel.
A

natural_image
Technical line drawing of a mechanical assembly with multiple circular components and internal springs (no text or labels)
natural_image
Technical line drawing of a mechanical assembly with springs and housing (no text or symbols)B

natural_image
Diagram of a multi-tiered storage or processing unit with circular tanks and rectangular chambers (no text or labels)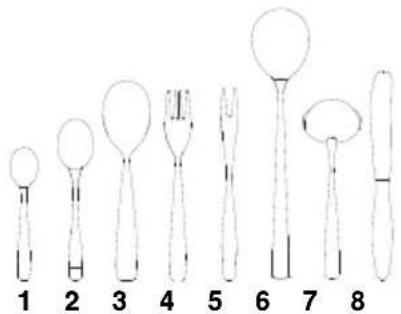
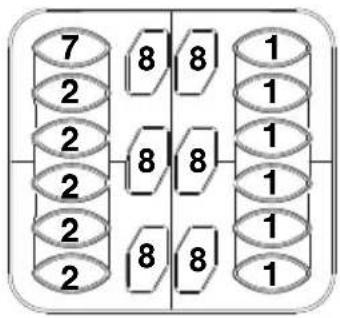

natural_image
Diagram of a mechanical or electrical component with internal flow lines and no visible text or symbols
natural_image
Diagram of a vehicle's exhaust system with airflow lines and structural components (no text or labels)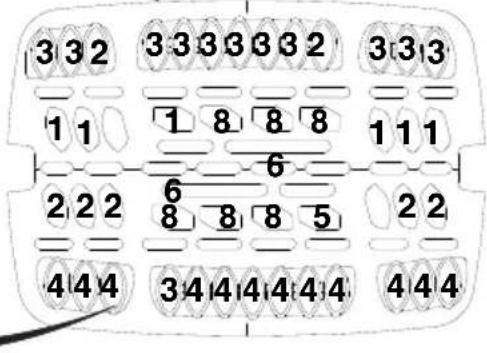
C

natural_image
Technical line drawing of a mechanical component with coiled spring and housing (no text or symbols)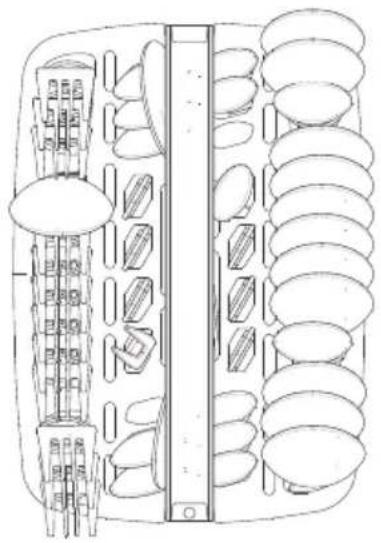
natural_image
Technical line drawing of a mechanical component with multiple cylindrical parts and a central vertical bar (no text or symbols)FAGOR MASTERCOOK
A FAGOR GROUP COMPANY
FagorMastercookS.A.51-130 WROCŁAW, ul. Żmigrodzka 143
Infolinia 0 703 10 31 31
www.mastercook.pl
- Ważne :
- Wskazówka :
- Mastercook
- Warning :
- / FOR THE USER'S ATTENTION
- / DESCRIPTION OF YOUR APPLIANCE
- / INFORMATION
- / WHAT TO DO BEFORE FIRST USING THE MACHINE
- Important :
- • SAFETY INSTRUCTIONS
- - Installation
- - Children's safety
- - Use
- • ENVIRONMENTAL PROTECTION
- • ECONOMICAL, ENVIRONMENTALLY FRIENDLY WASHING
- • GENERAL PRESENTATION OF THE DISHWASHER
- Advice :
- • CONTROL PANEL (Some models only)
- A Programme selector (3 functions):
- B Set, Delayed start :
- © Start/Pauza :
- D Pilot lights :
- Salt :
- ※ Rinse aid :
- Multi-function products :
- Praca :
- Koniec :
- NB :
- • MEASURE THE WATER HARDNESS AND SELECT THE TYPE OF DETERGENT: TRADITIONAL OR MULTI-PURPOSE
- - HARDNESS TABLE
- - Proceed as follows to adjust the water softener to the control table :
- • Door not properly closed
- • Programme access block
- • Anti-overflow safety system
- • Anti-leak safety system
- - Error display
- Observation :
- - Loading the detergent products. (Fig. 03-04-05)
- • Powders or liquids (Fig 03)
- - "Multi-purpose" or Traditional tablets (Fig 04 and 05)
- or, for optimum operation,
- - Loading the regenerating salt. (Fig. 06)
- - Determining the regenerating salt level:
- - Loading the rinsing product (Fig. 07)
- Tip :
- - Determining the rinse aid product level:
- Washing capacity : 12 standard place settings
- Very important :
- • THE LOWER BASKET
- • THE UPPER BASKET
- Advice:
- - Adjusting the height of the upper basket
- ① Setting in HIGH POSITION :
- ② Setting in LOW POSITION :
- • THE CUTLERY BASKET
- • PROGRAMME CHART
- • Immediate programme start
- • Delayed programme start
- - Cancelling a programme
- - Switching off the appliance
- • CLEANING THE WASTE FILTERS
- - Procedure :
- Re-installation :
- - Periodically
- - EXTENDED PERIOD OF NON USE OR HOUSE RELOCATION
- • SUMMARY OF THE FAULTS
- Tip:
- • BEFORE CALLING FOR SERVICE
- • INTERVENTION WORK
- ORIGINAL PARTS
- • Details common to all models
- • Tests to Standard EN 50242
- • Tests according to the mixed IEC 436/DIN 44990 method
- - Built in or full built in model: Measuring the noise level in accordance with Standard EN60704-2-3
- FAGOR MASTERCOOK
Brand : Mastercook
Model : ZWE-12176
Category : Dishwasher