
H-HT5115 - Home Theater HYUNDAI - Free user manual and instructions
Find the device manual for free H-HT5115 HYUNDAI in PDF.


| Product Type | Home Theater System |
| Model | H-HT5115 |
| Brand | Hyundai |
| Main Unit Dimensions | 360 x 280 x 45 mm |
| Speaker Dimensions (each) | 122 x 82 x 75 mm |
| Subwoofer Dimensions | 272 x 160 x 240 mm |
| Net / Gross Weight | 6.9 kg / 8.6 kg |
| Power Supply | 220 V, 50 Hz |
| Power Consumption | 175 W |
| Amplifier Power Output | 5 x 25 W + 50 W (subwoofer) |
| Supported Disc Types | DVD, DVD±R/RW, VCD, CD, CD-R/RW, HDCD, MP3, JPEG, Kodak Picture CD, DivX |
| Supported USB | Yes, up to 8 GB |
| Video Outputs | Composite, Component (YUV), S-Video, SCART |
| Audio Outputs | Stereo analog, Coaxial digital, Line out, Speaker terminals |
| Audio Inputs | Line in (stereo RCA) |
| Radio Tuner | FM, 64-108 MHz, 40 presets |
| Playback Formats | MP3, MPEG4 (DivX/XviD), JPEG, CDDA, VCD |
| Built-in Dolby Digital | Yes, with DTS digital out (coaxial) |
| Karaoke Function | Yes, with microphone input |
| Ripping (CD to USB) | Yes, MP3 format |
| Copy Function (Disc to USB) | Yes |
| OSD Languages | English, Russian |
| Remote Control Batteries | 2 x AAA 1.5V |
| Accessories Included | Subwoofer, 5 satellite speakers, remote, AV cable, FM antenna, speaker cables, batteries, manuals |
Frequently Asked Questions - H-HT5115 HYUNDAI
User questions about H-HT5115 HYUNDAI
0 question about this device. Answer the ones you know or ask your own.
Ask a new question about this device
Download the instructions for your Home Theater in PDF format for free! Find your manual H-HT5115 - HYUNDAI and take your electronic device back in hand. On this page are published all the documents necessary for the use of your device. H-HT5115 by HYUNDAI.
USER MANUAL H-HT5115 HYUNDAI
natural_image
Product photo of a black audio streaming setup with speakers, audio equipment, and a remote control (no visible text or labels)
natural_image
Two glossy spheres with reflections, no text or symbols presentThank you for purchasing our product. For safety, it is strongly recommended to read this manual carefully before connecting, operating and/or adjusting the product and keep the manual for reference in the future.
Table of contents 2
Before you start 3
Utilization of the product 3
Important safeguards 3
Supported formats.... 4
Connection 5
Video/audio system connection 5
Operation 6
Front panel 6
Rear panel 6
Remote controller 7
Changing the battery 7
Button functions 8
Standby 8
Open/Close 8
USB/Disc 8
Copy/Title 8
Subtitle 8
Angle 8
Menu/Rip 8
Play/Pause 8
Cursor buttons 8
Number buttons 8
Enter 8
Stop 8
Step 8
Fast forward 8
Rewind 8
Previous/next 8
Prog 9
Select source 9
Setup 9
Goto 9
Repeat 9
V-Mode 9
A-B 9
Audio 9
Mute 9
Volume+/- 9
OSD 9
Zoom 9
A-Mode 9
S-Effect 9
Tone 9
Key+/- 9
Ch-Level 10
System setup 10
General setup 10
Audio setup 10
Dolby digital setup 12
Video setup 13
Preference setup 13
Other functions 14
Radio tuner operations 14
Karaoke operation.... 14
USB operation 14
MP3/Compressed video playback ..... 14
Jpeg playback 15
Ripping 15
Copying data 16
Deleting data from USB 16
General information 17
Handling compact discs 17
Cleaning discs 17
Accessories 17
Troubleshooting 18
Specification 19
Utilization of the product
If you want to dispose this product, do not mix it with general household waste. There is a separate collection system for used electronic products in accordance with legislation that requires proper treatment, recovery and recycling.
Please contact your local authorities for the correct method of disposal. By doing so, you will ensure that your disposed product undergoes the necessary treatment, recovery and recycling and thus prevent potential negative effects on the environment and human health.
Important safeguards
Alerts the user to the presence of dangerous voltage within the product's enclosure.
Alerts the user to the presence of important operating instructions.
To reduce the risk of electric shock of life, do not open the cover. Refer servicing to qualified service personnel.
This mark indicates this unit belongs to class 1 laser product.
- To prevent the risk of fire or electric shock, don't allow water to come into contact with the device and don't use the device in high humidity conditions.
- The device is equipped with high voltage components and a laser system, hence you shall not open the device and repair it by yourself. The laser beam is dangerous to eyes when the housing is removed. Don't look at it.
-
When the device is moved from cold premises to the warm room or vice versa, condensate may form on the laser head and the device may not operate properly. In this case please turn the device on for 1-2 hours without disc before playback to heat it to a proper operation temperature.
-
Don't try to manually open or close the disc tray to load discs.
- Disconnect the receiver only when there is no disc therein.
- If you are not going to use the device for a long time disconnect it from the wall outlet.
- Before turning the device on, please make sure that you have connected it properly, adjust the volume of speakers and amplifiers of your radio system to the minimum. Adjust the volume as necessary only after normal playback has started to avoid damage of your audio system.
- Use supply sources of rated voltage, otherwise the unit may not function or may be damaged.
- Place the unit on a horizontal surface. Keep the unit ventilated. Don't block the heat hole. Overheat may cause malfunction.
- Do not place any objects on the player's cover, this may make it function improperly (incorrect playback).
- Please place the device in a dry and well-aired area. Do not place it near heating units or expose it to direct sunlight, mechanical vibration, humidity or excessive dust.
- If using power plug and appliance coupler as a cutting-connecting device, it should be operated easily.
- Never use liquid detergents, abrasives or organic compounds (alcohol, gasoline, etc) to clean the unit body.
Before you start
- All repairs and technical service should be made by qualified specialist from service centers.
All images provided herein are schematic drawings of real objects and may differ from their real images.
Supported formats
| Disc types | Symbol Contents | |
| DVD |  | Compressed digital audio - video |
| HDCD |  | Compressed digital audio |
| MPEG4 (DivX) |  | Compressed digital audio - video |
| Video-CD (VCD) |  | Compressed digital audio - video |
| CDDA |  | Digital audio |
| MP3 |  | Compressed digital audio |
| Kodak Picture CD |  | Compressed digital static image |
| JPEG |  | Compressed digital static image |
Video/audio system connection
Before you start connection of external devices, ensure that power of the unit is switched off.
Following outputs are available in this unit.
Composite video
Use the yellow plug of an AV cable to connect the composite video output of this unit to the video input of a TV/monitor.
Component video
Use a 3-core AV cable to connect the component outputs of this unit to the corresponding inputs of a TV/monitor.
S-video
Use an S-Video cable to connect the S-Video output of this unit to the S-Video input of a TV/monitor.
Stereo audio
Use a pair of AV cables (red for right/white for left) to connect the stereo audio outputs of this unit to the TV or a stereo input of power amplifier.
SCART
Use a 21-pin SCART cable to connect the SCART output of this unit to the TV/monitor SCART input.
Coaxial digital audio
Use a special coaxial cable to connect the coaxial output of this unit to the coaxial input of an external device.
Speaker connection
Use a special cables to connect the speaker output terminals of this unit to the corresponding speakers.
Line in connection
This unit has an extra group of audio input terminals. You can input the analogue stereo audio signals from extra devices such as DVD, VCD, CD, VCR player, etc. Use the audio cable (red for right, white for left) to connect the stereo audio output terminals of an extra device to the stereo input terminals (LINE IN) of this unit. Its corresponding signal source is LINE, which can be available by pressing SOURCE SELECT button.
- The connection you should make depends on the TV/monitor input terminals. Don't make all the connections at the same time; otherwise the produced picture will be affected.
- The physical connection should accord to the audio/video output setup of this unit.
Control elements
Front panel

- STANDBY button
- Disc tray
- OPEN/CLOSE button
- Display
- Microphone socket
- ▶ button
- USB port
- button
- VOLUME knob
Rear panel
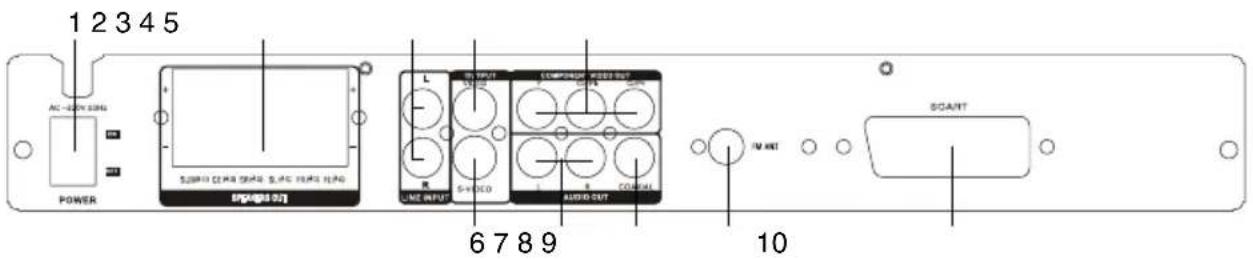
- Power switch
- Speaker output
- Line input
- Composite video output
- Component video output
- S-Video output
- Stereo audio output
- Coaxial digital audio output
- FM antenna jack
- SCART connector
Remote controller (RC)
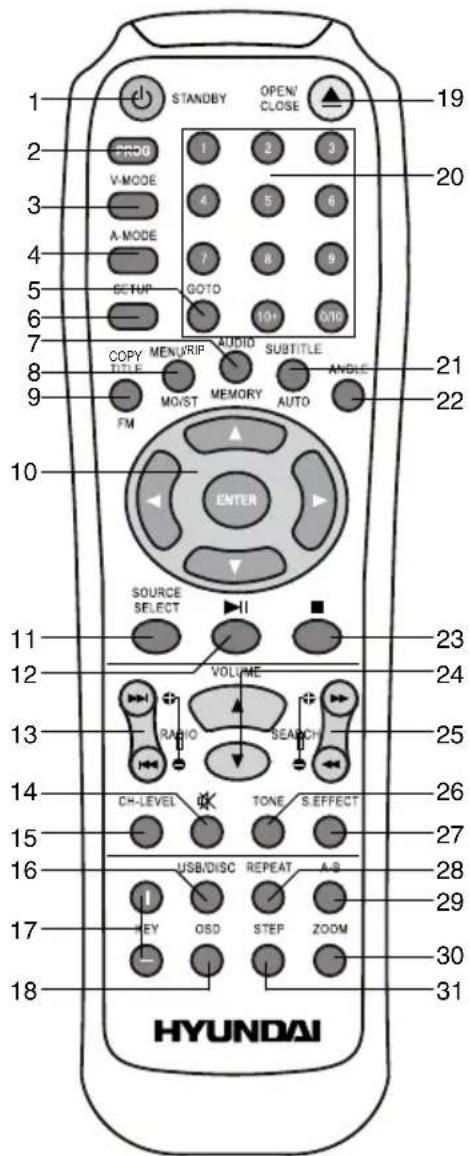
- STANDBY button
- PROG button
- V-MODE button
- A-MODE button
- GOTO button
- SETUP button
- AUDIO/MEMORY button
- MENU/RIP/MO/ST button
- TITLE/COPY/FM buttons
-
ENTER button/Cursor buttons
-
SOURCE SELECT button
- ▶|| button
- I/O+/- buttons
- □ button
- CH-LEVEL button
- USB/DISC button
- KEY+/- buttons
- OSD button
- OPEN/CLOSE button
- Number buttons
- SUBTITLE/AUTO button
- ANGLE button
- button
- VOLUME+/- button
- ↗/SEARCH+/- button
- TONE button
- S.EFFECT button
- REPEAT button 30. ZOOM button
- A-B button 31. STEP button
Changing the battery
- Remove the battery compartment cover on the back of the RC.
- Insert the batteries into the battery compartment making sure that the correct polarity is observed.
- Install the cover back.
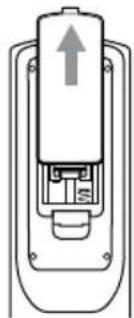
natural_image
Diagram of a mechanical device with an upward arrow indicating motion or force (no text or symbols present)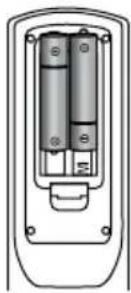
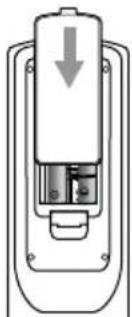
natural_image
Diagram of a mechanical device with a downward arrow indicating force or direction (no text or symbols)123
- Use two AAA/1.5V batteries for the RC. The RC should be pointed at remote sensor within 8 meters and within 30 degrees at the left or the right side.
• Take the battery out of the RC if it is not used for a long time. - Do not mix new and used batteries or different types of batteries. Weak batteries can leak and severely damage the RC.
Button functions
STANDBY
Press this button to put the unit to standby mode; press the button again, to turn on the unit. To turn off the unit completely, press the Power switch on the rear panel of the unit.
OPEN/CLOSE
Press this button when power is on, the disc tray is pushed out. Put the disc on the tray with the title faced up. Press OPEN/CLOSE button again to close the disc tray.
USB/DISC
Press this button to select a signal source (USB/DVD).
COPY/TITLE
- When playing a DVD disc, press COPY/TITLE button to return to the main title menu of the disc.
- When playing an MP3 disc, press COPY/TITLE button to enable Copy function menu.
SUBTITLE
When playing a disc with multi-language subtitle, press SUBTITLE button continually, the subtitle languages are changed in a circle, and you can select the needed one.
ANGLE
When playing the disc with multi-angle, press ANGLE button to select the view angle.
MENU/RIP
- When playing DVD disc, press this button once to return to the main menu of the disc.
- When playing SVCD, VCD2.0, after the disc is loaded, the unit will display the chapter menu (if PBC is on). Also, you can display this menu by pressing this button.
- When a USB is inserted, press this button to enter Ripping menu.
(▶) PLAY/PAUSE
When playing the disc, press ▶ button once to pause; press ▶|| button again to return to normal playback.
Cursor buttons
Press cursor buttons to navigate in various menus.
Number buttons
Press number buttons to input digits and numbers (e.g. track/chapter number, playback time etc.).
ENTER
Press ENTER button for confirmation of chosen options.
(■) STOP
When playing DVD, VCD, CD disc, press ■ button once, the unit will memorize the previous ending point; when afterwards you play the same disc, playback will start from the memorized point. Press ■ button two times, playback will stop without memorizing the stop point. (This function is only active when ON is set for Last Memory item in General setup page.)
STEP
When playing DVD, VCD disc, press STEP repeatedly to play video frame by frame. Press ▶ button to resume normal playback.
(FAST FORWARD)
Press this button for quick forward search.
(REWIND)
Press this button for quick rewind search.
PREVIOUS/NEXT)
- When playing DVD disc, press ◀◀ button to go to the previous chapter.
- When playing VCD, CD disc, press button to go to the previous track.
- When playing DVD disc, press▶▶ button to go to the next chapter.
- When playing VCD, CD disc, press▶▶ button to go to the next track.
PROG
- If the disc contains 2 or more tracks, chapters or titles, set up the playing order to your preference. Press PROG button to enter program menu.
- Press number buttons to input the number of the track, title or chapter. Use cursor buttons to move the cursor to START item. Press ENTER button to start program playback. Press PROG button to cancel programming.

For MP3 disc, this function is not available.
SELECT SOURCE
Press this button repeatedly to switch between modes: TUNER => LINE => DVD.
SETUP
Press SETUP button to enter or exit the system setup menu.
GOTO
Press GOTO button to enter goto menu where you can input chapter/title number or disc time. Select an item with cursor buttons, the use digit buttons to input data. Playback will start in accordance with the input data when you press ENTER button.
REPEAT
Press REPEAT button to repeat a title, chapter, track or the whole disc. Available repeat modes vary depending on the disc type being used.
V-MODE
Press this button to select a video output mode.
A - B
- Press A-B button at the start point (A) and the ending point (B) to select the repeat fragment.
- Press A-B button the third time to cancel fragment repeat and return to normal play.
AUDIO
- When playing DVD with more than one
audio stream, press this button to select the needed language.
- When playing a VCD disc, press this button repeatedly to select available audio channels (Left mono/Right mono/Mix mono/Stereo).

(MUTE)
Press this button, the sound will be turned off. Press the button again, the sound will resume.
VOLUME+/-
Press VOLUME+ button to adjust volume up. Press VOLUME- button to adjust volume down.
OSD
Press this button to display various info on the current playback: title/chapter time elapsed/remaining, etc.
ZOOM
When playing DVD, VCD disc, press ZOOM button to zoom in our out the picture. In zoom in mode, press cursor buttons to move the picture for viewing.
A-MODE
Press this button to switch between 5.1 channel output and stereo output of the sound.
S-EFFECT
Press this button repeatedly to switch between the available sound effects.
You are recommended to switch off the sound effect when playing a Dolby 5.1 channel disc so that to obtain the real 5.1 effect.
TONE
Press to select BASS or TREBLE, then use VOLUME+/- buttons to control the level of bass or treble.
KEY+/-
Press these buttons to change the key of the sound.
CH-LEVEL
Press this button repeatedly to select a channel or the overall volume, then press VOLUME+/- buttons to adjust its level.
System setup
- Press SETUP button to enter the setup menu. In Setup menu, press SETUP button again to quit the setup page.
- Use // buttons to choose a setup page: General setup page, Audio setup page, Dolby setup page, Video setup page, Preference page.
- Press button to enter the setup page selected.
- Use ▲ / buttons to select the option you want to adjust.
- Press button to enter the adjustment list. Use / buttons to select the adjustment and press ENTER button to confirm and button to return to options list.
- To return to setup page list press button when in the option list.
The items in gray can't be set up. The setup is memorized and kept after power is off.
General setup
| General | Audio Dollby Video Preference | |||
| General setup page | ||||
| TV displayAngle markOSD languageClosed captionsScreen saverLast memory | ||||
- TV DISPLAY
4:3 PanScan: When the unit connects to the normal TV set, the wide-screen image shows on the full screen, but some part is cut off.
4:3 LetterBox: When the unit connects to the normal TV set, the wide-screen image shows and black bars appear on the top and bottom of screen.
16:9: Use this item when the unit is connected with the wide screen TV set.
- ANGLE MARK
It will show the angle mark when playing DVD disc with multi-angle view if selecting On.
- OSD LANGUAGE
Select on-screen display language: English, Russian.
- CLOSED CAPTIONS
This function doesn't work with discs without captions. If Caption is Off, press SUBTITLE button on the RC to set Caption on. The default setup is On.
- SCREEN SAVER
If Screen saver is set ON and the unit is switched on without a disc playing for several minutes, a moving picture appears on the screen, and the unit will go to standby mode after several minutes. Press POWER button on the RC to wake it up.
- LAST MEMORY
When this function is on, the unit can memorize the time elapsed from the last time you played the disc. Then at the next playing, it will resume playing from the memorized point.
Audio setup
| General | Audio Dollby Video Preference | |||
| Audio setup page | ||||
| Analog audioDigital audioChannel delayEqualizer3D processingHDCDKaraoke setup | ||||
Analog audio setup page
| General | Audio Dollby Video Preference | |||
| Analog audio setup page | ||||
| DownmixFront speakerCenter speakerRear speakerSubwooferDialogD.R.C. | ||||
- DOWNMIX
LT/RT: The audio out is Left and Right channels format even if the original sound is 5.1CH format.
Stereo: The audio out format is stereo even if the original sound is 5.1CH format.
3D surround: The audio out is virtual surround sounds.
5.1CH: Turn off downmix function. If playing 5.1CH discs or the unit is connected with 5.1 channel amplifier, this item should be selected.
• FRONT, CENTER, REAR, SUBWOOFER SPEAKERS
If your speaker system includes the above speakers, you can set these items according the real speaker states. In karaoke On mode, or downmix is not set to Off, these setup don't work.
- DIALOG
With Audio output mode, and choose LT/RT stereo then under the Speaker setup page you can select Dialog item and adjust volumes.
While playing 5.1CH disc, can adjust speakers volumes via Dialog.
• D.R.C.
Dynamic compress output can lower volumes processing sound effect under the conditions of within speakers max output. The item is divided into On, Off, Auto.
Digital audio setup page
| General | Audio Dclby Video Preference | |||
| Digital audio setup | ||||
| Digital outputLPCM output | ||||
Digital audio setup
• DIGITAL OUTPUT
SPDIF/OFF: no digital signal out (coaxial output off), only analog audio output.
SPDIF/RAW: digital signal output in the original format recorded in the disc.
SPDIF/PCM: digital signal output in the decoded PCM form.
- LPCM OUTPUT
Select PCM frequency at 48 kHz or 96 kHz.
Some amplifiers don't support 96 kHz sampling and cause coaxial output abnormal.
Channel delay
You can set the speaker distances in the real conditions. Press / buttons
to select the speaker, Press ( ) / buttons to adjust the distance.
Equalizer
| General | Audio Do | by Video Preference | |
| Equalizer page | |||
| Sound modeBass boostSuper bassTreble boost | |||
Equalizer page
- SOUND MODE
Several equalizer modes are available
for selection. You can select any of them according to your preference and contents of the disc.
- Select BASS BOOST, SUPER BASS or TREBLE BOOST
ON means strengthening the corresponding audio frequency range.
3D processing
| General | Audio Ddby Video Preference | |||
| 3D processing page | ||||
| Pro Logic IIReverb Mode | ||||
In PRO LOGIC On mode, the Reverb mode setup is available. The initial factory setup is Off. The Pro Logic II is only available when Downmix is set to 5.1CH.
• PRO LOGIC II
On means 2CH music switch into 5.1CH music and can be played with multi CHs speakers while in Off status, no effect, if a disc does not support the function, suggesting to put to the Auto position, when playing with Dolby digital DVD, the function setting must be put on or put in auto.
- MODE
Music: All sound arrive simultaneously, without delay.
Movie: At the surrounding CH plus 10 ms delay.
PRO LOGIC: imitates PRO LOGIC I adopting logic 2.
Auto: auto selecting mode according to the input format.
• PANORAMA
On means the front stereo extends to both sides, with a better surrounding sense. Only available when Music is selected for MODE.
- DIMENSION
Similar as front and rear balance control, adjusting gradually the front and rear sound field, there are several musical scale to be chosen. Only available when Music is selected for MODE.
- CENTER WIDTH
Adjusting center CH signal and dividing left/right CH, to let the signal emit from 3 front speakers at different degree. Only available when Music is selected for MODE.
REVERB MODE
You can select the Reverb mode: Normal, Concert, Living room, Hall, Bathroom, Cave, Arena, Church.
HDCD
You can select the digital filter Off, 1x, 2x. The initial factory setup is 1x.
Karaoke setup
Set the microphone ON or OFF and adjust the microphone volume and echo.
Dolby Digital setup
| General | Audio Dolby Video Preference | |||
| Dolby digital setup | ||||
| Dual monoDynamic | ||||
- DUAL MONO
Stereo: stereo output signal,
L-Mono: left output signal,
R-Mono: right output signal,
Mix-Mono: left and right output average signal.
• DYNAMIC
If watching large dynamic scope movie program at night, by selecting this mode you can reduce the volume to a very low level and
at the same time keep the fine details sounds. In this case, this doesn't disturb the family and keep the quality sound.
Video setup
| General | Audio Dolby Video Preference | |||
| Video setup page | ||||
| Video outputColor setting | ||||
• VIDEO OUTPUT
OFF: set video output to the composite.
YUV: set video output in analog component video format when connecting to YUV terminals.
P-YUV: set progressive YUV signals.
Connection same as YUV.
RGB: set video output in red-green-blue format when connecting to SCART terminal.
If the video setting differs with the physical connection, the TV set may be without picture. In case of no picture, you can reset the setting, then keep pressing V-MODE key until the picture is OK again.
• COLOR SETTING
You can set the Sharpness, Brightness, Contrast, Gamma, Hue, Saturation according to your preference.
Preference setup
| General | Audio Dolby Video Preference | |||
 | ||||
 [T0WH][53T2] [T0WH][53T2]  [40YD] [40YD]  | ||||
• TV TYPE
This unit is suitable for all kinds of TV systems. You can select one of the PAL, NTSC or Auto.
Auto: the TV system is auto switched according to the disc system.
NTSC: this system is used in USA, Taiwan, Japan etc.
PAL: this system is used in China, Europe, Hong Kong etc.
• PBC
To set PBC with On, Off. PBC On means the function is available, Off, no function.
• AUDIO, SUBTITLE, DISC MENU
LANGUAGE
These are the initial settings by your preference. If a setting is supported by disc content, it will work. Otherwise the disc default value works. And these settings can be changed respectively by press AUDIO and SUBTITLE buttons when playing.
- PARENTAL
The control level is for parental to control playing content and protect your children from violence and erotic. The disc, the level of which is higher than the setting level can not be played.
- Password setup
Change the password. The initial factory password is 136900. You can set your own password. If you forget your own password, you can use 136900 as general password.
- DEFAULT
Reset to the initial factory setups.
Other functions
Radio tuner operation
- Select TUNER mode by pressing
SOURCE SELECT button. - To tune to a radio frequency, press SEARCH+/- buttons repeatedly. After you found the needed frequency, press MEMORY button then press a number button. The selected station will be saved under this number.
- To select a saved station, press RADIO+/buttons repeatedly. Or directly press number buttons to input the number of the needed station.
- Press AUTO button to perform scanning for broadcasting radio channels. Press ■ button to stop scanning.
- To switch between mono and stereo reception modes, press MO/ST button.
In Tuner mode, VOLUME+/-, CH-LEVEL, TONE and S-EFFECT buttons are functional.
Karaoke operation
- Karaoke disc is a DVD or VCD disc with music and subtitles, showing the user when he/she should start singing this or that song part. You need to use a microphone for singing (not included).
- Connect microphone to MIC jack on the front panel.
- Enter system setup menu on the Karaoke page and perform adjustment according to your preference.
- Put Karaoke disc into DVD-player and playback will start automatically. Press AUDIO button to include or eliminate the original singing voice.
USB operation
Insert a USB drive into the USB slot. Press USB/DISC button to select USB mode. Press it again to return to the DVD mode.
- In case the player breaks down when you insert a USB drive into the player, turn off the player, disconnect the power cord from the AC outlet and unplug the USB drive from the player. Then, power on the player again. The player will resume the normal status.
- All playback operations for USB are the same as MP3/MPEG4 disc operations.
The supported USB capacity is 8 Gbs. Please use USB devices of famous brands; some models of USB devices cannot be supported by this unit due to incompatibility.
MP3/compressed video playback
MP3 - generally adopted standard of audio compression, compressing audio data to 1/12 of their size. One CD disc mat store more than 600 minutes of music (170 songs). And the quality of MP3 disc approximates to an audio CD disc quality.
MPEG4 - standard for transmitting audio and video data via channels with low capacity. This format is very popular since it made possible to place full-length movies with good enough resolution in one CD.
Some DivX discs cannot be played due to their parameters and recording conditions. Video files more than 2 Gb having AVI extension can be played partially.
When a disc or a USB containing files of these formats is inserted, a content menu interface will be displayed.
Use / cursor buttons to select a folder or a file, then press ENTER button to enter the selected folder or play the selected file. You can also use number buttons to make selection of a folder to enter or a file to play.
In the content menu, press cursor button to return to the upper menu; press buttons to return/proceed to the previous/next menu page.
Press repeatedly PROG button to switch between folder playback mode and file list playback mode in the content menu.
During playback of an MPEG4 disc, press MENU button to return to the content menu.
JPEG playback
JPEG (Joint Photographic Expert Group) - image compression algorithm, used all over the world and providing high level of compression of the source data. Any graphics editor may edit images of this format and their size is 15-20 times less than the original images.
Place a picture disc in the disc tray; the unit will load the disc automatically.
- Press ■ button to enter the thumbnail mode to preview the pictures.
- In the thumbnail mode, use cursor buttons to select a picture, then press ENTER button to start the playback from the selected picture.
- In the thumbnail mode, use cursor buttons and ENTER button to make selection of the Slide Show, Menu, Prev or Next at the bottom of the screen.
Slide Show: Start slide show playback.
Menu: Enter the instruction menu for RC button functions. In the menu, press ENTER button to turn over to the next menu page and again to exit the instruction menu.
In JPEG playback mode, button functions are as follows:
| Button Function | |
| Entering preview mode | |
| Next picture | |
| Previous picture | |
| To play/pause slideshow | |
| Vertical mirror image | |
| Horizontal mirror image | |
| Rotate 90 degrees anticlockwise | |
| Rotate 90 degrees clockwise | |
| PROG Switch slideshow effects | |
| ZOOM ON/OFF zoom mode | |
| Zoom in/zoom out picture |
Some file names can be displayed incorrectly due to incompatibility of supported encoding.
Ripping
This unit has Ripping function making it handy and quick to copy audio files (e.g. music) from CDs. RIPPING is converting from CDDA format to the compressed MP3 format onto a USB drive. In the course of copying, ID3 tags are generated automatically in Russian and English, depending on the source. If the disc does not contain such information in CD-text format, ID3 tags will be written as “Unknown artist” and “Unknown album”.
RIPPING function has a simple and intuitive menu. To display the Ripping menu, press MENU/RIP button on the RC while CD playback. A USB-drive should be connected to the unit.
| CD RIP | |||
| Options | Track | ||
| Speed Normal | track01 | ||
| Bitrate 128 kbps | track02 | ||
| Create ID3 Yes | track03 | ||
| Device USB | track04 | ||
| Summary | track05 | ||
| Selected track 0Selected time 00:00 | track06 | ||
| Start | Exit | Select all | Select none |
For navigation in the menu use cursor buttons and press ENTER button to confirm your option. In "Options" column you may set speed and bit rate for ripping. In "Track" column you may select tracks for ripping (press ENTER button to select a highlighted track). Besides, you can select all tracks ("Select all") or cancel your choice ("Select none"). To start converting process, select "Start" and press ENTER button.
| CD RIP | |
| Ripping | Selected Track |
| Track Progress | track01 1% |
| Total Progress | |
| Cancel | |
| Summary | |
| Now ripping | |
| Track 01/01 | |
After the CD ripping procedure begins, the system will proceed to the next menu page.
In Ripping window, there are a track progress bar and a total progress bar showing how much the ripping procedure for the current track has been done and how much the total task has been finished respectively.
During ripping, the option Cancel is highlighted, so whenever you want to cancel ripping, just press ENTER button.
The ripped tracks from CD or HDCD discs will be stored in a folder created automatically by the system in the connected USB drive. If the selected track shares the same file name with the existing one in that folder, the system will pop up a dialogue box to warn you of that. Press ENTER button to continue and replace the existing one with the selected track. Select option Cancel to quit.
And you can choose to create another folder in the connected USB drive for ripping this track.
If you want to create another folder in the connected USB drive to save the ripped tracks, you need to open the disc tray and then close it. The tracks ripped afterwards will be saved in a newly created folder.
Copying data
- Play data disc containing MP3/JPG/DivX files and insert a USB.
- Press TITLE/COPY button on RC, the COPY menu will appear with option of ALL SELECT/ALL UNSEL/COPY/EXIT.
- Move the cursor to the target file or folder, press ENTER button to tick it, or select ALL
SELECT item to select all the data.
- Move the cursor to COPY item, then press ENTER button.
- Press ENTER button to display the option BACK/NEXT.
- Choose NEXT item to start copying data the selected device.
Deleting data from USB
- Play USB device containing the desired data.
- Press TITLE/COPY button to get the menu of ALL SELECT/ALL UNSEL/COPY/DEL/EXIT.
- Move the cursor to the target file or folder, press ENTER button to tick it, then move to DEL item and press ENTER button to delete the data from the device.
Handling compact discs
Handling compact discs
- Do not insert anything other than a CD into the disc tray.
- Do not use cracked, chipped, warped, or otherwise damaged discs as they may cause damage to the player.
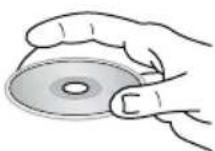
- Handle the disc only by the edges (as shown in the picture). To keep discs clean do not touch its surface.
- Store discs in their cases when not in use.
- Do not expose discs to direct sunlight, high humidity, high temperature or dust.
- Prolonged exposure to extreme temperature can wrap a disc.
- Do not attach labels, write on or apply chemicals to the surface of the discs.
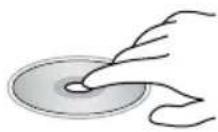
- Do not touch the recorded surface of the discs.
- Use 12-cm CDs. Use only conventional, fully circular discs. Do not use irregularly shaped discs.
Cleaning discs
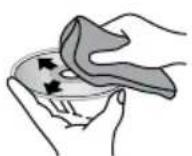
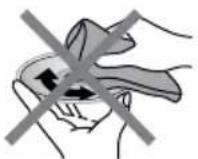
Fingerprints should be carefully wiped from the surface of disc with a soft cloth. Unlike conventional records, compact discs have no grooves to collect dust and macroscopic dirt, so gently wiping them with a soft cloth should remove must panicles. Wipe in a straight motion from the center to the edge.
Never use thinner benzine, record cleaner or anti static spray on a compact disc. Such chemicals can damage its plastic surface.
Accessories
- Home theatre 1 pc
- Subwoofer 1 pc
- Satellite speaker 5 pcs
- Remote controller 1 pc
- Audio-video cable 1 pc
- Battery AAA 1.5V 2 pcs
- FM-antenna 1 pc
- Speaker cable set 1 pc
- Consumer information 1 pc
- Warranty card 1 pc
- Instruction manual 1 pc
Troubleshooting
Below is a table describing simple measures that can help you eliminate most problems likely to emerge when this unit is in use. If below measures do not help, turn to a service center or to the nearest dealer.
| Symptom Cause Solution | ||
| No sound Poor audio cable connection Make proper connection | ||
| No image Poor video cable connection Make proper connection | ||
| Incorrect setting of your TV set Correct the settings of your TV set | ||
| Disc cannot be read | Disc not inserted Insert the disc | |
| Disc inserted incorrectly Install the disc with the label side facing up | ||
| Condensate on the unit laser head | Switch the unit on without disc for an hour | |
| Remote control does not operate | Remote control is incorrectly directed at the unit | Use the remote controller according to the manual |
| Distance and angle to the unit are too large | Decrease the distance and angle | |
| Run out batteries Replace both batteries | ||
| Some functions do not work | Disc is recorded incorrectly Wait | 5-10 seconds and the unit will automatically return to normal style |
| Incorrect key sequence Repeat the operation one more time | ||
| Static voltage on the unit housing | Switch the unit off for 1-2 minutes and then switch it on again | |
Specifications
Appearance
Dimensions of the unit 360 mm x 280 mm x 45 mm
Dimensions of a speaker 122 mm x 82 mm x 75 mm
Dimensions of the subwoofer 272 mm x 160 mm x 240 mm
Net/Gross weight 6.9 kg/8.6 kg
Compatibility
Supports DVD-R/-RW, DVD+R/+RW, CD-R/-RW, USB
Formats of playback DVD-video, DVD-audio, VCD, HDCD, CDDA, MP3, Kodak Picture CD, JPEG, MPEG4 (DivX/XviD)
Support of subtitle for MPEG4 +
Audio
Built-in Dolby Digital +
DTS digital out (coaxial) +
Power output 5 x 25 W + 50 W
Video
Support NTSC/PAL +
Progressive scan +
Connectors
Composite +
SCART +
Coaxial +
S-Video +
Component (YUV) +
Line in +
Stereo audio out +
Radio
FM frequency range 64 - 108 MHz
Presettable stations 40
Functions
Karaoke function +
Russian and English OSD +
Audio CD ripping in MP3 format to
USB flash drive +
Copy function from data disc to USB +
Russian file and disc name support +
Russian ID3 tag support +
Additional
Power supply 220 V, 50 Hz
Nominal power consumption 175 W
Specifications are subject to change without notice. Dimensions are approximate.
natural_image
Diagram of a mechanical device with an upward arrow indicating motion or force (no text or symbols present)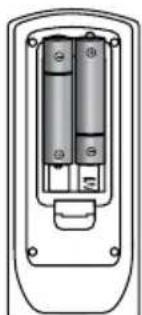
natural_image
Diagram of a device interior showing two cylindrical components with mounting holes and a central connector (no text or symbols)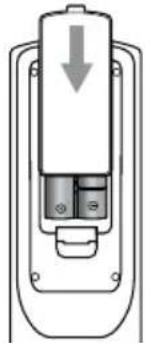
natural_image
Diagram of a mechanical device with a downward arrow and internal components (no text or symbols)123
natural_image
Illustration of a hand holding a circular disc (no text or symbols)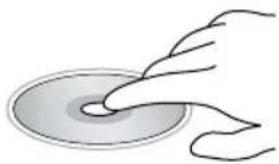
natural_image
Illustration of a hand pressing a circular button (no text or symbols)Чистка дисков
natural_image
Illustration of two hands performing a circular gesture with directional arrows, no text or symbols presentКомплект поставки

- Utilization of the product
- Important safeguards
- Before you start
- Video/audio system connection
- Composite video
- Component video
- S-video
- Stereo audio
- SCART
- Coaxial digital audio
- Speaker connection
- Line in connection
- Control elements
- Remote controller (RC)
- Changing the battery
- 123
- Button functions
- STANDBY
- OPEN/CLOSE
- USB/DISC
- COPY/TITLE
- SUBTITLE
- ANGLE
- MENU/RIP
- (▶) PLAY/PAUSE
- Cursor buttons
- Number buttons
- ENTER
- (■) STOP
- STEP
- (FAST FORWARD)
- (REWIND)
- PREVIOUS/NEXT)
- PROG
- SELECT SOURCE
- SETUP
- GOTO
- REPEAT
- V-MODE
- A - B
- AUDIO
- (MUTE)
- VOLUME+/-
- OSD
- ZOOM
- A-MODE
- S-EFFECT
- TONE
- KEY+/-
- CH-LEVEL
- System setup
- - ANGLE MARK
- - OSD LANGUAGE
- - CLOSED CAPTIONS
- - SCREEN SAVER
- - LAST MEMORY
- - DOWNMIX
- • FRONT, CENTER, REAR, SUBWOOFER SPEAKERS
- - DIALOG
- • D.R.C.
- Digital audio setup
- • DIGITAL OUTPUT
- - LPCM OUTPUT
- Channel delay
- Equalizer page
- - SOUND MODE
- - Select BASS BOOST, SUPER BASS or TREBLE BOOST
- • PRO LOGIC II
- - MODE
- • PANORAMA
- - DIMENSION
- - CENTER WIDTH
- REVERB MODE
- HDCD
- Karaoke setup
- - DUAL MONO
- • DYNAMIC
- • VIDEO OUTPUT
- • COLOR SETTING
- • TV TYPE
- • PBC
- • AUDIO, SUBTITLE, DISC MENU
- LANGUAGE
- - PARENTAL
- - Password setup
- - DEFAULT
- Other functions
- Radio tuner operation
- Karaoke operation
- USB operation
- MP3/compressed video playback
- JPEG playback
- Ripping
- Copying data
- Deleting data from USB
- Handling compact discs
- Cleaning discs
- Accessories
- Troubleshooting
- Specifications
- Appearance
- Compatibility
- Video
- Connectors
- Radio
- Functions
- Additional
- Чистка дисков
- Комплект поставки
Brand : HYUNDAI
Model : H-HT5115
Category : Home Theater