
Playon!HD3 - Media player AC Ryan - Free user manual and instructions
Find the device manual for free Playon!HD3 AC Ryan in PDF.


| Product Type | Media Player |
| Brand | AC Ryan |
| Model | Playon!HD3 |
| Video Output | HDMI 1.4, Component Y/Pb/Pr, Composite A/V |
| Audio Output | S/PDIF Optical & Coaxial, HDMI |
| Network | Gigabit Ethernet (10/100/1000Mbps), 802.11b/g/n Wi-Fi |
| USB Ports | 1x USB 3.0 Slave (compatible USB 2.0), 4x USB 2.0 Host |
| Internal Storage | Supports 3.5" SATA HDD (not included) |
| Supported File Systems | NTFS, FAT32 |
| Video Formats | ASF, AVI, DAT, FLV, IFO, ISO, M2TS, M4V, MKV, MP4, MPG, MOV, RM, RMVB, TP, TRP, TS, VOB, WMV |
| Audio Formats | APE, FLAC, MP3, OGG, WAV, WMA |
| Photo Formats | BMP, GIF, JPEG, PNG, TIF |
| Network Features | UPnP Media Server, SAMBA file sharing, BitTorrent client (Transmission) |
| 3D Playback | 2D to 3D simulation, 3D SBS (Side by Side), 3D TAB (Top and Bottom) |
| Subtitle Support | Subtitle color, offset, size adjustment; multiple subtitle formats |
| Power Supply | DC 12V, 3A (adapter included) |
| Firmware Upgrade | Online, USB flash drive, safe-mode |
| Safety | Do not expose to water; avoid shocks; unplug before cleaning; use only provided adapter |
| Maintenance | Clean with dry cloth; defragment HDD periodically; backup data regularly |
Frequently Asked Questions - Playon!HD3 AC Ryan
User questions about Playon!HD3 AC Ryan
0 question about this device. Answer the ones you know or ask your own.
Ask a new question about this device
Download the instructions for your Media player in PDF format for free! Find your manual Playon!HD3 - AC Ryan and take your electronic device back in hand. On this page are published all the documents necessary for the use of your device. Playon!HD3 by AC Ryan.
USER MANUAL Playon!HD3 AC Ryan
4 Upgrading the Firmware 46
5 Appendixes 47
5.1 Specifications 47
5.2 Frequently Asked Questions 48
6 Copyrights and Trademarks....50
7 Warranty....51
8 GPL Statement....51
1 User Information
1.1 Caution
This player's design and manufacture has your safety in mind. In order to safely and effectively use this player, please read the following before usage.
1.1.1 Usage cautions
User should not modify this player. If commercial hard disk is being used, the environmental temperature should be within +5^ +35^ .
1.1.2 Power
The player's power voltage: DC 12V.
When using this player, please connect the supplied AC adapter cable to the player's power jack. When placing the adapter cable, make sure it will not get damaged or be subjected to pressure. To reduce the risk of electric shock, unplug the adapter first before cleaning it. Never connect the adapter to the player in a humid or dusty area. Do not attempt to replace the adapter, cable or connector by yourself.
1.1.3 Radio interference/compatibility
- If not properly shielded, most electronic devices will receive radio interference. Under certain conditions, your player might receive some interference.
- The design of this player has followed the CE standard, and has followed the following rules:
(1) This player may not cause harmful interference;
(2) This player could accept some interference received including interference that may cause undesired operation.
1.1.4 Repair
If the player has a problem, you should take it to an authorized repair center and let the specialists do the repair, never repair the player yourself or you may damage the player, endanger yourself or even losing your data.
1.1.5 Disposing of the player
When you dispose of the player, be sure to dispose it appropriately. Some countries may regulate disposal of electrical device, please consult with your local authority on proper disposal.
1.1.6 Hard disk cautions
The player uses an internal 3.5" hard disk for data storage, in normal cases reformatting or repair is not required. You should carefully read the < Frequently Asked Questions > chapter, and check our website for any latest information before formatting the hard disk.
- Hard physical impact may cause bad sector in the hard disk, however you can use CHKDSK
to try fixing the problem.
- All data stored in the player may be lost due to physical impact, electrical shock, power lost, HDD format etc. Please remember to backup your data regularly.
- It is recommended to do a HDD defragment after a long period of usage.
- Regulatory backup the data in the hard disk so that it can be recovered in the event of data corruption or loss. Our company takes no responsibility for loss of data stored on the hard disk.
1.1.7 Others
When using this player, please do not let the player come into contact with water or other liquid, if water is accidentally spilled on the player, please use a dry cloth to absorb the spillage.
Electronic products are vulnerable, when using please avoid shaking or hitting the player, and do not press the buttons too hard.
Do not let the player come into contact with water or other liquid.
Do not disassemble the player, repair or alter its design, any damage due to such actions will not be covered within the repair policy.
Do not press the buttons of the player too hard.
Avoid hitting the player with hard objects, shaking the player, and stay away from magnetic fields.
The player may malfunction during electrostatic discharge and under strong electromagnetic field. When this happens, unplug the power cable first and then reconnect. The product will function back to normal the next time it is powered on.
2 Product Introduction
2.1 Product Overview
Thank you very much for purchasing this product. In the digital era, this product is a great home entertainment partner. With its outstanding design, you can enjoy Full HD 3D movies and music, view photos of precious moments. This player has the following functionality.
Network Feature
- A/V streaming/transmission via Ethernet(10M/100M/1000M) & Built-in Wi-Fi 802.11b/g/n
• A/V streaming via UPnP Media Server - File sharing via SAMBA server
- Torrent function with Transmission client
- Various internet media feature
Movie Playback
- 2D to 3D simulation, 3D SBS (Side by Side), 3D TAB (Top and Bottom) support
- Fast forward/rewind and other trick play functions
- Subtitle and audio switching
• Supports major audio formats
- Subtitle control: color/offset/size
- Movie format: ASF / AVI / DAT / FLV / IFO / ISO / M2TS / M4V / MKV / MP4 / MPG / MOV / RM / RMVB / TP / TRP / TS / VOB / WMV
Music Playback
- Fast forward/rewind and other trick play functions
- Shuffle
- Repeat functions
• Music format: APE / FLAC / MP3 / OGG / WAV / WMA
Photo Viewing
• View photos in slideshow mode with background music
- Zoom in/out, Rotate
• Photo format: BMP / GIF / HD JPEG / PNG / TIF
USB 3.0 & 2.0 Support
- USB 3.0 DEVICE port (for computer connection, compatible to USB 2.0)
- USB 2.0 HOST port (for USB storage devices)
File Copy
• Supports copying & moving files among USB and HDD
Note: All information mentioned in this manual is correct at the time of publication. However, as our engineers are always updating and improving the product, your device's software may have a slightly different appearance or modified functionality than presented in this manual.
2.2 Package Contents
| Part Quantity | |
| Playon!HD 3D 1 | |
| USB 3.0 cable 1 | |
| Remote Control 1 | |
| Remote Control Batteries 2 | |
| AC adaptor 1 | |
| Quick Installation Guide 1 |
Note:
The actual contents in the package might be different from the packing list in this manual.
2.3 Connection
2.3.1 Power connection
(1) Follow the image and connect the AC adaptor to the player's DC IN jack;
(2) Follow the image and plug in the AC adaptor to the power outlet.

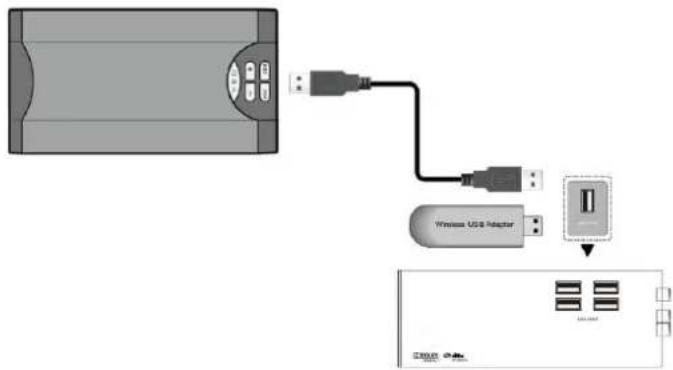
2.3.2 USB Mass Storage Device (like USB stick, USB HDD etc.) connection
(1) Make sure the player is powered on;
(2) Plug in the USB stick or USB HDD etc. to one of the USB host ports of this player.
2.3.3 TV connection
2.3.3.1 A/V out
(1) Follow the image and plug in the 3 color connector to the player's A/V out jack;
(2) Follow the image and plug in the 3 color connector to the TV's A/V in jack.
In this way, you can view the content of the player on TV or other display devices.

2.3.3.2 Y/Pb/Pr Component out
(1) Follow the image and plug in the connector of the YUV cable to the player's Y/Pb/Pr jack; (2) Follow the image and plug in the 3 color connector to the TV's Y/Pb/Pr jack.
Audio Connection while using Y/Pb/Pr Video out:
First method: use the audio output from the A/V out jack;
Second method: use the audio output from the S/PDIF Coaxial or Optical jack.

In this way, you can also enjoy videos, music, and photos from the player on your display.
2.3.3.3 HDMI out
(1) Follow the image and plug one end of the HDMI cable to the player's HDMI jack;
(2) Follow the image and plug the other end of the HDMI cable to the TV's HDMI jack.
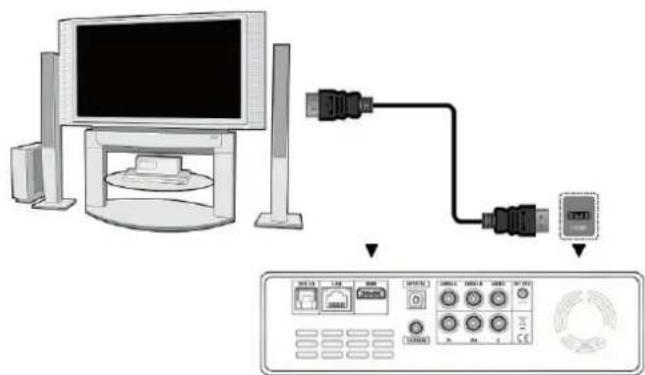
In this way, you can have the best quality video and audio via a single cable.
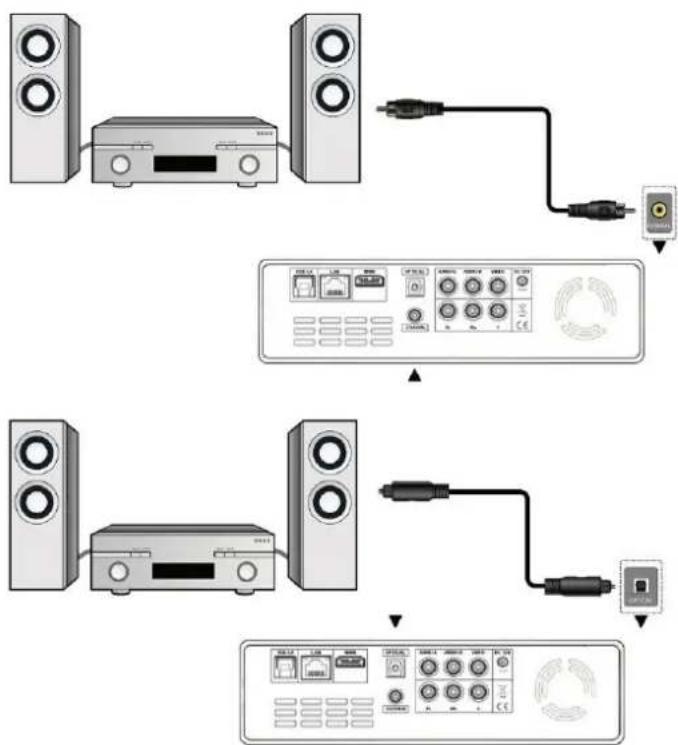
2.3.4 Digital Audio Device connection
(1) Follow the image and plug one end of the RCA connector of your coaxial cable to the player's S/PDIF Coaxial jack. Or if you use optical cable, please plug in one end of the Toslink connector of your optical cable to the player's S/PDIF Optical jack; (not supplied)
(2) Follow the image and plug in the other end of the coaxial or optical cable to the digital audio device. (not supplied)
flowchart
graph TD
    A["Speaker with two speakers"] --> B["USB cable"]
    B --> C["Audio interface with USB cable"]
    D["Speaker with two speakers"] --> E["Audio interface with USB cable"]
    E --> F["Audio interface with USB cable"]
    G["Speaker with two speakers"] --> H["Audio interface with USB cable"]
    H --> I["Audio interface with USB cable"]
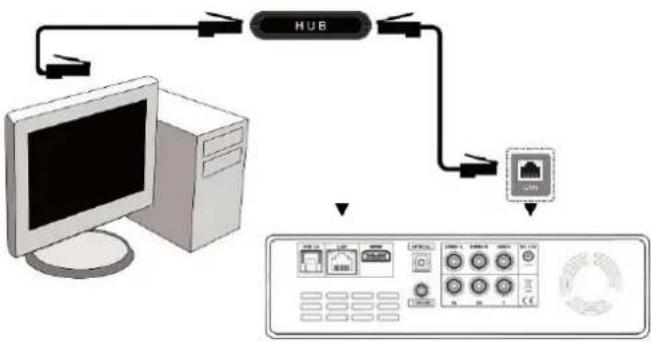
2.3.5 Connecting to a LAN
To connect to a LAN (Local Area Network) you require a CAT5, CAT5e or CAT6 network cable (not supplied).
(1) Connect one end of the cable to the player's RJ45 LAN socket;
(2) Connect the other end of the cable to a RJ45 LAN port on your router, switch, or hub devices.
flowchart
graph TD
    A["Computer"] -->|USB| B["Network Device"]
    B --> C["Control Panel"]
    C --> D["Port 1"]
    C --> E["Port 2"]
    C --> F["Port 3"]
    C --> G["Port 4"]
    C --> H["Port 5"]
2.3.6 Connecting to a WLAN
(1) Make sure the player is powered on; (2) The built-in Wi-Fi adapter will be active when the player is powered on.
Note: Please refer to '3.1.4 Changing Network Settings' for more details about wireless setup
2.4 Front Panel
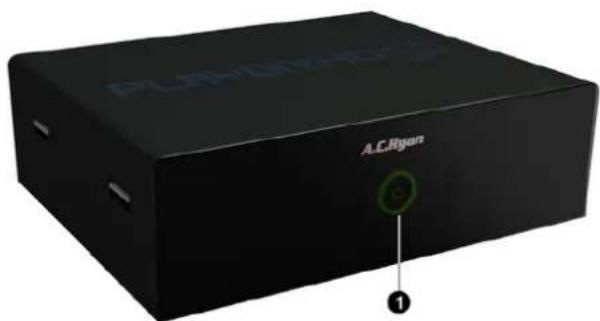
- POWER button & indicator
2.5 Side Panel
- USB 2.0 host ports
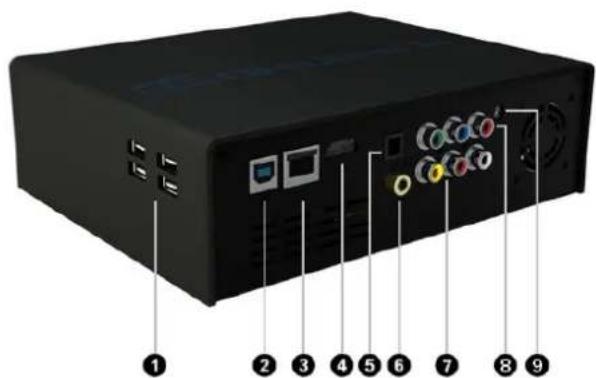
2.6 Back Panel
-
USB 3.0 slave port 3. RJ45 LAN socket
-
HDMI port 5. S/PDIF optical port
-
S/PDIF coaxial port
-
Composite video
-
Component video
-
DC-In jack
2.7 First Time Usage
2.7.1 Power On / Off
Power On
After connecting the DC-In jack and power on, the power indicator on the front panel will turn green, and the player will enter the home screen soon.
Power Off
Press the power button on the front panel, the player will soon enter standby mode and at the same time the power indicator will turn red. Then unplug the power cord to cut off the power supply.
2.7.2 Menu language
The system language of this player can be set to English or other languages. Change the language you desired in the setup menu, and the selected language will take effect immediately.

2.7.3 HDD Format
For users who wish to install a new SATA HDD in the player, it is required to format the hard disk first on the player before usage. Otherwise certain functions cannot be used, such as BT download, video podcast download. Please refer to the following procedures to format the
hard disk.
- Step 1: Select OK on the Warning page, press OK to confirm.

Note: This page can be also accessed via Setup > System > Format menu.
- Step 2: Select Format, press OK, and then hard disk format will start.
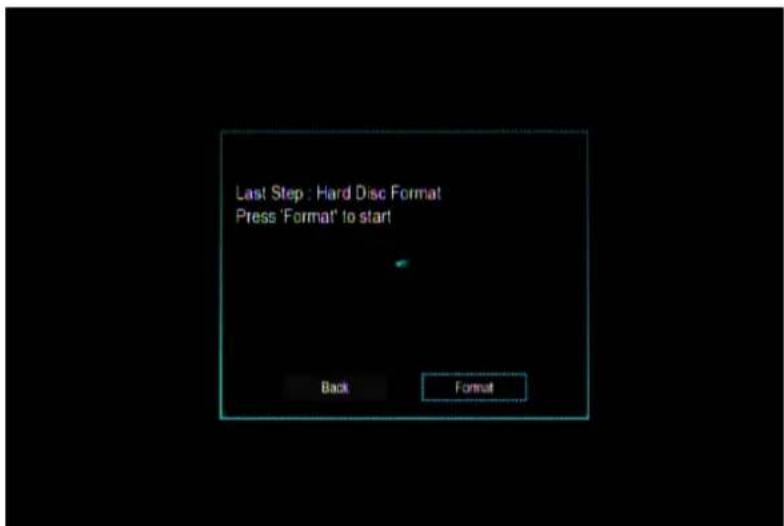
The formatting will be completed within a few minutes. After which you will be able to use the hard disk correctly on the player.
Note: HDD format will erase all data stored on the hard disk drive. Please ensure to backup your data in advance!
2.8 Remote Control

- Power 2. Numeric buttons
- Internet Media 4. Red
- Green 6. VoL+
- VoL- 8. Home
- OK /Enter 10. Navigational buttons
- Menu 12. FR
- Play 14. Zoom
- Pause 16. Repeat
17.Goto 18.A-B - Angle 20. TV Sys.
- Eject 22. Favorites
- IM Return 24. Blue
- Yellow 26. Prev
- Info 28. Next
- Mute 30. Return
- Setup 32. FF
- Stop 34. Subtitle
- Audio 36. CM skip
- Replay
| No. | Button | Function |
| 1 | Power | Press to enter standby mode or power on |
| 2 | Numeric buttons | Press to enter numeric input or alphanumeric input in MMH Portal (Function available only in certain regions) |
| 3 | Internet Media | Press to enter Internet Media menu or MMH Portal (Function available only in certain regions) |
| 4 | Red | Functions in various menu |
| 5 | Green | Functions in various menu |
| 6 | VOL+ | Press to increase the volume |
| 7 | VOL- | Press to decrease the volume |
| 8 | Home | Press to enter the home screen |
| 9 | OK/Enter Press OK | button to confirm |
| 10 | Navigational buttons | Press the arrow buttons to select menu options, and the OK button to confirm |
| 11 | Menu | Press to display the option menu, where you can change the view modes of file manager, filters, etcPress to display or hide the option menu during playback |
| 12 | FR | Press to fast rewind playback, repeatedly to select speeds |
| 13 | Play | Press to start playback |
| 14 | Zoom | Press to zoom (photo or video) |
| 15 | Pause | Press to pause playback |
| 16 | Repeat | Press to set repeat options |
| 17 | Goto | Press to jump to a specific point during playback. Skips by Time, Title or Chapter selection |
| 18 | A-B | Press to set the starting and end points of a section to loop |
| 19 | Angle | Press to change the view angle during DVD (with multangle) playback |
| 20 | TV SYS. | Press to switch between NTSC, PAL, 480 P, 576P, 720P, 1080I, and 1080P |
| 21 | Eject | Press to safely remove USB device |
| 22 | Favorites | Press to enter Favorites menu |
| 23 | IM Return | Press to return while in MMH Portal (Function available only in certain regions) |
| 24 | Blue | Functions in various menu |
| 25 | Yellow | Functions in various menu |
| 26 | Prev | Press to play the previous media / page up |
| 27 | Info | Press to display current infoPress during playback, an onscreen display will appear showing track number and time elapsed/remaining |
| 28 | Next | Press to play the next media / page down |
| 29 | Mute | Press to mute audio, press again to unmute |
| 30 | Return | Press to return to the previous screen while navigating menus or during playback |
| 31 | Setup | Press to enter the setup menu |
| 32 | FF | Press to fast forward playback, repeatedly to select speeds |
| 33 | Stop | Press to stop playback |
| 34 | Subtitle | Press to display subtitle menu during playback |
| 35 | Audio | Press to select audio track of the video playback |
| 36 | CM Skip | Press to advance 30 seconds of the current playback |
| 37 | Replay | Press to jump back 10 seconds of the current playback |
3 Main Functions
3.1 Setup Menu
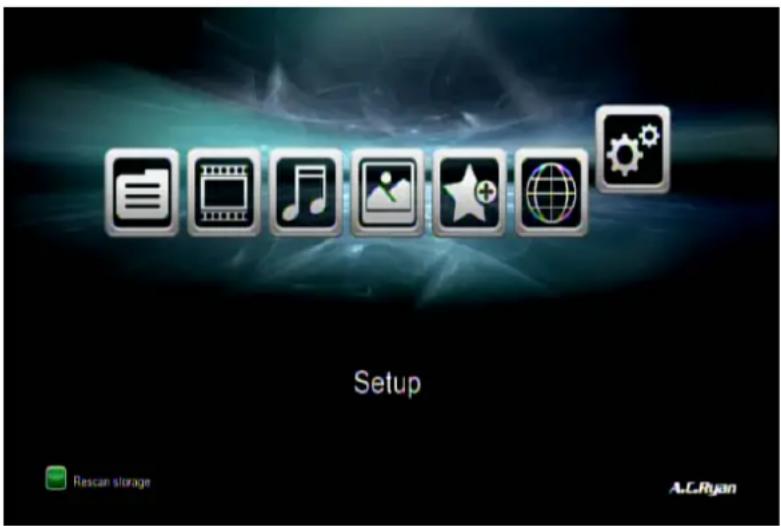
The Setup menu allows you to personalize and configure preferences for your player.
Select the Setup icon on the home screen, or press the Setup button on the remote control.
There are five setup options, including System, Audio, Video, Network and Misc. Use the navigation buttons to switch between categories and selecting options.
3.1.1 Changing System Settings
Use this menu to configure system settings.
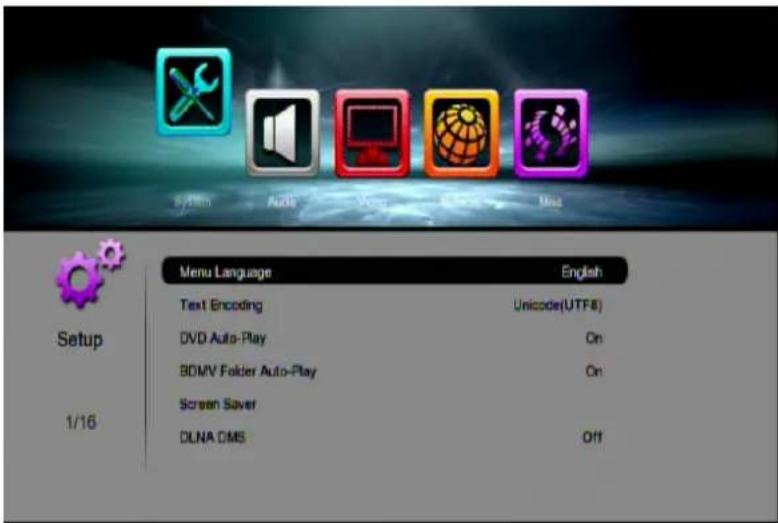
Menu Language
- Select to choose the OSD (On-Screen Display) language.
Text Encoding
- Select to choose the default text encoding for subtitle display during playback.
DVD Auto-Play
- Select to turn on/off DVD auto-play.
BDMV Folder Auto-Play
- Select to enable direct playback when entering into a BDMV folder. Disable this option if you want to navigate in such folder structure.
Screen Saver
- Timing
Select to choose the timing of screen saver to activate.
- Options
Select to display the default screen saver upon activation or choose your own Photo Album as screen saver.
DLNA DMS
- Digital Media Server, making your internal storage available to networked digital media players (DMP) and digital media renderers (DMR).
DLNA DMR
- Digital Media Renderer, plays content received from a digital media controller (DMC), which will find content from a digital media server (DMS).
Host Name
- Default network name of your player is PLAYONHD3D, select this option to rename to your desired network name.
Keyboard input method
- Select to change the language of the on-screen keyboard.
Rescan storage
- Select to set the scan mode of your media files.
Resume Play
- Select to turn on / off resume playback (auto-bookmarking) feature for movies.
Format
- Select to format your HDD.
BD-Lite Menu
- Select on to enable support for BD Profile 1.0 navigation menu.
CEC
Consumer Electronics Control, turning this on allows you to command and control up to ten CEC enabled devices that are connected through HDMI, by using just one of the device's remote control. This player supports the following modes
- One Touch Play, allows devices to switch the TV to use it as the active source when playback starts.
- One Touch Standby, allows you to switch the player to standby mode with the press of the power button.
- Auto Power On from TV, allows you to power on the Player when the TV is powered on.
Auto standby
- Select between 30 minutes, 1 hour or 2 hours to put the player to power standby when it is left idling after the selected time.
Restore Default
- Select to reset the player back to factory defaults.
3.1.2 Changing Audio Settings
Use this menu to configure audio settings
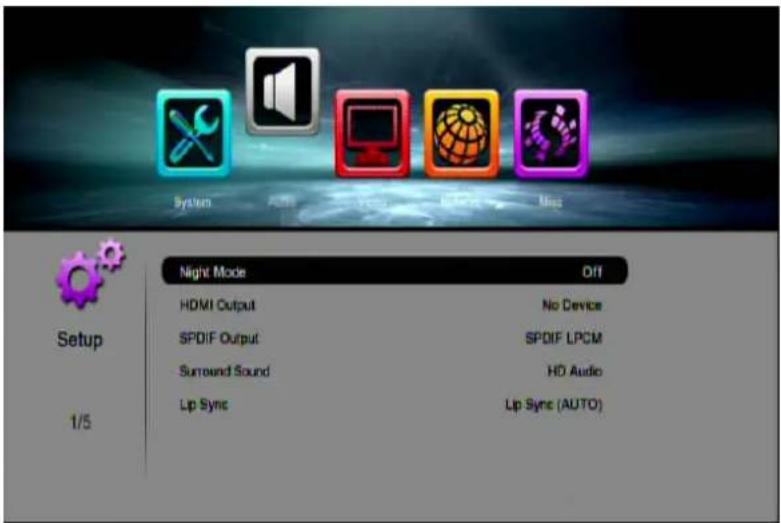
Night Mode
- Choose among Off / On / Comfort. If the option is turned on, the audio volume will be dynamically adjusted to make vocal more audible and loud scenes to soften for night comfort.
HDMI Output
- Choose among HDMI LPCM, HDMI RAW, HDMI Auto to suit your setup. It is recommended to choose HDMI Auto setting when you are connecting to an amplifier via HDMI cable.
SPDIF Output
- Choose among SPDIF LPCM or SPDIF RAW to suit your setup.
Surround Sound
- Select to support only 5.1 channels audio or High Definition (HD) audio.
Lip Sync
- Select auto mode to correct lip sync problems automatically with supported devices/displays via HDMI cable, or choose manual to set your own values.
Note: In RAW mode, all audio formats will be passed to the HDMI TV or digital amplifier for decoding. Due to the bandwidth requirement, Dolby TrueHD and Dolby Digital Plus audio can only be passed-though via HDMI cable, also the TV system must support up to 720p or above.
3.1.3 Changing Video Settings
Use this menu to configure video settings.
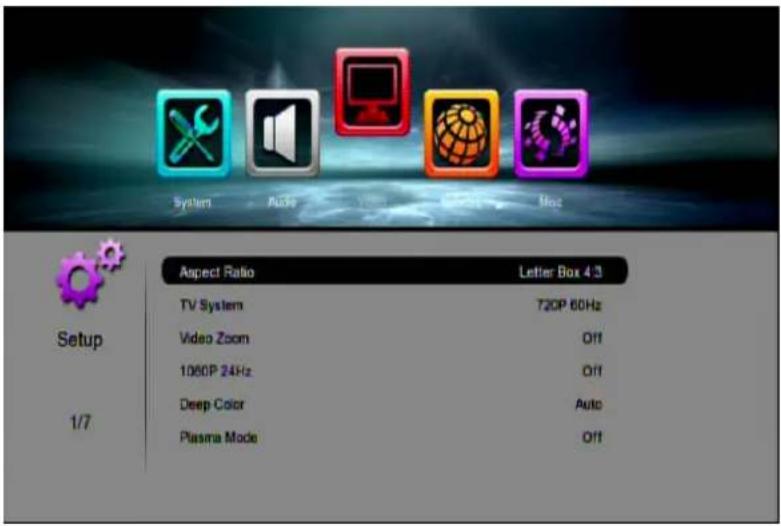
Aspect Ratio
- Pan Scan 4:3: Display a wide image on the entire screen and cuts off the redundant portions. Select this when a standard 4:3 TV is connected.
- Letter Box 4:3: Display a wide image with two black borders on the top and bottom of 4:3 screen. Select this when a standard 4:3 TV is connected.
- 16:9: Compress the image and then converting it. Select when a 16:9 TV is connected.
- 16:10: Select when a 16:10 display device is connected.
TV SYSTEM
- Select to adjust TV types and video output resolution. This includes:
HDMI Auto – Choose this for automatic connection using the HDMI cable
480P - Progressive scanning mode at 640x480 resolution
576P - Progressive scanning mode at 720x576 resolution
720P 50/60Hz – Progressive scanning mode at 1280x720 resolution
1080i 50/60Hz - Interlace scanning mode at 1920x1080 resolution
1080P 50/60Hz – Progressive scanning mode at 1920x1080 resolution
Video Zoom
- Select this to keep video zoom on / off by default
1080P 24Hz
- Choose this option to enable or disable 1080P 24Hz support. A display set with 1080P 24Hz (24p) mode is required for this function to work correctly.
Deep Color
- If your display supports deep color, you can select Auto, 12 bit or 10 bit to obtain more detailed level of color depth, making continuous color change smoother. You will also observe more vivid color effects.
Plasma Mode
- Turn this on if you are connecting to a plasma TV display by reducing the level of brightness.
Screen Size
- Adjust the video display screen size according to your desired area within the red borders, keeping within the maximum area inside the blue borders. When pressing the Zoom button during video playback, the "Fit" selection will then bring the display to that set area.
3.1.4 Changing Network Settings
Use this menu to configure your Wireless Local Area Network.

Connection Type
- Choose between Wireless or Wired, depending on your desired connection to your router.
Wired Lan Setup
- DHCP IP (Auto)
Select to obtain IP address automatically.
- FIX IP (Manual)
Select to manually input the IP Address, Subnet Mask, Default Gateway, and DNS Server IP Address.
Wireless Setup
- The player will list out all available wireless AP (access point) that it can scan, and will display the security type and signal strength next to the AP name.
- Select your desired AP to connect to and the virtual keyboard will pop up asking for your security key input.
- The network connection testing will then begin after the security key is entered. If the
connection is accepted, its network information (Profile Name, IP address, Subnet Mask, Gateway, etc.) will then be displayed on the screen.
PPPoE Setup
- Choose between Wired Interface or Wireless Interface, then key in your ADSL account ID and password, the player will then obtain the IP address automatically from the server based on PPPoE protocol.
Transmission
- Transmission is a popular BitTorrent client. Select this to turn the client on and operate it via a PC/network connected within the same network. Please refer to 'Transmission' page for more details.
SAMBA Process
- Select to turn NAS function On/Off. Please refer to 'SAMBA Server and Client' page for more details on the NAS function.
3.1.5 Miscellaneous
Use this menu to adjust miscellaneous settings.

Version Info
- This menu displays your current system firmware version, as well as its compiled date and bootloader version.
Network Info
- This menu displays information on both Wired and Wireless interface.
Online upgrade
- Select to check for any new updates that may be available. An active internet connection is required to complete this task.
- You can choose to perform the upgrade is a new version is found and this may take more than 10 minutes to complete. Power should not be interrupted during the updating process or you may risk corrupting the firmware and malfunction to occur.
USB upgrade
- Select to update the firmware via a USB flash drive. You can occasionally check our website for any new updates for this player and download the compressed zip package.
1) Unzip the package and then copy the file, 'install.img' to the root directory of a USB flash drive, and then connect it to any USB host ports of the player.
2) Press OK to start reading the USB flash drive and proceed on with confirming the firmware update.
Key Tone Volume
- Select the volume level of Key Tone to hear an audible click sound.
3.2 Movies Menu
After your HDD is scanned (Setup > System > Rescan Storage > Auto scan on), the smart content management system will index your media files accordingly by Movies, Music and Photos. Enter into the movie menu on the home screen and only supported files will be displayed. Please refer to Appendixes in chapter '5.1 Specifications' for more details on the supported file formats.
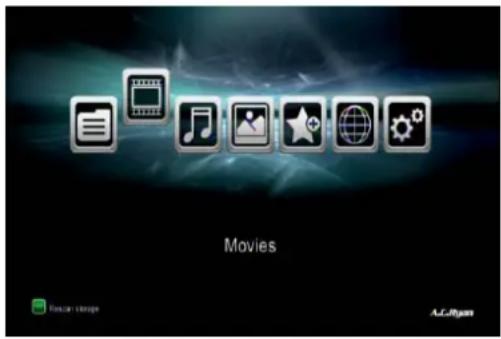
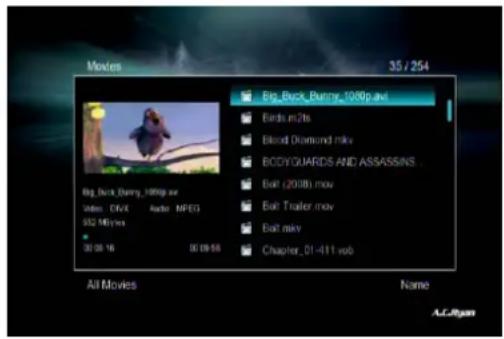
3.2.1 Movie Library Options
In the movie menu, press the MENU button on the remote control to display the options menu, various options will be available such as view layout, sorting by name, size, etc.
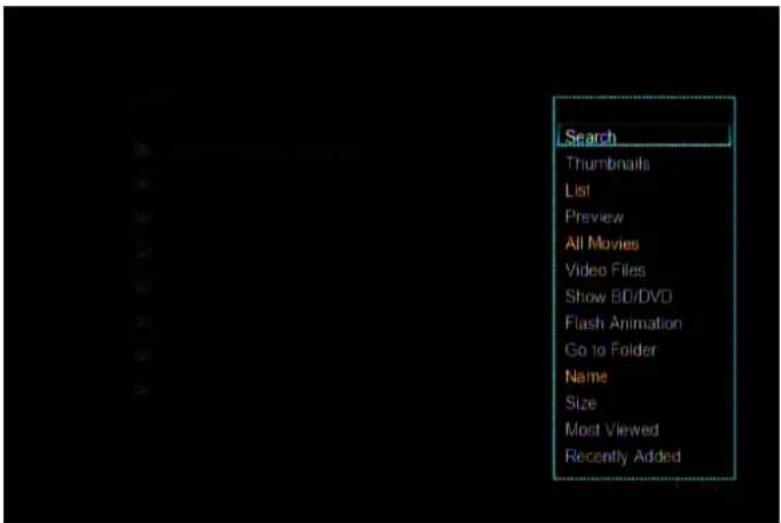
Search
- Choose the Search option in the pop up menu to search for a media file by keying in the title name using the onscreen keyboard that appears.
View mode
- Choose your desired view mode by Thumbnails, List or Preview.
Filters
- Choose to display All Movies titles including DVD/BD folders or compressed images (ISO), or just display all individual Video Files.
Show BD/DVD
- Choose to display only DVD, BDMV folders and ISO files.
Flash Animation
- Choose to display only .swf files.
Sorting Mode
- Choose to sort by Name, Size, Most Viewed or Recently Added.
3.2.2 Movie Playback Control
You can access the following functions during playback.
| Button Function | |
| Play | Start or resume a paused playback. |
| Pause | Pause playback. |
| Prev/Next | Play the previous or next media/chapter. |
| FR/FF | Fast rewind or fast forward. Press repeatedly to select speeds. |
| Goto | Press to jump to a specific point during playback. Skips by Time, Title or Chapter selection |
| Menu | Display or hide the option menu during playback. |
| Stop | Stop playback. |
| VOL+/- | Increase/decrease the volume. |
| Audio | Select an audio track of the video playback. |
| Subtitle | Displays the subtitle menu. |
| Repeat | Set the repeat options. |
| Zoom | Various zoom options available. |
| Info | Displays the video information. |
3.2.3 Movie Playback Options
During movie playback, press the MENU button to display or hide the options menu at the side of the screen.

Various options are available which can also be activated by similar remote control buttons like Subtitle, Audio, Goto and Repeat functions.
Depending on the video file type, you can present it as a normal 2D playback or reproduces it as 3D simulation. You can also choose the 3D Side by Side or 3D Top Bottom options if your video file is presented in either way.
*Note: You will need a 3D compatible display if you choose to playback in either of the 3D modes.
DVD/BD Menu
This option will be made available when you start playing a DVD or BD file.
- Title menu, returns to the title menu of the DVD title.
- Root menu, returns to the main navigation menu of the DVD title.
- Top menu, displays the BD menu while playback is in progress.
- Menu, returns to the main navigation menu of the BD title.
Video Setting
- Select to adjust the value of Brightness, Contrast, Saturation and Hue.
3.3 Photo Menu
After your HDD is scanned (Setup > System > Rescan Storage > Auto scan on), the smart content management system will index your media files accordingly by Movies, Music and Photos. Enter into the photo menu on the home screen and only supported files will be displayed. Please refer to Appendixes in chapter '5.1 Specifications' for more details on the supported file formats.
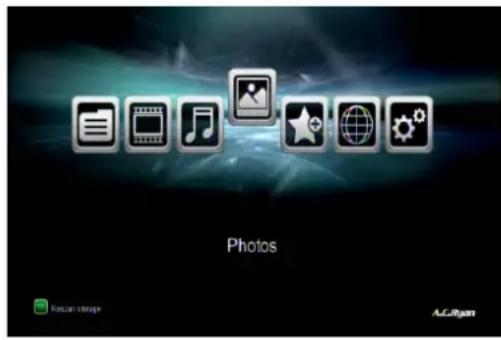

3.3.1 Photo Library Options
In the photo menu, press the MENU button on the remote control to display the options menu, various options will be available such as view layout, sorting by name, recently added, etc.
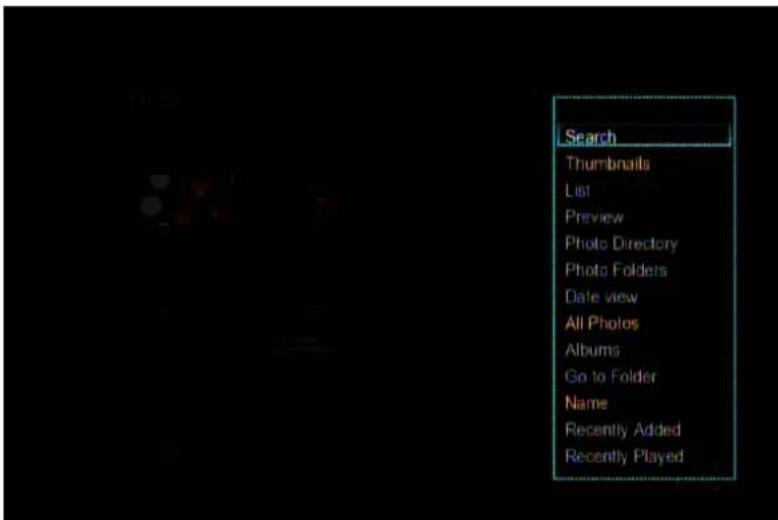
Search
- Choose the Search option in the pop up menu to search for a media file by keying in the title name using the onscreen keyboard that appears.
View mode
- Choose your desired view mode by Thumbnails, List or Preview.
Filters
- Choose to display All Photos, Albums or directly jump to the folder containing the current selected image by choosing Go to Folder.
Sorting Mode
- Choose to sort by Name, Size, Recently Added or Recently Played.
Photo Directory
- Choose to display all folders.
Photo Folders
- Choose to display all folders that contain photos.
Date view
- Choose to view photos according by date.
3.3.2 Photo Playback Control
You can access the following functions during photo playback.
| Button Function | |
| Prev/Next | View the previous or next photo. |
| Up/Down | Up – Rotates counter-clockwise, Down – Rotates clockwise. |
| Menu | Display or hide the option menu during playback. |
| Stop | Stop playback. |
| Zoom | Various zoom options available. |
3.3.3 Photo Playback Options
During photo playback, press the MENU button to display or hide the options menu at the side of the screen.

The repeat options are available here which can also be activated by pressing the Repeat button on the remote control.
Depending on the photo file type, you can present it as a normal 2D playback or reproduces it as 3D (if your photo supports) by choosing the 3D Auto option. You can also choose the 3D Side by Side or 3D Top Bottom options if your photo file is presented in either way.
*Note: You will need a 3D compatible display if you choose to playback in either of the 3D modes.
Slide Timing
- Select to choose the slideshow interval by 2, 5, 10 or 30 seconds. Select Off if you do not wish to run your photos as a slideshow.
Slide Transition
- You can apply various slideshow transition effects by choosing the desired one from the selection, or apply random effects by choosing 'All Effect Shuffle'.
Background Music
- Select to enable playing background music during your slideshow playback.
- Select either the default system music or your own music during photo playback.
Video Setting
- Select to adjust the value of Brightness, Contrast, Saturation and Hue.
3.4 Music Menu
After your HDD is scanned (Setup > System > Rescan Storage > Auto scan on), the smart content management system will index your media files accordingly by Movies, Music and Photos. Enter into the music menu on the home screen and only supported files will be displayed. Please refer to Appendixes in chapter '5.1 Specifications' for more details on the supported file formats.


3.4.1 Music Library Options
In the music menu, press the MENU button on the remote control to display the options menu, various options will be available such as view layout, sorting by name, recently played, etc.

Search
- Choose the Search option in the pop up menu to search for a media file by keying in the title name using the onscreen keyboard that appears.
View mode
- Choose your desired view mode by Thumbnails, List or Preview.
Filters
- Choose All Songs to display all music files that are indexed by the system.
- Choose Albums to search and display music files by album.
- Choose Artists to search and display music files by artist.
- Choose Genres to search and display music files by genre.
- Choose Years to search and display music files by modified year.
- Choose Playlists to search and display your music playlists.
- Directly jump to the folder containing the current selected image by choosing Go to Folder.
Sorting Mode
- Choose to sort by Recently Played, Recently Added or Name.
3.4.2 Music Playback Control
You can access the following functions during music playback.
| Button Function | |
| Play | Start or resume a paused playback. |
| Pause | Pause playback. |
| Prev/Next | Play the previous or next media/chapter. |
| FR/FF | Fast rewind or fast forward. Press repeatedly to select speeds. |
| Menu | Display or hide the option menu during playback. |
| VOL+/- | Increase/decrease the volume. |
| Repeat | Set the repeat options. |
3.4.3 Music Playback Options
During music playback, press the MENU button to display or hide the options menu at the side of the screen.

Repeat mode
- Choose a repeat mode among Repeat off, Repeat One, Repeat all or Shuffle Loop from the popup menu.
- The repeat options available here can also be activated by pressing the Repeat button on the remote control.
3.5 Files Manager
The files manager allows you to browse and navigate through your own media files to play music, photo and movie stored on the internal HDD, external USB storage device, memory card and network.

![HDD/All 8/11 Blood Diamond mktv Cyberg She 100p mktv h.204 mp3.MKV Hame: 100p.mktv Iran: deep sea, In 100p.mktv Indiana Jones IV 100p.mktv Iran_Mon_2 [DivX_Fits_HDI].mktv Punyscat Delta Live Earth 2007 T2 HDD (C) |MKV Videos Operations A.C.Ryam](/content/2026/05/919868/images/c66bec670d6b0f94f94b89d902584755410a5160bd1fe68e6c8b8fc17aacb10d.jpg)
3.5.1 Files Manager Options
In the Files Manager menu, press the MENU button on the remote control to display the options menu, various options will be available such as view layout, filtering by All Media, Movies, etc.
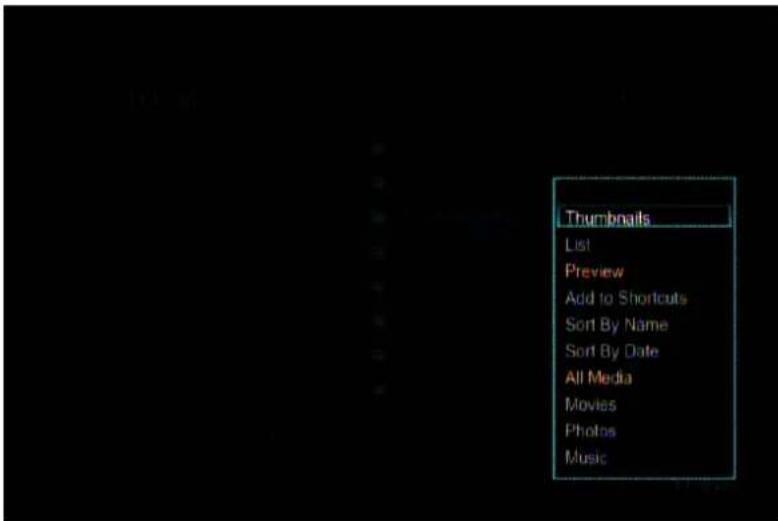
View mode
- Choose your desired view mode by Thumbnails, List or Preview.
Filters
- Choose All Media to display all supported video, audio and photo files in the current directory.
- Choose Movies to display only supported video files in the current directory.
- Choose Photos to display only supported photo files in the current directory.
- Choose Music to display only supported audio files in the current directory.
3.5.2 A/V Streaming via Network
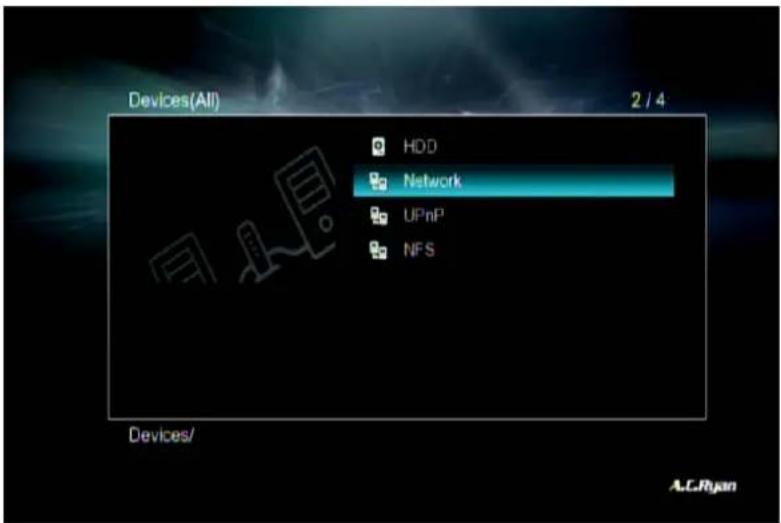
You can stream your media files that are shared on your local network. Please refer to '3.1.4 Changing Network Settings' for more details on network settings.
There are two ways to locate media files shared on your local network in the Network menu. One is to browse through your workgroup; the other way is to browse through 'My_Shortcuts'.

3.5.2.1 Browsing though workgroup
From the list of discovered workgroup names, locate your PC's workgroup name first, press the OK button and then continue to locate your PC's name, and then press the OK button again to enter. You would now be able to select and play your shared media files.


Note:
- Due to different network conditions, sometimes the workgroup might not be accessible or displayed in the list. When this happen you may need to use 'My_Shortcuts' to browse your shared files by entering your PC's IP address.
3.5.2.2 Browsing though 'My\_Shortcuts'
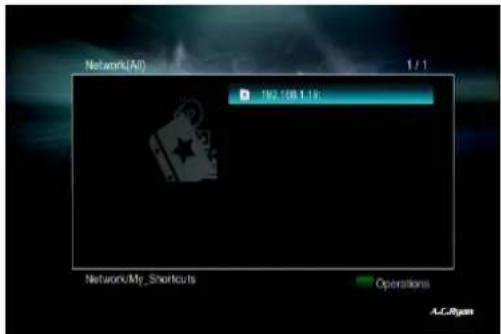
While you are in Network > My_Shortcuts,
- Press the Green button on the remote control and a menu will appear.

- Select Add and then key in your User Name, Password and the Specific File Server IP address of your PC. You can leave the User Name and Password entry empty if you do not need these details to login to your shared folders. Select OK to confirm, or select Detail for more advanced options.

- Select the shortcut you have just added and press the OK button to confirm. You can now select and play your shared media files.

3.5.3 A/V Streaming via UPnP-server
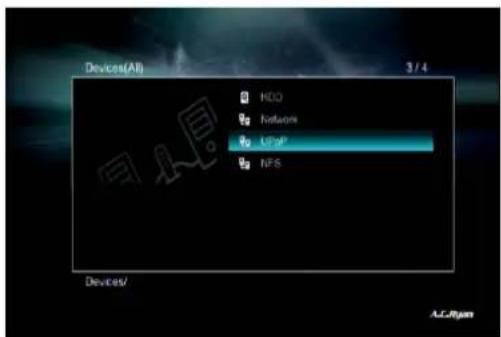
A built-in UPnP (Universal Plug and Play) client has been installed in the system, which enables the player to auto-detect UPnP Media Servers on the network to browse and stream media files from them.

3.5.3.1 Installing UPnP Media Server on your PC
There are a number of free and paid UPnP Media Server software, such as Windows Media Connect, Windows Media Player 11, XBMC Media Center (Linux/Mac/Windows), MediaTek (Linux), etc. Please install one of them on your PC if you would want to stream using the UPnP protocol. In the following chapters, we will take Windows Media Player 11 running on Microsoft Windows XP SP2 as an example.
3.5.3.2 Sharing Media on your PC
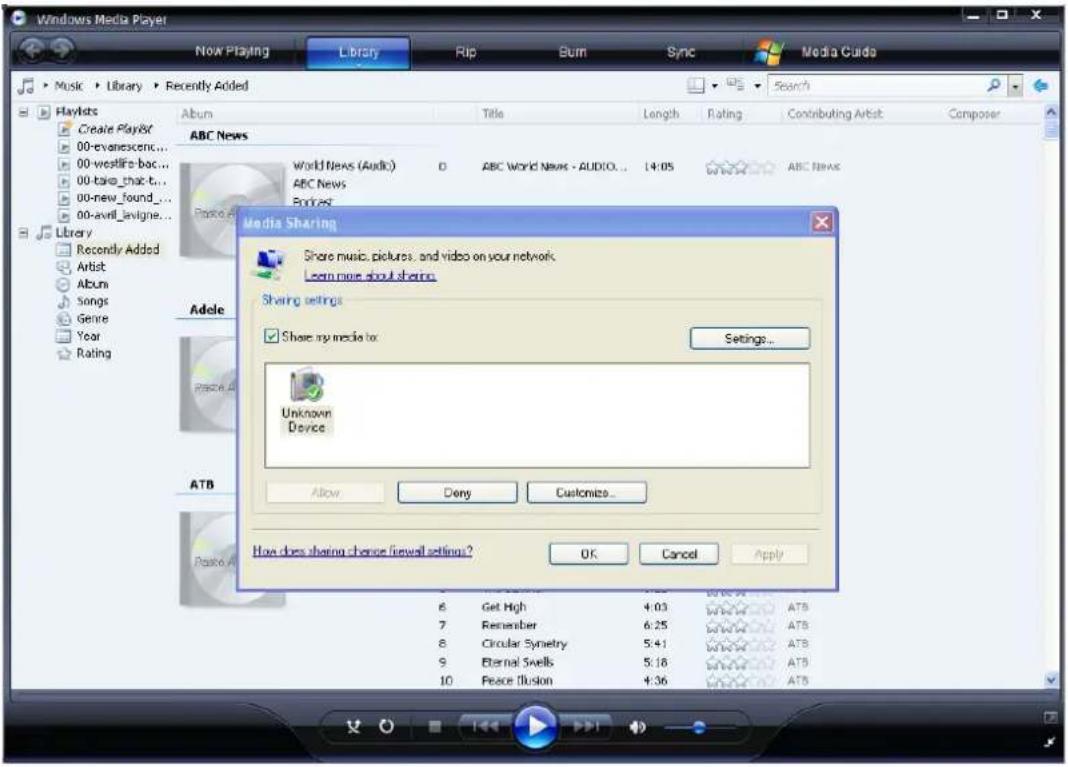
The Media Sharing feature of Windows Media Player 11 allows you to enjoy the contents of your Windows Media Player library from anywhere in your home.
- Launch Windows Media Player 11, click Library -> Add Library -> Advanced Options to add or remove media files from the library.

- Click Library -> Media Sharing, from here you can allow or deny devices to access the media library. Click Allow to authorize your player.
3.5.3.3 Streaming Media on your Player
- Connect your player to your local network (Wired LAN or Wireless LAN).
- From Files Manager > UPnP menu on the player, select the UPnP-server from the list that appears, and then press OK.
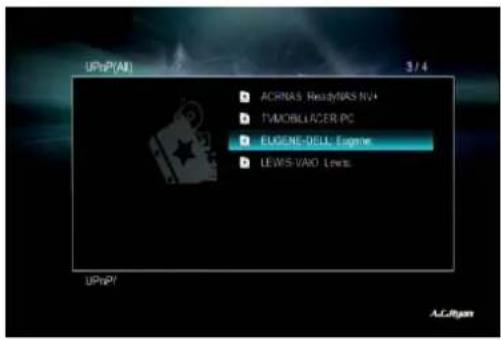

- You can now browse your media library that is shared by Windows Media Player 11.
Note:
- Your player and PC must be on the same local network and subnet.
- Firewall settings may prevent the player to communicate with your computer. Please open the ports manually or add your player to the 'trusted' list, or disable the firewall temporarily.
3.6 Favorites Menu
If you have frequently accessed media files or folders, you can add them as shortcuts in the Favorites menu on the home screen, for quicker and more convenient access.

To add your desired files or folders to the Favorites menu, navigate via the Files Manager to the file or folder you wish to add. Press the MENU button on the remote control to display the options menu and from the list, select 'Add to shortcuts' and press the OK button.
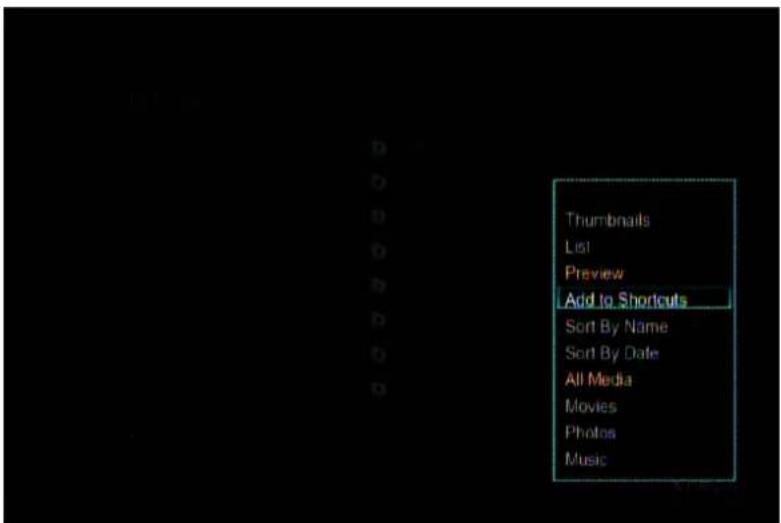
Once added, you can now find the newly added shortcuts in the Favorites menu. To delete from the Favorites menu, select the file of folder you wish to remove from the Favorites menu and then press the RED button on the remote control.

3.7 Playlist management
3.7.1 Music playlist
In Files Manager, when you navigate to the folders that contains your music files, you can do a multi selection and then save them to a playlist.
To do so, press the Green button on your remote control and select the option, 'Multiple Select'. From the left pane you can select files or folders to add to the current file list by pressing the play button of your remote control.

When you are done selecting, press the Green button on your remote control and select 'Save Playlist' and key in your desired filename.

The playlist will be saved on the root directory of your internal HDD, you can locate your playlist file under Files Manager, or from the Music menu of your home screen, press the MENU button and choose Playlists to display all of your saved music playlists.
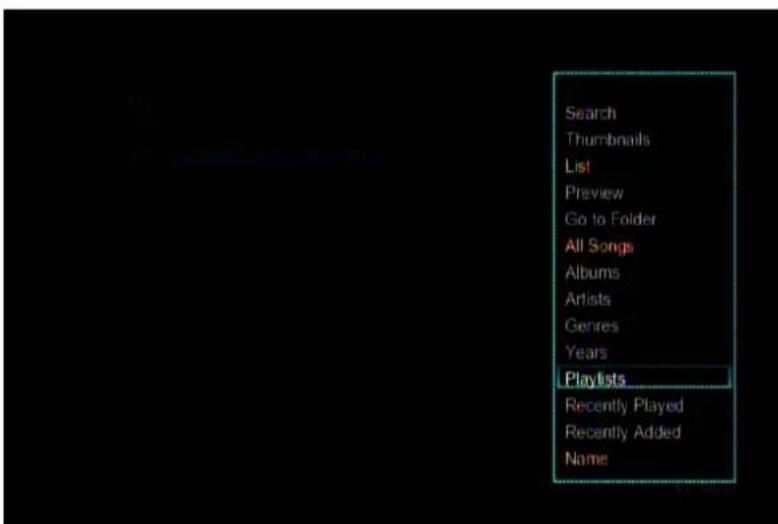
If you do not see your saved music playlists from the Music menu after doing the above, please make sure that the autoscan function has been turned on. You can check this under Setup > System > Rescan storage. Please make sure 'Auto scan on' is selected. You can also do an ad-hoc scan by choosing 'Resume scan'.
3.7.2 Photo Album
Using the same multiple selection method as describe above, you can also save your photos selection as albums. When you are done selecting, navigate to the right pane and then press the Green button on your remote control. Select 'Save Photo Album' and key in your desired filename.

The playlist will be saved on the root directory of your internal HDD, you can locate your playlist file under Files Manager, or from the Photo menu of your home screen, press the MENU button and choose Albums to display all of your saved albums.

If you do not see your saved albums from the Photos menu after doing the above, please make sure that the autoscan function has been turned on. You can check this under Setup > System > Rescan storage. Please make sure 'Auto scan on' is selected. You can also do an ad-hoc scan by choosing 'Resume scan'.
3.8 Copy Function
3.8.1 Copy under Movies, Music or Photos menu
Step 1. Press the Green button to enter the multiple select menu.
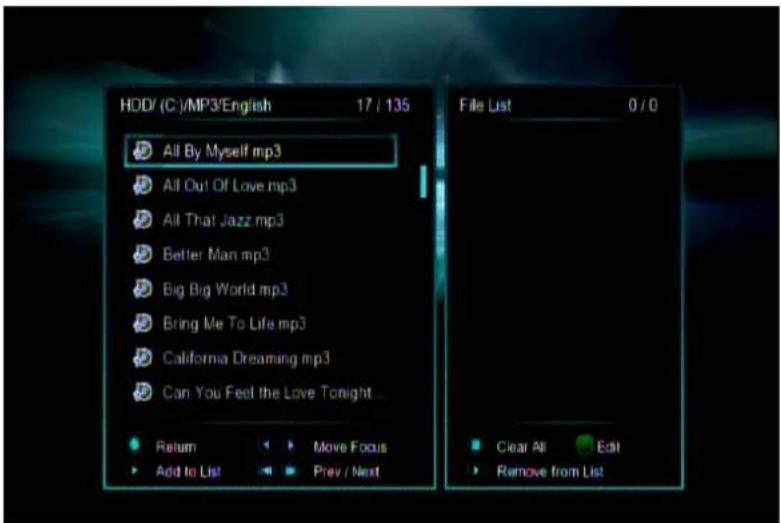
Step 2. Press the Play button to select the file or folder which you want to copy to the list.
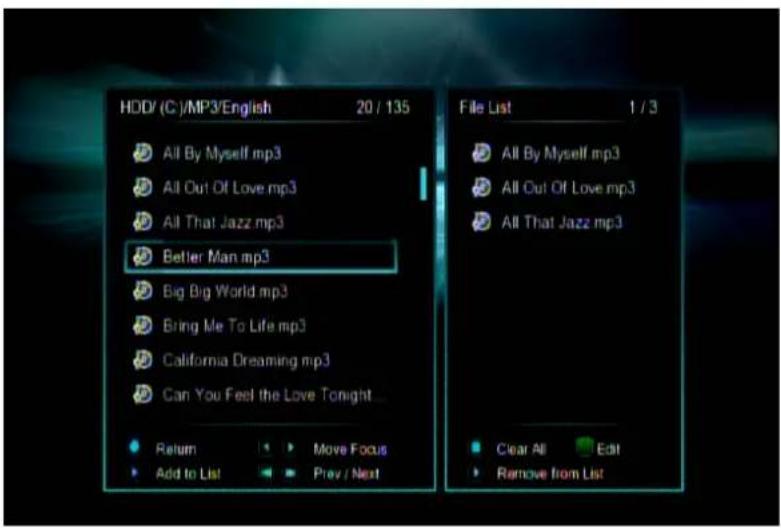
Step 3. Press the Green button after you are done selecting to display the Multi-File Editing menu. From this menu, you can choose to copy, delete or move your selection.

Step 4. Select the destination directory, and then press the Play button to confirm the operation. You can also press the Zoom button to create a new folder before the operation.
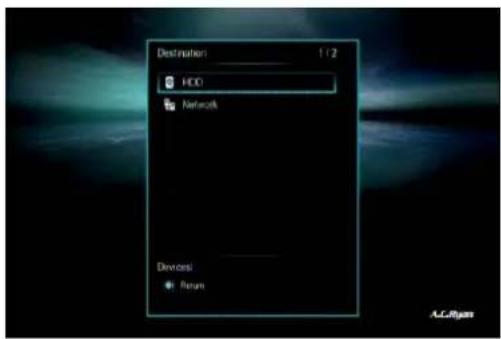
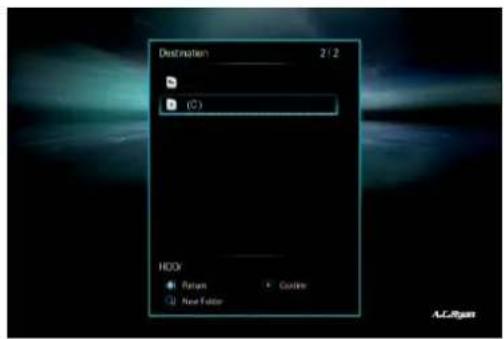
3.8.2 Copy under Files Manager
Press the Green button to enter the File Editing menu, choose Copy and select the destination directory, and then press the Play button to confirm the operation. You can also press the Zoom button to create a new folder before the operation.
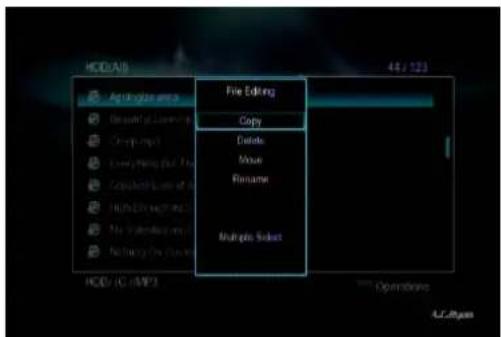

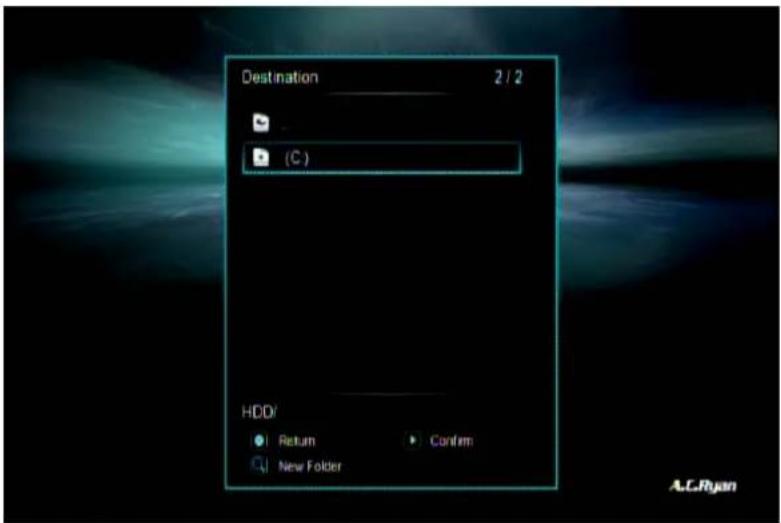
If you want to select multiple files and folders, please choose the Multiple Select option instead.

3.9 Internet Media
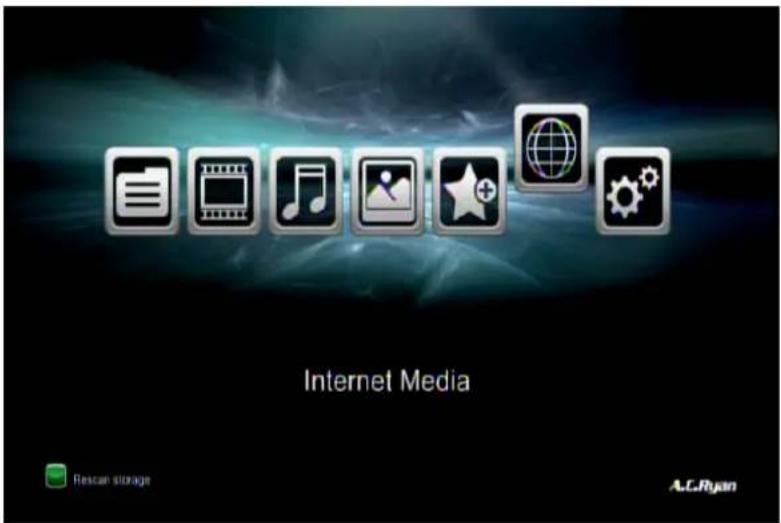
All contents and services provided in this menu are offered and maintained by third-party service providers. Our company will not hold any responsibility for any of these contents or services, and is not responsible for any operational stability of these usages. For example, if you cannot access certain web sites for video streaming or news broadcast, or the content of web sites has been changed, etc, are all responsibilities and controlled by the third-party service providers.

Other than these third-party services, RealPilot is a lite, non-flash web browser for you to surf the internet.

Press the MENU button your remote control for more options or to manually key in the URL of the website you wish to view at the address bar at the top.

Due to the limitation of the lite browser, you need to include the http:// header when you key in the URL address of the web site you are trying to reach. For example if you wish to visit www.yahoo.com you are required to key in full http://www.yahoo.com

If you discovered any of these features that are not operating properly, please contact our customer service or visit our company website to obtain any latest information we may release.
Note: Certain features in the internet media menu such as YouTube XL, facebook, RealPilot, can be better experienced with the use of a keyboard and mouse. You can use any USB keyboard and mouse by plugging in to the USB host ports of the player.
3.10 SAMBA Server and Client
This player can function either as a SAMBA server or client.
3.10.1 SAMBA Client
- The client service is always running in the background. You do not need to do anything to turn this on. With SAMBA client service, you can stream media files shared on your local network. Please refer to '3.5.2 A/V Streaming via Network' for more details.
3.10.2 SAMBA Server
- This product functions as a NAS (Network Attached Storage) device when it is included in your local network, either via Wired LAN or Wireless LAN. This function allows users to store and retrieve data from within their own local network.
- When the network connection is done correctly and ready for use, please turn on SAMBA Process function in the Setup > Network menu (refer to 3.1.4 Changing Network Settings for more details).
- From your PC, go to your file explorer and then click on the Network tab. You will be able to see a network device named PLAYONHD3D. Please take note that the discovery time varies with different brand/model of routers and in certain configuration you may not even be able to see this host name in your network.

If you still do not see the PLAYONHD3D device in your network, you can make a direct connection to it via its IP address. To find out the IP address of the player, please go to Setup > Misc > Network Info menu and take note of the IP address information.
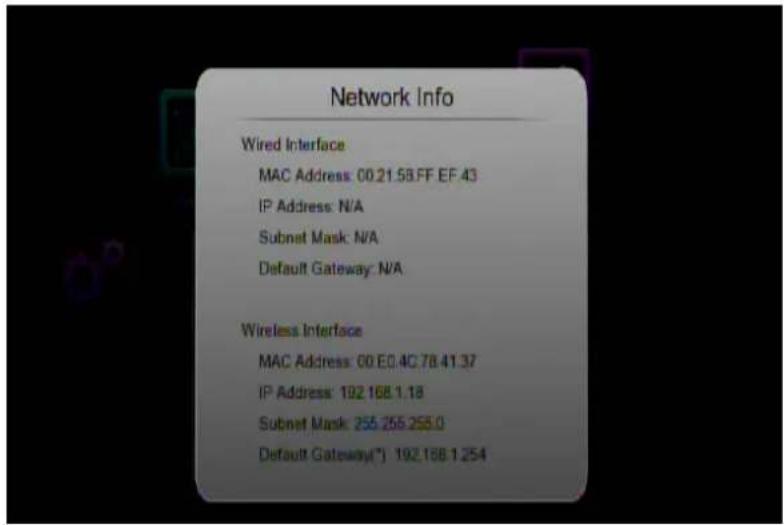
From your Windows Explorer, type in the IP address of the player in the address bar at the top of the screen. For example, \192.168.1.18
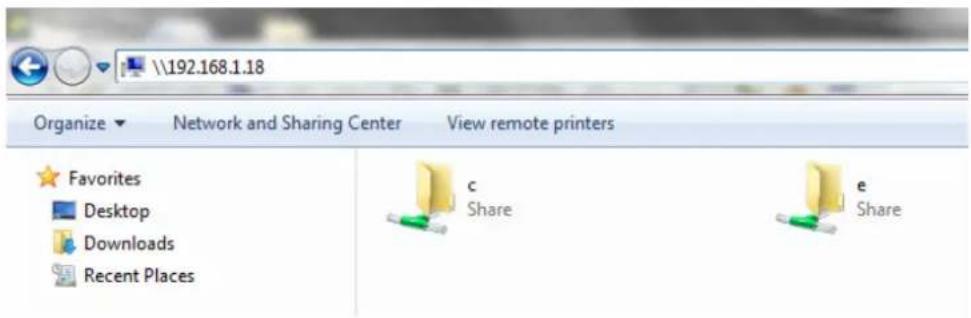
You can then manage the files stored on the internal HDD or external USB storages that is attached to the player. In this way, you can also playback and copy files via network between your PC and the player.
3.11 Transmission
Transmission is a popular BitTorrent client which is already installed in the player's firmware. You can use this client to download torrents from the internet and store the downloaded files in the internal HDD when the task is completed.
Please go to Setup > Network > Transmission to turn on the client. Prior to turning on the client, you need to connect the player to your local network with an available internet connection. The port number to access this Transmission client is 9091 which you can key in your PC's web browser address bar to access the configuration page.
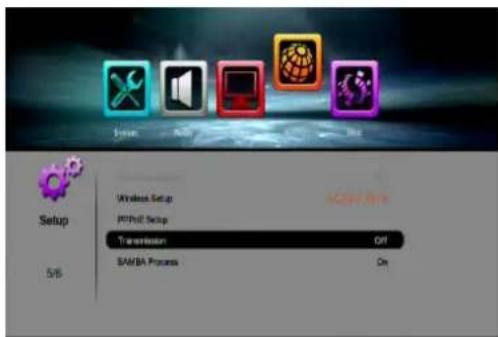

For example if your player's IP address is 192.168.1.18, you need to key in 192.168.1.18:9091 in the address bar. Once you are connected to the configuration page, you will be able to add your torrent files by clicking on the 'Open Torrent' icon at the top left corner.

Following this you would be able to click on Choose Files to locate the .torrent file which you have already downloaded to your PC.
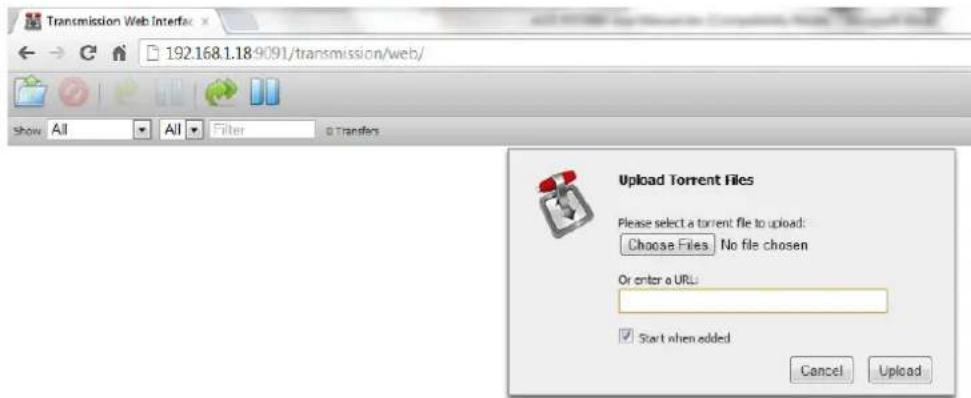
The tasks will start immediately when you click on the Upload button. You will then be able to see the current status of your torrent files.

Important note on using Transmission client
- Torrent programs are memory intensive and may slow down your player's performance while tasks are downloading/uploading.
- Users may feel significant performance difference as compared to running similar torrent tasks on a PC. This is normal as the hardware performance of a PC is more superior than this player. Nevertheless we recommend that you use the player for your torrent task on a casual basis to take advantage of the low power consumption while running it over long hours.
- Due to the firmware SDK limitation, all settings made in the client configuration page are only active per session. All settings made will be reset back to defaults when the player is rebooted.
4 Upgrading the Firmware
The firmware is the operating system (OS) installed on the device. Firmware upgrades can bring new features, improvements and bug fixes.
There are 3 methods to perform the firmware update for this player.
1. Online upgrade
- Enter Setup > Misc and then select Online upgrade to check for any available updates
- Press OK when the system finds a new version and prompted to update
*Please take note that the system may appear irresponsive for 10mins or more during the downloading process.
2. System flash
- Copy the install.img file to the root directory of a FAT32 formatted USB flash drive
- Plug in to an available USB host port
- Enter Setup > Misc and then select USB upgrade
- Press OK when the system prompted to update
3. Safe-mode flash
- Copy the install.img file to the root directory of a FAT32 formatted USB flash drive
- Plug in to an available USB host port
- Switch off the main power
- Press and hold on to the power button on the front panel and at the same time, switch on the main power
- Release the power button when the update starts flashing on your screen
Please ensure that power is not interrupted during the flashing process.
5 Appendixes
5.1 Specifications
I/O INTERFACES SUPPORTED:
- Gigabit Network Adapter
● Built-In Wireless N Adapter
● 3.5" SATA HDD (not included) - USB 3.0 Slave port (compatible to USB 2.0)
- 4x USB 2.0 Host port (compatible to USB 1.1)
- Composite (CVBS) A/V jack
- Component Y/Pb/Pr jack
- HDMI 1.4 interface
● S/PDIF Optical & Coaxial jack - DC-IN 12V 3A
NETWORK FEATURE
● 10/100/1000Mbps Auto-Negotiation Ethernet
● 802.11b/g/n Wireless LAN
FILE SYSTEM SUPPORTED:
Note: The specifications and design of this product are subject to change without notice.
5.2 Frequently Asked Questions
Question 1
When I try to disconnect the USB device, I keep on getting “The device ‘Generic volume’ cannot be stopped right now. Try stopping the device again later.” message, what should I do?
Answer:
Close any program that might be accessing data on the player, including Windows® Explorer. If it does not work, close all programs and wait for another 20 seconds, then try the green arrow icon again. If it still does not work, you should shut down the player and disconnect the USB cable.
Question 2
I find new file names and folder names that I never created before or they have strange gibberish names.
Answer:
Most likely, the player's file allocation table (FAT) has been corrupted. This might be due to the player shutting down (due to low battery power) while reading or writing to your computer by the USB connection. Windows and Macintosh often write extra files to the hard disk such as finder.def or System volume info. These are normal and will not do any harm to the player.
Question 3
I used my player to transfer files back and forth between different computers. Will defragmenting the player hard disk do any harm to it?
Answer:
Defragmenting the player hard disk may be useful after having transferred many files to and from the player. It is never harmful to use the defragment on the player. Make sure no other programs are running while using the Windows® defragment utility. Make sure you have connected the player with the external power adapter during this procedure.
Question 4
My files have disappeared from the player.
Answer:
Make sure that you browse your files via the correct browser mode which means correct filtered views such as Photos, Music, or Movies.
Question 5
During power on, why does the TV will have a short flashing, blue screen or screensaver?
Answer:
This is normal, when the system initializes, it will setup the corresponding parameters so it can output the correct video signal to the TV, during the initializing time, the TV will receive incorrect signals or the signals will not be stable and will cause the TV screen to flash, some TV's will treat this as no signal, and will display a blue screen or screensaver.
Question 6
Why is my internal HDD not detected?
Answer:
Make sure the firmware is installed correctly, and no system partitions on the HDD were deleted. If hard disc failure occurs, please backup your data and reinstall the firmware.
Question 7
Why does the transfer rate of my internal HDD cannot reach up to 3Gbps or higher when connected to my PC?
Answer:
Make sure there is a USB 3.0 host controller installed on your PC, the transmission speed is related with HDD itself and also the configuration of PC.
Question8
Why is my USB storage drive not shown in the files manager menu?
Answer:
Try to use a shorter USB cable or plug in the power cable to your USB storage drive if it requires more power. We suggest that you do not plug in more than one USB storage drive at the same time.
6 Copyrights and Trademarks
Copyrights
All rights reserved
No part of this manual may be reproduced, or transmitted in any form or by any means, whether by electronically or mechanically, without the express written permission from the copyright holder.
Copyrighted materials, such as software, music files, or movies, are protected by local law, and may not be illegally copied or used without permission from the copyright owner.
Trademarks
Microsoft and Windows are registered trademarks of Microsoft Corporation.
All other trademarks are property of their respective holders.

dts ^TM
2.0+Digital Out
Manufactured under license under U.S. Patent #'s:5,451,942; 5,956,674; 5,974,380; 5,978,762; 6,487,535 & other U.S. and worldwide patents issued & pending. DTS and DTS 2.0 + Digital Out are registered trademarks and the DTS logos and Symbol are trademarks of DTS, Inc. © 1996-2008 DTS, Inc. All Rights Reserved.
DOLBY.
DIGITAL
Manufactured under license from Dolby Laboratories.
Dolby and the double-D symbol are trademarks of Dolby Laboratories.
7 Warranty
What your warranty does not cover:
-Acts of nature, such as fire, static discharge.
-Damage from unauthorized repair, alteration or accident.
-Damage from misuse or neglect.
-A unit that has been modified or incorporated into other products or is used for institutional or other commercial purposes.
-Loss of customer's software, firmware, information, or memory data.
-Improper handling or installation.
8 GPL Statement
This product contains free software which is licensed under the GNU General Public License. After you purchase this product, you may procure, modify or distribute the source code of the GPL/LGPL software that is used in this product.
To obtain a copy of our open source software, please contact our support center and we will provide you with a CD-ROM of the source code that is used, charging only the actual expense involved. However, please be noted that we cannot provide guarantee with the source code, and there is also no technical support for the source code from us.
- User Information
- Caution
- Usage cautions
- Power
- Radio interference/compatibility
- Repair
- Disposing of the player
- Hard disk cautions
- Others
- Product Introduction
- Product Overview
- Network Feature
- Movie Playback
- Music Playback
- Photo Viewing
- USB 3.0 & 2.0 Support
- File Copy
- Package Contents
- Note:
- Connection
- Power connection
- USB Mass Storage Device (like USB stick, USB HDD etc.) connection
- TV connection
- A/V out
- Y/Pb/Pr Component out
- HDMI out
- Digital Audio Device connection
- Connecting to a LAN
- Connecting to a WLAN
- Front Panel
- Side Panel
- Back Panel
- First Time Usage
- Power On / Off
- Power On
- Power Off
- Menu language
- HDD Format
- Remote Control
- Main Functions
- Setup Menu
- Changing System Settings
- Menu Language
- Text Encoding
- DVD Auto-Play
- BDMV Folder Auto-Play
- Screen Saver
- DLNA DMS
- DLNA DMR
- Host Name
- Keyboard input method
- Rescan storage
- Resume Play
- Format
- BD-Lite Menu
- CEC
- Auto standby
- Restore Default
- Changing Audio Settings
- Night Mode
- HDMI Output
- SPDIF Output
- Surround Sound
- Lip Sync
- Changing Video Settings
- Aspect Ratio
- TV SYSTEM
- Video Zoom
- 1080P 24Hz
- Deep Color
- Plasma Mode
- Screen Size
- Changing Network Settings
- Connection Type
- Wired Lan Setup
- Wireless Setup
- PPPoE Setup
- Transmission
- SAMBA Process
- Miscellaneous
- Version Info
- Network Info
- Online upgrade
- USB upgrade
- Key Tone Volume
- Movies Menu
- Movie Library Options
- Search
- View mode
- Filters
- Show BD/DVD
- Flash Animation
- Sorting Mode
- Movie Playback Control
- Movie Playback Options
- DVD/BD Menu
- Video Setting
- Photo Menu
- Photo Library Options
- Photo Directory
- Photo Folders
- Date view
- Photo Playback Control
- Photo Playback Options
- Slide Timing
- Slide Transition
- Background Music
- Music Menu
- Music Library Options
- Music Playback Control
- Music Playback Options
- Repeat mode
- Files Manager
- Files Manager Options
- A/V Streaming via Network
- Browsing though workgroup
- Browsing though 'My\_Shortcuts'
- A/V Streaming via UPnP-server
- Installing UPnP Media Server on your PC
- Sharing Media on your PC
- Streaming Media on your Player
- Favorites Menu
- Playlist management
- Music playlist
- Photo Album
- Copy Function
- Copy under Movies, Music or Photos menu
- Copy under Files Manager
- Internet Media
- SAMBA Server and Client
- SAMBA Client
- SAMBA Server
- Transmission
- Important note on using Transmission client
- Upgrading the Firmware
- Online upgrade
- System flash
- Safe-mode flash
- Appendixes
- Specifications
- I/O INTERFACES SUPPORTED:
- FILE SYSTEM SUPPORTED:
- Frequently Asked Questions
- Question 1
- Answer:
- Question 2
- Question 3
- Question 4
- Question 5
- Question 6
- Question 7
- Question8
- Copyrights and Trademarks
- Copyrights
- All rights reserved
- Trademarks
- Warranty
- What your warranty does not cover:
- GPL Statement
Brand : AC Ryan
Model : Playon!HD3
Category : Media player