
F7-2 Digi-A - Oven PKM - Free user manual and instructions
Find the device manual for free F7-2 Digi-A PKM in PDF.


| Product Type | Built-in electric oven |
| Brand | PKM |
| Model | F7-2 Digi-A |
| Energy Efficiency Class | A |
| Energy Consumption (Conventional) | 0.88 kWh |
| Energy Consumption (Circulating Air) | 0.61 kWh |
| Usable Volume | 65 L |
| Maximum Power | 2.30 kW |
| Voltage / Frequency | 220-240 V / 50 Hz |
| Dimensions (W x H x D) | 59.5 x 59.5 x 59.0 cm (min depth) |
| Weight (Net / Gross) | 27.5 kg / 31.4 kg |
| Control Panel | Rotary switches + digital display with timer |
| Oven Functions | Defrosting, top+bottom heat, top+bottom with convection, bottom heat with convection, grill with convection, grill, top heat with grill, ECO |
| Temperature Range | 50°C to 250°C |
| Grill / Convection / Hot Air | Yes / Yes / Yes |
| Door Type | Full glass interior, 3 glass layers |
| Handle and Knobs Material | Aluminum |
| Accessories Included | 1 drip tray, 1 griddle |
| Power Cable Length | 150 cm |
| Replacement Light Bulb | 25W, G9 base, 300°C heat-resistant |
| Cleaning and Maintenance | Clean with warm water and mild detergent; avoid abrasive cleaners; never use steam cleaner |
| Safety Features | Enclosure cooling, oven door interlock, child supervision warning |
| Warranty | 24 months from date of purchase |
Frequently Asked Questions - F7-2 Digi-A PKM
User questions about F7-2 Digi-A PKM
0 question about this device. Answer the ones you know or ask your own.
Ask a new question about this device
Download the instructions for your Oven in PDF format for free! Find your manual F7-2 Digi-A - PKM and take your electronic device back in hand. On this page are published all the documents necessary for the use of your device. F7-2 Digi-A by PKM.
USER MANUAL F7-2 Digi-A PKM
natural_image
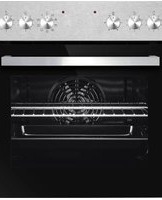
Front view of a stainless steel oven with digital display and control knobs (no visible text or symbols)Deutsch
Seite 2
English
Page 33
natural_image
Diagram of a simple enclosure with a bed, solar panel, and window (no text or symbols)natural_image
Simple line drawing of a bowl with a fan and a blue circular arrow indicating rotation (no text or symbols)natural_image
Technical line drawing of a mechanical linkage assembly (no text or symbols)A

natural_image
Technical line drawing of a mechanical assembly with no visible text or symbolsB

natural_image
Technical line drawing of a layered electronic component or circuit board (no text or symbols)Dear customer! We would like to thank you for purchasing a product from our extensive range. Please read the entire operating instructions before using the appliance for the first time. Keep these operating instructions in a safe place for future reference. If you pass the appliance on to someone else, you must also hand over these operating instructions.
Contents
Contents 33
- safety instructions .... 35
- installation 38
2.1 Unpacking and selecting the location.... 38
2.2 Installing the oven 39
2.3 Electrical connection 43
- operation 43
3.1 Before first use.... 44
3.2 Device / control panel / display 45
Oven....45
3.2.3 Control panel 45
3.2.4 Display.... 46
3.3 Using the oven.... 46
3.3.2 Manual operating mode.... 48
3.3.3 Setting the time....48
3.4 Programming the oven.... 49
3.4.1 Timer.... 49
3.5 Oven functions .... 51
- instructions for cooking....52
4.1 Tips for baking and roasting.... 53
4.2 Saving energy....53
- cleaning and care 54
5.1 Replacing the light source 54
4.2 Removing the side guides .... 55
4.3 Removing the oven door.... 55
5.4 Troubleshooting.... 56
- technical data....57
7.disposal....58
- warranty conditions.... 58
EC - Declaration of Conformity
★ The products described in these operating instructions comply with all harmonized requirements.
★ The relevant documents can be requested by the competent authorities via the product seller.
The illustrations contained in these operating instructions may differ in some details from the actual design of your device. If this is the case, please follow the instructions. Delivery without contents.
i The manufacturer reserves the right to make changes that do not affect the operation of the device.
i Dispose of the packaging material in accordance with the local regulations of your place of residence.
The appliance you have purchased may have been improved in the meantime and may therefore differ from the operating instructions. Nevertheless, the functions and operating conditions are identical so that you can make full use of the operating instructions
i We reserve the right to make technical changes and printing errors.
1. safety instructions
Read all the safety instructions carefully before using the appliance for the first time. The information contained therein is intended to protect your health. Failure to observe the safety instructions can lead to serious damage to your health and, in the worst case, to death.
⚠️ DANGER! indicates a hazardous situation which, if not averted, will result in immediate danger to life and health.
WARNING! indicates a hazardous situation which, if not avoided, may result in imminent danger to life and health.
⚠️ CAUTION! indicates a hazardous situation which, if not avoided, could result in moderate or minor injury.
NOTICE! indicates a hazardous situation which, if not avoided, may result in damage to the appliance.
Keep these operating instructions in a safe place so that they are always to hand when required. Follow all instructions carefully to avoid accidents or damage to the appliance.
i Be sure to check the technical environment of the device! Are all the cables or lines leading to your appliance in good order? Or are they outdated and no longer able to cope with the appliance's performance? A qualified specialist (electrical engineer) must therefore check both existing and new connections. All work required to connect the appliance to the power supply may only be carried out by a qualified electrician.
i The device is intended exclusively for private use.
The appliance is intended exclusively for cooking in a private household.
i The appliance is intended exclusively for operation in closed rooms.
This device may not be used for commercial purposes, when camping or on public transportation.
i Only operate the device in accordance with its intended use.
Do not allow anyone who is not familiar with the operating instructions to use the appliance.
This appliance can be used by children aged from 8 years and above and persons with reduced physical, sensory or mental capabilities or lack of experience and knowledge if they have been given supervision or instruction concerning use of the appliance in a safe way and understand the hazard involved. Children must not play with the appliance. Cleaning and user maintenance must not be carried out by children without supervision.
DANGER!
- The appliance may only be connected to the power supply by a qualified specialist (electrical engineer) who is familiar with and carefully observes the national legal regulations and the additional regulations of the local power supply companies.
- All electrical work must be carried out by a qualified electrician. No changes or arbitrary modifications may be made to the power supply. The connection must be made in accordance with the locally applicable legal regulations.
-
Never connect the appliance to the power supply if the appliance, the mains cable or the mains plug are visibly damaged.
-
Never attempt to repair the appliance yourself. Repairs carried out by unqualified persons can lead to serious injury and damage. If your appliance is not working properly, contact the store where you purchased the appliance. Only have original spare parts fitted.
- If the mains connection cable is damaged, it may only be replaced by the manufacturer or a customer service authorized by the manufacturer or a qualified specialist (electrical technician).
⚠ WARNING!
- Disconnect the appliance from the power supply before carrying out any cleaning or maintenance work on the appliance.
- The appliance must always be earthed in accordance with the requirements of the respective power supply. The main circuit must have a built-in safety cut-out.
-
All work required to connect the appliance to the power supply may only be carried out by a qualified specialist (electrician).
-
Should any malfunction occur due to a technical defect, disconnect the appliance from the power supply immediately (switch off the corresponding house fuse). Report the malfunction to your customer service so that it can be rectified immediately.
- Do not use adapters, multiple socket outlets or extension cables to connect the appliance - FIRE HAZARD!
- Do not make any changes to the device.
- The kitchen area must be dry and well ventilated. When the appliance is set up, all control and operating elements must be easily accessible.
- The vencers of cabinets must be fixed with a heat-resistant glue that can withstand temperatures of 120\ ircC .
- Adjacent furniture and all materials used for installation must be able to withstand a temperature of at least 85irc C above the room temperature of the room in which the appliance is installed while the appliance is in operation.
- Remove the rear panel of the conversion unit to ensure adequate ventilation
around the appliance. The appliance must have a free space of at least 45 mm at its rear.
-
Do not connect the appliance in rooms or places in or around which flammable materials such as petrol, gas or paint are present. This warning also applies to the vapors released by these materials.
-
Extractor hoods must be installed in accordance with the manufacturer's instructions.
-
Do not use the appliance for heating or drying laundry.
-
Do not connect the appliance near curtains or upholstered furniture. FIRE HAZARD.
-
Do not store any objects in the oven. FIRE HAZARD!
-
Household equipment and electrical cables of all kinds must never touch the appliance, as their insulating material will be damaged or destroyed by high temperatures.
-
Never use a steam cleaner to clean the appliance. The steam can permanently damage the electrical system of the appliance. RISK OF ELECTRIC SHOCK.
-
The accessible areas and parts of the oven become very hot during use. Children must therefore be kept away from the appliance while it is in use. Touching the appliance during operation can lead to serious burns.
-
Children must not play with the appliance.
-
Always supervise children when they are in the vicinity of the appliance.
CAUTION!
-
The appliance becomes hot during operation. Do not touch the hot parts inside the oven.
-
Do not use any aggressive or corrosive cleaning agents or sharp-edged objects to clean the door, as these will scratch the surface and cause cracks in the glass.
-
Do not place or lay any cookware or baking trays directly on the floor of the oven interior. Do not cover the bottom of the oven interior with aluminum foil.
-
Always keep the oven door closed when operating the oven.
-
Do not place any cookware directly on the bottom of the oven. Use the baking tray or rack instead.
-
Be careful when opening the oven door. Do not come into contact with hot areas or steam escaping from the open oven.
-
Always use oven gloves.
-
The appliance complies with current European safety legislation. However, we would like to emphasize that this compliance does not alter the fact that the surfaces of the appliance become hot during use and continue to radiate residual heat after use.
NOTE!
- When moving the appliance, always hold it by the lower end and lift it carefully. Keep the appliance upright when doing so.
- Never use the door itself to transport the appliance, as this will damage the hinges.
- The appliance must be transported and connected by at least two people.
- Make a note of the positions of all parts of the appliance when you unpack it, in case you need to pack and transport it again.
- Do not use the appliance until all the associated parts are correctly positioned in their intended locations.
- Never use the floor, drawers, doors, etc. of the appliance as a base or support.
- The ventilation openings of the appliance or its installation device (if your appliance is suitable for installation) must always be unobstructed and uncovered.
- Do not place or lay any heavy objects on the open oven door and do not lean against the open oven door. This will damage the door hinges.
2. installation
2.1 Unpacking and selecting the location
- Unpack the appliance carefully. Be sure to follow the instructions for disposing of the appliance in these operating instructions.
- The appliance may be protected with transport locks for transportation. Remove these completely. Do not use any aggressive cleaning agents to remove the remains of the transport locks.
- Before connecting the appliance, check that the mains connection cable or the appliance itself is not damaged.
- Do not install the appliance in a place where it may come into contact with water or rain to prevent damage to the electrical insulation.
- Set up the appliance on a level, dry and firm surface. Use a spirit level to check that your appliance is set up correctly.
- Remove all packaging material inside and outside the oven before commissioning.
- The rating plate is located inside the appliance or on the outside of the rear panel.
2.2 Installing the oven
DANGER!
The appliance may only be connected to the power supply by a qualified specialist (electrical engineer) who is familiar with and carefully observes the national legal regulations and the additional regulations of the local power supply companies.
All electrical work must be carried out by a qualified electrician. No changes or arbitrary modifications may be made to the power supply. The connection must be made in accordance with the locally applicable legal regulations.
- The opening of the conversion cabinet must have the dimensions shown in Figure 1. Fit the appliance into the opening.
- Open the oven door and remove the rubber caps from the two screws on the side of the oven frame.
- Attach the oven to the conversion cabinet using the two screws that fit into the holes on the oven frame.
- Replace the rubber caps after fitting the stove.
Enclosure diagram (high installation)
Enclosure diagram (high installation)

① Reserve 5 mm for the door panel at the top and bottom respectively.
② Reserve 20 mm for the door panel on the left and right respectively.
③ Reserve 20 mm for the door panel in thickness.
- The thickness of the cupboard wall is 20 mm.
- If the socket is installed at the rear of the appliance, the depth of the cabinet opening must be increased from at least 590 mm to 620 mm.
- The dimensions in the illustrations are given in mm.
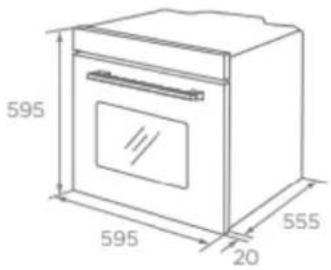

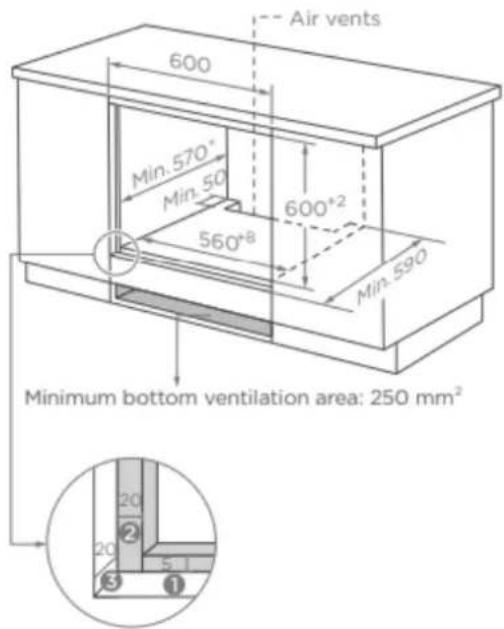
① Reserve 5 mm for the door panel at the top and bottom respectively.
② Reserve 20 mm for the door panel on the left and right respectively.
③ Reserve 20 mm for the door panel in thickness.

If the appliance is installed under the hob, the minimum thickness of worktop A is shown below:
| Hob type | worktop A |
| Induction hob | 37 mm |
| Full-surface induction hob | 47 mm |
| Gas hob | 30 mm |
| Electric hob | 27 mm |
- The thickness of the cupboard board is 20 mm.
- If the power socket is installed on the back of the appliance, the depth of the cupboard opening shall be increased from a minimum of 590 mm to 620 mm.
- The dimensions in the figures are in mm.
Installation steps
-
Please customize the cupboard according to the "Cupboard Diagram".
-
Before installation, please check for normal power sockets and appropriate grounding, and check whether the cupboard dimension meets the installation requirements.
-
Place the appliance in designated locations in the kitchen, install it in a vertical cupboard, and connect the power supply.
-
To locate the mounting fixing holes, open the appliance door and look at the side frame of the appliance (position shown above).
-
Fix the appliance on the Cupboard with two screws.


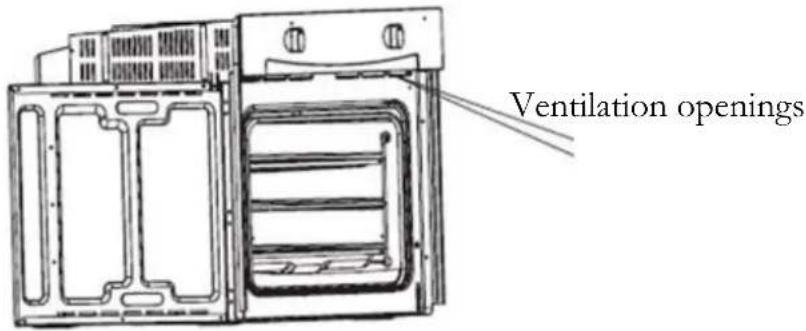
Ventilation openings
When cooking/baking is complete, the baking tube has a temperature of Switch off the device.
2.3 Electrical connection
Note for the qualified specialist (electrical engineer)
The appliance was developed for connection to a 230V-50Hz power supply. The total power consumption is 2300W. The mains connection cable must have a cross-section of at least 1.5 mm 2 . The direct connection to the power supply must have a two-pole switch with a load capacity of 250V, 20A. The switch must not disconnect the yellow-green earth cable at any point.
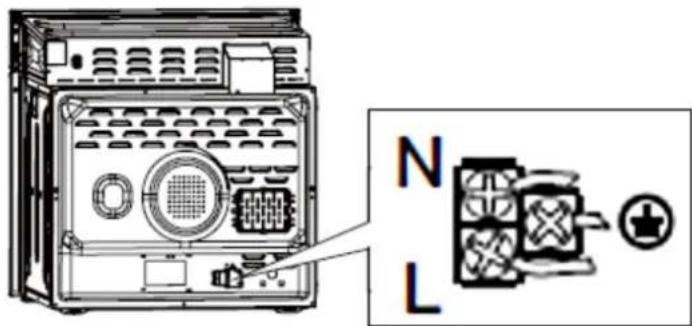
i After installation and connection, the mains connection cable must be laid in such a way that it cannot touch a high-temperature area at any point.
3. operation
WARNING! Accessible parts of the appliance may become hot during operation. Do not touch the hot areas and keep children away from the appliance. RISK OF BURNS!
⚠️ CAUTION! The internal components of the appliance become very hot. Do not touch any of these areas while handling your crockery / cookware. RISK OF BURNS!
⚠️ CAUTION! Cooking utensils can become hot due to the heat transferred by the food. Always use oven mitts or oven gloves when handling your crockery / cookware.
NOTE! Only use suitable and fireproof crockery / cookware.
i Read the complete operating instructions before using the appliance for the first time. Pay particular attention to the safety instructions and warnings!
i Remove any protective film that may still be on the device.
3.1 Before first use
- Remove all packaging materials.
- Clean the inside of the oven from the protective agent applied.
- Remove the equipment elements (sheet metal etc.) and clean them with warm water and a little washing-up liquid.
- Switch on the room ventilation or open the window.
- Run the oven at 250\ ircC for 30 minutes. Then remove any soiling and clean the interior. This may result in a slight development of smoke and the release of odors for about 15 minutes. This is a normal operating process caused by protective impregnation against corrosion damage during transportation.
NOTE! Only clean the inside of the oven with a little warm water and washing-up liquid.
3.2 Device / control panel / display
Oven
Wear heat-insulating gloves when removing food to avoid burns!
When you open the oven door, watch out for the steam.
Please open the door at a slight angle to prevent the steam from hitting your face.

Image similar
3.2.3 Control panel

K1: For selecting oven functions.
K2: For setting the temperature.
Time Setting: For adjusting the cooking time.
| K2 | ROTARY SWITCH FOR SELECTING THE OVEN FUNCTIONS➢ Function selection for preparing various dishes |
| Time setting | LED DISPLAY➢ Time display➢ Buttons for setting the clock➢ Buttons for programming the |
| K1 | ROTARY SWITCH FOR SELECTING THE TEMPERATURE➢ Adjustable from 50 ircC - 250 ircC |
3.2.4 Display
◆ The display shows the current time.
The display is also used to program the oven, the timer and to set the time.
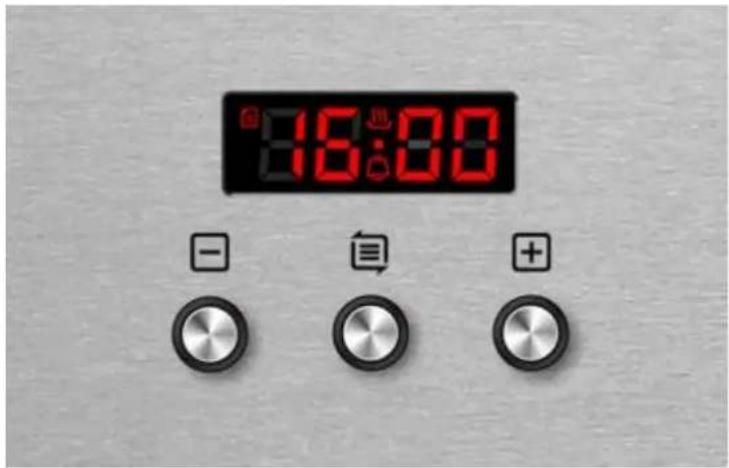
3.3 Using the oven
CAUTION! The internal components of the oven become very hot. Do not touch any of these areas while handling your cookware. RISK OF BURNS!
CAUTION! Be careful when opening the oven door. Do not come into contact with hot areas or steam escaping from the open oven. RISK OF BURNS! RISK OF SCALDING!
⚠️ CAUTION! Always use oven gloves.
To ensure safe operation of the appliance, the slide-i elements must be positioned correctly so that no hot food or cookware can fall out when they are removed.

natural_image
Simple line drawing of a cabinet with an open lid showing internal components (no text or symbols)When you connect the device to the power supply for the first time, the numbers on the display flash.
The oven fan continues to run for some time after the end of operation, even if the appliance itself is switched off.
Before you can set the time or select an oven function or oven temperature, you must the manual operating mode of the oven
The oven can be heated by using the top heat and bottom heat (with convection). The use of the oven is controlled by the ROTARY SWITCH FOR THE OVEN FUNCTIONS (K2 / see chapter 3.2.3 CONTROL PANEL). Move the rotary switch to the desired setting.
To set the temperature, move the ROTARY SWITCH FOR THE TEMPERATURE CONTROL of the oven (K1 / see chapter 3.2.3 CONTROL PANEL) to the desired setting. You can select a temperature from 50ircC - 250ircC (turn clockwise).
➢ You switch the oven off by setting both of these rotary switches to the 0 position (see illustration below).

K2 / TEMPERATURE CONTROL
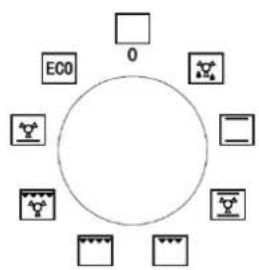
flowchart
graph TD
    A["0"] --> B["ECO"]
    B --> C[" "]
    C --> D[" "]
    D --> E[" "]
    E --> F[" "]
    F --> G[" "]
    G --> H[" "]
    H --> I[" "]
    I --> J[" "]
    J --> K[" "]
K1 / OVEN FUNCTIONS
Image similar
⚠️ CAUTION! Only turn the temperature control switch clockwise to the desired temperature. You can then turn the switch back to the starting position. Otherwise you may damage the temperature control switches.
3.3.2 Manual operating mode
In manual mode, only the time of day and the " symbol light up.
The oven is always in operation and the cooking time is controlled by the user.
Notes:
In manual mode, the displayed time starts to flash after 5 hours without operation. After 10 hours without operation, the device returns to standby mode.
If the time flashes and you switch back to manual mode
please press the "⊖" or "⊕" button.
Regular operation :
Turn the knob K1 to select the oven functions.
Turn the knob K2 to set the temperature.
Mode setting.
Once cooking is complete, turn all knobs to the "O" position.
Notes:
-
As a separate function, the oven light is used by consumers to actively observe the food or clean the cavity. After opening, the user must actively close the appliance before leaving it and returning to standby mode.
-
After cooking in the oven, the cooling fan continues to dissipate heat. The oven is only closed when the core temperature is below 75irc C.
3.3.3 Setting the time
Before you can use the oven in general, you must set the time.
When the oven is connected to the mains for the first time, you must set the clock.
Note: The clock is a 24-hour clock.
Press the "⊖" or "+" button to change the hour setting.
Press the " 🔗 " button to confirm the hour setting.
Press the "⊖" or "+" button to change the minute setting.
Press the " 🔒 " button to complete the clock setting.
3.4 Programming the oven
3.4.1 Timer
When setting the time, press and hold the " " or " " button for 3 seconds to increase or decrease the time continuously.
In alarm or automatic mode, press and hold the "+" and "☐" buttons until the buzzer sounds to delete all mode settings and switch to standby mode.
If you set the timer mode and do nothing for 5 minutes, the appliance returns to manual mode.
When setting each function, press and hold the "→" button for longer than 3 seconds to delete the current setting and switch to manual mode.
When setting the timer mode, only one of the two modes alarm clock and automatic cooking can be selected.
To switch off the oven, the rotary switches for the oven functions and the temperature control must be set to the -0- position.
Mode Setting:
In standby mode, press and hold the "button for 3 seconds to enter manual mode; the "symbol lights up.
In manual mode, press the "◀" button to select the time mode: → minute minder→ dur→ End→ manual.
The adjustable automatic cooking modes are semi-automatic: dur or End. If the "☐" symbol is not shown on the display, the oven is not working and is not heating up. The oven only works or heats up when the "☐" symbol is shown on the display.
Notes:
Manual mode - the cooking time is determined by the user.
Minute counter - You can set an acoustic reminder for the completion time.
Major - You can set the oven so that it can cook for the desired length of time.
End - You can set the oven to cook until the desired time.
Manual mode :
In manual mode, only the time of day and the " symbol light up.
The oven is always in operation and the cooking time is controlled by the user.
Notes
In manual mode, the displayed time starts to flash after 5 hours without operation. After 10 hours without operation, the device returns to standby mode.
If the time is flashing and you want to use manual mode again, press the "or" "button.
Minute less
This mode is only used as a reminder function.
Press the "button " to select the minute counter function. The corresponding "" " " symbol flashes.
Press the "☐" or " " button to set the alarm time (see "Setting the clock").
After setting, press the "☐" button to confirm the alarm clock setting. The "☐" symbol is always switched on.
When the time has elapsed, a reminder beep will sound and the "symbol on the screen will start to flash. At this point, press any button to delete the reminder.
Cooking time Time
If continuous operation is set to 1 hour, the cooking process ends after 1 hour.
Press the "" button until the screen displays "dur".
Press the "" or "+" button to call up the time setting in dur mode (see "Setting the clock"). The maximum setting time is 10 hours.
After you have confirmed the time setting, press the " 🔊 button to start. At this point, the " 🔊 and " Λ " symbols are always switched on.
If continuous operation is set to 1 hour, the buzzer sounds after 1 hour to indicate the end of the cooking process and the "A" symbol flashes.
Now press any button to return to standby mode, the signal tone stops and the "A" symbol disappears.
End of cooking Time
The cooking process starts at the current time and ends at the set time. Press the "" button until "End" is displayed on the screen.
Press the button " " or "+" to call up the time setting for the end mode ( see "Setting the clock" ).
After you have confirmed the time setting, press the " 🔊" button to start. At this point, the " 🔊" and " A " symbols are always switched on.
When the end time matches the system clock time, the buzzer sounds to indicate the end of the cooking process. The " 🔊 symbol disappears and the "A" symbol flashes.
Now press any button to return to standby mode and the chirping will stop. The "A" symbol disappears.
3.5 Oven functions
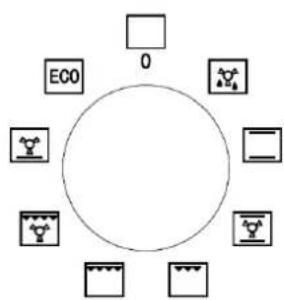
flowchart
graph TD
    A["□"] --> B["0"]
    C["□"] --> D["ECO"]
    E["□"] --> F["XY"]
    G["□"] --> H["XY"]
    I["□"] --> J["XY"]
    K["□"] --> L["XY"]
| SYMBOLS | DESCRIPTION OF THE FUNCTIONS |
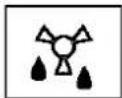 | Defrosting:➢ The circulating air runs without heat setting.➢ Reduces the defrosting time of frozen food.➢ Defrosting time: Depends on room temperature and the quantity and type of food |
| SYMBOLS | DESCRIPTION OF THE FUNCTIONS |
  | Grill with top heat and circulating air:➢ The grill (inner part of the grill element), top heat and convection work simultaneously.➢ Speeds up grilling and improves the taste of the food.Grilling with top heat:➢ The grill (inner part and outer part of the grill element) and the top heat work simultaneously.➢ Combined grilling allows higher temperatures in the upper cooking area, intensifies browning and enables larger portions to be prepared. |
 | Crickets➢ Only switches on the inner part of the grill element.➢ Suitable for grilling small portions. |
 | Top heat and bottom heat (with convection):➢ With this setting, the oven is heated with circulating air from above and below. |
 | Bottom heat (with circulating air):➢ Only heat the oven with the bottom heat, e.g. for final bakir from below. |
 | Top heat and bottom heat:➢ With this setting, the oven is heated conventionally.➢ The oven must be preheated before cooking/baking.➢ Suitable for baking / cooking on one level. |
 | co mode : top-bottom heat, maximum power limited |
4. instructions for cooking
⚠️ CAUTION! The internal components of the oven become very hot. Do not touch any of these areas while handling your cookware. RISK OF BURNS!
⚠️ CAUTION! Be careful when opening the oven door. Do not come into contact with hot areas or steam escaping from the open oven. RISK OF BURNS! RISK OF SCALDING!
⚠️ CAUTION! Always use oven gloves.
4.1 Tips for baking and roasting
We recommend using the baking tray supplied with the oven.
It is also possible to bake in cake tins and on trays purchased elsewhere. For baking, it is better to use black trays, which conduct the heat better and shorten the baking time.
❖ Moulds and trays with light or shiny surfaces are not recommended when using the conventional heating method (upper and lower heating elements); the use of such moulds may result in insufficient heating of the lower part of the cake.
Before removing the cake from the oven, check that baking is complete by using a wooden stick (the cake is cooked when the stick comes out dry and clean after inserting it into the cake).
- After switching off the oven, it is advisable to leave the cake in the oven for about 5 minutes.
◆ Prepare meat weighing over 1 kg in the oven; smaller quantities should be prepared on a hob.
◆ Use oven-safe cookware. Make sure that the handles are also heat-resistant.
If you are preparing your meat on a wire shelf or grill rack, place a baking tray filled with a little water in the oven at the lowest shelf height.
- Turn the meat at least once during the cooking time. Baste the meat with its gravy or hot salted water.
❖ Never pour cold water over the meat.
4.2 Saving energy
Do not open the oven door unnecessarily often.
❖ Switch off the oven in good time and use the residual heat.
❖ Only use the oven to prepare large quantities.
- Meat weighing less than 1 kg can be prepared more economically in a cookware on the hob.
If the cooking time is more than 40 minutes, switch off the oven 10 minutes before the end of the cooking time.
◆ Make sure that the oven door is properly closed.
- Contamination on the door seal can cause heat to escape. Therefore, remove all dirt immediately.
Do not connect the appliance in the immediate vicinity of refrigerators and / or freezers. Otherwise, the energy consumption may increase unnecessarily.
5. cleaning and care
⚠ WARNING!
Always switch the appliance off before cleaning and allow it to cool down completely. Disconnect the appliance from the power supply before carrying out any maintenance work.
Oven
▶ Clean the oven after each use.
➢ Switch on the interior lighting of the oven when cleaning.
Only clean the inside of the oven with warm water and a little washing-up liquid. Use a sponge or soft cloth for this purpose. Do not use any aggressive or corrosive cleaning agents.
➢ Wipe the inside of the oven dry after cleaning.
➢ Clean the outer areas of the oven with warm soapy water. Use a sponge or soft cloth for this purpose. Do not use any aggressive or corrosive cleaning agents.
If you use a special oven cleaner, be sure to check the cleaning manufacturer's instructions to ensure that the cleaner is suitable for your appliance.
Any damage caused to your appliance by a cleaning agent will not be repaired free of charge, not even within the warranty period.
⚠️ Never use a steam cleaner.
Oven door
Clean the glass pane of the oven door with extreme care. Do not use abrasive cleaners, otherwise you may scratch or break the glass. Use a little washing-up liquid and warm water.
5.1 Replacing the light source
-
Switch off the device and disconnect it from the power supply.
-
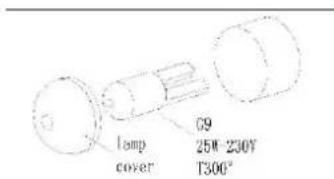
Unscrew the lamp cover, clean it and dry it.
-
Unscrew the bulb from the socket and replace it with a new one of the same type and wattage:
➢ Heat-resistant oven light bulb (300 0 C), 200-240V/25W/ G9 base /50Hz. Do not use any other light source.
-
Insert the bulb and make sure that it is correctly inserted in the ceramic base.
-
Screw the light source cover back on.
4.2 Removing the side guides
-
Loosen the screws of the side guides.
-
Turn the side guide vertically to detach it from the side wall of the oven.
-
Remove the side guide from the hole in the side panel at an angle of approx. 45irc between the side guide and the side panel.

4.3 Removing the oven door
-
Open the oven door. Open the hinge cover of the oven door to the maximum position (see figure A).
-
Close the door as far as it will go, grip the right and left sides of the door and pull the door upwards.

natural_image
Technical line drawing of a mechanical assembly with no visible text or symbolsA

Reinstalling the oven door
Follow the reverse order of door disassembly.
-
When installing the oven door, make sure that both hinges fit directly into the opening.
-
Both sides of the hinge rebate must be attached to the hinge fastening opening of the door.
-
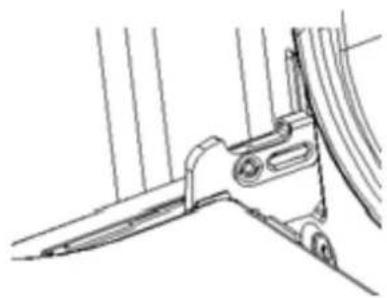
When you open the door, fold down the locking bar (see figure B).
natural_image
Technical line drawing of a mechanical assembly with no visible text or symbolsB

If the door accidentally falls down or the hinges close suddenly, do not press your hand into the hinges. Call your customer service.

Removing the inner glass pane
-
Loosen the screws on the retaining strip at the top of the door.
-
Then remove the inner glass pane.
-
After cleaning the glass pane, replace the glass pane, reinsert the retaining strip and screw it back in place. (see figure C).

natural_image
Technical line drawing of a layered electronic component or circuit board (no text or symbols)5.4 Troubleshooting
Proceed as follows in the event of an emergency or malfunction:
- Switch the device off completely.
- Disconnect the appliance from the power supply (appropriate fuse in the fuse box of the house power supply).
- Contact your customer service.
Check the information in the table before contacting customer service.
ERROR
POSSIBLE CAUSE
MEASURES
Device does not work at all.
The device is not supplied with power.
➢ Check the corresponding fuse in the fuse box of the house power supply.
Interior lighting does not work.
The light source is loose or damaged.
▶ Tighten or replace the bulb.
- technical data
| Supplier | PKM | |
| Model | F7-2 DIGI | |
| Energy efficiency index (IEE baking tube) | 72,60 | |
| Number of baking tubes | 1 | |
| Heat source per baking tube | Electric current | |
| Device type | Built-in oven | |
| Control panel | Stainless steel cover | |
| Energy efficiency class | A | |
| Energy consumption (conventional) | 0,88 KW/h | |
| Energy consumption (circulating air) | 0,61 KW/h | |
| Usable baking tube volume | 65,00 l | |
| Oven functions | Defrosting, top and bottom heat, top and bottom heat with convection, bottom heat with convection, grill with convection, grill, top heat with grill, ECO | |
| Grill/convection/hot air | ✓ | ✓ |
| Full glass interior door | ✓ | |
| Oven door/glass layers | black glass | 3 |
| Enclosure cooling | ✓ | |
| Handle and knobs | Aluminum | |
| Maximum. Performance | 2.30 KW | |
| Current voltage/frequency | 220-240V | 50 Hz |
| Drip tray/griddle | 1 | 1 |
| Cable length | 150 cm | |
| Appliance dimensions in cm | 59,50 | 59,50 |
| Packaging dimensions in cm | 65,00 | 66,00 |
| Weight net/gross | 27,50 | 31,40 |
7. disposal
- When unpacking, make absolutely sure that the components of the packaging (polyethylene bags, polystyrene pieces) are kept out of the reach of children. DANGER OF SUFFOCATION!
- Old appliances that are no longer in use must be taken to the responsible recycling center. Never expose to naked flames.
- Before you dispose of any old appliance, it is essential that you render it inoperable! This means always pulling the mains plug and then cutting the power cable on the appliance and removing and disposing of it directly with the mains plug! Always dismantle the entire door so that children cannot become trapped and put themselves in danger!
- of paper and cardboard in the bins provided.
- Dispose of plastics in the containers provided for this purpose.
- If there are no suitable disposal containers in your area, take these materials to a suitable municipal collection point.
- For more information, please contact your specialist dealer or your local waste disposal facility.

All materials marked with this symbol are recyclable.

All available information on waste separation can be obtained from your local authorities.
8. warranty conditions
for large electrical appliances from PKM GmbH & Co. KG, Neuer Wall 2, 47441 Moers.
The manufacturer guarantees the consumer for a period of 24 months, calculated from the date of purchase, for faultless material and faultless manufacture.
In addition to the rights arising from the guarantee, the consumer is entitled to the statutory warranty rights that the consumer has against the seller from whom he purchased the device. These are not restricted by the guarantee.
The warranty claim must be proven by the buyer by submitting the proof of purchase with the date of purchase and/or delivery and must be reported to the first end customer immediately after discovery and within 24 months of delivery.
The guarantee does not justify any claims for withdrawal from the purchase contract or reduction (reduction of the purchase price). Replaced parts or exchanged devices become our property.
The warranty claim does not extend to:
- fragile parts such as plastic or glass or light bulbs;
- minor deviations of the PKM products from the target quality, which have no influence on the utility value of the product;
- Damage due to operating and handling errors,
- Damage caused by aggressive environmental influences, chemicals, cleaning agents;
- Damage to the product caused by improper installation or transportation;
- Damage due to non-household use;
- Damage caused outside the appliance by a PKM product - unless liability is prescribed by law.
The validity of the guarantee ends at:
-
Failure to observe the installation and operating instructions;
-
Repair by non-experts;
-
Damage caused by the seller, installer or third parties;
-
improper installation or commissioning;
-
lack of or incorrect maintenance;
-
devices that are not used for their intended purpose;
-
Damage caused by force majeure or natural disasters, in particular but not limited to fire or explosion.
Warranty services do not extend the warranty period, nor do they start a new warranty period.
The geographical scope of the guarantee extends to appliances purchased and used in Germany, Austria, Belgium, Luxembourg and the Netherlands.

Aftersales service information on the leaflet inside this instruction manual.
Subject to alterations
Updated 03/18/2025
- Contents
- Contents 33
- EC - Declaration of Conformity
- safety instructions
- DANGER!
- ⚠ WARNING!
- CAUTION!
- NOTE!
- installation
- Unpacking and selecting the location
- Installing the oven
- Enclosure diagram (high installation)
- Installation steps
- Ventilation openings
- Electrical connection
- Note for the qualified specialist (electrical engineer)
- operation
- Before first use
- Device / control panel / display
- Oven
- Control panel
- Display
- Using the oven
- Image similar
- Manual operating mode
- Notes:
- Setting the time
- Programming the oven
- Timer
- Mode Setting:
- Notes
- Minute less
- Cooking time Time
- Oven functions
- instructions for cooking
- Tips for baking and roasting
- Saving energy
- cleaning and care
- ⚠️ Never use a steam cleaner.
- Oven door
- Replacing the light source
- Removing the side guides
- Removing the oven door
- Reinstalling the oven door
- Removing the inner glass pane
- Troubleshooting
- ERROR
- POSSIBLE CAUSE
- MEASURES
- Device does not work at all.
- Interior lighting does not work.
- disposal
- warranty conditions
- The warranty claim does not extend to:
- The validity of the guarantee ends at:
Brand : PKM
Model : F7-2 Digi-A
Category : Oven