TSA3537 - Food processor Teesa - Free user manual and instructions
Find the device manual for free TSA3537 Teesa in PDF.


| Product Type | Food processor |
| Brand | Teesa |
| Model | TSA3537 |
| Power | 800 W |
| Bowl Capacity | 1.5 L |
| Dimensions (L x W x H) | 30 x 20 x 25 cm |
| Weight | 3.5 kg |
| Main Functions | Chopping, slicing, shredding, kneading, mixing, blending |
| Speed Settings | 2 speeds + pulse |
| Blade Material | Stainless steel |
| Bowl Material | Plastic (BPA-free) |
| Safety Features | Safety lock lid, non-slip feet, overload protection |
| Accessories Included | Chopping blade, slicing disc, shredding disc, dough hook |
| Cleaning | Removable parts dishwasher safe (top rack) |
| Warranty | 2 years |
Frequently Asked Questions - TSA3537 Teesa
User questions about TSA3537 Teesa
0 question about this device. Answer the ones you know or ask your own.
Ask a new question about this device
Download the instructions for your Food processor in PDF format for free! Find your manual TSA3537 - Teesa and take your electronic device back in hand. On this page are published all the documents necessary for the use of your device. TSA3537 by Teesa.
USER MANUAL TSA3537 Teesa
natural_image
White reesa blender with control panel and brand logo (no visible text or symbols on device body)Bedienungsanleitung
Owner's manual
Εγχειρίδιο χρήσης
Instrukcja obsługi
Manual de utilizare
Návod na použitie
DE
EN
GR
PL
RO
SK
natural_image
Four different types of kitchen utensils, including a knife, a fork, and a coiled cord, shown in grayscale (no text or symbols)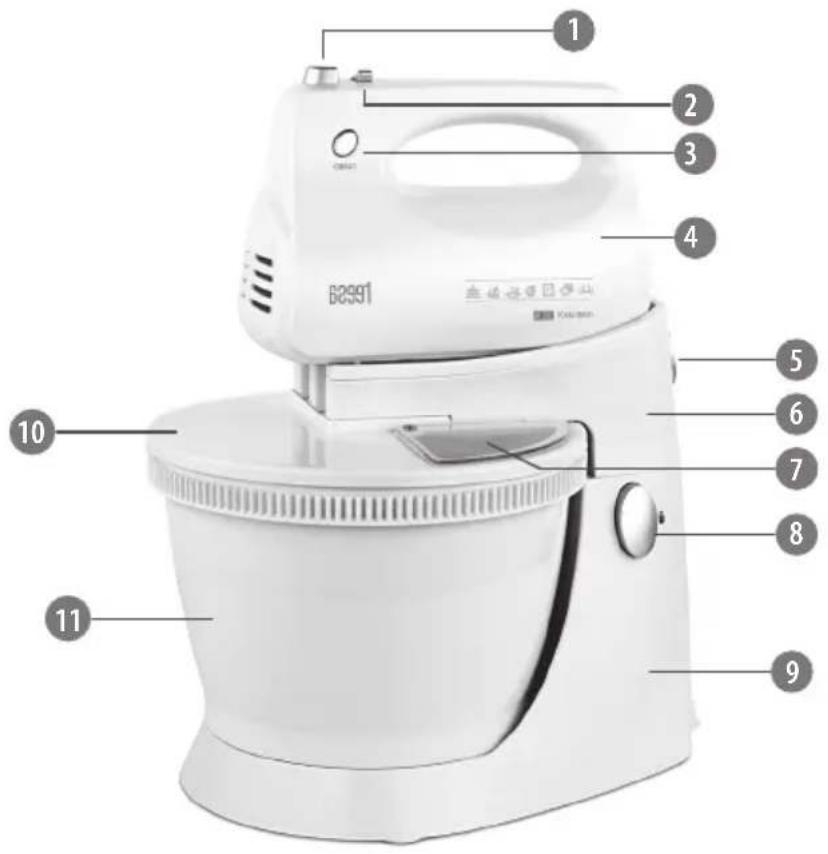
DEENGRPLROSK
| 1 | Taste Auswerfen Eject button Kouμπί εξαγωγής Przycisk zwalniający | końcówki | Buton se evacuare Aretačné tlačidlo metličiek | ||
| 2 | Drehzahlregler Speed control switch Διακόπτης ελέγχου ταχύτητας | Przełącznik prędkości Comutator de control al vitezei | Prepínač rýchlosti | ||
| 3 | Taste Turbo | Turbo button | Kouμπί Turbo | Przycisk Turbo | Buton turbo |
| 4 | Handmixer | Hand mixer | Μίξερ χειρός | Mikser ręczny | Mixer manual |
| 5 | Handmixer Entriege-lungstaste | Handmixer release button | Kouμπί απελευθέρωσης χειροκίνητου μίξερ | Przycisk zwalniający mikser ręczny | Buton eliberare mixer de mână |
| 6 | Schwenkkopf | Tilt head | Κεφαλή κλίσης | Ramię | Unitate înclinată |
| 7 | Deckelöffnung | Cover opening | Άνοιγμα καλύμματος | Otwór pokrywy | Deschidere capac |
| 8 | Schwenkkopf Entriegelungstaste | Tilt head release button | Kouμπί απελευθέρωσης κεφαλής κλίσης | Przycisk zwalniający ramię | Buton eliberare unitate înclinată |
| 9 | Basis | Base | Βάση | Podstawa | Bază |
| 10 | Deckel | Cover | Κάλυμμα | Pokrywa | Capac |
| 11 | Schüssel | Bowl | Μπολ | Misa | Bol |
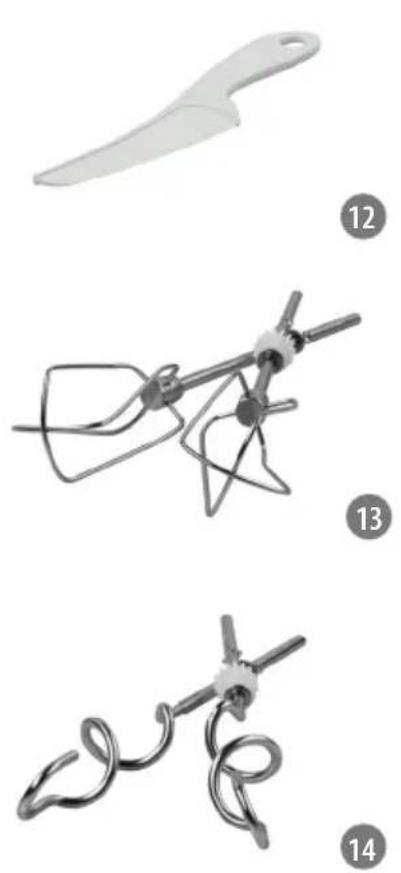
| 12 | Spatel | Spatula | Σπάτουλα | Łopatka | Spatulă |
| 13 | Rührbesen | Beaters | Χτυπητήρια | Trzepaczki | Bătătoare |
| 14 | Knethaken | Dough hooks | Άγκιστρα ζύμης | Mieszadła | Cârlige pentru amestecarea aluatului |
Thank you for purchasing TEESA appliance. Please read this operation instruction carefully before use, and keep it for future use.
Distributor does not take responsibility for damages caused by inappropriate handling and use of the product.
SAFETY INSTRUCTIONS
In order to reduce the injuries or damages, follow basic safety precautions applied when using any electrical device, including the following:
- Read this instruction manual carefully, even if you are familiar with the appliance. Keep the manual for future reference.
- Before connecting the appliance to power supply socket, make sure the voltage indicated on the appliance corresponds to the voltage in the power supply socket.
- Product intended for household use only.
- Clean and store this appliance in accordance to instructions listed in "Cleaning and storage" section.
- ALWAYS turn off the appliance and disconnect it from the mains supply:
• if it's not operating correctly,
- if there's an uncommon voice when using,
• before disassembling the device,
• before cleaning,
- when not in use.
- When you disconnect the power cord of the appliance, grasp and pull the plug, not the cord/cable.
- This appliance may be used by children who are above 8 years old and by persons with reduced physical, sensory or mental capabilities, or lack of experience and knowledge, if they are supervised and guided by a person who is responsible for their safety in a cautious manner, and all the safety precautions are understood and followed. Children should not play with this device. Children should not perform cleaning and servicing of the device unsupervised.
- Keep the appliance out of the reach of children.
- Fixed power cable may only be replaced in an authorized service point.
- Keep the appliance and its cord/cable away from heat, water, moisture, sharp edges and any other factor which may damage the appliance or its cord.
- Make sure the power cord does not touch any hot or sharp elements.
- Do not use the product for purposes different from displayed in this operating manual.
-
Do not place the appliance in water or any liquid; nor handle/use it with wet or moist hands.
-
Do not leave the appliance unattended when it's working.
- DO NOT use this appliance if the cord or the plug is damaged, or the appliance is broken.
- Do not attempt to repair this appliance yourself. Only authorized and qualified personnel may repair this appliance. Never disassemble this appliance.
- Do not use unauthorized accessories.
IMPORTANT!
• NEVER TOUCH THE ROTATING ATTACHMENTS.
- PROTECT LONG HAIR OR LOOSE ITEMS OF CLOTHING TO PREVENT THEM FROM BECOMING CAUGHT IN THE ROTATING ATTACHMENTS.
- NEVER ATTACH OR RELEASE THE ATTACHMENTS WHEN THE APPLIANCE IS OPERATING.
• DO NOT PUT ANY OBJECTS IN BETWEEN THE ATTACHMENTS WHEN THE APPLIANCE IS OPERATING.
• INSERT ATTACHMENTS OF ONE TYPE ONLY.
• TO PREVENT OVERHEATING, DO NOT USE THE APPLIANCE FOR MORE THAN 10 MINUTES. LEAVE IT TO COOL FOR A FEW MINUTES BEFORE NEXT USE.
• DO NOT TURN ON THE APPLIANCE AND LEAVE IT OPERATING IF IT IS NOT USED.
FITTING THE ATTACHMETNS
-
Before first use, clean the attachments according to the instructions included in the "Cleaning" section.
-
Prior to fitting the attachments, make sure the appliance is turned off (speed control switch is set to the 0 position) and disconnected from power supply.
-
Insert the selected attachments into the appropriate slots underneath the appliance and push them gently until they lock in place (you will hear a characteristic click).
IMPORTANT
• Always use the attachments of the same type! Do not mix the attachments!
• Each of the beater/dough hook has its dedicated slot at the bottom of the hand mixer. Always attach the beaters/dough hooks into the appropriate slots!
• The beater/hook with the flange must be inserted into the larger slot.
REMOVING THE ATTACHMETNS
-
Prior to removing the attachments, make sure the appliance is turned off (speed control switch is set to the 0 position) and disconnected from power supply.
-
Hold the attachments with one hand and press the eject button with the other hand to release the attachments.
USING THE BASE AND BOWL
-
Press the tilt head release button and tilt back the head.
-
Put the bowl on the base.
-
Fit the attachments to the hand mixer according to the instructions included in the "Fitting the attachments" section.
-
Attach the hand mixer to the head until it locks in place (you will hear a characteristic click).
-
If desired, attach the cover by sliding it into the notches of the head.
-
Press the tilt head release button and lower the head (you will hear a characteristic click).
-
Put the ingredients into the bowl (if cover has been attached, add the ingredients through the cover opening).
- Make sure the speed control switch is set to 0 position, then connect the plug of the appliance's power cord to the power supply socket.
- Set the speed control switch to the desired position depending on the type of food.
Notes:
- When kneading yeast dough, start with the lowest speed and gradually increase it.
- To enhance the mixing process, you may gently rotate the bowl with your hand.
- Do not place any kitchen utensils, cutlery or other tools into the bowl when the appliance is operating.
-
To prevent overheating, do not use the appliance for more than 10 minutes. Leave it to cool for a few minutes before next use.
-
When mixing is completed, set the speed control switch to the 0 position and disconnect the appliance from power supply socket.
- Wait until the attachments stop rotating completely, press the tilt head release button and tilt back the head.
- If the cover has been attached, remove it now and press the hand mixer release button to remove the hand mixer from the head.
- Remove the attachments according to the instructions included in the "Removing the attachments" section.
- If necessary, use the spatula to scrape the excess food particles from the attachments or bowl.
- Clean the appliance according to the instructions included in the "Cleaning" section.
It is possible to use the hand mixer separately without the base and bowl.
- Make sure the appliance is turned off (speed control switch is set to the 0 position) and disconnected from power supply.
- Fit the attachments to the hand mixer according to the instructions included in the "Fitting the attachments" section.
- Connect the plug of the appliance's power cord to the wall outlet.
-
Dip the attachments into the food mixture before turning on the appliance.
-
Set the speed control switch to the desired position depending on the type of food.
-
When mixing is completed, set the speed control switch to the 0 position and disconnect the appliance from power supply socket.
-
Wait until the attachments stop rotating completely and pull them out from the food mixture.
-
Remove the attachments according to the instructions included in the "Removing the attachments" section.
-
Clean the appliance according to the instructions included in the "Cleaning" section.
COOKING TIPS
- Refrigerated ingredients, such as butter and eggs, should be at room temperature before mixing. Make sure to take out those ingredients from the refrigerator before mixing.
- To eliminate the possibility of shells in your mixture, break eggs into separate container first and then add them to your mixture.
- Do not overbeat. Make sure to mix only for the time indicated in the recipe.
- Mixing time and achieved results depend on the temperature and texture of used ingredients.
CLEANING AND STORAGE
- Before cleaning make sure the appliance is turned off, disconnected from power supply socket and that it has cooled down.
• Do not immerse the appliance in water!
- Clean the housing of the appliance with soft and slightly damp cloth.
- Clean the attachments under warm running water or in a dishwasher straightaway after usage so that residues of food will not dry on. Then wipe them dry.
- Clean the bowl, cover and spatula under warm running water straightaway after usage so that residues of food will not dry on. Then wipe them dry.
• Do not use any abrasives or chemical agents to clean this appliance.
- Before storing the appliance make sure it is clean, dry and disconnected from power supply.
SPECIFICATION
MAIN FEATURES
Turbo function
5 speed settings
Eject button
Rotating bowl with cover
Detachable mixer
Base with tilting head
Beaters and dough hooks included
Dishwasher safe attachments
Anti-slip feet
TECHNICAL DATA
Power: 300 W
Bowl capacity: 3,5 l
Power supply: 230 \~ 240 V; 50 Hz
In set: bowl, bowl cover, base, beaters, dough hooks, spatula, user's manual
Weight: 2,3 kg
Dimensions: 192 x 350 x 300 mm
Cord length: 120 cm
EN
English
Correct Disposal of This Product
(Waste Electrical & Electronic Equipment)



(Applicable in the European Union and other European countries with separate collection systems) This marking shown on the product or Its literature, indicates that It should not be disposed with other household wastes at the end of its working life. To prevent possible harm to the environment or human health from uncontrolled waste disposal, please separate this from other types of wastes and recycle it responsibly to promote the sustainable reuse of material resources. Household users should contact either the retailer where they purchased this product, or their local government office, for details of where and how they can take this item for environmentally safe recycling. Business users should contact their supplier and check the terms and conditions of the purchase contract This product should not be mixed with other commercial wastes for disposal.
Made in China for LECHPOL ELECTRONICS Sp. z o.o. Sp.k., ul. Garwolińska 1, 08-400 Miętne.

- SAFETY INSTRUCTIONS
- In order to reduce the injuries or damages, follow basic safety precautions applied when using any electrical device, including the following:
- IMPORTANT!
- FITTING THE ATTACHMETNS
- IMPORTANT
- REMOVING THE ATTACHMETNS
- USING THE BASE AND BOWL
- Notes:
- COOKING TIPS
- CLEANING AND STORAGE
- SPECIFICATION
- MAIN FEATURES
- TECHNICAL DATA
Brand : Teesa
Model : TSA3537
Category : Food processor