
LUMIS Key Light Pro - Lighting ROLLEI - Free user manual and instructions
Find the device manual for free LUMIS Key Light Pro ROLLEI in PDF.


| Product Type | LED Video Light Panel |
| Model | Rollei LUMIS Key Light Pro |
| Number of LEDs | 192 (96 warm white, 96 cool white) |
| Power | 10 W |
| Color Temperature Range | 2500 – 9000 K (adjustable in 10 K and 100 K steps) |
| Color Rendering Index (CRI) | 90+ |
| Television Lighting Consistency Index (TLCI) | 95+ |
| Brightness Adjustment | 0 – 100% in 1% steps |
| Illuminance | 650 lx at 0.5 m (at 5500 K) |
| Beam Angle | 120° |
| Channels | 7 |
| Remote Control | Included, Bluetooth 5.0, range up to 20 m |
| Remote Control Battery | Rechargeable lithium-polymer (3.7 V / 500 mAh), charge time 1 hour, battery life approx. 30 days |
| Power Supply (Panel) | 5.0 V = 2.0 A via USB-C |
| Panel Dimensions (L x W x H) | 26 x 17 x 1.8 cm |
| Panel Weight | 387 g |
| Monopod Height Range | 28.5 cm (min) to 78 cm (max) |
| Monopod Weight | 844 g |
| Mounting Threads | 2 x 1/4" on panel, 1/4" screw on ball head |
| Bluetooth Version | 5.0 (frequency band 2.400 – 2.480 GHz, max. radiated power 6 dBm) |
| Safety Features | Do not point at eyes, keep away from children, avoid moisture and extreme temperatures |
| Included Accessories | LED panel, remote control, monopod with ball head, base plate, hex wrench, screw, magnetic mounting plate, USB-C cable (2 m), user manual |
Frequently Asked Questions - LUMIS Key Light Pro ROLLEI
User questions about LUMIS Key Light Pro ROLLEI
0 question about this device. Answer the ones you know or ask your own.
Ask a new question about this device
Download the instructions for your Lighting in PDF format for free! Find your manual LUMIS Key Light Pro - ROLLEI and take your electronic device back in hand. On this page are published all the documents necessary for the use of your device. LUMIS Key Light Pro by ROLLEI.
USER MANUAL LUMIS Key Light Pro ROLLEI
natural_image
Line drawing of a handheld electronic device with a vertical stand and a control panel, no text or symbols present.Before the First Use 24
Intended Use 24
Explanation of Symbols 24
Safety Instructions 25
Warnings Concerning Batteries 28
What's in the Box 29
Setting Up the Key Light 30
Note on the Operation.... 31
Components.... 32
Operation on the LED Panel 34
Operation with the Remote Control 35
Bluetooth ^® * Connection with the Smartphone ..... 36
Synching LED Panel and Remote Control 37
Connecting Groups of LED Panels 38
Attachment of the Remote Control
to any Non-Magnetic Object 39
Technical Data 40
Disposal 42
Conformity.... 43

natural_image
Simple line drawing of a cable with connector (no text or symbols)8 9

natural_image
Empty rounded rectangle outline with a small dot at the bottom-left corner (no text or symbols)
natural_image
Diagram of a mechanical assembly with a rotating component and a downward arrow (no text or symbols)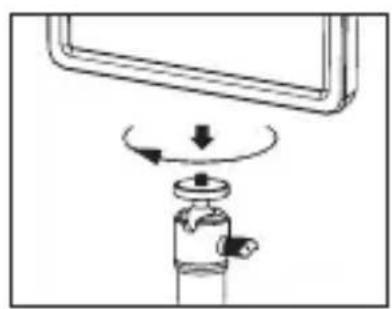
natural_image
Diagram of a mechanical device with rotating arm and valve (no text or symbols)natural_image
Abstract graphic with a red arrow pointing to a white paper clip and an orange right-pointing triangle (no text or symbols)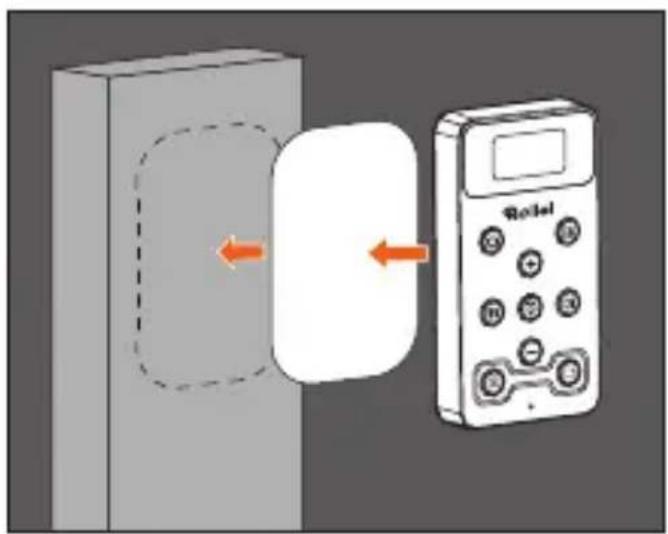
Before using the product for the first time, read the operating instructions and the safety instructions carefully.
Keep the operating instructions together with the product for later use. If other people use this product, please make these instructions available to them. If you pass the product on to third parties, these instructions belong to the product and must be supplied with it.
Intended Use
This product is designed for use as photo and video lighting only. It must not be used for other purposes and in particular not for domestic room lighting.
Explanation of Symbols
The following symbols are used in this manual, the Rollei LUMIS Key Light Pro or on the packaging.

Products marked with this symbol comply with all relevant commproducty regulations of the European Economic Area.

Products marked with this symbol are operated with direct current.
Electric current hazard!
Faulty electrical installations or excessive line voltage can cause electric shock.
- Connect the product to an easily accessible socket for usage so that you can quickly disconnect it from the mains in case of problems.
- Only use the USB cable supplied.
- Only connect the product if the mains voltage of the USB input on the computer or USB power supply matches the information on the type plate on the back of the product.
- Do not use the product if it is visibly damaged or if the cable is defective.
- If the product or the accessories are damaged, they must be replaced or repaired by the manufacturer, its customer service or a similarly qualified person in order to avoid hazards.
- The housing must not be opened and repairs may only be carried out by a specialist. To do this, contact a specialist workshop. In the event of repairs by the user, improper connection or incorrect operation, any liability and warranty claims are excluded.
- Do not insert any objects into the product.
- Do not leave the product unattended during operation.
- Protect the product from moisture. Do not touch it with wet / damp hands and do not immerse it in water.
Safety Instructions
- This product is not waterproof! Do not use this product in the rain or in wet areas.
- Do not use or store the product at high or low temperatures or in closed rooms with direct sunlight. The product should not be used at ambient temperatures of more than 50^ or below -10^ .
- Provide adequate ventilation during operation. Never cover the product.
- Keep the battery in the remote control away from children and animals, open flames and liquids, and do not expose them to temperatures higher than 50^ .
- Immediately remove the USB cable in case of unusual noises or smells as well as smoke from the housing.
Caution!
- Keep the product and accessories away from open flames, hot surfaces and easily flammable materials.
- Do not bend the USB cable or place it over sharp edges.
Danger!
Danger for children and people with limited physical, sensory or mental abilities (e.g. partially handicapped people, older people with limited physical and mental abilities) or lack of experience and know-how (e.g. older children).
- This product can be used by persons with limited physical, sensory or mental capabilities or lack of experience and know-how, provided that they are supervised or have received instructions for the safe use of the product and understand the possible dangers arising from its use. Children are not allowed to play with the product. The product must not be cleaned or main tained by children. Keep children under the age of eight away from the product and its accessories.
- Do not leave the product unattended during operation and charging.
- Do not point the product at car, bus, bicycle, motorbike or train drivers while driving. The driver may be blinded and cause an accident. This also applies to persons or groups not listed if an accident could be caused by possible glare.
- Do not shine the light directly into the eyes of people or animals as this can cause retinal damage, impaired vision and even blindness.
- The product is not a toy. Keep the product, accessories and packaging materials away from children and pets to prevent accidents and choking.
- If you sell the product to another person, also pass on this instruction manual to that person.
Note: Only for lighting for video purposes. Not suitable for permanent room lighting.
Warnings Concerning Batteries
- Do not disassemble, hit or puncture the battery, be careful not to short-circuit the battery.
- Do not expose the battery to places with high temperatures.
- Do not continue to use the battery if it leaks or expands.
- Always charge through the system. If the battery is replaced with the wrong type, there is a risk of explosion.
- Keep the battery away from children and animals.
- Batteries can explode if exposed to an open fire. Never throw batteries into a fire.
- Dispose of used batteries according to local regulations.
- Before disposing of the product, remove the battery and dispose of it separately.
- The batteries must be fully charged before using the product for the first time.
What's in the Box
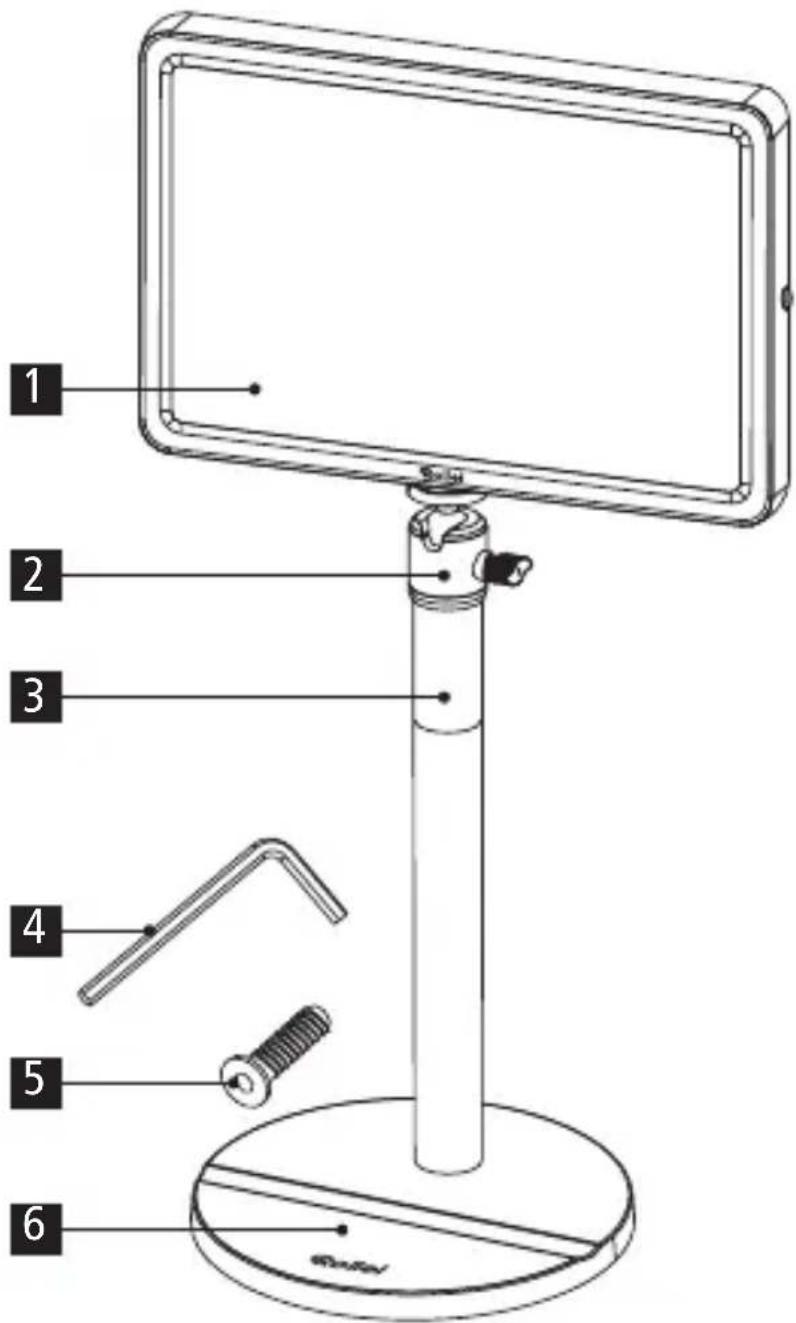
1 LED panel
2 Ball head
3 Monopod
4 Hex wrench
5 Screw
6 Base plate
7 USB-C cable
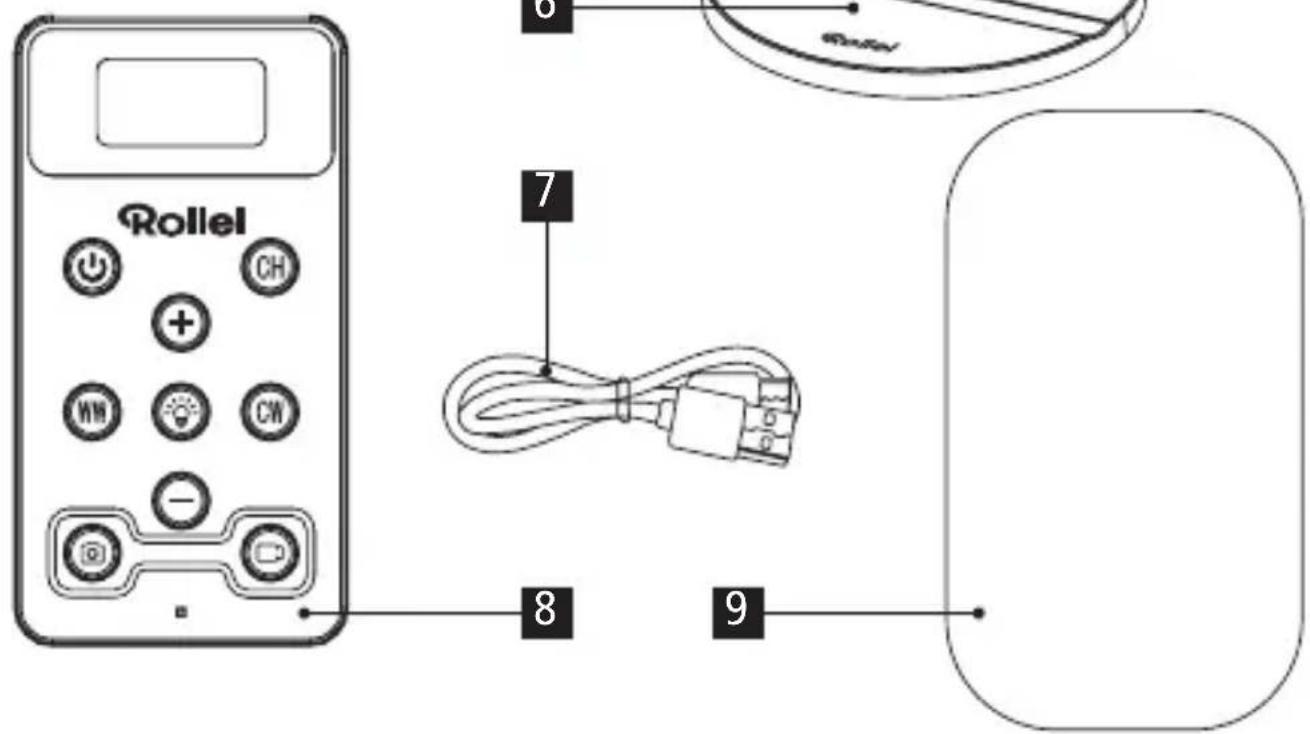
8 Remote control
9 Magnetic mounting plate for the remote control
Setting Up the Key Light

natural_image
Diagram of a mechanical component with a rotating base and a downward arrow, no text or symbols present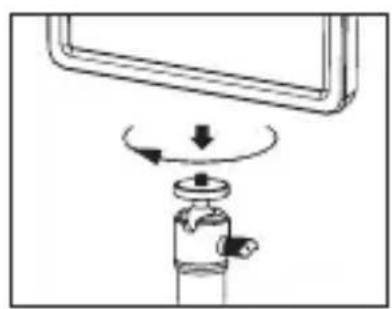
natural_image
Diagram of a mechanical device with rotating arm and valve (no text or symbols)- Fasten the tripod leg [3] in the matching thread on the base plate [6]. To do so, screw the screw [5] tightly into the thread at the bottom of the base plate [6] using the supplied hex wrench [4].
- Mount the light panel [1] on the ball head [2] of the monopod [3].
- Then adjust the Rollei LUMIS Key Light Pro to the desired height by pulling the leg segments of the monopod [3] apart.
- Plug the USB-C cable [7] with the USB-C connector into the USB-C input on the back of the LED panel [1] and connect the Rollei LUMIS Key Light Pro to your computer via the USB-A port or to a power supply product with a USB-A port (not included; necessary output of the power supply product: 5.0 V=2.0 A).

Note on the Operation
Please use USB power supplies with an output of 5.0 V = 2.0 A (not included) to operate the Rollei LUMIS Key Light Pro. With other USB power supplies or USB outputs on other products (e.g. computers, laptops), error messages or automatic shutdown of the Rollei LUMIS Key Light Pro may occur due to a deviating voltage.

Components: LED Panel

1 14 " screw thread
2 Magnetic stowage surface for the remote control
3 USB-C input
4 Button for increasing color temperature / brightness
5 Button for decreasing color temperature / brightness
6 Channel switch button
7 Power and mode button
8 Display

1 Display
2 Power button
3 Button for increasing the brightness
4 Button for decreasing the color temperature
5 Photo shutter release for smartphone camera
6 Bluetooth®* control light
7 Channel switch button
8 Standby button for LED panel
9 Button for increasing the color temperature
10 Button for decreasing the brightness
11 Video shutter release for smartphone camera
Operation on the LED Panel
Channel Switch Button CH
Press ⓒ to change the channel of the LED panel. You can choose between channel 0 to 6.
The channel of the remote control remains unchanged.
Power and Mode Button
Press Ⓤ for 3 seconds to turn the light on or off.
Press the button briefly to switch between color temperature and brightness mode.
Button to Increase Color Temperature / Brightness
Increase the color temperature / brightness by pressing ⚠The settings can be seen on the remote control (provided that LED panel and remote control are set on the same channel).
Button to Decrease Color Temperature / Brightness
Decrease the color temperature / brightness by pressing ⒽThe settings can be seen on the remote control (provided that LED panel and remote control are set on the same channel).
Display
The display shows which channel is set on the LED panel.
Operation with the Remote Control
Power Button ⏻
Press 📊 for 1 second for switching the remote control on.
Press 📊 for 3 seconds for switching it off.
The remote control, enters power saving mode after 5 minutes of inactivity. Reactivate it by pressing ⏻
Charge the remote control once every week for 1 hour to avoid a loss of battery capacity.
Channel Switch Button CH
Press ① for 3 seconds for changing the channel between channels 0 and 6. The channel of the LED panel stays the same and does not change.
Setting the Color Temperature ⒸW / ⓌW
Press Ⓒ to set the color temperature to cool white.
Press ⓥ to set the color temperature to warm white.
The color temperature can be set between 2,500 K and 9,000 K. Press
or briefly to adjust the color temperature in 10 K steps. Press
and long to adjust the color temperature in 100 K steps.
Setting the Brightness ⨀ ⊖
Press ⚙ for adjusting the brightness. The brightness can be adjusted between 0 and 100 % in 1 % steps.
Standby Button for LED Panel
Press ☐ to switch off the LED panel.
Bluetooth®\* Connection with the Smartphone
- Press 📋 for 3 seconds. The Bluetooth ^* control light flashes red.
- Activate Bluetooth®* on your smartphone.
- Connect the remote control to your smartphone by selecting the remote control "Remote Control" in the Bluetooth®* settings of your smartphone.
You can now trigger recordings on the smartphone via


using the remote control. Please note that you must be in the video mode of your camera for video recordings.
- After 5 minutes of inactivity, the remote control will go into standby mode. Press any button to activate it again.
- After 30 minutes of inactivity, the remote control will turn off.
Synching LED Panel and Remote Control
Connecting one Rollei LUMIS Key Light Pro
Pairing
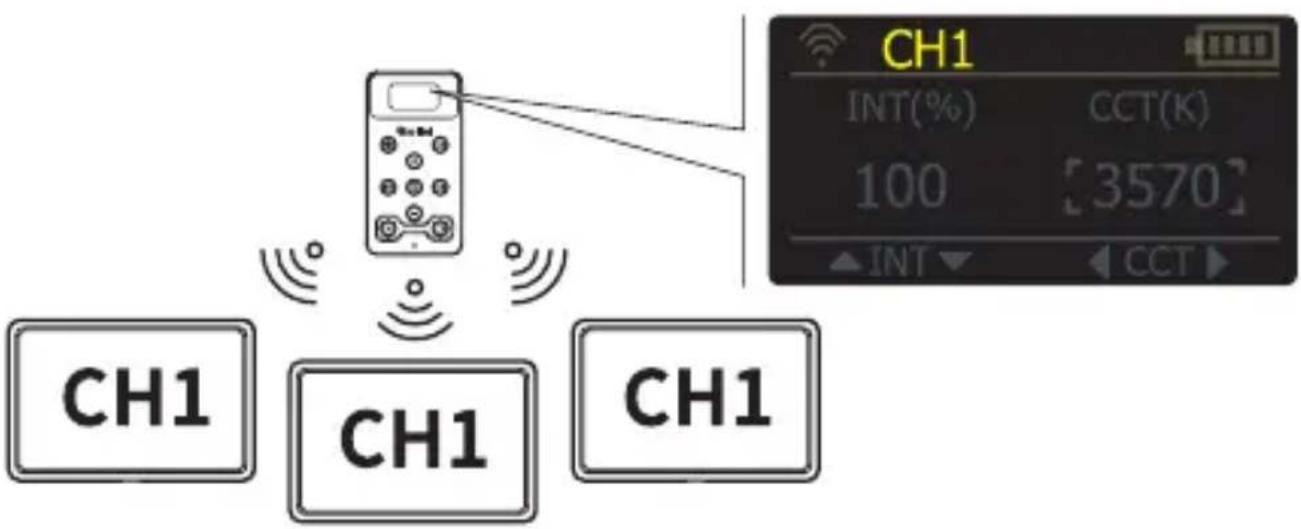
The display on the LED panel shows which channel the LED panel is on. On the display of the remote control, you can see the channel the remote control is on.
In order to operate the LED panel via the remote control, the same channel must be set on both products.
![0 1 2 3 4 5 6 CH1 INT(%) CCT(K) 100 [3570] ▲ INT ▼ ◀ CCT ▶](/content/2026/05/915044/images/343455bb3bec0f493a3914e8138ccae16b7c8a2ae1efc3e84d6d7e095971c367.jpg)
Channel Switch
If LED panel and remote control are not set to the same channels, press Ⓗ on the remote control for 3 seconds for changing the channel between 0 and 6.

Alternatively, you can change the channel on the LED panel by pressing Ⓗ on the back of the LED panel and change the channel accordingly. The green illuminated number on the display shows you which channel is set.
Connecting Groups of LED Panels
Multiple LED Panels in the Same Group
Set the same channel on all LED panels in the group. Set the same channel on the remote control. Now you can set the settings on the LED panels synchronously via the remote control or on one of the panels.
flowchart
graph TD
    A["CH1"] -->|Wireless Signal| B["Mobile Phone"]
    C["CH1"] -->|Wireless Signal| B
    D["CH1"] -->|Wireless Signal| B
    B --> E["CH1"]
    style A fill:#f9f,stroke:#333
    style C fill:#f9f,stroke:#333
    style D fill:#f9f,stroke:#333
Multiple LED Panels in Various Groups
To operate different Rollei LUMIS Key Light Pro in independent groups, set the LED panels to the desired channels. Bundle the LED panels that are to have the same settings on one channel and the other LED panels for other settings on another channel. You can set a total of 7 channels (see Channel Switch Button under Operation on the LED Panel).
Connecting Groups of LED Panels
Now change the channels on the remote control by pressing Ⓤfor 3 seconds. The display will show you which channel you are on. Now you can operate the LED panel groups on the respective channels independently and adjust the settings.

flowchart
graph LR
    A["CH1"] -->|Signal| B["CH2"]
    C["CH1"] -->|Signal| D["CH2"]
    E["CH1"] -->|Signal| F["CH2"]
    G["CH1"] --> H["CH2"]
    I["CH1"] --> J["CH2"]
    K["CH1"] --> L["CH2"]
    M["CH1"] --> N["CH2"]
    O["CH1"] --> P["CH2"]
    Q["CH1"] --> R["CH2"]
    S["CH1"] --> T["CH2"]
    U["CH1"] --> V["CH2"]
    W["CH1"] --> X["CH2"]
    Y["CH1"] --> Z["CH2"]
    AA["CH1"] --> AB["CH2"]
    AC["CH1"] --> AD["CH2"]
    AE["CH1"] --> AF["CH2"]
    AG["CH1"] --> AH["CH2"]
    AI["CH1"] --> AJ["CH2"]
    AK["CH1"] --> AL["CH2"]
    AM["CH1"] --> AN["CH2"]
    AO["CH1"] --> AP["CH2"]
    AQ["CH1"] --> AR["CH2"]
    AS["CH1"] --> AT["CH2"]
    AU["CH1"] --> AV["CH2"]
    AW["CH1"] --> AX["CH2"]
    AY["CH1"] --> AZ["INT(%)"]
    BA["CH2"] --> BB["INT(%)"]
    BC["X"] --> BD["X"]
Attachment of the Remote Control to any Non-Magnetic Object
To attach the magnetic remote control to non-metallic objects, stick the one-time-only magnetic attachment plate [9] to the object with its adhesive surface. The magnetic side of the remote control
can now be easily attached to it.

| LED Panel | |
| Number of LEDs 192 (96 warm white, 96 cool white) | |
| Power 10 W | |
| EU energy efficiency class G(EU 2017 / 1369) | |
| EU energy efficiency class A – Gspectrum (EU 2017 / 1369) | |
| Colour temperature 2,500 – 9,000 K; adjustable in10 and 100 K steps | |
| Colour rendering index (CRI) 90+ | |
| Television Lighting Consistency 95+Index (TLCI) | |
| Power control 0 – 100 %, in 1 % steps | |
| Illuminance 650 lx (0.5 m at 5,500 K) | |
| Beam angle 120° | |
| Remote control Via included remote control | |
| Channels 7 | |
| Bluetooth®* version 5.0 | |
| Frequency band 2.400 GHz – 2.480 GHz | |
| Max. radiated power 6 dBm | |
| Power supply 5.0 V = 2.0 A | |
| Rated input power 10 W | |
| Connections LED panel: 2x 1/4" thread, USB-Cinput | ball head on monopod:1/4" screw | |
| Dimensions | Weight 26 x 17 x 1.8 cm | 387 g | |
| Remote Control | |
| Max. range 20 m | |
| Channels | 7 |
| Bluetooth®* version 5.0 | |
| Frequency band 2.400 GHz – 2.480 GHz | |
| Max. radiated power 6 dBm | |
| Power supply Rechargeable lithium-polymer battery (3.7 V / 500 mAh / 1.85 Wh) | |
| Input 5.0 V 1.0 A | --- |
| Battery charging time | Battery life 1 hour | 30 days | |
| Dimensions | Weight 4.5 x 8.4 x 1.4 cm | 66 g | |
| Monopod with Tripod Base | |
| Material Iron and ABS plastic | |
| Weight 844 g | |
| Max. Height | Min. height 78 cm | 28.5 cm | |
| Leg segments 4 | |
| Tripod leg diameter | 2.5 cm, 2 cm, 1.6 cm, 1.4 cm |
| Diameter tripod foot | 16.8 cm |
| What's in the box | LED panel, remote control, tripod leg with ball head, tripod foot, hex wrench, screw, magnetic mounting plate, USB-C cable (2 m), user manual |
Design and specifications are subject to change without notice.
*The Bluetooth ^® word mark and logos are registered trademarks of the Bluetooth SIG, Inc. and any use of such marks by Rollei is under licence. Other trademarks and trade names are the property of their respective owners.

Dispose of the packaging according to its type. Use the local possibilities for collecting paper, cardboard and other materials (applicable in the European Union and other European countries with systems for the separate collection of recyclable materials).

Devices that are marked with this symbol must not be disposed of with household waste! You are legally obliged to dispose of old products separately from to dispose of household waste. Information on collection points that accept old appliances free of charge can be obtained from your local authority or town council.

Batteries and rechargeable accumulators must not be dis posed of in household waste! As a consumer you are legally obliged to dispose of all batteries and accumulators, whether they contain harmful substances* or not, to be disposed of in an environmentally sound manner. Accumulators and batteries are therefore marked with the symbol shown opposite. For more information, contact your dealer or contact return and collection points in your commproducty.
*marked with: Cd = Cadmium, Hg = Mercury, Pb = Lead.
Rollei GmbH & Co. KG hereby declares that the product "Rollei LUMIS Key Light Pro" is in compliance with Directive 2014 / 53 / EU.
The full text of the EU Declaration of Conformity is available at the following Internet address: www.rollei.com/egk/lumiskeylightpro

Rollei GmbH & Co. KG, In de Tarpen 42, 22848 Norderstedt Germany
Rollei

bar
| Category | Value | | -------- | ----- | | A | 10 | | B | 10 | | C | 10 | | D | 10 | | E | 10 | | F | 10 | | G | 10 |
- Intended Use
- Explanation of Symbols
- Electric current hazard!
- Faulty electrical installations or excessive line voltage can cause electric shock.
- Safety Instructions
- Caution!
- Danger!
- Warnings Concerning Batteries
- What's in the Box
- Setting Up the Key Light
- Note on the Operation
- Components: LED Panel
- Operation on the LED Panel
- Channel Switch Button CH
- Power and Mode Button
- Button to Increase Color Temperature / Brightness
- Button to Decrease Color Temperature / Brightness
- Display
- Operation with the Remote Control
- Power Button ⏻
- Setting the Color Temperature ⒸW / ⓌW
- Setting the Brightness ⨀ ⊖
- Standby Button for LED Panel
- Bluetooth®\* Connection with the Smartphone
- Synching LED Panel and Remote Control
- Connecting one Rollei LUMIS Key Light Pro
- Pairing
- Channel Switch
- Connecting Groups of LED Panels
- Multiple LED Panels in the Same Group
- Multiple LED Panels in Various Groups
- Attachment of the Remote Control to any Non-Magnetic Object
- Rollei
Brand : ROLLEI
Model : LUMIS Key Light Pro
Category : Lighting