
BR-80SL - Lighting BRESSER - Free user manual and instructions
Find the device manual for free BR-80SL BRESSER in PDF.


| Product Type | LED Lighting Device |
| Brand | Bresser |
| Model | BR-80SL |
| Dimensions (W x H x D) | 120 x 80 x 30 mm |
| Weight | 250 g |
| Power Supply | 3 x AAA batteries (not included) |
| Luminous Flux | 80 lumens |
| Color Temperature | 6500K (daylight) |
| Lighting Modes | High / Low |
| Battery Life | Up to 10 hours (low mode) |
| Material | ABS plastic |
| Protection Rating | IP20 (indoor use only) |
| Mounting | Rotating stand |
| Beam Angle | 120° |
| Color | Black |
| Warranty | 2 years |
| Maintenance | Clean with a soft dry cloth; do not use chemical cleaners. |
| Safety | Do not expose to moisture; use only AAA batteries. |
| Spare Parts / Repairability | No user-serviceable parts; replace unit if defective. |
| General Information | Bresser BR-80SL LED light for indoor illumination. |
Frequently Asked Questions - BR-80SL BRESSER
User questions about BR-80SL BRESSER
0 question about this device. Answer the ones you know or ask your own.
Ask a new question about this device
Download the instructions for your Lighting in PDF format for free! Find your manual BR-80SL - BRESSER and take your electronic device back in hand. On this page are published all the documents necessary for the use of your device. BR-80SL by BRESSER.
USER MANUAL BR-80SL BRESSER
natural_image
Black handheld electronic device with digital display showing 8.80, no visible text or symbols on the device bodyGB INSTRUCTION MANUAL
NL HANDLEIDING
natural_image
Black digital blood glucose meter with control buttons and display (no visible text or symbols)FIG. 2
IMPRINT
Bresser GmbH
Gutenbergstr. 2
46414 Rhede
Germany
www.bresser.de
Errors and technical changes reserved.
© 2023 Bresser GmbH
All rights reserved.
VALIDITY NOTE
This documentation is valid for the products with the following article numbers:
F004543, F004544, F004545, F004546
Manual version: 0323
Delivery part: Remote control
For any inquiries, please state these information.
MAIN FEATURES
• 2.4G wireless remote control
- Connect up to 99 BR-SL LED lights at the same time
- Set and control brightness, light intensity, color temperature and special light effects
- Colored function lights
- Easy to use
GENERAL SAFETY INFORMATION
RISK OF MATERIAL DAMAGE!
The manufacturer accepts no liability for damage to property caused by improper or insufficiently safe installation!
Only use the recommended batteries for power supply!
Do not touch the device with wet or damp body parts.
!IMPORTANT NOTE!
Do not disassemble the device! In the event of a defect, please contact your dealer. They will contact the Service Center and can arrange the return of this device for repair if necessary.
DELIVERY CONTENT (FIG. 1)
Remote control (A)
Additionally needed (not included):
2 pcs. AAA/LR03 type batteries
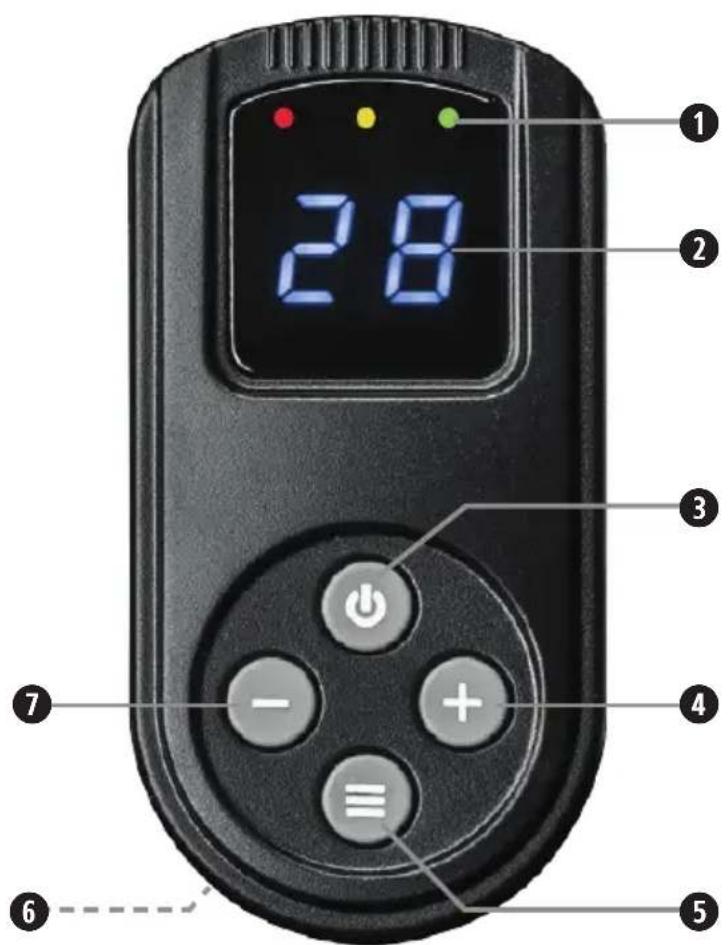
PARTS LIST (FIG. 2)
(1) Function lights
(left/red, centre/orange, right/green)
(2) Display (2-digits), shows the values for brightness, colour temperature and channel
(3) ON/OFF button
(4) [+] button
(5) MENU button
(6) Battery compartment and cover (on backside)
(7) [-] button
FUNCTION LIGHTS
• Red/left: brightness setting
- Orange/centre: color temperature setting*
- Green/right: special light effects activated
- no color: channel setting
INSERTING BATTERIES
- Remove the cover from the battery compartment on the backside.
- Insert two batteries into the battery compartment in the direction of the printed markings.
- Re-attach the cover.
- The remote conbtrol is now ready for use.
SELECTING A CHANNEL & SYNCHRONIZING
- Make sure that the light you are able to work with is switched on.
- Press the On/Off button on remote control shortly to activate the display.
- Check the currently selected settings in the light and the remote control. The channel selected on the remote control must be the same as the channel set on the light.
- If the channels are incorrectly se press the MENU button on the remote control. Each time you press the MENU button on the remote control, you switch between setting the brightness, colour temperature and channel.
- Select channel setting.
- The currently set channel is displayed and the channel selection is activated if no function light lights up on the remote control display.
- Set the desired channel by pressing the plus [+] or minus [-] buttons on the remote control.
- Press the MENU button again confirm the channel selection and to return to the settings menu for brightness adjustment (basic settings).
- Then check whether the select information matches on the remote control and on the device. If necessary, correct the values on the light as described in section.
-
The light is now ready to be operated via the remote control.
-
The display of the remote control has an automatic switch off function. To reactivate the display, press the On/Off button shortly.
- In the circumstance that the channel of the remote is set to "00", it can control all the devices at any channel from 01 to 99 at the same time. The brightness intensity and color temperature can be increased/decreased and the devices can be switched on or off by the remote control.
SWITCHING THE LIGHT ON/OFF & STANDBY STATUS
the NOTE: Make sure that the light and the remote control have been correctly paired up and the same channels are set.
- Use the ON/OFF switch to switch on the light and select the correct power source (if not already done).
NOTE: The ON/OFF function on the remote control will not work if the mains power switch on the lamp is switched off. - Press the ON/OFF button on the remote control once shortly to activate the remote control.
- Press the ON/OFF button on the remote control for approx. 2-3 seconds to switch the lamp off (set into standby mode.)
- Press the ON/OFF button on the remote control shortly again to switch on the light with the remote control.
- The remote control has an automatic switch off function. To reactivate the display, please press the ON/OFF button shortly.
SETTING BRIGHTNESS (DIMMER)
NOTE: Make sure that the light and the remote control have been correctly paired up and the same channels are set.
- Use the ON/OFF switch to switch on the light and select the correct power source (if not already done).
NOTE: The ON/OFF function on the remote control will not work if the mains
power switch on the light is switched off.
- Press the ON/OFF button on the remote control once shortly to activate the remote control.
- Check that the red status LED on the remote control is on and that the dimming function is activated.
- If the dimming function is not set, press the MENU button on the remote control until the red status LED on the remote control is on. Each time you press the MENU button on the remote control, you can switch between the brightness, color temperature* and channel settings menu.
- Set the desired light output by pressing the [+] or [-] buttons on the remote control. When a new value is set for the first time, the values on the light are automatically synchronized with the settings of the remote control.
- The brightness of the light changes and the selected values for the brightness are shown on the displays of the light and the remote control at the same time.
• The brightness can be adjusted steps of 1% from 10 to 99%. - The selected values are applied and saved by the device immediately.
SELECTING COLOR TEMPERATURE\*OR SPECIAL LIGHT EFFECTS CONTROL
NOTE: Make sure that the light and the remote control have been correctly paired up and the same channels are set.
- Shortly press the ON/OFF button to activate the remote control.
- Press and hold the MENU butto until the green LED is on. The remote control will go to the special effect light control mode.
- Shortly press the MENU button to change the brightness or the flash speed. When both, red and green
LED are on, dimmer is able to be changed. When both, orange and green LED are on, flash speed is able to be changed. When only the green LED is on, special light effects are able to be changed.
- Long press the MENU button until the orange LED is on (green LED is off), the remote controller goes to color temperature control.
COLOR TEMPERATURE\*
NOTE: Make sure that the light and the remote control have been correctly paired up and the same channels are set.
-
Shortly press the ON/OFF button to activate the remote control.
-
Check that the orange status LED on the remote control is on and that the color temperature* set mode is activated.
-
If the color temperature* set mode is not activated, press the MENU button on the remote control until the orange status LED lights up. Each time you press the MENU button on the remote control, you can switch between the brightness, color temperature* and channel setting menu.
-
The currently set color temperature* is shown in shortened form on the display of the remote control. For example, 32 means 3,200 K, 44 means 4,400 K and 55 means 5,500 K.
-
Set the desired color temperature* by pressing the [+] or the [-] button on the remote control. When a new value is set for the first time, the values for the light are automatically synchronised with the settings of the remote control.
NOTE: The color temperature* can be set in steps of 100 Kelvin from 3,200 to 5,500 Kelvin.
The selected values are applied and saved by the device immediately.
NOTE: Make sure that the light and the remote control have been correctly paired up and the same channels are set.
- Shortly press the ON/OFF button to activate the remote control.
- Long press the MENU button until the green light is on, which goes to the mode of special effect lighting control.
- Shortly press MENU button to switch to brightness, flash mode or flash speed in loop. When you switch to flash mode, the red and orange indicators are both off. Press [+] and [-] button to choose from F1 to F6 flash type settings.
F1: Paparazzi; F2: Fireworks;
F3: Bad bulbs; F4: Lightning;
F5: TV; F6: SOS
LIGHT INTENSITY IN F1-F6 MODE
- Shortly press MENU button.
- When both, red and green indicator are on, shortly press [+] or [-] button to set the light intensity.
FLASH SPEED
- Shortly press MENU button.
- When both, orange and red indicator are on, shortly press [+] or [-] button to set the flash speed.
CLEANING & MAINTENANCE
- Only use a dry cloth to clean the exterior of the device. To avoid damaging the electronics, do not use any cleaning fluid.
- Only use the recommended batteries. Always replace weak or empty batteries with a new, complete set of batteries at full capacity. Do not use batteries from different brands or with different capacities.
STORAGE
- Remove the batteries from the unit if it is not used for a longer time.
- Protect the device from dust and moisture and store it in a dry environment.
SPECIFICATIONS
| Model RC-01C | 2.4G wireless remote control |
| Wireless frequency 2.4 GHz | |
| Transmission range up to | 50 m (16.4 ft) |
| Channels up to 99 | |
| Standby time | >1 year |
| Dimensions (LxWxH) | 85 x 45 x 55 mm |
| Weight | 50 g (without batteries) |
| Operating temperature | -10° to 50°C |
| Power supply | 2 pcs. 1.5V AAA/LR03 |
IMPRINT
Bresser GmbH
Gutenbergstr. 2
46414 Rhede
Duitsland
www.bresser.de
LEVERINGSOMVANG (AFB. 1)
Afstandsbediening (A)
Please contact the service centre first for any questions regarding the product or claims, preferably by e-mail.
E-Mail: service@bresseruk.com
Telephone*: +44 1342 837 098
BRESSER UK Ltd.
Suite 3G, Eden House
Enterprise Way
Edenbridge, Kent TN8 6HF
Great Britain
*Number charged at local rates in the UK (the amount you will be charged per phone call will depend on the tariff of your phone provider); calls from abroad will involve higher costs.
FR BE
- IMPRINT
- VALIDITY NOTE
- MAIN FEATURES
- GENERAL SAFETY INFORMATION
- RISK OF MATERIAL DAMAGE!
- !IMPORTANT NOTE!
- DELIVERY CONTENT (FIG. 1)
- Additionally needed (not included):
- PARTS LIST (FIG. 2)
- FUNCTION LIGHTS
- INSERTING BATTERIES
- SELECTING A CHANNEL & SYNCHRONIZING
- SWITCHING THE LIGHT ON/OFF & STANDBY STATUS
- SETTING BRIGHTNESS (DIMMER)
- SELECTING COLOR TEMPERATURE\*OR SPECIAL LIGHT EFFECTS CONTROL
- COLOR TEMPERATURE\*
- LIGHT INTENSITY IN F1-F6 MODE
- FLASH SPEED
- CLEANING & MAINTENANCE
- STORAGE
- LEVERINGSOMVANG (AFB. 1)
- BRESSER UK Ltd.
- FR BE
Brand : BRESSER
Model : BR-80SL
Category : Lighting