
BR-12B - Lighting BRESSER - Free user manual and instructions
Find the device manual for free BR-12B BRESSER in PDF.


| Product Type | Studio LED Light |
| Model | BR-12B (Bicolor) |
| Power Consumption | 12W |
| LED Luminosity | 720 Lux at 0.5m; 180 Lux at 1m |
| Number of LEDs | 120 |
| Luminous Flux | 1200 LM |
| Color Temperature Range | 3200K to 5600K (adjustable) |
| Dimming Range | 10% to 100% (digital, stepless) |
| Operating Voltage | DC 6.5V to 17V via power adapter |
| Power Supply Options | Mains adapter or optional battery (NP-F550/NP-F750/NP-F960, not included) |
| Remote Control | Optional 2.4GHz remote (not included) |
| Control Interface | Touch buttons (UP, DOWN, MODE, ON/OFF) |
| Display | LED display for settings (intensity, color temperature, channel) |
| Safety Features | Overheat protection, glare warning, safe for indoor use |
| Cleaning | Use dry cloth; disconnect power first |
| Disposal | Electronic waste – do not dispose with household waste |
| Compliance | CE, EC Declaration of Conformity |
Frequently Asked Questions - BR-12B BRESSER
User questions about BR-12B BRESSER
0 question about this device. Answer the ones you know or ask your own.
Ask a new question about this device
Download the instructions for your Lighting in PDF format for free! Find your manual BR-12B - BRESSER and take your electronic device back in hand. On this page are published all the documents necessary for the use of your device. BR-12B by BRESSER.
USER MANUAL BR-12B BRESSER
natural_image
Black-and-white photo of a digital camera with a 8888 timer and control panel, no visible text or symbols on the device itself.Studio Light · Studiolamp · Studiolicht ·
BR-12B

Instruction manual
Visit our website via the following QR Code or web link to find further information on this product or the available translations of these instructions.

1 Validity information.... 5
2 About this Instruction Manual.... 5
3 Intended use 5
4 General safety instructions .... 5
5 Parts overview and scope of delivery 7
6 Establishing the power supply (mains operation) 8
7 Power supply via battery (optional)....8
8 Lighting settings.... 8
9 Remote control (optional).... 9
10 Setting a channel for remote control....9
11 Technical data....9
12 Disposal....9
13 EC Declaration of Conformity 10
1 Validity information
This documentation is valid for the products with the article numbers listed below:
F004237
Manual version: 0419
Manual description:
Manual_F004237_BR-12B_en-nl-de_BRESSER-PSE_v042019a
With any service inquiries, please state these information.
2 About this Instruction Manual

NOTICE
These operating instructions are to be considered a component of the device.
Please read the safety instructions and the operating instructions carefully before use.
Keep these instructions for renewed use at a later date. When the device is sold or given to someone else, the instruction manual must be provided to the new owner/user of the product.
3 Intended use
- This device is not intended to be used by persons (including children) with limited physical, sensory or mental capabilities or those who lack the relevant experience and/or knowledge, unless they are supervised by a person responsible for their safety or have received instructions from this person as to how the device is used.
• This device is for private use only. - The device is for indoor use only.
4 General safety instructions

DANGER
Risk of electric shock
This device has electronic parts operated via a power source (power supply and/or batteries). Improper use of this product can cause an electric shock. An electric shock can cause serious or potentially fatal injuries. The following safety information must be observed at all times.
- Disconnect the device from the power supply by pulling the power plug when it is not used or in case of longer interruption of operation and before starting any work on maintenance and cleaning.
- Position your device so that it can be disconnected from the power supply at any time. The power socket should be installed near the device and should be easily accessible as the mains cable plug is used to disconnect the device from the power supply.
- To disconnect the device from the power supply, always pull on the plug. Never pull on the cable.
- Before starting up the device, check the device, the cables and the connections for signs of damage.
- Never use a damaged device or a device with damaged live parts. Damaged parts must be immediately replaced by an authorised service company.
- Discharge the device before maintenance work and cleaning.
- Only use the device in complete dry environment and do not touch it with wet or moist parts of your body.
- Never use the device with defective or damaged components (e.g. housing, cable, lamp, etc.).

! DANGER
Risk of suffocation
Improper use of this product can result in suffocation. This is particularly dangerous for children. The following safety information must be observed at all times.
- Keep packaging materials (plastic bags, rubber bands etc.) away from children. They can cause suffocation.

WARNING
Danger of glare!
Make sure people and animals do not stare into the light. Due to the high power of illumination, your eyes can be glared or after-images may achieve. This visual impairment can cause accidents.

CAUTION
Risk of burns!
Never touch parts of the device during operation or until it has sufficiently cooled down (about 45 min. after switching off)!

CAUTION
Danger of injury!
This device contains components and/or accessories that can cause minor to severe injuries in case of any improper use. Therefore please read the safety instructions below to avoid any bodily injury.
• Always handle flash tubes and lamps with special care. Pieces of glass may cause serious or fatal injury to eyes and skin!
- Tools with sharp edges and points are often used when working with this device. Because there is a risk of injury from such tools, store this device and all tools and accessories in a location that is out of the reach of children.

! DANGER
Risk of explosion
Improper use of this product can cause an explosion. The following safety information must be observed at all times to prevent an explosion.
- Do not expose the device to high temperatures. Use only the power supply provided. Never short-circuit the device or throw it into a fire. Excessive heat and improper handling of this product can result in short-circuits, fires or even explosions.

CAUTION
Fire hazard!
In case of any improper use of this device, there is a risk of fire. Therefore please read the safety instructions below to avoid the initiation of burning.
- Due to extreme heat development of some components of up to 250^ there is an acute FIRE HAZARD! Always set up the device securely, so that it may not turn over. Ensure for a safe storage.
- Keep children and animals away from the device! They could overturn the device.
• Make sure that no one can trip over the connection cables of the device. The device could be overturned. - Never turn on the device with its protection cap fitted.
- Never cover the ventilation slots or cooling fins of the device while using it or as long as it has not sufficiently cooled down!
- Keep flammable materials away from the device!
- Operate this device only installed with open softboxes to prevent fire hazard due to heat build!

NOTICE
Risk of damage to property
Improper handling can result in damage to the device and/or to the accessories. Always observe the following safety information when using the device.
- Never disassemble the device. In the event of a fault, please contact your specialist retailer. The specialist retailer will contact the service centre and send the device for repair if necessary.
- Perform all cleaning and maintenance work at the device only as described in the instruction manual.
- Do not expose this device to higher temperatures and protect it from water and high humidity.
- Protect the device from severe shocks!
- For this device only use accessories and spare parts that comply with the technical information.
- Never touch flash tubes or lamps with bare hands! Use clean cotton gloves or a clean cloth when inserting or suspending them.
5 Parts overview and scope of delivery
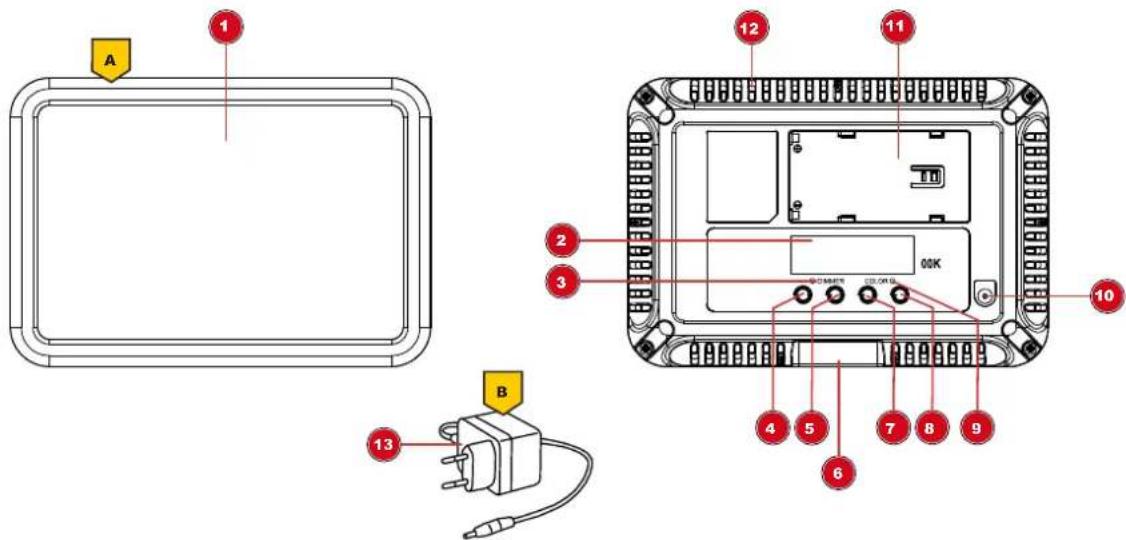
Illustration 1: All parts of the LED light
1 LED lighting panel 2 LED display (display of the settings)
3 Funktion indicator (light intensity) 4 UP Touch button (increase setting value)
5 DOWN Touch button (decrease setting value) 6 Connection thread
7 MODE Touch button (select setting mode) 8 ON/OFF Touch button (turn on/off device)
9 Function indicator (colour temperature) 10 DC connection socket for coaxial/barrel connector
11 Battery socket (adding suitable batteries* 12 Vents for mobile use) (optional)
13 DC power adapter with coaxial/barrel plug
* suitable battery types NP-F550, NP-F750 or NP-F960 not included
Scope of delivery:
LED light (A), power adapter (B)
6 Establishing the power supply (mains operation)
WARNING! The device can not be operated at the same time by mains power adapter and by battery!
- Put the DC connector into the connection socket of the device.
- Insert the mains plug into the power outlet.
CAUTION! Before switching on the device, make sure that only one voltage source is used (power adapter or battery)!
- Press On/Off button to turn the device on or off.
NOTICE! If the device is not used for a long time, disconnect the device from the power supply (pull out mains plug or remove battery).
7 Power supply via battery (optional)
WARNING! The device can not be operated at the same time by mains power adapter and by battery!
As an alternative to the power supply through mains voltage, the device can also be powered by a battery*.
NOTICE! Only use the type of battery described in this manual. Use of an unsuitable or unauthorized battery will damage the device and void the warranty.
- Charge the rechargeable battery* completely.
- Insert the battery into the battery socket at the backside of the housing.
CAUTION! Before switching on the device, make sure that only one voltage source is used (power adapter or battery)!
- Press On/Off button for approx. 2 seconds to turn the device on or off.
*not included
8 Lighting settings
- Press MODE touch button several times to set the desired mode.
- Depending on the selected mode, one of the following function indicators will light:
• function indicator 'Dimmer': light intensity from 10 (10%) to 99 (99%) settable stepless - function indicator 'Color': color temperature from 32 (3,200K) to 56 (5,600K) settable stepless
- Press UP touch button to increase the value in the corresponding mode.
- Press DOWN touch button to decrease the value in the corresponding mode.
9 Remote control (optional)
The device can be controlled with a suitable 2.4GHz remote control* over the built-in receiver. When using the same channel, different devices can be operated at the same time through the remote control*.
To control the device through a remote control, proceed as follows:
- Turn on the device(s).
- Set the desired receiving channel to all lights being controlled.
- Set the channel also for the remote control.
NOTICE! Only use the remote control recommended for this type of light! If a light is not to be controlled synchronously, simply change the channel on the corresponding light.
*not included
10 Setting a channel for remote control
- Press MODE touch button several times until two digits flash on the display (channel currently set).
- Press UP touch button to increase the value.
- Press DOWN touch button to decrease the value.
- Once the number on the display does not flash anymore the new channel value has been saved.
11 Technical data
| Model BR-12B (bicolor) | |
| Power consumption 12W | |
| LED luminosity 0.5m/720LUX, 1m/180LUX | |
| Number of LEDs 120 | |
| Luminous flux 1,200 LM | |
| Lamps LED, not replaceable | |
| Color temperature 3,200K to 5,600K | |
| Dimmer digital, 10% to 100% | |
| Operating voltage DC 6.5V to 17V via power adapter | or optionalvia lithium battery1x NP-F550/NP-F750/NP-F960 |
Operating conditions dry, 0^ C to +40^ C
Storage conditions dry and dust-free, 0^ C to +40^ C
Table 1: BR-12B
NOTICE! The LEDs used in this device have a very long lifespan and do not need to be changed. The LEDs can not be changed due to technical reasons!
12 Disposal

Dispose of the packaging materials properly, according to their type, such as paper or cardboard. Contact your local waste-disposal service or environmental authority for information on the proper disposal.
Do not dispose of electronic devices in the household garbage!
As per Directive 2012/19/EC of the European Parliament on waste electrical and electronic equipment and its adaptation into German law, used electronic devices must be collected separately and recycled in an environmentally friendly manner.
13 EC Declaration of Conformity

Bresser GmbH has issued a "Declaration of Conformity" in accordance with applicable guidelines and corresponding standards. The full text of the EU declaration of conformity is available at the following internet address: www.bresser.de/download/F004237/CE/F004237_CE.pdf
Inhoud
Please contact the service centre first for any questions regarding the product or claims, preferably by e-mail.
e-mail: service@bresseruk.com
Telephone*: +44 1342 837 098
BRESSER UK Ltd
Unit 1 starborough Farm,
Starborough Road, Nr Marsh Green,
Edenbridge, Kent TN8 5RB
Great Britain
* Number charged at local rates in the UK (the amount you will be charged per phone call will depend on the tariff of your phone provider); calls from abroad will involve higher costs.
FR BE
- Validity information
- About this Instruction Manual
- NOTICE
- Intended use
- General safety instructions
- DANGER
- Risk of electric shock
- ! DANGER
- Risk of suffocation
- WARNING
- Danger of glare!
- CAUTION
- Risk of burns!
- Danger of injury!
- Risk of explosion
- Fire hazard!
- Risk of damage to property
- Parts overview and scope of delivery
- Establishing the power supply (mains operation)
- Power supply via battery (optional)
- Lighting settings
- Remote control (optional)
- Setting a channel for remote control
- Technical data
- Disposal
- EC Declaration of Conformity
- Inhoud
- e-mail: service@bresseruk.com
- BRESSER UK Ltd
- FR BE
Brand : BRESSER
Model : BR-12B
Category : Lighting