
BR-96RGB - Lighting BRESSER - Free user manual and instructions
Find the device manual for free BR-96RGB BRESSER in PDF.


| Product Type | LED RGB Light Panel |
| Brand | Bresser |
| Model | BR-96RGB |
| Dimensions (approx.) | 30 x 20 x 5 cm |
| Weight (approx.) | 500 g |
| Power Supply | USB 5V / 2A (cable included) |
| Power Consumption | 10 W |
| Light Source | 96 RGB LEDs |
| Color Range | RGB with adjustable hue and saturation |
| Brightness Levels | 0-100% dimmable |
| Color Temperature | 3200K - 5600K (via RGB mixing) |
| Special Effects | Strobe, pulse, fade, and color cycling modes |
| Control Method | On-device buttons and remote control (included) |
| Mounting | Standard 1/4" tripod thread; tabletop stand |
| Material | Aluminum housing with diffuser |
| Operating Temperature | 0°C to 40°C |
| Maintenance & Cleaning | Wipe with a soft dry cloth. Avoid solvents. |
| Safety | Use only supplied adapter; do not expose to water. |
| Spare Parts & Repairability | Contact Bresser support for replacement parts. |
| General Information | Designed for photography, video, and studio lighting. |
Frequently Asked Questions - BR-96RGB BRESSER
User questions about BR-96RGB BRESSER
0 question about this device. Answer the ones you know or ask your own.
Ask a new question about this device
Download the instructions for your Lighting in PDF format for free! Find your manual BR-96RGB - BRESSER and take your electronic device back in hand. On this page are published all the documents necessary for the use of your device. BR-96RGB by BRESSER.
USER MANUAL BR-96RGB BRESSER
natural_image
Smart camera setup with a mounted tripod and smartphone, no visible text or symbolsGB INSTRUCTION MANUAL
NL HANDLEIDING
GB Visit our website via the following QR Code or web link to find further information on this product or the available translations of these instructions.
Do not use in the presence of children or animals. Store out of reach of children and animals.

RISK OF MATERIAL DAMAGE!
Make sure that no one can trip over connection cables of the device. The device could be knocked over.
Only use the recommended power cable or the recommended battery for the power supply!
The manufacturer accepts no liability for voltage damage caused by the use of an unsuitable power supply!

DANGER OF AN ELECTRIC SHOCK!
This device contains electronic parts that are powered by a power source (power adapter). Only use the device as described in the manual. Otherwise, you run the DANGER of an ELECTRIC SHOCK.
Never bend, squeeze or pull power cables, connecting cables, extensions or connectors. Protect cables from sharp edges and heat.
Check this device, cables and connections for damage before use.
Never attempt to operate a damaged device, or a device with damaged electrical parts! Damaged parts must be replaced immediately by an authorized service agent.
Operate the device only in a completely dry environment and do not touch the device with wet or damp body parts.

RISK OF GLARE!
Make sure that people and animals do not look into the light. The high luminosity can cause glare to the eyes and afterimages. This impairment of vision can lead to accidents.

FIRE/EXPLOSION HAZARD!
Always place the device in such a way that it cannot tip over and ensure that it is stored in a reasonably safe place.
- Keep children and animals away from the device! They could knock the device over.
- Make sure that no one can trip over connection cables. The device could be knocked over.
- Do not expose the device to high temperatures. Do not short-circuit the device or dispose of in fire! Excessive heat and improper handling can cause short circuits, fires and even explosions!
- Only use the recommended power supply*!

IMPORTANT NOTE!
Do not disassemble the device! In the event of a defect, please contact your dealer. They will contact the Service Center and can arrange the return of this device for repair if necessary.
Disconnect the power supply by pulling the mains plug when the appliance is not in use, in case of a longer interruption of operation and before any maintenance and cleaning work.
Place your device so that it can be disconnected from the power supply at any time. The power outlet should always be near your appliance and should be easily accessible, as the plug of the power cord serves as a disconnect device from the mains supply.
To disconnect the unit from the mains, always pull the mains plug and never pull the cable!
Do not subject the device to excessive vibrations!
PARTS OVERVIEW
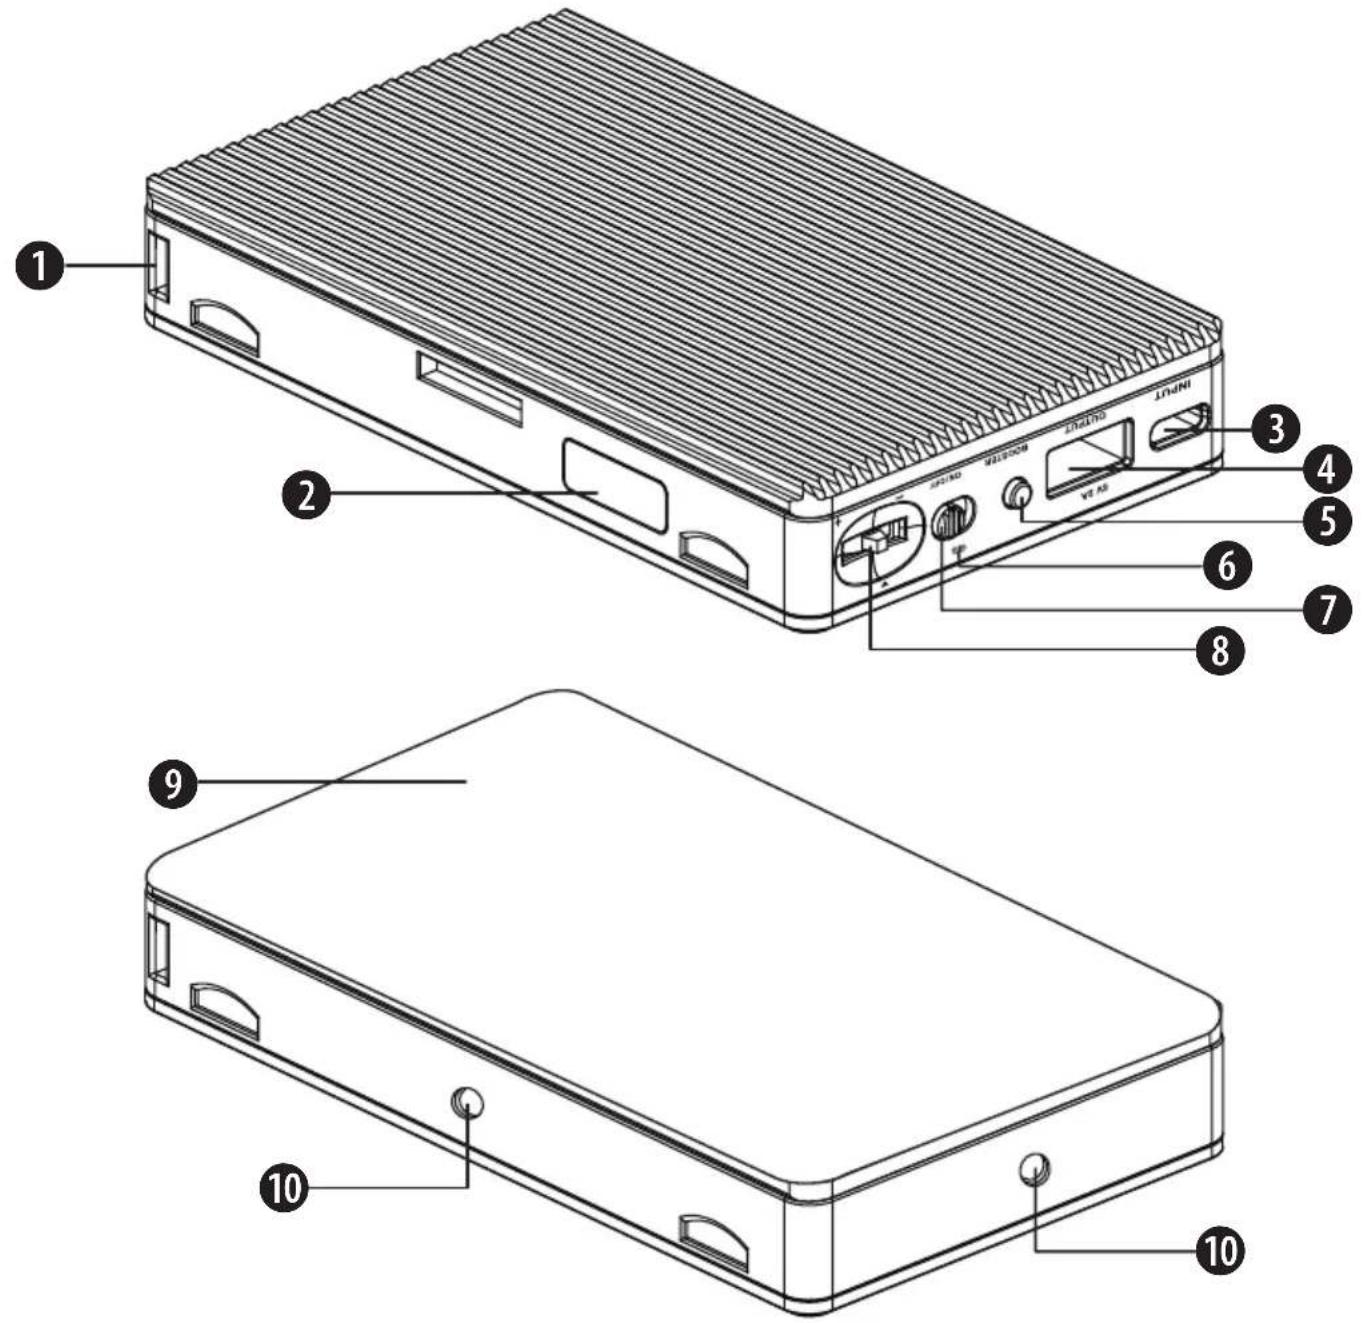
PARTS DESCRIPTION
① Hole for handstrap
② LED-Screen
③ USB-C Power input socket
④ USB-A Power Output
⑤ Mode button
⑥ Battery status indicator
⑦ On/Off switch
⑧ Dial control
⑨ LED light surface
⑩ Connection thread (1/4" - 20)
CHARGING & POWER SUPPLY
This device is equipped with an rechargebale battery and can therefore be used with or without mains power supply. Furthermore you can use it as an power bank to charge your third-party devices (power input: 5V/2A).
Charging the battery
Note: An additional USB-A/USB-C charging cable* and an USB power adapter* (5V/2A) are required. Read the chapter "Technical data" for detailed information.
- Insert the USB-C plug of the charging cable into the USB-C power input socket (3).
- Insert the USB-A plug of the cable into the USB-A power socket of the USB power adapter.
- Insert the mains plug of the power adapter into a mains power socket (210-230V). After successful connection, the battery status indicator (6) lights up green. It's colour will change to blue when it is fully charged. The light is ready is for use.
Hint: Use the USB-A power output socket (4) to connect your smart device and charge it via an USB-A/USB-C charging cable* (power bank function).
Mains power supply
Once the battery level low is low, just connect the light with the mains power supply again as mentioned above to enable a direct power supply.
The light can be set in operation directly and the battery is charged in parallel.
- To turn on the light, slide the On/Off Switch (7) to position "ON". The light will turn on immediately with settings used latest.
- To turn off the light, slide the On/Off switch (7) to position "OFF". The light will turn off immediately.
FUNCTIONS & OPERATION
CCT / HSI / FX Mode
Shortly press Mode button (5) to switch between HSI, CCT or FX mode.
- In [HSI] mode (RGB colour), press the dial control (8) to switch between [INT] (intensity), [Hue] and [SAT] (saturation). Push the dial control up or down to increase or decrease the values.
- In [CCT] mode (bi-colour), press the dial control (8) to switch between [colour temperature] and [intensity control]. Push the dial control up or down to increase or decrease the values.
- In special [FX] mode (special effects), press the dial control (8) to switch between [intensity] and [special effect options]. Select [intensity control] and push the dial control up or down to increase or decrease the brightness. Select [special effect options] and push the dial control up or down to select one of the available special effects (see list below).
Special effects list
F1: Fire / F2: Cop car / F3: pulsing / F4: Party / F5: Lightning / F6: TV / F7: Fault bulb / F8: Firework / F9: Paparazzi
ATTACHING TO OTHER DEVICES\* (optional)
Through the two connection threads (10), this LED light can be attached to many other devices* such as (D)SLR cameras, camcorders, selfie sticks, gimbals or action cams. An additional adapter* may be required for installation.
DISPOSAL
Dispose of the packaging materials properly, according to their type, such as paper or cardboard. Contact your local waste-disposal service or environmental authority for information on the proper disposal.
Do not dispose of electronic devices in the household garbage! As per the Directive 2012/19/EC of the European Parliament on waste electrical and electronic equipment and its adaptation into German law, used electronic devices must be collected separately and recycled in an environmentally friendly manner.
In accordance with the regulations concerning batteries and rechargeable batteries, disposing of them in the normal household waste is explicitly forbidden. Please make sure to dispose of your used batteries as required by law — at a local collection point or in the retail market. Disposal in domestic waste violates the Battery Directive.
CE DECLARATION OF CONFORMITY
CE Bresser GmbH has issued a „Declaration of Conformity“ in accordance with applicable guidelines and corresponding standards. The full text of the CE declaration of conformity is available at the following internet address: www.bresser.de/download/BR-RGB/CE/F005101_CE.pdf
WARRANTY & SERVICE
The regular warranty period is 2 years and begins on the day of purchase. To benefit from an extended voluntary warranty period as stated on the gift box, registration on our website is required.
You can consult the full warranty terms as well as information on extending the warranty period and details of our services at www.bresser.de/warranty_terms.
www.bresser.de/warranty_terms
TECHNICAL DATA
| Model No. BR-96RGB | |
| Art. No. F005101 | |
| Power Consumption 9W | |
| Luminous Flux 800 lm | |
| Color Temperature 2800K to 6500K | |
| CRI ≥ 95 | |
| Dimmer 0% to 100% | |
| Saturation 0% to100% | |
| Light source LED; 0.5W*28 pcs. @6500K / 0.5W*28 pcs. @2800K / 1.5W RGB LEDs (5050)*24 pcs. | |
| Special Effects 9 | |
| Colour Chnage 0 to 360° | |
| Battery Type / Power Rechargeable Li-Po battery, 4000 mAh | |
| Duration approx. 100 min. at 100% brightness | |
| Charging time approx. 120 min. | |
| DC power input | DC 5V/2A via USB power adapter* and USB-A/USB-C charging cable* |
| Dimensions | 116 x 68 x 20 mm |
ALGEMENE WAARSCHUWINGEN
⚠️ GEVAAR OP LICHAMELIJK LETSEL!
BESCHRIJVING VAN DE ONDERDELEN
GEFAHR EINES STROMSCHLAGS!
TEILEBESCHREIBUNGEN
Please contact the service centre first for any questions regarding the product or claims, preferably by e-mail.
E-Mail: service@bresseruk.com
Telephone*: +44 1342 837 098
BRESSER UK Ltd.
Suite 3G, Eden House Enterprise Way Edenbridge, Kent TN8 6HF Great Britain
*Number charged at local rates in the UK (the amount you will be charged per phone call will depend on the tariff of your phone provider); calls from abroad will involve higher costs.
FR BE
- RISK OF MATERIAL DAMAGE!
- DANGER OF AN ELECTRIC SHOCK!
- RISK OF GLARE!
- FIRE/EXPLOSION HAZARD!
- IMPORTANT NOTE!
- PARTS DESCRIPTION
- CHARGING & POWER SUPPLY
- Charging the battery
- Mains power supply
- FUNCTIONS & OPERATION
- CCT / HSI / FX Mode
- Special effects list
- ATTACHING TO OTHER DEVICES\* (optional)
- DISPOSAL
- CE DECLARATION OF CONFORMITY
- WARRANTY & SERVICE
- ALGEMENE WAARSCHUWINGEN
- ⚠️ GEVAAR OP LICHAMELIJK LETSEL!
- BESCHRIJVING VAN DE ONDERDELEN
- GEFAHR EINES STROMSCHLAGS!
- TEILEBESCHREIBUNGEN
- BRESSER UK Ltd.
- FR BE
Brand : BRESSER
Model : BR-96RGB
Category : Lighting