PH 228HTE - Measurement PCE Instruments - Free user manual and instructions
Find the device manual for free PH 228HTE PCE Instruments in PDF.


| Product Type | pH/mV/Temperature Meter |
| Brand | PCE Instruments |
| Model | PH 228HTE |
| Measurement Parameters | pH, mV, Temperature |
| pH Range | 0.00 to 14.00 pH |
| pH Resolution | 0.01 pH |
| pH Accuracy | ±0.02 pH |
| mV Range | ±1999 mV |
| Temperature Range | 0 to 100 °C (32 to 212 °F) |
| Temperature Resolution | 0.1 °C |
| Automatic Temperature Compensation | Yes |
| Calibration | Up to 3 points (pH 4, 7, 10) |
| Display | Backlit LCD |
| Power Supply | 9V battery (included) |
| Dimensions | 180 x 80 x 35 mm |
| Weight | Approx. 220 g |
| Electrode | Combined pH electrode with temperature sensor |
| Waterproof Rating | IP67 (meter body) |
| Auto Power Off | Yes, after 10 minutes of inactivity |
| Data Hold | Yes |
| Low Battery Indicator | Yes |
| Accessories Included | pH electrode, temperature probe, calibration solutions (pH 4 & 7), carry case, manual |
| Maintenance | Rinse electrode with distilled water after use; store in storage solution |
| Safety | Designed for laboratory and field use; avoid exposure to extreme conditions |
Frequently Asked Questions - PH 228HTE PCE Instruments
User questions about PH 228HTE PCE Instruments
0 question about this device. Answer the ones you know or ask your own.
Ask a new question about this device
Download the instructions for your Measurement in PDF format for free! Find your manual PH 228HTE - PCE Instruments and take your electronic device back in hand. On this page are published all the documents necessary for the use of your device. PH 228HTE by PCE Instruments.
USER MANUAL PH 228HTE PCE Instruments
natural_image
Abstract logo design with blue and yellow curved shapes forming a stylized 'E' or 'G' (no text or symbols)PCE
INSTRUMENTS
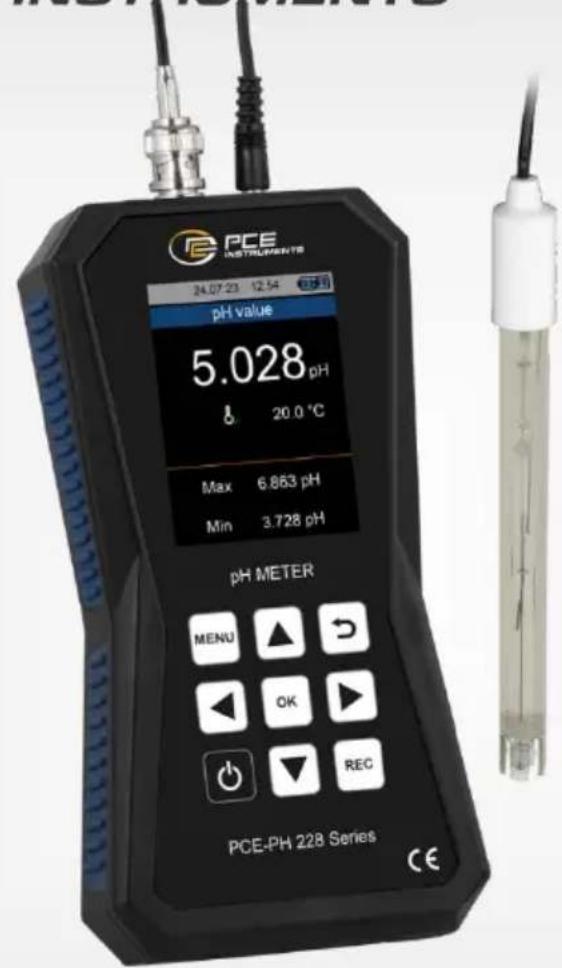
User manuals in various languages (français, italiano, español, português, nederlands, türk, polski, русский, 中文) can be found by using our product search on: www.pce-instruments.com
7.4 Navigation....20
8 Instandhaltung 20
1 Safety notes....22
2 Introduction....23
3 Specifications....24
3.1 Technical specifications.... 24
3.2 Delivery contents 24
3.3 Technical specifications pH electrodes....25
3.4 Product variations....26
3.5 Accessories 26
3.6 Explanations....26
4 System description....27
4.1 Device....27
4.2 Display....28
4.3 Function keys....29
5 Getting started....30
5.1 Power supply 30
6 Main menu....31
6.1 pH calibration....31
6.2 Measurement....34
6.3 Data logger 36
6.4 User menu....36
6.5 Settings....37
6.6 User manual 38
6.7 Info....38
7 Operation....38
7.1 pH measurement....38
7.2 mV / Redox measurement.... 40
7.3 Evaluation....40
7.4 Navigation....41
8 Maintenance....41
8.1 Storing the pH electrode 41
8.2 Troubleshooting....42
9 Contact 42
10 Disposal....42
natural_image
Simple red battery icon on black background (no text or symbols)Please read this manual carefully and completely before you use the device for the first time. The device may only be used by qualified personnel and repaired by PCE Instruments personnel. Damage or injuries caused by non-observance of the manual are excluded from our liability and not covered by our warranty.
- The device must only be used as described in this instruction manual. If used otherwise, this can cause dangerous situations for the user and damage to the meter.
- The instrument may only be used if the environmental conditions (temperature, relative humidity, ...) are within the ranges stated in the technical specifications. Do not expose the device to extreme temperatures, direct sunlight, extreme humidity or moisture.
- Do not expose the device to shocks or strong vibrations.
• The case should only be opened by qualified PCE Instruments personnel.
- Never use the instrument when your hands are wet.
- You must not make any technical changes to the device.
- The appliance should only be cleaned with a damp cloth. Use only pH-neutral cleaner, no abrasives or solvents.
• The device must only be used with accessories from PCF Instruments or equivalent.
- Before each use, inspect the case for visible damage. If any damage is visible, do not use the device.
- Do not use the instrument in explosive atmospheres.
- The measurement range as stated in the specifications must not be exceeded under any circumstances.
- Non-observance of the safety notes can cause damage to the device and injuries to the user.
We do not assume liability for printing errors or any other mistakes in this manual.
We expressly point to our general guarantee terms which can be found in our general terms of business.
2 Introduction
The advanced pH meter stands for precision, user-friendliness, and GLP compliance. With a high-resolution LCD, the pH meter provides a clear and concise presentation of measurement values. The USB-C interface enables quick data transfer and charging. A powerful LiPo battery enables hours of measurements before it needs to be recharged.
The graphics-guided calibration makes the process simple and user-friendly. GLP compliance is ensured by automatic data recording and traceable documentation. User and sample management allow easy navigation and setting of measurement parameters. Sample information can be saved to facilitate management and identification of measurements. A vast internal data memory saves extensive records without the need for external memory.
Overall, this pH meter represents a significant step in the development of handheld and laboratory instruments. The LCD, USB-C interface, powerful battery, graphics-guided calibration, GLP compliance, user and sample management and data memory make it an indispensable tool for scientists, researchers and laboratory technicians who rely on precise pH measurements. It not only improves the accuracy and efficiency of experiments but also facilitates everyday work in industry, quality assurance and laboratories.
3 Specifications
3.1 Technical specifications
| Specifications | |
| pH measurement range | -2 ... 20 pH |
| Resolution (adjustable) | 0.1 pH, 0.01 pH, 0.001 pH |
| Accuracy | ±0.002 pH + 2 digits |
| Redox measurement range | -2000 mV ... 2000 mV |
| Resolution | 1 mV |
| Accuracy | ± 2 mV |
| Calibration pH | selectable 2-, 3-,4- or 5-point calibration |
| Temperature measurement range | -20 ... 100 °C |
| Resolution | 0.1 °C |
| Accuracy | ± 0.5 °C (@ 20 °C) |
| Temperature sensor | Pt1000 3-conductor; 1.5 m cable length |
| Temperature compensation | automatic / manual |
| Sampling rate | 3 Hz |
| General | |
| Display | 2.8" LCD |
| Menu languages | English, German, French, Spanish, Italian, Dutch, Portuguese, Turkish, Polish, Russian, Chinese, Danish, Japanese |
| Operating and storage conditions | Temperature: -20 ... +65 °CHumidity: 10 ... 95 % RH, non-condensing |
| Data logger | 32 GB memory capacity100 recordings with a maximum of 100,000 data points per recording |
| Memory interval | 1 s ... 12 h |
| Interface | USB-C |
| Protection class | IP52 |
| Power supply | Internal: rechargeable LiPo battery (3.7 V, 2500 mAh)External: USB 5 VDC, 500 mA |
3.2 Delivery contents
1 x pH meter PCE-PH 228
1 x pH electrode (depending on the model)
1 x temperature sensor
1 x service bag
1 x USB-C cable
1 x quick start guide
3.3 Technical specifications pH electrodes
3.3.1 PCE-PH-FOOD
| Applications | pH measurement of food, meat, cheese... |
| Measurement range | 0 ... 14 pH |
| Temperature range | 0 ... 60 °C |
| Zero point | 0 ... ± 20 mV |
| Slope | 56 ... 59 mV/pH at 25 °C |
| Min. insertion / immersion depth | 20 mm |
| Diameter | 12 mm |
| Length | 110 mm |
| Material | Stainless steel |
| Connection | BNC |
| Connection cable | 1 m |
| Electrolyte | solid |
| Diaphragm | open-pored |
| Reference system | Ag/AgCl |
3.3.2 PE-03
| Applications | general pH measurements in aqueous solutions |
| Measurement range | 1 ... 13 pH |
| Temperature range | 5 ... 60 °C |
| Zero point | 7 pH ±1 pH |
| Min. insertion / immersion depth | 20 mm |
| Diameter | 12 mm |
| Length | 160 mm |
| Material | plastic |
| Connection | BNC |
| Connection cable | 1 m |
3.4 Product variations
| Product code | Included pH electrode | Application |
| PCE-PH 228 | PE-03 | general pH measurements in aqueous solutions |
| PCE-PH 228HTE | PCE-PH-HTE | high-temperature measurements up to 100 °C |
| PCE-PH 228LIQ | PCE-PH-LIQ | pH measurements specifically for beer, milk, blood |
| PCE-PH 228M | PCE-PH-FOOD | pH measurements in food, pH electrode with stainless steel blade |
| PCE-PH 228P | IJ-44A | pH measurements in pasty media such as shampoo, soap, pastes, paints and lacquers |
| PCE-PH 228R | ORP-17 | measurement of redox potential |
| PCE-PH 228S | PCE-PH-ES | measurements in loose soil and seeds |
| PCE-PH 228SF | EPX-3 | surface pH measurements |
| PCE-PH 228SLUR | PCE-PH-SLUR | pH measurements in sludge and soil |
| PCE-PH 228WINE | PCE-PH-WINE | pH measurements in wine |
3.5 Accessories
Calibration solutions
Cleaning/storage solution
3.6 Explanations
pH value
The pH value is a measure of the hydrogen ion concentration in a solution. The value is given as a negative logarithm of ten (=10-pH). Acidic solutions have pH values <7, basic solutions have pH values >7. "pH" is derived from pondus Hydrogenii (Latin: pondus = weight, hydrogenium = hydrogen).
Redox value
The redox value is an electrical voltage that can be measured with a corresponding electrode (redox electrode). It is an indirect measure of the disinfection effect in the pool, measured in millivolts (mV). At a pH value of 7.0, the redox value should be 0 mV.
Buffer solution
A buffer system or just buffer is a mixture of substances the pH value (concentration of hydrogen ions) of which changes much less when an acid or base is added than would be the case in an unbuffered system.
BNC connection
A BNC plug connection is a coaxial plug connection with a bayonet lock. Coaxial means that there is a tubular outer conductor around a central inner conductor, which has a shielding effect due to its tubular shape. A bayonet lock works on the principle of "plug in - turn slightly (usually approx. 90°) - connected".
4 System description
4.1 Device
Front side
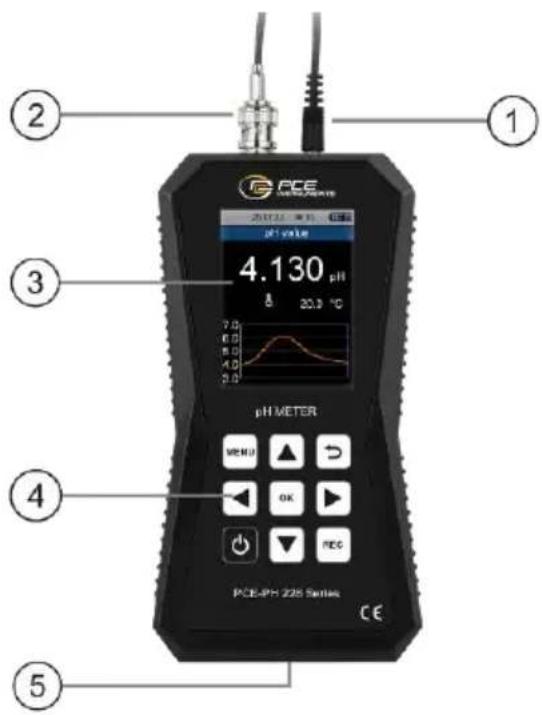
Upper side
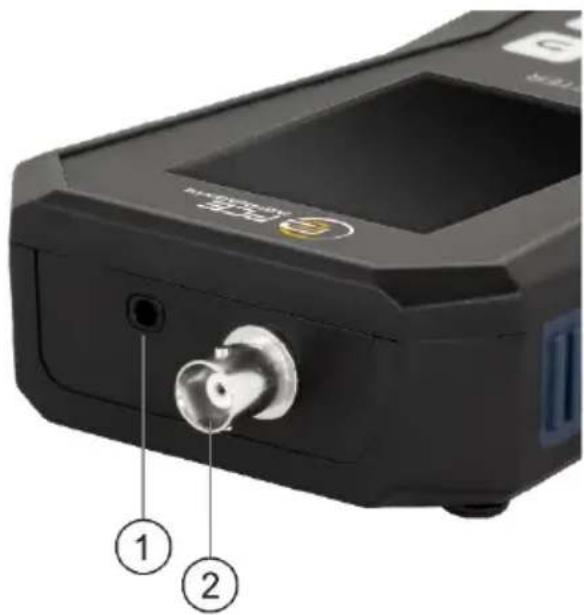
- 3.5 mm jack connection for temperature sensor
- BNC connection for measuring electrode (pH- electrode)
- Display
- Control panel
- USB-C socket
4.2 Display
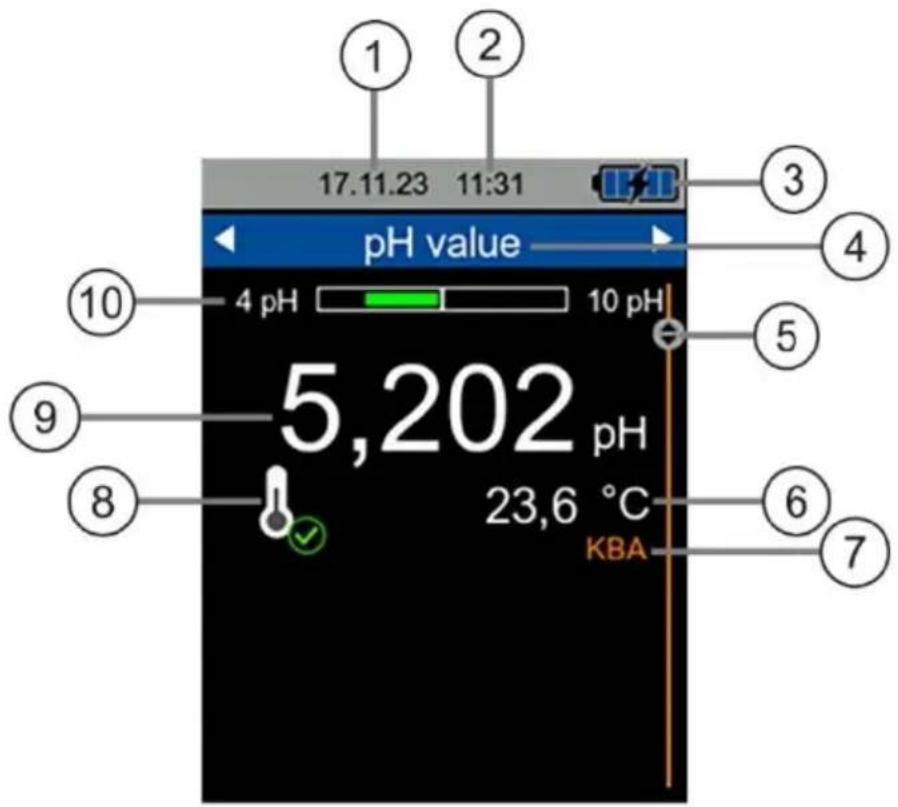
- Date
- Time
- Battery level
- Title bar for displaying the measurement parameter
- Vertical scroll bar shows the position of the measurement screen
- Set or measured compensation temperature
- Selected user (visible when selected)
- Temperature sensor recognition
- pH or redox reading
- Bar display of the PMV function
4.3 Function keys
| Key | Description | Function | |
 | ON/OFF | Turn meter on/off | |
 | MENU | Open main menu | |
 | BACK | Cancel, back | |
 | OK | Confirm / start quick calibration | |
 | REC | Open data logger dialogue | |
 | UP | Navigate up / change display mode | |
 | DOWN | Navigate down / change display mode | |
 | RIGHT | Navigate right / change measured parameter | |
 | LEFT | Navigate left / change measured parameter | |
5 Getting started
5.1 Power supply
An internal rechargeable LiPo battery supplies the power. With a fully charged battery, a battery life of approx. 10 ... 15 hours is possible, depending on the display brightness. The battery is charged via the USB-C socket at the bottom of the device and corresponding USB-C chargers can be used. The charging process can be shortened by switching off the device in the meantime.
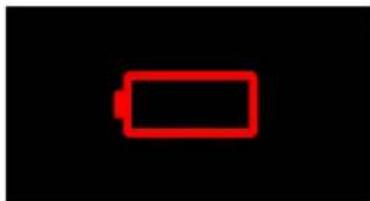
The current charge status of the battery is displayed in the status bar at the top right. As soon as the battery charge level is no longer sufficient for proper operation of the device, it switches off automatically and the screen shown below is displayed.
natural_image
Simple red battery icon on black background (no text or symbols)
The device is switched on by pressing the ON/OFF key. When switching on, the start screen appears for approx. 1 second and then the device switches to the measurement screen. To switch off, press and hold the ON/OFF key. A dialogue with a countdown now appears on the display, announcing that the device is switching off.
The pH electrode is connected by plugging it into the BNC socket at the top of the device and turning it. To disconnect, turn and pull the surface of the connector to release the plug connection.
The supplied temperature sensor can be connected by simply plugging it into the 3.5 mm jack connection provided.
6 Main menu
The main menu can be opened at any time using the MENU key. Use the arrow keys to navigate between the menu items, which can be activated with the OK key. The BACK key can be used to exit submenus. The main menu of the PCE-PH 228 series consists of the submenus Calibration, Measurement, Data logger, User menu, Settings, Manual and Info. The submenus are explained in more detail in the following chapters.
6.1 pH calibration
The calibration menu allows you to set a scaling factor which can be determined by calibration. To ensure ideal accuracy of the measured pH values, it is recommended that the PCE-PH 228 is calibrated regularly. The frequency of calibration depends on the individual application and the desired degree of accuracy. The PCE-PH 228 supports various calibration types, including two-point, three-point, four-point and five-point calibrations. In addition, the pH meter can be calibrated with user-defined solutions. In the "Reset calibration points" submenu, the saved calibration can be reset while the "Calibration reminder" submenu displays the time remaining until the next calibration. Calibration can be carried out by any user.
You can find the required calibration solutions in the online shop of PCE Instruments.
If you require a calibration certificate, please contact PCE Instruments. Our contact data can be found at the end of this manual.
6.1.1 Calibration
In the Calibration menu, select the calibration to be performed. The following chart shows the calibration values that are saved by the factory. However, you can also customise these.
| Calibration | M1 | M2 | M3 | M4 | M5 | Temperature |
| 2-point | 7.00 | 4.00 | - | - | - | at 25°C |
| 3-point | 7.00 | 4.00 | 10.00 | - | - | at 25°C |
| 4-point | 7.00 | 2.00 | 4.00 | 10.00 | - | at 25°C |
| 5-point | 7.00 | 2.00 | 4.00 | 10.00 | 12.00 | at 25°C |
An ideal pH electrode outputs a value of 0 mV at a pH value of 7. A pH meter at a medium temperature of +25 °C would therefore be ideally calibrated. As such a pH electrode does not exist, the meter must be calibrated. Calibration liquids are required in order to carry out a calibration.
The meter can be calibrated either via the calibration menu or via the quick calibration function. Quick calibration can be started on the measurement screen by pressing and holding OK.
Connect the pH electrode and the temperature sensor to the meter. When using the temperature sensor, the temperature cannot be entered manually.
Use clean containers for the buffer solution and fill them with one buffer solution each.
Note:
Never pour the buffer solution back into the containers but dispose of it properly!
- Connect the pH electrode and the temperature sensor* to the meter.
- Turn on the meter.
- Press the MENÜ key to get to the main menu. Select Calibration and confirm with OK.
- Select one out of five pre-programmed calibration options and confirm with OK.
- To make a calibration, select Start calibration and confirm with OK.
- Pay attention to the specified pH value of the buffer solution.
- Remove the protective cover from the pH electrode and immerse it and the temperature probe in the buffer solution. The temperature of the buffer solution is automatically measured and transferred.
- As soon as the pH electrode and the temperature probe are immersed in the buffer solution, press OK. The meter is now calibrated. Once the calibration is complete, "Calibration point added" appears on the display. Then confirm with OK.
- You will automatically be taken to the next stage of calibration. Follow the instructions on the device. Repeat step 8 until all calibrations have been carried out.
- Press the BACK key twice to return to the start screen.
* If the temperature is determined manually, set the temperature value under Menu=>Measurement=>Temperature as close as possible to the value of the medium to be analysed; the calibration can then be carried out.
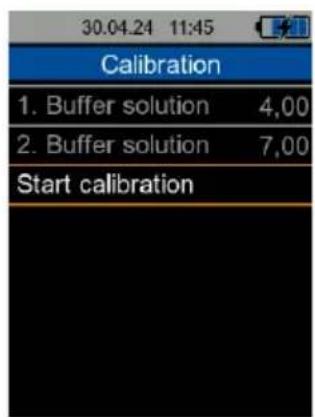
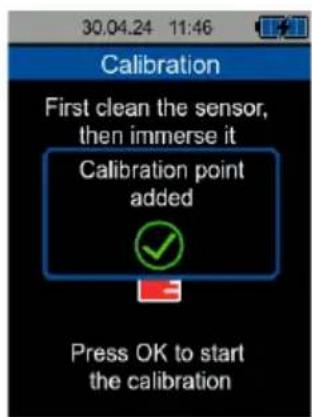
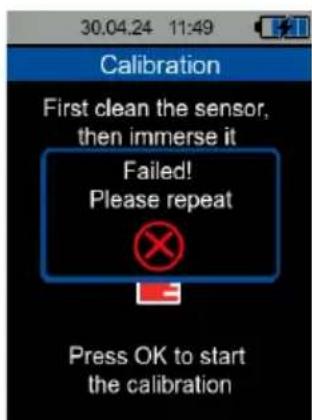
If calibration is not successful, the entire calibration process must be restarted. The meter can only be used after successful calibration.
6.1.2 Custom calibration liquid
You can define individual pH values between 0.00 and 13.99. To do this, you have the options Custom 1-5.
- Press MENU.
- In the main menu, select Calibration and confirm with OK.
- Select Custom solution and confirm with OK.
- Select Custom 1 and confirm with OK.
- Set the pH value using the arrow keys.
- Confirm your entry with OK.
You can create up to 5 user-defined pH values ("Custom 1-5") in the same order. To calibrate with the user-defined pH values, proceed as follows for the setting. The two-point calibration is described as an example.
- Press the BACK key.
- You are in the Calibration submenu. You can set customised pH values for the two-, three-, four- and five-point calibration.
- Select two-point calibration and confirm with OK.
- Select buffer solution 1 and confirm with OK.
- Select the user-defined pH value Custom 1-5 and confirm with OK.
- Select buffer solution 2 and confirm with OK.
- Select the user-defined pH value Custom 1-5 and confirm with OK.
- Select Start calibration and confirm with OK.
- The PCE-PH 228 calibrates according to the customised pH values. Follow the instructions of the meter.
- Once calibration is complete, press the BACK key twice to return to the start screen.
6.1.3 Reset calibration
The calibration points can be reset manually. To do so, go to Reset calibration points in the submenu Calibration and confirm with OK. Select the tick with the arrow LEFT key and confirm with OK. To get to the start screen, press the BACK key twice.
6.1.4 Calibration reminder
How often you carry out a calibration later depends on the intended use and the desired accuracy. When the meter is delivered from the factory and when it is reset, the default setting is 7 days. You have the option of setting the calibration reminder to a value between 1 and 999 days.
If you set 0 days, the calibration reminder will be deactivated. You will not be reminded!
Do the following to change the calibration reminder:
- Press the MENU key.
- In the main menu, go to Calibration and confirm with OK.
- Select calibration reminder and confirm with OK.
- Use the arrow keys to set the days of the next calibration reminder and confirm with OK.
- To return to the start screen, press the BACK key twice.
6.2 Measurement
In the Measurement menu, you can set the Temperature, Temperature Sensor, Unit, Alert and pH resolution.
6.2.1 Temperature
The manually determined temperature of the liquid to be measured can be entered in the Temperature submenu. Temperatures from 0 to 100 °C can be set. If the temperature sensor is connected, the temperature cannot be changed.
To set the manual temperature, select the corresponding menu item using the OK key. A dialogue for entering the temperature opens.
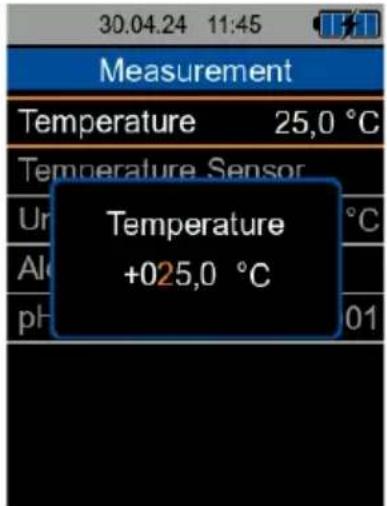
Each decimal place can be selected using the RIGHT/LEFT arrow keys and edited using the UP/DOWN arrow keys.
6.2.2 Temperature sensor
In this submenu, you can select the temperature sensor to be used. You can select the temperature electrode TP-07 (NTC) or the sensor PT-1000.
6.2.3 Unit
This menu allows you to set the units for all measured parameters. The following chart shows the available units.
| Parameter | Unit | Acronym |
| Temperature | Celsius | [°C] |
| Fahrenheit | [°F] | |
| Kelvin | [K] |
- Press MENU.
- In the main menu, go to Measurement and confirm with OK.
- In the submenu, go to Unit and confirm with OK.
- Use the arrow keys to select the unit and confirm your selection with OK.
- Press the BACK key twice to return to the start screen.
6.2.4 Alert
The Alert menu is used to configure the visual and audible alarm of the device. Three modes are available for monitoring.
| Mode | Description |
| Off | The alarm is deactivated. |
| Overflow | The alarm is triggered as soon as the measured parameter exceeds the upper limit value. |
| Undercut | The alarm is triggered as soon as the measured parameter falls below the lower limit value. |
| Window mode | The alarm is triggered as soon as the measured parameter is between the upper and lower limit values. |
| Inverted window mode | The alarm is triggered as soon as the measured parameter is outside the range between the upper and lower limit values. |
In addition to selecting the alarm mode, the measured parameter to be monitored can be selected under the Parameter menu item.
The limit values can be set under the Limits menu item by selecting the respective menu item using an input dialogue.
6.2.5 pH resolution
In the submenu pH resolution, you can set if you want the readings to be displayed with a resolution 0.1, 0.01 or 0.001.
To do this, press OK and then select the desired resolution with the arrow keys. Confirm again with OK.
6.3 Data logger
The Data logger menu allows you to select Start condition, Stop condition, Measuring interval, Records and Delete all. The data logger dialogue can be called up on any screen using the REC key and displays the current settings and the status of the data logger.
6.3.1 Start condition
The data logger can either be started manually by pressing a key via the data logger dialogue or automatically from a date that is set in this menu.
6.3.2 Stop condition
Three different options are available for stopping the data logger. It can either be stopped manually by pressing a key via the data logger dialogue, on a date or after an adjustable time interval.
6.3.3 Measuring interval
The time interval for saving the measured values can be set between 1 s and 12 h via an input dialogue.
6.3.4 Records
All saved data records are displayed in this menu and selecting a data record displays information on the start and stop time as well as the number of saved data points. One data point corresponds to the one-off storage of all measured parameters.
6.3.5 Delete all
By selecting this menu item and confirming via the dialogue, all saved data records are deleted.
6.4 User menu
With the PCE-PH 228, up to 10 different users can be saved in the menu, whereby the meter can be protected with a 4-digit password. When data is recorded, the log shows which user carried out the measurement and which user calibrated the measuring instrument.
6.4.1 Add user
You can create a maximum of 10 users in the user menu. A maximum of 25 characters is available for the name and 4 numbers for the password.
6.4.2 Delete user
Users can be deleted in this menu. You need the password to delete a user.
6.4.3 Change password
The entered password can be changed here.
If you have forgotten the password, press and hold the arrow UP/DOWN keys simultaneously for 5 seconds. The password will then be reset and a new one must be set.
6.4.4 User login
Here you can set whether the meter takes the user login into account when switching on. This setting then applies to all created users. You can activate the user login, in which case each user must log in with the saved password, or you can deactivate the users, in which case the device starts without a login.
6.5 Settings
6.5.1 Decimal separator
Either a point or a comma can be selected as the decimal separator for measured values.
6.5.2 Date & time
In this menu, you can set the date and time as well as the date and time format.
6.5.3 Display
In this tab, the display brightness can be set between 50 and 100 %. Automatic dimming can also be set. After the set time, the display is dimmed to a lower brightness to save power. Pressing any key returns the brightness to the original setting.
6.5.4 Language
The menu languages available are English, German, French, Spanish, Italian, Dutch, Portuguese, Turkish, Polish, Russian and Chinese.
6.5.5 Automatic power off
This option can be used to set the device to switch off automatically. When auto power off mode is activated, the meter switches off if no key is pressed for a certain period of time. You can choose between 1 minute, 5 minutes and 15 minutes. The automatic power off function can also be deactivated completely.
6.5.6 Factory settings
Via this option, you can reset the meter to its factory settings.
When the device is reset, the default values for the measurement parameters and the remaining menu options are restored.
6.6 User manual
A QR code is displayed in this menu. The QR code can be scanned with an appropriate reader, such as a mobile phone, and leads directly to this user manual.
6.7 Info
The model name, serial number and firmware version are displayed in the Info menu.
7 Operation
When the meter is started, the password is requested if a user has been created. If no user has been created, the start screen starts automatically. If you have saved a password, press OK to enter the password using the UP/DOWN and RIGHT/LEFT arrow keys, then press OK to confirm.
7.1 pH measurement
Before carrying out a pH measurement, the meter must be calibrated. This is the only way to ensure that the measurement is accurate. Calibration is described in chapter 6.1 pH calibration.
7.1.1 With automatic compensation (recommended method)
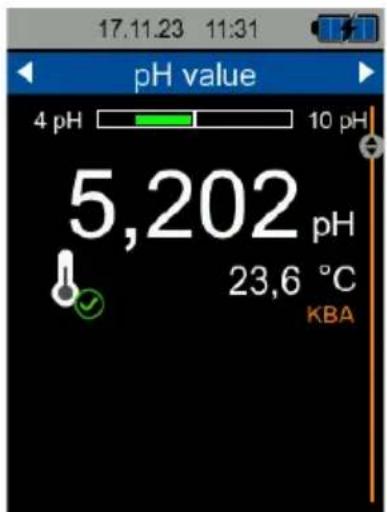
Connect the pH electrode to the PCE-PH 228 as described in chapter 5.1. Also connect the temperature sensor to the meter in order to use automatic temperature compensation. Now immerse the pH electrode and the temperature sensor in the medium the pH value of which is to be determined. The measured pH value of the medium is shown on the display directly.
7.1.2 With manual compensation
If you do not want to use automatic temperature compensation, set the compensation temperature in the menu as described in chapter 6.2.1 Temperature as close as possible to that of the medium to be measured. Connect the pH electrode to the PCE-PH 228 as described in chapter 5.1. Now immerse the electrode in the medium to be measured. The measured value is now shown on the display.
When the pH electrode is moved within the medium, the reading will be displayed more quickly.
7.1.3 PMV function
The PCE-PH 228 pH meter has a PMV function, which stands for "Permanent Measurement Verification". This function ensures that the measurements are always carried out within the calibration range. The verification of the measured value is shown via the bar display above the measured value.
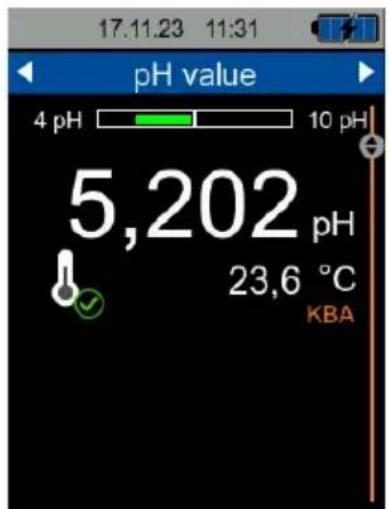
Reading within calibration range
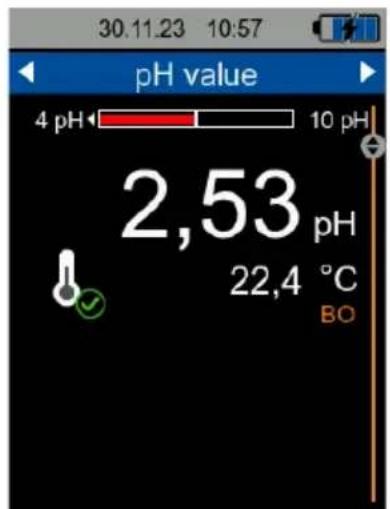
Reading outside calibration range
If the measured value is outside the measurement range of -2 ... 20 pH, a warning message will be displayed.
7.2 mV / Redox measurement
In addition to pH, the PCE-PH 228 can also measure the redox potential of liquids in mV. Connect the redox electrode to the meter via the BNC socket. Press the LEFT/RIGHT arrow keys to switch to mV mode. Immerse the electrode in the liquid to be measured. The measured value is shown on the display directly.
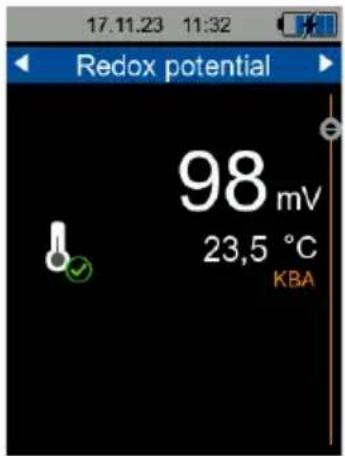

7.3 Evaluation
You have the option of creating users in the user menu as described in 6.4.1. The measurements are automatically assigned to the registered user. The registered user is displayed on the start screen directly below the temperature display.
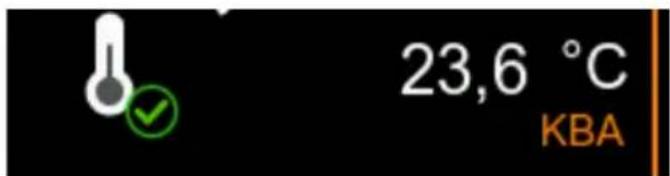
When reading out the meter, the time of calibration, the pH values / mV values with date and time and the user are transmitted.
7.4 Navigation
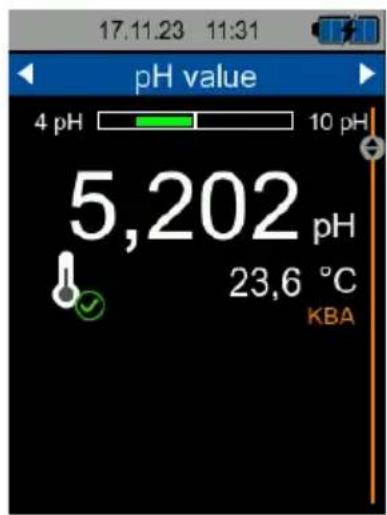
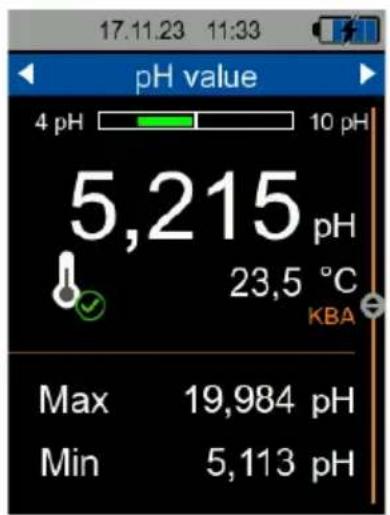
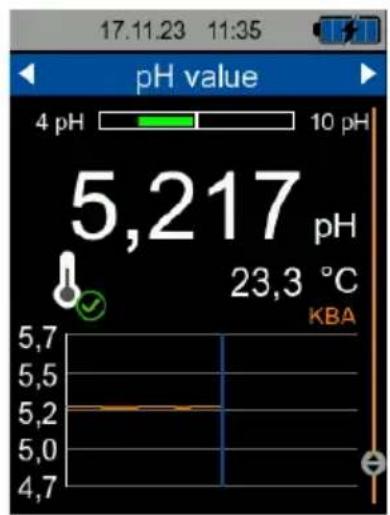
To ensure a clear display of the measured parameters, the measurement screen consists of several views. Each view displays a parameter, whereas the parameter is displayed in the top blue bar of the view. You can switch between the views of the parameters using the RIGHT and LEFT arrow keys.
Some parameter views also have several display formats for the parameter, such as the simple numerical display, the graphical display or the display of the statistical values (minimum value, maximum value). Use the UP and DOWN arrow keys to change the display format. The following illustrations show the different display formats.
8 Maintenance
8.1 Storing the pH electrode
The pH electrode should always be kept moist in the storage liquid, as this is the only way to ensure proper operation.
If the pH electrode is stored in dry condition, it must be soaked in a pH-neutral storage solution before use.
8.2 Troubleshooting
8.2.1 Calibration not successful
An x appears. Restart the calibration. A successful calibration is marked with a tick. Check the redox potentials during calibration.
The pH electrode is not permanently durable, therefore the approximate value at a value of 7 pH should be 0 mV, the deviation corresponds to ±2 mV. If the deviation is greater, replace the measuring probe.
8.2.2 Meter does not work
Press and hold the ON/OFF and MENU keys at the same time until the meter restarts.
8.2.3 Forgotten user password
Press the UP and DOWN arrow keys simultaneously for 5 seconds. The password is reset and a new password must be entered.
9 Contact
If you have any questions, suggestions or technical problems, please do not hesitate to contact us. You will find the relevant contact information at the end of this user manual.
10 Disposal
For the disposal of batteries in the EU, the 2006/66/EC directive of the European Parliament applies. Due to the contained pollutants, batteries must not be disposed of as household waste. They must be given to collection points designed for that purpose.
In order to comply with the EU directive 2012/19/EU we take our devices back. We either re-use them or give them to a recycling company which disposes of the devices in line with law.
For countries outside the EU, batteries and devices should be disposed of in accordance with your local waste regulations.
If you have any questions, please contact PCE Instruments.


PCE Instruments contact information
Germany France Spain
PCE Deutschland GmbH PCE Instruments France EURL PCE Ibérica S.L.
Im Langel 26 23, rue de Strasbourg Calle Mula, 8
D-59872 Meschede 67250 Soultz-Sous-Forets 02500 Tobarra (Albacete)
Chester Rd, Old Trafford
Manchester M32 0RS
United Kingdom
Tel: +44 (0) 161 464902 0
Fax: +44 (0) 161 464902 9
info@pce-instruments.co.uk
www.pce-instruments.com/english
Italy
PCE Italia s.r.l.
Via Pesciatina 878 / B-Interno 6
55010 Loc. Gragnano Pehlivan Sok. No.6/C
Capannori (Lucca)
Italia
www.pce-instruments.com/turkish
The Netherlands
PCE Brookhuis B.V.
Institutenweg 15
7521 PH Enschede
Nederland
Telefoon: +31 (0)53 737 01 92
info@pcebenelux.nl
www.pce-instruments.com/dutch Fax: +1 (561) 320-9176
info@pce-americas.com
www.pce-instruments.com/us
United States of America
PCE Americas Inc.
1201 Jupiter Park Drive, Suite 8
Jupiter / Palm Beach
33458 FL
USA
Tel: +1 (561) 320-9162
Denmark
PCE Instruments Denmark ApS
Birk Centerpark 40
7400 Herning
Denmark
Specifications are subject to change without notice.
- Introduction
- Specifications
- Delivery contents
- Technical specifications pH electrodes
- Accessories
- Explanations
- pH value
- Redox value
- Buffer solution
- BNC connection
- System description
- Device
- Front side
- Upper side
- Display
- Getting started
- Power supply
- Main menu
- pH calibration
- Calibration
- Note:
- Custom calibration liquid
- Reset calibration
- Calibration reminder
- Measurement
- Temperature
- Temperature sensor
- Unit
- Alert
- pH resolution
- Data logger
- Start condition
- Stop condition
- Measuring interval
- Records
- Delete all
- User menu
- Add user
- Delete user
- Change password
- User login
- Settings
- Decimal separator
- Date & time
- Display
- Language
- Automatic power off
- Factory settings
- User manual
- Info
- Operation
- pH measurement
- With automatic compensation (recommended method)
- With manual compensation
- PMV function
- mV / Redox measurement
- Evaluation
- Navigation
- Maintenance
- Storing the pH electrode
- Troubleshooting
- Calibration not successful
- Meter does not work
- Forgotten user password
- Contact
- Disposal
- PCE Instruments contact information
- Germany France Spain
- Italy
- The Netherlands
- United States of America
- Denmark
Brand : PCE Instruments
Model : PH 228HTE
Category : Measurement