
ZI-SHW300 - Uncategorized Zipper - Free user manual and instructions
Find the device manual for free ZI-SHW300 Zipper in PDF.


| Brand | Zipper |
| Model | ZI-SHW300 |
| Product Type | Scissor Lift Truck |
| Intended Use | Lifting, lowering, and transporting loads within specified limits |
| Power Supply | Battery (40 V DC) and charger (230 V / 50 Hz) |
| Operating Temperature | +5 °C to +40 °C |
| Relative Humidity (max) | 65 % |
| Hydraulic Oil | HLP hydraulic oil, ISO VG class 22 or higher (DIN 51425) |
| Charger Input | 230 V / 50 Hz |
| Safety Features | Emergency stop, brake lock, overload protection, EBS (electronic brake), BAS (brake assist) |
| Control Elements | ON/OFF switch, direction selector, lift/lower buttons, speed control lever |
| Maintenance Intervals | Daily visual check, monthly lubrication, annual oil change and expert inspection |
| Battery Charge Level Indications | 40 V = 100%, 35 V = ~50%, below 32 V = charge required |
| Number of Pages in Manual | 29 |
| Languages Available | DE, EN and others via request |
| Spare Parts Order | Online at zipper-maschinen.at or by email |
| Warranty | 2 years for mechanical/electrical parts, 6 months for batteries |
Frequently Asked Questions - ZI-SHW300 Zipper
User questions about ZI-SHW300 Zipper
0 question about this device. Answer the ones you know or ask your own.
Ask a new question about this device
Download the instructions for your Uncategorized in PDF format for free! Find your manual ZI-SHW300 - Zipper and take your electronic device back in hand. On this page are published all the documents necessary for the use of your device. ZI-SHW300 by Zipper.
USER MANUAL ZI-SHW300 Zipper
natural_image
Two industrial scissor lifters with yellow-black hazard stripes, one supporting the other (no text or symbols visible)
ZI-SWH300
EAN: 9120039235431
CE
YOUR
JOB.
OUR
TOOLS.
1 INHALT / INDEX
1 INHALT / INDEX 2
12.1 Intended use of the machine....17
12.1.1 Technical restrictions....17
12.1.2 Prohibited applications / Dangerous misuse....17
12.2 User requirements.... 17
12.3 General safety instructions.... 17
12.4 Special safety instructions for this machine....18
12.5 Hazard warnings....18
13 TRANSPORT....19
14 ASSEMBLY....19
14.1 Preparation....19
14.1.1 Check delivery content....19
14.2 Assemble....19
15 OPERATION....20
15.1 Operating instructions....20
15.2 Opeation....21
15.2.1 Start electrical support....21
15.2.2 Machine stopping / parking....21
15.2.3 Locking the Brake....21
15.2.4 Loading the Table....21
15.2.5 Lifting / lowering the Table....21
15.2.6 Driving with Load 22
15.2.7 Parking 22
15.3 Charger....22
16 CLEANING, MAINTENANCE, STORAGE, DISPOSAL....22
16.1 Cleaning....22
16.2 Maintenance....22
16.2.1 Maintenance plan 23
16.3 Storage 23
16.4 Disposal....24
17 TROUBLESHOOTING 24
18 ERSATZTEILE / SPARE PARTS 24
18.1 Ersatzteilbestellung / Spare parts order 24
19 ZUBEHÖR/ACCESSORIES....25
19.1 Explosionszeichnung / Exploded view 26
19.2 Ersatzteilliste / Spare part list 26
20 EG-KONFORMITÄTSERKLÄRUNG / CE-CERTIFICATE OF CONFORMITY .....27
21 GARANTIEERKLÄRUNG (DE) 28
22 GUARANTEE TERMS (EN)....29
23 PRODUKTBEOBACHTUNG | PRODUCT MONITORING 30
EN EC-CONFORM: This product complies with the EC-directives.
EN READ THE MANUAL! Read the user and maintenance carefully and get familiar with the controls in order to use the machine correctly and to avoid injuries and machine defects.
ATTENTION! Ignoring the safety signs and warnings applied on the machine as well as ignoring the security and operating instructions can cause serious injuries and even lead to death.
EN Wear protective equipment!
EN Protect from rain, splashing!
DE Maximale Hublast
EN Maximum lifting capacity
EN Do not put foot or hand under lowering table
EN Do not put foot or hand in scissor mechanism.
EN Do not use machine on slope or inclined surface.
EN Do not lift or transport persons. Persons could be severely injured.
EN Missing or non-readable security stickers have to be replaced immediately.
This manual contains information and important notes for safe commissioning and handling of the scissor lift truck ZI-SHW300, hereinafter referred to as “machine” in this document.

This manual is part of the machine and must not be removed. Save it for later reference and if you let other people use the machine, add this manual to the machine.
Please read and note the safety instructions!
Before first use read this manual carefully. It eases the correct use of the machine and prevents misunderstanding and damages of machine.
Due to constant advancements in product design, construction, illustrations and contents may deviate slightly. If you notice any errors, please inform us.
We reserve the right to make technical changes!
Check the goods immediately after receipt and note any complaints on the consignment note when taking over the goods from the deliverer!
Transport damage must be reported to us separately to us within 24 hours.
ZIPPER MASCHINEN GmbH cannot accept any liability for transport damage that has not been reported.
Copyright
© 2024
This documentation is protected by copyright. All rights reserved! In particular, the reprint, translation and extraction of photos and illustrations will be prosecuted.
The place of jurisdiction is the regional court Linz or the court responsible for 4170 Haslach is valid.
Customer service contact
This section contains information and important notes on the safe commissioning and handling of the machine.

For your safety, read this manual carefully before commissioning. This will enable you to handle the machine safely and thus prevent misunderstandings as well as personal injury and damage to property. Pay special attention to the symbols and pictograms used on the machine as well as the safety information and danger warnings!
12.1 Intended use of the machine
The machine is designed exclusively for the following activities: lifting and lowering loads and transporting loads when machine is lowered, within the specified technical limits prescribed technical limits.
NOTE

ZIPPER MASCHINEN GmbH assumes no responsibility or warranty for any other use or use beyond this and for any resulting damage to property or injury.
12.1.1 Technical restrictions
The machine is designed for the work under the following conditions:
Relative humidity
max. 65 %
Temperature (operation)
+5 °C to +40 °C
The machine, especially the battery; may not be exposed to a temperature of about 80 °C . Do not store in the blazing sun or a long time in the trunk of a car.
12.1.2 Prohibited applications / Dangerous misuse
- Operating the machine without adequate physical and mental fitness.
- Operating the machine without knowledge of the manual.
- Modifying the machine design.
- Driving with the load lifted.
- Stay under a lifted load.
• Lifting or transporting persons.
• Use the machine as a climbing aid (ladder). - Operating the machine outdoors.
• Using the machine on ramps and inclines. - Operating the machine in wet and rainy conditions.
- Operating the machine outside the technical limits specified in this manual.
- Removing of the safety markings attached to the machine.
- Modifying, circumventing or disabling the safety devices of the machine.
The non-intended use or the disregard of the explanations and instructions described in this manual will result in the expiration of all warranty claims and compensation claims for damages against ZIPPER MASCHINEN GmbH.
12.2 User requirements
The machine is designed to be operated by one person. The prerequisites for operating the machine are physical and mental fitness as well as knowledge and understanding of the operating instructions. Persons who, due to their physical, sensory or mental capabilities, inexperience or lack of knowledge, are unable to operate the machine safely must not use the machine without supervision or instruction by a responsible person.
Please note that locally applicable laws and regulations determine the minimum age of the operator and may restrict the use of this machine!
Work on electrical components or equipment may only be carried out by a qualified electrician or under the guidance and supervision of a qualified electrician.
Work on hydraulic components or equipment may only be carried out by a competent person with the appropriate specialist knowledge or under the instruction and supervision of such a competent persons.
Put on your personal protective equipment before working on the machine.
12.3 General safety instructions
To avoid malfunctions, damage and health impairments when working with the machine, the following points must be observed in addition to the general rules for safe working:
- Check the machine for completeness and function before starting. Only use the machine if the separating and other non-separating protective devices required for machining have are fitted.
- Ensure sufficient lighting conditions at the workplace to ensure safe handling of the machine.
- Check the machine's connections for strength before each use.
-
Never leave the running machine unattended. Switch off the machine before leaving the working area and secure it against unintentional or unauthorized restarting.
-
The machine may only be operated, maintained or repaired by persons who are familiar and who have been informed about the dangers arising from this work.
- Ensure that unauthorized persons keep a safety distance from the machine and keep children away from the machine.
- Wear suitable work clothing and footwear.
• Always work with care and the necessary caution and never use excessive force. - Shut down the machine and remove the battery, before adjustment, changeover, cleaning, maintenance or repair work, etc. Before starting work on the machine, wait until all tools or machine parts have come to a complete standstill and secure the machine against unintentional restart.
- Do not work on the machine if you are tired, not concentrated or under the influence of medication, alcohol or drugs!
12.4 Special safety instructions for this machine
• Always tighten the brakes when the machine is not in use.
- Tighten the brakes when loading and unloading the table.
- Do not drive the table while lifting a load.
- Never move the table with the load lifted higher than ground level.
- Observe the permissible loading capacity. Do not overload the machine!
- Pay attention to the correct distribution of the load on the table. Do not concentrate the load on one side.
- Keep hands and feet away from the scissor mechanism.
- Do not lower the table too quickly to prevent the load from slipping.
- Ensure that there are no persons in front of or behind the table (danger zone!) when lifting a load. Loads could fall down!
- Secure the load against falling down.
- Caution in slippery conditions - slip hazard - risk of injury. When working, robust and non-slip footwear. Slides / stumble / traps are a major cause of serious injury or death.
- Never use the machine when it is raining or in damp, wet areas.
• Always use both hands to hold the machine when in use.
- Before start, after failure or shock, be sure to check the machine and make sure that it is in good condition.
- Unplug battery before all maintenance and settings!
CHARGER:
- The charger is designed exclusively to charge the battery of this machine. Charging other batteries is not permitted.
- Never use the charger in a damp or wet environment.
- Disconnect cable connections only by pulling the plug. Pulling on the cable could damage the cable and plug and electrical safety would no longer be guaranteed.
- Never use the charger if the cable, plug or the machine itself are damaged by external influences. Then take the charger to the nearest specialist workshop.
- Do not operate the machine in close proximity to heat sources.
- Do not use an extension cord to plug in the charging station's power supply.
• Do not place any metal objects in the area of the charging contacts of the charger.
• Do not open the charger. In case of failure, contact a specialist workshop.
- Only use the original charger to charge the battery. If other chargers are used, defects may occur or a fire might be caused.
BATTERY:
- Vapours may be emitted during improper use or when using damaged batteries. These vapours can irritate the respiratory tract. Inhale fresh air and consult a physician if you experience any discomfort.
- EXPLOSION HAZARD! Protect the battery from heat and fire.
- Only use the battery in an ambient temperature between 0^ and +45^ .
- HAZARD OF SHORT-CIRCUIT! For disposal, transport or storage, the battery must be packed (plastic bag, box) or the contacts must be taped.
- Never open the battery.
12.5 Hazard warnings
Due to the structure and construction of the machine, hazardous situations may occur which are identified in this manual as follows:
DANGER

A safety instruction designed in this way indicates an imminently hazardous situation which, if not avoided, will result in death or serious injury.
WARNING
A safety instruction designed in this way indicates a potentially hazardous situation which, if not avoided, could result in death or serious injury.
CAUTION

A safety instruction designed in this way indicates a possibly hazardous situation which, if not avoided, may result in minor or moderate injury.
NOTE

A safety notice designed in this way indicates a potentially hazardous situation which, if not avoided, may result in property damage.
Regardless of all safety regulations, your common sense and your appropriate technical aptitude/training are and remain the most important safety factor in the error-free operation of the machine. Safe working depends on you!
13 TRANSPORT
Transport the machine in its packaging to the place of installation. To manoeuvre the machine in the packaging, a pallet truck or forklift truck with the appropriate lifting force can be used, for example. The specifications can be found in the chapter Technical data. For proper transport, also observe the instructions and information on the transport packaging regarding centre of gravity, lifting points, weight, means of transport to be used as well as the prescribed transport position etc. Ensure that the selected lifting equipment (crane, forklift, pallet truck, load sling, etc.) is in perfect condition. Ensure the correct body posture when lifting, carrying and setting down the load.
Lifting / Setting down
- When lifting/setting down, ensure that you are standing firmly (legs hip-width apart).
- Lift/set down load with knees bent and back straight.
- Do not lift/set down load with a jerk.
Carrying
- Carry load with both hands as close to body as possible.
- Carry load with straight back.
- When transporting the assembled machine, ensure to lift it only by the machine body and not by the attachments.
To transport the assembled machine, e.g. on a truck or trailer, remove the load from the table, lower table to the lowest position, brake the castors, if necessary additionally fix machine with the aid of blocking wedges and lash the machine with tension belts.
14 ASSEMBLY
14.1 Preparation
14.1.1 Check delivery content
Check the delivery immediately for transport damage and missing parts. Report any damage or missing parts to your dealer or the shipping company immediately. Visible transport damage must also be noted immediately on the delivery note in accordance with the provisions of the warranty, otherwise the goods are deemed to have been properly accepted.
14.2 Assemble
The machine comes pre-assembled, it is necessary to assemble the components dismantled for transport according to the following instructions.
NOTE

Do not fully tighten all screws until assembly is complete.
natural_image
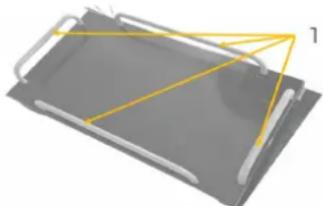
3D diagram of a rectangular electronic component with yellow connectors and white internal parts, no visible text or symbolsInsert the transport frame (1) into the matching recesses in the table as shown
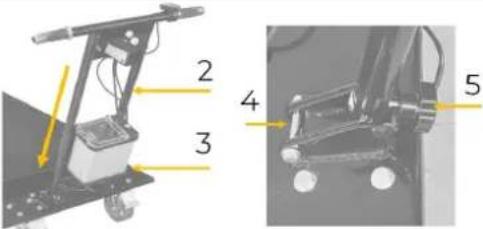 | |||
| 2x: M8x65 4x: ∅8 2x: M8 | |||
| Fix the handle (2) with screws, washers and nuts (4) as shown and insert the knurled screw (5) | |||
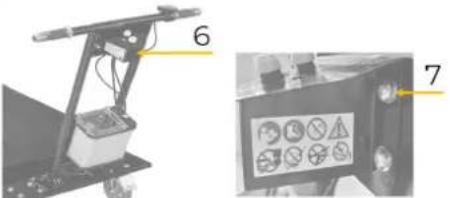 | |||
| 4x: M6x25 4x: ∅6 4x: M6 | |||
| Fix the control panel (6) as shown with screws, washers and nuts (7) | |||
 | |||
| 4x: M6x14 | |||
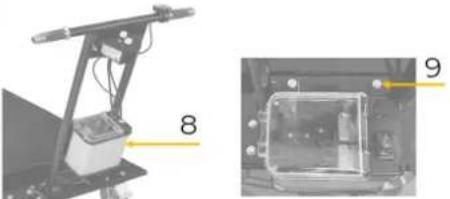
| Fix the battery box (8) with screws (9) as shown. | |||
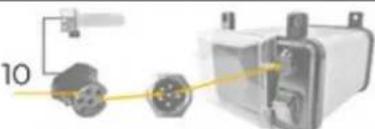 | Insert the plug of the motor control unit (10) into the socket on the front side of the battery box and secure it with the lock nut. | ||
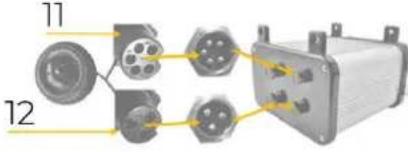 | Insert the plugs of the drive unit (11,12) into the respective matching socket on the back side of the battery box and secure with lock nuts.NOTE: If all plugs are connected correctly, you can secure the loose cables with cable ties on the handle. | ||
15 OPERATION
Only operate the machine when it is in a perfect condition. Before each operation, a visual inspection of the machine must be carried out. Safety devices and operating elements must be checked carefully. Check in particular the safety equipment, electrical controls, electric cables and screwed connection for damage and if tightened properly. Replace any damaged parts before operating the machine.
15.1 Operating instructions
WARNING

Unplug battery before all maintenance and settings!
NOTE

- Never remove the battery while the machine is running.
• In case of longer standstill, press the shut-down button. - Use the electric motor only with sufficient battery charge.
Check the following points daily or before each use of the machine:
- Check the machine for damage.
• Check the hydraulics for leaks. - Check the brakes and castors for function.
• Make sure all screws and bolts are tightened.
Do not use the machine, if you notice any malfunction or damage!
15.2 Opeation
15.2.1 Start electrical support
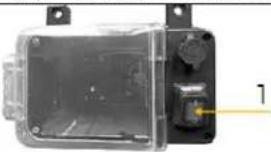 | 1. Turn ON-Off-Switch (1) to Position „I“:L1 and L3 light green |
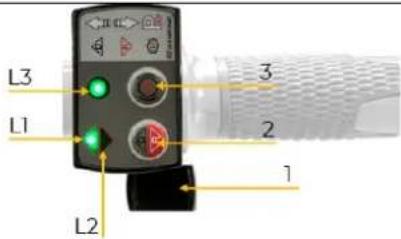 | 2. Select the direction of motor rotation and thus the forward or backward movement of the machine by pressing button (2). The selected direction is indicated by the arrows L1/L2.3. By pushing the button (3) the BAS activated / EBS deactivated.L3 lights red: EBS activatedL3 lights green: EBS deactivatedBAS = Brake assistance if no electronic support is requestedEBS = Electronic Brake: Machine is braked and braking effect is maintained as long as- until battery empty- until EBS is deactivated again4. By pushing the lever (1), the strength of the electrical support is adjusted; the further the lever is turned away from its initial position, the stronger the support.NOTE: no activation on electrical support means BAS active (braking effect noticeable)5. NOTE: If EBS is activated, no electric drive assistance in forward or reverse direction. |
15.2.2 Machine stopping / parking
-
Turn ON-Off-Switch (1) to Position „I“:
-
EBS deactivated / BAS activated
Brake support by motor but the machine must be braked manually by manpower. If the machine is to remain in position for a longer period of time and secure it against rolling away (locking the brake)
-
EBS activated
-
The machine brakes until it comes to a complete stand still and the braking effect remains active as long as EBS is activated. If the machine is to remain in position for a longer period of time secure it against rolling away (locking the brake).
NOTE:
Braking function EBS requires battery energy, designed for short times only (max. 15 minutes)
15.2.3 Locking the Brake
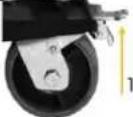 | Locking brakes (1) are located upside of the steering castors. • Press brake pedals to lock the castors. • Lift brake pedals to release the castors. |
15.2.4 Loading the Table
The machine is designed for a maximum permissible load (loading capacity). Take care not to overload the table. Do not concentrate the load on one side of the table. The load must be distributed over at least 80 percent of the table surface.
15.2.5 Lifting / lowering the Table
| NOTICE | ||
 | Due to micro leaks in the hydraulic system, the table lowers slowly but gradually if left in the same position for a longer period of time. | |
| WARNING | ||
 | Keep your hands and feet away from the scissor mechanism! | |
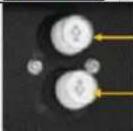 | 1 | Lock the brakeLifting: Push lift table button (1)Lowering: Push lower table button (2) |
| 2 | ||
The machine is equipped with a hydraulic pump. If the maximum top or bottom point has been reached, the hydraulic pump makes an unusual noise. To avoid damage, release the button immediately.
15.2.6 Driving with Load
WARNING

Do not use the machine on ramps and inclines!
Move the load as low as possible above the floor, taking ground clearance into account. Pay attention to obstacles on the carriageway.
15.2.7 Parking
Always lock the brakes when the table is not in use, in order to avoid accidental machine movements.
15.3 Charger
Charging the battery:
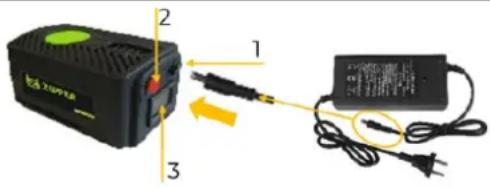
- remove battery from battery box
- connect the charger to the power supply (socket) 230 V / 50 Hz and the charging socket (1)..
- battery charging
- When the battery is fully charged (display on the charger), disconnect the charger again.
- charging status is indicated by pressing button (2) on the display (3).
Voltage display on battery box system indicates the status of the battery:
| Voltage display shows 40 V | Battery capacity 100% |
| Voltage display shows 35 V | Battery capacity ~50% |
| Voltage display shows < 32 V | Please charge the battery (too less capacity left) |
NOTE:
- Avoid overheating when charging the battery. Ensure sufficient air supply so that no heat can accumulate.
- Only charge the battery in an ambient temperature between 0^ and +40^ .
- Allow the battery to cool down after intensive use before recharging it.
• Always charge the battery in a well-ventilated area. - FIRE HAZARD! Never charge batteries near acids and flammable materials.
- Do not smoke when charging the battery. Keep the battery away from open flames and sparks.
- Allow the battery to cool down immediately after charging.
16 CLEANING, MAINTENANCE, STORAGE, DISPOSAL
16.1 Cleaning
NOTE

The usage of certain solutions containing ingredients damaging metal surfaces as well as the use of scrubbing agents will damage the machine surface!
Clean the machine surface with a wet cloth soaked in a mild solution Never use running water or a high pressure cleaner to clean the machine.
- Clean the outer parts with a damp sponge.
- Never clean the electronic parts with water!
- Check the machine and remove the deposits and / or residues with a brush.
16.2 Maintenance
CAUTION

Unplug battery before all maintenance and settings! Serious injury due to unintentional or automatic activation of the machine!
NOTICE

Please note that in certain countries lifting tables must be inspected annually by an expert. Check the applicable legal requirements in good time and, if necessary, contact your local authority for further information regarding a necessary inspection.
NOTICE

The hydraulic oil should be changed every twelve months. Only use HLP hydraulic oil (ISO VG class 22 or higher) that meets the requirements of DIN 51425, Part 2.
NOTICE


Hydraulic oils are toxic and must not be released into the environment. When changing, use suitable collecting containers with sufficient volume! Observe the disposal instructions of the oil manufacturer. If necessary, contact your local authority for further information on proper disposal.
WARNING

Danger of crushing! Unload the table before carrying out any maintenance work. During servicing or maintenance work on the hydraulics, there is a risk that the table will lower from the set position. Before carrying out any maintenance or repair work in the raised position, support the table securely!
WARNING

The following hazards may occur when working on the hydraulics:
• uncontrolled discharge of the hydraulic fluid
• accidental machine movements
• flying away or bursting parts
- skin diseases
Work on the hydraulics must therefore only be carried out by competent persons with the appropriate specialist knowledge.
NOTE

Clean your machine regularly after every usage – it prolongs the machines lifespan and is a pre-requisite for a safe working environment.
Repair jobs shall be performed by respectively trained professionals only!
The machine is low-maintenance and only a few parts have to be serviced. Nevertheless, malfunctions or defects which could impair the safety of the user must be rectified immediately!
- Before each start-up, make sure that the machine is in perfect condition and functions properly.
• Once a week check all connections for tightness. - Regularly check whether the warning and safety labels on the machine are in perfect and legible condition.
• Only use faultless and suitable tools
• Only use lubricants and original spare parts recommended by the manufacturer.
16.2.1 Maintenance plan
| Interval | Component | What to do? |
| Daily or before every start of work | Table | Check for damage |
| Hydraulic system | Check for leakage | |
| Breaks, castors | Check for correct functioning | |
| Screws, bolts | Check for tight fit | |
| Cables | Check for tight fit/damage | |
| Monthly | Moving parts | Oil/lubricate all moving parts monthly. Lubrication points: Cylinder seat (oil); friction surfaces of the rollers (grease); hinge pins (oil); grease nipple (grease). |
| Charge the battery (for longer period of storage) | Check of the charge level | |
| Annually | Hydraulic oil | Change the hydraulic oil (pump out used hydraulic fluid, fill in new hydraulic fluid). |
| Hydraulic unit | Check hydraulic unit for leaks. A lifted load must not show any discernible change in position after 10 minutes (max. 5 mm). | |
| Hydraulic cylinder | Bleed hydraulic cylinder. | |
| Expert inspection | If necessary, have an expert inspection carried out by an authorised body. | |
| As required | Hydraulic lines | Replace damaged hydraulic lines immediately |
16.3 Storage
- Clean thoroughly all components before storage.
- Store all components separately in a dry area at not less than 0^ .
Important notes on storing the battery to avoid possible damage:
If the machine will not be used for a longer period of time, the battery should be disconnected or disassembled from the machine. Before storage, the battery should be charged again. An exception to this rule are batteries permanently installed in the machine, which should not be disassembled and simply charged with the charger supplied. Batteries should be stored at room temperature (approx. 20^ C) in a dry and frost-proof place. Avoid large temperature fluctuations (e.g. do not expose battery to direct sunlight or store near heating systems). Higher temperatures can lead to accelerated ageing and premature loss of function of the battery. If the battery is not used for a longer period of time, check the charge level regularly (monthly, max. every 3 months). If necessary, recharge the battery.
16.4 Disposal
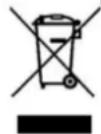
Observe the national waste disposal regulations. Never dispose of the machine, machine components or operating equipment in the residual waste. If necessary, contact your local authorities for information regarding available disposal options. If you purchase a new machine or equivalent equipment from your specialist dealer, he is obliged in certain countries to dispose of your old machine properly.
17 TROUBLESHOOTING
BEFORE YOU START WORKING FOR THE ELIMINATION OF DEFECTS, UNPLUG THE BATTERY.
If you are unable to carry out necessary repairs properly and/or do not have the required training, always consult a specialist to get the problem fixed.
| Trouble | Possible cause | Solution |
| No electrical support | Battery is not chargedMotor stucksPower switch is damagedBroken or loose cables | Recharge batteryCheck motorCheck switchCheck cables |
| No charging of battery | Loosen cable | Check cable connection |
| Pump does not work | Too little oil in the cylinder | Top up with oil |
| Machine does not lift load, pump works correctly | Load too heavy, pressure relief valve is effectiveDrain valve no longer closes or valve seat leaks due to soiling | Reduce loadClean or replace |
| Machine lifts slowly or not at all when pumping with or without load | Pressure relief valve adjusted or valve seat dirtyHydraulic cylinder is defective | Adjust or clean the valveRepair or replace hydraulic pump |
| Lifted load sinks automatically, oil loss at hydraulic cylinder | Leak in the hydraulic systemDrain valve no longer closes or valve core leaks due to oil contaminationIncorrect valve adjustment.Sealing elements are worn | Seal itClean or replace.Adjust the drain valveReplace sealing elements |
| Lifted load sinks too slow | Temperature too low, hydraulic oil too viscous | Go to a warmer room |
| Lifting height not reached | Oil missing | Top up or change oil |
18 ERSATZTEILE / SPARE PARTS
(EN) With original ZIPPER spare parts you use parts that are attuned to each other shorten the installation time and elongate your products lifespan.
NOTE

The installation of parts other than original spare parts leads to the loss of the guarantee! Therefore: When replacing components/parts, only use spare parts recommended by the manufacturer.
Order the spare parts directly on our homepage – category SPARE PARTS or contact our customer service
• via our Homepage – category SERVICE/NEWS - SPARE PARTS REQUEST,
• by e-mail to eg01@zipper-maschinen.at.
Always state the machine type, spare part number and designation. To prevent misunderstandings, we recommend that you add a copy of the spare parts drawing with the spare parts order, on which the required spare parts are clearly marked, especially when not using the online-spare-part catalogue.
19 ZUBEHÖR / ACCESSORIES
| No. | Description | Qty. | No. | Description | Qty. | No. | Description | Qty. |
| 1 | main base | 1 | 12 | square tube cap | 10 | 23 | hexgonal nut M12 | 10 |
| 2 | below slide arm | 1 | 13 | bolt 16-70-M12 | 8 | 24 | flange bolt M6x20 | 4 |
| 3 | scissor arm | 4 | 14 | bolt 16-50-M15 | 4 | 25 | screw M6x20 | 4 |
| 4 | scissor arm shaft | 1 | 15 | handle cap | 2 | 26 | screw M8x20 | 8 |
| 5 | upper slide arm | 1 | 16 | speed control lever | 1 | 27 | washer | 4 |
| 6 | platform assy | 1 | 17 | battery box assy | 1 | 28 | hexgonal nut M8 | 4 |
| 7 | handle assy | 1 | 18 | O ring 30x12 | 1 | 29 | hexg | 2 |
| 8 | hydraulic switch assy | 1 | 19 | shaft M16x60 | 2 | 30 | hexgonal nut M8 | 2 |
| 9 | protetive plate | 1 | 20 | washer 16x3.0 | 2 | 31 | bakelite screw M8x50 | 2 |
| 10 | bolt M8x50 | 2 | 21 | split pin M4x36 | 2 | |||
| 11 | hydraulic pump | 1 | 22 | washer 12x2.5 | 10 |
ZIPPER machines are subject to the legal warranty, which is valid in the current version. (For electrical and mechanical components, this is equivalent to 2 years (excluding wearing parts and batteries), starting from the date of purchase by the end user/buyer. For rechargeable batteries and batteries, the legal warranty of 6 months applies, starting from the date of purchase by the end user/buyer). In case of defects during this period, which are not excluded by paragraph 3, ZIPPER will repair or replace the machine at its own discretion.
2.) Report:
In order to check the legitimacy of warranty claims, the final consumer must contact his dealer. The dealer has to report in written form the occurred defect to ZIPPER. If the warranty claim is legitimate, ZIPPER will pick up the defective machine from the dealer. Returned shippings by dealers which have not been coordinated with ZIPPER, will not be accepted and refused.
3.) Regulations:
a) Warranty claims will only be accepted, when a copy of the original invoice or cash voucher from the trading partner of ZIPPER is enclosed to the machine. The warranty claim expires if the accessories belonging to the machine are missing.
b) The warranty does not include free checking, maintenance, inspection or service works on the machine. Defects due to incorrect usage of the final consumer or his dealer will not be accepted as warranty claims either. Some examples: usage of wrong fuel, frost damages in water tanks, leaving fuel in the tank during the winter, etc.
c) Defects on wear parts are excluded, e.g. carbon brushes, collection bags, knives, cylinders, cutting blades, clutches, sealings, wheels, saw blades, splitting crosses, riving knives, riving knife extensions, hydraulic oils, oil/air/fuel filters, chains, spark plugs, sliding blocks, etc.
d) Also excluded are damages on the machine caused by incorrect or inappropriate usage, if it was used for a purpose which the machine is not supposed to, ignoring the user manual, force majeure, repairs or technical manipulations by not authorized workshops or by the customer himself, usage of non-original ZIPPER spare parts or accessories.
e) After inspection by our qualified personnel, resulted costs (like freight charges) and expenses for not legitimated warranty claims will be charged to the final customer or dealer.
f) In case of defective machines outside the warranty period, we will only repair after advance payment or dealer's invoice according to the cost estimate (incl. freight costs) of ZIPPER.
g) Warranty claims can only be granted for customers of an authorized ZIPPER dealer who directly purchased the machine from ZIPPER. These claims are not transferable in case of multiple sales of the machine.
4.) Claims for compensation and other liabilities:
The liability of company ZIPPER is limited to the value of goods in all cases. Claims for compensation because of poor performance, lacks, damages or loss of earnings due to defects during the warranty period will not be accepted. ZIPPER insists on its right to subsequent improvement of the machine.
SERVICE
After Guarantee and warranty expiration specialist repair shops can perform maintenance and repair jobs. But we are still at your service as well with spare parts and/or product service. Place your spare part/repair service cost inquiry by
- Mail to service@zipper-maschinen.at.
- Or use the online complaint order formula provided on our homepage – category service/news.
(EN) We monitor the quality of our delivered products in the frame of a Quality Management policy.
Your opinion is essential for further product development and product choice. Please let us know about your:
- Impressions and suggestions for improvement.
- Experiences that may be useful for other users and for product design
- Experiences with malfunctions that occur in specific operation modes
We would like to ask you to note down your experiences and observations and send them to us via e-mail or by post:
- INHALT / INDEX
- Copyright
- Customer service contact
- Intended use of the machine
- NOTE
- Technical restrictions
- Prohibited applications / Dangerous misuse
- User requirements
- General safety instructions
- Special safety instructions for this machine
- CHARGER:
- BATTERY:
- Hazard warnings
- DANGER
- WARNING
- CAUTION
- TRANSPORT
- Lifting / Setting down
- Carrying
- ASSEMBLY
- Preparation
- Check delivery content
- Assemble
- OPERATION
- Operating instructions
- Opeation
- Start electrical support
- Machine stopping / parking
- Locking the Brake
- Loading the Table
- Lifting / lowering the Table
- Driving with Load
- Parking
- Charger
- Charging the battery:
- NOTE:
- CLEANING, MAINTENANCE, STORAGE, DISPOSAL
- Cleaning
- Maintenance
- NOTICE
- Repair jobs shall be performed by respectively trained professionals only!
- Storage
- Important notes on storing the battery to avoid possible damage:
- Disposal
- TROUBLESHOOTING
- ERSATZTEILE / SPARE PARTS
- ZUBEHÖR / ACCESSORIES
- 2.) Report:
- 3.) Regulations:
- 4.) Claims for compensation and other liabilities:
- SERVICE
Brand : Zipper
Model : ZI-SHW300
Category : Uncategorized