
DVBT02 - TV Decoder Manta - Free user manual and instructions
Find the device manual for free DVBT02 Manta in PDF.


| Product Type | Digital Terrestrial TV Receiver (DVB-T2) |
| Brand | Manta |
| Model | DVBT02 |
| Input Frequency | 170-230 MHz (VHF), 470-860 MHz (UHF) |
| Input Level | -20 to -78 dBm |
| Modulation | QPSK, 16QAM, 64QAM |
| Video Decoding | MPEG-2, MPEG-4, H.264 (up to 1080i@30fps) |
| Video Output Formats | 480i, 480p, 576i, 576p, 720p, 1080i, 1080p |
| Audio Decoding | MPEG-1/2 Layer 1&2, AAC, AAC+, HE-AAC, AC3, E-AC3 (Dolby Digital+) |
| Audio Output | Digital S/PDIF, Analog L/R, SCART |
| Video Output | HDMI, SCART |
| USB Port | Front USB for multimedia playback and PVR recording |
| Power Supply | 100-240V AC, 50/60 Hz |
| Power Consumption | Max 10 W |
| Dimensions (approx) | 180 x 120 x 30 mm |
| Weight (approx) | 0.3 kg |
| Remote Control | Included (2x AAA batteries) |
| Main Functions | Auto/manual channel search, EPG, parental lock, timeshift, USB recording, multimedia playback (MP3, WMA, JPEG, BMP, AVI, MP4, DIVX) |
| Safety | Do not expose to rain or moisture; unplug during storms; use only specified attachments |
| Care | Clean with dry cloth only |
| Spare Parts | Remote control, power cord (typical, not specified) |
Frequently Asked Questions - DVBT02 Manta
User questions about DVBT02 Manta
0 question about this device. Answer the ones you know or ask your own.
Ask a new question about this device
Download the instructions for your TV Decoder in PDF format for free! Find your manual DVBT02 - Manta and take your electronic device back in hand. On this page are published all the documents necessary for the use of your device. DVBT02 by Manta.
USER MANUAL DVBT02 Manta
natural_image
Abstract black-and-white circular logo with interlocking curved shapes (no text or symbols)MANTA
Safety Instructions....16
Front Panel....17
Rear Panel....17
Remote Control....18
Installing the Batteries....18
Using the Remote Control 18
Connection....19
TV Connection....19
Connection to amplifier 20
First time installation....20
Basic operation....20
Program Manage Settings....20
Video Setting....22
Channel Search....22
Time Setting....23
Option 24
System Setting....24
Parental Guidance....24
Set Password 24
Photo configure....25
Movie Configure 25
Subtitle Specific 25
Troubleshooting 27
Specification 27
INSTRUkCJa oBSIgI
Instrukcja obsługi
Uwaga!
PLAY: start odtwarzania.
Read these instructions. ●
Keep these instructions. ●
Heed all warnings. ●
Follow all instructions. ●
Do not use this apparatus near water ●
Clean only with dry cloth. ●
- Do not block any ventilation openings, install in accordance with the instructions.
Do not install near any heat sources stoves, or other ● apparatus (including amplifiers) that produce heat. - Do not defeat the safety purpose of the polarized plug. If the Provided plug does not fit into your outlet, consult an electrician for replacement of the obsolete outlet.
●Protected the power cord from being walked on or pinched particularly at plugs convenience receptacles, and the point where they exit from the apparatus.
●Only use attachments/accessories specified by the manufacturer.
Unplug this apparatus during lighting storms or when unused for long periods of time.
Refer all servicing to qualified service personnel. Servicing is required when the apparatus has been damaged in anyway. Such as power-supply cord or plug is damaged I liquid has been spilled or objects have fallen into the apparatus, the apparatus has been exposed to rain or moisture, does not operate normally, or has been dropped.
●Mains plug is used as the disconnect device, the disconnect device shall remain readily operable.
The ventilation should not be impeded by cove ring the ventilation openings with items: such as newspapers, table-cloth, curtains, etc
● No naked flame sources, such as lighted candles, should be placed on the apparatus.
●Attention should be drawn to the environmental aspects of battery disposal.
The use of apparatus in moderate climate. ●
WARNING:
To reduce the risk of fire or electric shock, do not expose this apparatus to rain or moisture.
WARNING:
The batteries shall not be exposed to excessive heat such as sunshine, fire or the like.

The symbol indicates that dangerous voltages constituting a risk of electric shock are present within this unit.

The symbol instructions indicate that there are important operating and maintenance the literature accompanying this unit.

This symbol indicates that this product incorporates double insulation between hazardous mains voltage and user accessible parts. When servicing use only identical replacement parts.

When the apparatus was in electrostatic circumstance, it may be malfunction and need to reset by user.
USER'S MaNUal
Front Panel

- Change Channel (CH-)
- Change Channel (CH+)
- Power Button
- Power Indication Light (Red: Stand-by, Green: Switched on)
- IR Receiver
- USB Port
Rear Panel

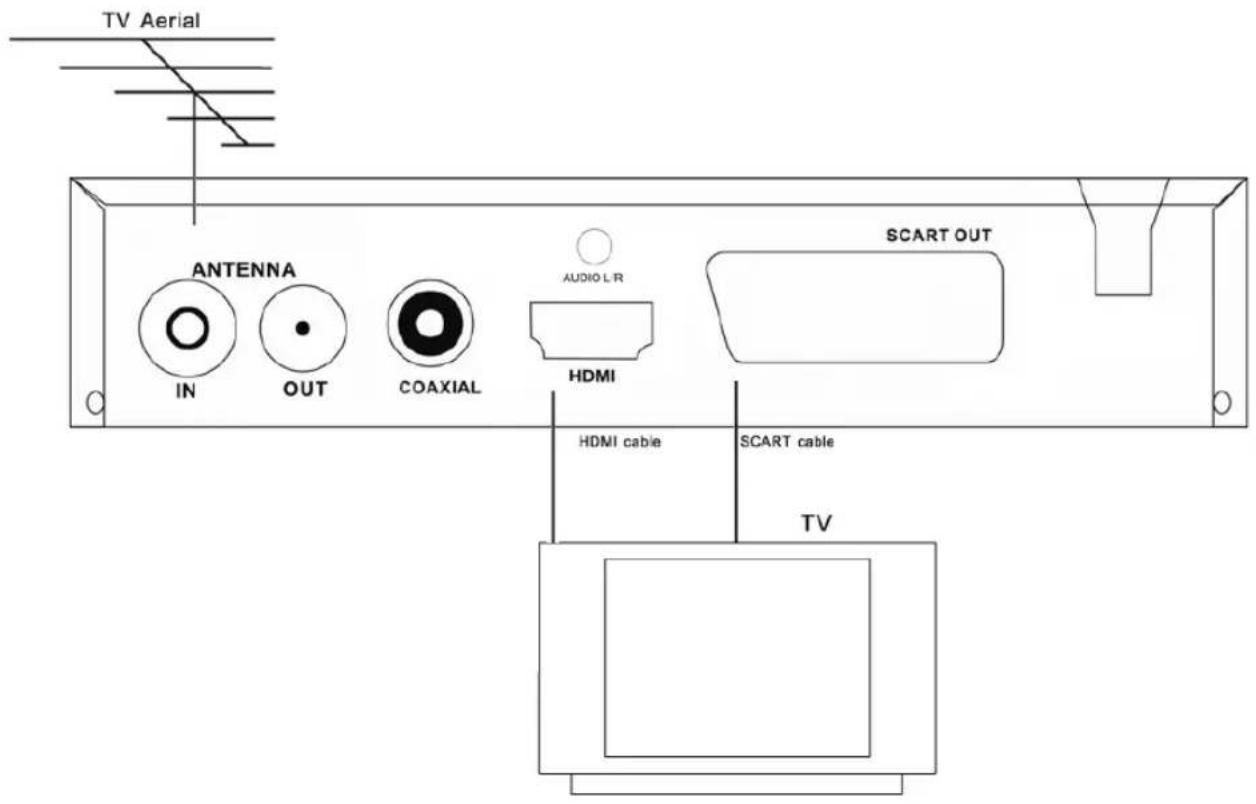
- Aerial Input
- Loop Out Aerial output
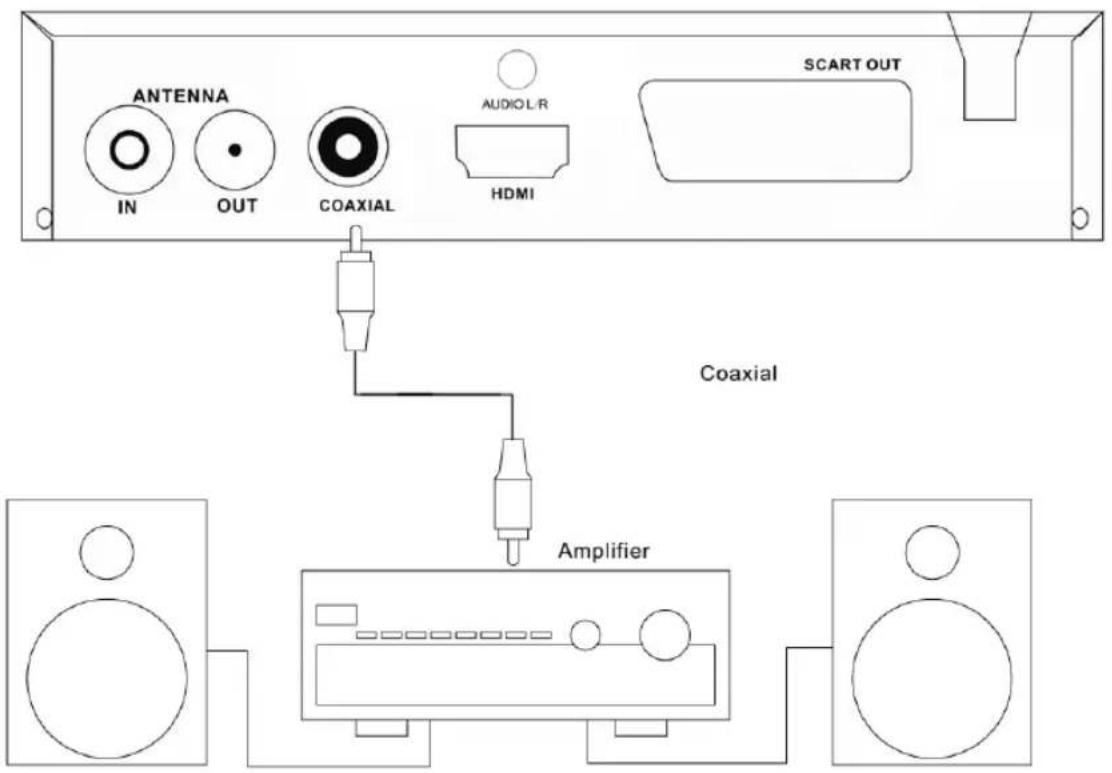
- Digital Audio output
- HDMI Output
- SCART
- Audio L/R
USER'S MaNUal
Remote Control

POWER button
MUTE button
Numeric Buttons (0 ... 9)
RECALL button
GOTO button
REPEAT button
Favorite Button (FAV)
Subtitle button (SUB-T)
Information button (INFO)
Videotext (TTX)
PAGE+ / PAGE- buttons
Audio button (LANG)
TV / Radio button
EPG button
Navigation Cross (UP, DOWN, LEFT, RIGHT)
OK button
MENU button
Exit button
PLAY button
PAUSE / TIMESHIFT button ( )
STOP button
Record button
Fast Rewind button
Fast Forward button
Previous button
Next button
BLUE / TIMER button
RED / PVR Button
GREEN / V-FORMAT button
YELLOW / ASPECT button
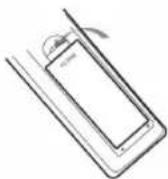
Installing the Batteries
Remove the battery cover from the Remote Control and put 2pcs size batteries inside the compartment 1.5 V AAA,
The diagram inside the Battery Compartment shows the correct way to install the batteries.
- Open the cover

- Install batteries

- Close the cover
Using the Remote Control
To use the Remote Control, point it to wards the front of the Digital Set Top Box
The Remote Control has a range of up to 7 meters from the Set Top Box at an angle of up to 60 degrees.
USER'S MaNUal
Connection
Caution:
Make sure to check the voltage speci cation of the wall outlet is the same rating with the receiver. To prevent the risk of electric shock, do not open the cover or the back of the receiver.
TV Connection
USER'S MaNUal
Connection to amplifier
First time installation
After all connections have been made properly, switch on TV and make sure the receiver is switch on restoring receiver. connected to the Main Power. Press Power button to If you are using the receiver for the first time or to Factory Default, the Main Menu will appear on your TV screen.

Select [OSD Language] and press the RIGHT/LEFT button to select a language
Select [Country] and press the RIGHT/LEFT button to select your country of residence
Select [Channel Search] and press the RIGHT/LEFT or OK button to begin Automatic channel search.
Once channel tuning is complete, you are now ready to watch TV.
Basic operation
Program Manage Settings
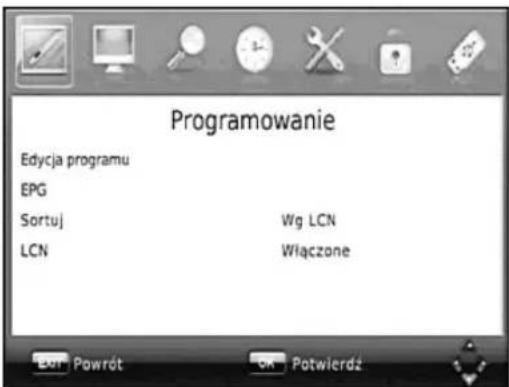
Press the MENU button and select [Program]. The Menu provides options to adjust the Program Manage Settings. Select an option and press OK or RIGHT/LEFT button to change setting. Press the EXIT button to exit the Menu
USER'S MaNUal
Program Edit
To edit your program preferences (lock, skip, favourite, move or delete) you will need to enter the Program Edit Menu. This Menu requires a password to access. Enter the default password '000000'.
Set Favourite Program
You can create a shortlist of favourite -
-Set Favourite TV or Radio program: (Edit favourite program type: Disable Movie, News, Sport and Music)
-Select the preferred program then press the FAVOUR-ITE button, and press UP/DOWN button to highlight the favourite type, press the favourite button
A heart-shaped symbol will appear and the program - is marked as favourite
- Repeat the previous steps to select more Favourite programs
To confirm and exit the Menu, press the EXIT button -
View Favourite Program
Press the Favourite button and the Favourite Menu will appear.
Press the UP/DOWN button to highlight the program that you want to mark as favourite
Press the OK button to select your favourite program
Delete a TV or Radio Program
Select the program you would like to delete and press the BLUE button A delete symbol will appear.
Repeat the previous steps to delete more programs. To confirm and exit the menu, press EXIT button
Skip TV or Radio Program
Select the program you would like to skip and press - the GREEN button
-A skip symbol will appear. The program is marked as a skip.
Repeat the previous step to select more programs. – To confirm and exit the menu, press EXIT key. –
Disable a skip TV or Radio program:
Press the GREEN button on the skip program with the skip symbol.
Move a TV or Radio Program
Select the preferred program then press the RED button. A move symbol will appear
Press the UP/DOWN button to move the program
Press the OK button to confirm
Repeat the above steps to move more program
Lock Program
You can lock the selected programs for restricted view Lock a TV or Radio Program:
Select the will appear preferred program then press the YELLOW button. A lock-shaped symbol The program is now marked as locked
Repeat the previous steps to select more programs
To confirm and exit the menu, press the EXIT button
Press the YELLOW button to disable the locked program
To view, the locked program you will be requested to enter either the default password '000000' or your last set password.
RENAME: Press "RECALL" key to show the rename form, choose the letter to rename the TV program as you like.

EPG (Electronic program guide)
The EPG is an on-screen TV guide that shows scheduled programs seven days in advance for every tuned channel. Press the EPG button on the Remote Control to access to the guide.
USER'S MaNUal

You can use the UP/DOWN button to select the preferred program. If there is more than one page of information, use the BLUE button for page up and the YELLOW button for page down.
Sort
Sort your channels from the following options:
[By LCN]: Sort the channels in ascending order (Logical channel number)
[By Service Name]: By name of service offer company
[By Service ID]: By ID of service offer company
[By ONID]: Sort by ONID
LCN (Logical channel number)
Set LCN on or off
Video Setting
Press the MENU button then select [Picture]. The Menu provides options to adjust the video settings. Press UP/DOWN button to select an option and press RIGHT/LEFT button to adjust that setting. Press the EXIT button to exit the menu.
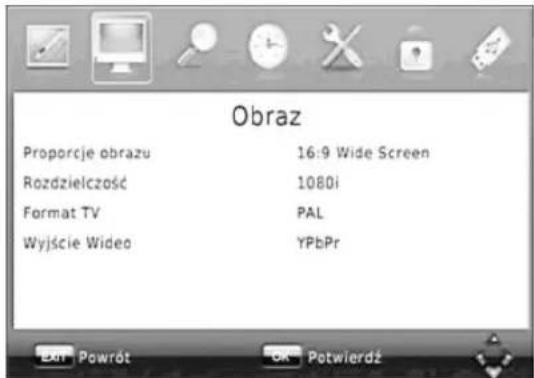
[480i]: for NTSC system TV.
[480P]: for NTSC system TV.
[576i]: for PAL system TV.
[576P]: for PAL system TV.
[720P]: for NTSC or PAL system TV.
[1080P]: for NTSC or PAL system TV
If the video does not appear correctly, change the setting. This setting is to match the most common setting for HDMI.
TV format
If the video does not appear correctly, you need to change the settings. This should match the most common setting for TVs in your country.
[NTSC]: for NTSC system TV.
[PAL]: for PAL system
Video output
[RGB]: RGB SCART OUT
Channel Search
Press the MENU button and select [Channel Search] options to search channel Select an option and press button to adjust the settings. Press the EXIT button to The Menu provides the RIGHT/LEFT exit the Menu

Search and install all channels automatically. This option overwrites all preset channels.
-
Select [Auto Search] and press the OK or RIGHT button start channel search.
-
To cancel channel search, press the EXIT button
USER'S MaNUal
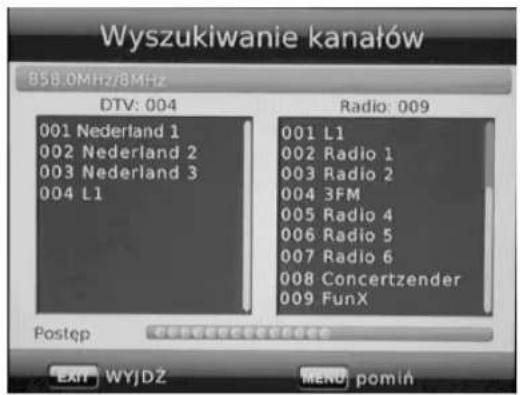
Manual Search
Install new channels manually. This option adds new channels without changing the current channels list.
- Select [Manual Search] then press the OK or RIGHT button. The channel search screen will appear.

-
Press the RIGHT/LEFT button to select the channel frequency
-
Press the OK button to start searching channels
If a channel is found, it will be saved and added to the channels list. If channels cannot be found, it exits the menu automatically.
Country
Select your country of residence.
Antenna power
Enable Antenna Power if an external active antenna is connected.
In order to get a nice and stable TV signal reception, pls set "Antenna Power" at "On" if user uses an active Antenna, otherwise, pls set "Antenna Power" at "Off" if user uses an passive antenna.
Time Setting
Press the MENU button then select [Time]. The Menu provides options to adjust the time settings.
Press the UP/DOWN button to select an option and press the RIGHT/LEFT button to adjust the settings. Press the EXIT button to exit the menu.

Select auto or manual for GMT offset adjustments.
Country Region
Select the Country Region when [Time Offset] is set to Auto.
Time Zone
Select the Time Zone Offset when [Time Offset] is set to Manual.
Timer for Power On/Off
Press the MENU button on the remote control. enter Time. then select Power On/Off
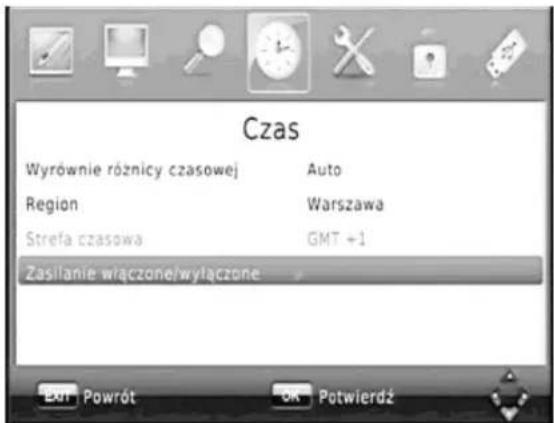
Please set Power On and Power Off as Enable, then move the cursor to set Power On/Off Time.
USER'S MaNUal

Press the MENU button and select [Option]. The menu provides options to adjust the OSD Language, Subtitle Language and Audio Language. Select an option and press the RIGHT/LEFT button to adjust the setting.
Press the EXIT button to exit the Menu

Select an OSD language
Subtitle Language
Select the preferred subtitle language
Audio Language
Select the preferred audio language for watching TV channels.
If the language is not available, the default language will be selected
Digital Audio
PCM: Set as PCM digital audio output
RAW: et as RAW digital audio output
Offset off digital audio output
System Setting
Press the MENU button and select [System].
The menu provides options to change the system settings.
Press the UP/DOWN button to select an option and press the RIGHT/LEFT button to change the setting.
Press the EXIT button to exit the Menu.

You can restrict to channel access that are unsuitable for children.
To restrict/lock the channel, you will need to enter either the default password '000000' or your own password.
Set Password
To set or change the password for locked programs. Enter your old password or the default password '000000'. then You will be asked to enter your new password. To confirm, re-enter your new password. Once it is confirmed, press the EXIT button to exit the Menu.
Note: if you forgot your new password, you need enter "888888" to unlock it.
Reset your Set Top Box to the Default Factory Settings.
In Main Menu, move the cursor to RIGHT/LEFT button to select "System" UP/DOWN button to select [Restore Factory Default] and press the OK button. Enter your password or the default password '000000' and press OK to confirm. This option will delete all preset channels and settings.
Information
View model, hardware and software information.
USER'S MaNUal
USB
Press the MENU button and select [USB]. The menu provides options to play back Music,
Photo and Movie files, supports: MP3, WMA, JPEG, BMP, AVI, MP4 DIVX etc. Multimedia files. The unit will only support USB device with NTFS, FAT and FAT32 file system.

- Slide Time: Press the RIGHT/LEFT button to change slide show interval from 1-8 seconds
- Slide Mode: adjust slide show effect in mode of 0-59 seconds or random
- Aspect Ratio: display the picture at its original aspect,
Discard display the picture in full screen mode.
Movie Configure

[Small]: Display the subtitle in small mode.
[Normal]: Display the subtitle in normal mode.
[Big]: Display the subtitle in big mode.
Subtitle BG:
[White]: Display the subtitle in white background.
[Transparent]: Display the subtitle in transparent background.
[Gray]: Display the subtitle in grey background.
[Yellow green]: Display the subtitle in yellow green background.
Subtitle Font Color:
[Red]: Display Subtitle in red font.
[Blue]: Display Subtitle in blue font.
[Green]: Display Subtitle in green font.
[White]: Display Subtitle in White font
[Black]: Display Subtitle in Black font
Note: We cannot guarantee compatibility (operation and/or bus power) with all USB mass storage devices and assumes no responsibility for any loss of data that may occur when connected to this unit.
With large amounts of data, it may take longer for the system to read the contents of a USB device.
Some USB devices may not be properly recognized.
Even when they are in a supported format, some files may not be played or displayed depending on the content.
Recording configure:
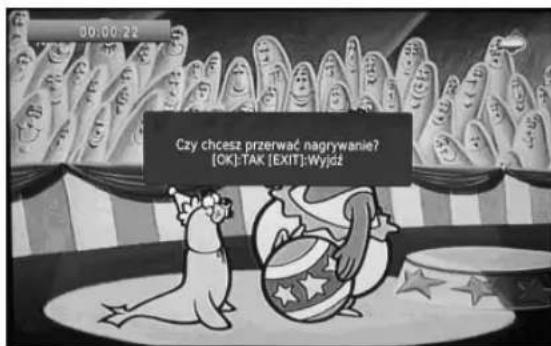
Insert USB device to receiver and television shows "USB device is inserted" then press RECORD button in remote control and television will display "Enter Record Waiting Later. receiver is in recording mode, while recording icon and recording time 00:00:15 are shown on the left top of the screen
USER'S MaNUal
Exit from recording mode: Press STOP button in remote control, system will remind user "Do you want to stop this?" Press "OK", receiver will exit from recording mode, recording icon and recording time 00:00:37 will disappear on screen; Receiver will return to recording mode and remain recording if user press "NEXT".
Playback for PVR record. Select PVR item and press "OK", then select „PVR RECORD” folder which is established in system automatically, all PVR records are saved in the folder in according with the sequence of recording time, user can play/rename/delete the records in the folder
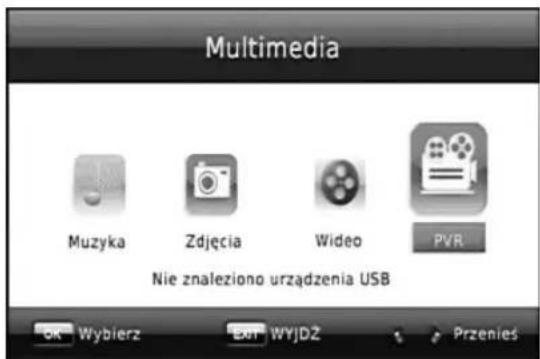
When watching a TV channel, press the BLUE button on the remote control, this screen will appear.
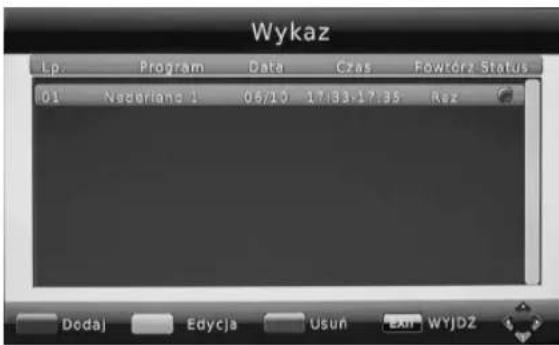
Press the RED button on the remote control, this screen will appear.
Press the UP or DOWN button to move the cursor to - set Start date, Star time and End time.
After Star date, Start time and End time are set, please set the mode to Record. Press the ok button on the remote control to confirm
OK button on the remote control to confirm. -
After all the setting are confirmed, this screen will appear.
Press EXIT button on the remote control to watch TV program.
Time shift -
If you are watching live TV and want to pause it until – you return then do the following.
Please connect a USB mass storage device with the - set top box.
Please press REC button on the remote control, the recording icon will display at the top
-Press PLAY button on the remote control, a bar will appear at the bottom of the screen. Select REC to review, or FWD or forward.
Press EXIT button on the remote control to go back to - watch normal TV
USER'S MaNUal
Troubleshooting
| PROBLEM POTENTIAL | REASONS WHAT TO DO | |
| No picture | Power isn't connected Connect the power | |
| The power switch is not on Switch on the power | ||
| Screen Shows„No Signal,, | Not connect DVB-T cable Plug in the DVB-T cable | |
| Incorrect setting | Set up correct parameter | |
| No sound from speaker | No or incorrect connection with audio cable Connect the audio cable correctly | |
| Mute the sound Switch on the correct, volume control | ||
| Incorrect sound track Try another sound track | ||
| Only sound, no Image on the screen | No or incorrect connection with AV cable Connect the video cable correctly | |
| Program is a radio program | Press TV/RADIO key to shift into TV mode | |
| Remote control is not workable | The battery is exhausted Change new battery | |
| Remote control unit is not in the right opposite of the front panel or too far from it | Adjust the way of holding remote control unit and get near to the panel | |
| The image stop Suddenly or mosaic | The signal i to weak Strengthen the signal |
Specification
| ITEM | SUB ITEM | PARAMETER |
| Tuner | Input Frequency | 170-230MHz, 470-860MHz |
| FR Input Level | -20 ~-78dBm | |
| FR Bandwidth 7,8MHz | ||
| Modulation | QPSK, 16QAM, 64QAM | |
| Video | Decoder Format | MPEG-2(ISO/IEC 13818-2)MPEG-4(ISO/IEC 14496)H.264 (ISO/IEC 14496-10)1080i@30fps |
| Output Format | 480i/480p/576i/576p/720p/1280i/1280p | |
| Output Port | SCART, HDMI | |
| Audio | Decoder Format | MPEG-1&MPEG-2(layer1&layer2)AAC,AAC+/HE-AAC,AC3, E-AC-3 (Dolby Digital +) |
| Audio output | Digital audio: S/PDIF | |
| Power | Voltage | ~100~240V,50 / 60HZ |
| POWER | Max 10 W |

INFORMACJA O PRAWIDŁOWYM POSTĘPOWANIU W PRZYPADKU UTYLIZACJI URZĄDZEŃ ELEKRONICZNYCH I ELEKTRYCZNYCH
- MANTA
- INSTRUkCJa oBSIgI
- Instrukcja obsługi
- Uwaga!
- WARNING:
- USER'S MaNUal
- Front Panel
- Rear Panel
- Remote Control
- Installing the Batteries
- Using the Remote Control
- Connection
- Caution:
- Connection to amplifier
- First time installation
- Basic operation
- Program Manage Settings
- Program Edit
- Set Favourite Program
- View Favourite Program
- Delete a TV or Radio Program
- Skip TV or Radio Program
- Move a TV or Radio Program
- Lock Program
- EPG (Electronic program guide)
- Sort
- LCN (Logical channel number)
- Video Setting
- TV format
- Video output
- Channel Search
- Manual Search
- Country
- Antenna power
- Time Setting
- Country Region
- Time Zone
- Timer for Power On/Off
- Subtitle Language
- Audio Language
- Digital Audio
- System Setting
- Set Password
- Information
- USB
- Movie Configure
- Subtitle BG:
- Subtitle Font Color:
- Recording configure:
- INFORMACJA O PRAWIDŁOWYM POSTĘPOWANIU W PRZYPADKU UTYLIZACJI URZĄDZEŃ ELEKRONICZNYCH I ELEKTRYCZNYCH
Brand : Manta
Model : DVBT02
Category : TV Decoder